CSS선택자를 사용해서 BGM 플레이어 만들기
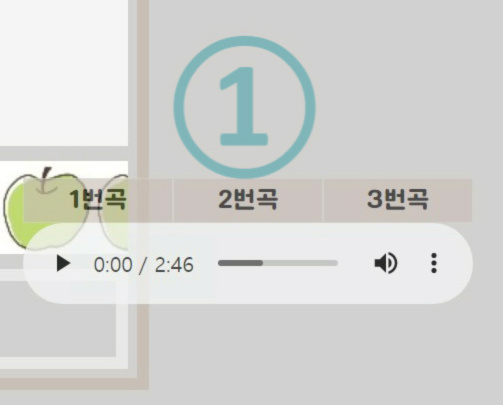
1번곡, 2번곡, 3번곡 버튼을 눌러서 원하는 노래로 변경할 수 있다. 1번곡을 누르면 1번 mp3파일을 display:block으로 화면에 출력, 나머지 2번곡과 3번곡은 display:none으로 화면에 출력하지 않는다.
선택자란?
태그가 길어지면 무수한 요소중에서 내가 원하는 요소를 찾기 어려워진다. 선택자는 내가 원하는 요소만 선택하는 것을 돕는다. 간단한 선택자도 있지만 복잡한 선택자도 있기 때문에 정확하게 알아두는 편이 좋다.
사용한 선택자의 종류
<상태 선택자>
:checkedchecked 속성을 갖는input을 선택
ex )
input:checked { }<input type="radio" checked="checked">
<동위 선택자>
선택자1 ~ 선택자2선택자1과 형제 관계인 선택자2를 선택
ex )
h1 ~ h2 { }<h1>첫번째</h1> <h2>두번째</h2> <--- <h2>세번째</h2> <---
<구조 선택자>
선택자:nth-of-type(숫자)선택자의 형제 중 (숫자)번째로 나오는 태그를 선택
ex )
div:nth-of-type(1)첫번째div를 선택<div>first</div> <--- <div>second</div>
( 응용 예시 )
input:nth-of-type(1) ~ div:nth-of-type(1)
: 첫번째input의 형제 중 첫번째div를 선택
input:nth-of-type(1):checked ~ div:nth-of-type(1)
:checked속성을 가진 첫번째input의 형제 중 첫번째div를 선택input:nth-of-type(1) input:nth-of-type(1) ~ div:nth-of-type(1) input:nth-of-type(1):checked ~ div:nth-of-type(1)
display`속성을 사용해서 특정 요소만 화면에 출력한다.
input:nth-of-type(1) {display: none;}
input:nth-of-type(1) ~ div:nth-of-type(1) {display: none;}
input:nth-of-type(1):checked ~ div:nth-of-type(1) {display: block;}
html에 적용해보면?
<input id="first" type="radio" name="list" checked="checked">
<label for="first">1번곡</label>
<div> <!--checked속성을 가진 첫번째input의 첫번째div-->
	<audio controls>
		   <source src="01.mp3" type="audio/mpeg">
	</audio>
</div>

2번곡 추가 !
(1번곡)
input:nth-of-type(1) {display: none;}
input:nth-of-type(1) ~ div:nth-of-type(1) {display: none;}
input:nth-of-type(1):checked ~ div:nth-of-type(1) {display: block;}
(2번곡)
input:nth-of-type(2) {display: none;}
input:nth-of-type(2) ~ div:nth-of-type(2) {display: none;}
input:nth-of-type(2):checked ~ div:nth-of-type(2) {display: block;}
<input id="first" type="radio" name="list" checked="checked">
<input id="second" type="radio" name="list">
<label for="second">1번곡</label>
<label for="first">2번곡</label>
<div>
	<audio controls>
		   <source src="01.mp3" type="audio/mpeg">
	</audio>
</div>
<div>
	<audio controls>
		<source src="02.mp3" type="audio/mpeg">
	</audio>
</div>
ps.
label태그를div로 정리해도 좋을 듯 하다.
공교롭게도 두 노래의 길이가 비슷 .. !

후기 : 복잡한 선택자를 사용할 필요가 없다고 생각했었다. 하지만, 선택자를 체계적으로 사용하면 특정 요소를 지정할 때마다 그 요소의 모든 경로를 입력하지 않아도 되기때문에 오히려 선택자가 간단해질 수 있다는 것을 알았다.

Make my day !