
오늘은 javaScript의 Prototype이라는 문법에 대해 이야기 헤볼것이다.
Class란?
우선 Prototype이라는 문법을 알기 위해선 Class라는것을 이해하고 넘어가야한다.
클래스는 객체 지향 프로그래밍에서 특정 객체를 생성하기 위해 변수와 메소드를 정의하는 일종의 틀로, 객체를 정의하기 위한 상태(멤버 변수)와 메서드(함수)로 구성된다.
javaScript는 사실 객체 지향 프로그래밍 언어인 JAVA, C++과 달리 함수형 프로그래밍을 지향 하도록 만들어졌다. 하지만 JAVA를 기반으로 빠른시간에 만들다 보니 Class와 같은 문법이 들어와지게 되었다.
쉽게 말해서 Class는 주로 붕어빵 틀로 설명이 많이 된다. 붕어빵 틀을 이용해서 여러개의 붕어빵을 만들게 되는데 그것이 바로 인스턴스라는 것이다.
JS에서 Class 만들기
javaScript에서는 두가지 방식으로 Class를 만들 수 있다.
1. class 키워드 사용(es6)
class Animal {
    constructor(name, age) {
        this.name = name;
        this.age = age;
    }
}
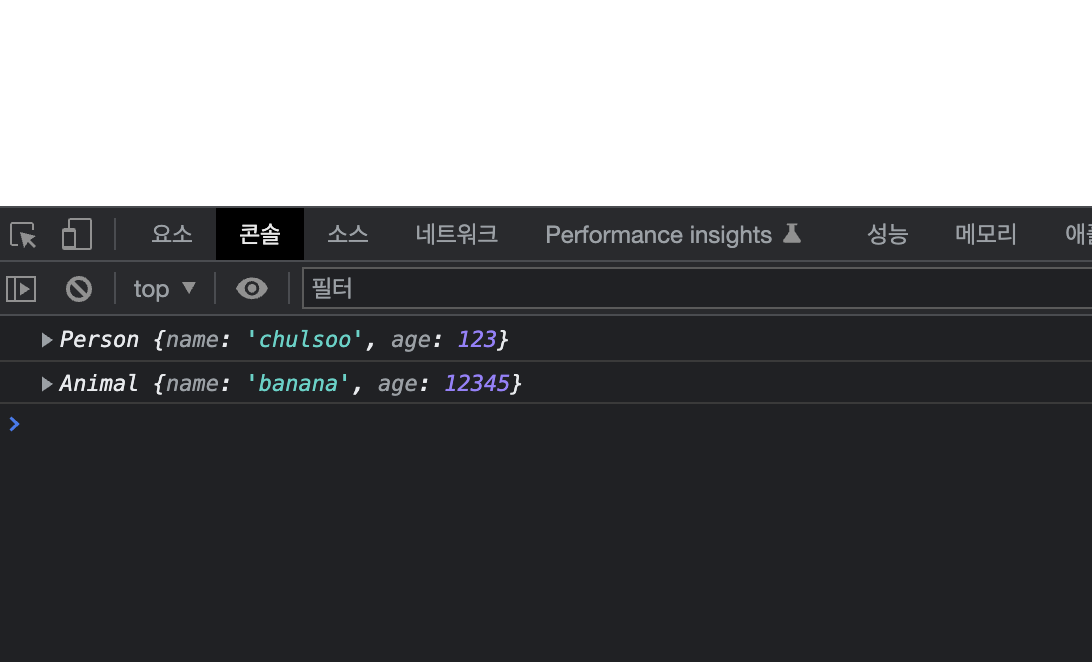
const monkey = new Animal("banana", 12345);- function 키워드 사용(syntax sugar)
function Person(name, age) {
    this.name = name;
    this.age = age;
}

const chulsoo = new Person("chulsoo", 123);
Class 앞에 new 키워드와 함께 여러개의 인스턴스를 코드 반복없이 만들 수 있게 해주는 것이다.
- 로그 찍어보기
Getter, Setter
getter와 setter는 정확한 값을 가져오거나 사용자가 잘못된 값을 입력했을때 막아주는 역활을 합니다!
class Animal {
    constructor(name, age) {
    	// setter 실행시킨다.
        this.name = name;
        this.age = age;
    }

    get name() {
        return this._name;
    }

    get age() {
        return this._age;
    }

    set name(value) {
        if (value.length < 4) {
            console.error("이름은 5자 이상입니다!");
        }
        this._name = value;
    }

    set age(value) {
        if (value <= 0) {
            console.error("나이는 양수 입니다.");
        }
        this._age = value;
    }
}

const monkey = new Animal("ban", -1);
Class에서 constructor가 실행이면 되면 자동으로 setter에 접근하게 된다.
또한 getter와 setter에서 값을 변경하거나 넣기 위해서는 반드시 _를 붙여주어야한다!(call stack 에러 방지)
상속
Class를 배우다보면 상속이라는 개념을 배우게 된다.
상속이란 부모 Class에 있는 속성과 메소드를 자식 Class에서 공유하는것을 의미한다.
예를 들어서 동물 Class가 있으면 그 아래에 포유류 Class, 파충류 Class와 같은 자식 Class를 만들 수 있다. 하지만 포유류와 파충류는 모두 동물이고 공통점이 존재하기 때문에 부모 Class인 동물 Class를 상속 받아서 속성들을 공휴한다,
class Animal {
    constructor(name, age) {
        this.name = name;
        this.age = age;
    }

    get name() {
        return this._name;
    }

    get age() {
        return this._age;
    }

    set name(value) {
        if (value.length < 4) {
            console.error("이름은 5자 이상입니다!");
        }
        this._name = value;
    }

    set age(value) {
        if (value <= 0) {
            console.error("나이는 양수 입니다.");
        }
        this._age = value;
    }
}


class 사나운동물 extends Animal {
    constructor(name, age, feed) {
        super(name, age);
        this.feed = feed;
    }
}

const lion = new 사나운동물("라이언이닼", 456, "고기");
extends와 super를 이용해서 부모 Class에 있는 속성들을 공유 할 수 있게 된다.
Prototype이란?
prototype의 위의 상속과 동일하게 부모 Class의 속성을 공유 할 수 있는 또한가지의 방법이다.
유명 프로그래밍 유투버 코딩애플님께서는 prototype을 유전자라고 설명 해주셨다. 말 그대로 유전자는 부모로부터 받아온것이기 때문에 그렇게 비유하지 않았나 생각이 든다.
class Animal {
    constructor(name, age) {
        this.name = name;
        this.age = age;
    }

    get name() {
        return this._name;
    }

    get age() {
        return this._age;
    }

    set name(value) {
        if (value.length < 4) {
            console.error("이름은 5자 이상입니다!");
        }
        this._name = value;
    }

    set age(value) {
        if (value <= 0) {
            console.error("나이는 양수 입니다.");
        }
        this._age = value;
    }
}

Animal.prototype.say = "hihi"; // 속성 지정!

class 사나운동물 extends Animal {
    constructor(name, age, feed) {
        super(name, age);
        this.feed = feed;
    }
}

const monkey = new Animal("ban", -1);
const lion = new 사나운동물("라이언이닼", 456, "고기");

console.log(monkey);
console.log(lion);
console.log(monkey.say);
lion.say = "바보";
console.log(lion.say);
console.log(monkey.say);
실행화면
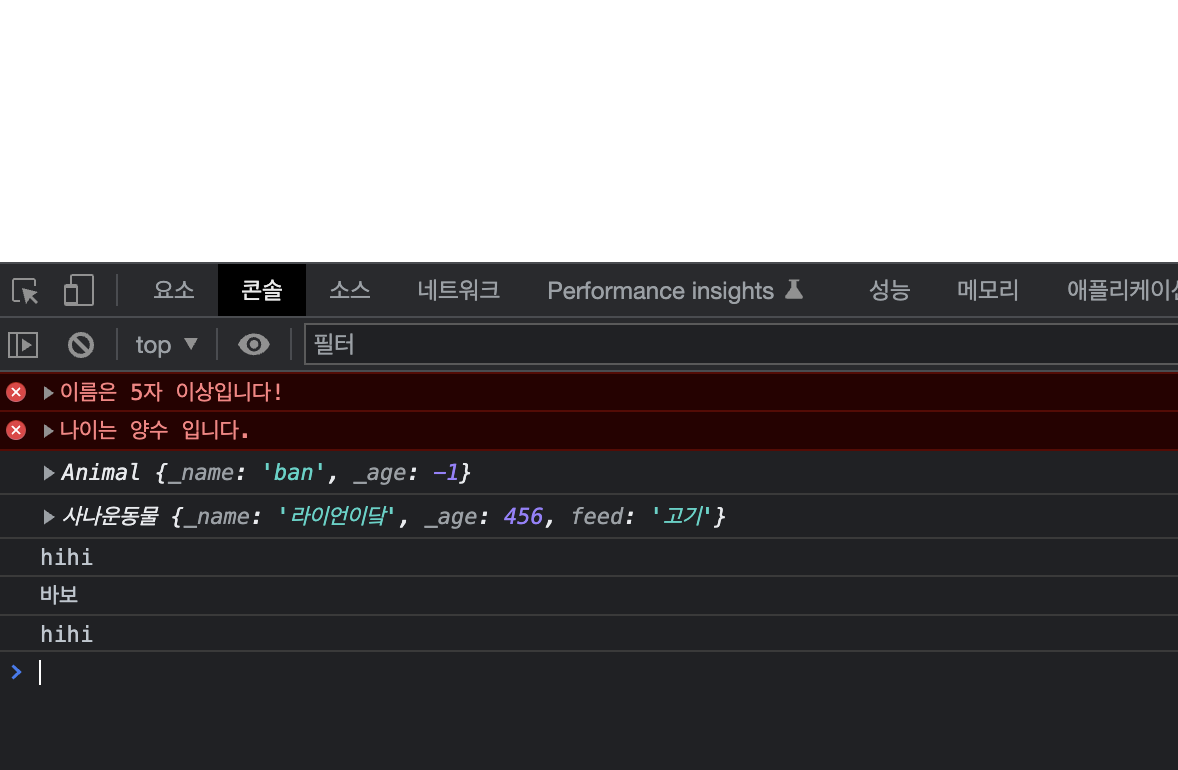
이렇듯 prototype을 지정해두면 자식 Class 어디서든지 Class 안에 있는 속성 처럼 사용이 가능하다.
Prototype의 원리
prototype의 원리는 javaScript의 동작을 이해해야한다.
처음 log에 lion.say를 찍을때 사실 상 lion은 say라는 값을 가지지 않고 있다.
하지만 javaScript는 여기서 멈추지 않고, 부모 Class를 찾아가게 된다. 그리고 부모 Class의 prototype에서 say라는 값을 찾아 log를 찍게 되는것이다.
javascript는 값을 찾기 위해서라면 최상위 부모 Class까지도 찾아간다.
Prototype의 사용
사실상 javaScript를 사용해서 개발을 하고 있다면 이미 여러번 알게모르게 prototype 문법을 사용하기 있다.
가장 쉬운 예로는 Array와 String이다.
const examArray = [1, 2, 3];
// const examArray = new Array(1,2,3);
const examString = "안녕하세요";
// const examString = new String("안녕하세요");

console.log(examArray.length);
console.log(examString.length);
사실살 배열과 문자열을 만드는 것은 새로운 인스턴스를 만드는것과 동일하게 동작을 한다.
따라서 길이를 반환하는 length와 같은 prototype 메소드를 이용할 수 있게 되는 것이다.
그럼 만약 Array의 prototype 메소드로 3번째 요소의 값을 5로 바꿔주는 메소드를 만들어보자
const examArray = [1, 2, 3];

Array.prototype.changeThirdFive = function () {
    return this.map((item, index) => (index === 2 ? 5 : item));
};

console.log(examArray.changeThirdFive());
실행화면

정상적으로 3번째 요소가 5로 바뀐것을 볼수 있다.
이렇게 prototype을 이용해서 선언을 해둔다면 해당 기능을 자식 Class 어디에서나 사용할 수 있다는 장점이 있다.
우리가 이미 많이 사용하고 있는것 처럼...ㅎㅎㅎ
참조
유튜브 코팅애플
https://www.nextree.co.kr/p7323/
https://think0wise.tistory.com/27
https://ko.javascript.info/class