제일 많이 하는 예제인
counter! 버튼 누르면 1씩 증가하고,2배 증가하는.. 걸 해보자
export default function Page(){
  const [counter,setCounter]= useRecoilState(counterAtom);

  //setState(prev=> prev+1);

  return(
   <>
     <h1>Coutner:{counter}</h1>
     <button onClick={()=> {
         setCounter((prev)=>prev+1)
     }}>증가</button>

  </>
  )
 }
Selector?
selector는 쉽게 말해서 기존에 선언한 atom을 처리하여 새로운 값을 리턴하거나 기존 atom의 값을 수정하는 역할을 수행한다. 즉, 데이터를 가공할때 쓴다.
투두리스트 경우에 todo/done/doing 등 상태가 변화되는 경우에 selector를 쓸 수 있다!
[1] 기존 버튼을 원래 클릭하면 1씩 증가했는데,버튼 하나를 더 만들어서 이젠 누르면 2배씩 커지는 걸 구현해보자.
- get
//atom.js
export const doubledCounterSelector=selector({
  key:'double',
  get:({})=>{
    const counter=get(counterAtom);
    return counter*2;
  }
 });
이렇게 입력받은(원래는 1씩 증가한) 값을 후처리하여 2배씩 증가하게 만들어버리는 것이다.즉,중요한 것은 get은 내부 atom이 변경되어야 호출된다는 것이다.
그래서 저 atom을 import할 페이지에 다음과 같이 작성한다.
const doubledCounter=useRecoilValue(doubledCounterSelector);

<h2>{doubledCounter}</h2>

<button onClick{()=>{
   setCounter((prev)=>prev+1);
}}>증가</button>
원래 버튼을 누르면 1씩 증가하게 되고,그럼 stateAtom이 변경되었으니 get이 호출됨 -> 그럼 *2한 값이 doubledCounter로 넘어오게 됨
2.set
//atom.js
export const doubledCounterSelector=selector({
  key:'double',
  get:({})=>{
    const counter=get(counterAtom);
    return counter*2;
  },
  set:({set},newValue)=>{
    console.log(newValue,'newValue');
        //첫번째인자에는 변경시킬 atom,두번째 인자에는 어떤 값으로 변경시킬지
    set(counterAtom, newValue/2);

  },
 });
//page
<button onClick={()=>{ setDoubleCounter(doubleCounter*2);})>2배 증가</button>버튼을 누르면 2배 증가한 counter값이 atom에 있는 newValue값으로 넘어온다.
[2] 비동기 통신으로 값을 가져올때도 이 selector가 쓰인다.
//service/post.js

const getPosts=async()=>{
  return axios.get('https://jsonplaceholder.typicode.com/posts').then(res=>res.data);
};
//atom.js
export const getPostsSelecotr=selector({
key:'getPostsSelector',
get:async()=>{
const posts=await getPosts(getPostsSelector);
console.log(posts,'posts');
근데 위 코드를 실행시키면?
error가 뜬다!
왜냐?
비동기 통신을 할때 서버와 클라이언트 사이에 간극(틈)이 있는데, 이 사이를 커버해줘야 한다. 예를 들어 사용자가 어떤 url을 입력해 페이지에 들어왔는데 로딩중인지..에러가 뜬건지 아무런 공지?없이 빈화면만 뜨면 '어 이 사이트 왜이래?'라고 생각할 수 있다.
따라서 이를 해결하기 위해 Suspense를 사용한다.
Suspense는 아직 렌더링이 준비되지 않은 컴포넌트가 있을때 로딩 화면을 보여주고 로딩이 완료되면 해당 컴포넌트를 보여주는 React에 내장되어 있는 기능이다.
현재 Next.js에는 loading.js라는 파일 컨벤션을 만들면 알아서 loading을 구현해 준다.(내가 디자인?틀만 만들면 된다)
loading.js 자체 내부에서 suspense 기능이 있기 때문이다.
하지만 React에서는 원하는 파일을 suspense로 감싸줘야 한다.
path:'/posts',
element:(
   <Suspense fallback={<div>loading...</div>}>
      <PostsPage/>
    </Suspense>
)fallback은 로딩이 끝나지 않았을 때 보여줄 UI다.
loading 화면을 확인해보자
개발자 도구->네트워크로 가서
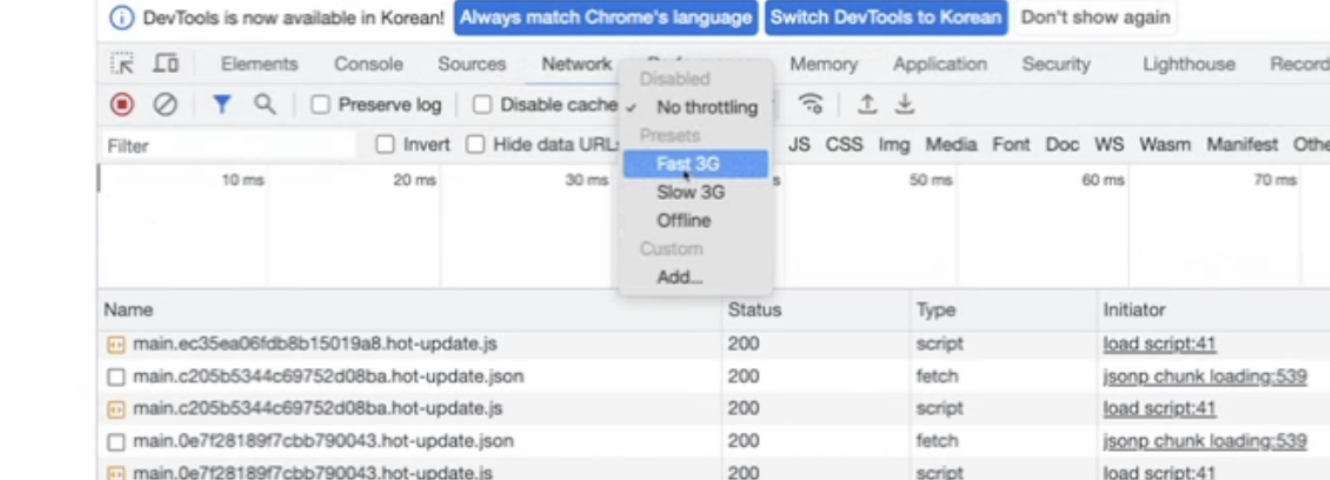
보면 속도를 임의로 느리게,빠르게 할 수 있다.
5초 넘게로 지정해서 보면

이렇게 loading...이라는 걸 확인 할 수 있다!
3. LoadingLoadable
Loadable Components는 코드 분할을 편하게 하도록 도와주는 서드파티 라이브러리라고 한다.
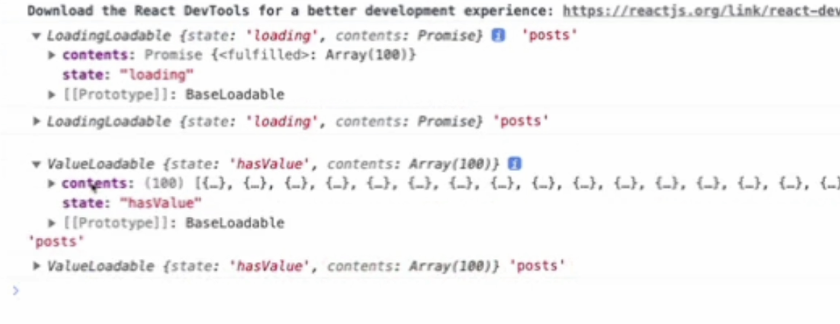
LoadingLoadable에는 state값을 loading/hasValue/hasError 로 총 3가지를 가지고 있다.
export default function PostsPage(){
  const posts=useRecoilValueLoadable(getPostsSelector);
  console.log(posts,'posts');
콘솔로 확인해본 결과이다.
그래서 state 값에 따라 어떻게 사용자에게 UI를 보여줄지 switch문으로
조건을 걸어줄 수 있다.
switch(posts.state){
  case 'loading':
     return <div>loading...</div>
  case 'hasError':
     return <div>error</div>
  default:
     return (
     <>
        {posts.contents.map((post)=>(
          <li key={post.title}>{post.title}</li>
         ))}
     </>
    );
   }
 }
이처럼 비동기 통신할때 사용자에게 Loading 사실을 알려주는 것이 중요하다!