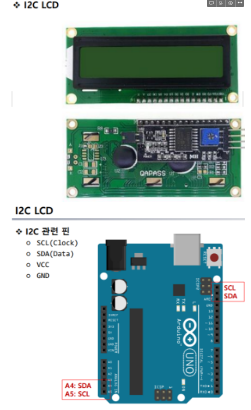
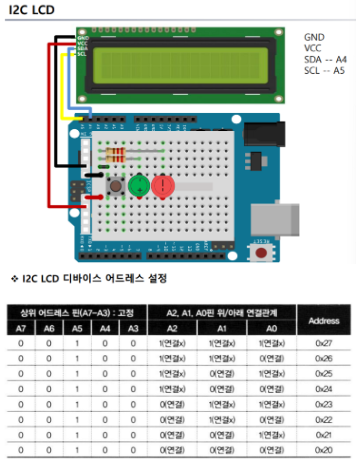
- I2C LCD: 기존의 16*2 Character LCD에 결합하여 사용할 수 있는 brakout board 형태의 모듈입니다.
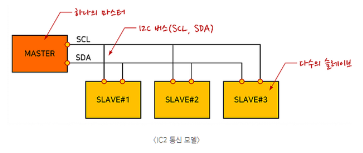
- I2C(Inter Intergrated Circuit)통신: 두 개의 전선으로 여러 디바이스를 연결할 수 있는 저속 통신 인터페이스
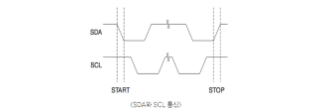
- SCL(CLOCK): 시리얼 클럭으로 마스터와 슬레이브 간의 클럭을 맞춰 데이터를 송수신 할 수 있게 해준다. 기본 값 HIGH 일 때만 SDA가 HIGH- > LOW로 가면 START, LOW - > HIGH로 가면 END를 뜻 한다. 데이터 송수신은 SCL이 LOW일 때만 가능하다.
- SDA(Data): 시리얼 데이터로 통신하고자 하는 데이터를 의미하며 위의 설명처럼 SCL이 LOW일 때 데이터를 주고받을 수 있으며 각각의 전송에는 ACK가 포함되며 데이터를 읽을 것인지 쓸 것인지에 따라 규격이 다릅니다.

1. 실습1: I2C 주소 스캔 - I2C 디바이스 찾기

#include <Wire.h>

void setup()
{
	Wire.begin();
	Serial.begin(9600);
	while (!Serial); // Leonardo: wait for serial monitor
	Serial.println("\nI2C Scanner");
}
void loop()
{
	byte error, address;
	int nDevices;

	Serial.println("Scanning...");

	nDevices = 0;

	for(address = 1; address < 127; address++ ){
		Wire.beginTransmission(address);
		error = Wire.endTransmission();
		if (error == 0){
			Serial.print("I2C device found at address 0x");
			if (address<16) Serial.print("0");
			Serial.print(address,HEX);
			Serial.println(" !");
			nDevices++;
		}
		else if (error==4){
		Serial.print("Unknown error at address 0x");
		if (address<16) Serial.print("0");
		Serial.println(address,HEX);
		}
	}

	if (nDevices == 0) Serial.println("No I2C devices found\n");
	else Serial.println("done\n");
	delay(5000); // wait 5 seconds for next scan
}
2. 실습2: 간단한 문자 출력
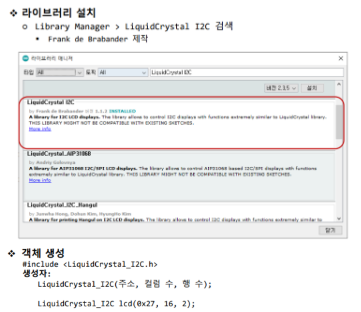
#include <LiquidCrystal_I2C.h>
// set the LcD address 0X27 for a 16 chars and 2 line display
LiquidCrystal_I2C lcd(0X27, 16, 2);
void setup(){
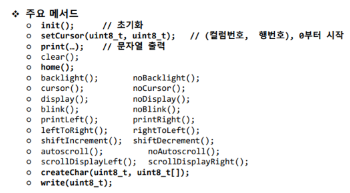
lcd.init(); // initialize the lcd
lcd.setCursor(3,0);
lcd.print("Hello, world!");
lcd.setCursor(2,1);
lcd.print("Ywrobot Arduino!");
lcd.setCursor(0,2);
lcd.print("Arduino LCM IIC 2004");
lcd.setCursor(2,3);
lcd.print("Power By Ec-yuan!");
}
void loop(){
}3. 실습3: 문자열 스크롤
#include <LiquidCrystal_I2C.h>

LiquidCrystal_I2C lcd(0x27, 16, 2);

void setup()
{
	// put your setup code here, to run once:
	lcd.init();

	lcd.setCursor(0, 0);  //커서 홈(0,0)
	lcd.print("1++++++++23---------45*******67########7");
	// 40문자 저장
	lcd.setCursor(0, 1);  // 커서홈 2행 1열(0, 1)
	lcd.print("1++++++++23--------45********67########8");
	// 40문자 저장
}

void loop()
{
	// put your main code here, to run repeatly:
	int n;

	for(n = 0; n < 80; n++){
		lcd.scrollDisplayLeft(); // 왼쪽으로 한 칸 씩 이동
		delay(500);
	}
	delay(4000);

	for(n = 0; n < 80; n++){
		lcd.scrollDisplayRight(); // 오른쪽으로 한 칸 씩 이동
		delay(500);
	}
	delay(4000);
}
4. 실습4: 사용자 정의 패턴 출력
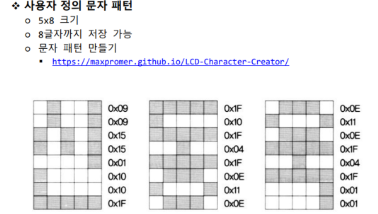
LCD Custom Character Generator (maxpromer.github.io)
#include <LiquidCrystal_I2C.h>
// '신' 패턴
uint8_t name_s[8] = {0x09, 0x09, 0x15, 0x15, 0x01, 0x10, 0x10, 0x1F};
// '동' 패턴
uint8_t name_d[8] = {0x1F, 0x10, 0x1F, 0x04, 0x1F, 0x0E, 0x11, 0x0E};
// '욱' 패턴
uint8_t name_u[8] = {0x0E, 0x11, 0x0E, 0x1F, 0x04, 0x1F, 0x01, 0x01};
LiquidCrystal_I2C lcd(0x27, 16, 2); // lcd 객체 생성

void setup()
{
	lcd.init();

	lcd.createChar(0, name_s); // '신' 패턴 코드 0으로 저장
	lcd.createChar(1, name_d); // '동' 패턴 코드 1으로 저장
	lcd.createChar(2, name_u); // '욱' 패턴 코드 2으로 저장
}

void loop()
{
	lcd.setCursor(0,0);  //커서 2행 1열(0,1)
	lcd.print("Hello, Ardyino!")

	lcd.setCursor(0,1);
	lcd.print("My name is ");

	lcd.write(0);
	lcd.write(1);
	lcd.write(2);
}
좋은 지식 나누어요