# RGB BGR → Red Green Blue
# 3가지 색상 채널을 사용해서 이미지 표현

# HSV
# H : Hue(색상)
# S : Saturation(채도) : 색상의 진한 정도
# V : Value(명도) : 색상의 밝기
# 실제 사진에 많이 사용
# 색상 분리- RGB가 기본값
import cv2

# RGB가 기본값
img = cv2.imread('./data/balloon.jpg')

cv2.imshow('balloon', img)
cv2.waitKey(0)
cv2.destroyAllWindows()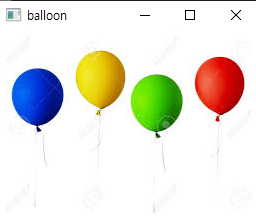
- RGB → HSV 로 변경
import cv2

# RGB가 기본값
img = cv2.imread('./data/balloon.jpg')

# RGB → HSV 로 변경
hsv = cv2.cvtColor(img, cv2.COLOR_BGR2HSV)

cv2.imshow('balloon', hsv)
cv2.waitKey(0)
cv2.destroyAllWindows()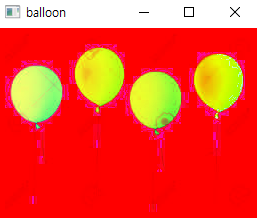
- 빨간색만 가져오기
import cv2

# RGB가 기본값
img = cv2.imread('./data/balloon.jpg')

# RGB → HSV 로 변경
hsv = cv2.cvtColor(img, cv2.COLOR_BGR2HSV)

# 빨간색만 가져오기
# H : -15 ~ 15
# S,V: 100 ~ 255
# 파란색 H : 100 ~ 130
# 초록색 H : 40 ~ 70
# 노란색 H : 10 ~ 40
import numpy as np
lower = np.array([-15, 100, 100])
upper = np.array([15, 255, 255])

# 쓸 영역과 안 쓸 영역 구분
# 1. 범위 값 만들어주기 → 범위 안에 있는 값만 사용
# 2. 원본 이미지에 표현
mask = cv2.inRange(hsv, lower, upper)

img2 = cv2.bitwise_and(img, img, mask=mask)

cv2.imshow('balloon', img2)
cv2.waitKey(0)
cv2.destroyAllWindows()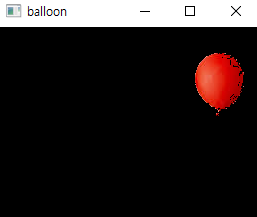
- 파란색만
# H : -15 ~ 15
# S,V: 100 ~ 255
# 파란색 H : 100 ~ 130
# 초록색 H : 40 ~ 70
# 노란색 H : 10 ~ 40
import numpy as np
lower = np.array([100, 100, 100])
upper = np.array([130, 255, 255])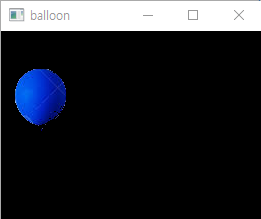
- 초록색만
# 빨간색만 가져오기
# H : -15 ~ 15
# S,V: 100 ~ 255
# 파란색 H : 100 ~ 130
# 초록색 H : 40 ~ 70
# 노란색 H : 10 ~ 40
import numpy as np
lower = np.array([40, 100, 100])
upper = np.array([70, 255, 255])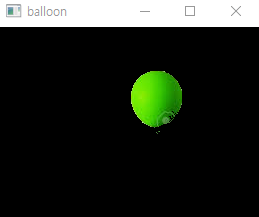
- 노란색만
- 초록색만
# 빨간색만 가져오기
# H : -15 ~ 15
# S,V: 100 ~ 255
# 파란색 H : 100 ~ 130
# 초록색 H : 40 ~ 70
# 노란색 H : 10 ~ 40
import numpy as np
lower = np.array([10, 100, 100])
upper = np.array([40, 255, 255])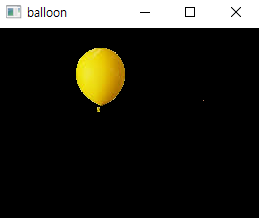
# 색상의 분포가 균일하지 않으면 이미지가 흐려보임
# 균일하지 않을걸 균일하게 변경해보자- 이미지 불러오기
img = cv2.imread('./data/histogram.png')

cv2.imshow('histogram', img)
cv2.waitKey(0)
cv2.destroyAllWindows()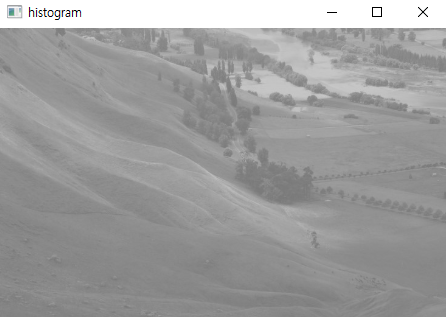
- 그래프
import matplotlib.pyplot as plt

hist = cv2.calcHist([img], [0], None, [256], [0, 256])

plt.plot(hist)
plt.xlim([0, 255])
plt.show()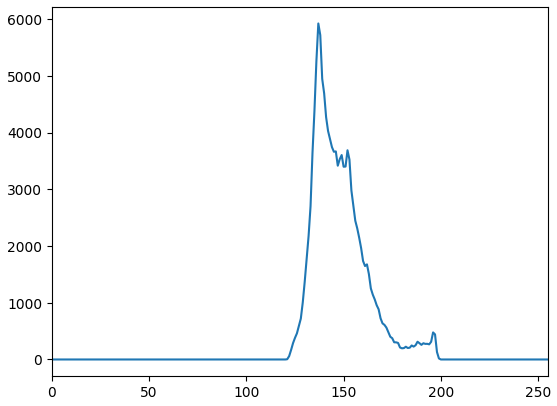
- 이미지를 흑백으로 가져오기
# 이미지를 흑백으로 가져오기
img = cv2.imread('./data/histogram.png', cv2.IMREAD_GRAYSCALE)

# 색상의 분포를 120 ~ 200 → 0 ~ 255까지로 변경하기
img = cv2.equalizeHist(img)

cv2.imshow('histogram', img)
cv2.waitKey(0)
cv2.destroyAllWindows()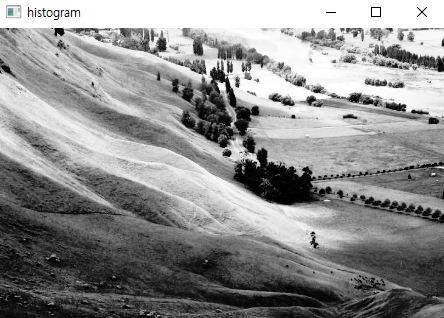
- 그래프
import matplotlib.pyplot as plt

hist = cv2.calcHist([img], [0], None, [256], [0, 256])

plt.plot(hist)
plt.xlim([0, 255])
plt.show()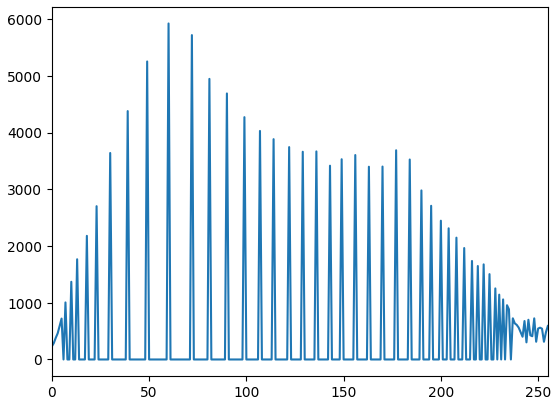
# 템플릿 매칭
# 어떤 이미지에서 원하는 대상을 찾는 방법
# 물체의 형태가 고정되어 있어야 찾기 원할함 → 애니메이션, 그림
# 배경이 되는 이미지(헤네시스 사냥터), 찾을 이미지(초록버섯, 파란달팽이)
# 배경에서 찾을 이미지를 모든 픽셀마다 검사해보고 유사한 정도를 0 ~ 1까지로 표현- 이미지 불러오기
import cv2

maple = cv2.imread('./data/maple.jpg')
blue = cv2.imread('./data/blue_snail.jpg')
green = cv2.imread('./data/green_mushroom.jpg')

cv2.imshow('maple', maple)
cv2.imshow('blue', blue)
cv2.imshow('green', green)
cv2.waitKey(0)
cv2.destroyAllWindows()
- 크기 확인
maple.shape
green.shape
import cv2
# 빠른결과 확인을 위해 흑백으로 시도
maple = cv2.imread('./data/maple.jpg')
maple_gray = cv2.cvtColor(maple, cv2.COLOR_BGR2GRAY)
blue = cv2.imread('./data/blue_snail.jpg')
blue_gray = cv2.cvtColor(blue, cv2.COLOR_BGR2GRAY)
green = cv2.imread('./data/green_mushroom.jpg')
green_gray = cv2.cvtColor(green, cv2.COLOR_BGR2GRAY)
# 찾을 이미지 크기 반환
h, w = green_gray.shape
# 배경이미지, 찾을 이미지, 매칭 방법
result = cv2.matchTemplate(maple_gray, green_gray, cv2.TM_CCOEFF_NORMED)
result
# cv2.imshow('maple', maple)
# cv2.imshow('blue', blue)
# cv2.imshow('green', green)
# cv2.waitKey(0)
# cv2.destroyAllWindows()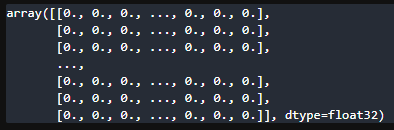 → 1에 가까울수록 닮았다, 0에 가까울수록 하나도 안닮았다.
- 초록버섯 찾기
import cv2

# 빠른결과 확인을 위해 흑백으로 시도
maple = cv2.imread('./data/maple.jpg')
maple_gray = cv2.cvtColor(maple, cv2.COLOR_BGR2GRAY)

blue = cv2.imread('./data/blue_snail.jpg')
blue_gray = cv2.cvtColor(blue, cv2.COLOR_BGR2GRAY)

green = cv2.imread('./data/green_mushroom.jpg')
green_gray = cv2.cvtColor(green, cv2.COLOR_BGR2GRAY)

# 찾을 이미지 크기 반환
h, w = green_gray.shape

# 배경이미지, 찾을 이미지, 매칭 방법
result = cv2.matchTemplate(maple_gray, green_gray, cv2.TM_CCOEFF_NORMED)
# 0 ~ 1까지 유사도가 표현되어있음
# 0.7이상의 값만 출력
sum(sum(result >= 0.7))

# cv2.imshow('maple', maple)
# cv2.imshow('blue', blue)
# cv2.imshow('green', green)
# cv2.waitKey(0)
# cv2.destroyAllWindows()
import cv2

# 빠른결과 확인을 위해 흑백으로 시도
maple = cv2.imread('./data/maple.jpg')
maple_gray = cv2.cvtColor(maple, cv2.COLOR_BGR2GRAY)

blue = cv2.imread('./data/blue_snail.jpg')
blue_gray = cv2.cvtColor(blue, cv2.COLOR_BGR2GRAY)

green = cv2.imread('./data/green_mushroom.jpg')
green_gray = cv2.cvtColor(green, cv2.COLOR_BGR2GRAY)

# 찾을 이미지 크기 반환
h, w = green_gray.shape

# 배경이미지, 찾을 이미지, 매칭 방법
result = cv2.matchTemplate(maple_gray, green_gray, cv2.TM_CCOEFF_NORMED)
# 0 ~ 1까지 유사도가 표현되어있음
# 0.7이상의 값만 출력
import numpy as np
loc = np.where(result >= 0.7)
loc

# cv2.imshow('maple', maple)
# cv2.imshow('blue', blue)
# cv2.imshow('green', green)
# cv2.waitKey(0)
# cv2.destroyAllWindows()
import cv2

# 빠른결과 확인을 위해 흑백으로 시도
maple = cv2.imread('./data/maple.jpg')
maple_gray = cv2.cvtColor(maple, cv2.COLOR_BGR2GRAY)

blue = cv2.imread('./data/blue_snail.jpg')
blue_gray = cv2.cvtColor(blue, cv2.COLOR_BGR2GRAY)

green = cv2.imread('./data/green_mushroom.jpg')
green_gray = cv2.cvtColor(green, cv2.COLOR_BGR2GRAY)

# 찾을 이미지 크기 반환
h, w = green_gray.shape

# 배경이미지, 찾을 이미지, 매칭 방법
result = cv2.matchTemplate(maple_gray, green_gray, cv2.TM_CCOEFF_NORMED)
# 0 ~ 1까지 유사도가 표현되어있음
# 0.7이상의 값만 출력
import numpy as np
loc = np.where(result >= 0.7)

# -1 : 거꾸로 출력하기
for pt in loc[::-1] :
    print(pt)

# cv2.imshow('maple', maple)
# cv2.imshow('blue', blue)
# cv2.imshow('green', green)
# cv2.waitKey(0)
# cv2.destroyAllWindows()
- zip
import cv2

# 빠른결과 확인을 위해 흑백으로 시도
maple = cv2.imread('./data/maple.jpg')
maple_gray = cv2.cvtColor(maple, cv2.COLOR_BGR2GRAY)

blue = cv2.imread('./data/blue_snail.jpg')
blue_gray = cv2.cvtColor(blue, cv2.COLOR_BGR2GRAY)

green = cv2.imread('./data/green_mushroom.jpg')
green_gray = cv2.cvtColor(green, cv2.COLOR_BGR2GRAY)

# 찾을 이미지 크기 반환
h, w = green_gray.shape

# 배경이미지, 찾을 이미지, 매칭 방법
result = cv2.matchTemplate(maple_gray, green_gray, cv2.TM_CCOEFF_NORMED)
# 0 ~ 1까지 유사도가 표현되어있음
# 0.7이상의 값만 출력
import numpy as np
loc = np.where(result >= 0.7)

# -1 : 거꾸로 출력하기
# zip(*) : 같은 위치에 있는 데이터들끼리 묶어서 출력하기
for pt in zip(*loc[::-1]) :
    print(pt)

# cv2.imshow('maple', maple)
# cv2.imshow('blue', blue)
# cv2.imshow('green', green)
# cv2.waitKey(0)
# cv2.destroyAllWindows()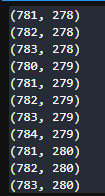
- 위치 찾기
import cv2
# 빠른결과 확인을 위해 흑백으로 시도
maple = cv2.imread('./data/maple.jpg')
maple_gray = cv2.cvtColor(maple, cv2.COLOR_BGR2GRAY)
blue = cv2.imread('./data/blue_snail.jpg')
blue_gray = cv2.cvtColor(blue, cv2.COLOR_BGR2GRAY)
green = cv2.imread('./data/green_mushroom.jpg')
green_gray = cv2.cvtColor(green, cv2.COLOR_BGR2GRAY)
# 찾을 이미지 크기 반환
h, w = blue_gray.shape
# 배경이미지, 찾을 이미지, 매칭 방법
result = cv2.matchTemplate(maple_gray, blue_gray, cv2.TM_CCOEFF_NORMED)
# 0 ~ 1까지 유사도가 표현되어있음
# 0.7이상의 값만 출력
import numpy as np
loc = np.where(result >= 0.7)
# -1 : 거꾸로 출력하기
# zip(*) : 같은 위치에 있는 데이터들끼리 묶어서 출력하기
for pt in zip(*loc[::-1]) :
# 흑백에서 찾은 위치를 컬러 이미지에 표현하기
# 이미지, 좌상단좌표, 우하단좌표, 색상, 두께
cv2.rectangle(maple, pt, (pt[0] + w, pt[1] + h), (0, 255, 0), 2)
cv2.imshow('maple', maple)
# cv2.imshow('blue', blue)
# cv2.imshow('green', green)
cv2.waitKey(0)
cv2.destroyAllWindows()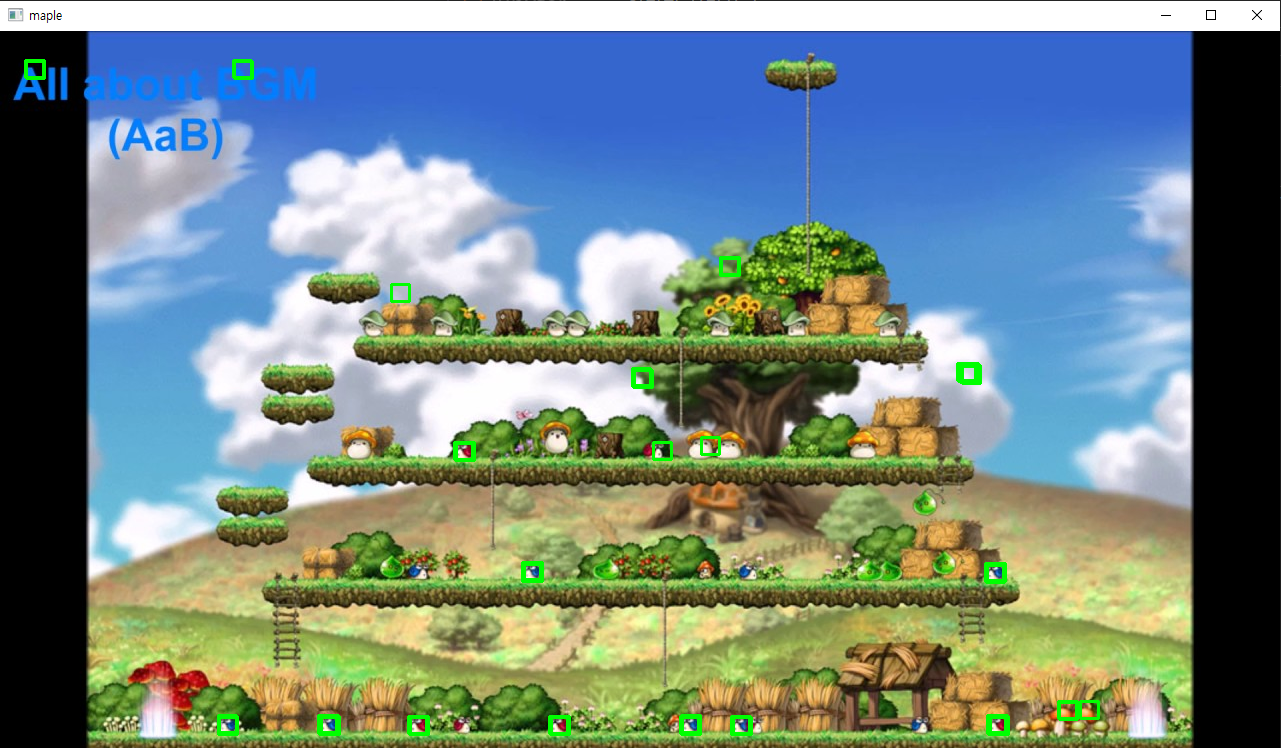 → 정확하진않다.
# 템플릿 매칭 = 원하는 이미지를 찾는 방법
# 원 찾기 = Hough 변환
# 꼭짓점 찾기 = Corner 검출
# 사각형 찾기 = cv2.boundingRect()
# 색상의 변화가 큰 곳을 기준으로 물체를 찾아간다.

# ORB(Oriented Fast and Rotate Brief) 알고리즘 : 특성 찾기
# 침식(Erosion) : 이미지에서 흰 부분(1의 값)의 값을 줄이는 방법
# 팽창(Dilation) : 이미지에서 흰 부분(1의 값)의 값을 늘리는 방법import cv2
num = cv2.imread('./data/number.png')
cv2.imshow('num', num)
cv2.waitKey(0)
cv2.destroyAllWindows()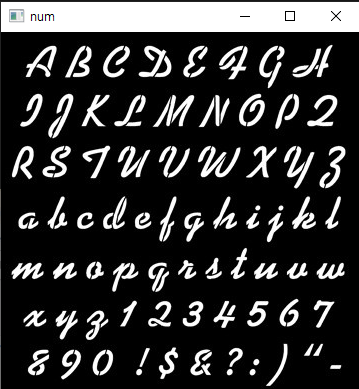
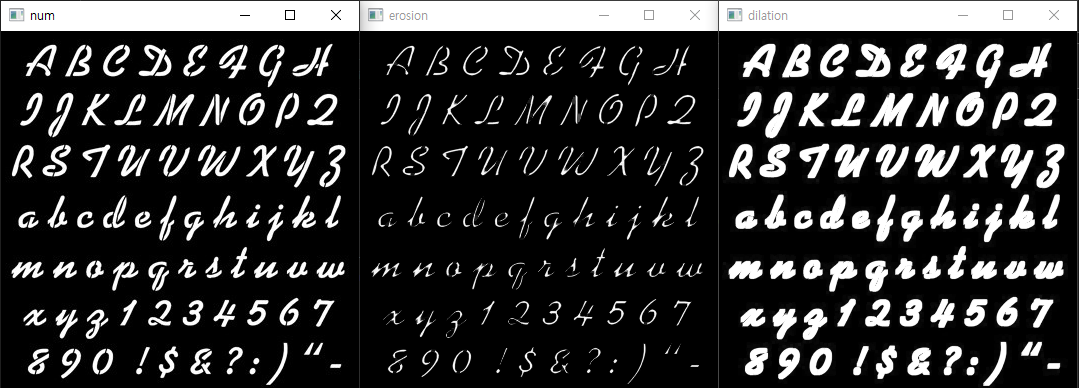
import cv2

num = cv2.imread('./data/number.png')

# 침식과 팽창의 정도 = (3,3)
import numpy as np
kernel = np.ones((3,3), np.uint8) # unit = unsigned integer : 부호가 없는 정수(양의 정수)

# iterations = 반복 횟수
erosion = cv2.erode(num, kernel, iterations = 1)
dilation = cv2.dilate(num, kernel, iterations = 1)

cv2.imshow('num', num)
cv2.imshow('erosion', erosion)
cv2.imshow('dilation', dilation)
cv2.waitKey(0)
cv2.destroyAllWindows()
-기본, 침식, 팽창
- kernel을 (5,5)로 바꿨을 때
import cv2

num = cv2.imread('./data/number.png')

# 침식과 팽창의 정도 = (3,3)
import numpy as np
kernel = np.ones((5,5), np.uint8) # unit = unsigned integer : 부호가 없는 정수(양의 정수)

# iterations = 반복 횟수
erosion = cv2.erode(num, kernel, iterations = 1)
dilation = cv2.dilate(num, kernel, iterations = 1)

cv2.imshow('num', num)
cv2.imshow('erosion', erosion)
cv2.imshow('dilation', dilation)
cv2.waitKey(0)
cv2.destroyAllWindows()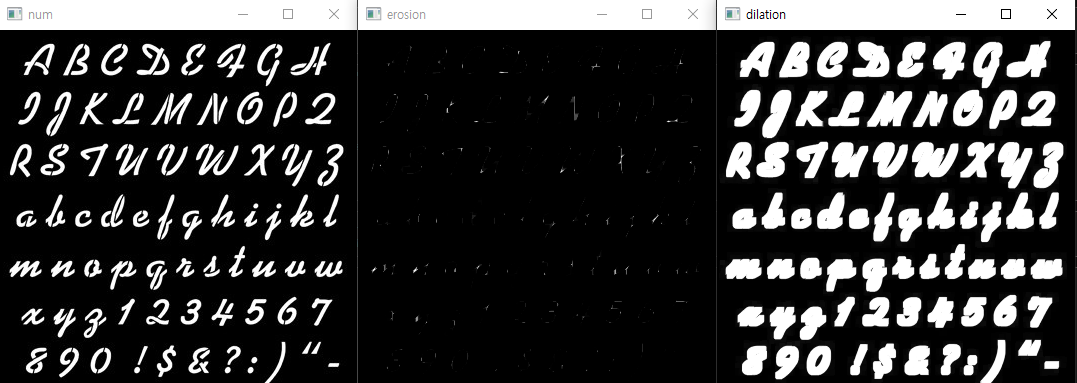
- iterations를 2로 바꿨을 때
import cv2

num = cv2.imread('./data/number.png')

# 침식과 팽창의 정도 = (3,3)
import numpy as np
kernel = np.ones((3,3), np.uint8) # unit = unsigned integer : 부호가 없는 정수(양의 정수)

# iterations = 반복 횟수
erosion = cv2.erode(num, kernel, iterations = 2)
dilation = cv2.dilate(num, kernel, iterations = 2)

cv2.imshow('num', num)
cv2.imshow('erosion', erosion)
cv2.imshow('dilation', dilation)
cv2.waitKey(0)
cv2.destroyAllWindows()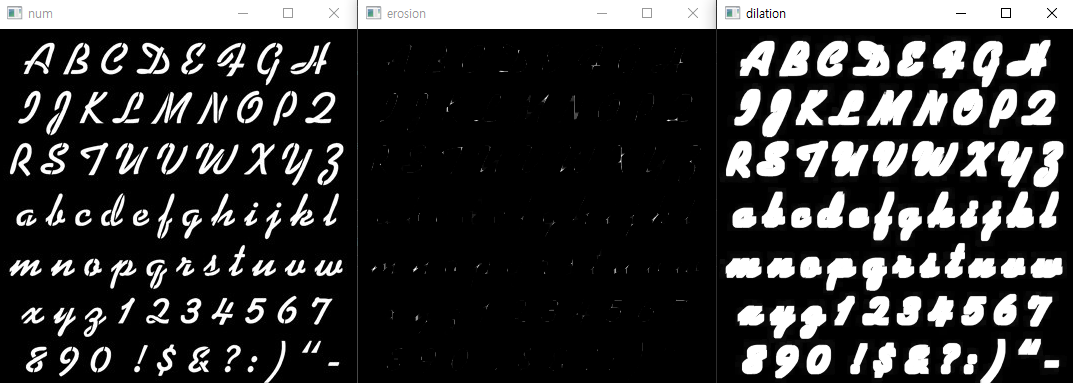
- Opening
# 이미지에서 노이즈 데이터 제거
# Opening : erosion → dilation
# 검은 부분이 늘어났다가 다시 줄어듦, 흰색 부분이 줄어들었다가 다시 늘어남
# 흰색(1)의 노이즈 제거
import cv2
num = cv2.imread('./data/A.png')
# 침식과 팽창의 정도 = (3,3)
import numpy as np
kernel = np.ones((5,5), np.uint8) # unit = unsigned integer : 부호가 없는 정수(양의 정수)
# iterations = 반복 횟수
erosion = cv2.erode(num, kernel, iterations = 2)
dilation = cv2.dilate(erosion, kernel, iterations = 2)
cv2.imshow('num', num)
cv2.imshow('erosion', erosion)
cv2.imshow('dilation', dilation)
cv2.waitKey(0)
cv2.destroyAllWindows()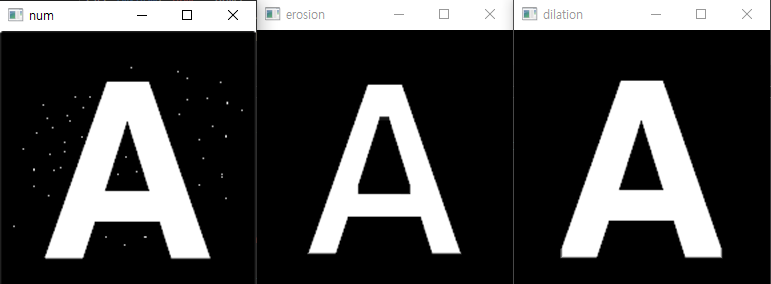
# Opening
import cv2

num = cv2.imread('./data/A.png')

kernel = np.ones((3,3), np.uint8)

opening = cv2.morphologyEx(num, cv2.MORPH_OPEN, kernel)

cv2.imshow('noise', num)
cv2.imshow('opening', opening)
cv2.waitKey(0)
cv2.destroyAllWindows()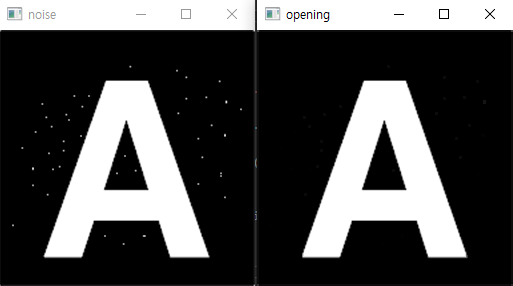
- Closing
# Closing : dilation → erosion
# 흰색 부분이 늘어났다가 다시 줄어듦, 검은 부분이 줄어들었다가 다시 늘어남
# 검은색(0)의 노이즈 제거
import cv2
num = cv2.imread('./data/B.png')
# 침식과 팽창의 정도 = (3,3)
import numpy as np
kernel = np.ones((5,5), np.uint8) # unit = unsigned integer : 부호가 없는 정수(양의 정수)
# iterations = 반복 횟수
dilation = cv2.dilate(num, kernel, iterations = 2)
erosion = cv2.erode(dilation, kernel, iterations = 2)
cv2.imshow('num', num)
cv2.imshow('erosion', erosion)
cv2.imshow('dilation', dilation)
cv2.waitKey(0)
cv2.destroyAllWindows()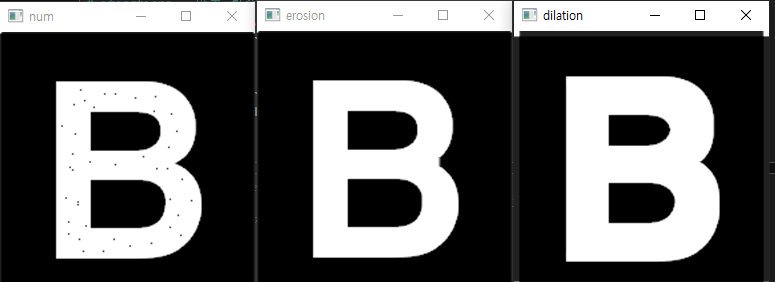
# Closing
import cv2

num = cv2.imread('./data/B.png')

kernel = np.ones((3,3), np.uint8)

closing = cv2.morphologyEx(num, cv2.MORPH_CLOSE, kernel)

cv2.imshow('noise', num)
cv2.imshow('opening', closing)
cv2.waitKey(0)
cv2.destroyAllWindows()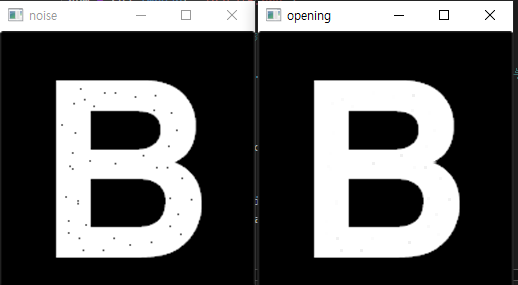

노는게 제일 좋아~!