- 명령프롬프트 설정하기
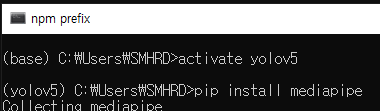
-설정하고 jupyter notebook 들어가기

Mediapipe-hands 사용하기
- 순서
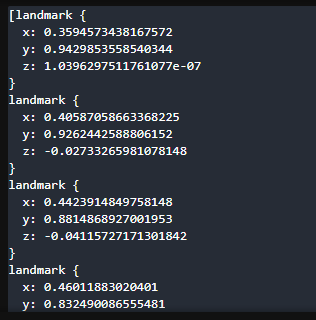
- 손가락 관절 위치(mediapipe에서 출력된 값)
- 관절끼리 연결한 뼈의 값 구하기(점을 연결한 선)
- 뼈 사이의 각도 구하기
- knn 모델에 예측시키기
- 이미지에 예측값 표현
- import
import cv2
import mediapipe as mp- 손 찾기
# 캠 연결하기
import cv2

# mediapipe 사용하기
# 손 찾기 관련 기능 불러오기
mp_hands = mp.solutions.hands
# 손 그려주는 기능 불러오기
mp_drawing = mp.solutions.drawing_utils
# 손 찾기 관련 세부 설정
hands = mp_hands.Hands(
    max_num_hands = 1, # 탐지할 최대 손의 갯수
    min_detection_confidence = 0.5, # 표시할 손의 최소 정확도
    min_tracking_confidence = 0.5 # 표시할 관절의 최소 정확도
)

video = cv2.VideoCapture(0)

while video.isOpened() :
    ret, img = video.read()
    img = cv2.flip(img,1)
    # 파이썬이 인식 잘 하도록 BGR → RGB로 변경
    img = cv2.cvtColor(img, cv2.COLOR_RGB2BGR)

    # 손 탐지하기
    result = hands.process(img)

    img = cv2.cvtColor(img, cv2.COLOR_RGB2BGR)

    if not ret :
        break

    # 찾은 손 표시하기
    if result.multi_hand_landmarks is not None :
        print(result.multi_hand_landmarks)

    k = cv2.waitKey(30)
    if k == 49 :
        break
    cv2.imshow('hand', img)

video.release()
cv2.destroyAllWindows()
-캠에 손을 올리면 좌표 같은게 뜬다.
- 손 위치

https://developers.google.com/mediapipe/solutions/vision/hand_landmarker#get_started
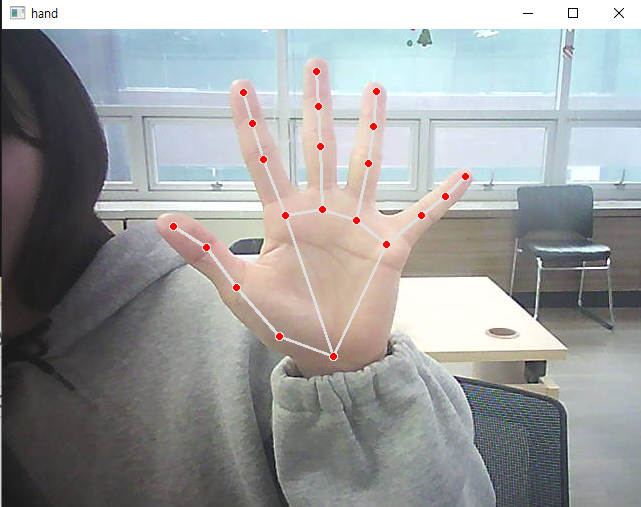
- 손의 관절 체크
# 캠 연결하기
import cv2
# mediapipe 사용하기
# 손 찾기 관련 기능 불러오기
mp_hands = mp.solutions.hands
# 손 그려주는 기능 불러오기
mp_drawing = mp.solutions.drawing_utils
# 손 찾기 관련 세부 설정
hands = mp_hands.Hands(
max_num_hands = 1, # 탐지할 최대 손의 갯수
min_detection_confidence = 0.5, # 표시할 손의 최소 정확도
min_tracking_confidence = 0.5 # 표시할 관절의 최소 정확도
)
video = cv2.VideoCapture(0)
while video.isOpened() :
ret, img = video.read()
img = cv2.flip(img,1)
# 파이썬이 인식 잘 하도록 BGR → RGB로 변경
img = cv2.cvtColor(img, cv2.COLOR_RGB2BGR)
# 손 탐지하기
result = hands.process(img)
img = cv2.cvtColor(img, cv2.COLOR_RGB2BGR)
if not ret :
break
# 찾은 손 표시하기
if result.multi_hand_landmarks is not None :
# print(result.multi_hand_landmarks)
# 이미지에 손 표현하기
for res in result.multi_hand_landmarks :
mp_drawing.draw_landmarks(img, res, mp_hands.HAND_CONNECTIONS)
k = cv2.waitKey(30)
if k == 49 :
break
cv2.imshow('hand', img)
video.release()
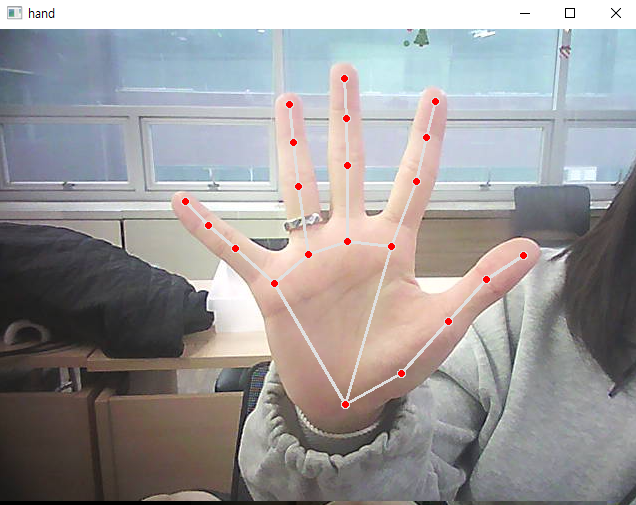
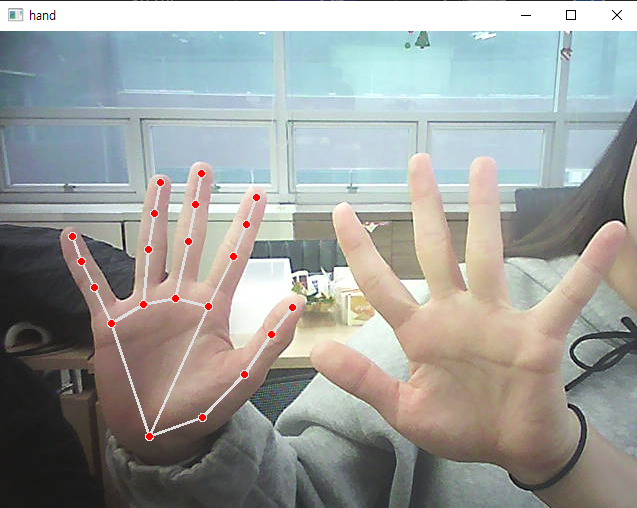
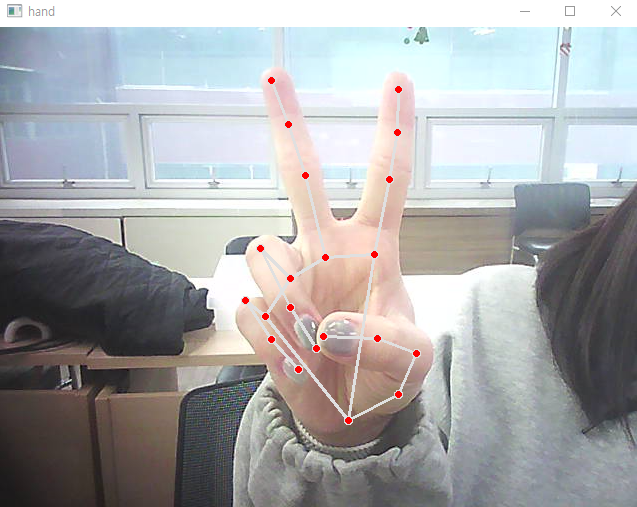
cv2.destroyAllWindows()-정면
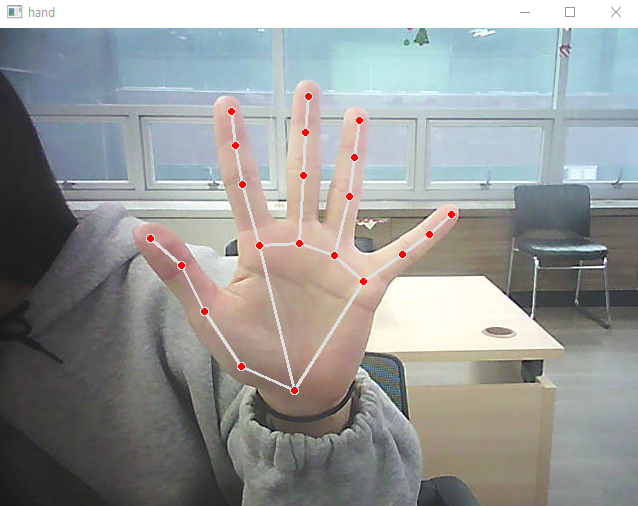
-후면

-반대손
-하지만 아직 양손은 안된다.
한손 동작 인식시키기
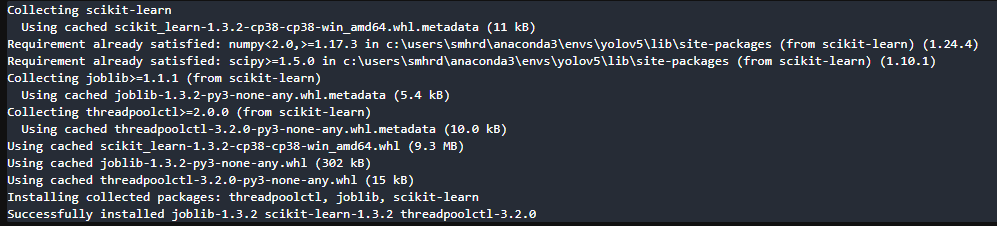
- scikit-learn 설치
- 한손 동작 인식
# 캠 연결하기
import cv2
import mediapipe as mp
import numpy as np
from sklearn.neighbors import KNeighborsClassifier

# 인식 가능한 11가지 동작
gesture = {
    0:'fist', 1:'one', 2:'two', 3:'three', 4:'four', 5:'five',
    6:'six', 7:'rock', 8:'spiderman', 9:'yeah', 10:'ok',
}

# 동작 인식 모델 만들기(knn 모델)
file = np.genfromtxt('./data/gesture_train.csv', delimiter = ',')
X = file[:, :-1].astype(np.float32)
y = file[:, -1].astype(np.float32)
knn = KNeighborsClassifier(n_neighbors=3)
knn.fit(X, y)

# mediapipe 사용하기
# 손 찾기 관련 기능 불러오기
mp_hands = mp.solutions.hands
# 손 그려주는 기능 불러오기
mp_drawing = mp.solutions.drawing_utils
# 손 찾기 관련 세부 설정
hands = mp_hands.Hands(
    max_num_hands = 1, # 탐지할 최대 손의 갯수
    min_detection_confidence = 0.5, # 표시할 손의 최소 정확도
    min_tracking_confidence = 0.5 # 표시할 관절의 최소 정확도
)

video = cv2.VideoCapture(0)

while video.isOpened() :
    ret, img = video.read()
    img = cv2.flip(img,1)
    # 파이썬이 인식 잘 하도록 BGR → RGB로 변경
    img = cv2.cvtColor(img, cv2.COLOR_RGB2BGR)

    # 손 탐지하기
    result = hands.process(img)

    img = cv2.cvtColor(img, cv2.COLOR_RGB2BGR)

    if not ret :
        break

    # 찾은 손 표시하기
    if result.multi_hand_landmarks is not None :
        # print(result.multi_hand_landmarks)
        # 이미지에 손 표현하기
        for res in result.multi_hand_landmarks :
            mp_drawing.draw_landmarks(img, res, mp_hands.HAND_CONNECTIONS)

    k = cv2.waitKey(30)
    if k == 49 :
        break
    cv2.imshow('hand', img)

video.release()
cv2.destroyAllWindows()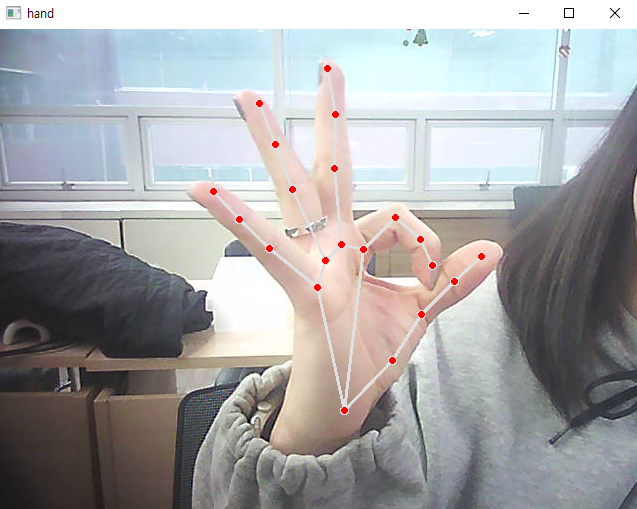
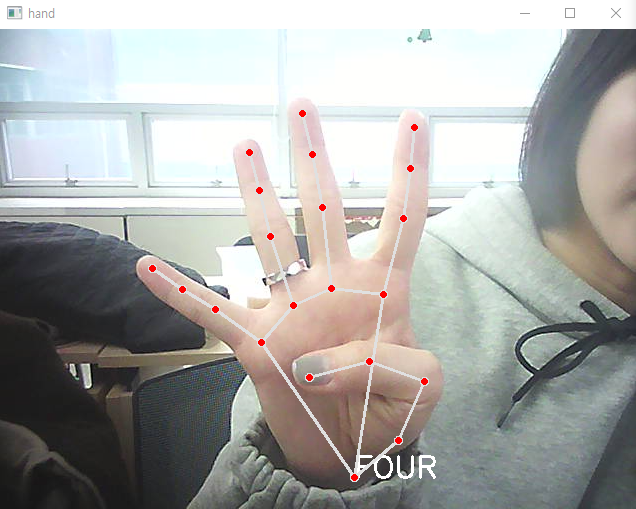
- 손의 모양 인식
# 캠 연결하기
import cv2
import mediapipe as mp
import numpy as np
from sklearn.neighbors import KNeighborsClassifier

# 인식 가능한 11가지 동작
gesture = {
    0:'fist', 1:'one', 2:'two', 3:'three', 4:'four', 5:'five',
    6:'six', 7:'rock', 8:'spiderman', 9:'yeah', 10:'ok',
}

# 동작 인식 모델 만들기(knn 모델)
file = np.genfromtxt('./data/gesture_train.csv', delimiter = ',')
X = file[:, :-1].astype(np.float32)
y = file[:, -1].astype(np.float32)
knn = KNeighborsClassifier(n_neighbors=3)
knn.fit(X, y)

# mediapipe 사용하기
# 손 찾기 관련 기능 불러오기
mp_hands = mp.solutions.hands
# 손 그려주는 기능 불러오기
mp_drawing = mp.solutions.drawing_utils
# 손 찾기 관련 세부 설정
hands = mp_hands.Hands(
    max_num_hands = 1, # 탐지할 최대 손의 갯수
    min_detection_confidence = 0.5, # 표시할 손의 최소 정확도
    min_tracking_confidence = 0.5 # 표시할 관절의 최소 정확도
)

video = cv2.VideoCapture(0)

while video.isOpened() :
    ret, img = video.read()
    img = cv2.flip(img,1)
    # 파이썬이 인식 잘 하도록 BGR → RGB로 변경
    img = cv2.cvtColor(img, cv2.COLOR_RGB2BGR)

    # 손 탐지하기
    result = hands.process(img)

    img = cv2.cvtColor(img, cv2.COLOR_RGB2BGR)

    if not ret :
        break

    # 찾은 손 표시하기
    if result.multi_hand_landmarks is not None :
        # print(result.multi_hand_landmarks)
        # 이미지에 손 표현하기
        for res in result.multi_hand_landmarks :
            joint = np.zeros((21, 3)) # 21개 관절, xyz값 저장할 배열 생성
            # enumerate = for문의 순서 표현
            for j, lm in enumerate(res.landmark) :
                joint[j] = [lm.x, lm.y, lm.z]
            # 연결할 관절 번호 가져오기
            v1 = joint[[0,1,2,3,0,5,6,7,0,9,10,11,0,13,14,15,0,17,18,19],:]
            v2 = joint[[1,2,3,4,5,6,7,8,9,10,11,12,13,14,15,16,17,18,19,20],:]
            v = v2 - v1 # 뼈의 값(x, y, z좌표값 → 벡터값)
            # 유클리디안 길이로 변환(피타고라스)
            # 뼈의 값(직선 값)
            v = v / np.linalg.norm(v, axis = 1)[:, np.newaxis]

            # 뼈의 값으로 뼈 사이의 각도 구하기, 변화값이 큰 15개
            angle = np.arccos(np.einsum('nt,nt->n',
                v[[0,1,2,4,5,6,8,9,10,12,13,14,16,17,18],:],
                v[[1,2,3,5,6,7,9,10,11,13,14,15,17,18,19],:]))
            # radian 각도를 degree 각도로 변경하기
            angle = np.degrees(angle)

            # 구한 각도를 knn 모델에 예측시키기
            # 학습을 위한 타입 변경(2차원 array)
            X_pred = np.array([angle], dtype = np.float32)
            results = knn.predict(X_pred)
            idx = int(results)
            print(idx)

            mp_drawing.draw_landmarks(img, res, mp_hands.HAND_CONNECTIONS)

    k = cv2.waitKey(30)
    if k == 49 :
        break
    cv2.imshow('hand', img)

video.release()
cv2.destroyAllWindows()
-손을 피면 5, 4모양 하면 4, 1하면 1

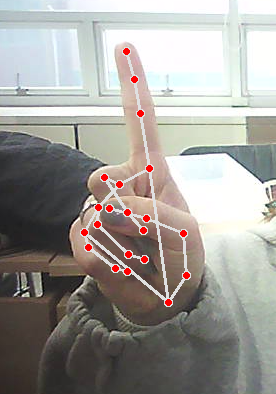
- 손 동작 인식
# 캠 연결하기
import cv2
import mediapipe as mp
import numpy as np
from sklearn.neighbors import KNeighborsClassifier

# 인식 가능한 11가지 동작
gesture = {
    0:'fist', 1:'one', 2:'two', 3:'three', 4:'four', 5:'five',
    6:'six', 7:'rock', 8:'spiderman', 9:'yeah', 10:'ok',
}

# 동작 인식 모델 만들기(knn 모델)
file = np.genfromtxt('./data/gesture_train.csv', delimiter = ',')
X = file[:, :-1].astype(np.float32)
y = file[:, -1].astype(np.float32)
knn = KNeighborsClassifier(n_neighbors=3)
knn.fit(X, y)

# mediapipe 사용하기
# 손 찾기 관련 기능 불러오기
mp_hands = mp.solutions.hands
# 손 그려주는 기능 불러오기
mp_drawing = mp.solutions.drawing_utils
# 손 찾기 관련 세부 설정
hands = mp_hands.Hands(
    max_num_hands = 1, # 탐지할 최대 손의 갯수
    min_detection_confidence = 0.5, # 표시할 손의 최소 정확도
    min_tracking_confidence = 0.5 # 표시할 관절의 최소 정확도
)

video = cv2.VideoCapture(0)

while video.isOpened() :
    ret, img = video.read()
    img = cv2.flip(img,1)
    # 파이썬이 인식 잘 하도록 BGR → RGB로 변경
    img = cv2.cvtColor(img, cv2.COLOR_RGB2BGR)

    # 손 탐지하기
    result = hands.process(img)

    img = cv2.cvtColor(img, cv2.COLOR_RGB2BGR)

    if not ret :
        break

    # 찾은 손 표시하기
    if result.multi_hand_landmarks is not None :
        # print(result.multi_hand_landmarks)
        # 이미지에 손 표현하기
        for res in result.multi_hand_landmarks :
            joint = np.zeros((21, 3)) # 21개 관절, xyz값 저장할 배열 생성
            # enumerate = for문의 순서 표현
            for j, lm in enumerate(res.landmark) :
                joint[j] = [lm.x, lm.y, lm.z]
            # 연결할 관절 번호 가져오기
            v1 = joint[[0,1,2,3,0,5,6,7,0,9,10,11,0,13,14,15,0,17,18,19],:]
            v2 = joint[[1,2,3,4,5,6,7,8,9,10,11,12,13,14,15,16,17,18,19,20],:]
            v = v2 - v1 # 뼈의 값(x, y, z좌표값 → 벡터값)
            # 유클리디안 길이로 변환(피타고라스)
            # 뼈의 값(직선 값)
            v = v / np.linalg.norm(v, axis = 1)[:, np.newaxis]

            # 뼈의 값으로 뼈 사이의 각도 구하기, 변화값이 큰 15개
            angle = np.arccos(np.einsum('nt,nt->n',
                v[[0,1,2,4,5,6,8,9,10,12,13,14,16,17,18],:],
                v[[1,2,3,5,6,7,9,10,11,13,14,15,17,18,19],:]))
            # radian 각도를 degree 각도로 변경하기
            angle = np.degrees(angle)

            # 구한 각도를 knn 모델에 예측시키기
            # 학습을 위한 타입 변경(2차원 array)
            X_pred = np.array([angle], dtype = np.float32)
            results = knn.predict(X_pred)
            idx = int(results)

            # 인식된 제스쳐 표현하기
            img_x = img.shape[1]
            img_y = img.shape[0]
            hand_x = res.landmark[0].x
            hand_y = res.landmark[0].y

            cv2.putText(img, text = gesture[idx].upper(),
                       org = (int(hand_x * img_x), int(hand_y * img_y)+20),
                       fontFace=cv2.FONT_HERSHEY_SIMPLEX, fontScale=1, color=(255, 255, 255), thickness=2
                       )

            mp_drawing.draw_landmarks(img, res, mp_hands.HAND_CONNECTIONS)

    k = cv2.waitKey(30)
    if k == 49 :
        break
    cv2.imshow('hand', img)

video.release()
cv2.destroyAllWindows()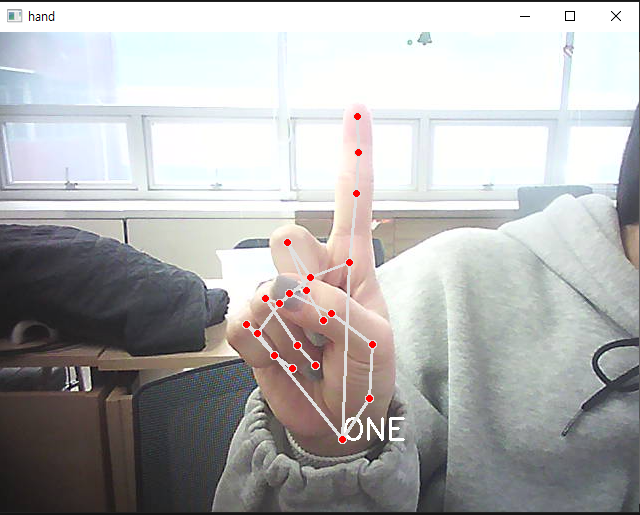
- 가위바위보 인식
# 캠 연결하기
import cv2
import mediapipe as mp
import numpy as np
from sklearn.neighbors import KNeighborsClassifier

# 인식 가능한 11가지 동작
gesture = {
    0:'fist', 1:'one', 2:'two', 3:'three', 4:'four', 5:'five',
    6:'six', 7:'rock', 8:'spiderman', 9:'yeah', 10:'ok',
}

# 가위바위보 동작 만들기
rsp = {
    0 : 'rock', 5 : 'paper', 9 : 'scissors'
}

# 동작 인식 모델 만들기(knn 모델)
file = np.genfromtxt('./data/gesture_train.csv', delimiter = ',')
X = file[:, :-1].astype(np.float32)
y = file[:, -1].astype(np.float32)
knn = KNeighborsClassifier(n_neighbors=3)
knn.fit(X, y)

# mediapipe 사용하기
# 손 찾기 관련 기능 불러오기
mp_hands = mp.solutions.hands
# 손 그려주는 기능 불러오기
mp_drawing = mp.solutions.drawing_utils
# 손 찾기 관련 세부 설정
hands = mp_hands.Hands(
    max_num_hands = 1, # 탐지할 최대 손의 갯수
    min_detection_confidence = 0.5, # 표시할 손의 최소 정확도
    min_tracking_confidence = 0.5 # 표시할 관절의 최소 정확도
)

video = cv2.VideoCapture(0)

while video.isOpened() :
    ret, img = video.read()
    img = cv2.flip(img,1)
    # 파이썬이 인식 잘 하도록 BGR → RGB로 변경
    img = cv2.cvtColor(img, cv2.COLOR_RGB2BGR)

    # 손 탐지하기
    result = hands.process(img)

    img = cv2.cvtColor(img, cv2.COLOR_RGB2BGR)

    if not ret :
        break

    # 찾은 손 표시하기
    if result.multi_hand_landmarks is not None :
        # print(result.multi_hand_landmarks)
        # 이미지에 손 표현하기
        for res in result.multi_hand_landmarks :
            joint = np.zeros((21, 3)) # 21개 관절, xyz값 저장할 배열 생성
            # enumerate = for문의 순서 표현
            for j, lm in enumerate(res.landmark) :
                joint[j] = [lm.x, lm.y, lm.z]
            # 연결할 관절 번호 가져오기
            v1 = joint[[0,1,2,3,0,5,6,7,0,9,10,11,0,13,14,15,0,17,18,19],:]
            v2 = joint[[1,2,3,4,5,6,7,8,9,10,11,12,13,14,15,16,17,18,19,20],:]
            v = v2 - v1 # 뼈의 값(x, y, z좌표값 → 벡터값)
            # 유클리디안 길이로 변환(피타고라스)
            # 뼈의 값(직선 값)
            v = v / np.linalg.norm(v, axis = 1)[:, np.newaxis]

            # 뼈의 값으로 뼈 사이의 각도 구하기, 변화값이 큰 15개
            angle = np.arccos(np.einsum('nt,nt->n',
                v[[0,1,2,4,5,6,8,9,10,12,13,14,16,17,18],:],
                v[[1,2,3,5,6,7,9,10,11,13,14,15,17,18,19],:]))
            # radian 각도를 degree 각도로 변경하기
            angle = np.degrees(angle)

            # 구한 각도를 knn 모델에 예측시키기
            # 학습을 위한 타입 변경(2차원 array)
            X_pred = np.array([angle], dtype = np.float32)
            results = knn.predict(X_pred)
            idx = int(results)

            # 인식된 제스쳐 표현하기
            img_x = img.shape[1]
            img_y = img.shape[0]
            hand_x = res.landmark[0].x
            hand_y = res.landmark[0].y

            # 모든 동작 출력
            # cv2.putText(img, text = gesture[idx].upper(),
            #            org = (int(hand_x * img_x), int(hand_y * img_y)+20),
            #            fontFace=cv2.FONT_HERSHEY_SIMPLEX, fontScale=1, color=(255, 255, 255), thickness=2
            #            )

            # 가위, 바위, 보 동작만 인식하기
            if idx in rsp.keys() :
                cv2.putText(img, text = rsp[idx].upper(),
                        org = (int(hand_x * img_x), int(hand_y * img_y)+20),
                        fontFace=cv2.FONT_HERSHEY_SIMPLEX, fontScale=1, color=(255, 255, 255), thickness=2
                       )

            mp_drawing.draw_landmarks(img, res, mp_hands.HAND_CONNECTIONS)

    k = cv2.waitKey(30)
    if k == 49 :
        break
    cv2.imshow('hand', img)

video.release()
cv2.destroyAllWindows()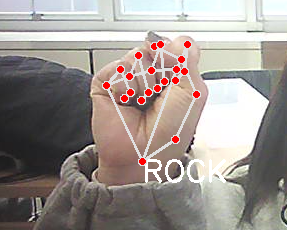


-다른건 인식이 안됨
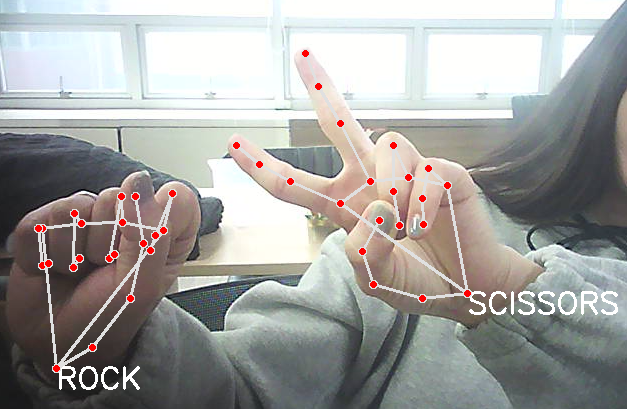
가위바위보 만들기
- 2로 바꾸기
# 캠 연결하기
import cv2
import mediapipe as mp
import numpy as np
from sklearn.neighbors import KNeighborsClassifier

# 인식 가능한 11가지 동작
gesture = {
    0:'fist', 1:'one', 2:'two', 3:'three', 4:'four', 5:'five',
    6:'six', 7:'rock', 8:'spiderman', 9:'yeah', 10:'ok',
}

# 가위바위보 동작 만들기
rsp = {
    0 : 'rock', 5 : 'paper', 9 : 'scissor'
}

# 동작 인식 모델 만들기(knn 모델)
file = np.genfromtxt('./data/gesture_train.csv', delimiter = ',')
X = file[:, :-1].astype(np.float32)
y = file[:, -1].astype(np.float32)
knn = KNeighborsClassifier(n_neighbors=3)
knn.fit(X, y)

# mediapipe 사용하기
# 손 찾기 관련 기능 불러오기
mp_hands = mp.solutions.hands
# 손 그려주는 기능 불러오기
mp_drawing = mp.solutions.drawing_utils
# 손 찾기 관련 세부 설정
hands = mp_hands.Hands(
    max_num_hands = 2, # 탐지할 최대 손의 갯수
    min_detection_confidence = 0.5, # 표시할 손의 최소 정확도
    min_tracking_confidence = 0.5 # 표시할 관절의 최소 정확도
)

video = cv2.VideoCapture(0)

while video.isOpened() :
    ret, img = video.read()
    img = cv2.flip(img,1)
    # 파이썬이 인식 잘 하도록 BGR → RGB로 변경
    img = cv2.cvtColor(img, cv2.COLOR_RGB2BGR)

    # 손 탐지하기
    result = hands.process(img)

    img = cv2.cvtColor(img, cv2.COLOR_RGB2BGR)

    if not ret :
        break

    # 찾은 손 표시하기
    if result.multi_hand_landmarks is not None :
        # print(result.multi_hand_landmarks)
        # 이미지에 손 표현하기
        for res in result.multi_hand_landmarks :
            joint = np.zeros((21, 3)) # 21개 관절, xyz값 저장할 배열 생성
            # enumerate = for문의 순서 표현
            for j, lm in enumerate(res.landmark) :
                joint[j] = [lm.x, lm.y, lm.z]
            # 연결할 관절 번호 가져오기
            v1 = joint[[0,1,2,3,0,5,6,7,0,9,10,11,0,13,14,15,0,17,18,19],:]
            v2 = joint[[1,2,3,4,5,6,7,8,9,10,11,12,13,14,15,16,17,18,19,20],:]
            v = v2 - v1 # 뼈의 값(x, y, z좌표값 → 벡터값)
            # 유클리디안 길이로 변환(피타고라스)
            # 뼈의 값(직선 값)
            v = v / np.linalg.norm(v, axis = 1)[:, np.newaxis]

            # 뼈의 값으로 뼈 사이의 각도 구하기, 변화값이 큰 15개
            angle = np.arccos(np.einsum('nt,nt->n',
                v[[0,1,2,4,5,6,8,9,10,12,13,14,16,17,18],:],
                v[[1,2,3,5,6,7,9,10,11,13,14,15,17,18,19],:]))
            # radian 각도를 degree 각도로 변경하기
            angle = np.degrees(angle)

            # 구한 각도를 knn 모델에 예측시키기
            # 학습을 위한 타입 변경(2차원 array)
            X_pred = np.array([angle], dtype = np.float32)
            results = knn.predict(X_pred)
            idx = int(results)

            # 인식된 제스쳐 표현하기
            img_x = img.shape[1]
            img_y = img.shape[0]
            hand_x = res.landmark[0].x
            hand_y = res.landmark[0].y

            # 모든 동작 출력
            # cv2.putText(img, text = gesture[idx].upper(),
            #            org = (int(hand_x * img_x), int(hand_y * img_y)+20),
            #            fontFace=cv2.FONT_HERSHEY_SIMPLEX, fontScale=1, color=(255, 255, 255), thickness=2
            #            )

            # 가위, 바위, 보 동작만 인식하기
            if idx in rsp.keys() :
                cv2.putText(img, text = rsp[idx].upper(),
                        org = (int(hand_x * img_x), int(hand_y * img_y)+20),
                        fontFace=cv2.FONT_HERSHEY_SIMPLEX, fontScale=1, color=(255, 255, 255), thickness=2
                       )

            mp_drawing.draw_landmarks(img, res, mp_hands.HAND_CONNECTIONS)

    k = cv2.waitKey(30)
    if k == 49 :
        break
    cv2.imshow('hand', img)

video.release()
cv2.destroyAllWindows()
- 상단 중앙에 결과 표시
# 캠 연결하기
import cv2
import mediapipe as mp
import numpy as np
from sklearn.neighbors import KNeighborsClassifier
# 인식 가능한 11가지 동작
gesture = {
0:'fist', 1:'one', 2:'two', 3:'three', 4:'four', 5:'five',
6:'six', 7:'rock', 8:'spiderman', 9:'yeah', 10:'ok',
}
# 가위바위보 동작 만들기
rsp = {
0 : 'rock', 5 : 'paper', 9 : 'scissor'
}
# 동작 인식 모델 만들기(knn 모델)
file = np.genfromtxt('./data/gesture_train.csv', delimiter = ',')
X = file[:, :-1].astype(np.float32)
y = file[:, -1].astype(np.float32)
knn = KNeighborsClassifier(n_neighbors=3)
knn.fit(X, y)
# mediapipe 사용하기
# 손 찾기 관련 기능 불러오기
mp_hands = mp.solutions.hands
# 손 그려주는 기능 불러오기
mp_drawing = mp.solutions.drawing_utils
# 손 찾기 관련 세부 설정
hands = mp_hands.Hands(
max_num_hands = 2, # 탐지할 최대 손의 갯수
min_detection_confidence = 0.5, # 표시할 손의 최소 정확도
min_tracking_confidence = 0.5 # 표시할 관절의 최소 정확도
)
video = cv2.VideoCapture(0)
while video.isOpened() :
ret, img = video.read()
img = cv2.flip(img,1)
# 파이썬이 인식 잘 하도록 BGR → RGB로 변경
img = cv2.cvtColor(img, cv2.COLOR_RGB2BGR)
# 손 탐지하기
result = hands.process(img)
img = cv2.cvtColor(img, cv2.COLOR_RGB2BGR)
if not ret :
break
# 찾은 손 표시하기
if result.multi_hand_landmarks is not None :
rsp_result = []
# print(result.multi_hand_landmarks)
# 이미지에 손 표현하기
for res in result.multi_hand_landmarks :
joint = np.zeros((21, 3)) # 21개 관절, xyz값 저장할 배열 생성
# enumerate = for문의 순서 표현
for j, lm in enumerate(res.landmark) :
joint[j] = [lm.x, lm.y, lm.z]
# 연결할 관절 번호 가져오기
v1 = joint[[0,1,2,3,0,5,6,7,0,9,10,11,0,13,14,15,0,17,18,19],:]
v2 = joint[[1,2,3,4,5,6,7,8,9,10,11,12,13,14,15,16,17,18,19,20],:]
v = v2 - v1 # 뼈의 값(x, y, z좌표값 → 벡터값)
# 유클리디안 길이로 변환(피타고라스)
# 뼈의 값(직선 값)
v = v / np.linalg.norm(v, axis = 1)[:, np.newaxis]
# 뼈의 값으로 뼈 사이의 각도 구하기, 변화값이 큰 15개
angle = np.arccos(np.einsum('nt,nt->n',
v[[0,1,2,4,5,6,8,9,10,12,13,14,16,17,18],:],
v[[1,2,3,5,6,7,9,10,11,13,14,15,17,18,19],:]))
# radian 각도를 degree 각도로 변경하기
angle = np.degrees(angle)
# 구한 각도를 knn 모델에 예측시키기
# 학습을 위한 타입 변경(2차원 array)
X_pred = np.array([angle], dtype = np.float32)
results = knn.predict(X_pred)
idx = int(results)
# 인식된 제스쳐 표현하기
img_x = img.shape[1]
img_y = img.shape[0]
hand_x = res.landmark[0].x
hand_y = res.landmark[0].y
# 모든 동작 출력
# cv2.putText(img, text = gesture[idx].upper(),
# org = (int(hand_x * img_x), int(hand_y * img_y)+20),
# fontFace=cv2.FONT_HERSHEY_SIMPLEX, fontScale=1, color=(255, 255, 255), thickness=2
# )
# 가위, 바위, 보 동작만 인식하기
if idx in rsp.keys() :
cv2.putText(img, text = rsp[idx].upper(),
org = (int(hand_x * img_x), int(hand_y * img_y)+20),
fontFace=cv2.FONT_HERSHEY_SIMPLEX, fontScale=1, color=(255, 255, 255), thickness=2
)
rsp_result.append({
'rsp' : rsp[idx],
'org' : (int(hand_x * img_x), int(hand_y * img_y)+20)
})
mp_drawing.draw_landmarks(img, res, mp_hands.HAND_CONNECTIONS)
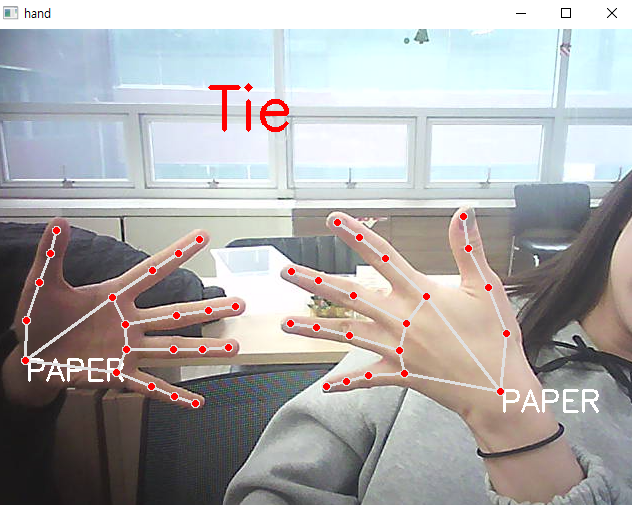
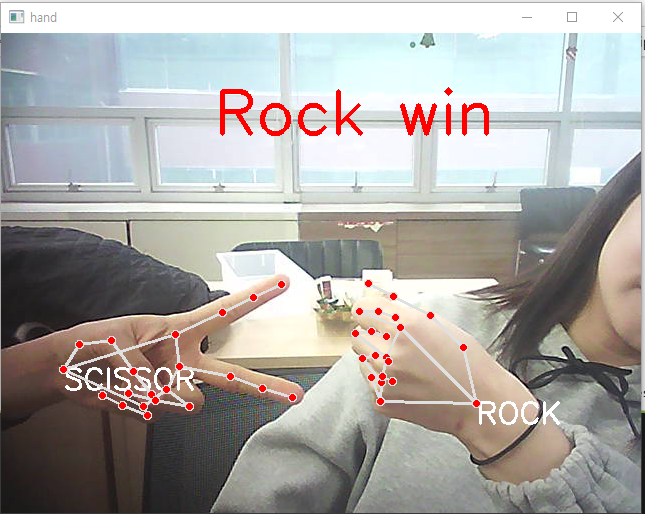
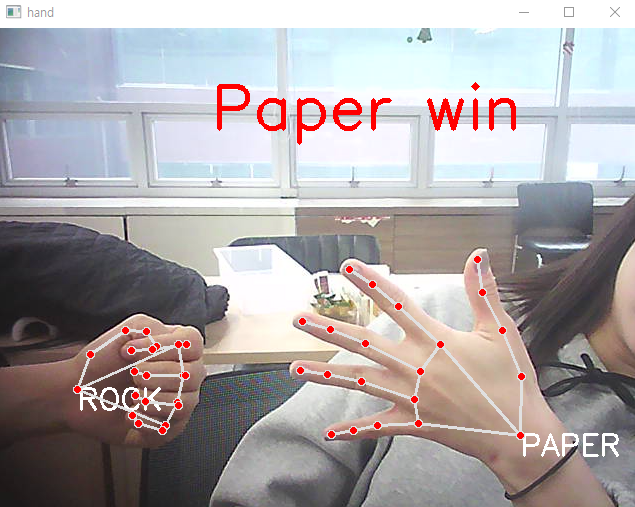
# 누가 이겼는지 판단하기
if len(rsp_result) == 2 :
winner = None
text = ''
if rsp_result[0]['rsp'] == 'rock' :
if rsp_result[1]['rsp'] == 'rock' : text = 'Tie';
elif rsp_result[1]['rsp'] == 'paper' : text = 'Paper win'; winner = 1;
elif rsp_result[1]['rsp'] == 'scissor' : text = 'Rock win'; winner = 0;
elif rsp_result[0]['rsp'] == 'paper' :
if rsp_result[1]['rsp'] == 'rock' : text = 'Paper win'; winner = 0;
elif rsp_result[1]['rsp'] == 'paper' : text = 'Tie';
elif rsp_result[1]['rsp'] == 'scissor' : text = 'Scissor win'; winner = 1;
elif rsp_result[0]['rsp'] == 'scissor' :
if rsp_result[1]['rsp'] == 'rock' : text = 'Rock win'; winner = 1;
elif rsp_result[1]['rsp'] == 'paper' : text = 'Scissor win'; winner = 0;
elif rsp_result[1]['rsp'] == 'scissor' : text = 'Tie';
cv2.putText(img, text = text,
# 이미지 중앙에 결과 표시
org = (int(img_x / 3), 100),
fontFace=cv2.FONT_HERSHEY_SIMPLEX, fontScale=2, color=(0, 0, 255), thickness=3
)
k = cv2.waitKey(30)
if k == 49 :
break
cv2.imshow('hand', img)
video.release()
cv2.destroyAllWindows()-비김
-주먹 이김
-보 이김
-가위 이김

가위바위보 + 얼굴 마스크
- 얼굴 점
import cv2
import mediapipe as mp

# 얼굴에서 특징점 찾기 관련 기능
mp_face = mp.solutions.face_mesh
# 특징점 찾기 세부 기능
face = mp_face.FaceMesh(
    min_detection_confidence = 0.5, # 얼굴 표현할 최소 정확도
    min_tracking_confidence = 0.5 # 특징점 표현할 최소 정확도
)
# 특징점 표현 기능
mp_drawing = mp.solutions.drawing_utils

video = cv2.VideoCapture(0)

while video.isOpened() :
    ret, img = video.read()

    img = cv2.cvtColor(img, cv2.COLOR_BGR2RGB)
    img = cv2.flip(img, 1)

    # 얼굴에서 특징점 검출하기
    face_result = face.process(img)
    img = cv2.cvtColor(img, cv2.COLOR_RGB2BGR)

    if not ret :
        break

    if face_result.multi_face_landmarks is not None :
        for res in face_result.multi_face_landmarks :
            mp_drawing.draw_landmarks(img, res, mp.solutions.face_mesh.FACEMESH_TESSELATION)

    k = cv2.waitKey(30)
    if k == 49 :
        break

    cv2.imshow('face', img)

video.release()
cv2.destroyAllWindows()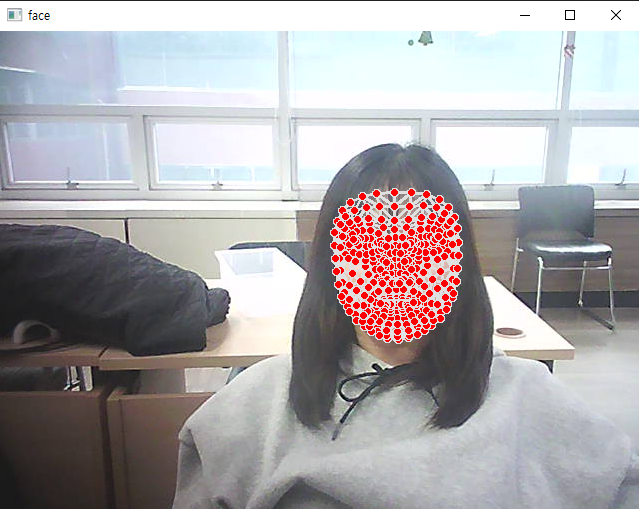
- 순서
- 얼굴 인식 후 478개의 특징점 표현하기
- 캠의 고정영역에 스파이더맨 마스크 씌우기
1) 마스크는 투명영역이 하얀색 이여야함
2) 정사각형의 형태를 띄는 마스크 가져오기
-마스크 씌우기, 안경 씌우기 - 얼굴을 따라다니게 만들기
2-1.
코 = 4
입 = 0
미간 = 6
수동으로 크기 조절 - 손 동작에 따라 호랑이 마스크, 스파이더맨 마스크
- 이미지 크기 확인
import cv2
spider = cv2.imread('./data/spiderman_mask.jpg')
# 마스크 이미지 크기 확인
spider.shape
- 이미지 크기 축소
import cv2
spider = cv2.imread('./data/spiderman_mask.jpg')
# 이미지 크기 축소
spider = cv2.resize(spider, (250, 250))
spider.shape
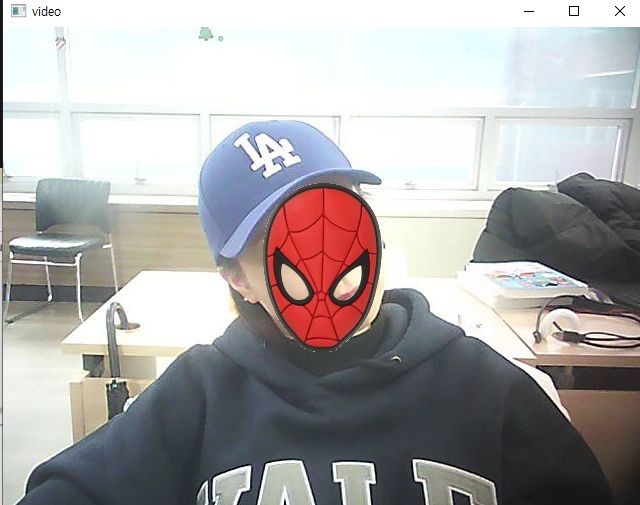
- 고정된 영역에
import cv2

# 한 번만 실행하면 되는 코드
spider = cv2.imread('./data/spiderman_mask.jpg')
spider = cv2.resize(spider, (250, 250))

mask2gray = cv2.cvtColor(spider, cv2.COLOR_RGB2GRAY)
_, mask_b = cv2.threshold(mask2gray, 200, 255, cv2.THRESH_BINARY)
mask_b_inv = cv2.bitwise_not(mask_b)
img_fg = cv2.bitwise_and(spider, spider, mask = mask_b_inv)
# 마스크 이미지에서 사용할 영역의 값만 추출

video = cv2.VideoCapture(0)

while video.isOpened() :
    ret, img = video.read()

    if not ret :
        break

    k = cv2.waitKey(30)
    if k == 49 :
        break

    # 마스크 띄울 종합영역(320, 240)
    # 사용할 이미지, 원의 위치, 원의 크기, 원의 색, 내부를 채울지 결정
    #cv2.circle(img, (320, 240), 20, (0, 0, 255), cv2.FILLED)
    # 매 프레임마다 실행해야 하는 코드
    # 좌상단(195, 115)
    # 우하단(445, 365)
    roi = img[115:365, 195:445]
    img_bg = cv2.bitwise_and(roi, roi, mask=mask_b)
    bg_fg = cv2.add(img_bg, img_fg)
    img[115:365, 195:445] = bg_fg

    cv2.imshow('video', img)

video.release()
cv2.destroyAllWindows()
-고정된 영역
- 코의 점으로 마스크 씌우기 (고정되지 않음)
# 코의 위치 확인하기
import cv2
import mediapipe as mp

# 얼굴에서 특징점 찾기 관련 기능
mp_face = mp.solutions.face_mesh
# 특징점 찾기 세부 기능
face = mp_face.FaceMesh(
    min_detection_confidence = 0.5, # 얼굴 표현할 최소 정확도
    min_tracking_confidence = 0.5 # 특징점 표현할 최소 정확도
)
# 특징점 표현 기능
mp_drawing = mp.solutions.drawing_utils

# 한 번만 실행하면 되는 코드
spider = cv2.imread('./data/spiderman_mask.jpg')
spider = cv2.resize(spider, (250, 250))

mask2gray = cv2.cvtColor(spider, cv2.COLOR_RGB2GRAY)
_, mask_b = cv2.threshold(mask2gray, 200, 255, cv2.THRESH_BINARY)
mask_b_inv = cv2.bitwise_not(mask_b)
img_fg = cv2.bitwise_and(spider, spider, mask = mask_b_inv)

video = cv2.VideoCapture(0)

while video.isOpened() :
    ret, img = video.read()

    img = cv2.cvtColor(img, cv2.COLOR_BGR2RGB)
    img = cv2.flip(img, 1)

    # 얼굴에서 특징점 검출하기
    face_result = face.process(img)
    img = cv2.cvtColor(img, cv2.COLOR_RGB2BGR)

    if not ret :
        break

    if face_result.multi_face_landmarks is not None :
        for res in face_result.multi_face_landmarks :
            # 4번이 코의 점
            nose = face_result.multi_face_landmarks[0].landmark[4]
            x_nose = int(nose.x * img.shape[1])
            y_nose = int(nose.y * img.shape[0])
            # cv2.circle(img, (x_nose, y_nose), 20, (0, 0, 255), cv2.FILLED)
            # 프레임마다 실행하는 코드
            try :
                roi = img[y_nose - 125:y_nose + 125, x_nose - 125:x_nose + 125] # 어디 위치에 표현할건지
                img_bg = cv2.bitwise_and(roi, roi, mask=mask_b)
                bg_fg = cv2.add(img_bg, img_fg)
                img[y_nose - 125:y_nose + 125, x_nose - 125:x_nose + 125] = bg_fg # 어디 위치에 표현할건지
            except :
                pass

    k = cv2.waitKey(30)
    if k == 49 :
        break

    cv2.imshow('face', img)

video.release()
cv2.destroyAllWindows()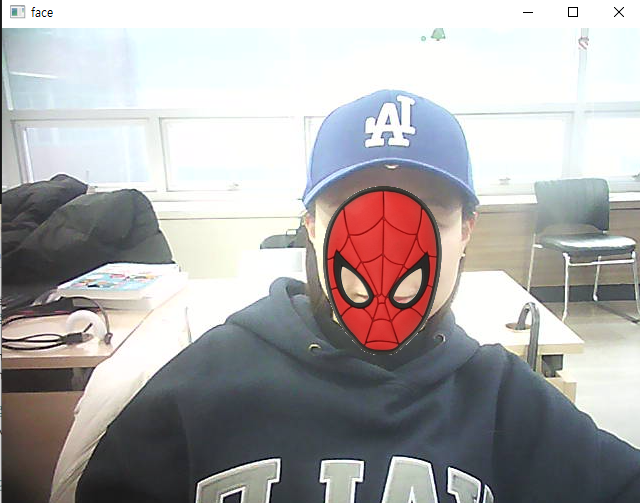
- 입의 점으로 마스크 씌우기
import cv2
import mediapipe as mp

# 얼굴에서 특징점 찾기 관련 기능
mp_face = mp.solutions.face_mesh
# 특징점 찾기 세부 기능
face = mp_face.FaceMesh(
    min_detection_confidence = 0.5, # 얼굴 표현할 최소 정확도
    min_tracking_confidence = 0.5 # 특징점 표현할 최소 정확도
)
# 특징점 표현 기능
mp_drawing = mp.solutions.drawing_utils

# 한 번만 실행하면 되는 코드
spider = cv2.imread('./data/mask.jpg') # 225, 225

mask2gray = cv2.cvtColor(spider, cv2.COLOR_RGB2GRAY)
_, mask_b = cv2.threshold(mask2gray, 250, 255, cv2.THRESH_BINARY)
mask_b_inv = cv2.bitwise_not(mask_b)
img_fg = cv2.bitwise_and(spider, spider, mask = mask_b_inv)

video = cv2.VideoCapture(0)

while video.isOpened() :
    ret, img = video.read()

    img = cv2.cvtColor(img, cv2.COLOR_BGR2RGB)
    img = cv2.flip(img, 1)

    # 얼굴에서 특징점 검출하기
    face_result = face.process(img)
    img = cv2.cvtColor(img, cv2.COLOR_RGB2BGR)

    if not ret :
        break

    if face_result.multi_face_landmarks is not None :
        for res in face_result.multi_face_landmarks :
            # 0번이 입의 점
            lip = face_result.multi_face_landmarks[0].landmark[0]
            x_lip = int(lip.x * img.shape[1])
            y_lip = int(lip.y * img.shape[0])
            # cv2.circle(img, (x_nose, y_nose), 20, (0, 0, 255), cv2.FILLED)
            # 프레임마다 실행하는 코드
            try :
                roi = img[y_lip - 112:y_lip + 113, x_lip - 112:x_lip + 113] # 어디 위치에 표현할건지
                img_bg = cv2.bitwise_and(roi, roi, mask=mask_b)
                bg_fg = cv2.add(img_bg, img_fg)
                img[y_lip - 112:y_lip + 113, x_lip - 112:x_lip + 113] = bg_fg # 어디 위치에 표현할건지
            except :
                pass

    k = cv2.waitKey(30)
    if k == 49 :
        break

    cv2.imshow('face', img)

video.release()
cv2.destroyAllWindows()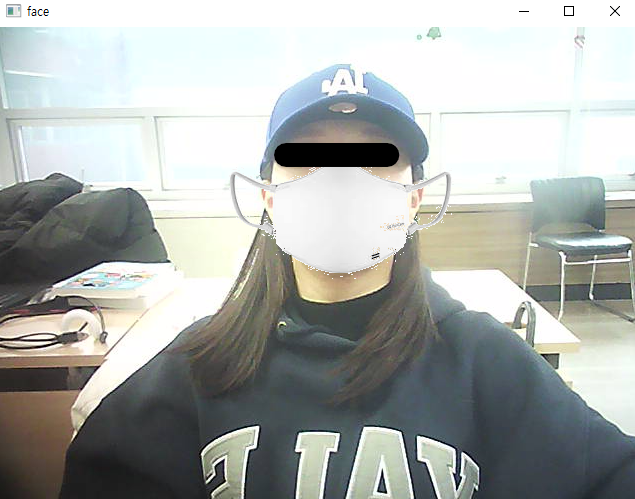
- 미간의 점으로 선글라스 씌우기
# 코의 위치 확인하기
import cv2
import mediapipe as mp

# 얼굴에서 특징점 찾기 관련 기능
mp_face = mp.solutions.face_mesh
# 특징점 찾기 세부 기능
face = mp_face.FaceMesh(
    min_detection_confidence = 0.5, # 얼굴 표현할 최소 정확도
    min_tracking_confidence = 0.5 # 특징점 표현할 최소 정확도
)
# 특징점 표현 기능
mp_drawing = mp.solutions.drawing_utils

# 한 번만 실행하면 되는 코드
spider = cv2.imread('./data/sunglass.jpg') # 225, 150 → 180, 120
spider = cv2.resize(spider, (180, 120))

mask2gray = cv2.cvtColor(spider, cv2.COLOR_RGB2GRAY)
_, mask_b = cv2.threshold(mask2gray, 200, 255, cv2.THRESH_BINARY)
mask_b_inv = cv2.bitwise_not(mask_b)
img_fg = cv2.bitwise_and(spider, spider, mask = mask_b_inv)

video = cv2.VideoCapture(0)

while video.isOpened() :
    ret, img = video.read()

    img = cv2.cvtColor(img, cv2.COLOR_BGR2RGB)
    img = cv2.flip(img, 1)

    # 얼굴에서 특징점 검출하기
    face_result = face.process(img)
    img = cv2.cvtColor(img, cv2.COLOR_RGB2BGR)

    if not ret :
        break

    if face_result.multi_face_landmarks is not None :
        for res in face_result.multi_face_landmarks :
            # 0번이 입의 점
            eye = face_result.multi_face_landmarks[0].landmark[6]
            x_eye = int(eye.x * img.shape[1])
            y_eye = int(eye.y * img.shape[0])
            # cv2.circle(img, (x_nose, y_nose), 20, (0, 0, 255), cv2.FILLED)
            # 프레임마다 실행하는 코드
            try :
                roi = img[y_eye - 60:y_eye + 60, x_eye - 90:x_eye + 90] # 어디 위치에 표현할건지
                img_bg = cv2.bitwise_and(roi, roi, mask=mask_b)
                bg_fg = cv2.add(img_bg, img_fg)
                img[y_eye - 60:y_eye + 60, x_eye - 90:x_eye + 90] = bg_fg # 어디 위치에 표현할건지
            except :
                pass

    k = cv2.waitKey(30)
    if k == 49 :
        break

    cv2.imshow('face', img)

video.release()
cv2.destroyAllWindows()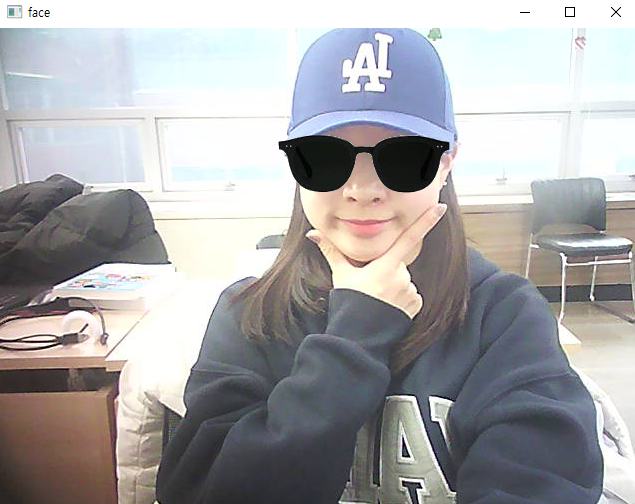
- 캡쳐, 녹화, 녹화종료
# 코의 위치 확인하기
import cv2
import mediapipe as mp
# 얼굴에서 특징점 찾기 관련 기능
mp_face = mp.solutions.face_mesh
# 특징점 찾기 세부 기능
face = mp_face.FaceMesh(
min_detection_confidence = 0.5, # 얼굴 표현할 최소 정도
min_tracking_confidence = 0.5 # 특징점 표현할 최소 정확도
)
# 특징점 표현 기능
mp_drawing = mp.solutions.drawing_utils
# 한 번만 실행하면 되는 코드
spider = cv2.imread('./data/sunglass.jpg') # 225, 150 → 180, 120
spider = cv2.resize(spider, (180, 120))
mask2gray = cv2.cvtColor(spider, cv2.COLOR_RGB2GRAY)
_, mask_b = cv2.threshold(mask2gray, 200, 255, cv2.THRESH_BINARY)
mask_b_inv = cv2.bitwise_not(mask_b)
img_fg = cv2.bitwise_and(spider, spider, mask = mask_b_inv)
video = cv2.VideoCapture(0)
cnt = 0
fps = 30
fcc = cv2.VideoWriter_fourcc(*'DIVX')
width = int(video.get(3))
height = int(video.get(4))
record = False
while video.isOpened() :
ret, img = video.read()
img = cv2.cvtColor(img, cv2.COLOR_BGR2RGB)
img = cv2.flip(img, 1)
# 얼굴에서 특징점 검출하기
face_result = face.process(img)
img = cv2.cvtColor(img, cv2.COLOR_RGB2BGR)
if not ret :
break
if face_result.multi_face_landmarks is not None :
for res in face_result.multi_face_landmarks :
# 0번이 입의 점
eye = face_result.multi_face_landmarks[0].landmark[6]
x_eye = int(eye.x * img.shape[1])
y_eye = int(eye.y * img.shape[0])
# cv2.circle(img, (x_nose, y_nose), 20, (0, 0, 255), cv2.FILLED)
# 프레임마다 실행하는 코드
try :
roi = img[y_eye - 60:y_eye + 60, x_eye - 90:x_eye + 90] # 어디 위치에 표현할건지
img_bg = cv2.bitwise_and(roi, roi, mask=mask_b)
bg_fg = cv2.add(img_bg, img_fg)
img[y_eye - 60:y_eye + 60, x_eye - 90:x_eye + 90] = bg_fg # 어디 위치에 표현할건지
except :
pass
k = cv2.waitKey(30)
if k == 49 :
break
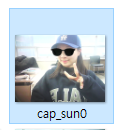
elif k == 50 : # 캡쳐
cv2.imwrite(f'./data/cap_sun{cnt}.png', img, params=[cv2.IMWRITE_PNG_COMPRESSION, 0])
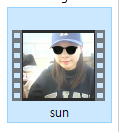
elif k == 51 : # 녹화 시작
out = cv2.VideoWriter('./data/sun.avi', fcc, fps, (width, height))
record = True
elif k == 52 : # 녹화 종료
record = False
out.release()
# 동영상 객체에 사진 저장
if record :
out.write(img)
cv2.imshow('face', img)
video.release()
cv2.destroyAllWindows()-캡쳐
-녹화

노는게 제일 좋아~!