Tiptap
Tiptap is a headless editor framework with an open source core.
Javascript Rich Text Editor로 쉽게 에디터를 사용할 수 있다.
사용
친절하게 공식 문서에서 Next.js에서 사용법이 설명되어 있다.
https://tiptap.dev/docs/editor/getting-started/install/nextjs
npm install @tiptap/react @tiptap/pm @tiptap/starter-kit
'use client'

import { useEditor, EditorContent } from '@tiptap/react'
import StarterKit from '@tiptap/starter-kit'

const Tiptap = () => {
  const editor = useEditor({
    extensions: [StarterKit],
    content: '<p>Hello World! 🌎️</p>',
  })

  return <EditorContent editor={editor} />
}

export default Tiptap
extensions : 에디터의 기능들을 쉽게 커스텀 할 수 있다.
content : 처음에 에디터에 표시되는 placeholder와 같은 기능을 한다.
많은 extension이 존재하고, 커스텀도 할 수 있다.
https://tiptap.dev/docs/editor/extensions/overview
Tiptap 커스텀
Editor를 예쁘게 사용하기 위해서는 상단의 ToolBar 컴포넌트를 만들어야 한다. ToolBar에는 Bold, Italic 등 여러 기능들을 사용할 수 있는 버튼을 등록하고 글 등록도 추가했다.
// ToolBar.tsx
import type { Editor } from "@tiptap/react";

import {
  Bold,
  Strikethrough,
  Italic,
  List,
  ListOrdered,
  Heading1,
  Heading2,
  Heading3,
  Underline,
  Undo,
  Redo,
} from "lucide-react";

type ToolBarProps = {
  editor: Editor <| null;
  content: string;
};

export default function ToolBar({ editor, content }: ToolBarProps) {
  if (!editor) {
    return null;
  }
  return (
    <div className="px-4 py-3 rounded-tl-md rounded-tr-md flex justify-between items-start gap-5 w-full flex-wrap border border-gray-700">
      <div className="flex justify-start items-center gap-5 w-full lg:w-10/12 flex-wrap ">
        <button
          onClick={(e) => {
            e.preventDefault();
            editor.chain().focus().toggleBold().run();
          }}
          className={
            editor.isActive("bold")
              ? "bg-sky-700 text-white p-2 rounded-lg"
              : "text-sky-400"
          }
        >
          <Bold className="w-5 h-5" />
        </button>
        <button
          onClick={(e) => {
            e.preventDefault();
            editor.chain().focus().toggleItalic().run();
          }}
          className={
            editor.isActive("italic")
              ? "bg-sky-700 text-white p-2 rounded-lg"
              : "text-sky-400"
          }
        >
          <Italic className="w-5 h-5" />
        </button>
        <button
          onClick={(e) => {
            e.preventDefault();
            editor.chain().focus().toggleUnderline().run();
          }}
          className={
            editor.isActive("underline")
              ? "bg-sky-700 text-white p-2 rounded-lg"
              : "text-sky-400"
          }
        >
          <Underline className="w-5 h-5" />
        </button>
        <button
          onClick={(e) => {
            e.preventDefault();
            editor.chain().focus().toggleStrike().run();
          }}
          className={
            editor.isActive("strike")
              ? "bg-sky-700 text-white p-2 rounded-lg"
              : "text-sky-400"
          }
        >
          <Strikethrough className="w-5 h-5" />
        </button>
        <button
          onClick={(e) => {
            e.preventDefault();
            editor.chain().focus().toggleHeading({ level: 1 }).run();
          }}
          className={
            editor.isActive("heading", { level: 1 })
              ? "bg-sky-700 text-white p-2 rounded-lg"
              : "text-sky-400"
          }
        >
          <Heading1 className="w-5 h-5" />
        </button>
        <button
          onClick={(e) => {
            e.preventDefault();
            editor.chain().focus().toggleHeading({ level: 2 }).run();
          }}
          className={
            editor.isActive("heading", { level: 2 })
              ? "bg-sky-700 text-white p-2 rounded-lg"
              : "text-sky-400"
          }
        >
          <Heading2 className="w-5 h-5" />
        </button>
        <button
          onClick={(e) => {
            e.preventDefault();
            editor.chain().focus().toggleHeading({ level: 3 }).run();
          }}
          className={
            editor.isActive("heading", { level: 3 })
              ? "bg-sky-700 text-white p-2 rounded-lg"
              : "text-sky-400"
          }
        >
          <Heading3 className="w-5 h-5" />
        </button>

        <button
          onClick={(e) => {
            e.preventDefault();
            editor.chain().focus().toggleBulletList().run();
          }}
          className={
            editor.isActive("bulletList")
              ? "bg-sky-700 text-white p-2 rounded-lg"
              : "text-sky-400"
          }
        >
          <List className="w-5 h-5" />
        </button>
        <button
          onClick={(e) => {
            e.preventDefault();
            editor.chain().focus().toggleOrderedList().run();
          }}
          className={
            editor.isActive("orderedList")
              ? "bg-sky-700 text-white p-2 rounded-lg"
              : "text-sky-400"
          }
        >
          <ListOrdered className="w-5 h-5" />
        </button>
        <button
          onClick={(e) => {
            e.preventDefault();
            editor.chain().focus().undo().run();
          }}
          className={
            editor.isActive("undo")
              ? "bg-sky-700 text-white p-2 rounded-lg"
              : "text-sky-400 hover:bg-sky-700 hover:text-white p-1 hover:rounded-lg"
          }
        >
          <Undo className="w-5 h-5" />
        </button>
        <button
          onClick={(e) => {
            e.preventDefault();
            editor.chain().focus().redo().run();
          }}
          className={
            editor.isActive("redo")
              ? "bg-sky-700 text-white p-2 rounded-lg"
              : "text-sky-400 hover:bg-sky-700 hover:text-white p-1 hover:rounded-lg"
          }
        >
          <Redo className="w-5 h-5" />
        </button>
      </div>

      <button
        type="submit"
        disabled={content ? false : true}
        className={
          content
            ? `px-4 bg-sky-700 text-white py-2 rounded-md`
            : "px-4 bg-sky-500 text-white py-2 rounded-md opacity-15"
        }
      >
        Add
      </button>
    </div>
  );
}
lucide-react를 이용하여 아이콘을 예쁘게 꾸며보았다.
props로 받은 editor를 사용해서 입력한 값에 대해 특정 기능들을 수행한다.
// Tiptap.tsx
"use client";

import { useEditor, EditorContent } from "@tiptap/react";
import StarterKit from "@tiptap/starter-kit";
import ToolBar from "@/components/Post/ToolBar";
import Underline from "@tiptap/extension-underline";

const Tiptap = ({
  onChange,
  content,
}: {
  onChange: (newContent: string) => void;
  content: string;
}) => {
  const changeHandler = (newContent: string) => {
    onChange(newContent);
  };
  const editor = useEditor({
    extensions: [
      StarterKit.configure({
        heading: {
          levels: [1, 2, 3],
        },
      }),
      Underline,
    ],
    editorProps: {
      attributes: {
        class:
          "flex flex-col px-4 py-3 justify-start border-b border-r border-l border-gray-700 text-black items-start w-full gap-3 font-medium text-[20px] pt-4 rounded-bl-md rounded-br-md outline-none",
      },
    },
    onUpdate: ({ editor }) => {
      changeHandler(editor.getHTML());
    },
    immediatelyRender: false,
  });

  return (
    <div className="w-full px-4 border-black border-4 p-4">
      <ToolBar editor={editor} content={content} />
      <EditorContent editor={editor} style={{ whiteSpace: "pre-line" }} />
    </div>
  );
};

export default Tiptap;

//////////////////////////////////////////////

// NewPostForm.tsx
const [content, setContent] = useState<string>("");
...
  <Tiptap
        content={content}
        onChange={(newContent: string) => contentChangeHandler(newContent)}
  />
...
NewPostForm 컴포넌트에서 Tiptap 컴포넌트를 이용하고 Tiptap에서 editor와 toolbar를 사용해서 이용할 수 있다.
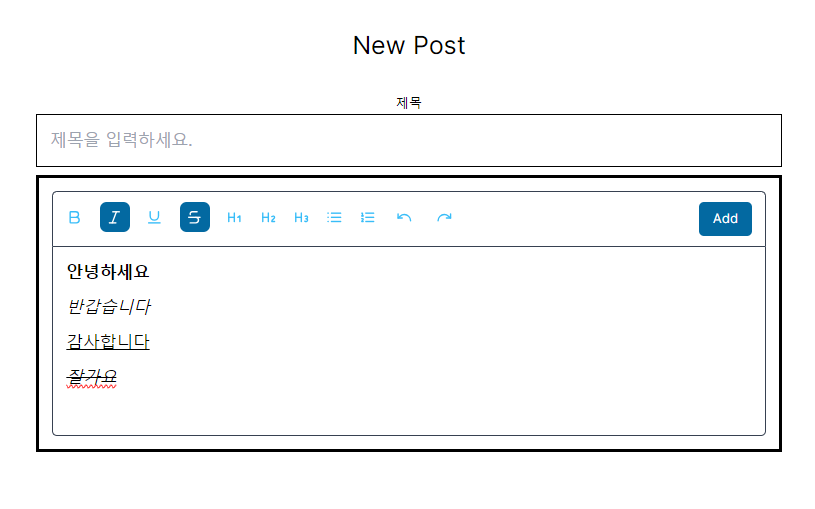
공식 문서를 살펴보면 더 다양하게 에디터를 내가 원하는 대로 작성할 수 있다. 아래는 위 코드의 실행 결과이다.
저장한 데이터 불러오기
post에 글에 대한 정보가 저장되어 있다. html 코드를 화면 상에 표시하기 위해서는 아래와 같이 작성하면 된다.
<div dangerouslySetInnerHTML={{ __html: post.content }} />하지만 이는 XSS 공격에 취약할 수 있다. 따라서 게시물 내용을 렌더링 할 때 안전하게 처리하는 dompurify를 사용했다.
npm install dompurify @types/dompurify
https://velog.io/@brgndy/Next.js-DOMPurify%EB%A1%9C-XSS-%EA%B3%B5%EA%B2%A9-%EB%A7%89%EA%B8%B0
import DOMPurify from "dompurify";
import { JSDOM } from "jsdom";
...
const sanitizeContent = DOMPurify.sanitize(post.content);
...
<div dangerouslySetInnerHTML={{ __html: sanitizeHtml(post.content) }} />
Tiptap 사용 도중 문제
렌더링 문제
Tiptap 커스텀을 진행하던 도중 이런 에러가 발생했다.
Tiptap Error: SSR has been detected, please set immediatelyRender explicitly to false to avoid hydration mismatches.
Tiptap은 클라이언트 사이드에서만 렌더링 되어야 하기 때문에 서버 사이드 렌더링을 false를 한다.
-> useEditor에 immediatelyRender: false를 추가하면 해결할 수 있다.
Header, List 적용 안됨
toolbar의 header와 list가 적용이 되지 않았다. 그래서 찾아보니 tailwind를 사용 중이라 적용이 안된다고 했다. 이를 해결하기 위해서는 tailwind typography를 install 해주어야 했다.
https://github.com/tailwindlabs/tailwindcss-typography
설치 후 tailwind.config.js에 플러그인을 넣어주고 theme에 extend를 추가해서 사용해주면 된다.
// tailwind.config.js

/** @type {import('tailwindcss').Config} */
module.exports = {
  content: [
    "./app/**/*.{js,ts,jsx,tsx,mdx}",
    "./pages/**/*.{js,ts,jsx,tsx,mdx}",
    "./components/**/*.{js,ts,jsx,tsx,mdx}",

    // Or if using `src` directory:
    "./src/**/*.{js,ts,jsx,tsx,mdx}",
  ],
  theme: {
    extend: {
      fontSize: {
        custom: "20px",
      },
      maxWidth: {
        full: "100%",
      },
      height: {
        default: "300px",
      },
      borderRadius: {
        lg: "10px",
      },
      colors: {
        gray: {
          border: "#cccccc",
        },
      },
    },
  },
  plugins: [require("@tailwindcss/typography")],
};
그리고 editor를 수정해준다.
// Tiptap.tsx
editorProps: {
      attributes: {
        // class:
        //   "flex flex-col px-4 py-3 justify-start border-b border-r border-l border-gray-700 text-black items-start w-full gap-3 font-medium text-[20px] pt-4 rounded-bl-md rounded-br-md outline-none",
        class:
          "prose  max-w-full min-h-[300px] text-left px-4 mt-4 border border-gray-border rounded-lg",
      },
    },
여기까지 끝내니까 또 다른 문제가 발생했다. edtior 내에서 글을 작성하니 각 태그마다 margin-bottom이 20px로 고정되어 줄 간격이 크게 되어 있었다. 이를 해결하기 위해서 css를 수정해주었다.
@layer components {
  .prose p, .prose h1, .prose h2, .prose h3, .prose ul, .prose ol {
    margin: 0;
    padding: 0;
  }
}
원하는 대로 더 꾸밀수도 있다.
참고 자료
https://www.youtube.com/watch?v=LiELuVk12ig&t=1482s&ab_channel=SolveItOut
https://stackoverflow.com/questions/78057571/why-isnt-the-headings-and-lists-working-in-tiptap