📁LIST
- NestJS 시작
- NestJS + GraphQL
- NestJS + Mysql DB 연결
- ERD 정규화
👉 NestJS 시작하기
NestJS Documentation : https://nestjs.com/
✔ 설치 & 프로젝트 생성
$ npm i -g @nestjs/cli
($ nest -version)
$ nest new project-name
(which package manager would you ❤ to use? -> yarn)
✔ 폴더 구조
- package.json : 프로젝트 전체 설명서
- script : 명령어를 쉽게 실행 가능하게 하는 단축 명령어
- dependencies & devDependencies : node 라이브러 설치 목록
- jest : 테스트 관련
- node_modules : node 라이브러리 실제 설치 위치
- test & .spec.ts : test 관련
- eslintrc.js & prettierrc : 코드 규격화/정형화 설정
- tsconfig : 타입스크립 관련 설정

👉 NestJS + GraphQL + TypeScript
✔ 방법
Nest는 GraphQl application 빌드하는데 2가지 방법을 제공
-
Code First(코드우선)
autoSchemaFile : 자동 생성될 스키마가 저장될 경로//@module - import GraphQLModule.forRoot({ autoSchemaFile: 'src/common/graphql/schema.gql', }), -
Schema First(스키마 우선)
프로그래밍 언어와 독립적이지만 통합되는 언어, GraphQL SDL(schema definision language)
.graphql 파일에 스키마 직접 작성GraphQLModule.forRoot({ typePaths: ['./**/*.graphql'], }),
✔ 스텝
$ yarn add @nestjs/graphql graphql apollo-server-express
$ nest g module board
$ nest g service board
$ nest g resolver board
$ yarn start dev
http://localhost:3000/graphql 로 확인
✔ 폴더 구조 참고
NestJS Github : https://github.com/nestjs/nest
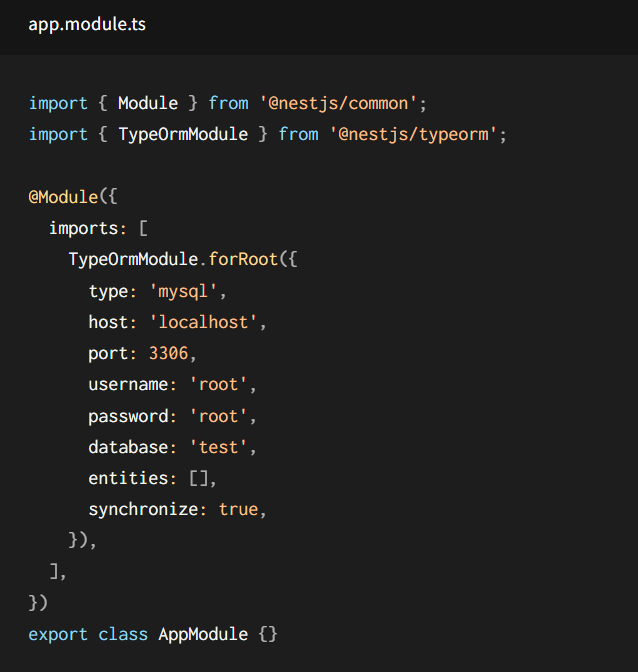
👉 NestJS Mysql 연결
✔ 설치
$ npm install --save @nestjs/typeorm typeorm mysql2
✔ 폴더(파일) 구조 & 생성
**.entity.ts 파일 생성 후 DB에 저장될 엔티티(테이블)의 각 필드 타입을 key: value 형태로 지정
✔ 설정
👉 ERD
✔ 단계별 정규화
1. 비정규화
처음에는 모든 데이터가 하나의 테이블에 다 담겨있는 상태
- 중복되는 데이터가 많음
- 연관성이 없는 데이터가 같이 묶여 있음
- 데이터 수정, 삭제, 추가, 검색에 효율성이 떨어짐
- 정규화 과정을 거쳐 중복되는 데이터를 없애고 연관성이 높은 컬럼끼리 묶기
- 제 1 정규화
- 제 2 정규화
- 제 3 정규화
✔ ERDCloud
https://www.erdcloud.com/
✔참고링크
https://www.youtube.com/watch?v=Zshhj0yEenw
https://www.opentutorials.org/course/3883/25259
