
들어가며
안녕하세요! 브라우저 작동방식 탐구 2탄입니다!
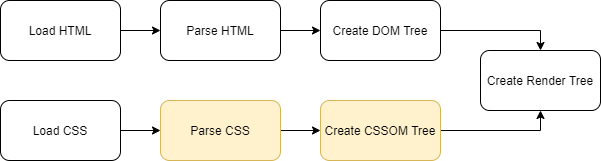
지난 시간엔 HTML 문서를 파싱하고 간단한 버전의 DOM Tree를 만들어보았습니다. 이번 시간에는 CSS(Cascading Style Sheets) 파일을 파싱하고 CSSOM(Cascading Style Sheets Object Model) Tree를 만들어볼 겁니다. DOM Tree와 CSSOM Tree는 Render Tree를 만드는 데 사용됩니다.
DOM이 컨텐츠들의 위계 관계, 전체적인 구조를 나타내는 자료 구조라면 CSSOM은 그러한 컨텐츠들이 브라우저에 어떻게 보일 지 나타냅니다.
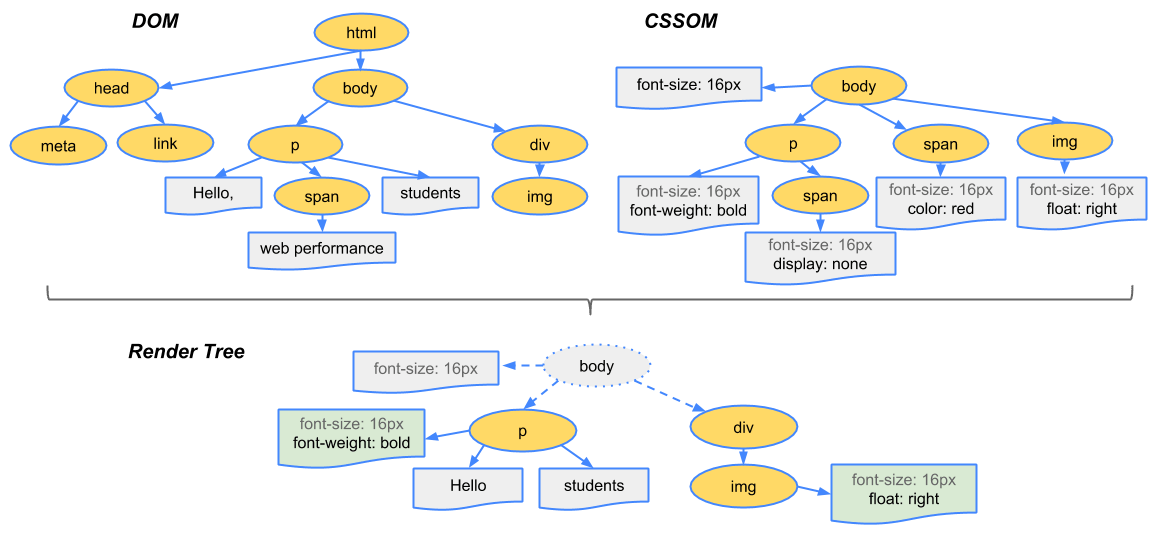
Render Tree는 최종적으로 어떤 컨텐츠들을 브라우저에 그릴지 나타내는 자료 구조입니다. 예를 들어, html, head와 같은 메타 노드들은 실제로 브라우저에 표시되는 것이 아니므로 Render tree에서 제외되었습니다. 또한 display: none 와 같은 CSS 문법에 따라 감춰진 노드들도 제외되었습니다.
이제 CSS 파서를 만들어봅시다. 이번에 만들어 볼 CSS 파서 또한 마찬가지로 간단하게 구현한 것입니다. 예를 들어 수치를 나타내는 단위(unit)를 px 만 지원합니다. 이를 감안해주세요. 그리고 사용되는 메소드들이 HTML 파서와 겹치는 게 많으므로(특히, consume 류 메소드) 지난 HTML 파서 글도 참고하시면 좋습니다.
작업 내용은 저장소에서 확인해보실 수 있습니다. 코드는 TypeScript로 작성하였습니다.
우리는 다음과 같은 CSS 파일을 파싱할 것입니다.
// 파싱할 예시 css

h1, h2, h3 { margin: auto; color: #cc0000; }
div.note { margin-bottom: 20px; padding: 10px; }
#answer { display: none; }
// main.ts
import CssParser from "./CssParser";
const css = `h1, h2, h3 { margin: auto; color: #cc0000; } div.note { margin-bottom: 20px; padding: 10px; } #answer { display: none; }`;
const cssParser = new CssParser(css, 0);
파싱에 성공하면 이러한 결과를 얻게 됩니다. 이러한 결과물이 CSS 에 대한 좀 더 자세한 내용을 담게 된다면 CSSOM의 역할을 하게되겠죠!
// StyleSheet 객체
"rules": [
    {
      "selectors": [
        {
          "tagNames": [
            "h1",
            "h2",
            "h3"
          ],
          "ids": [],
          "classes": [],
          "specificity": 3
        }
      ],
      "declarations": [
        {
          "name": "margin",
          "value": "auto"
        },
        {
          "name": "color",
          "value": {
            "r": 204,
            "g": 0,
            "b": 0,
            "a": 255
          }
        }
      ]
    },
    {
      "selectors": [
        {
          "tagNames": [
            "div"
          ],
          "ids": [],
          "classes": [
            "note"
          ],
          "specificity": 11
        }
      ],
      "declarations": [
        {
          "name": "margin-bottom",
          "value": "20px"
        },
        {
          "name": "padding",
          "value": "10px"
        }
      ]
    },
    {
      "selectors": [
        {
          "tagNames": [],
          "ids": [
            "answer"
          ],
          "classes": [],
          "specificity": 100
        }
      ],
      "declarations": [
        {
          "name": "display",
          "value": "none"
        }
      ]
    }
  ]
}
자료 구조 구현
StyleSheet 객체가 rules 를 갖고 있고 하나의 rule은 selectors와 declarations를 갖고있는 구조입니다. 파싱하면서 이러한 아래 인터페이스를 따르는 객체들을 생성하게 됩니다. 이들이 CSSOM Tree를 구성하는 재료가 됩니다.
// CssParser.ts

// CSS 파일 전체를 담는 StyleSheet 객체
interface StyleSheet {
  rules: Array<Rule>;
}

// h1, h2, h3 { margin: auto; color: #cc0000; } 과 같은 하나의 Rule을 나타내는 객체
interface Rule {
  selectors: Array<Selector>;
  declarations: Array<Declaraction>;
}

// h1 과 같은 선택자. 태그 이름과 아이디, 클래스를 가질 수 있음
// 예를 들어 div.note 라면 tagNames은 div를, classes엔 note를 포함
// specificity는 후술할 CSS 명시도를 말함
interface Selector {
  tagNames: Array<string>;
  ids: Array<string>;
  classes: Array<string>;
  specificity: number;
}

// margin: auto; 과 같은 선언
// 예를 들어 margin이 name, auto가 value
interface Declaraction {
  name: string;
  value: Value;
}

// Value는 string, number, color가 될 수 있음
type Value = string | number | Color;

// Color 는 3원 색 숫자 값을 받음
interface Color {
  r: number;
  g: number;
  b: number;
  a: number;
}
파서 구현
CssParser 클래스를 선언해줍시다. 이 클래스는 파싱의 대상이 되는 문자열인 input과 현재 파싱이 input 문자열의 어느 인덱스에 위치해 있는지 저장하는 position을 멤버변수로 가집니다.
parse 메소드를 시작으로 Rule 의 영역별로 깊이를 더해가며 parse 류 메소드를 호출해가는 형태를 취하고 있습니다.
// CssParser.ts

export default class CssParser {
  input: string;
  position: number;

  constructor(input: string, position: number) {
    this.input = input;
    this.position = position;
  }

  // 전체 파싱을 시작하는 메소드. rules들을 파싱하고 반환
  parse(): StyleSheet {
    const rules = this.parseRules();

    return { rules };
  }

  // rules 파싱을 시작하는 메소드. 단일 rule을 반복적으로 파싱하고 배열에 담아 반환
  parseRules(): Array<Rule> {
    let rules = [];

    while (true) {
      // 공백을 소비해줌. 이 메소드가 궁금하다면 HTML 파서를 참고!
      this.consumeWhitespace();

      // 파싱하다가 모든 문자를 소비하면 종료
      if (this.isEndOfInput()) break;

      rules.push(this.parseRule());
    }

    return rules;
  }

  // 단일 rule을 파싱하는 메소드. rule를 구성하는 selectors와 declarations를 파싱하고
  // rule를 반환
  parseRule(): Rule {
    return {
      selectors: this.parseSelectors(),
      declarations: this.parseDeclarations(),
    };
  }
}
아래는 선택자(selector)들을 파싱하는 메소드들입니다. id, class, tagName 들을 파싱해서 배열에 추가하고 이에 따라 후술할 명시도(specificity)를 구합니다.
// 선택자들을 파싱하는 메소드. 내부적으로 parseSelector 메소드를 호출하여
// 그 결과값을 selectors 배열에 담고 이를 반환한다.
parseSelectors(): Array<Selector> {
  const selectors = [];

  while (true) {
    selectors.push(this.parseSelector());
    this.consumeWhitespace();

    const character = this.getCharacter();

    if (character === "{") break;
    else if (character === ",") {
      this.consumeCharacter();
      this.consumeWhitespace();
    } else assert(false, `Unexpected Character ${character}`);
  }

  return selectors;
}

// 선택자를 파싱하는 메소드. 태그 이름, 아이디, 클래스들 파싱하여
// tagNames, ids, classes 배열에 추가
// 이를 토대로 후술할 명시도를 구함
parseSelector(): Selector {
   const selector = { tagNames: [], ids: [], classes: [], specificity: 0 };

   while (!this.isEndOfInput()) {
     const character = this.getCharacter();

     if (character === "#") {
       this.consumeCharacter();
       selector.ids.push(this.parseIdentifier());
     } else if (character === ".") {
       this.consumeCharacter();
       selector.classes.push(this.parseIdentifier());
     } else if (character === "*") this.consumeCharacter();
     else if (isValidIdentifierChar(character))
       selector.tagNames.push(this.parseIdentifier());
     else if (character === "{") break;
     else this.consumeCharacter();
   }

   // 우선순위
   // 1. 아이디 2. 클래스 3. 태그 이름
   selector.specificity =
     selector.ids.length * 100 +
     selector.classes.length * 10 +
     selector.tagNames.length;

   return selector;
}

// CSS 문법에서 사용할 수 있는 문자라면 파싱하는 메소드
parseIdentifier(): string {
  return this.consumeWhile(isValidIdentifierChar);
}
아래는 key와 value로 이루어진 선언(declaration)들을 파싱하는 메소드들입니다.
// key와 value로 이루어진 선언들을 파싱하는 메소드
// 내부적으로 parseDeclaration를 호출하여 그 결과값을 declarations에 추가
parseDeclarations(): Array<Declaraction> {
  assert(
    this.consumeCharacter() === "{",
    "Declarations start with { character"
  );

  const declarations = [];

  while (true) {
    this.consumeWhitespace();

    if (this.getCharacter() === "}") {
      this.consumeCharacter();
      break;
    }

    declarations.push(this.parseDeclaration());
  }

  return declarations;
}

// 선언을 파싱하는 메소드
// name과 value를 파싱하고 이를 담은 객체를 반환한다.
parseDeclaration(): Declaraction {
  const name = this.parseIdentifier();

  this.consumeWhitespace();
  assert(
    this.consumeCharacter() === ":",
    'There is no ":" character between property and value'
  );
  this.consumeWhitespace();

  const value = this.parseValue();

  this.consumeWhitespace();
  assert(
    this.consumeCharacter() === ";",
    'There is no ";" character at end of declaration'
  );

  return {
    name,
    value,
  };
}

// 선언 중 value를 파싱하는 메소드
// 숫자, 문자열을 지원하며 색을 위한 rgba 값 또한 지원
parseValue(): Value {
  const character = this.getCharacter();

  if (numberCharacters.indexOf(character) !== -1)
    return this.parseNumberValue();
  else if (character === "#") return this.parseColor();
  else return this.parseIdentifier();
}

// 숫자 value 값을 파싱하는 메소드
parseNumberValue(): Value {
  return `${this.parseNumber()}${this.parseUnit()}`;
}

// 숫자 value 값의 단위를 파싱하는 메소드
// px만 지원
parseUnit(): string {
  const unit = this.parseIdentifier();

  if (unit === "px") return unit;

  assert(false, "Unrecognized unit!");
}

// 색을 위한 rgba 값을 파싱하는 메소드
parseColor(): Color {
  this.consumeCharacter();

  return {
    r: this.parseHexPairToDecimal(),
    g: this.parseHexPairToDecimal(),
    b: this.parseHexPairToDecimal(),
    a: 255,
  };
}

// 숫자 value 를 파싱하는 메소드
parseNumber(): number {
  return Number(
    this.consumeWhile(function (character) {
      return numberCharacters.indexOf(character) !== -1;
    })
  );
}

// rgba를 구성하는 16진수 값을 10진수 값으로 바꾸는 메소드
parseHexPairToDecimal(): number {
  const hexPair = this.input.slice(this.position, this.position + 2);
  this.position += 2;

  return parseInt(hexPair, 16);
}
CSS 명시도란?
앞선 코드에서 명시도(specificity)를 구하고 있습니다. 명시도란 같은 요소가 여러 선언의 대상이 될 경우, 어떤 선언의 CSS 속성(Property)를 우선 적용할지 결정하는데 사용하는 수치입니다.
MDN CSS 명시도 문서와 W3C 문서의 specificity 에서는 명시도에 영향을 주는 요소들을 크게 5가지로 설명하고 있습니다.
-
!important 선언
-
인라인(inline) 선언
-
유형 선택자(type selector, 예를 들어 h1 등)
-
클래스 선택자(class selector, 예를 들어 .example 등)
-
ID 선택자(ID selector, 예를 들어 #example 등)
이들이 같은 가중치(weight)를 갖고있는 것은 아니며 가중치의 순위는 !important 선언 > 인라인 선언 > 유형 선택자 > 클래스 선택자 > ID 선택자인 것으로 알려져 있습니다.
현재 구현에선 유형 선택자, 클래스 선택자, ID 선택자만 지원하고 있으며 가중치에 따라 10의 제곱수를 곱하여 명시도에 차이를 주고 있습니다.
마치며
이번엔 CSS 파서를 직접 만들어보았습니다. 실제 브라우저에선 파싱을 통해 CSSOM Tree을 만들고 이를 DOM Tree와 비교하여 Render Tree를 만들게 됩니다. 그리고 이후 트리 내 노드들을 요소로서 브라우저에 배치하는 레이아웃(layout) 과정을 거치게 됩니다. 다음 글은 이 레이아웃을 다루게 될 것 같습니다.
궁금하신 점, 피드백, 기타 의견이 있다면 댓글로 남겨주세요! 댓글은 작성자에게 힘이 됩니다.
감사합니다!
참고문헌
https://d2.naver.com/helloworld/59361
https://www.w3.org/TR/selectors/#specificity
https://developer.mozilla.org/ko/docs/Web/CSS/Specificity
https://limpet.net/mbrubeck/2014/08/13/toy-layout-engine-3-css.html