
들어가며
프론트엔드 개발자들은 많은 코드를 브라우저에서 실행하고 있습니다. 성능에 영향을 주는 요소들이 많겠지만 브라우저에선 컨텐츠를 렌더링하는 코드들을 어떻게 작성하느냐에 따라 성능이 좌지우지됩니다. 그러므로 컨텐츠를 렌더링하는 렌더링 엔진의 작동방식을 고려하며 개발할 필요가 있습니다.
렌더링 엔진 작동방식을 간단히 살펴봅시다!
.png)
브라우저는 네트워크 통신으로 HTML 문서를 받아옵니다. 그리고 파싱을 진행한 후 이를 바탕으로 DOM Tree를 만듭니다. DOM Tree는 이후 CSSOM Tree와 합쳐져 렌더트리(Render Tree)를 만들게 됩니다.
렌더 트리를 만든 이후 레이아웃(Layout)과 페인트(Paint)라는 추가 작업을 거치게 됩니다. 다만, 오늘은 이 모든 과정을 짚어보진 않을 것입니다. 렌더 트리를 만드는 과정 중 HTML을 파싱하는 부분만을 코드와 함께 다뤄볼 예정입니다.
작업 내용은 저장소에서 확인해보실 수 있습니다. 코드는 TypeScript로 작성하였습니다.
이번에 구현할 HTML 파서(Parser)는 예시를 파싱하는 정도의 간단한 구현체이므로 이하 3가지 문법만을 지원합니다. 참고해주세요.
- Balanced Tags :
<p>. . .</p> - Attributes with quotes :
id="main" - Text nodes:
<em>world</em>
우리는 다음과 같은 HTML 파일을 파싱할 것입니다.
<html>
  <body>
    <h1>Title</h1>
    <div id="main" class="test"><p>Hello<em>world</em>!</p></div>
  </body>
</html>
이 HTML은 사실 문자열이라는 것을 알고 계셨나요?
// main.ts

const html = "<html><body><h1>Title</h1><div id="main" class="test"><p>Hello<em>world</em>!</p></div></body></html>";
노드 구현
파싱의 결과물은 DOM Tree를 구성할 수 있는 노드들입니다. 파싱하다가 <html> 문자열을 만나면 <html> 노드로 바꿔줘야 합니다. 이를 위한 클래스를 만들어 줍시다.
// dom.ts

export class KarlNode {
  children: Array<KarlNode>;
  nodeType: Text | KarlElement;

  constructor({ children, nodeDetail}) {
    this.children = children;
    this.nodeDetail= nodeDetail;
  }
}
이 KarlNode 클래스는 멤버 변수로 children 과 nodeDetail이 있습니다. children 은 자신과 같은 KarlNode 의 인스턴스들을 저장합니다. 예를 들어 <html> 에 대응하는 KarlNode 인스턴스는 <body> 에 대응하는 KarlNode 를 인스턴스를 children 의 원소로 갖겠군요.
nodeDetail은 노드의 세부 사항을 나타냅니다. 그저 텍스트 노드라면 문자열이 들어갈 것이고 이외에는 KarlElement의 인스턴스를 갖게 됩니다. 이 인스턴스는 tagName 과 attributes 를 멤버 변수로 갖고 있습니다. <div id="main" class="test"> 와 같은 코드에서 div 는 tagName 에, id="main" , class="test" 는 attributes 에 포함되는 거죠.
// dom.ts

type Text = string;

export class KarlElement {
  tagName: string;
  attributes: object;

  constructor({ tagName, attributes }) {
    this.tagName = tagName;
    this.attributes = attributes;
  }

  getID() {
    return this.attributes["id"];
  }

  getClasses() {
    return this.attributes["class"];
  }
}
// 예로 들면..
karlNode {
children: [...],
nodeDetail: KarlElement { tagName: 'div', attributes: { id : 'main', class: 'test' } }
}파싱을 진행하면서 KarlNode 의 인스턴스들을 계속 생성해줘야 할 것입니다. 이를 위한 함수들도 만들어봅시다.
// text type의 노드를 만드는 메소드
export function createText(data: string): KarlNode {
  return new KarlNode({ children: [], nodeDetail: data });
}

// 이외 type의 노드들(Element)을 만드는 메소드
// 추가적으로 attrs(속성), children(자식노드)를 갖는다.
export function createElement(
  name: string,
  attrs: object,
  children: Array<KarlNode>
): KarlNode {
  return new KarlNode({
    children,
    nodeDetail: new KarlElement({ tagName: name, attributes: attrs }),
  });
}
파서 구현
이젠 파서를 만들어 볼 겁니다. 실제 코드 구현에 들어가기 전에, 알고리즘을 개괄적으로 파악해봅시다.
<html>
<body>
<h1>Title</h1>
<div id="main" class="test"><p>Hello<em>world</em>!</p></div>
</body>
</html>
// main.ts
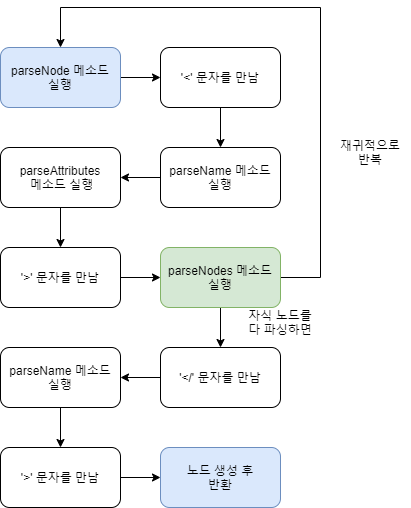
const html = "<html><body><h1>Title</h1><div id="main" class="test"><p>Hello<em>world</em>!</p></div></body></html>";단일 노드를 파싱하는 것을 기준으로 설명해보겠습니다. 파싱을 진행하면서 문자열의 문자(Character)를 차례차례 소비(Consume)하게 됩니다. 처음 < 문자를 만날 때 오프닝 태그(Opening Tag, 예를 들어 <html> ) 가 '태그 열림 상태' 가 됩니다. 이 상태에선 태그의 이름(Tag Name), 속성들(Attributes)를 파싱할 수 있게 됩니다. 이 상태는 계속 문자를 소비하며 진행하다가 > 문자를 만났을 때 해제됩니다.
이 다음 자식 노드들을 파싱하게 됩니다. 이 부분은 이후 설명하겠습니다.
이후, 연속된 문자 </ 를 만나면 클로징 태그(Closing Tag, 예를 들어 </html> ) 가 '태그 열림상태' 가 됩니다. 태그의 이름만 파싱할 수 있습니다. 이 상태는 > 문자를 만났을 때 해제되면서 노드(예를 들어, KarlNode클래스의 인스턴스)를 생성하게 됩니다.
자식 노드들을 파싱하는 과정을 언급했었는데요, 위의 과정을 재귀적으로 반복하게 됩니다. 예를 들어 <html> 을 지나서 <body> 를 만나더라도 위의 과정을 되풀이 하게 됩니다. <body> 의 이후의 <h1> 을 만나도 마찬가지입니다.

HTML parser 알고리즘 도식 - 단일노드 파싱 시
htmlParser 클래스를 선언해줍시다. 이 클래스는 파싱의 대상이 되는 문자열인 input과 현재 파싱이 input 문자열의 어느 인덱스에 위치해 있는지 저장하는 position을 멤버변수로 가집니다.
그리고 앞으로 필요한 메소드들의 기초 재료가 되는 메소드들을 선언해줍시다.
export default class HtmlParser {
	input: string;
  position: number;

  constructor(input: string, position: number) {
    this.input = input;
    this.position = position;
  }

  // 현재 position에 있는 문자를 반환하는 메소드
  getCharacter(): string {
    return this.input[this.position];
  }

  // 현재 position에서부터의 문자열들이 파라미터 문자열 str 로 시작하는지 판단하는 메소드
  isStartWith(str: string): boolean {
    const characterArray = Array.from(str);
    let currentPosition = this.position;

    return characterArray.every((character) => {
      return this.input[currentPosition++] === character;
    });
  }

  // 현재 position이 input의 끝을 가리키는지 판단하는 메소드
  isEndOfInput(): boolean {
    return this.position >= this.input.length;
  }
}
앞서 말한 것처럼, 파싱을 진행하면서 문자열(input)의 문자(Character)를 차례차례 소비(Consume)하게 됩니다. 문자열을 소비하는 메소드들을 만들어봅시다.
문자열을 순회하는 for 문을 완전 실행하지 않고 컨트롤(원할 때 순회 시작, 정지)하기 위하여 Generator Function 을 사용하고 있습니다. 자세한 내용은 MDN Generator 를 참고해주세요!
// ... in htmlParser class

// Generator Function
// Iterator 를 반환하며 이를 통해 흐름을 통제한다.
makeInputIterator = function* (input, start = 0): Generator {
  for (let i = start; i < input.length; i++) {
    yield [i, input[i]];
  }
};

// 문자를 소비하는 메소드. Iterator의 next()를 통해
// 현재 position의 문자를 얻고 반환한다.(소비한다)
consumeCharacter(): string {
  const inputIterator = this.makeInputIterator(this.input, this.position);
  const [currentPosition, currentCharacter] = inputIterator.next().value;
  this.position += 1;

  return currentCharacter;
}

// consumeCharacter를 반복적으로 실행하는 메소드
// test라는 판별 함수를 파라미터로 받는다.
// 현재 position이 input의 끝이 아니고, 판별 함수가 참을 반환하면 계속 문자를 소비한다.
// 마지막에 지금까지 소비된 문자열을 반환한다.
// 파싱 과정에서 주로 사용될 것이다.
consumeWhile(test: TestFunction): string {
  let result = "";

  while (!this.isEndOfInput() && test(this.getCharacter())) {
    result += this.consumeCharacter();
  }

  return result;
}

// 파싱 과정에서의 연속된 공백을 모두 소비하는 메소드
// 공백에 대한 판별 함수를 파라미터로 받는 consumeWhile를 실행한다.
consumeWhitespace(): void {
  this.consumeWhile(function (character: string): boolean {
    if (character === " ") return true;

    return false;
  });
}
이제 직접적으로 파싱을 실행하는 메소드들을 만들어봅시다. 앞서 선언한 Consume 류 함수들을 내부적으로 활용하게 될 것입니다. 그래야 파싱이 진행되니까요.
parse 메소드를 실행하면 최상위 노드의 자식 노드들을 찾기 위해 parseNodes 메소드를 사용합니다. parseNodes 메소드는 개개의 노드를 파싱하기 위해 parseNode 메소드를 사용합니다.
// ... in htmlParser class

// HTML input 파싱을 시작하는 entry 메소드
// parseNodes()로 HTML input 내 모든 노드(<html> 태그의 자식 노드)들을 파싱한다.
// 모든 노드를 자식으로 갖는 최상위 태그인 <html> 태그를 반환한다.
parse(): KarlNode {
  const nodes = this.parseNodes();

  if (nodes.length === 1) return nodes.pop();

  return createElement("html", {}, nodes);
}

// 자식 노드들을 파싱하는 메소드
// HTML input의 끝에 도달하거나 '</' 문자열(부모 태그가 닫힘을 의미)을 만나기 전까지
// parseNode()로 노드를 파싱하고 자식 노드에 추가한다.
parseNodes(): Array<KarlNode> {
  let nodes = [];

  while (true) {
    this.consumeWhitespace();

    if (this.isEndOfInput() || this.isStartWith("</")) break;

    nodes.push(this.parseNode());
  }

  return nodes;
}

// 단일 노드를 파싱하는 메소드
// '<' 문자열(태그가 열림을 의미)를 만난다면 Element, 그 외엔 Text 노드로 파싱한다.
parseNode(): KarlNode {
  if (this.getCharacter() === "<") return this.parseElement();

  return this.parseText();
}
parseNode 메소드로 단일 노드를 파싱할 때 노드의 타입을 결정하고 각기 다른 방식으로 파싱하게 됩니다. parseElement 메소드의 경우 태그의 이름, 속성, 자식 노드들을 추가로 파싱하여 **Element 노드를 만듭니다. `parseNodes로 자식 노드들을 파싱할 경우parseNode,parseElement` 순으로 함수를 호출하여 재귀적으로 반복됩니다. 이러한 반복은 더이상 파싱할 자식 노드가 존재하지 않는 경우 끝나게 됩니다.**
// ... in htmlParser class

// Element 노드를 만드는 메소드
// 태그의 이름, 속성, 자식 노드들을 파싱한다.
// 마지막에 Element 노드를 반환한다.
// assert 문(custom으로 만든 assert)으로 형식이 강요됩니다.
parseElement(): KarlNode {
  assert(this.consumeCharacter() === "<", "character is not <");

  const tagName = this.parseName();
  const attributes = this.parseAttributes();

  assert(this.consumeCharacter() === ">", "character is not >");

  const children = this.parseNodes();

  assert(this.consumeCharacter() === "<", "character is not <");
  assert(this.consumeCharacter() === "/", "character is not /");
  assert(
    this.parseName() === tagName,
    "There is no tag name in closing tag"
  );
  assert(this.consumeCharacter() === ">", "character is not >");

  return createElement(tagName, attributes, children);
}
아래는parseElement 메소드에서 사용된 태그의 이름과 속성을 파싱하는 메소드입니다. 이름과 다르게 속성의 경우 name="value" 구조를 취하고 있으므로 파싱 과정이 더 복잡합니다.
// ... in htmlParser class

// 태그의 이름을 파싱하는 메소드
// 현재 소비하는 문자가 numberCharacters, lowerAlphabet, upperAlphabet 내 요소에 해당하면
// 계속 소비하는 consumeWhile 메소드의 결과값을 반환한다. 즉 이름을 반환한다.
// numberCharacters 는 숫자 문자('1', '2' ...), lowerAlphabet는 알파벳 소문자('a', 'b' ...)
// upperAlphabet는 알파벳 대문자 ('A', 'B', ...) 를 요소로 갖는다.
parseName(): string {
  return this.consumeWhile(function (character: string): boolean {
    if (
      numberCharacters.indexOf(character) !== -1 ||
      lowerAlphabet.indexOf(character) !== -1 ||
      upperAlphabet.indexOf(character) !== -1
    )
      return true;

    return false;
  });
}

// 속성들을 파싱하는 메소드
// '>' 문자를 만날 때까지(태그의 닫힘을 의미)
// 단일 속성을 파싱하는 parseAttr 메소드를 계속 실행하여 엳은 name과 value를
// attributes 객체에 추가합니다. 그리고 마지막에 attributes 객체를 반환합니다.
parseAttributes() {
  let attributes = {};

  while (true) {
    this.consumeWhitespace();

    if (this.getCharacter() === ">") break;

    const { name, value } = this.parseAttr();
    attributes[name] = value;
  }

  return attributes;
}

// 단일 속성을 파싱하는 메소드
// name="value" 형식의 문자열을 파싱한다.
// assert 문으로 위의 형식이 강요됩니다.
// '='을 구분자로 삼아 name과 value를 파싱한다.
// name, value를 담은 객체를 반환한다.
parseAttr(): AttributeObject {
  const name = this.parseName();

  assert(
    this.consumeCharacter() === "=",
    "there is no '=' between attribute name and attribute value"
  );

  const value = this.parseAttrValue();

  return { name, value };
}

// 단일 속성의 value를 파싱하는 메소드
// assert문으로 "value" 형식이 강요됩니다.
parseAttrValue() {
  const quote = this.consumeCharacter();

  assert(quote === '"', "open quote error");

  const value = this.consumeWhile(function (character: string): boolean {
    if (character !== quote) return true;

    return false;
  });

  assert(this.consumeCharacter() === quote, "close quote error");

  return value;
}
parseText 메소드의 경우 < 문자를 만날 때 지금껏 소비한 문자열로 Text 노드를 만들고 반환합니다.
// ... in htmlParser class

// Text 노드를 만드는 메소드
// '<' 문자(새로운 태그가 시작됨을 의미)를 만날 때 지금껏 소비한 문자열로 Text 노드를 만들고 반환.
parseText(): KarlNode {
  return createText(
    this.consumeWhile(function (character: string): boolean {
      if (character !== "<") return true;

      return false;
    })
  );
}
지금까지 구현한 메소드들을 앞서 말한 알고리즘 도식에 적용하면 이러한 형태가 될 것입니다. 물론 많이 생략된 형태입니다.
이해에 조금 도움이 됐을까요?
열심히 구현한 HTML parser으로 HTML 문자열을 파싱하면 다음과 같은 결과를 얻을 수 있습니다!
이런 결과물이 HTML 문서에 대한 좀 더 자세한 내용을 담고 자바스크립트를 위한 Interface 를 제공하게 되면 DOM(Document Object Model)의 역할을 하게되겠죠!
// main.ts

const html = `<html><body><h1>Title</h1><div id="main" class="test"><p>Hello<em>world</em>!</p></div></body></html>`;

const htmlParser = new HtmlParser(html, 0);

// 파싱 결과

KarlNode: {
  "children": [
    {
      "children": [
        {
          "children": [
            {
              "children": [],
              "nodeDetail": "Title" // Text 노드인 경우 nodeDetail은 내용이되는 문자열
            }
          ],
          "nodeDetail": {
            "tagName": "h1",
            "attributes": {}
          }
        },
        {
          "children": [
            {
              "children": [
                {
                  "children": [],
                  "nodeDetail": "Hello"
                },
                {
                  "children": [
                    {
                      "children": [],
                      "nodeDetail": "world"
                    }
                  ],
                  "nodeDetail": {
                    "tagName": "em",
                    "attributes": {}
                  }
                },
                {
                  "children": [],
                  "nodeDetail": "!"
                }
              ],
              "nodeDetail": {
                "tagName": "p",
                "attributes": {}
              }
            }
          ],
          "nodeDetail": { // Element 노드인 경우 nodeDetail엔 태그의 이름과 속성들이 담김
            "tagName": "div",
            "attributes": {
              "id": "main",
              "class": "test"
            }
          }
        }
      ],
      "nodeDetail": {
        "tagName": "body",
        "attributes": {}
      }
    }
  ],
  "nodeDetail": {
    "tagName": "html",
    "attributes": {}
  }
}
마치며
직접 구현하면서 추상적으로 알고 있던 HTML 파싱 과정을 구체적으로 알 수 있었습니다. 앞으로 HTML에 관련된 코드를 작성할 때 더욱 자신감 있게 임할 수 있을 것 같습니다!
궁금하신 점, 피드백, 기타 다른 의견이 있다면 댓글로 남겨주세요! 댓글은 작성자에게 힘이 됩니다.
감사합니다!
참고문헌
https://d2.naver.com/helloworld/59361
https://www.html5rocks.com/en/tutorials/internals/howbrowserswork/
https://html.spec.whatwg.org/multipage/syntax.html#parsing
https://limpet.net/mbrubeck/2014/08/08/toy-layout-engine-1.html

안녕하세요. 혹시 게시글을 작성하려고 하는데요. 출처 남기고 참고해도 될까요?