
Controller란?
서버로 들어오는 요청을 처리하고 클라이언트에 응답을 반환하는 역할을 하는 객체를 Controller라고 합니다.
컨트롤러의 목적은 애플리케이션에 대한 특정 요청을 수신하는 것입니다.
라우팅 메커니즘은 어떤 컨트롤러가 어떤 요청을 받는지 제어합니다.
NestJS에서 기본 컨트롤러를 만들기 위해 클래스와 데코레이터를 사용합니다 .
생성
cli를 통해 생성
$ nest g controller [name]

// ex) nest g controller cats
수동 생성
-
Controller.ts 파일 생성
import { Controller, Get } from '@nestjs/common'; @Controller('cats') export class CatsController { @Get() findAll(): string { return 'This action returns all cats'; } } -
app.module.ts 파일에 controllers 부분에 해당 controller 입력
import { Module } from '@nestjs/common';
import { AppController } from './app.controller';
import { AppService } from './app.service';
import { CatsController } from './cats/cats.controller';

@Module({
  imports: [],
  controllers: [AppController, **CatsController**],
  providers: [AppService],
})
export class AppModule {}
Http Request 인자로 받기
@Req 데코레이터를 통해 Http Request 인자로 받을 수 있음.
이때 Reqest 객체는 express Request로 사용 가능함. (NestJs Request 객체도 사용 가능)
@Get()
helloWorld(@Req() request: Request): string {
	console.log(request);
	return 'hello world!';
}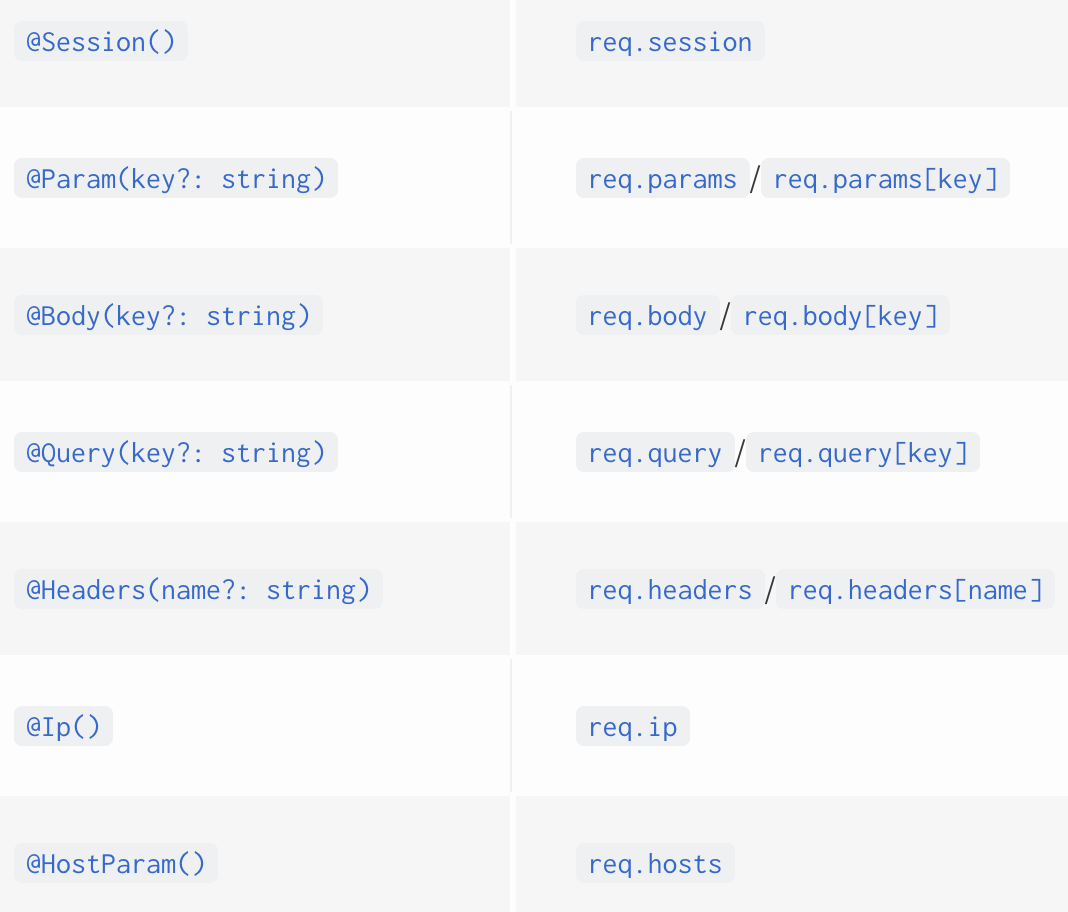
다음과 같은 정보 Request 객체에서 확인 가능함.
**Route wildcards - 패턴 기반 경로 설정**
‘*’ 에는 아무 문자나 들어가도 해당 route에 맵핑됨.
@Get('ab*cd')
findWildcard(): string {
  return 'This route uses a wildcard';
}
상태 코드
@HttpCode 데코레이터를 통해 반환 HttpCode를 설정해줄 수 있음.
@Post의 기본 반환 HttpCode는 201임.
@Post()
@HttpCode('숫자')
create(): string {
  return 'This action adds a new dog';
}
Header 설정
@Header 데코레이터를 통해 반환 HttpResponse Header 설정 가능함.
다음과 같이 ‘Cache-Control’ : ‘none’ Header 설정할 수 있음.
@Post()
@Header('Cache-Control', 'hi')
create(): string {
  return 'This action adds a new dog';
}
Redirect 설정
@Redirect 데코레이터를 통해 특정 URL로 Redirect 시킬 수 있음.
@Redirect('https://nestjs.com', 301) 다음과 같이 url과 statusCode 두 개의 인수를 사용합니다.
이때 statusCode는 생략될 경우 기본값 301 로 됩니다.
경로 매개변수 설정
@Get 데코레이터에 아래와 같이 설정해서 url로 매개변수를 넘길 수 있습니다.
@Get(':id')
findOne(@Param() params: any): string {
  return `This action returns a #${params.id} dog`;
}
또는 다음과 같이 @Params 에 특정 매개변수만 넘길 수 있습니다.
@Get(':id')
findOne(@Param('id') id: string): string {
  return `This action returns a #${params.id} dog`;
}
비동기처리 (async)
async 키워드를 통해 비동기 처리를 할 수 있습니다.
@Get()
async findAll(): Promise<Cat[]> {
  return this.catsService.findAll();
}
DTO 생성 - CLI 이용
dogs/dto 폴더에 create-dogs.dto 파일 생성 → CreateDogsDto Class
nest generate class dogs/dto/create-dogs.dto --no-specRequest Payload 설정
@Body 데코레이터를 이용하여 request body를 확인할 수 있습니다.
@Post()
create(@Body() createDogsDto: CreateDogsDto): string {
	console.log(createDogsDto);
  return 'This action adds a new dog';
}

// output : { name: 'test', age: 24, breed: 'test' }
Response 설정
@Res 데코레이터를 통해 Response를 설정할 수 있습니다.
@Post()
  @HttpCode(204)
  async create(@Res() res: Response, @Body() createCatDto: CreateCatDto) {
    this.catsService.create(createCatDto);
    res.status(HttpStatus.CREATED).send();
  }
다음과 같이 HttpStatus.CREATED response를 반환할 수 있습니다.