AbstractAnnotationConfigDispatcherServletInitializer를 상속받아 구현하면 어떤 경로로 root application context와 servlet application context가 올라가는가
앞서 살펴본 두 글을 보면, root application context와 servlet application context를 지정하고 올라가는 방식이 매우 복잡하게 구성되어 있는 것을 알 수 있습니다.
그러나 Spring MVC부터는 AbstractAnnotationConfigDispatcherServletInitializer를 상속받아 구현한 클래스를 통해 손쉽게 둘을 적용할 수 있었습니다.
public class WebAppInitializer extends AbstractAnnotationConfigDispatcherServletInitializer {
    @Override
    protected Class<?>[] getRootConfigClasses() {
        return new Class[]{RootConfig.class};
    }

    @Override
    protected Class<?>[] getServletConfigClasses() {
        return new Class[]{WebConfig.class};
    }

    @Override
    protected String[] getServletMappings() {
        return new String[]{"/"};
    }

    ...

}
해당하는 클래스를 구현했다고 가정하고, 어떠한 흐름을 통해 작동하는지 알아보도록 합시다.
(RootConfig.class와 WebConfig.class는 직접 작성한 클래스이며, 간단하게 @Controller를 제외하고 스캔 / @Controller만 스캔하는 @Configuration으로 가정하겠습니다.)
ServletContainerInitializer
Spring 관련된 클래스를 살펴보기 전에, 우리는 Spring MVC가 Servlet API를 기반으로 설계되었다는 것을 알아야 합니다.
Spring MVC 공식문서를 살펴보도록 합시다.
Spring Web MVC is the original web framework built on the Servlet API and has been included in the Spring Framework from the very beginning.
해당하는 내용을 확인할 수 있습니다.
다음은 ServletContainerInitializer 문서를 통해 서블릿 컨테이너가 어떻게 적용하는지 확인해 봅시다.
ServletContainerInitializers (SCIs) are registered via an entry in the file META-INF/services/javax.servlet.ServletContainerInitializer that must be included in the JAR file that contains the SCI implementation.
jar 파일 내 META-INF/services/javax.servlet.ServletContainerInitializer라는 경로에 ServletContainerInitializer를 구현한 클래스 경로가 있어야 한다고 합니다.
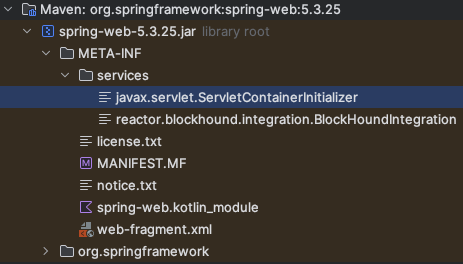
해당 스프링 라이브러리 경로에 가서 확인해보면, 위에서 언급한 방식으로 Spring이 이미 작성해 둔 것을 알 수 있습니다.
해당 파일 내에는 org.springframework.web.SpringServletContainerInitializer라는 클래스 경로가 적힌 것도 확인해볼 수 있습니다.
SpringServletContainerInitializer
이번엔 SpringServletContainerInitializer를 알아보도록 합시다.
@HandlesTypes(WebApplicationInitializer.class)
public class SpringServletContainerInitializer implements ServletContainerInitializer {

	@Override
	public void onStartup(@Nullable Set<Class<?>> webAppInitializerClasses, ServletContext servletContext)
			throws ServletException {

		List<WebApplicationInitializer> initializers = Collections.emptyList();

		if (webAppInitializerClasses != null) {
			initializers = new ArrayList<>(webAppInitializerClasses.size());
			for (Class<?> waiClass : webAppInitializerClasses) {
				// Be defensive: Some servlet containers provide us with invalid classes,
				// no matter what @HandlesTypes says...
				if (!waiClass.isInterface() && !Modifier.isAbstract(waiClass.getModifiers()) &&
						WebApplicationInitializer.class.isAssignableFrom(waiClass)) {
					try {
						initializers.add((WebApplicationInitializer)
								ReflectionUtils.accessibleConstructor(waiClass).newInstance());
					}
					catch (Throwable ex) {
						throw new ServletException("Failed to instantiate WebApplicationInitializer class", ex);
					}
				}
			}
		}

		if (initializers.isEmpty()) {
			servletContext.log("No Spring WebApplicationInitializer types detected on classpath");
			return;
		}

		servletContext.log(initializers.size() + " Spring WebApplicationInitializers detected on classpath");
		AnnotationAwareOrderComparator.sort(initializers);
		for (WebApplicationInitializer initializer : initializers) {
			initializer.onStartup(servletContext);
		}
	}

}
@HandlesTypes
@HandlesTypes는 서블릿 컨테이너가 스캔할 클래스들을 지정합니다. 지정한 클래스들을 상속받거나 구현한 클래스들은 onStartup의 Set<Class<?>> 파라미터로 전달됩니다.
해당 코드에서는 WebApplicationInitializer.class를 지정했으므로, 해당 클래스를 상속받거나 구현한 클래스들이 모두 들어올 것입니다.

Spring에서 작성한 4가지 클래스와, 처음에 작성해뒀던 WebAppInitializer이 들어오는군요.
그러나 Spring에서 작성된 클래스들은 인터페이스 혹은 Abstract 클래스이므로 중간의 if문을 통과하지 못 할 것이고, WebAppInitializer 클래스만 list에 추가될 것입니다.
그 후 WebAppInitializer의 onStartUp 메서드가 동작할 것입니다.
onStartUp()
WebAppInitializer의 onStartUp은 AbstractDispatcherServletInitializer -> AbstractContextLoaderInitializer의 onStartUp으로 향합니다.
AbstractContextLoaderInitializer
@Override
public void onStartup(ServletContext servletContext) throws ServletException {
	registerContextLoaderListener(servletContext);
}

protected void registerContextLoaderListener(ServletContext servletContext) {
	WebApplicationContext rootAppContext = createRootApplicationContext();
	if (rootAppContext != null) {
		ContextLoaderListener listener = new ContextLoaderListener(rootAppContext);
		listener.setContextInitializers(getRootApplicationContextInitializers());
		servletContext.addListener(listener);
	}
	else {
		logger.debug("No ContextLoaderListener registered, as " +
				"createRootApplicationContext() did not return an application context");
	}
}

@Nullable
protected abstract WebApplicationContext createRootApplicationContext();createRootApplicationContext()는 AbstractAnnotationConfigDispatcherServletInitializer에서 구현하였습니다.
AbstractAnnotationConfigDispatcherServletInitializer
@Nullable
protected WebApplicationContext createRootApplicationContext() {
    Class<?>[] configClasses = this.getRootConfigClasses();
    if (!ObjectUtils.isEmpty(configClasses)) {
        AnnotationConfigWebApplicationContext context = new AnnotationConfigWebApplicationContext();
        context.register(configClasses);
        return context;
    } else {
        return null;
    }
}

@Nullable
protected abstract Class<?>[] getRootConfigClasses();getRootConfigClasses()는 WebAppInitializer에서 구현했던 것, 기억나시나요?
우리가 작성했던 RootConfig.class가 전달될 것입니다.
그 후 AnnotationConfigWebApplicationContext를 생성하고 regist()를 동작시킵니다.
잠깐, AnnotationConfigWebApplicationContext가 낯이 익지 않으신가요?
해당 시리즈 첫 번째 글인 root application context가 올라가는 과정에서 xml로 contextClass를 선언해줄 때 지정했던 클래스와 같습니다.
@Override
public void register(Class<?>... componentClasses) {
	Assert.notEmpty(componentClasses, "At least one component class must be specified");
	Collections.addAll(this.componentClasses, componentClasses);
}
해당 클래스의 LinkedHashSet인 componentClasses에 RootConfig.class가 추가됩니다.
그 후 listener를 만들고 servlet context에 추가시킵니다.
AbstractDispatcherServletInitializer
public void onStartup(ServletContext servletContext) throws ServletException {
    super.onStartup(servletContext);
    this.registerDispatcherServlet(servletContext);
}
방금 작성한 과정이 super.onStartup(servletContext)이었습니다.
registerDispatcherServlet 메서드를 확인해봅시다.
protected void registerDispatcherServlet(ServletContext servletContext) {
    String servletName = this.getServletName();
    Assert.hasLength(servletName, "getServletName() must not return null or empty");
    WebApplicationContext servletAppContext = this.createServletApplicationContext();
    Assert.notNull(servletAppContext, "createServletApplicationContext() must not return null");
    FrameworkServlet dispatcherServlet = this.createDispatcherServlet(servletAppContext);
    Assert.notNull(dispatcherServlet, "createDispatcherServlet(WebApplicationContext) must not return null");
    dispatcherServlet.setContextInitializers(this.getServletApplicationContextInitializers());
    ServletRegistration.Dynamic registration = servletContext.addServlet(servletName, dispatcherServlet);
    if (registration == null) {
        throw new IllegalStateException("Failed to register servlet with name '" + servletName + "'. Check if there is another servlet registered under the same name.");
    } else {
        registration.setLoadOnStartup(1);
        registration.addMapping(this.getServletMappings());
        registration.setAsyncSupported(this.isAsyncSupported());
        Filter[] filters = this.getServletFilters();
        if (!ObjectUtils.isEmpty(filters)) {
            Filter[] var7 = filters;
            int var8 = filters.length;
            for(int var9 = 0; var9 < var8; ++var9) {
                Filter filter = var7[var9];
                this.registerServletFilter(servletContext, filter);
            }
        }
        this.customizeRegistration(registration);
    }
}
protected String getServletName() {
    return "dispatcher";
}

protected abstract WebApplicationContext createServletApplicationContext();
createServletApplicationContext() 메서드는 다시 한 번 AbstractAnnotationConfigDispatcherServletInitializer를 통해 AnnotationConfigWebApplicationContext를 반환합니다.
AbstractAnnotationConfigDispatcherServletInitializer
protected WebApplicationContext createServletApplicationContext() {
    AnnotationConfigWebApplicationContext context = new AnnotationConfigWebApplicationContext();
    Class<?>[] configClasses = this.getServletConfigClasses();
    if (!ObjectUtils.isEmpty(configClasses)) {
        context.register(configClasses);
    }
    return context;
}

@Nullable
protected abstract Class<?>[] getServletConfigClasses();
이번에도 register를 통해 우리가 작성한 클래스를 내부적으로 지니게끔 합니다.
그 후 디스패쳐 서블릿을 생성하는데, 방금 만든 AnnotationConfigWebApplicationContext를 파라미터로 전달해줍니다.
마지막으로 서블릿 컨텍스트에 해당 서블릿을 추가한 뒤 디스패쳐 서블릿에 대한 설정을 몇 가지 거친 후, 해당 과정이 끝나게 됩니다.
servlet application context에 root application context가 기록되는지는 더 알아본 후 작성하도록 하겠습니다.