ContextLoaderListener은 contextClass와 contextConfigLocation을 어떻게 처리하는가
nhnAcademy에서 Spring MVC를 배우던 도중, xml로 스프링 설정을 하게 되었습니다. 컨텍스트 파라미터를 지정하고 리스너와 디스패쳐 서블릿만 선언해줬을 뿐인데, 필요한 설정을 읽고 스프링 구조를 생성해 준 것을 확인했습니다.
대체 서블릿 api 기반으로 어떻게 스프링의 root application context와 servlet application context가 적재되고, 내부적으로 어떤 일들을 처리하는지 흐름을 보고 싶어 공식문서와 코드를 참조하게 되었습니다.
이번에는 root application context가 적재되는 과정만 살펴보도록 하겠습니다.
context-param 설정
<context-param>
    <param-name>contextClass</param-name>
    <param-value>org.springframework.web.context.support.AnnotationConfigWebApplicationContext</param-value>
</context-param>
해당 부분에서는 contextClass라는 이름으로 AnnotationConfigWebApplicationContext을 지정해 주었습니다.
<context-param>
    <param-name>contextConfigLocation</param-name>
    <param-value>com.nhnacademy.springmvc.config.RootConfig</param-value>
</context-param>
여기서는 우리가 작성한 RootConfig를 지정했습니다.
@Configuration
@ComponentScan(basePackages = {"com.nhnacademy.springmvc"},
        excludeFilters = { @ComponentScan.Filter(Controller.class) })
public class RootConfig {

}
단순히 컨트롤러를 제외한 모든 컴포넌트를 스캔하게끔 되어 있습니다.
listener 설정
<listener>
    <listener-class>org.springframework.web.context.ContextLoaderListener</listener-class>
</listener>ContextLoaderListener를 지정하였습니다.
docs를 확인하여 ContextLoaderListener가 어떤 일을 하는지 확인해봅시다.
Create a new ContextLoaderListener that will create a web application context based on the "contextClass" and "contextConfigLocation" servlet context-params.
우리가 방금 지정한 params를 사용하여 웹 어플리케이션 컨텍스트를 생성한다고 합니다. 더 자세한 확인을 위해 ContextLoader docs를 살펴보도록 하겠습니다.
ContextLoader
Looks for a "contextClass" parameter at the web.xml context-param level to specify the context class type, falling back to XmlWebApplicationContext if not found. With the default ContextLoader implementation, any context class specified needs to implement the ConfigurableWebApplicationContext interface.
contextClass param을 찾고 컨텍스트 클래스 유형을 지정해 준다고 합니다. 다만 해당 param으로 지정한 클래스는 ConfigurableWebApplicationContext를 구현해야 합니다.
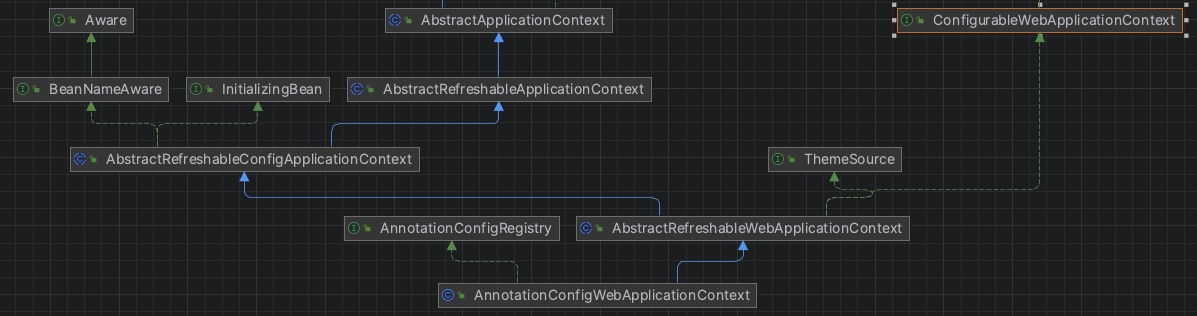
사진과 같이 AnnotationConfigWebApplicationContext는 ConfigurableWebApplicationContext를 구현해 놓았습니다.
다시 돌아와서, 실제 코드를 통해 ContextLoaderListener가 어떻게 contextClass와 contextInitializerClasses를 처리하는지 확인해 봅시다.
@Override
public void contextInitialized(ServletContextEvent event) {
	initWebApplicationContext(event.getServletContext());
}
Servlet api의 Servlet Context가 생성된 직후, ContextLoader의 initWebApplicationContext 메서드를 호출합니다(해당 부분은 리스너의 내부 구현에 의해 동작합니다).
initWebApplicationContext(ServletContext servletContext)
initWebApplicationContext는 코드의 양이 많기 때문에, 대략적인 개념 설명 혹은 부분적으로 필요한 코드만 짚고 넘어가도록 하겠습니다.
if (servletContext.getAttribute(WebApplicationContext.ROOT_WEB_APPLICATION_CONTEXT_ATTRIBUTE) != null) {
	throw new IllegalStateException(...);
}

...
root application context는 스프링 컨테이너 기준으로 하나만 올라와있어야 합니다. 만약 servletContext에 이미 정해진 이름의 어트리뷰트가 있다면 예외를 던집니다. 이번 단계에서 root application context를 만들 것이며, 만약 이미 생성되어 있다면 web.xml 설정이 잘못되어 있을 수 있기 때문에(contextClass 중복 선언 등) 확인하라는 메시지를 내포합니다.
@Nullable
private WebApplicationContext context;

...

if (this.context == null) {
	this.context = createWebApplicationContext(servletContext);
}
초기 생성시에 ContextLoader의 context는 null로 잡혀 있습니다. 따라서 createWebApplicationContext 메서드가 동작합니다.
createWebApplicationContext
protected WebApplicationContext createWebApplicationContext(ServletContext sc) {
	Class<?> contextClass = determineContextClass(sc);
	if (!ConfigurableWebApplicationContext.class.isAssignableFrom(contextClass)) {
		throw new ApplicationContextException(...);
	}
	return (ConfigurableWebApplicationContext) BeanUtils.instantiateClass(contextClass);
}contextClass가 ConfigurableWebApplicationContext를 구현했다면 해당 클래스의 인스턴스를 구현하여 반환하도록 되어 있습니다(인스턴스 구현은 BeanUtils.instantiateClass 메서드 내의 리플렉션을 이용합니다).
determineContextClass 메서드도 확인해봅시다.
determineContextClass
public static final String CONTEXT_CLASS_PARAM = "contextClass";

...

protected Class<?> determineContextClass(ServletContext servletContext) {
	String contextClassName = servletContext.getInitParameter(CONTEXT_CLASS_PARAM);
	if (contextClassName != null) {
		try {
			return ClassUtils.forName(contextClassName, ClassUtils.getDefaultClassLoader());
		}
		catch (ClassNotFoundException ex) {
			throw new ApplicationContextException(...);
		}
	}
	...
}
우리가 xml에 작성했던 contextClass를 통해 클래스 이름을 가져와 contextClassName에 넣는다는 것을 알 수 있습니다.
ClassUtils.forName은 문자열로 된 클래스 이름을 기반으로 클래스를 동적으로 로드하기 위해 사용되는 스프링 유틸리티 클래스입니다.
즉, determineContextClass를 통해 우리가 작성한 contextClass의 값인 org.springframework.web.context.support.AnnotationConfigWebApplicationContext를 읽은 후 동적으로 로드하여 반환합니다.
createWebApplicationContext에서는 AnnotationConfigWebApplicationContext의 인스턴스를 생성하여 반환하고, ContextLoader의 context에 해당 인스턴스를 대입합니다.
다시 initWebApplicationContext 설명으로 넘어가겠습니다.
...

if (this.context instanceof ConfigurableWebApplicationContext) {
	ConfigurableWebApplicationContext cwac = (ConfigurableWebApplicationContext) this.context;
	if (!cwac.isActive()) {
		if (cwac.getParent() == null) {
			ApplicationContext parent = loadParentContext(servletContext);
			cwac.setParent(parent);
		}
		configureAndRefreshWebApplicationContext(cwac, servletContext);
	}
}
servletContext.setAttribute(WebApplicationContext.ROOT_WEB_APPLICATION_CONTEXT_ATTRIBUTE, this.context);
방금 대입한 AnnotationConfigWebApplicationContext 인스턴스를 ConfigurableWebApplicationContext로 강제 형변환한 후 상태를 확인합니다.
생성만 하고 아무것도 하지 않았으니, Active 상태가 아닙니다.
하이라키 구조를 위해 부모를 설정하는 코드가 있으나, root를 생성해주는 것이기 때문에 null이 반환됩니다.
마지막으로 servletContext에 해당 컨텍스트를 어트리뷰트로 올려주기 전에, configureAndRefreshWebApplicationContext를 통해 몇 가지 설정을 해줍시다.
configureAndRefreshWebApplicationContext
protected void configureAndRefreshWebApplicationContext(ConfigurableWebApplicationContext wac, ServletContext sc) {
	if (ObjectUtils.identityToString(wac).equals(wac.getId())) {
		String idParam = sc.getInitParameter(CONTEXT_ID_PARAM);
		if (idParam != null) {
			wac.setId(idParam);
		}
		else {
			wac.setId(ConfigurableWebApplicationContext.APPLICATION_CONTEXT_ID_PREFIX +
					ObjectUtils.getDisplayString(sc.getContextPath()));
		}
	}
	wac.setServletContext(sc);
	String configLocationParam = sc.getInitParameter(CONFIG_LOCATION_PARAM);
	if (configLocationParam != null) {
		wac.setConfigLocation(configLocationParam);
	}

    ...

    wac.refresh();
}
root application context의 현재 id는 기본적으로 java가 붙이는 이름 형식(obj.getClass().getName() + "@" + getIdentityHexString(obj))으로 이루어져 있습니다.
특별한 이름을 지정해줬다면 그것으로 동작하겠으나, 따로 설정하지 않았기에 설정을 통해 org.springframework.web.context.WebApplicationContext:까지 생성됩니다.
그 후 root application context에게 servlet context와 우리가 설정한 contextConfigLocation 값을 알려줍니다.
마지막으로 refresh()를 통해, 방금 지정한 contextConfigLocation 경로의 설정을 읽어 빈을 생성하고 DI를 수행합니다.
해당 과정을 통해 root application context가 올라가는 과정을 알아보았습니다.
다음에는 dispatcherServlet과 servlet application context에 대해 알아보겠습니다.