How to Do Epson ET 2800 Wireless Setup Without USB Cable?
Setting up your Epson ET-2800 printer wirelessly—without needing a USB cable—is straightforward, even for novices. Follow these instructions for a seamless Epson ET 2800 Setup if you want to print from computers, smartphones, and tablets without any hassles.
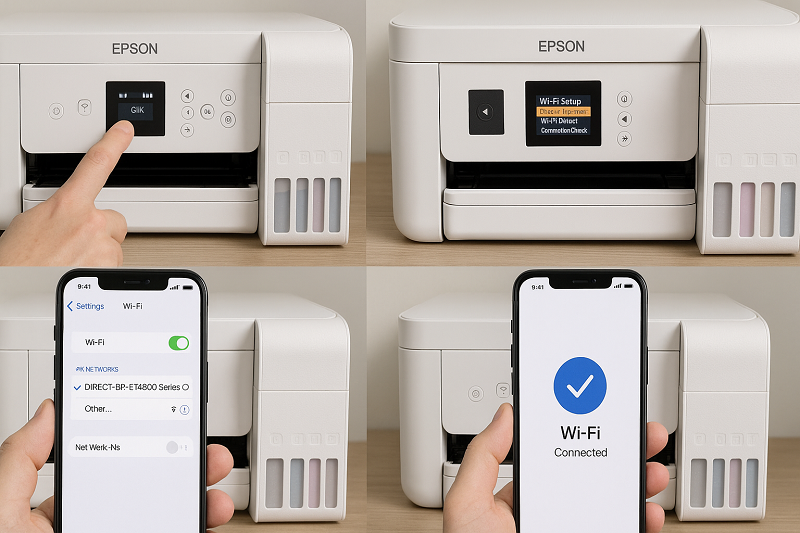
How to Set Up the Epson ET-2800 Wirelessly Without a USB Cable
Power on the Printer
Press the power button after plugging in your Epson ET-2800.
Make sure paper is loaded and ink tanks are full.
Use the Control Panel to Connect to Wi-Fi
Click the Home button on the printer.
Go to Wi-Fi Recommended → Wi-Fi Setup → Start Setup.
Select your Wi-Fi network and input the password.
Install the mobile setup option for the Epson Smart Panel app.
Get the Epson Smart Panel from Google Play or the App Store.
Launch the application, select Add Printer, and then select Epson ET-2800.
Follow the on-screen instructions to complete the epson wireless printer setup.
Computer Configuration (Mac/Windows)
Visit the Epson support page and download the ET-2800 drivers.
Run the installation and choose Wireless Connection Setup.
After selecting Printer Already Connected to Wi-Fi, complete the installation.
Test the Connection
Print a sample document or nozzle check page.
Advice for Easy Setup
When setting up the Epson ET 2800, place the printer close to your Wi-Fi router.
For the strongest connection, choose the 2.4 GHz Wi-Fi spectrum rather than the 5 GHz range.
Restart printer and router if the network doesn’t display on the printer screen.
The epson wireless printer setup technique without a USB cable is simple and eliminates wiring complications. Once connected, you may experience wireless productivity at home or at work and print from any device with ease. To know more visit our webpage.