
코랩에 다운로드 되지 않은 라이브러리 다운로드
- 이때 다운 받고, 런타임 다시 시작해줘야 적용됨.
!pip install transformers
!pip install datasets
!pip install umap
!pip install accelerate -U
허깅페이스에 있는 데이터셋 사용하기
from datasets import list_datasets

all_datasets = list_datasets()
print(f'현재 허브에는 {len(all_datasets)}개의 데이터셋이 있습니다.')
print(f'처음 10개 데이터셋: {all_datasets[:10]}')
현재 허브에는 78719개의 데이터셋이 있습니다.
처음 10개 데이터셋: ['acronym_identification', 'ade_corpus_v2', 'adversarial_qa', 'aeslc', 'afrikaans_ner_corpus', 'ag_news', 'ai2_arc', 'air_dialogue', 'ajgt_twitter_ar', 'allegro_reviews']from datasets import load_dataset
emotions = load_dataset('emotion')emotion data 를 들여다보면 허깅페이스에서 제공하는 DatasetDict 형태로 구성되어 있음. 이때 train, validation, test set 으로 구분되어 있고, 각각 그 안에는 text(X), label(y) 로 구성되어 있음.
emotionsDatasetDict({
train: Dataset({
features: ['text', 'label'],
num_rows: 16000
})
validation: Dataset({
features: ['text', 'label'],
num_rows: 2000
})
test: Dataset({
features: ['text', 'label'],
num_rows: 2000
})
})train_ds = emotions['train']
len(train_ds)16000train_ds[0]{'text': 'i didnt feel humiliated', 'label': 0}print(train_ds.features)
print(train_ds.column_names){'text': Value(dtype='string', id=None), 'label': ClassLabel(names=['sadness', 'joy', 'love', 'anger', 'fear', 'surprise'], id=None)}
['text', 'label']import pandas as pd
pd.DataFrame(train_ds)| text | label | |
|---|---|---|
| 0 | i didnt feel humiliated | 0 |
| 1 | i can go from feeling so hopeless to so damned... | 0 |
| 2 | im grabbing a minute to post i feel greedy wrong | 3 |
| 3 | i am ever feeling nostalgic about the fireplac... | 2 |
| 4 | i am feeling grouchy | 3 |
| ... | ... | ... |
| 15995 | i just had a very brief time in the beanbag an... | 0 |
| 15996 | i am now turning and i feel pathetic that i am... | 0 |
| 15997 | i feel strong and good overall | 1 |
| 15998 | i feel like this was such a rude comment and i... | 3 |
| 15999 | i know a lot but i feel so stupid because i ca... | 0 |
16000 rows × 2 columns
train_ds[:5]{'text': ['i didnt feel humiliated',
'i can go from feeling so hopeless to so damned hopeful just from being around someone who cares and is awake',
'im grabbing a minute to post i feel greedy wrong',
'i am ever feeling nostalgic about the fireplace i will know that it is still on the property',
'i am feeling grouchy'],
'label': [0, 0, 3, 2, 3]}데이터셋에서 데이터프레임으로 변환하기
- Dataset 객체를 DataFrame으로 변환하여 사용하고 분석하는 것이 편리할 때가 있음.
emotions.set_format(type = 'pandas')
df = emotions['train'][:]
df.head()| text | label | |
|---|---|---|
| 0 | i didnt feel humiliated | 0 |
| 1 | i can go from feeling so hopeless to so damned... | 0 |
| 2 | im grabbing a minute to post i feel greedy wrong | 3 |
| 3 | i am ever feeling nostalgic about the fireplac... | 2 |
| 4 | i am feeling grouchy | 3 |
def label_int2str(row):
return emotions['train'].features['label'].int2str(row)df['label_name'] = df['label'].apply(label_int2str)
df.head()| text | label | label_name | |
|---|---|---|---|
| 0 | i didnt feel humiliated | 0 | sadness |
| 1 | i can go from feeling so hopeless to so damned... | 0 | sadness |
| 2 | im grabbing a minute to post i feel greedy wrong | 3 | anger |
| 3 | i am ever feeling nostalgic about the fireplac... | 2 | love |
| 4 | i am feeling grouchy | 3 | anger |
클래스 분포 살펴보기
import matplotlib.pyplot as plt
dist = df['label_name'].value_counts(ascending = True)
dist.plot.barh()
plt.title('Frequency of Classes')
plt.show()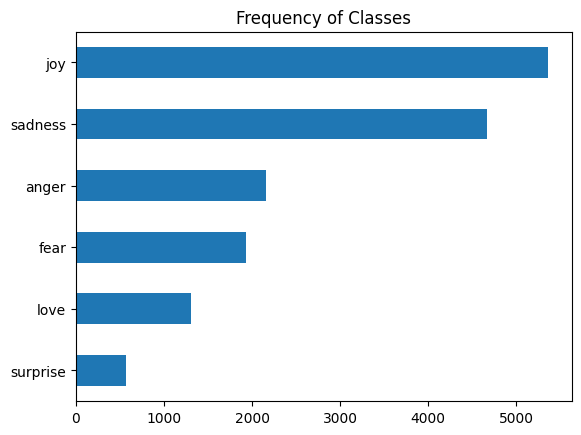
트윗 길이 확인
df['Words Per Tweet'] = df['text'].str.split(' ').apply(len)
df.head()| text | label | label_name | Words Per Tweet | |
|---|---|---|---|---|
| 0 | i didnt feel humiliated | 0 | sadness | 4 |
| 1 | i can go from feeling so hopeless to so damned... | 0 | sadness | 21 |
| 2 | im grabbing a minute to post i feel greedy wrong | 3 | anger | 10 |
| 3 | i am ever feeling nostalgic about the fireplac... | 2 | love | 18 |
| 4 | i am feeling grouchy | 3 | anger | 4 |
import seaborn as sns

sns.boxplot(x = 'label_name', y = 'Words Per Tweet', data = df)
plt.show()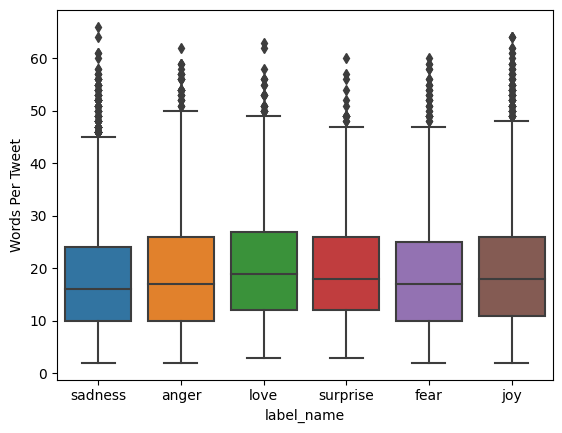
emotions.reset_format() #더이상 dataframe 포맷이 불필요해서 원래 출력포맷으로 전환텍스트에서 토큰으로
문자 토큰화
text = 'Tokenizing text is a core task of NLP.'
tokenized_text = list(text)
print(tokenized_text, len(tokenized_text))
['T', 'o', 'k', 'e', 'n', 'i', 'z', 'i', 'n', 'g', ' ', 't', 'e', 'x', 't', ' ', 'i', 's', ' ', 'a', ' ', 'c', 'o', 'r', 'e', ' ', 't', 'a', 's', 'k', ' ', 'o', 'f', ' ', 'N', 'L', 'P', '.'] 38token2idx = {ch:idx for idx, ch in enumerate(sorted(set(tokenized_text)))} #set은 집합화, sorted는 문자, 숫자등을 순서대로 배열
print(token2idx){' ': 0, '.': 1, 'L': 2, 'N': 3, 'P': 4, 'T': 5, 'a': 6, 'c': 7, 'e': 8, 'f': 9, 'g': 10, 'i': 11, 'k': 12, 'n': 13, 'o': 14, 'r': 15, 's': 16, 't': 17, 'x': 18, 'z': 19}input_ids = [token2idx[ch] for ch in tokenized_text]
print(input_ids)[5, 14, 12, 8, 13, 11, 19, 11, 13, 10, 0, 17, 8, 18, 17, 0, 11, 16, 0, 6, 0, 7, 14, 15, 8, 0, 17, 6, 16, 12, 0, 14, 9, 0, 3, 2, 4, 1]import torch
import torch.nn.functional as Finput_ids = torch.tensor(input_ids)
one_hot_encodings = F.one_hot(input_ids, num_classes = len(token2idx))
print(one_hot_encodings.shape)torch.Size([38, 20])print(f'토큰: {tokenized_text[0]}')
print(f'텐서 인덱스: {input_ids[0]}')
print(f'원-핫 인코딩: {one_hot_encodings[0]}')토큰: T
텐서 인덱스: 5
원-핫 인코딩: tensor([0, 0, 0, 0, 0, 1, 0, 0, 0, 0, 0, 0, 0, 0, 0, 0, 0, 0, 0, 0])단어 토큰화
tokenized_text = text.split(' ')
print(tokenized_text)
['Tokenizing', 'text', 'is', 'a', 'core', 'task', 'of', 'NLP.']부분단어 토큰화
from transformers import AutoTokenizer

checkpoint = 'distilbert-base-uncased'
tokenizer = AutoTokenizer.from_pretrained(checkpoint)
encoded_text = tokenizer(text)
print(encoded_text){'input_ids': [101, 19204, 6026, 3793, 2003, 1037, 4563, 4708, 1997, 17953, 2361, 1012, 102], 'attention_mask': [1, 1, 1, 1, 1, 1, 1, 1, 1, 1, 1, 1, 1]}tokens = tokenizer.convert_ids_to_tokens(encoded_text.input_ids)
print(tokens)['[CLS]', 'token', '##izing', 'text', 'is', 'a', 'core', 'task', 'of', 'nl', '##p', '.', '[SEP]']print(tokenizer.convert_tokens_to_string(tokens))[CLS] tokenizing text is a core task of nlp. [SEP]tokenizer.vocab_size30522tokenizer.model_max_length512전체 데이터셋 토큰화하기
def tokenize(batch):
return tokenizer(batch['text'], padding = True, truncation = True)tokenize(train_ds[:2]){'input_ids': [[101, 1045, 2134, 2102, 2514, 26608, 102, 0, 0, 0, 0, 0, 0, 0, 0, 0, 0, 0, 0, 0, 0, 0, 0], [101, 1045, 2064, 2175, 2013, 3110, 2061, 20625, 2000, 2061, 9636, 17772, 2074, 2013, 2108, 2105, 2619, 2040, 14977, 1998, 2003, 8300, 102]], 'attention_mask': [[1, 1, 1, 1, 1, 1, 1, 0, 0, 0, 0, 0, 0, 0, 0, 0, 0, 0, 0, 0, 0, 0, 0], [1, 1, 1, 1, 1, 1, 1, 1, 1, 1, 1, 1, 1, 1, 1, 1, 1, 1, 1, 1, 1, 1, 1]]}emotions_encoded = emotions.map(tokenize, batched = True, batch_size = None)emotions_encoded['train'].column_names['text', 'label', 'input_ids', 'attention_mask']텍스트 분류 모델 훈련하기
트랜스포머를 특성 추출기로 사용하기
- 트랜스포머 아키텍쳐를 feature extractor 로 사용하여 데이터의 특징을 추출하고 그 정보를 머신러닝 알고리즘에 input으로 넣어서 학습. 즉, deep learning + machine learing (단, head 부분을 어떻게 가져가겠느냐에 따라 달라 질 수 있음.)
from transformers import AutoModel

checkpoint = 'distilbert-base-uncased'
device = torch.device('cuda' if torch.cuda.is_available() else 'cpu')
model = AutoModel.from_pretrained(checkpoint).to(device)
text = 'this is a test'
inputs = tokenizer(text, return_tensors = 'pt')print(f'입력 텐서 크기: {inputs.input_ids.size()}')입력 텐서 크기: torch.Size([1, 6])inputs.input_idstensor([[ 101, 2023, 2003, 1037, 3231, 102]])inputs = {k:v.to(device) for k, v in inputs.items()}
with torch.no_grad():
outputs = model(**inputs)
print(outputs)BaseModelOutput(last_hidden_state=tensor([[[-0.1565, -0.1862, 0.0528, ..., -0.1188, 0.0662, 0.5470],
[-0.3575, -0.6484, -0.0618, ..., -0.3040, 0.3508, 0.5221],
[-0.2772, -0.4459, 0.1818, ..., -0.0948, -0.0076, 0.9958],
[-0.2841, -0.3917, 0.3753, ..., -0.2151, -0.1173, 1.0526],
[ 0.2661, -0.5094, -0.3180, ..., -0.4203, 0.0144, -0.2149],
[ 0.9441, 0.0112, -0.4714, ..., 0.1439, -0.7288, -0.1619]]],
device='cuda:0'), hidden_states=None, attentions=None)outputs.last_hidden_state.size()torch.Size([1, 6, 768])outputs.last_hidden_state[:, 0].size()torch.Size([1, 768])tokenizer.model_input_names['input_ids', 'attention_mask']def extract_hidden_states(batch):
inputs = {k:v.to(device) for k, v in batch.items() if k in tokenizer.model_input_names}
with torch.no_grad():
last_hidden_state = model(**inputs).last_hidden_state
return {'hidden_state': last_hidden_state[:, 0].cpu().numpy()}emotions_encoded.set_format('torch', columns = ['input_ids', 'attention_mask', 'label'])emotions_hidden = emotions_encoded.map(extract_hidden_states, batched = True)emotions_hidden['train']Dataset({
features: ['text', 'label', 'input_ids', 'attention_mask', 'hidden_state'],
num_rows: 16000
})import numpy as npX_train = np.array(emotions_hidden['train']['hidden_state'])
X_valid = np.array(emotions_hidden['validation']['hidden_state'])
y_train = np.array(emotions_hidden['train']['label'])
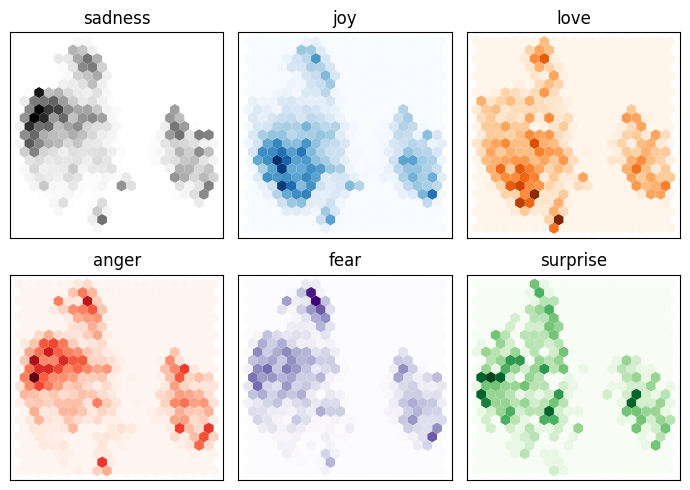
y_valid = np.array(emotions_hidden['validation']['label'])print(X_train.shape, X_valid.shape)(16000, 768) (2000, 768)768차원으로 임베딩된 문장을 사람이 보기 쉽게 2차원으로 차원 축소 시키기
# from umap import UMAP
import umap.umap_ as UMAP
from sklearn.preprocessing import MinMaxScaler
scaler = MinMaxScaler()
X_scaled = scaler.fit_transform(X_train)
print(X_scaled)[[0.36425388 0.58609843 0.3973004 ... 0.7459289 0.5048055 0.6927474 ]
[0.45346388 0.45611912 0.33501166 ... 0.53971803 0.5051366 0.6042192 ]
[0.5296934 0.68904227 0.65353525 ... 0.5932565 0.48888594 0.6854378 ]
...
[0.4840833 0.3930192 0.5745293 ... 0.6562953 0.39327294 0.608452 ]
[0.55808437 0.6603525 0.6409969 ... 0.7481154 0.43671072 0.74880564]
[0.50531745 0.58877945 0.5125654 ... 0.63667035 0.4953048 0.5319328 ]]mapper = UMAP.UMAP(n_components = 2, metric = 'cosine').fit(X_scaled)
print(mapper)df_emb = pd.DataFrame(mapper.embedding_, columns = ['X', 'Y'])
df_emb['label'] = y_train
df_emb.head()| X | Y | label | |
|---|---|---|---|
| 0 | 4.529623 | 5.889310 | 0 |
| 1 | -2.763253 | 5.967319 | 0 |
| 2 | 5.342086 | 2.251982 | 3 |
| 3 | -2.502051 | 3.651878 | 2 |
| 4 | -3.205420 | 4.092112 | 3 |
fig, axes = plt.subplots(2, 3, figsize = (7, 5))
axes = axes.flatten()
cmaps = ['Greys', 'Blues', 'Oranges', 'Reds', 'Purples', 'Greens']
labels = emotions['train'].features['label'].names

for i, (label, cmap) in enumerate(zip(labels, cmaps)):
    df_emb_sub = df_emb.query(f'label == {i}')
    axes[i].hexbin(df_emb_sub['X'], df_emb_sub['Y'], cmap = cmap, gridsize = 20, linewidths=(0, ))
    axes[i].set_title(label)
    axes[i].set_xticks([]), axes[i].set_yticks([])

plt.tight_layout()
plt.show()
분류 헤드에 machine learning algorithm 결합하기
from sklearn.linear_model import LogisticRegression

lr_clf = LogisticRegression(max_iter = 3000)
lr_clf.fit(X_train, y_train)
lr_clf.score(X_valid, y_valid)0.633데이터를 바탕으로 랜덤하게 추측하는 것을 베이스라인으로 삼음.
특히, 6개 레이블이 있는 경우에는 class-imbalance 상황에서 가장 많은 데이터를 가지고 있는 label 을 추측하도록 하는 것이 성능을 가장 높이는 방법임.
from sklearn.dummy import DummyClassifier

dummy_clf = DummyClassifier(strategy = 'most_frequent')
dummy_clf.fit(X_train, y_train)
dummy_clf.score(X_valid, y_valid)0.352정규화된 오차행렬 그리기
트랜스포머 fine-tuning
from transformers import AutoModelForSequenceClassification

num_labels = 6
model = AutoModelForSequenceClassification.from_pretrained(checkpoint, num_labels = num_labels).to(device)modelDistilBertForSequenceClassification(
(distilbert): DistilBertModel(
(embeddings): Embeddings(
(word_embeddings): Embedding(30522, 768, padding_idx=0)
(position_embeddings): Embedding(512, 768)
(LayerNorm): LayerNorm((768,), eps=1e-12, elementwise_affine=True)
(dropout): Dropout(p=0.1, inplace=False)
)
(transformer): Transformer(
(layer): ModuleList(
(0-5): 6 x TransformerBlock(
(attention): MultiHeadSelfAttention(
(dropout): Dropout(p=0.1, inplace=False)
(q_lin): Linear(in_features=768, out_features=768, bias=True)
(k_lin): Linear(in_features=768, out_features=768, bias=True)
(v_lin): Linear(in_features=768, out_features=768, bias=True)
(out_lin): Linear(in_features=768, out_features=768, bias=True)
)
(sa_layer_norm): LayerNorm((768,), eps=1e-12, elementwise_affine=True)
(ffn): FFN(
(dropout): Dropout(p=0.1, inplace=False)
(lin1): Linear(in_features=768, out_features=3072, bias=True)
(lin2): Linear(in_features=3072, out_features=768, bias=True)
(activation): GELUActivation()
)
(output_layer_norm): LayerNorm((768,), eps=1e-12, elementwise_affine=True)
)
)
)
)
(pre_classifier): Linear(in_features=768, out_features=768, bias=True)
(classifier): Linear(in_features=768, out_features=6, bias=True)
(dropout): Dropout(p=0.2, inplace=False)
)모델 성능 계산 함수 만들어주기
from sklearn.metrics import accuracy_score, f1_score

def compute_metrics(pred):
    labels = pred.label_ids
    preds = pred.predictions.argmax(-1)
    f1 = f1_score(labels, preds, average = 'weighted')
    acc = accuracy_score(labels, preds)
    return {'accuracy': acc, 'f1': f1}
허깅페이스에서 로그인 후 access token 을 만들어서 입력해주어야함
from huggingface_hub import notebook_login
notebook_login()
허깅페이스에서 제공하는 Trainer API를 활용하면 간편하게 학습시킬 수 있음.
from transformers import Trainer, TrainingArguments

batch_size = 64
logging_steps = len(emotions_encoded['train'])//batch_size
model_name = f'{checkpoint}-finetuned-emotion'
training_args = TrainingArguments(output_dir = model_name,
                                  num_train_epochs = 2,
                                  learning_rate = 2e-5,
                                  per_device_train_batch_size=batch_size,
                                  per_device_eval_batch_size=batch_size,
                                  weight_decay = 0.01,
                                  evaluation_strategy='epoch',
                                  disable_tqdm = False,
                                  logging_steps=logging_steps,
                                  push_to_hub = True,
                                  save_strategy = 'epoch',
                                  load_best_model_at_end = True,
                                  log_level = 'error')
trainer = Trainer(model = model, args = training_args,
compute_metrics = compute_metrics,
train_dataset = emotions_encoded['train'],
eval_dataset = emotions_encoded['validation'],
tokenizer = tokenizer)
trainer.train()
TrainOutput(global_step=500, training_loss=0.5339508361816406, metrics={'train_runtime': 237.6582, 'train_samples_per_second': 134.647, 'train_steps_per_second': 2.104, 'total_flos': 720342861696000.0, 'train_loss': 0.5339508361816406, 'epoch': 2.0})preds_output = trainer.predict(emotions_encoded['validation'])y_preds = np.argmax(preds_output.predictions, axis = 1)
y_predsarray([0, 0, 2, ..., 1, 1, 1])모델 저장 및 공유
trainer.push_to_hub(commit_message = 'Training complete!')'https://huggingface.co/ericoh929/distilbert-base-uncased-finetuned-emotion/tree/main/'from transformers import pipeline
model_id = 'ericoh929/distilbert-base-uncased-finetuned-emotion'
classifier = pipeline('text-classification', model = model_id)tweet = 'I saw a movie today and it was really good.'
predss = classifier(tweet, return_all_scores = True)
predss[[{'label': 'LABEL_0', 'score': 0.02116491086781025},
{'label': 'LABEL_1', 'score': 0.9409784078598022},
{'label': 'LABEL_2', 'score': 0.012075760401785374},
{'label': 'LABEL_3', 'score': 0.007848703302443027},
{'label': 'LABEL_4', 'score': 0.007253389339894056},
{'label': 'LABEL_5', 'score': 0.010678944177925587}]]labels['sadness', 'joy', 'love', 'anger', 'fear', 'surprise']코랩파일 md 파일로 저장하는 법
- github 이나 블로그에 올리는 사람들을 위해
from google.colab import drive
drive.mount('/content/drive')
md 파일로 저장
!jupyter nbconvert --to markdown "/content/drive/MyDrive/NLP/HuggingFace/트랜스포머를 활용한 자연어처리/text_classification.ipynb"
Deep Learning, Multi-Agent RL, Large Language Model, Statistics