AWS Elastic Kubernetes Service +7 EKS CI/CD (AEWS 2기)
0. 실습 환경 배포
# YAML 파일 다운로드
curl -O https://s3.ap-northeast-2.amazonaws.com/cloudformation.cloudneta.net/K8S/eks-oneclick6.yaml

# CloudFormation 스택 배포
예시) aws cloudformation deploy --template-file eks-oneclick6.yaml --stack-name myeks --parameter-overrides KeyName=kp-gasida SgIngressSshCidr=$(curl -s ipinfo.io/ip)/32  MyIamUserAccessKeyID=AKIA5... MyIamUserSecretAccessKey='CVNa2...' ClusterBaseName=myeks --region ap-northeast-2

# CloudFormation 스택 배포 완료 후 작업용 EC2 IP 출력
aws cloudformation describe-stacks --stack-name myeks --query 'Stacks[*].Outputs[0].OutputValue' --output text

# 작업용 EC2 SSH 접속
ssh -i ~/.ssh/kp-gasida.pem ec2-user@$(aws cloudformation describe-stacks --stack-name myeks --query 'Stacks[*].Outputs[0].OutputValue' --output text)
or
ssh -i ~/.ssh/kp-gasida.pem root@$(aws cloudformation describe-stacks --stack-name myeks --query 'Stacks[*].Outputs[0].OutputValue' --output text)
~ password: qwe123- 기본 설정
# default 네임스페이스 적용
kubectl ns default

# 노드 정보 확인 : t3.medium
kubectl get node --label-columns=node.kubernetes.io/instance-type,eks.amazonaws.com/capacityType,topology.kubernetes.io/zone

# ExternalDNS
MyDomain=<자신의 도메인>
echo "export MyDomain=<자신의 도메인>" >> /etc/profile
MyDomain=gasida.link
echo "export MyDomain=gasida.link" >> /etc/profile
MyDnzHostedZoneId=$(aws route53 list-hosted-zones-by-name --dns-name "${MyDomain}." --query "HostedZones[0].Id" --output text)
echo $MyDomain, $MyDnzHostedZoneId
curl -s -O https://raw.githubusercontent.com/gasida/PKOS/main/aews/externaldns.yaml
MyDomain=$MyDomain MyDnzHostedZoneId=$MyDnzHostedZoneId envsubst < externaldns.yaml | kubectl apply -f -

# kube-ops-view
helm repo add geek-cookbook https://geek-cookbook.github.io/charts/
helm install kube-ops-view geek-cookbook/kube-ops-view --version 1.2.2 --set env.TZ="Asia/Seoul" --namespace kube-system
kubectl patch svc -n kube-system kube-ops-view -p '{"spec":{"type":"LoadBalancer"}}'
kubectl annotate service kube-ops-view -n kube-system "external-dns.alpha.kubernetes.io/hostname=kubeopsview.$MyDomain"
echo -e "Kube Ops View URL = http://kubeopsview.$MyDomain:8080/#scale=1.5"

# AWS LB Controller
helm repo add eks https://aws.github.io/eks-charts
helm repo update
helm install aws-load-balancer-controller eks/aws-load-balancer-controller -n kube-system --set clusterName=$CLUSTER_NAME \
  --set serviceAccount.create=false --set serviceAccount.name=aws-load-balancer-controller

# gp3 스토리지 클래스 생성
kubectl apply -f https://raw.githubusercontent.com/gasida/PKOS/main/aews/gp3-sc.yaml

# 노드 보안그룹 ID 확인
NGSGID=$(aws ec2 describe-security-groups --filters Name=group-name,Values=*ng1* --query "SecurityGroups[*].[GroupId]" --output text)
aws ec2 authorize-security-group-ingress --group-id $NGSGID --protocol '-1' --cidr 192.168.1.100/32- 프로메테우스 & 그라파나(admin / prom-operator)
- 대시보드 : 15757 17900 15172
# 사용 리전의 인증서 ARN 확인
CERT_ARN=`aws acm list-certificates --query 'CertificateSummaryList[].CertificateArn[]' --output text`
echo $CERT_ARN

# repo 추가
helm repo add prometheus-community https://prometheus-community.github.io/helm-charts

# 파라미터 파일 생성 : PV/PVC(AWS EBS) 삭제에 불편하니, 4주차 실습과 다르게 PV/PVC 미사용
cat <<EOT > monitor-values.yaml
prometheus:
  prometheusSpec:
    podMonitorSelectorNilUsesHelmValues: false
    serviceMonitorSelectorNilUsesHelmValues: false
    retention: 5d
    retentionSize: "10GiB"

  ingress:
    enabled: true
    ingressClassName: alb
    hosts:
      - prometheus.$MyDomain
    paths:
      - /*
    annotations:
      alb.ingress.kubernetes.io/scheme: internet-facing
      alb.ingress.kubernetes.io/target-type: ip
      alb.ingress.kubernetes.io/listen-ports: '[{"HTTPS":443}, {"HTTP":80}]'
      alb.ingress.kubernetes.io/certificate-arn: $CERT_ARN
      alb.ingress.kubernetes.io/success-codes: 200-399
      alb.ingress.kubernetes.io/load-balancer-name: myeks-ingress-alb
      alb.ingress.kubernetes.io/group.name: study
      alb.ingress.kubernetes.io/ssl-redirect: '443'

grafana:
  defaultDashboardsTimezone: Asia/Seoul
  adminPassword: prom-operator
  defaultDashboardsEnabled: false

  ingress:
    enabled: true
    ingressClassName: alb
    hosts:
      - grafana.$MyDomain
    paths:
      - /*
    annotations:
      alb.ingress.kubernetes.io/scheme: internet-facing
      alb.ingress.kubernetes.io/target-type: ip
      alb.ingress.kubernetes.io/listen-ports: '[{"HTTPS":443}, {"HTTP":80}]'
      alb.ingress.kubernetes.io/certificate-arn: $CERT_ARN
      alb.ingress.kubernetes.io/success-codes: 200-399
      alb.ingress.kubernetes.io/load-balancer-name: myeks-ingress-alb
      alb.ingress.kubernetes.io/group.name: study
      alb.ingress.kubernetes.io/ssl-redirect: '443'

alertmanager:
  enabled: false
EOT
cat monitor-values.yaml | yh

# 배포
kubectl create ns monitoring
helm install kube-prometheus-stack prometheus-community/kube-prometheus-stack --version 57.2.0 \
--set prometheus.prometheusSpec.scrapeInterval='15s' --set prometheus.prometheusSpec.evaluationInterval='15s' \
-f monitor-values.yaml --namespace monitoring

# Metrics-server 배포
kubectl apply -f https://github.com/kubernetes-sigs/metrics-server/releases/latest/download/components.yaml

# 프로메테우스 ingress 도메인으로 웹 접속
echo -e "Prometheus Web URL = https://prometheus.$MyDomain"

# 그라파나 웹 접속 : 기본 계정 - admin / prom-operator
echo -e "Grafana Web URL = https://grafana.$MyDomain"

(leeeuijoo@myeks:default) [root@myeks-bastion ~]# echo -e "Prometheus Web URL = https://prometheus.$MyDomain"
Prometheus Web URL = https://prometheus.22joo.shop
(leeeuijoo@myeks:default) [root@myeks-bastion ~]# echo -e "Grafana Web URL = https://grafana.$MyDomain"
Grafana Web URL = https://grafana.22joo.shop

(leeeuijoo@myeks:default) [root@myeks-bastion ~]# k get ingress -n monitoring
NAME                               CLASS   HOSTS                   ADDRESS                                                         PORTS   AGE
kube-prometheus-stack-grafana      alb     grafana.22joo.shop      myeks-ingress-alb-1775769576.ap-northeast-2.elb.amazonaws.com   80      84s
kube-prometheus-stack-prometheus   alb     prometheus.22joo.shop   myeks-ingress-alb-1775769576.ap-northeast-2.elb.amazonaws.com   80      84s
1. Docker
- prerequirements : 자신만의 Docker Hub 계정이 있으셔야 합니다.
# ubuntu 이미지 다운로드
docker pull ubuntu:20.04
docker images
(leeeuijoo@myeks:default) [root@myeks-bastion ~]# docker images
REPOSITORY TAG IMAGE ID CREATED SIZE
ubuntu 20.04 33985b2ba010 7 days ago 72.8MB
# 실습을 위한 디렉터리 생성 및 이동
mkdir -p /root/myweb && cd /root/myweb
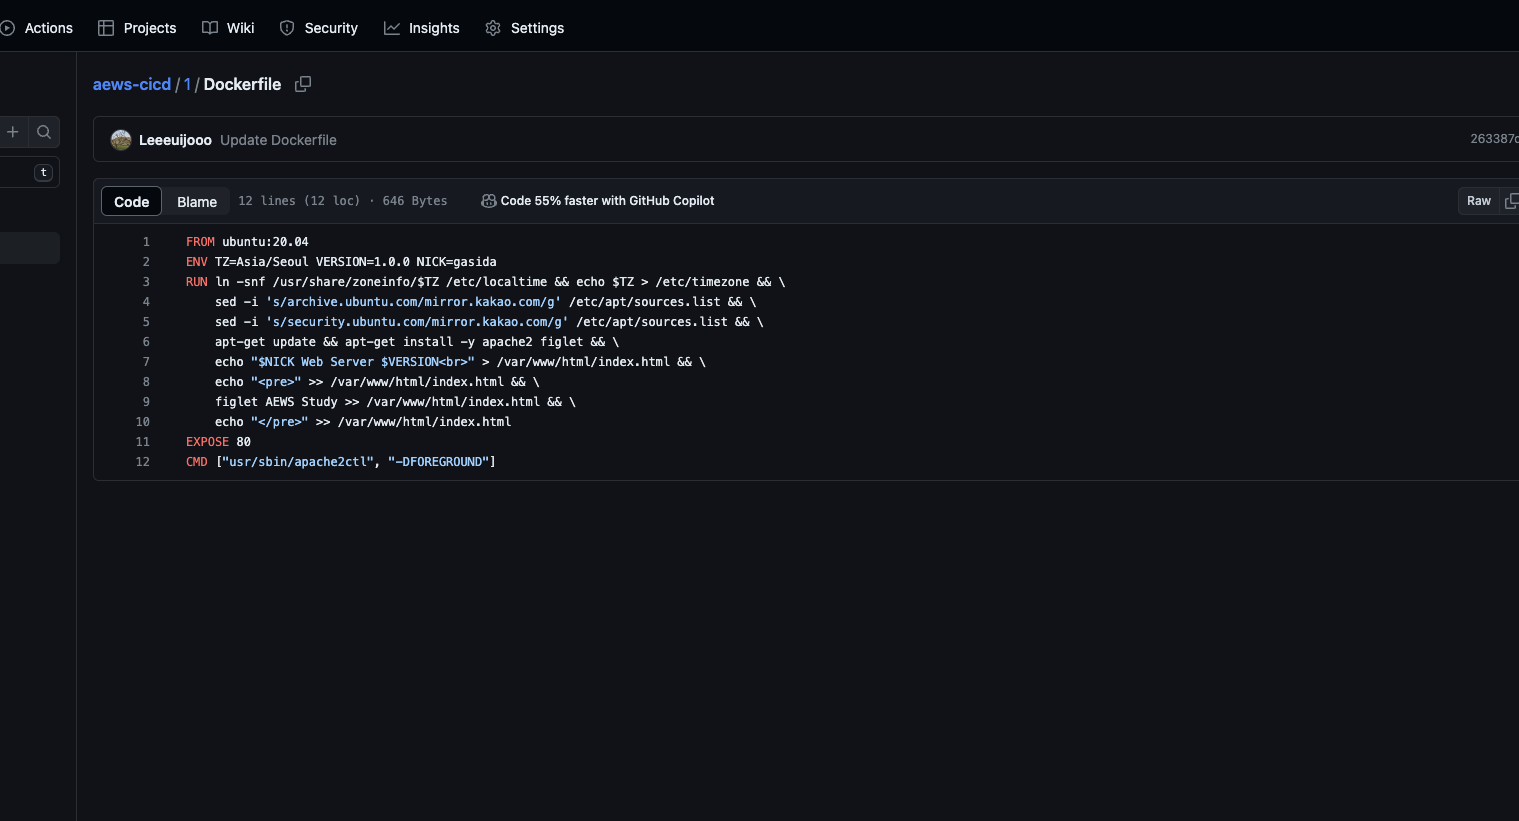
# Dockerfile 파일 생성
vi Dockerfile
FROM ubuntu:20.04
ENV TZ=Asia/Seoul VERSION=1.0.0 NICK=<자신의 닉네임>
RUN ln -snf /usr/share/zoneinfo/$TZ /etc/localtime && echo $TZ > /etc/timezone && \
sed -i 's/archive.ubuntu.com/mirror.kakao.com/g' /etc/apt/sources.list && \
sed -i 's/security.ubuntu.com/mirror.kakao.com/g' /etc/apt/sources.list && \
apt-get update && apt-get install -y apache2 figlet && \
echo "$NICK Web Server $VERSION<br>" > /var/www/html/index.html && \
echo "<pre>" >> /var/www/html/index.html && \
figlet AEWS Study >> /var/www/html/index.html && \
echo "</pre>" >> /var/www/html/index.html
EXPOSE 80
CMD ["usr/sbin/apache2ctl", "-DFOREGROUND"]
(leeeuijoo@myeks:default) [root@myeks-bastion myweb]# cat Dockerfile
FROM ubuntu:20.04
ENV TZ=Asia/Seoul VERSION=1.0.0 NICK=euijoo
RUN ln -snf /usr/share/zoneinfo/$TZ /etc/localtime && echo $TZ > /etc/timezone && \
sed -i 's/archive.ubuntu.com/mirror.kakao.com/g' /etc/apt/sources.list && \
sed -i 's/security.ubuntu.com/mirror.kakao.com/g' /etc/apt/sources.list && \
apt-get update && apt-get install -y apache2 figlet && \
echo "$NICK Web Server $VERSION<br>" > /var/www/html/index.html && \
echo "<pre>" >> /var/www/html/index.html && \
figlet AEWS Study >> /var/www/html/index.html && \
echo "</pre>" >> /var/www/html/index.html
EXPOSE 80
CMD ["usr/sbin/apache2ctl", "-DFOREGROUND"]
# 이미지 빌드
docker build -t myweb:v1.0.0 .
docker images
docker image history myweb:v1.0.0
docker image inspect myweb:v1.0.0 | jq
(leeeuijoo@myeks:default) [root@myeks-bastion myweb]# docker images | grep my
myweb v1.0.0 138734a9d166 11 seconds ago 237MB
# 컨테이너 실행
docker run -d -p 80:80 --rm --name myweb myweb:v1.0.0
docker ps
curl localhost
(leeeuijoo@myeks:default) [root@myeks-bastion myweb]# docker ps
CONTAINER ID IMAGE COMMAND CREATED STATUS PORTS NAMES
b68b66c90632 myweb:v1.0.0 "usr/sbin/apache2ctl…" 4 seconds ago Up 2 seconds 0.0.0.0:80->80/tcp, :::80->80/tcp myweb
(leeeuijoo@myeks:default) [root@myeks-bastion myweb]# curl localhost
euijoo Web Server 1.0.0<br>
<pre>
_ _______ ______ ____ _ _
/ \ | ____\ \ / / ___| / ___|| |_ _ _ __| |_ _
/ _ \ | _| \ \ /\ / /\___ \ \___ \| __| | | |/ _` | | | |
/ ___ \| |___ \ V V / ___) | ___) | |_| |_| | (_| | |_| |
/_/ \_\_____| \_/\_/ |____/ |____/ \__|\__,_|\__,_|\__, |
|___/
</pre>
# 웹 접속 확인
curl -s ipinfo.io/ip | awk '{ print "myweb = http://"$1"" }'
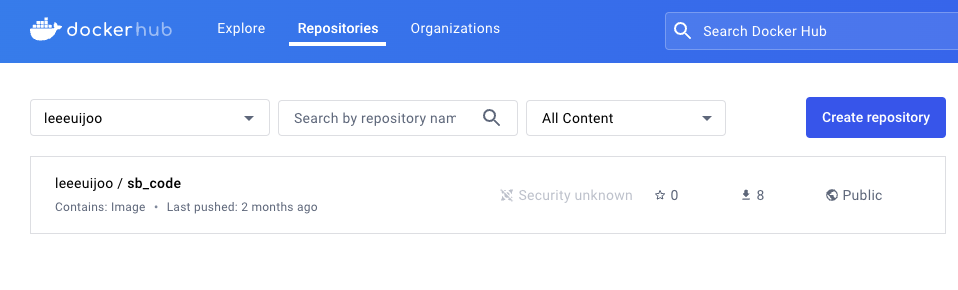
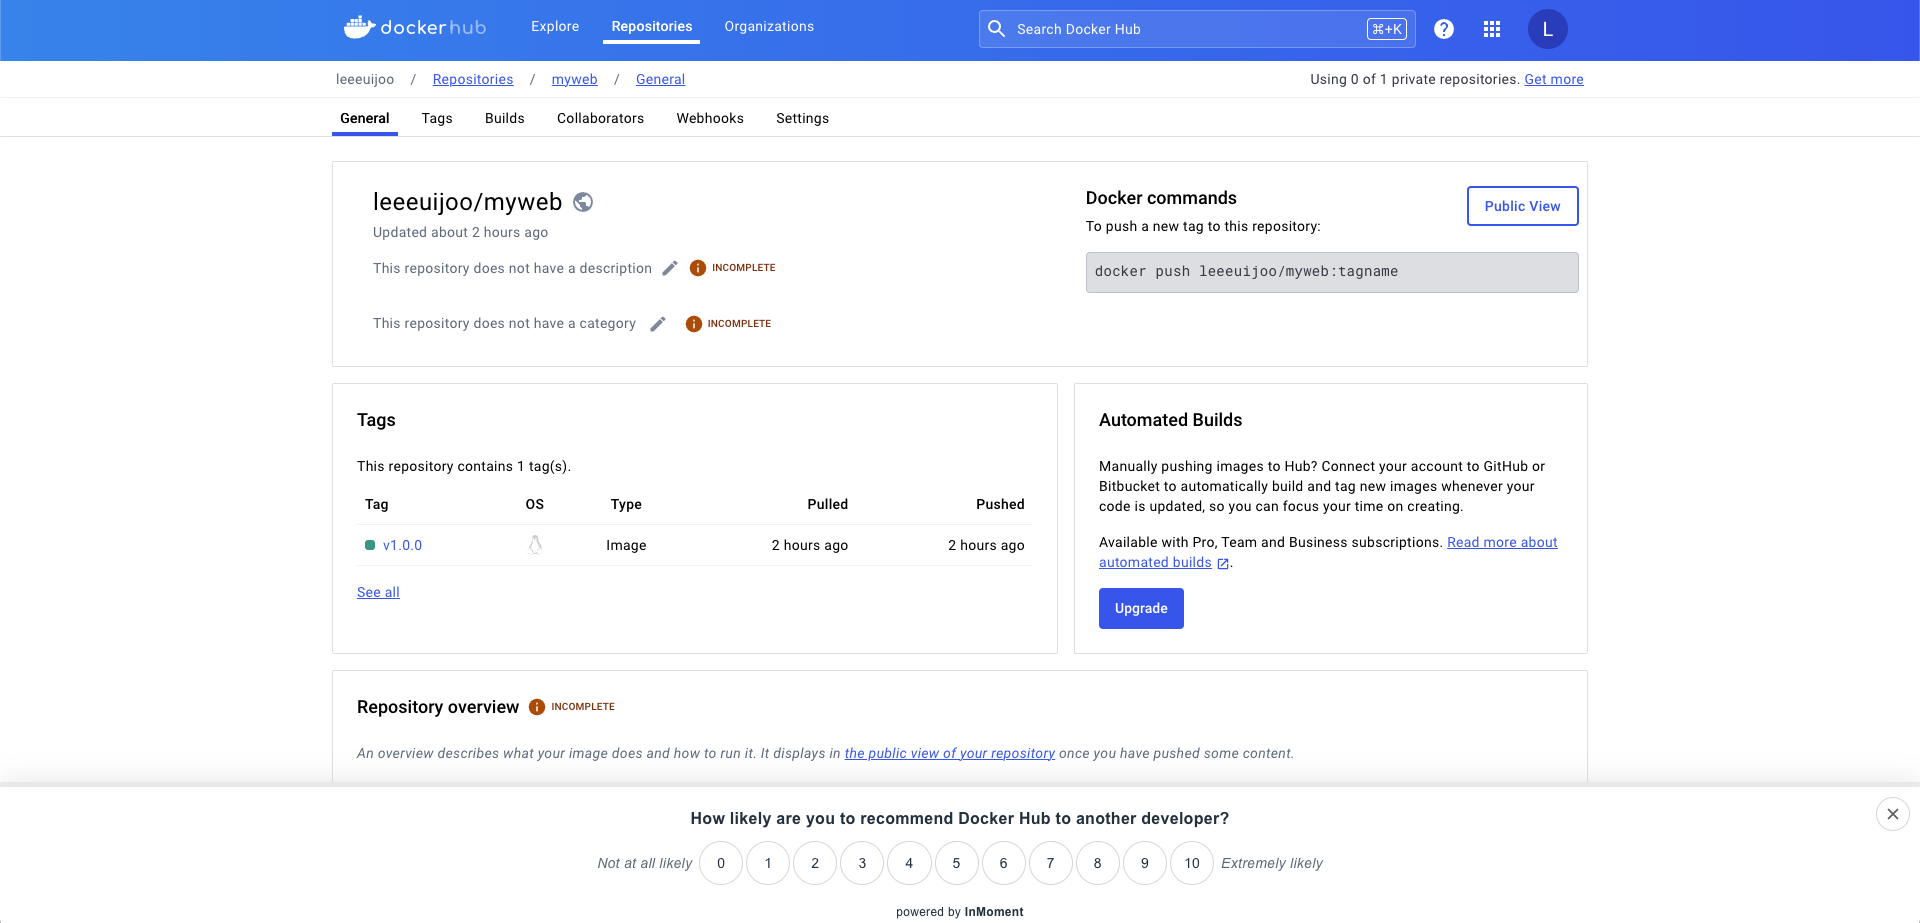
- Docker Hub 에 Push
# 설정
DHUB=leeeuijoo
docker tag myweb:v1.0.0 $DHUB/myweb:v1.0.0
docker images

(leeeuijoo@myeks:default) [root@myeks-bastion myweb]# docker images
REPOSITORY        TAG       IMAGE ID       CREATED         SIZE
leeeuijoo/myweb   v1.0.0    138734a9d166   2 minutes ago   237MB
myweb             v1.0.0    138734a9d166   2 minutes ago   237MB
ubuntu            20.04     33985b2ba010   7 days ago      72.8MB
(leeeuijoo@myeks:default) [root@myeks-bastion myweb]#

# 도커 허브 로그인
docker login
Username: <자신의 ID>
Password: <암호>
## 로그인 정보는 /[계정명]/.docker/config.json 에 저장됨. docker logout 시 삭제됨
## cat /root/.docker/config.json | jq

(leeeuijoo@myeks:default) [root@myeks-bastion myweb]# docker login
Login with your Docker ID to push and pull images from Docker Hub. If you don't have a Docker ID, head over to https://hub.docker.com to create one.
Username: leeeuijoo
Password:
WARNING! Your password will be stored unencrypted in /root/.docker/config.json.
Configure a credential helper to remove this warning. See
https://docs.docker.com/engine/reference/commandline/login/#credentials-store

Login Succeeded

# push 로 이미지를 저장소에 업로드
docker push $DHUB/myweb:v1.0.0

(leeeuijoo@myeks:default) [root@myeks-bastion myweb]# docker push $DHUB/myweb:v1.0.0
The push refers to repository [docker.io/leeeuijoo/myweb]
13e0c15d39a0: Pushed
106e8431b412: Mounted from library/ubuntu
v1.0.0: digest: sha256:a80ac1ced9ea7f057077c5eb15b7e92001329488c356539bc0f0387bf88a4777 size: 741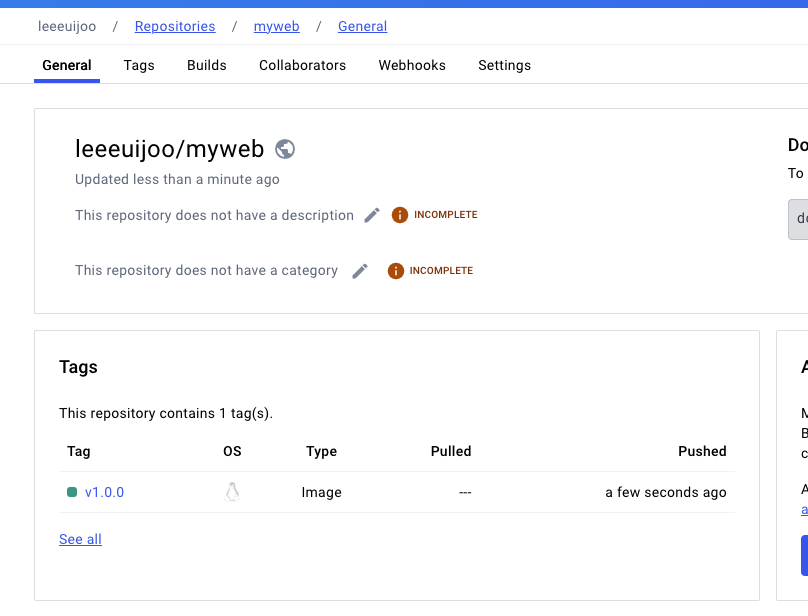
- 해당 Image 활용
# 컨테이너 종료
docker rm -f myweb
docker ps

# 로컬 이미지 삭제
docker rmi $DHUB/myweb:v1.0.0
docker images

# Container 실행
docker run -d -p 80:80 --rm --name myweb $DHUB/myweb:v1.0.0
docker iamges

(leeeuijoo@myeks:default) [root@myeks-bastion myweb]# docker images
REPOSITORY        TAG       IMAGE ID       CREATED         SIZE
leeeuijoo/myweb   v1.0.0    138734a9d166   5 minutes ago   237MB
myweb             v1.0.0    138734a9d166   5 minutes ago   237MB
ubuntu            20.04     33985b2ba010   7 days ago      72.8MB

# 확인
docker ps
curl localhost
curl -s ipinfo.io/ip | awk '{ print "myweb = http://"$1"" }'

(leeeuijoo@myeks:default) [root@myeks-bastion myweb]# curl localhost
euijoo Web Server 1.0.0<br>
<pre>
    _    _______        ______    ____  _             _
   / \  | ____\ \      / / ___|  / ___|| |_ _   _  __| |_   _
  / _ \ |  _|  \ \ /\ / /\___ \  \___ \| __| | | |/ _` | | | |
 / ___ \| |___  \ V  V /  ___) |  ___) | |_| |_| | (_| | |_| |
/_/   \_\_____|  \_/\_/  |____/  |____/ \__|\__,_|\__,_|\__, |
                                                        |___/
</pre>

# 삭제
docker rm -f myweb
2. Jenkins
Jenkins 소개 : 지속적인 통합과 배포 → Work flow를 제어 - Link
CI(지속적 제공)/CD(지속적 배포) 워크플로 시나리오
- 아래와 같은 순서로 실습을 진행해보겠습니다.
- 최신 코드 가져오기 : 개발을 위해 중앙 코드 리포지터리에서 로컬 시스템으로 애플리케이션의 최신 코드를 가져옴
- 단위 테스트 구현과 실행 : 코드 작성 전 단위 테스트 케이스를 먼저 작성
- 코드 개발 : 실패한 테스트 케이스를 성공으로 바꾸면서 코드 개발
- 단위 테스트 케이스 재실행 : 단위 테스트 케이스 실행 시 통과(성공!)
- 코드 푸시와 병합 : 개발 소스 코드를 중앙 리포지터리로 푸시하고, 코드 병합
- 코드 병합 후 컴파일 : 변경 함수 코드가 병함되면 전체 애플리케이션이 컴파일된다
- 병합된 코드에서 테스트 실행 : 개별 테스트뿐만 아니라 전체 통합 테스트를 실행하여 문제 없는지 확인
- 아티팩트 배포 : 애플리케이션을 빌드하고, 애플리케이션 서버의 프로덕션 환경에 배포
- 배포 애플리케이션의 E-E 테스트 실행 : 셀레늄 Selenium과 같은 User Interface 자동화 도구를 통해 애플리케이션의 전체 워크플로가 정상 동작하는지 확인하는 종단간 End-to-End 테스트를 실행.
-
소프트웨어 개발 프로세스의 다양한 단계를 자동화하는 도구로서 중앙 소스 코드 리포지터리에서 최신 코드 가져오기, 소스 코드 컴파일, 단위 테스트 실행, 산출물을 다양한 유형으로 패키징, 산출물을 여러 종류의 환경으로 배포하기 등의 기능을 제공.
-
젠킨스는 아파치 톰캣처럼 서블릿 컨테이너 내부에서 실행되는 서버 시스템이다. 자바로 작성됐고, 소프트웨어 개발과 관련된 다양한 도구를 지원.
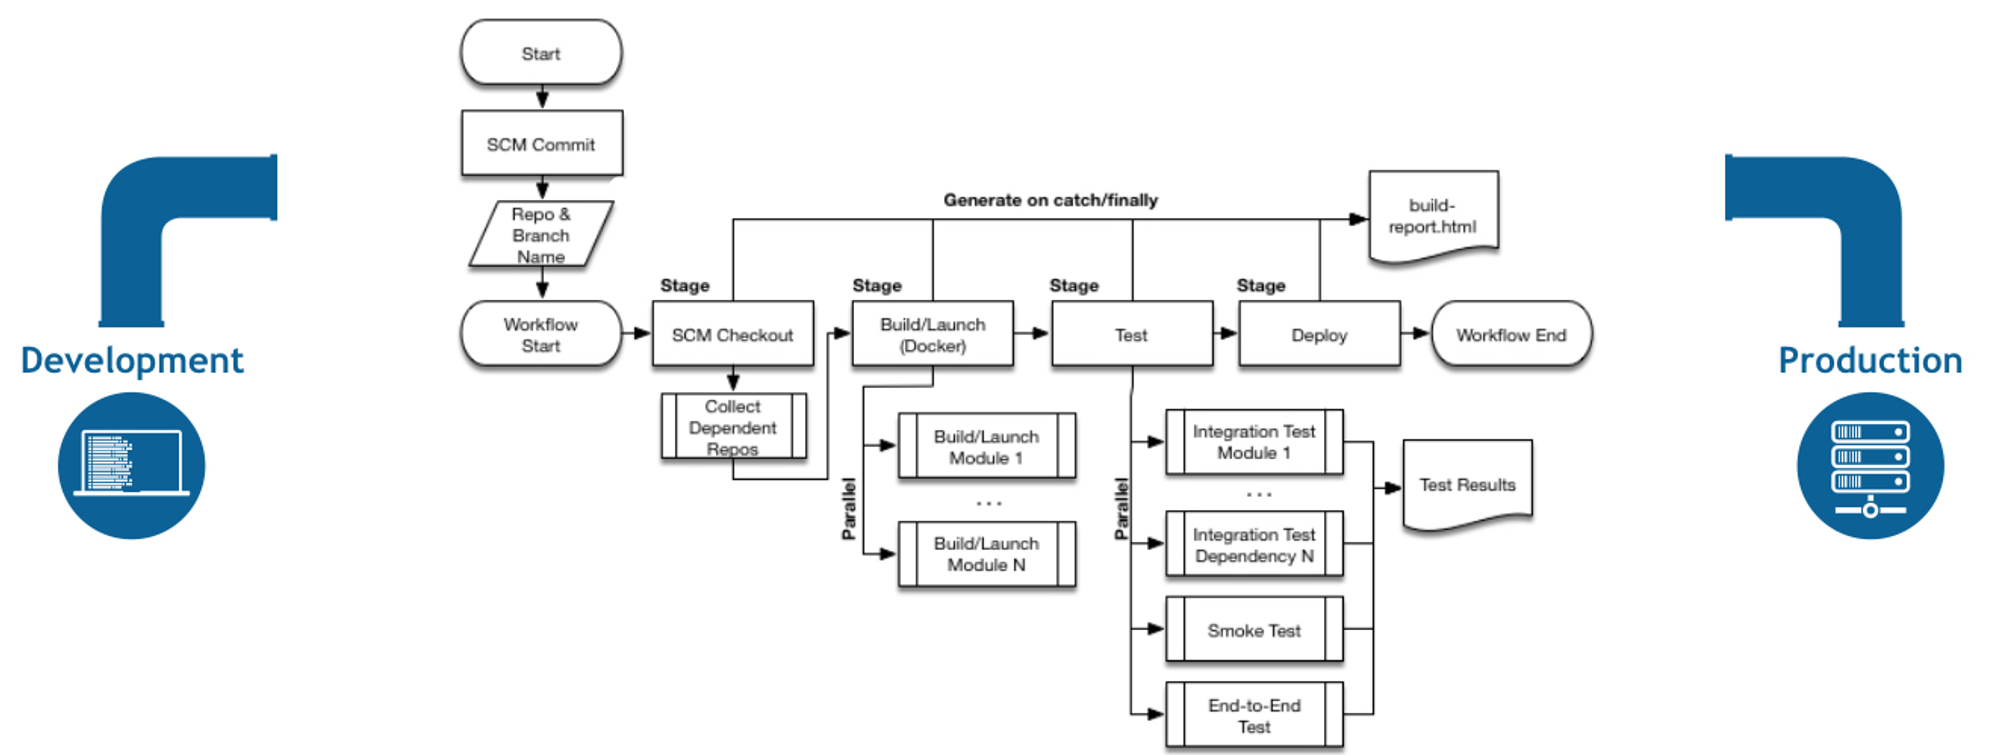
-
젠킨스는 DSL Domain Specific Language (jenkins file)로 E-E 빌드 수명 주기 단계를 구축한다.
-
젠킨스는 파이프라인이라고 부르는 스크립트를 작성할 수 있는데, 이를 사용해서 각 빌드 단계마다 젠킨스가 수행할 태스트 및 하위 태스크의 순서를 정의.
- 순차적이고 종속적인 단계가 시작부터 끝까지 실행되면 최종적으로 사용자가 실행할 수 있는 빌드가 생성됨.
- 만약 빌드 프로세스를 진행하는 중에 특정 단계에서 실패가 발생하며, 이 단계의 출력 결과를 사용하는 다음 단계는 실행되지 않으며 빌드 프로세스 전체가 실패한다.
- 다양한 Plugins 연동
- Build Plugins : Maven, Ant, Gradle …
- VCS Plugins : Git, SVN …
- Languages Plugins : Java, Python, Node.js …
- 설치 및 설정
# 실습 편리를 위해서 root 계정 전환
sudo su -

# Add required dependencies for the jenkins package
# https://docs.aws.amazon.com/corretto/latest/corretto-17-ug/amazon-linux-install.html
sudo yum install fontconfig java-17-amazon-corretto -y
java -version
alternatives --display java
JAVA_HOME=/usr/lib/jvm/java-17-amazon-corretto.x86_64
echo $JAVA_HOME

(leeeuijoo@myeks:default) [root@myeks-bastion ~]# echo $JAVA_HOME
/usr/lib/jvm/java-17-amazon-corretto.x86_64

# 젠킨스 설치
sudo wget -O /etc/yum.repos.d/jenkins.repo https://pkg.jenkins.io/redhat-stable/jenkins.repo
sudo rpm --import https://pkg.jenkins.io/redhat-stable/jenkins.io-2023.key
sudo yum upgrade
sudo yum install jenkins -y
sudo systemctl daemon-reload
sudo systemctl enable jenkins && sudo systemctl start jenkins   # 다소 시간 걸림
sudo systemctl status jenkins
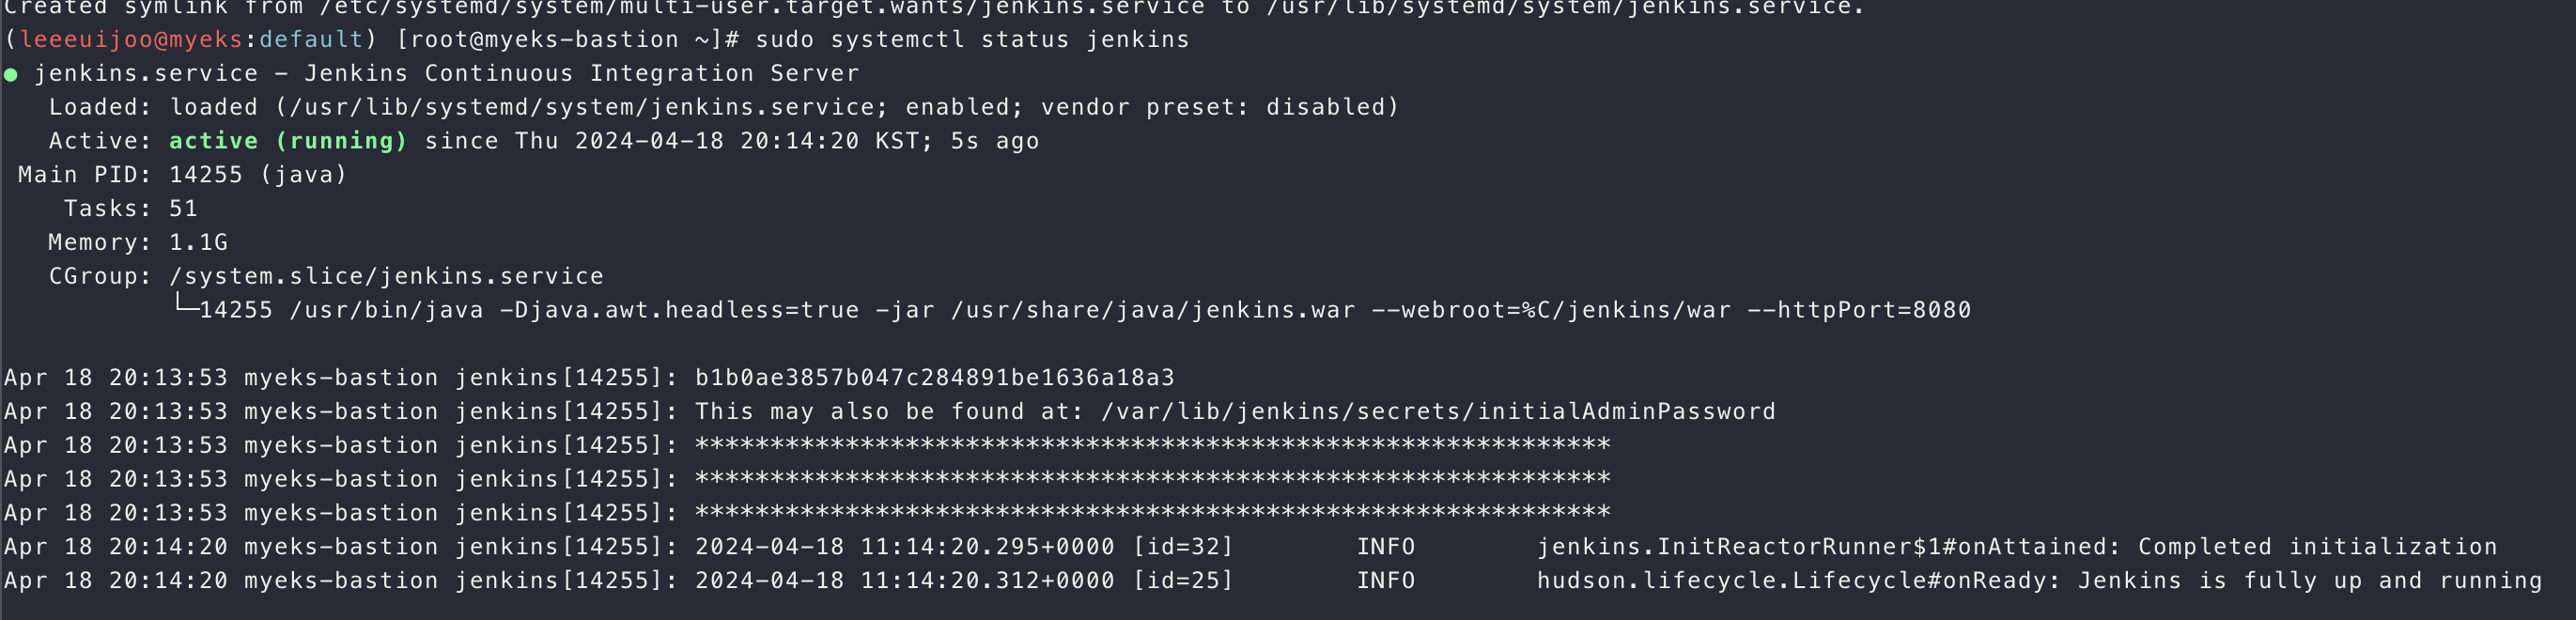
# 초기 암호 확인
sudo systemctl status jenkins
cat /var/lib/jenkins/secrets/initialAdminPassword

# 접속 주소 확인
curl -s ipinfo.io/ip | awk '{ print "Jenkins = http://"$1":8080" }'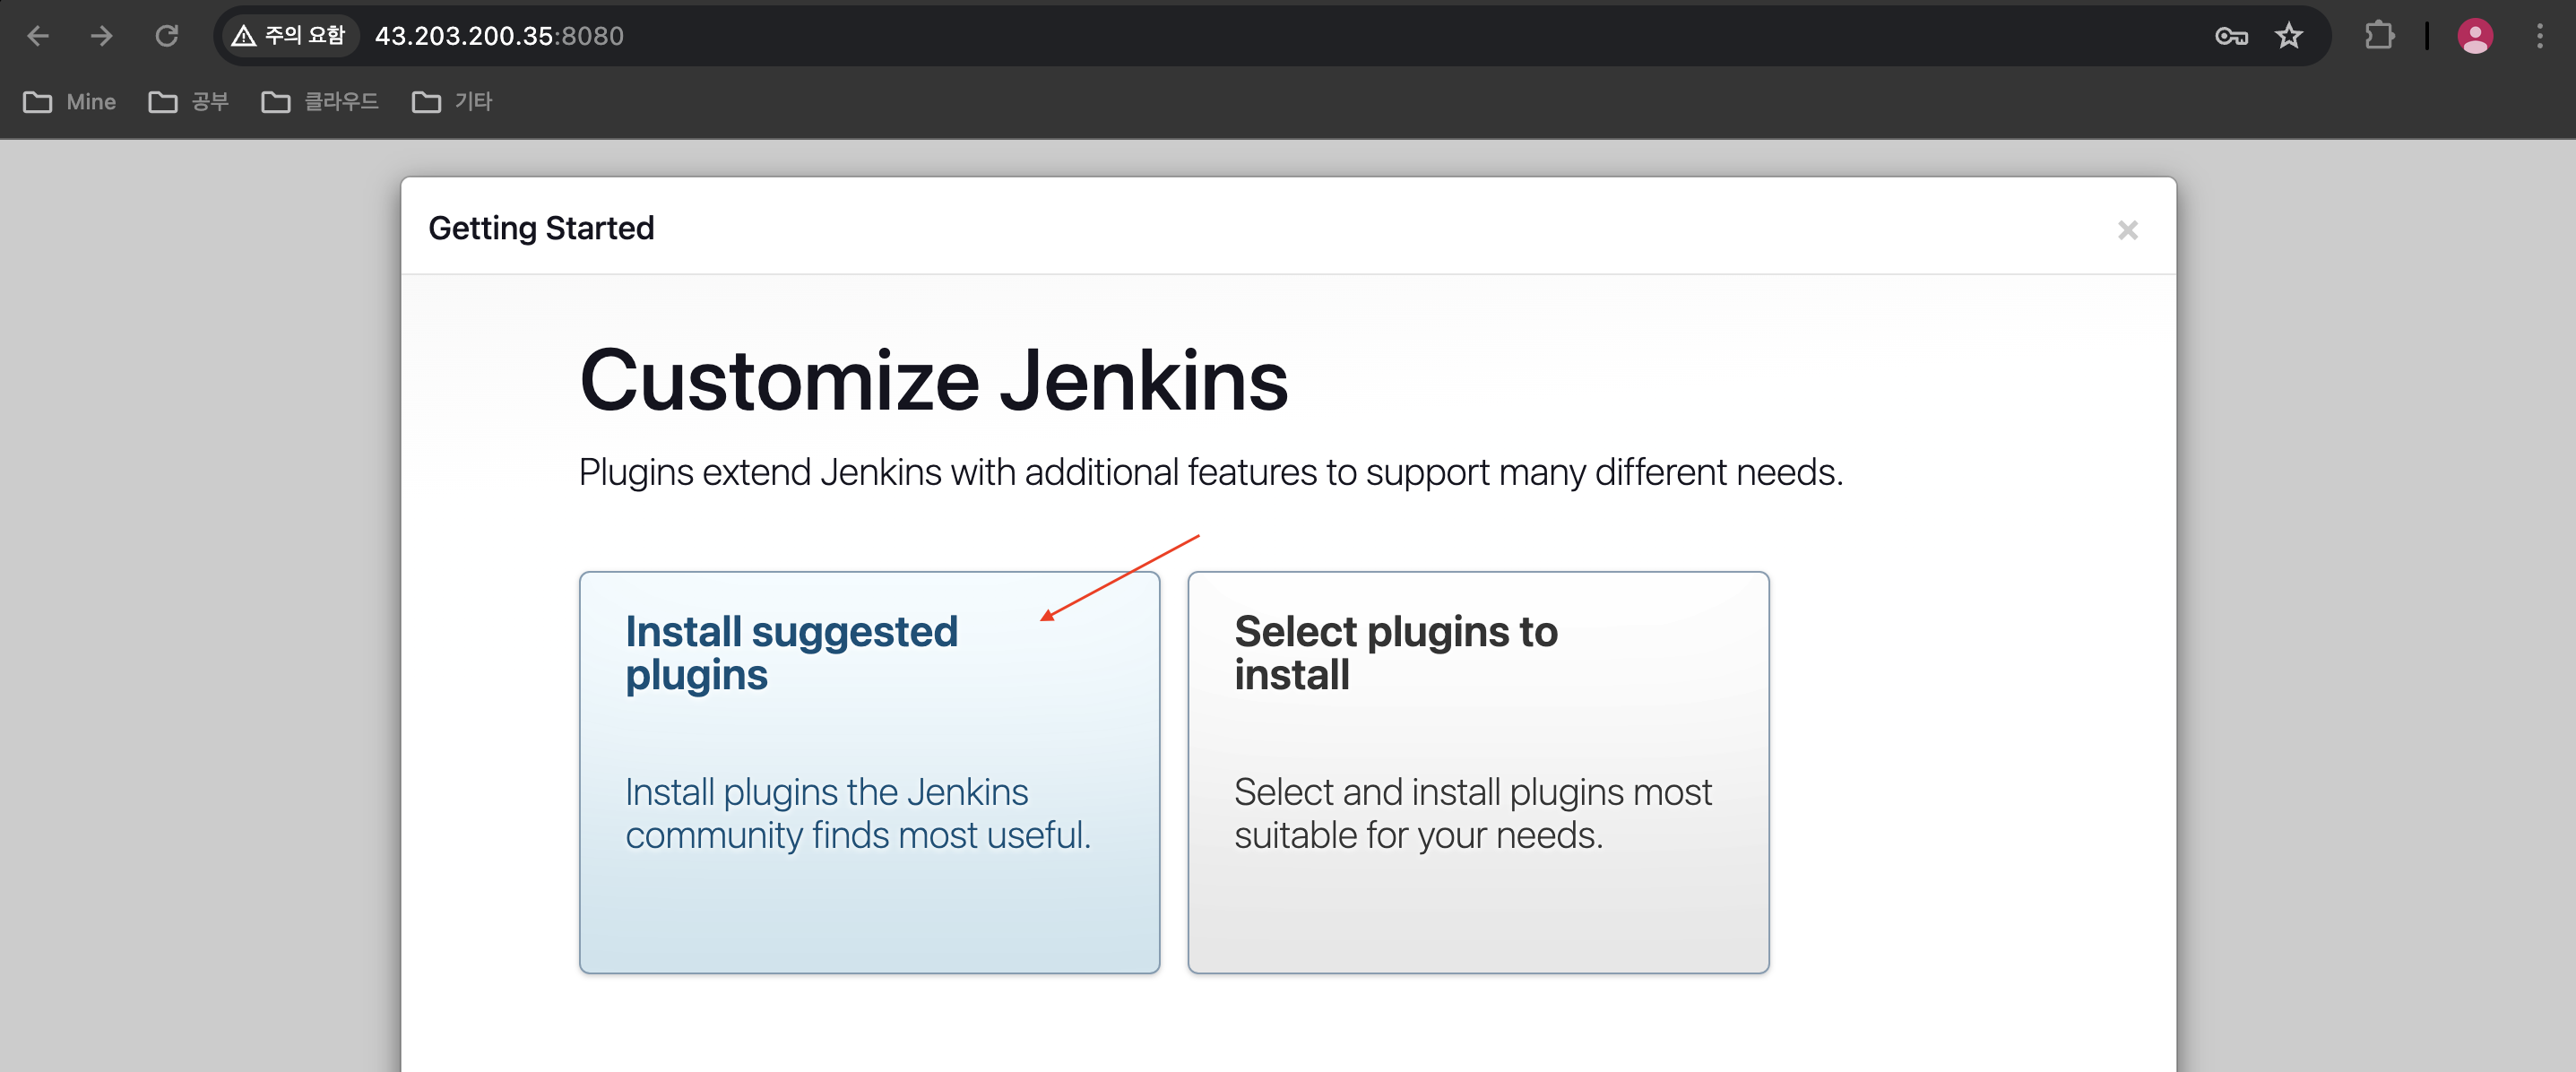
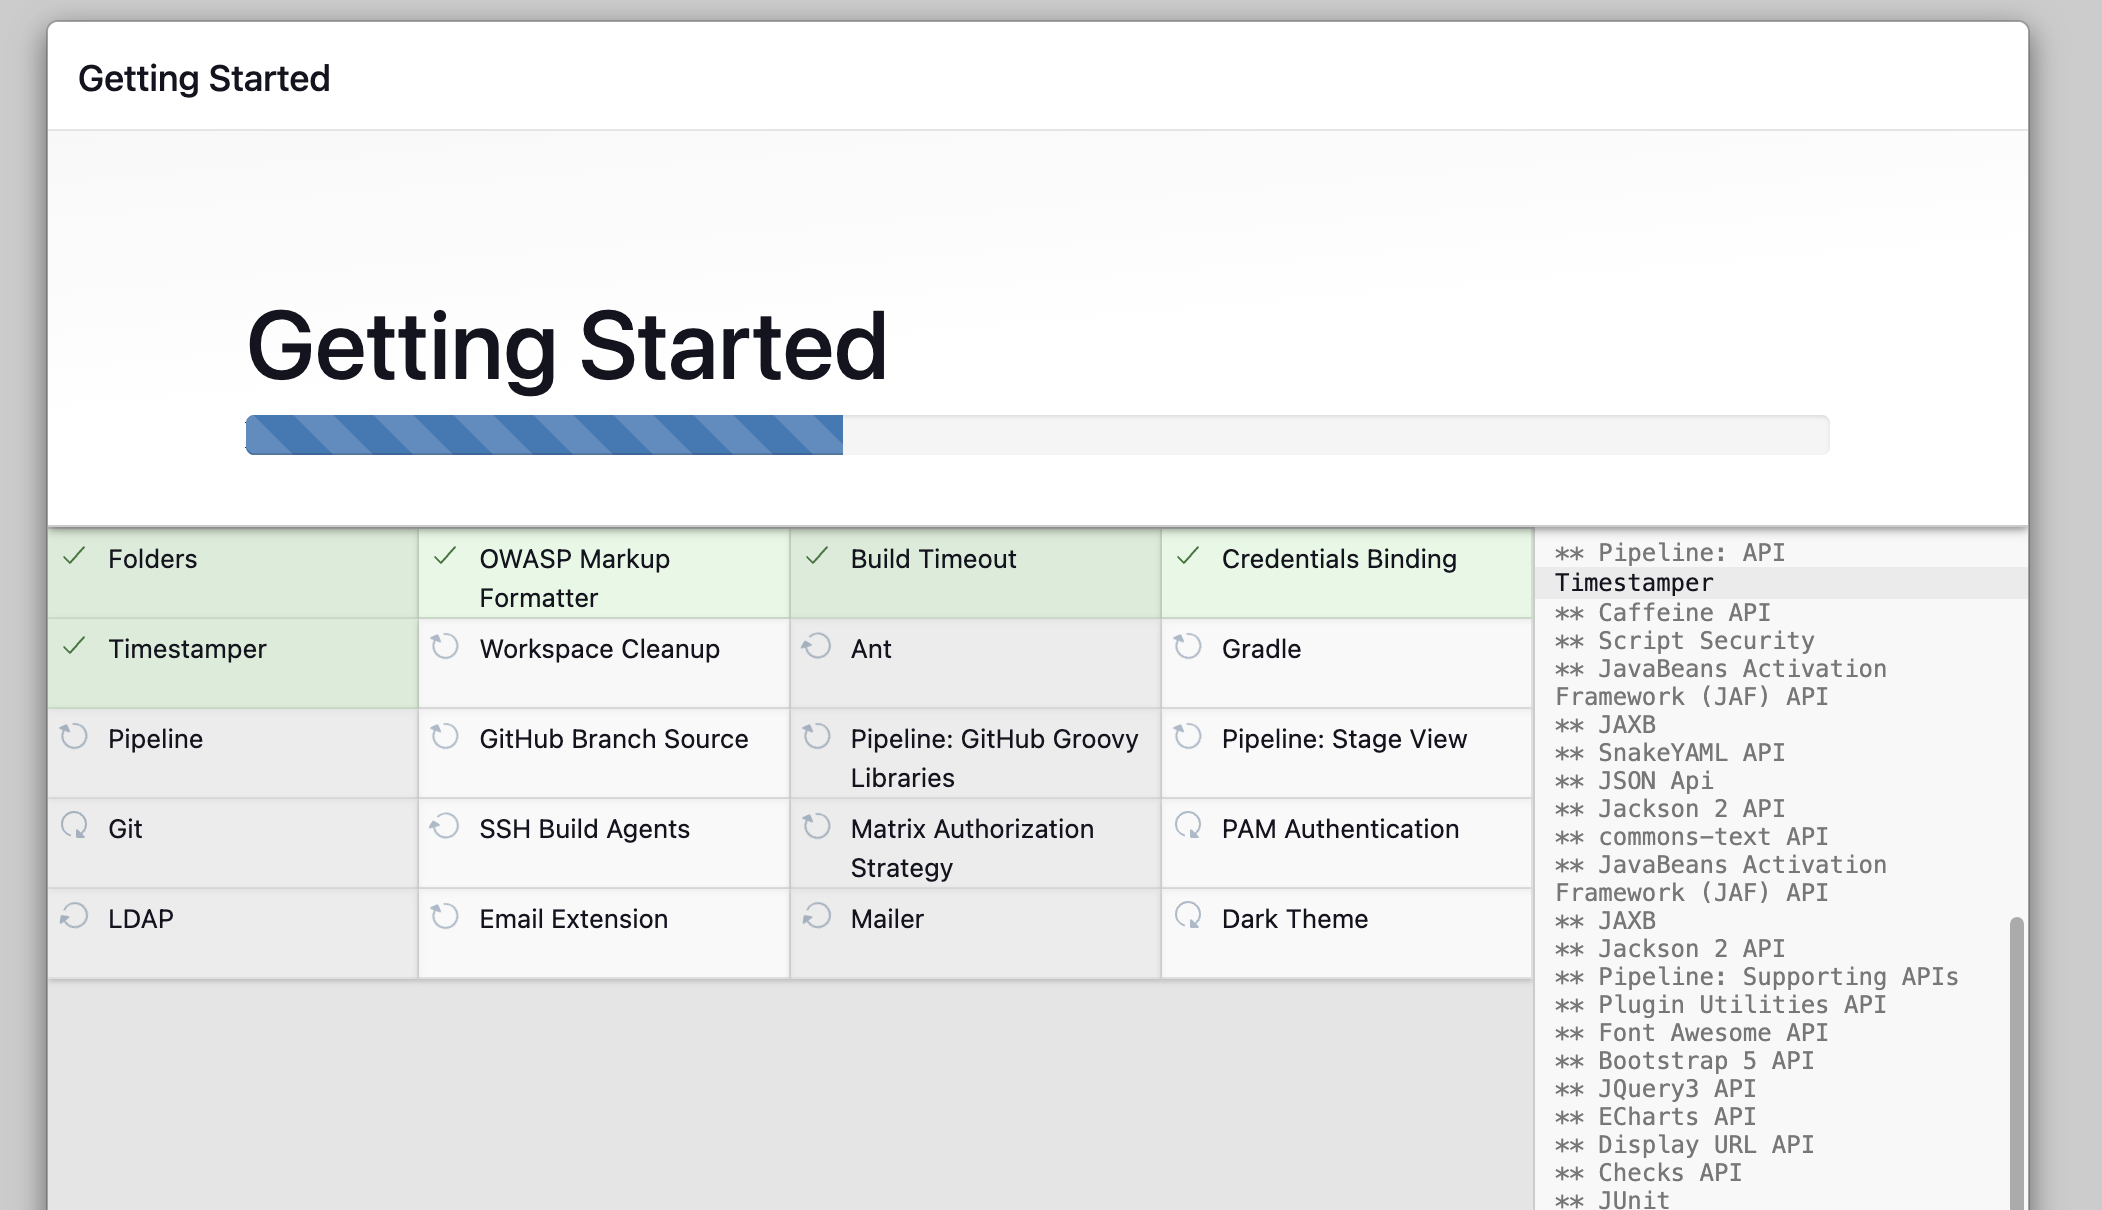
- Suggested Plugins 설치
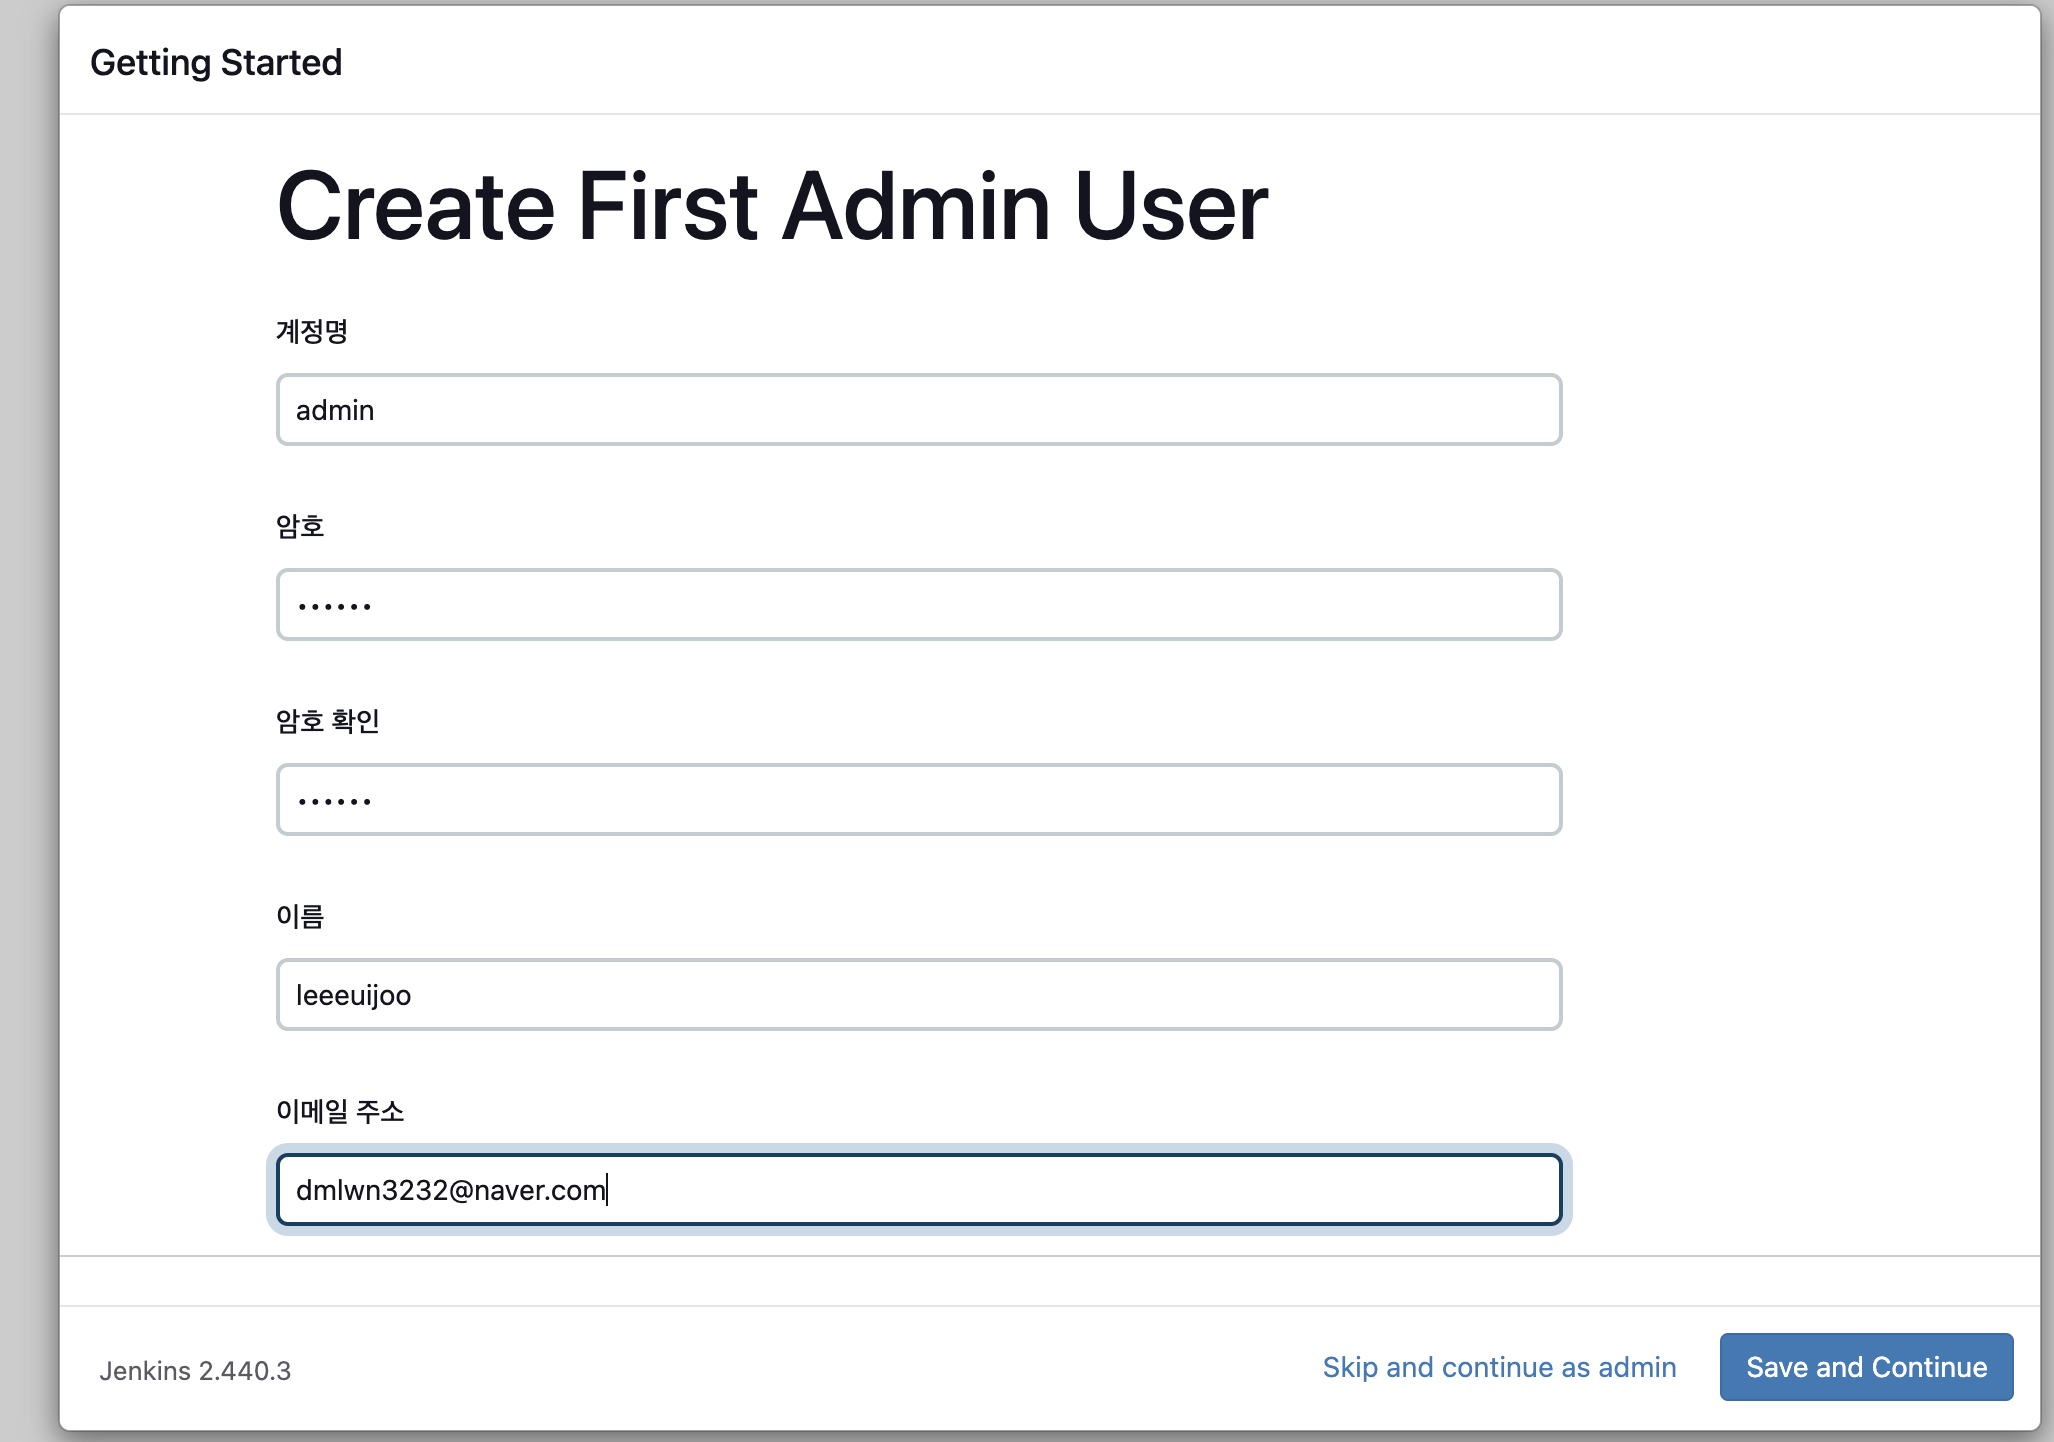
- 관리자 계정 설정 : 계정명(admin) , 암호(qwe123), 이름(’각자 자신의 닉네임’)
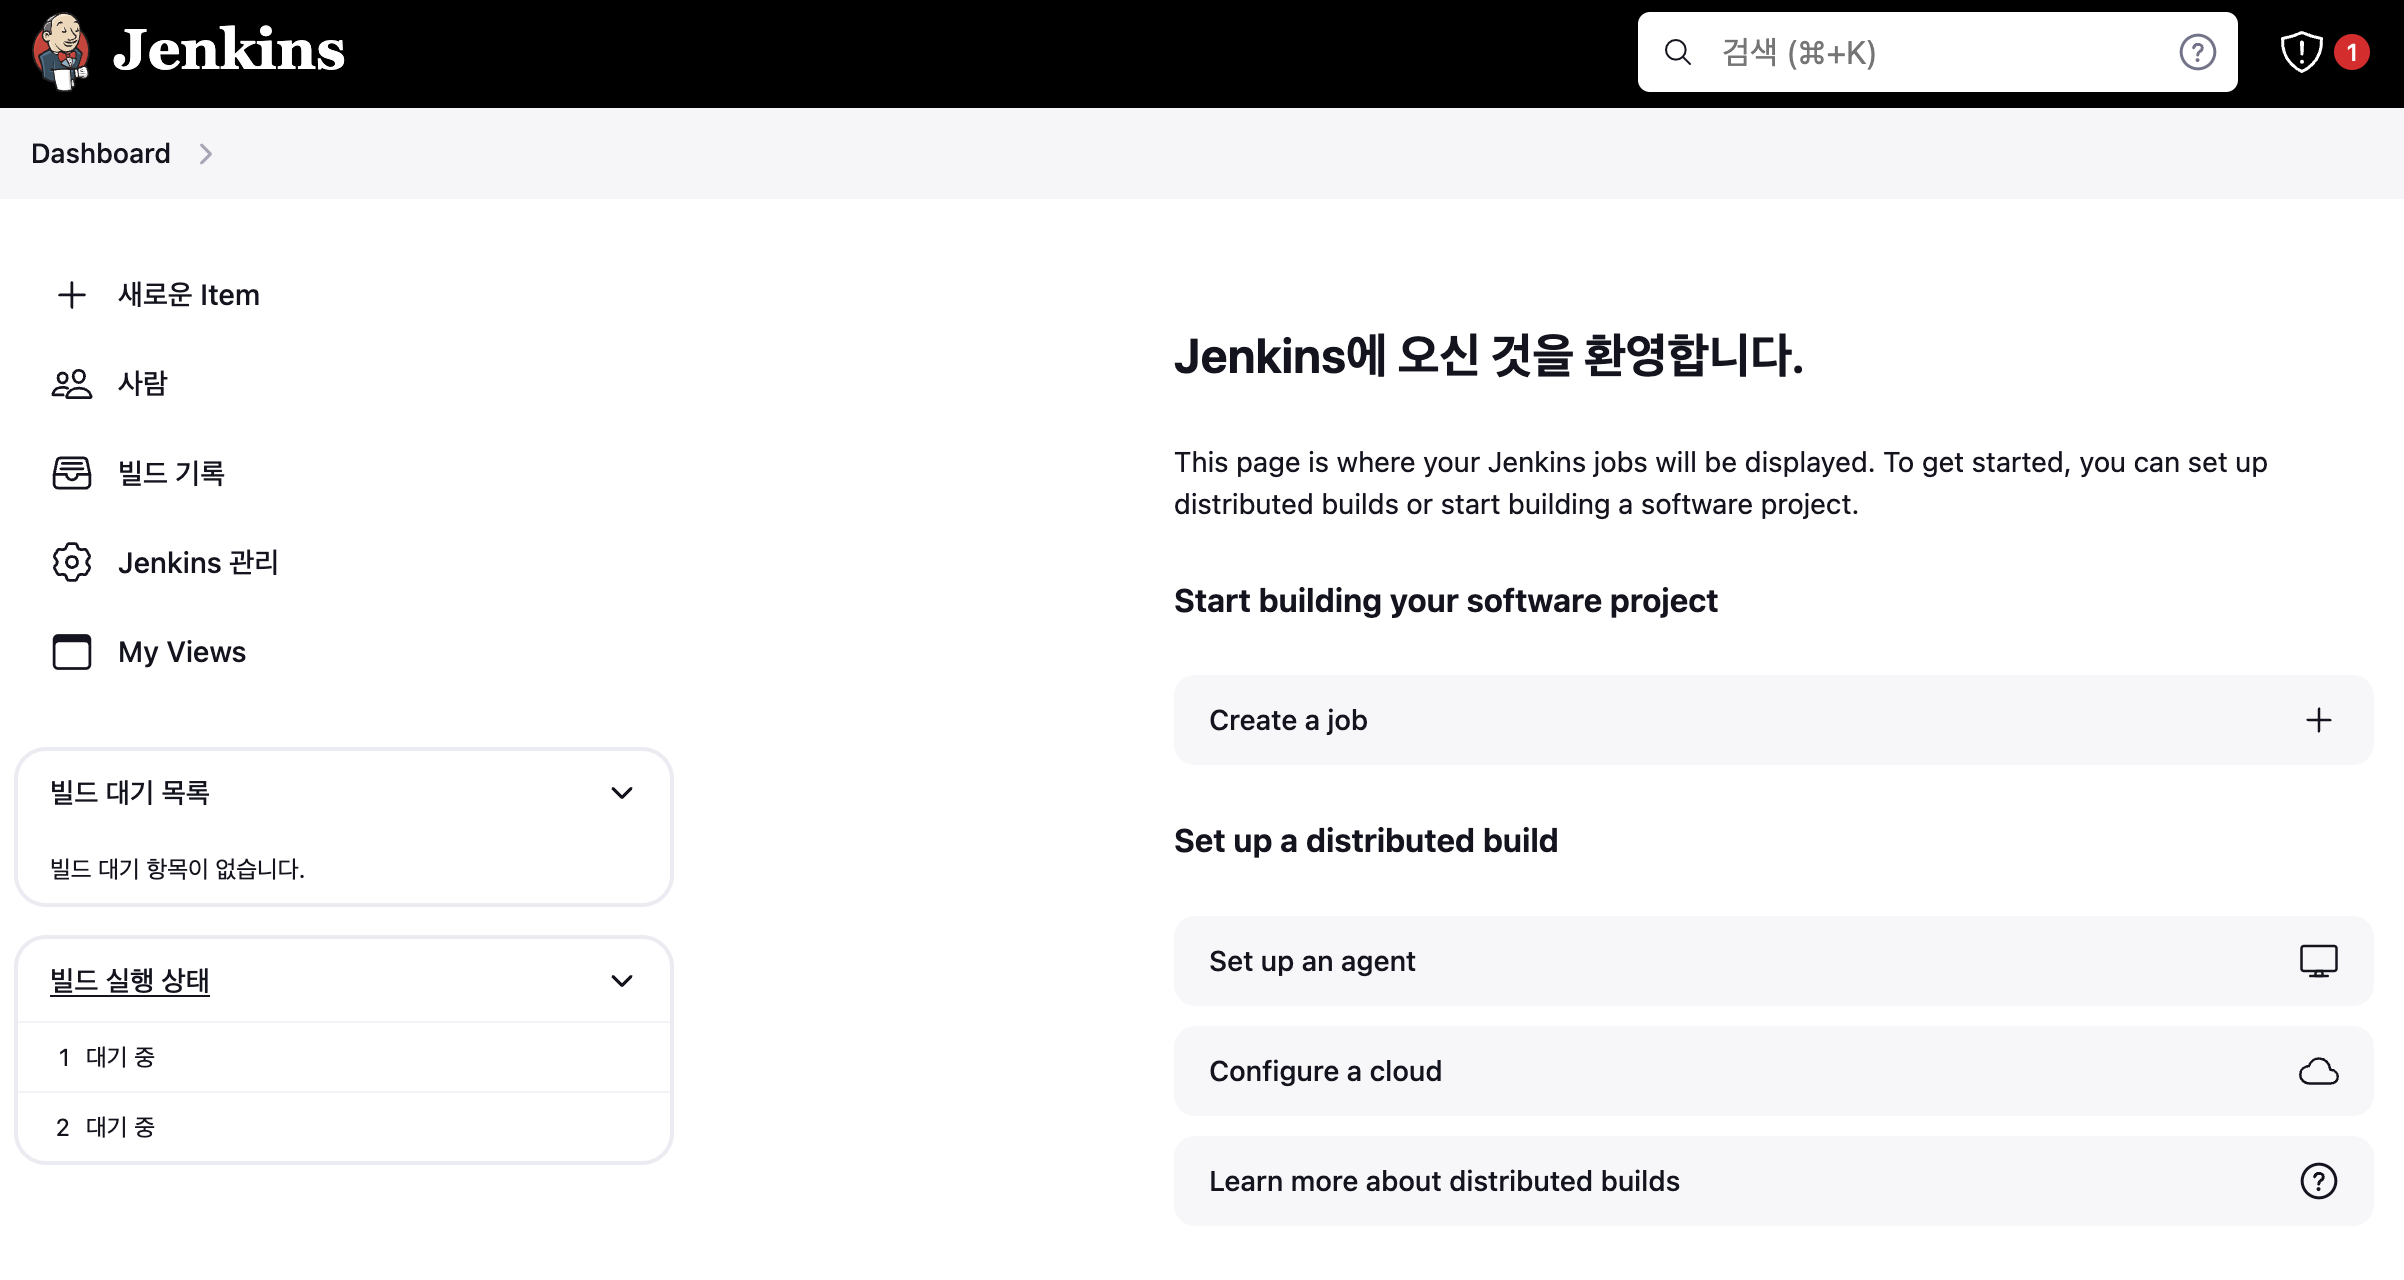
- Jenkins 접속
- item : 젠킨스에서 사용하는 작업의 최소 단위
- 사람 : 계정 관련
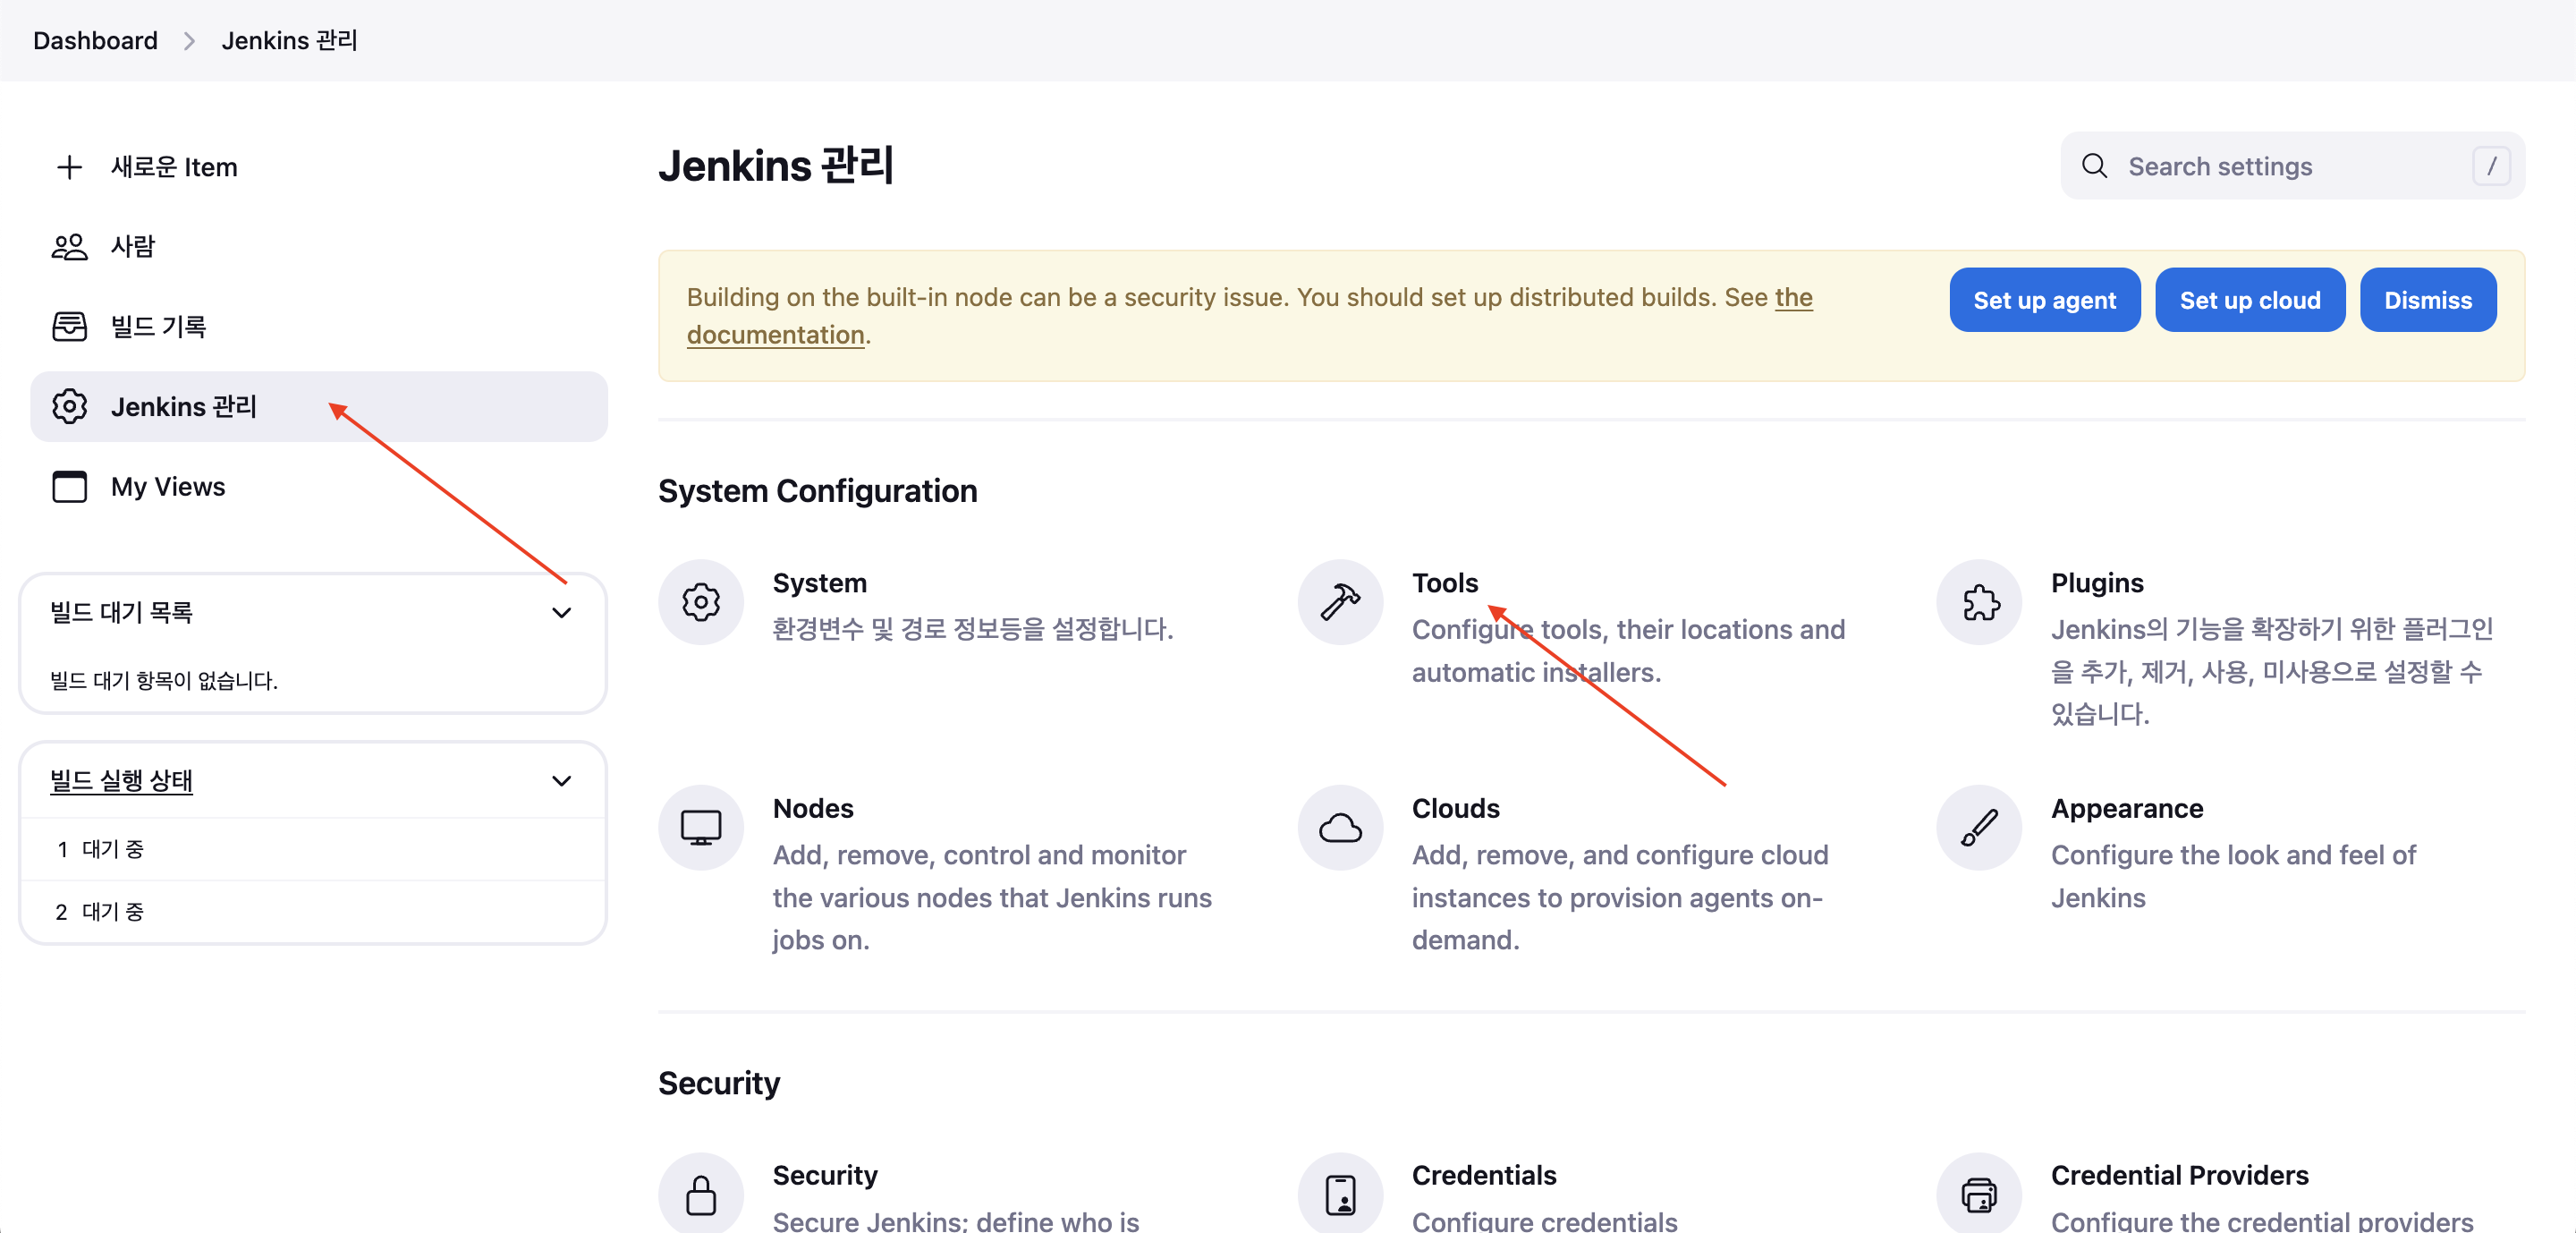
- Jenkins 관리 : 전역 설정 등
- 기본 사용 , Tools 설정 : First-Project
Jenkins 관리 → Tools 진입
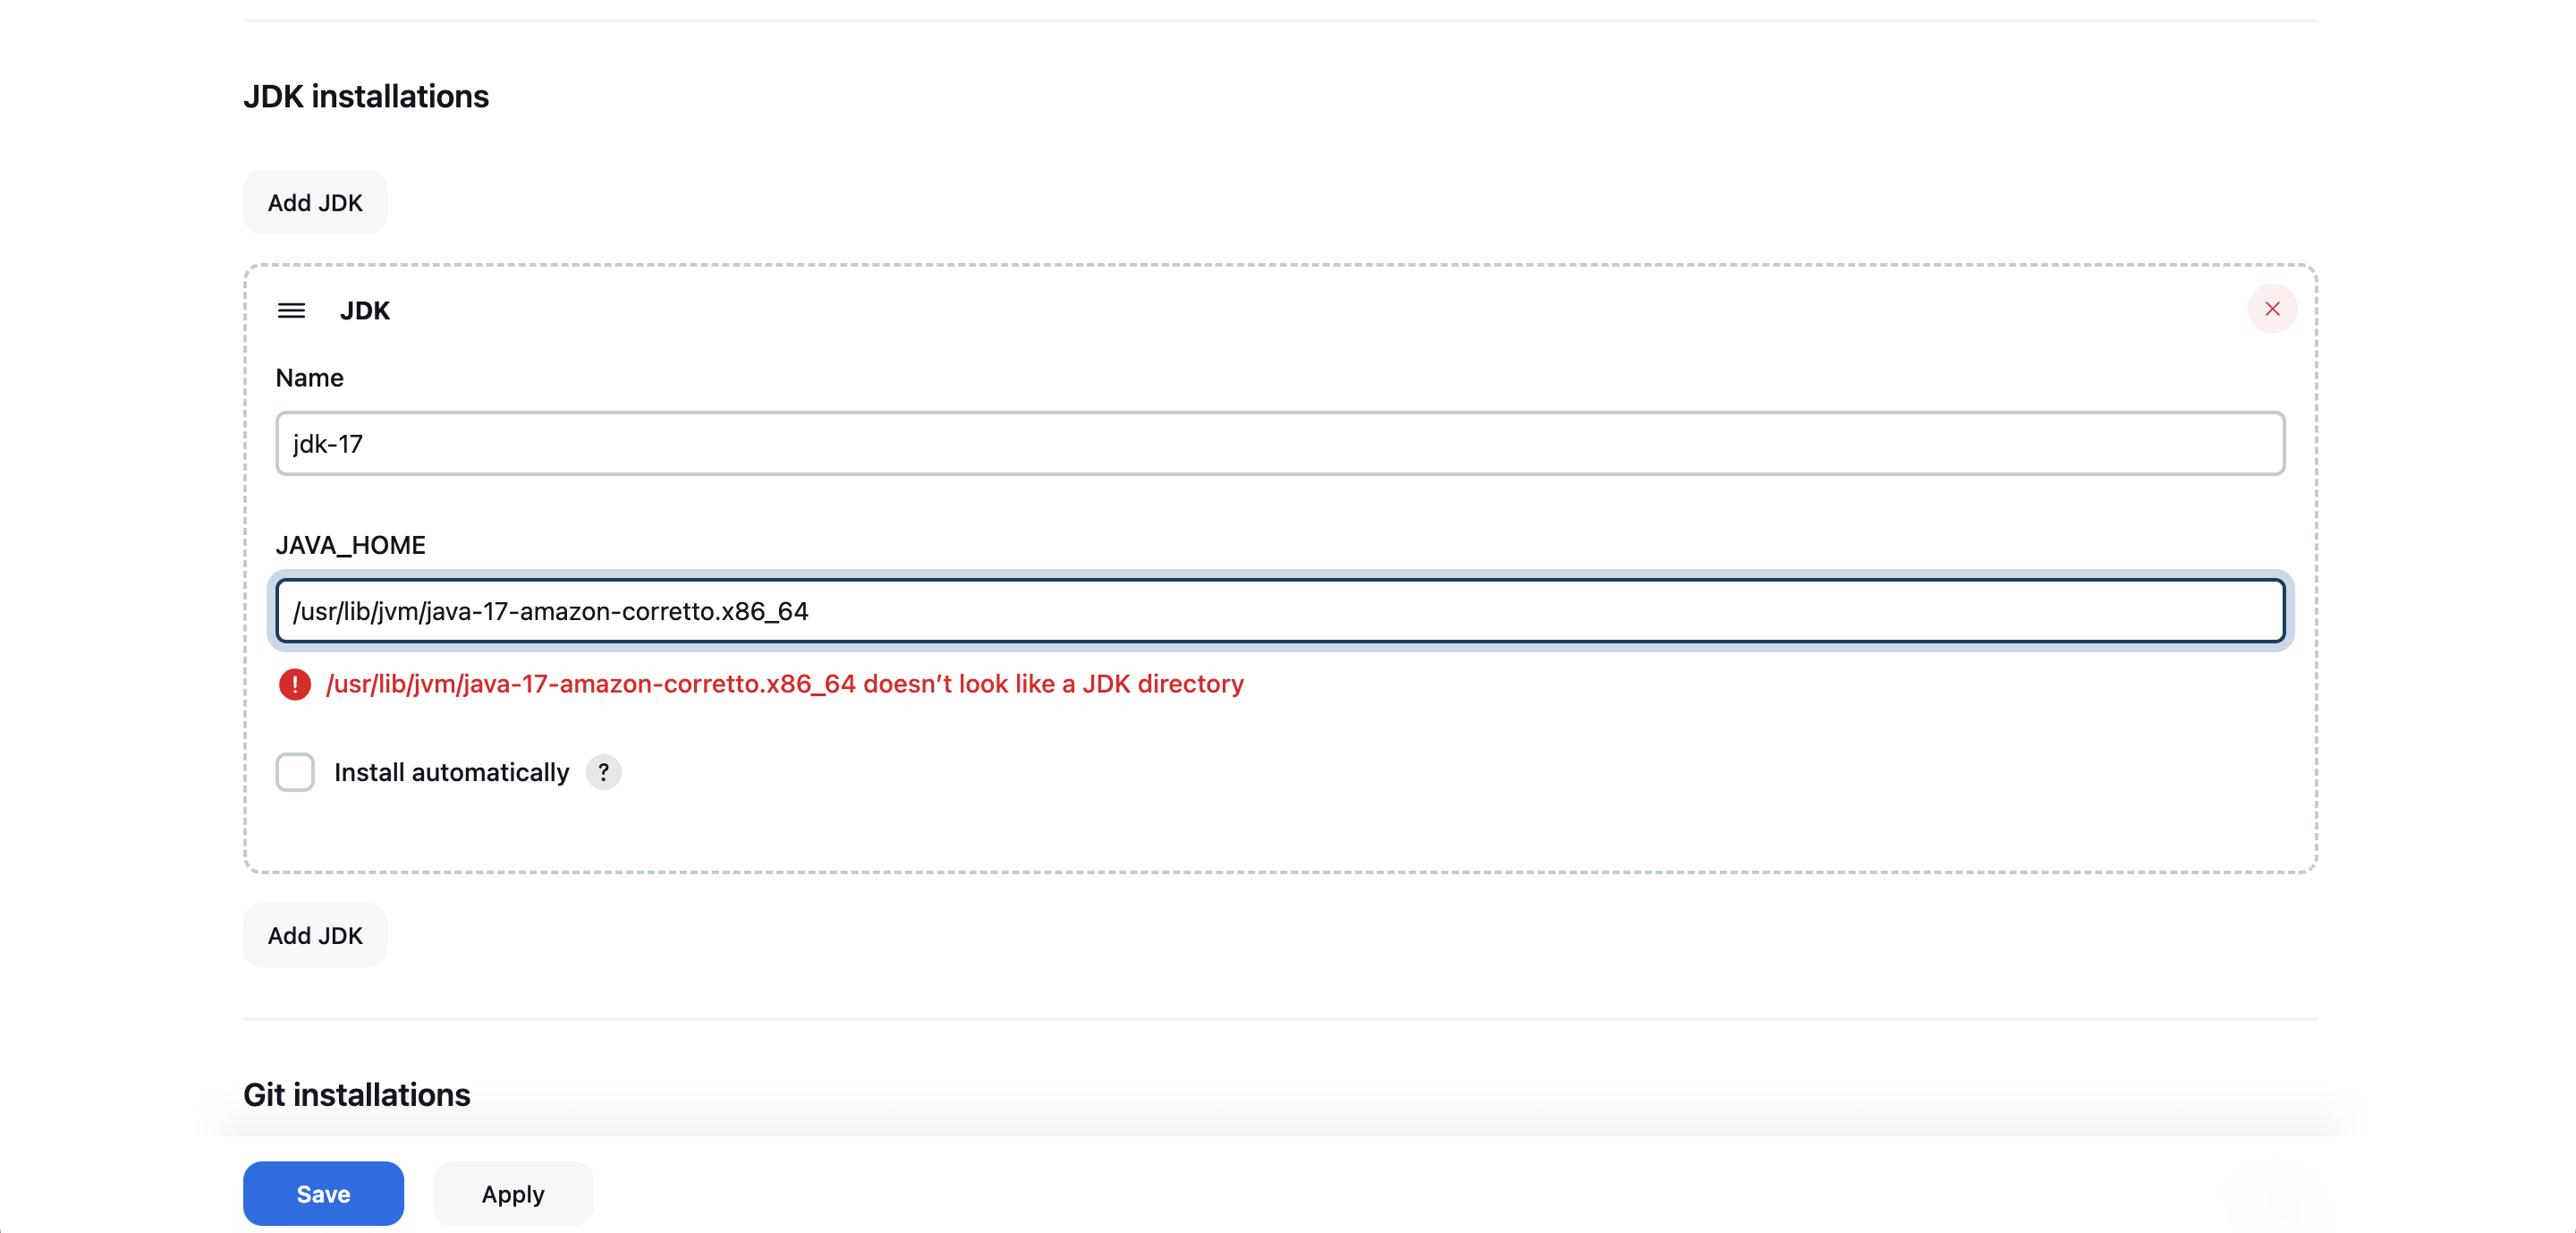
- JDK installations : jdk-17 , /usr/lib/jvm/java-17-amazon-corretto.x86_64 → Save
-
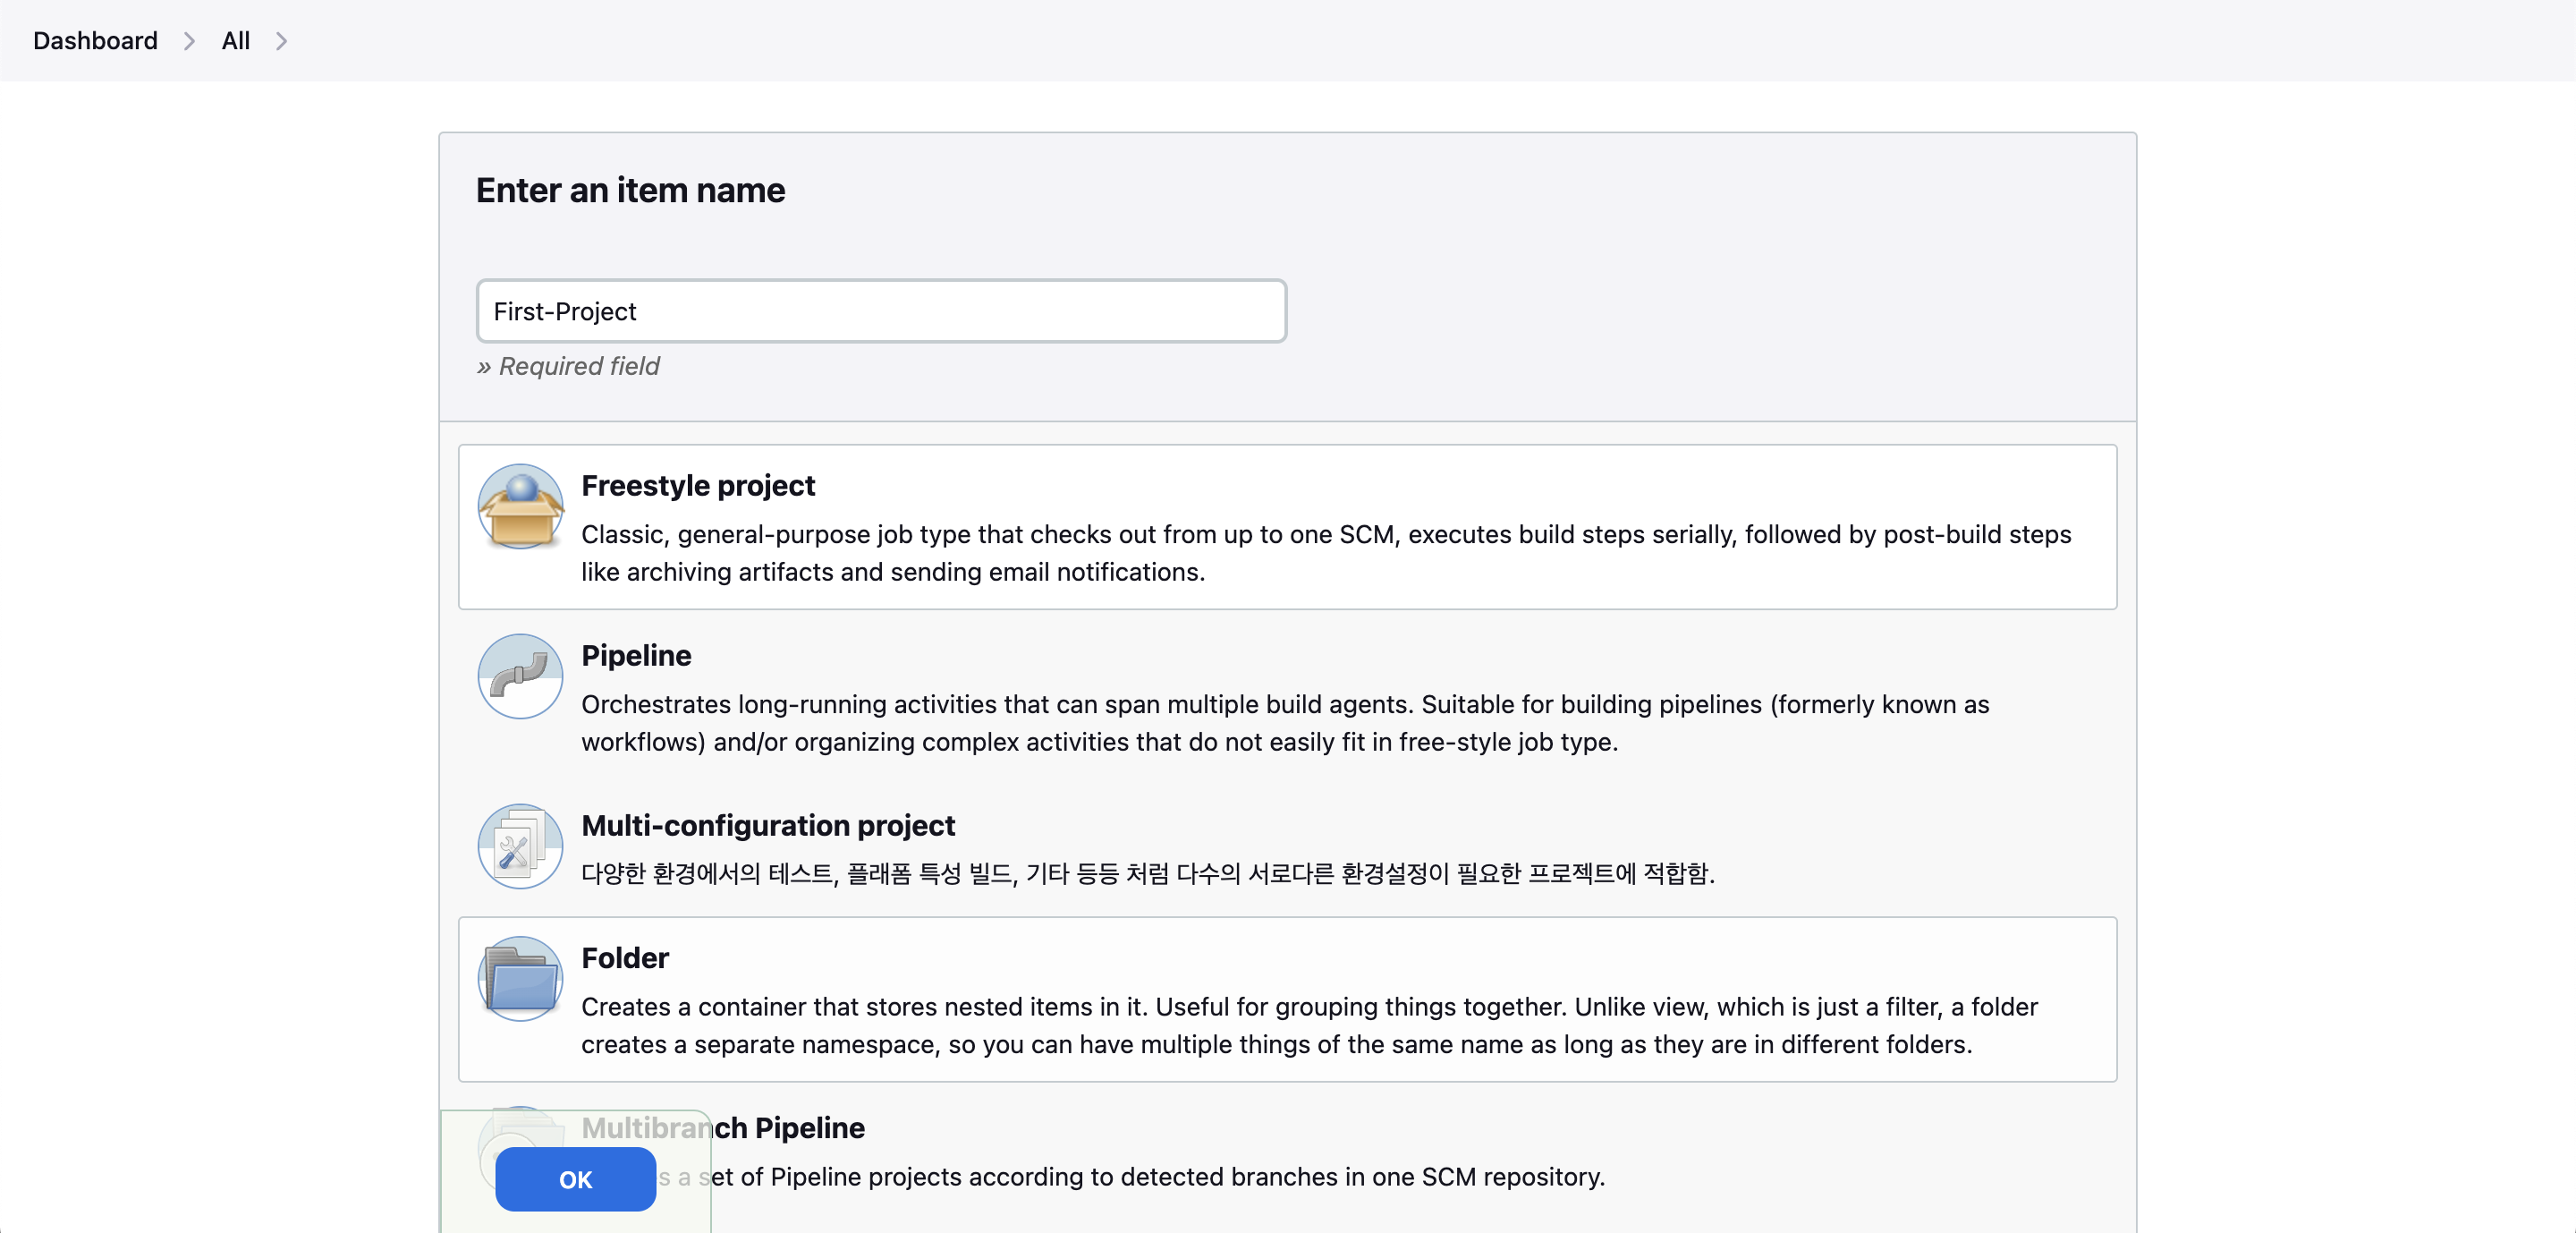
첫번째 Item(Project) 생성
- 새로운 Item 클릭 → Name : First-Project , Freestyle project ⇒ 하단 OK 클릭
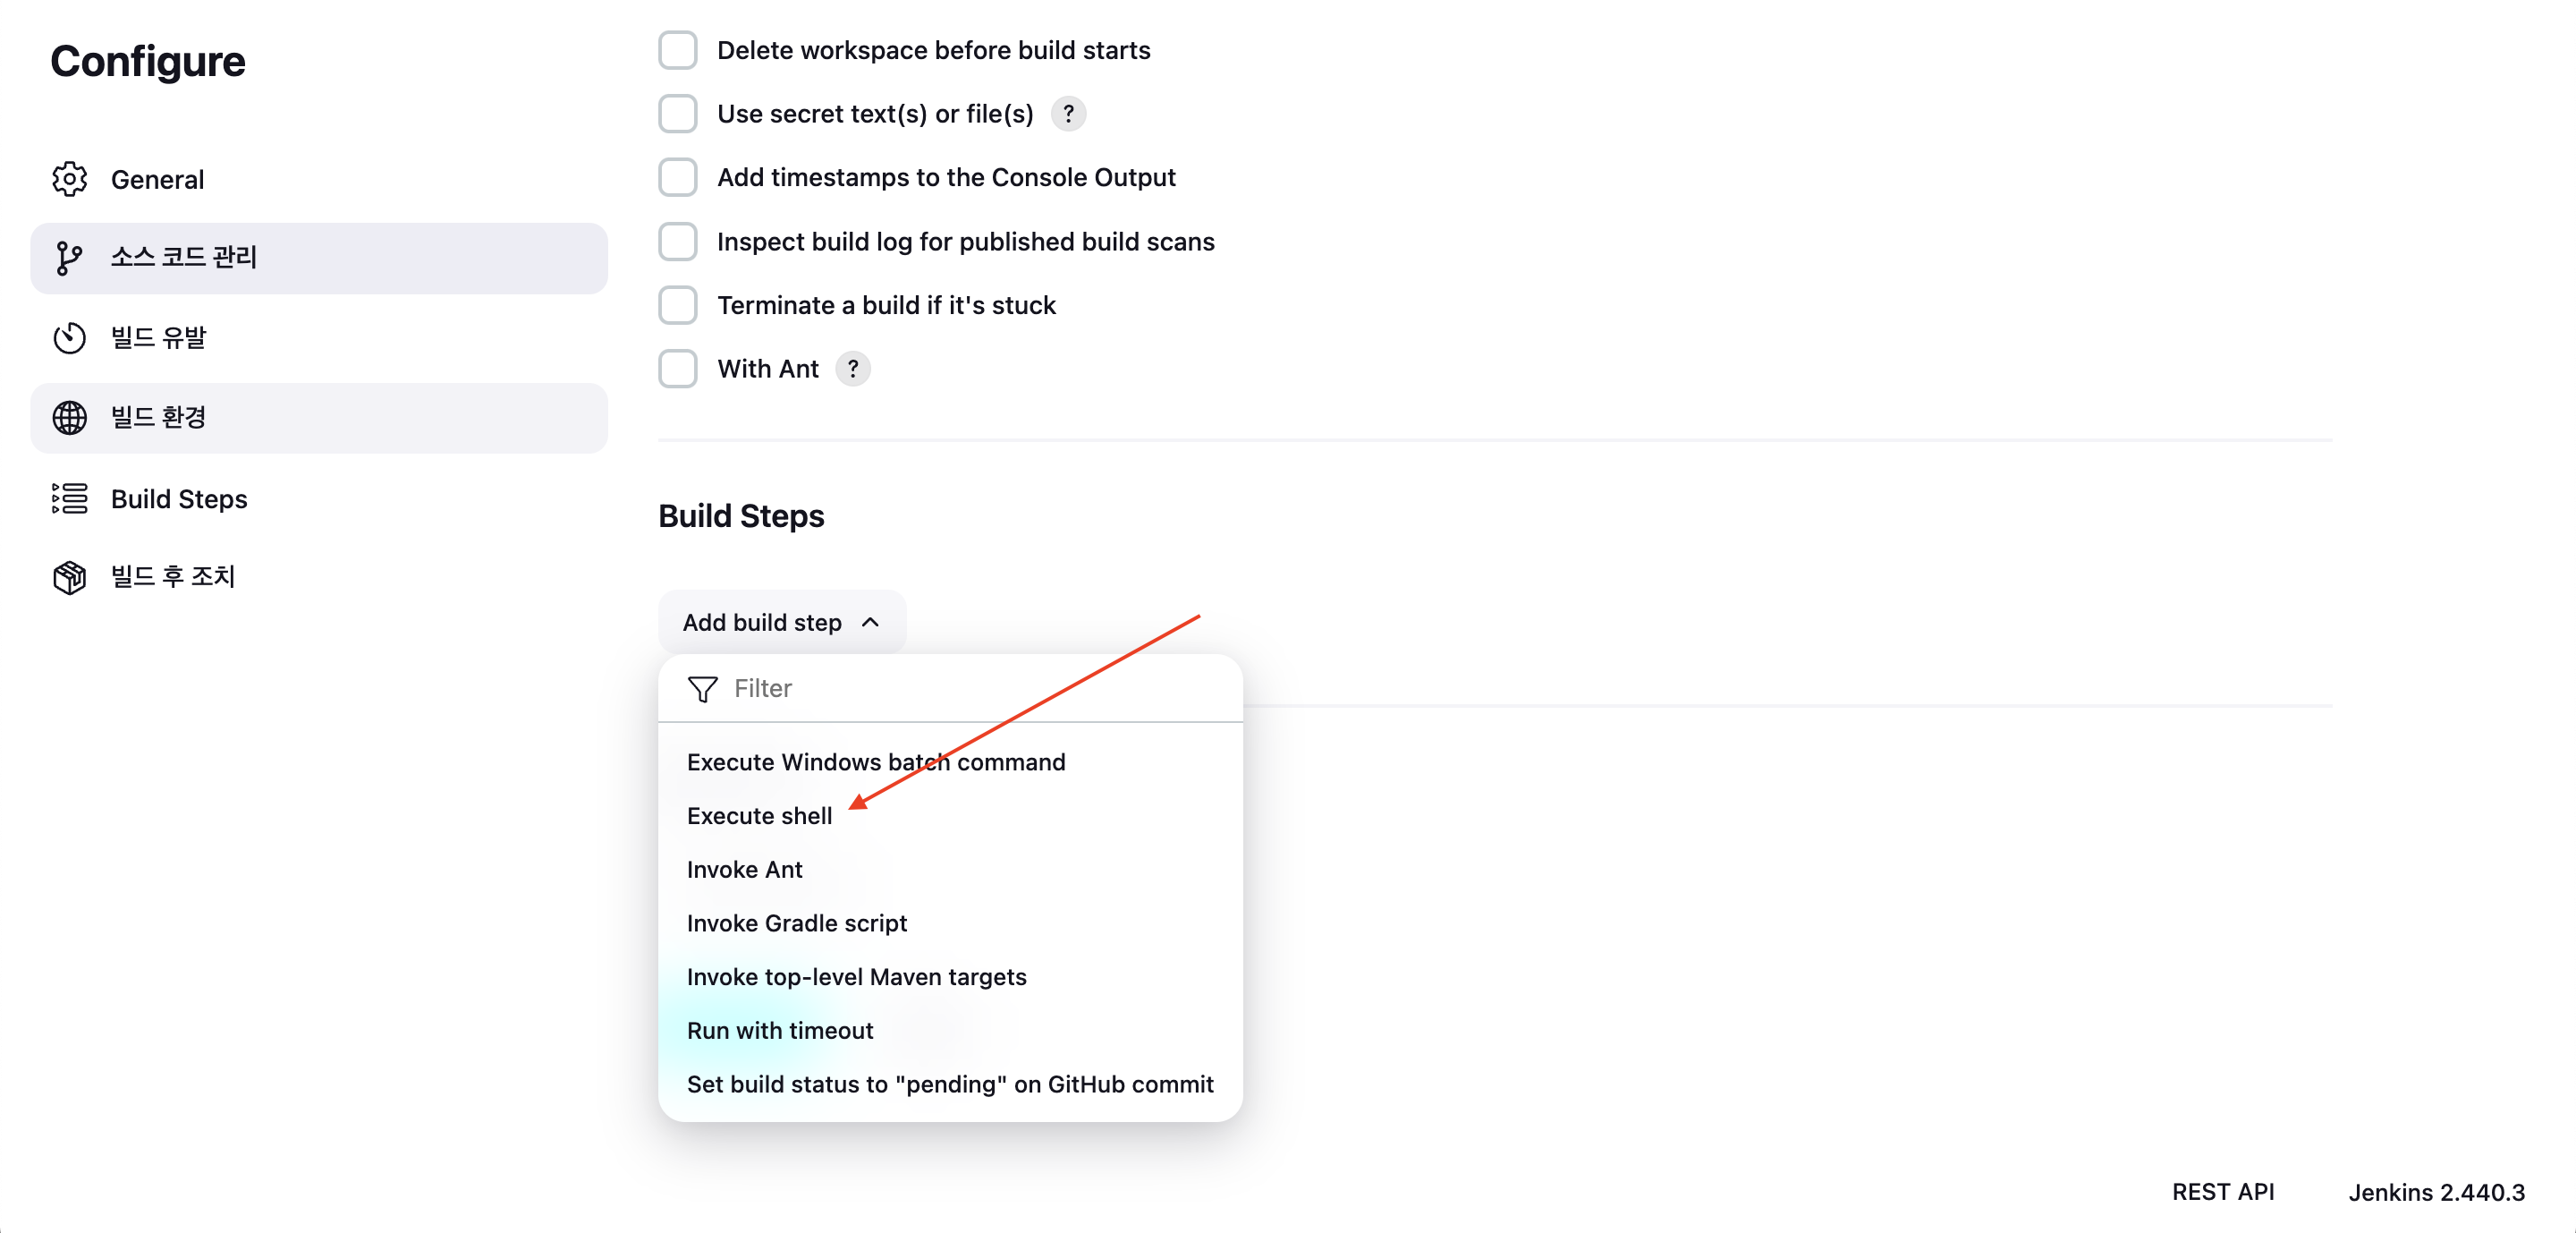
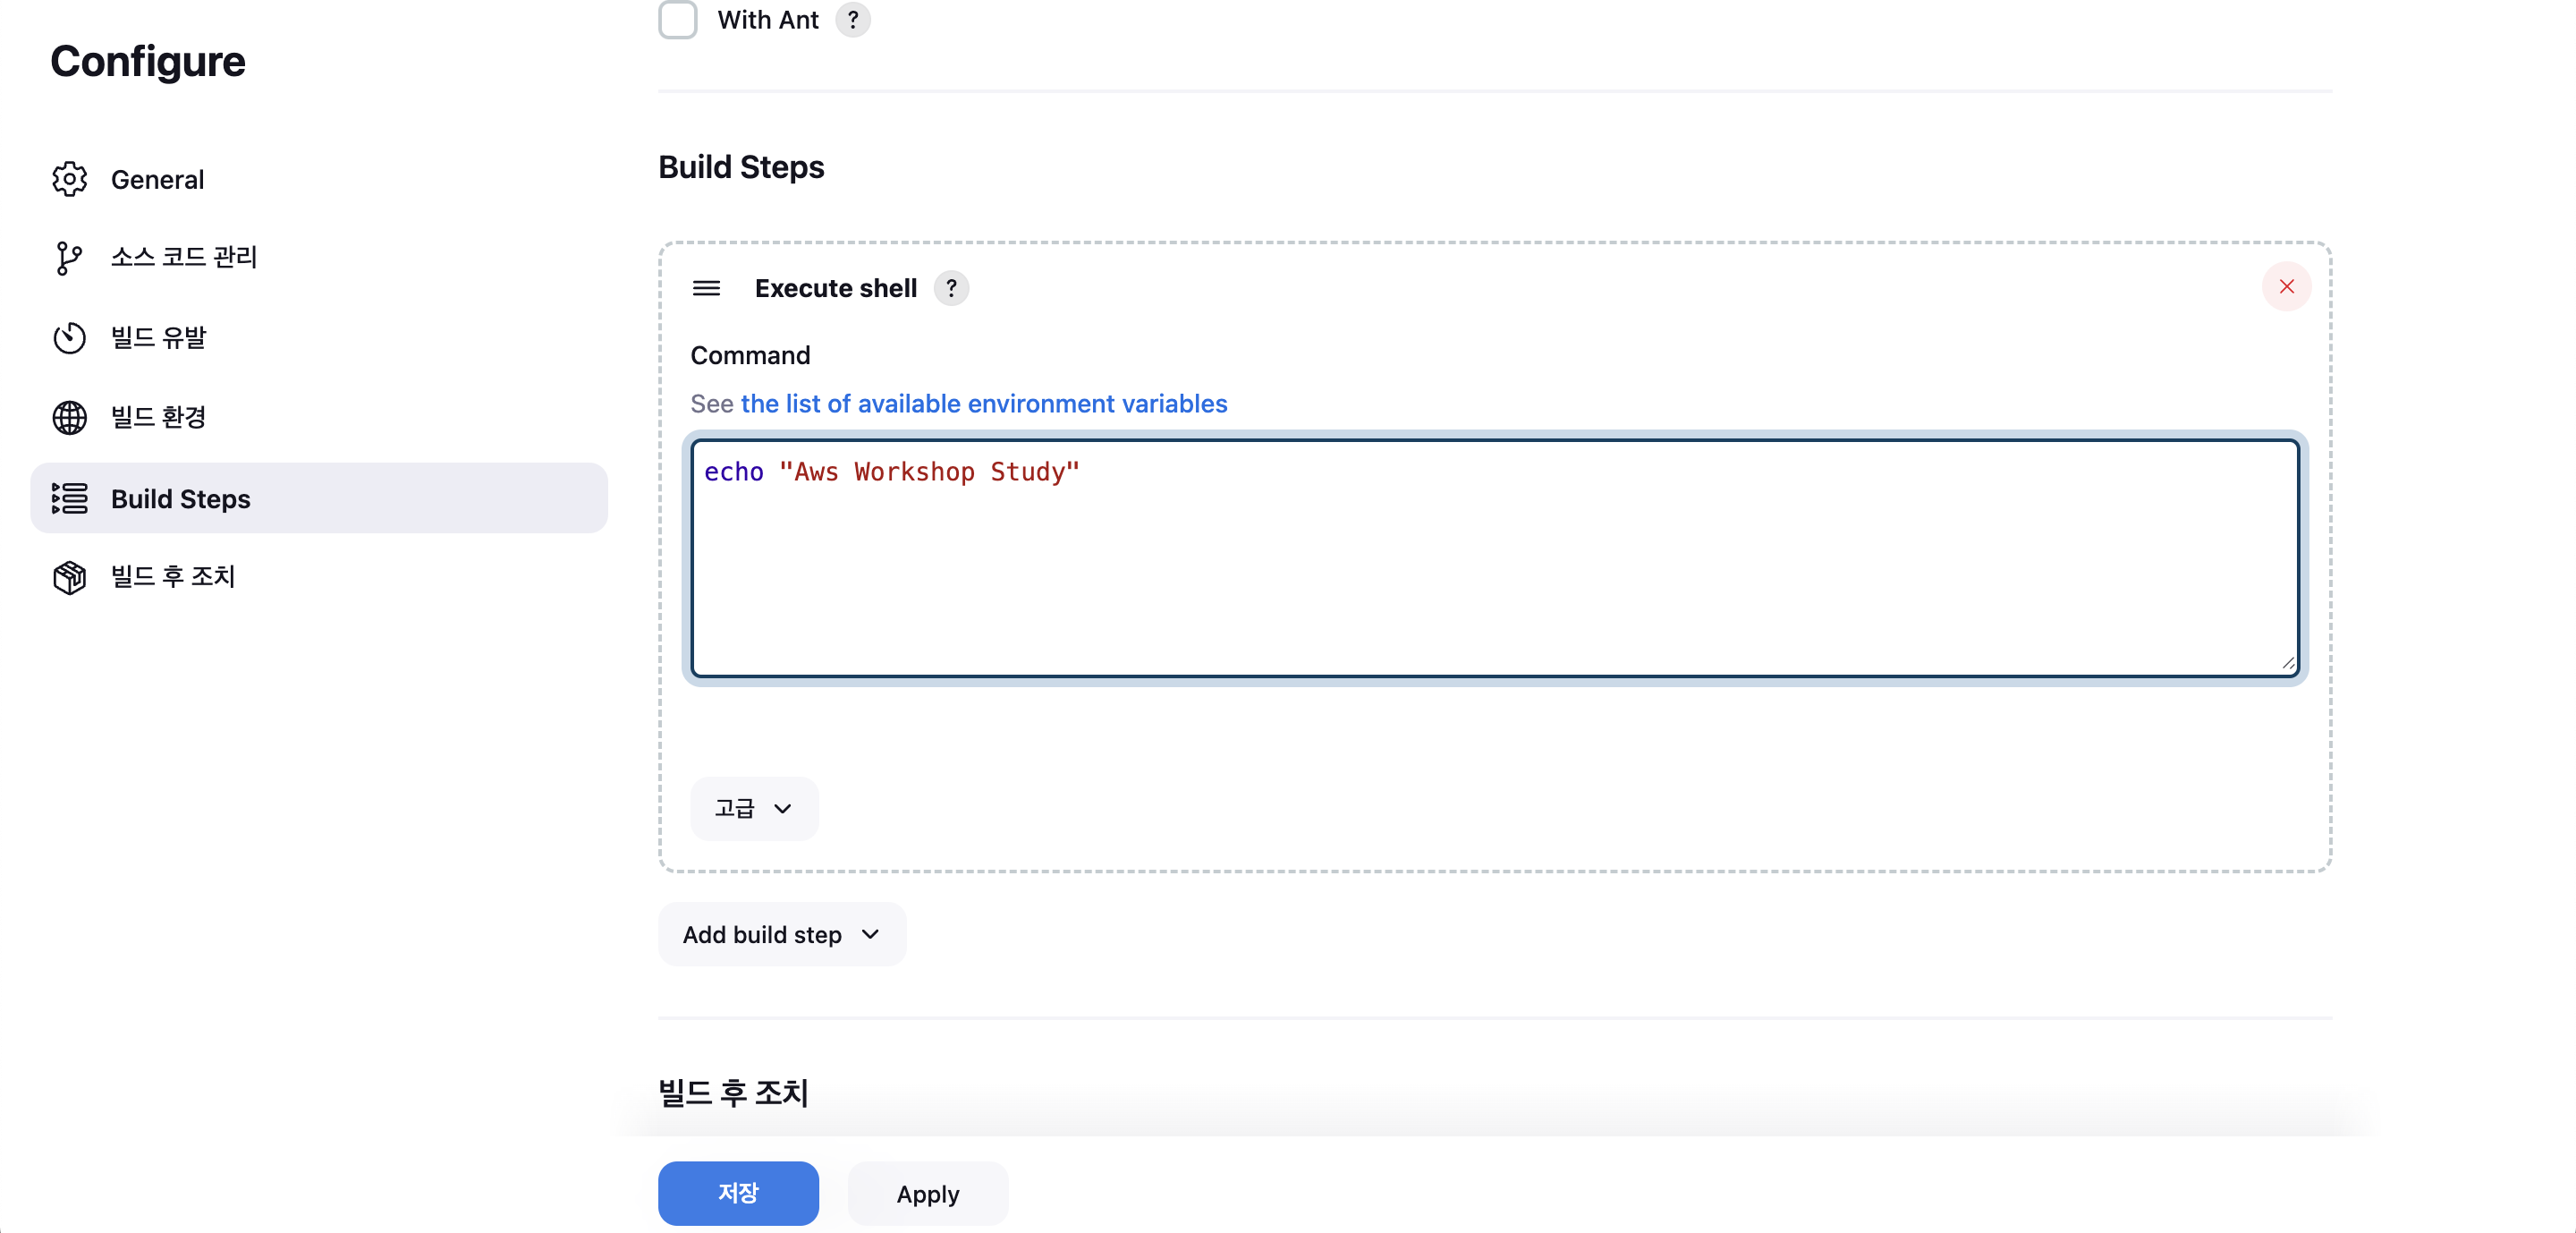
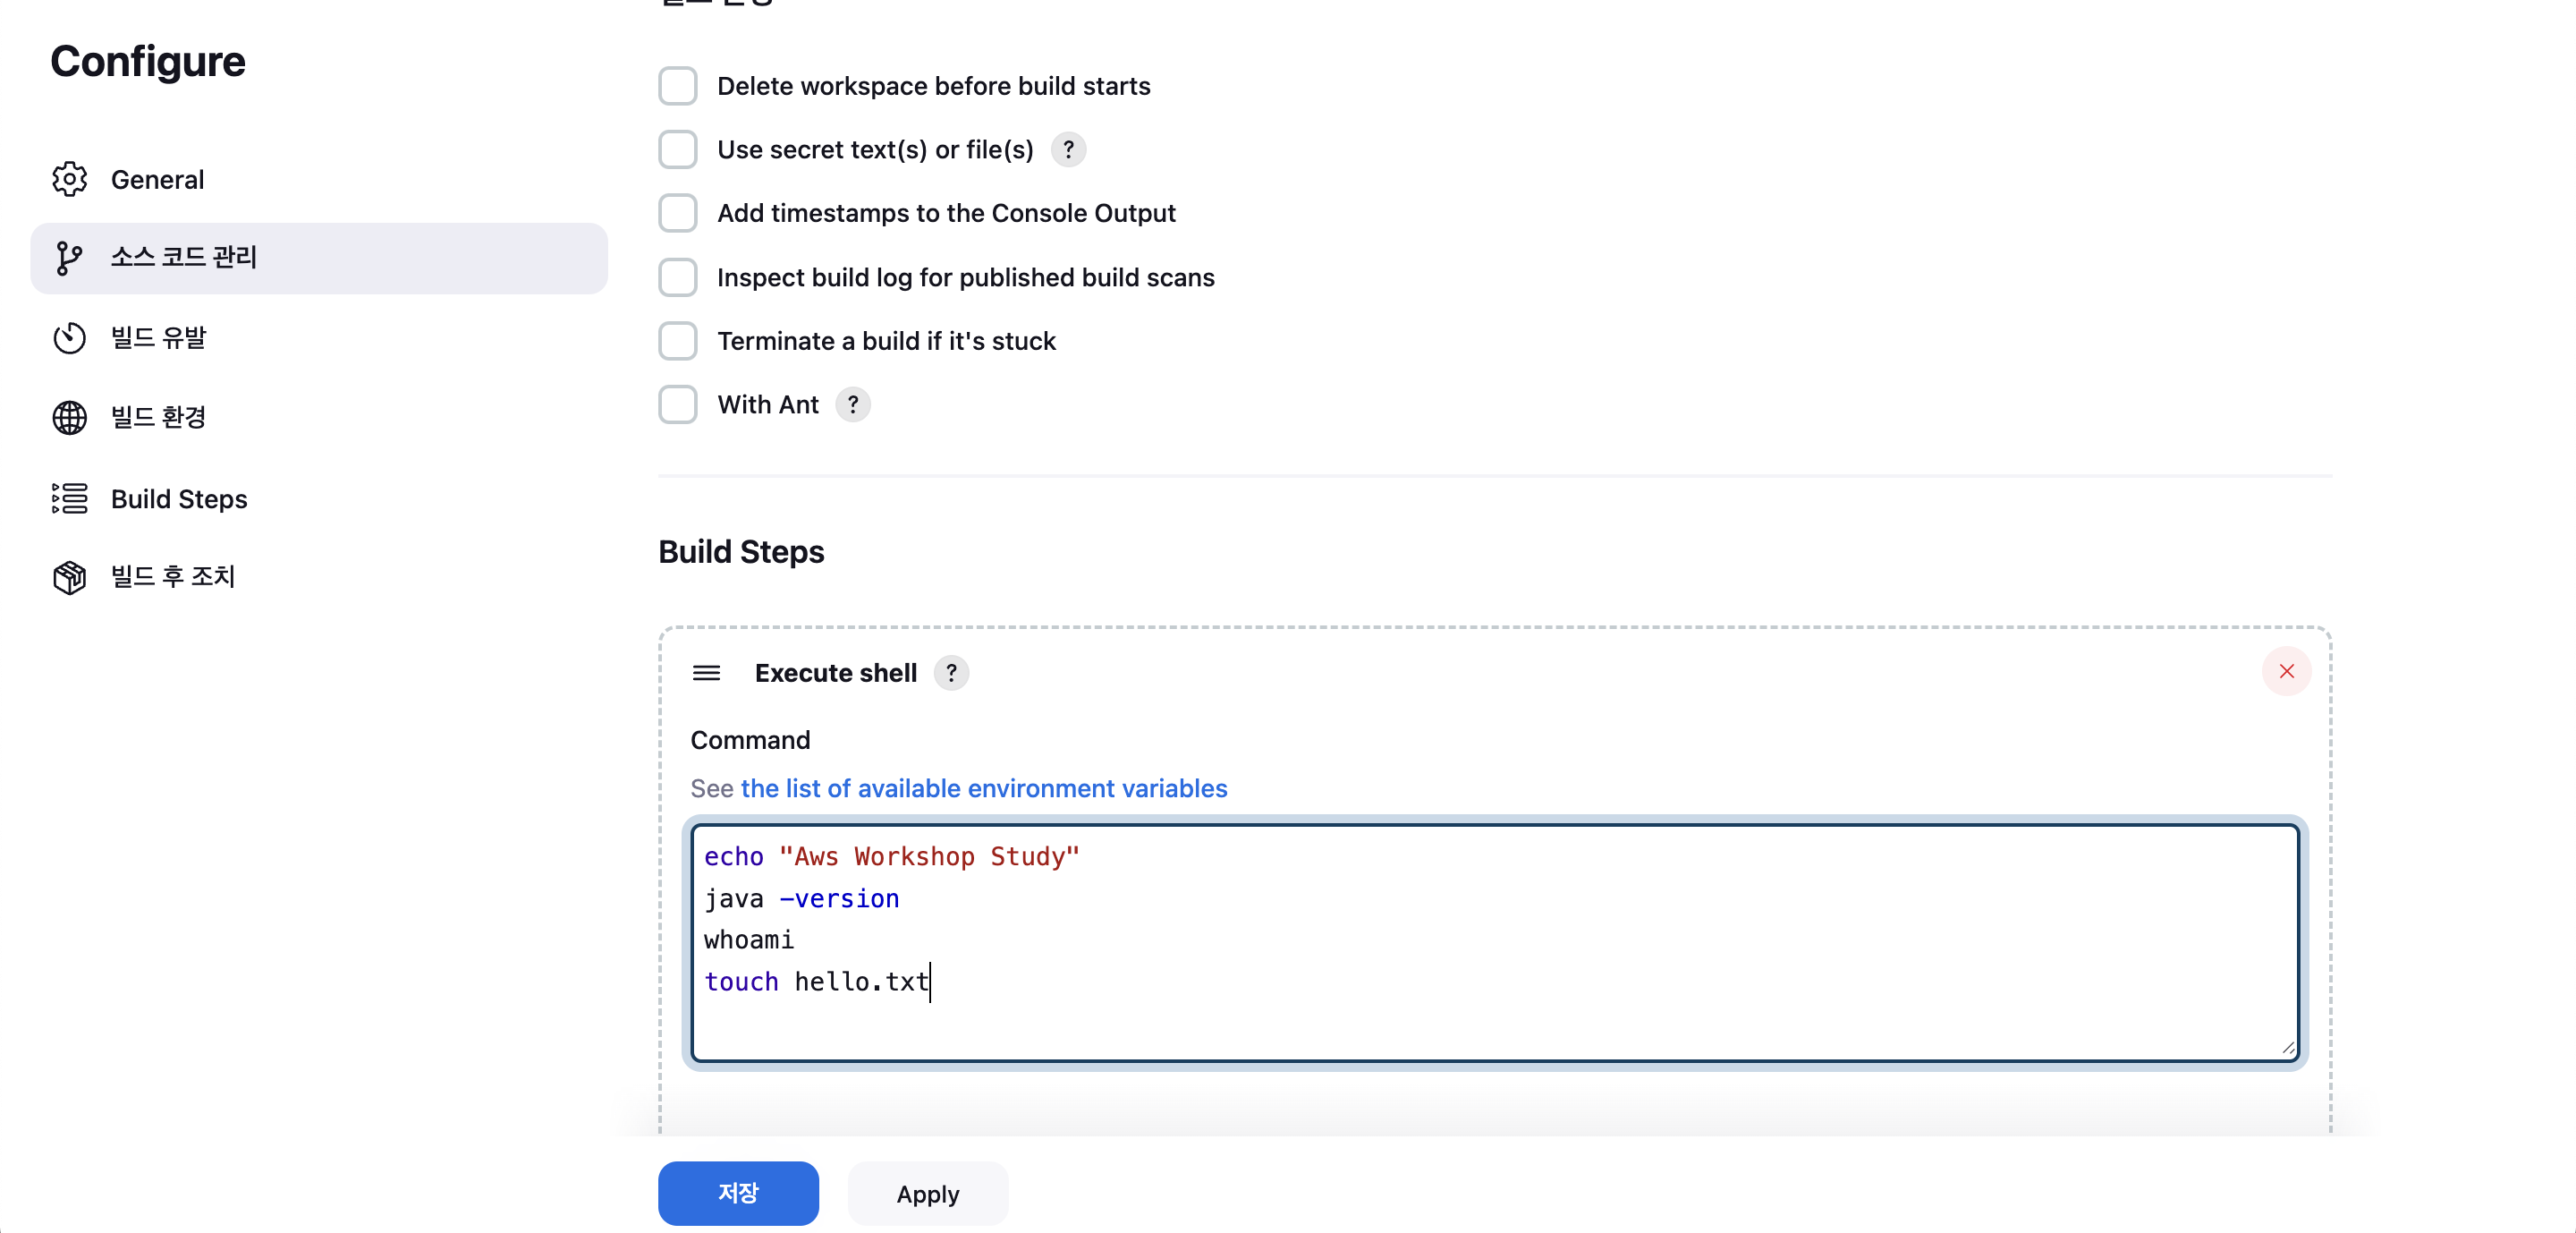
- Build Steps → Add build step ⇒ Execute shell 클릭
- 간단한 문장 출력 될 수 있게 입력 : echo "Aws Workshop Study" → 하단 Apply 후 저장
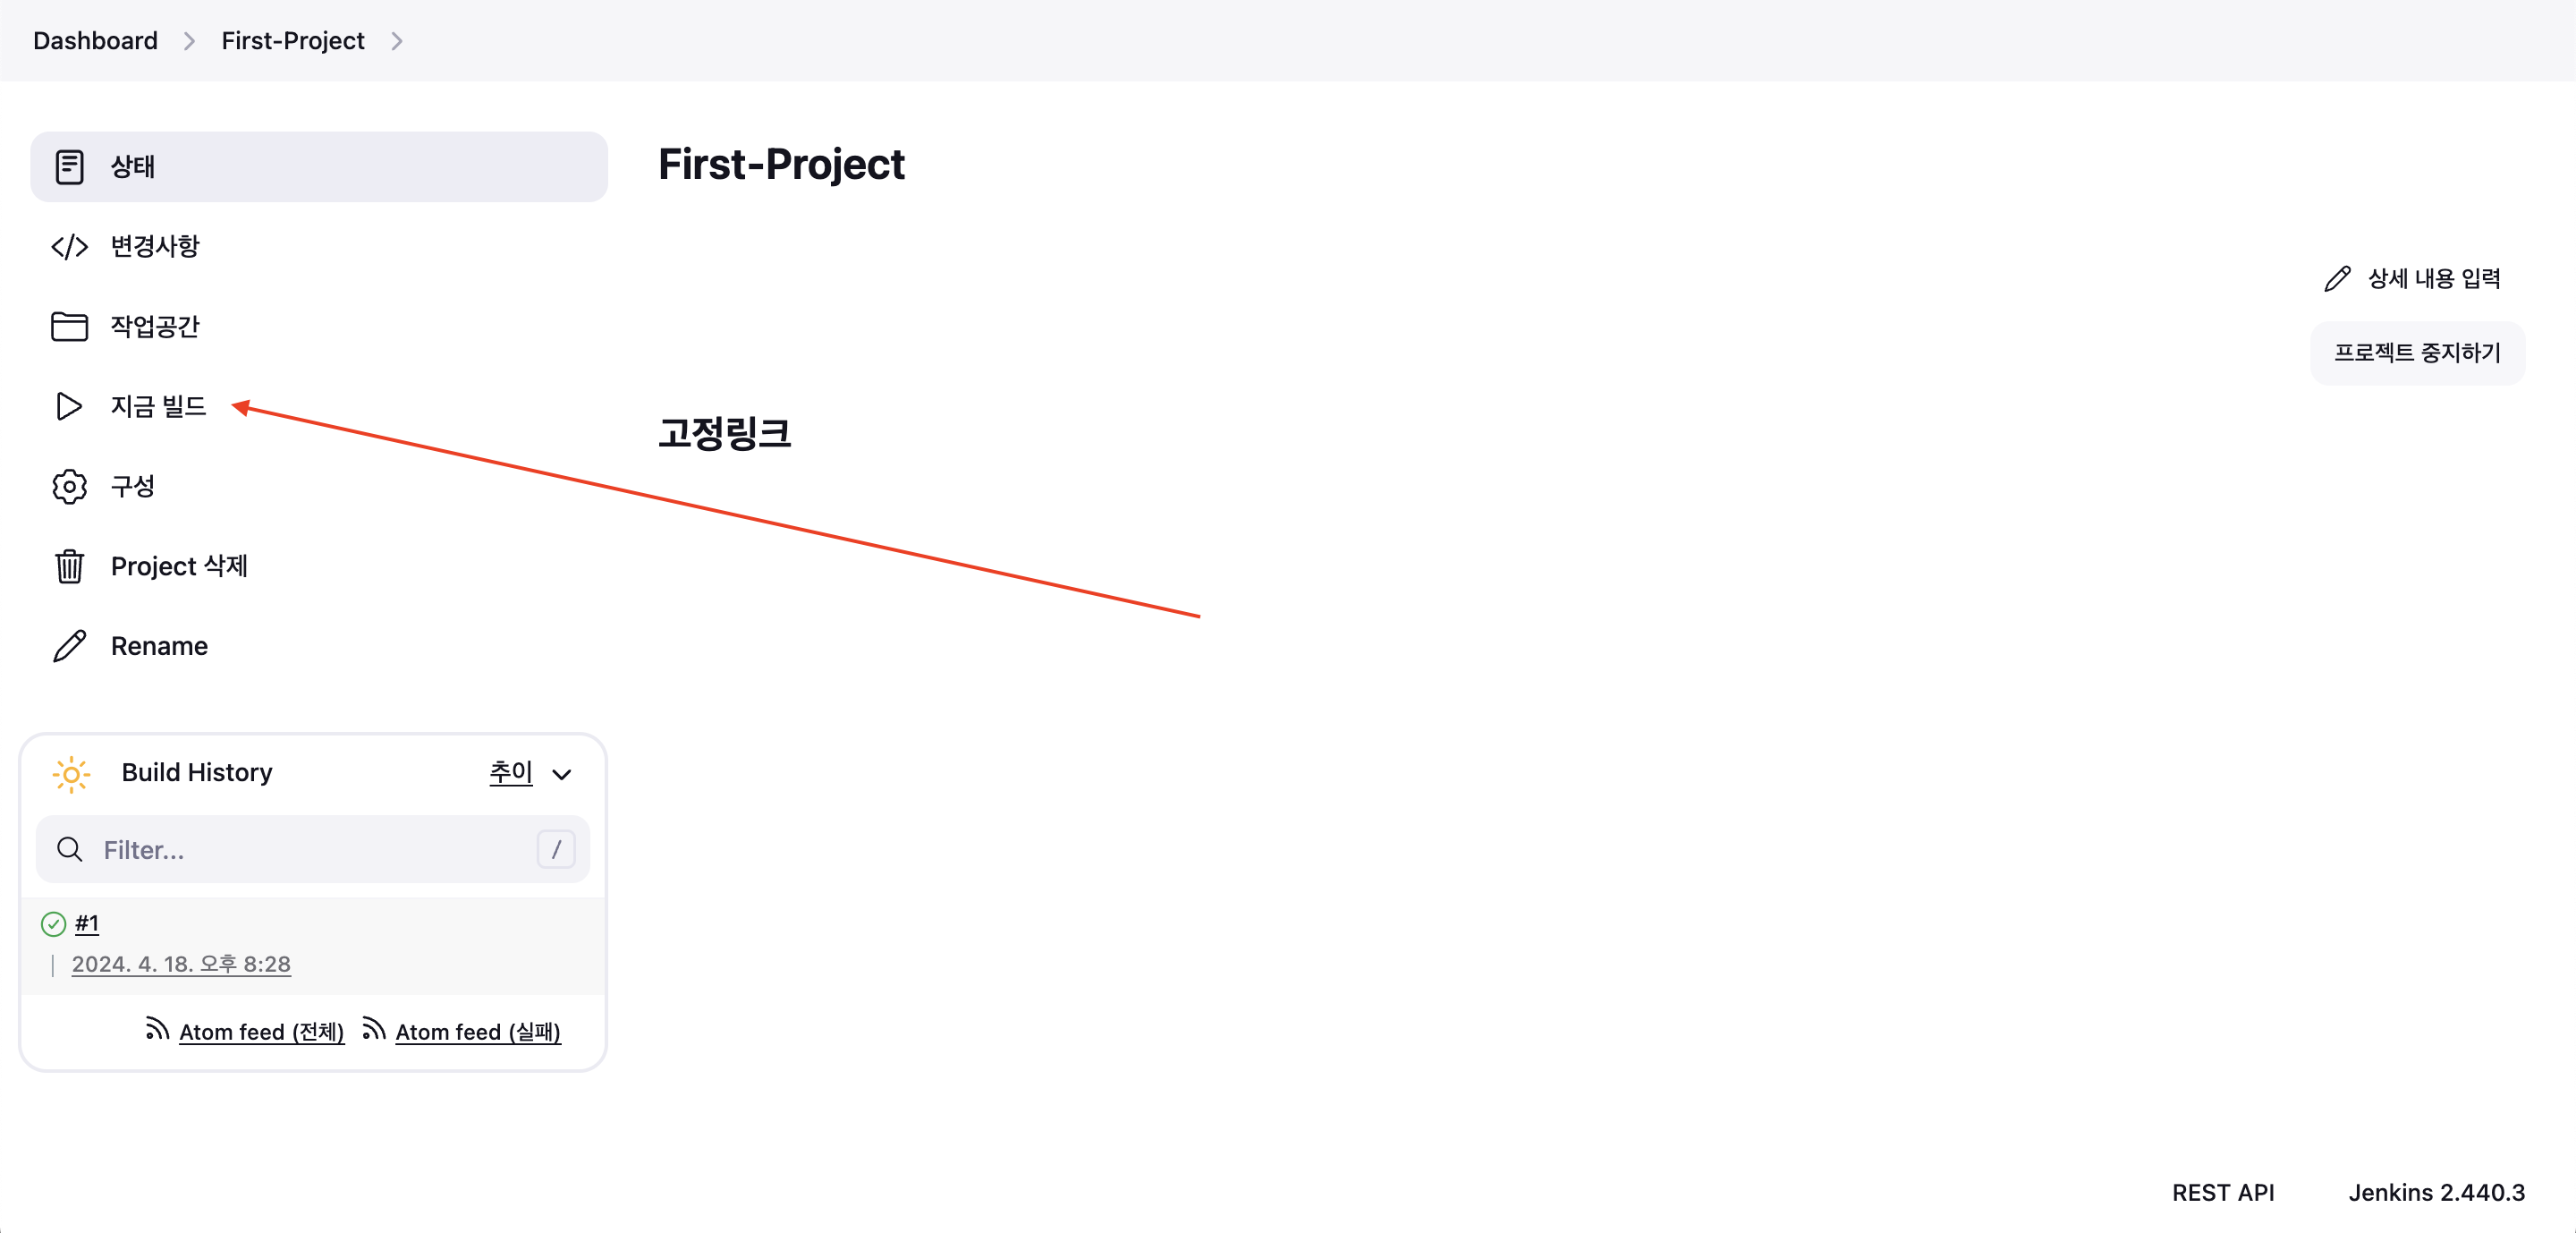
- 지금 빌드 클릭
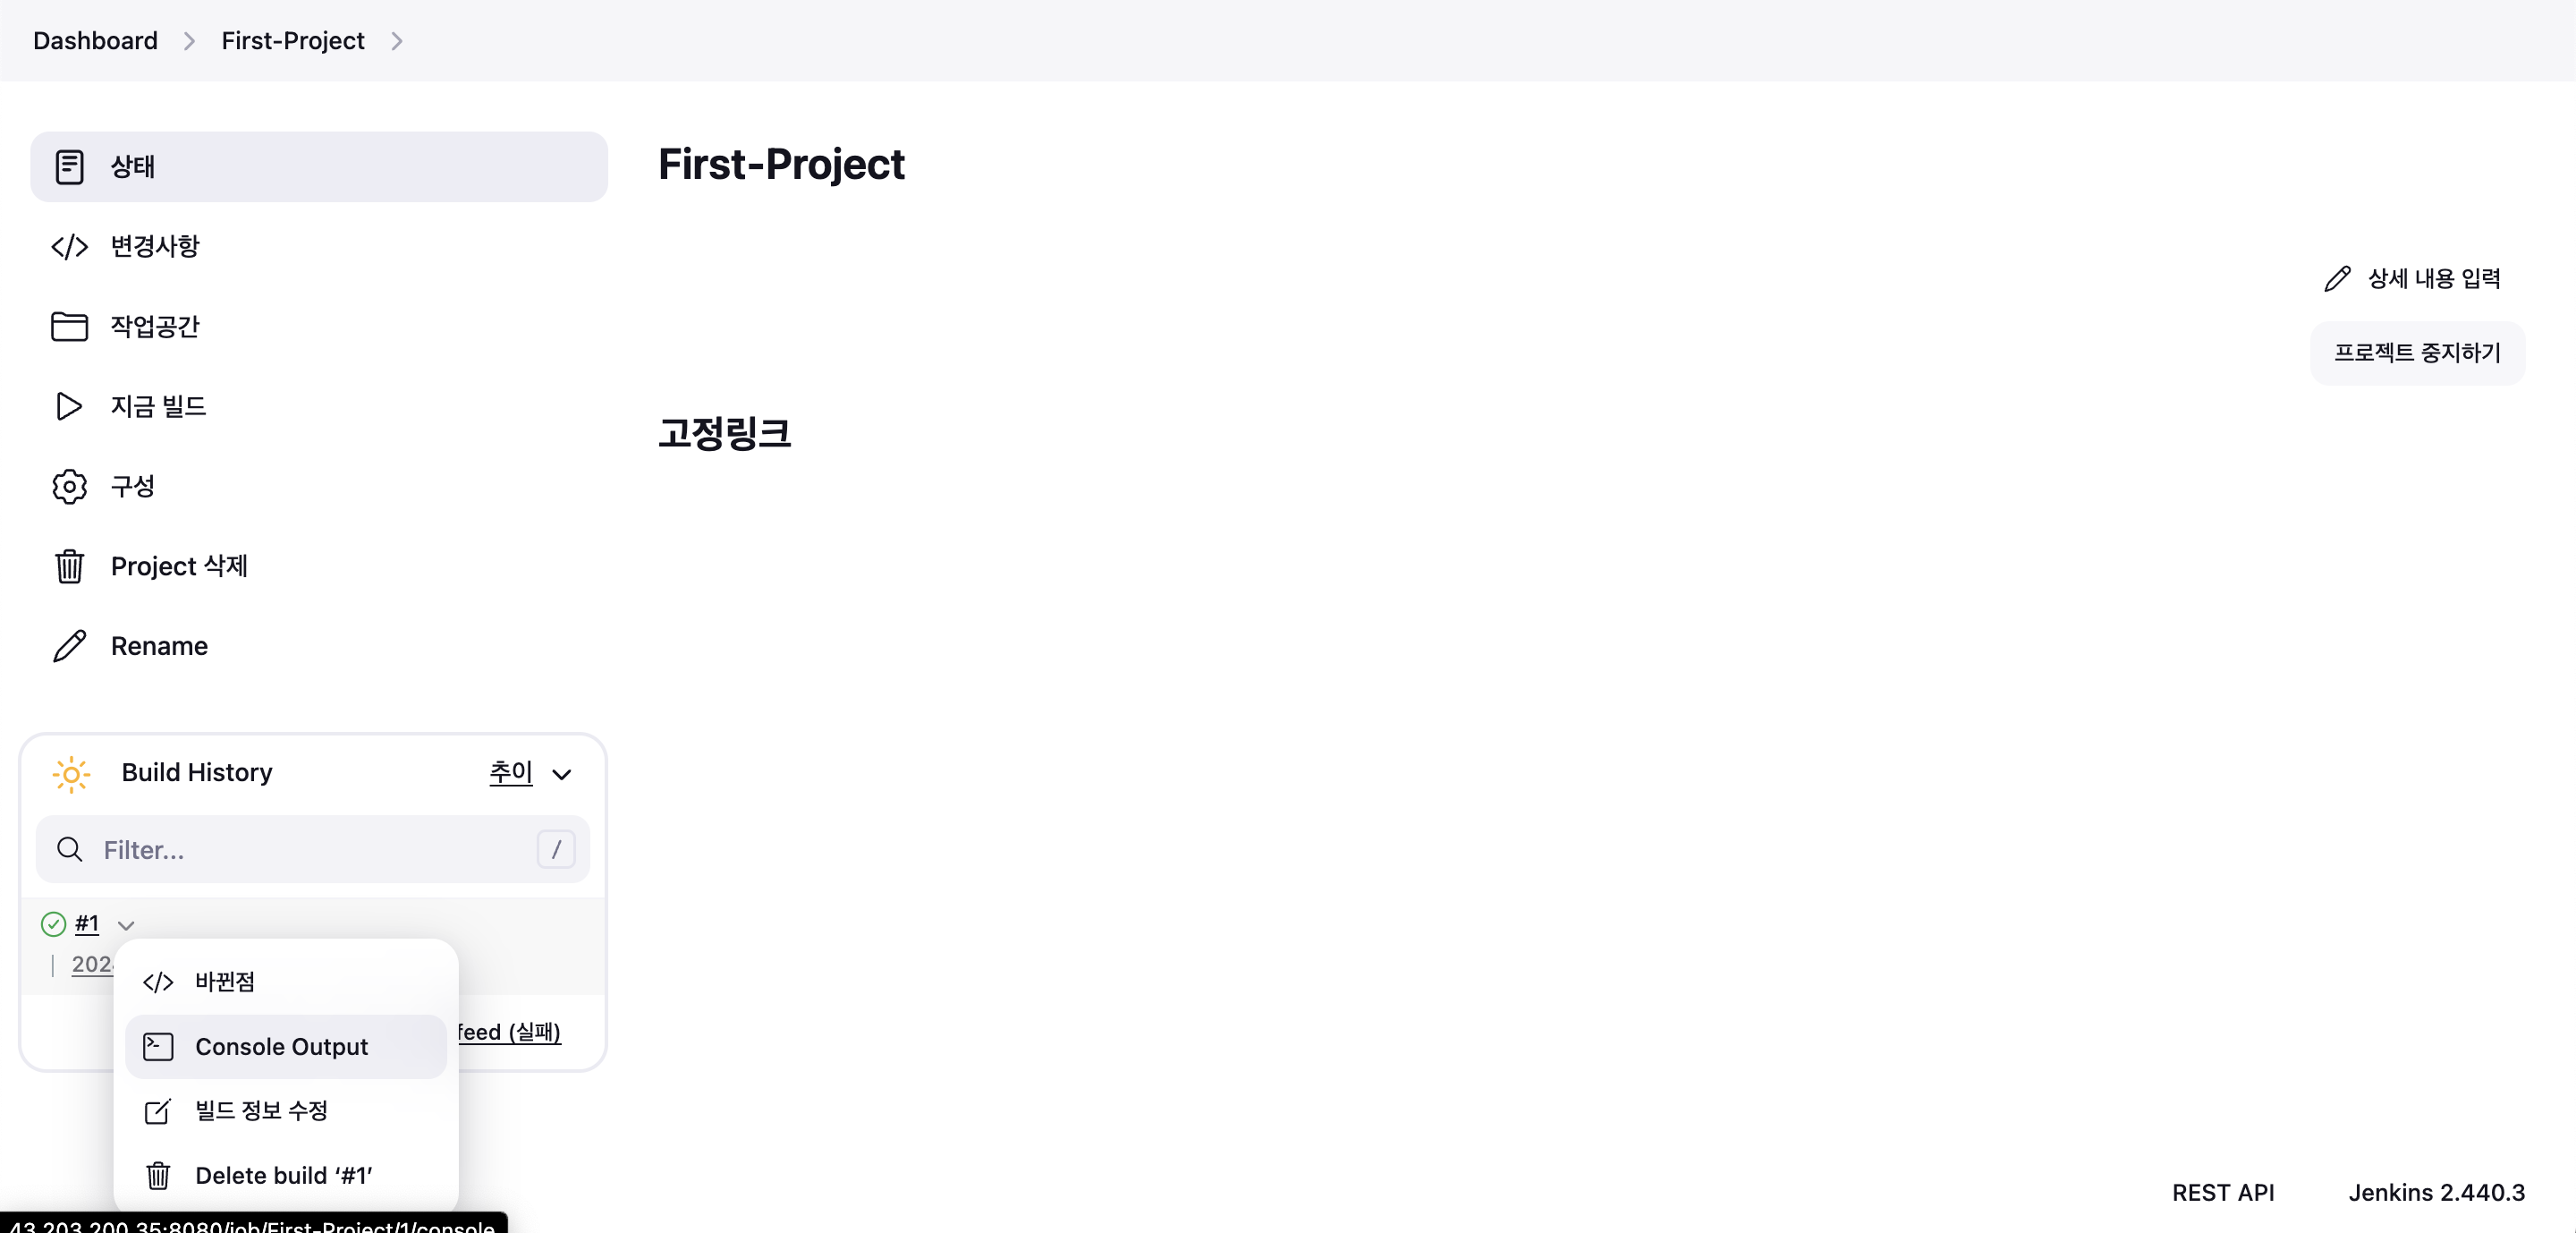
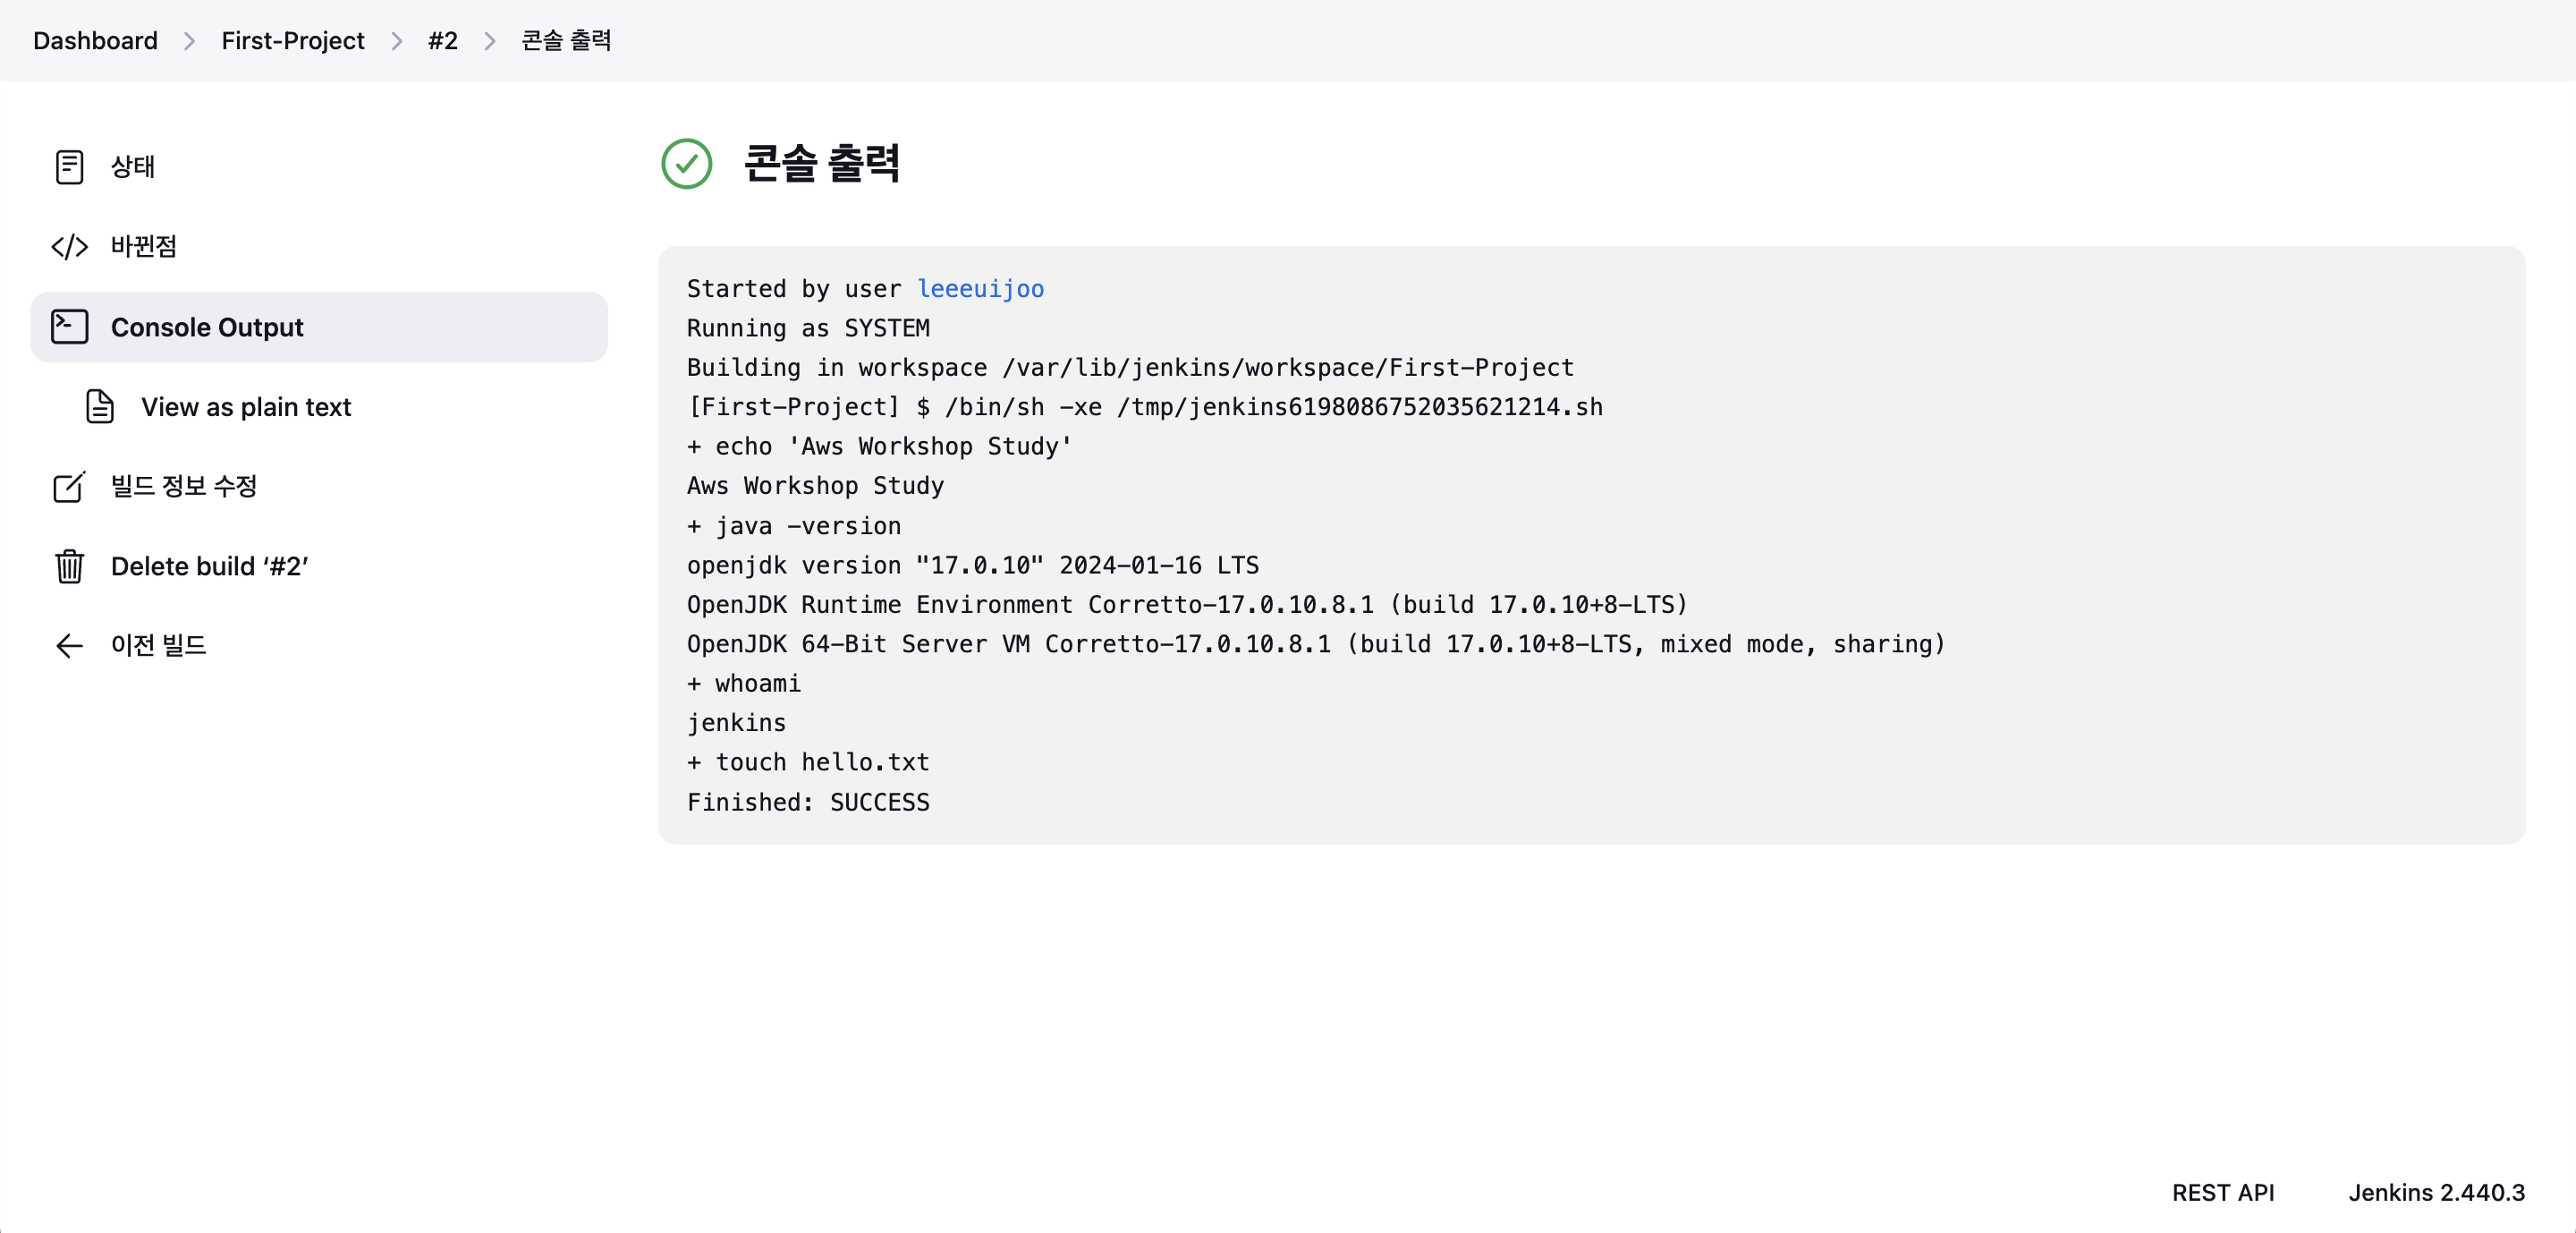
- 빌드 결과 확인 : 화살표 클릭 후 Console Output 클릭

- 상위 메뉴 - 구성 : 아래 명령어 한줄 추가
java -version→ Apply 저장- 한줄 더 추가 :
whoami - 한줄 더 추가 :
touch hello.txt
- 한줄 더 추가 :
- 최상위 - 프로젝트 화살표 선택 → 지금 빌드
- 이후 콘솔 출력 확인
- Console Output 확인
- Item(Job) 프로젝트 디텍토리 확인 : 혹은 젠킨스 작업 공간 확인
find / -name First-Project
/var/lib/jenkins/jobs/First-Project
/var/lib/jenkins/workspace/First-Project

# 프로젝트(job, item) 별 작업 공간 확인
tree /var/lib/jenkins/workspace/First-Project


(leeeuijoo@myeks:default) [root@myeks-bastion ~]# tree /var/lib/jenkins/workspace/First-Project
/var/lib/jenkins/workspace/First-Project
└── hello.txt

0 directories, 1 file
Docker 사용 : Docker-Project
- 사전 준비
# jenkins 유저로 docker 사용 가능하게 설정
grep -i jenkins /etc/passwd
usermod -s /bin/bash jenkins
grep -i jenkins /etc/passwd
(leeeuijoo@myeks:default) [root@myeks-bastion ~]# grep -i jenkins /etc/passwd
jenkins:x:995:991:Jenkins Automation Server:/var/lib/jenkins:/bin/false
(leeeuijoo@myeks:default) [root@myeks-bastion ~]# usermod -s /bin/bash jenkins
(leeeuijoo@myeks:default) [root@myeks-bastion ~]# grep -i jenkins /etc/passwd
jenkins:x:995:991:Jenkins Automation Server:/var/lib/jenkins:/bin/bash
# jenkins 유저 전환 (Docker 권한이 있지 않습니다.)
su - jenkins
whoami
pwd
docker info
exit
-bash-4.2$ docker info
Client:
Context: default
Debug Mode: false
Plugins:
buildx: Docker Buildx (Docker Inc., v0.0.0+unknown)
Server:
ERROR: Got permission denied while trying to connect to the Docker daemon socket at unix:///var/run/docker.sock: Get "http://%2Fvar%2Frun%2Fdocker.sock/v1.24/info": dial unix /var/run/docker.sock: connect: permission denied
errors pretty printing info
-bash-4.2$ exit
logout
# 권한 부여
chmod 666 /var/run/docker.sock
usermod -aG docker jenkins
# Jeknins 유저로 확인
su - jenkins
docker info
(leeeuijoo@myeks:default) [root@myeks-bastion ~]# su - jenkins
Last login: Thu Apr 18 20:39:02 KST 2024 on pts/0
-bash-4.2$ docker info
Client:
Context: default
Debug Mode: false
Plugins:
buildx: Docker Buildx (Docker Inc., v0.0.0+unknown)
Server:
Containers: 0
Running: 0
Paused: 0
Stopped: 0
Images: 5
# Dockerhub로 로그인 하기
docker login
Username: <자신의 계정명>
Password: <자신의 암호>
-bash-4.2$ docker login
Login with your Docker ID to push and pull images from Docker Hub. If you don't have a Docker ID, head over to https://hub.docker.com to create one.
Username: leeeuijoo
Password:
WARNING! Your password will be stored unencrypted in /var/lib/jenkins/.docker/config.json.
Configure a credential helper to remove this warning. See
https://docs.docker.com/engine/reference/commandline/login/#credentials-store
Login Succeeded
# myweb:v2.0.0 컨테이너 이미지 생성을 위한 Dockerfile 준비
# 실습을 위한 디렉터리 생성 및 이동
mkdir -p ~/myweb2 && cd ~/myweb2
-bash-4.2$ pwd
/var/lib/jenkins/myweb2
# Dockerfile 파일 생성
vi Dockerfile
FROM ubuntu:20.04
ENV TZ=Asia/Seoul VERSION=2.0.0 NICK=euijoo
RUN ln -snf /usr/share/zoneinfo/$TZ /etc/localtime && echo $TZ > /etc/timezone && \
sed -i 's/archive.ubuntu.com/mirror.kakao.com/g' /etc/apt/sources.list && \
sed -i 's/security.ubuntu.com/mirror.kakao.com/g' /etc/apt/sources.list && \
apt-get update && apt-get install -y apache2 figlet && \
echo "$NICK Web Server $VERSION<br>" > /var/www/html/index.html && \
echo "<pre>" >> /var/www/html/index.html && \
figlet AEWS Study >> /var/www/html/index.html && \
echo "</pre>" >> /var/www/html/index.html
EXPOSE 80
CMD ["usr/sbin/apache2ctl", "-DFOREGROUND"]
-bash-4.2$ cat Dockerfile
FROM ubuntu:20.04
ENV TZ=Asia/Seoul VERSION=2.0.0 NICK=euijoo
RUN ln -snf /usr/share/zoneinfo/$TZ /etc/localtime && echo $TZ > /etc/timezone && \
sed -i 's/archive.ubuntu.com/mirror.kakao.com/g' /etc/apt/sources.list && \
sed -i 's/security.ubuntu.com/mirror.kakao.com/g' /etc/apt/sources.list && \
apt-get update && apt-get install -y apache2 figlet && \
echo "$NICK Web Server $VERSION<br>" > /var/www/html/index.html && \
echo "<pre>" >> /var/www/html/index.html && \
figlet AEWS Study >> /var/www/html/index.html && \
echo "</pre>" >> /var/www/html/index.html
EXPOSE 80
CMD ["usr/sbin/apache2ctl", "-DFOREGROUND"]
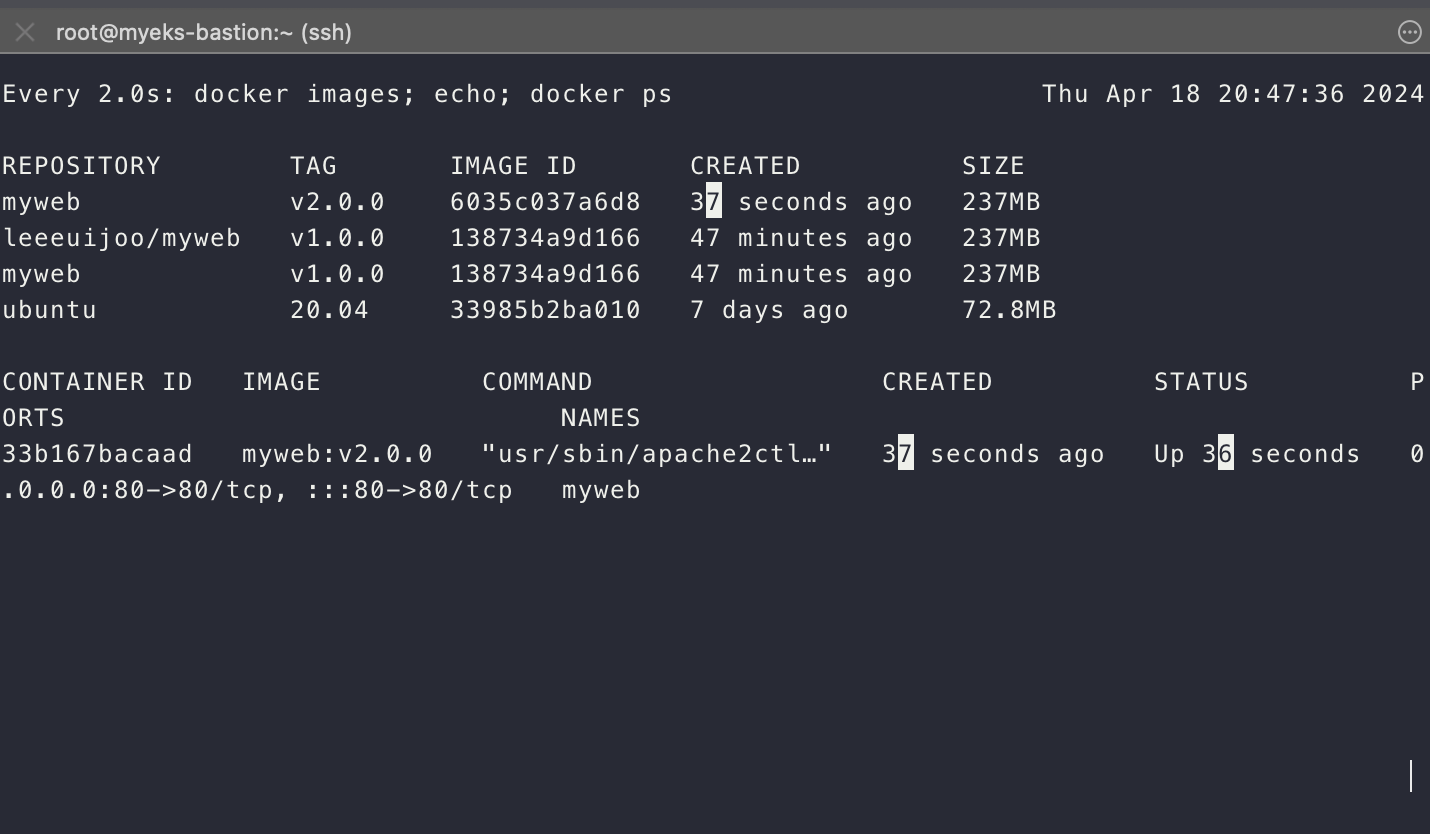
# 모니터링
watch -d 'docker images; echo; docker ps'
-----------
# (참고) 이미지 빌드
docker build -t myweb:v2.0.0 -f /var/lib/jenkins/myweb2/Dockerfile
# (참고) 컨테이너 실행
docker run -d -p 80:80 --rm --name myweb myweb:v2.0.0item : Docker-Project , freestyle
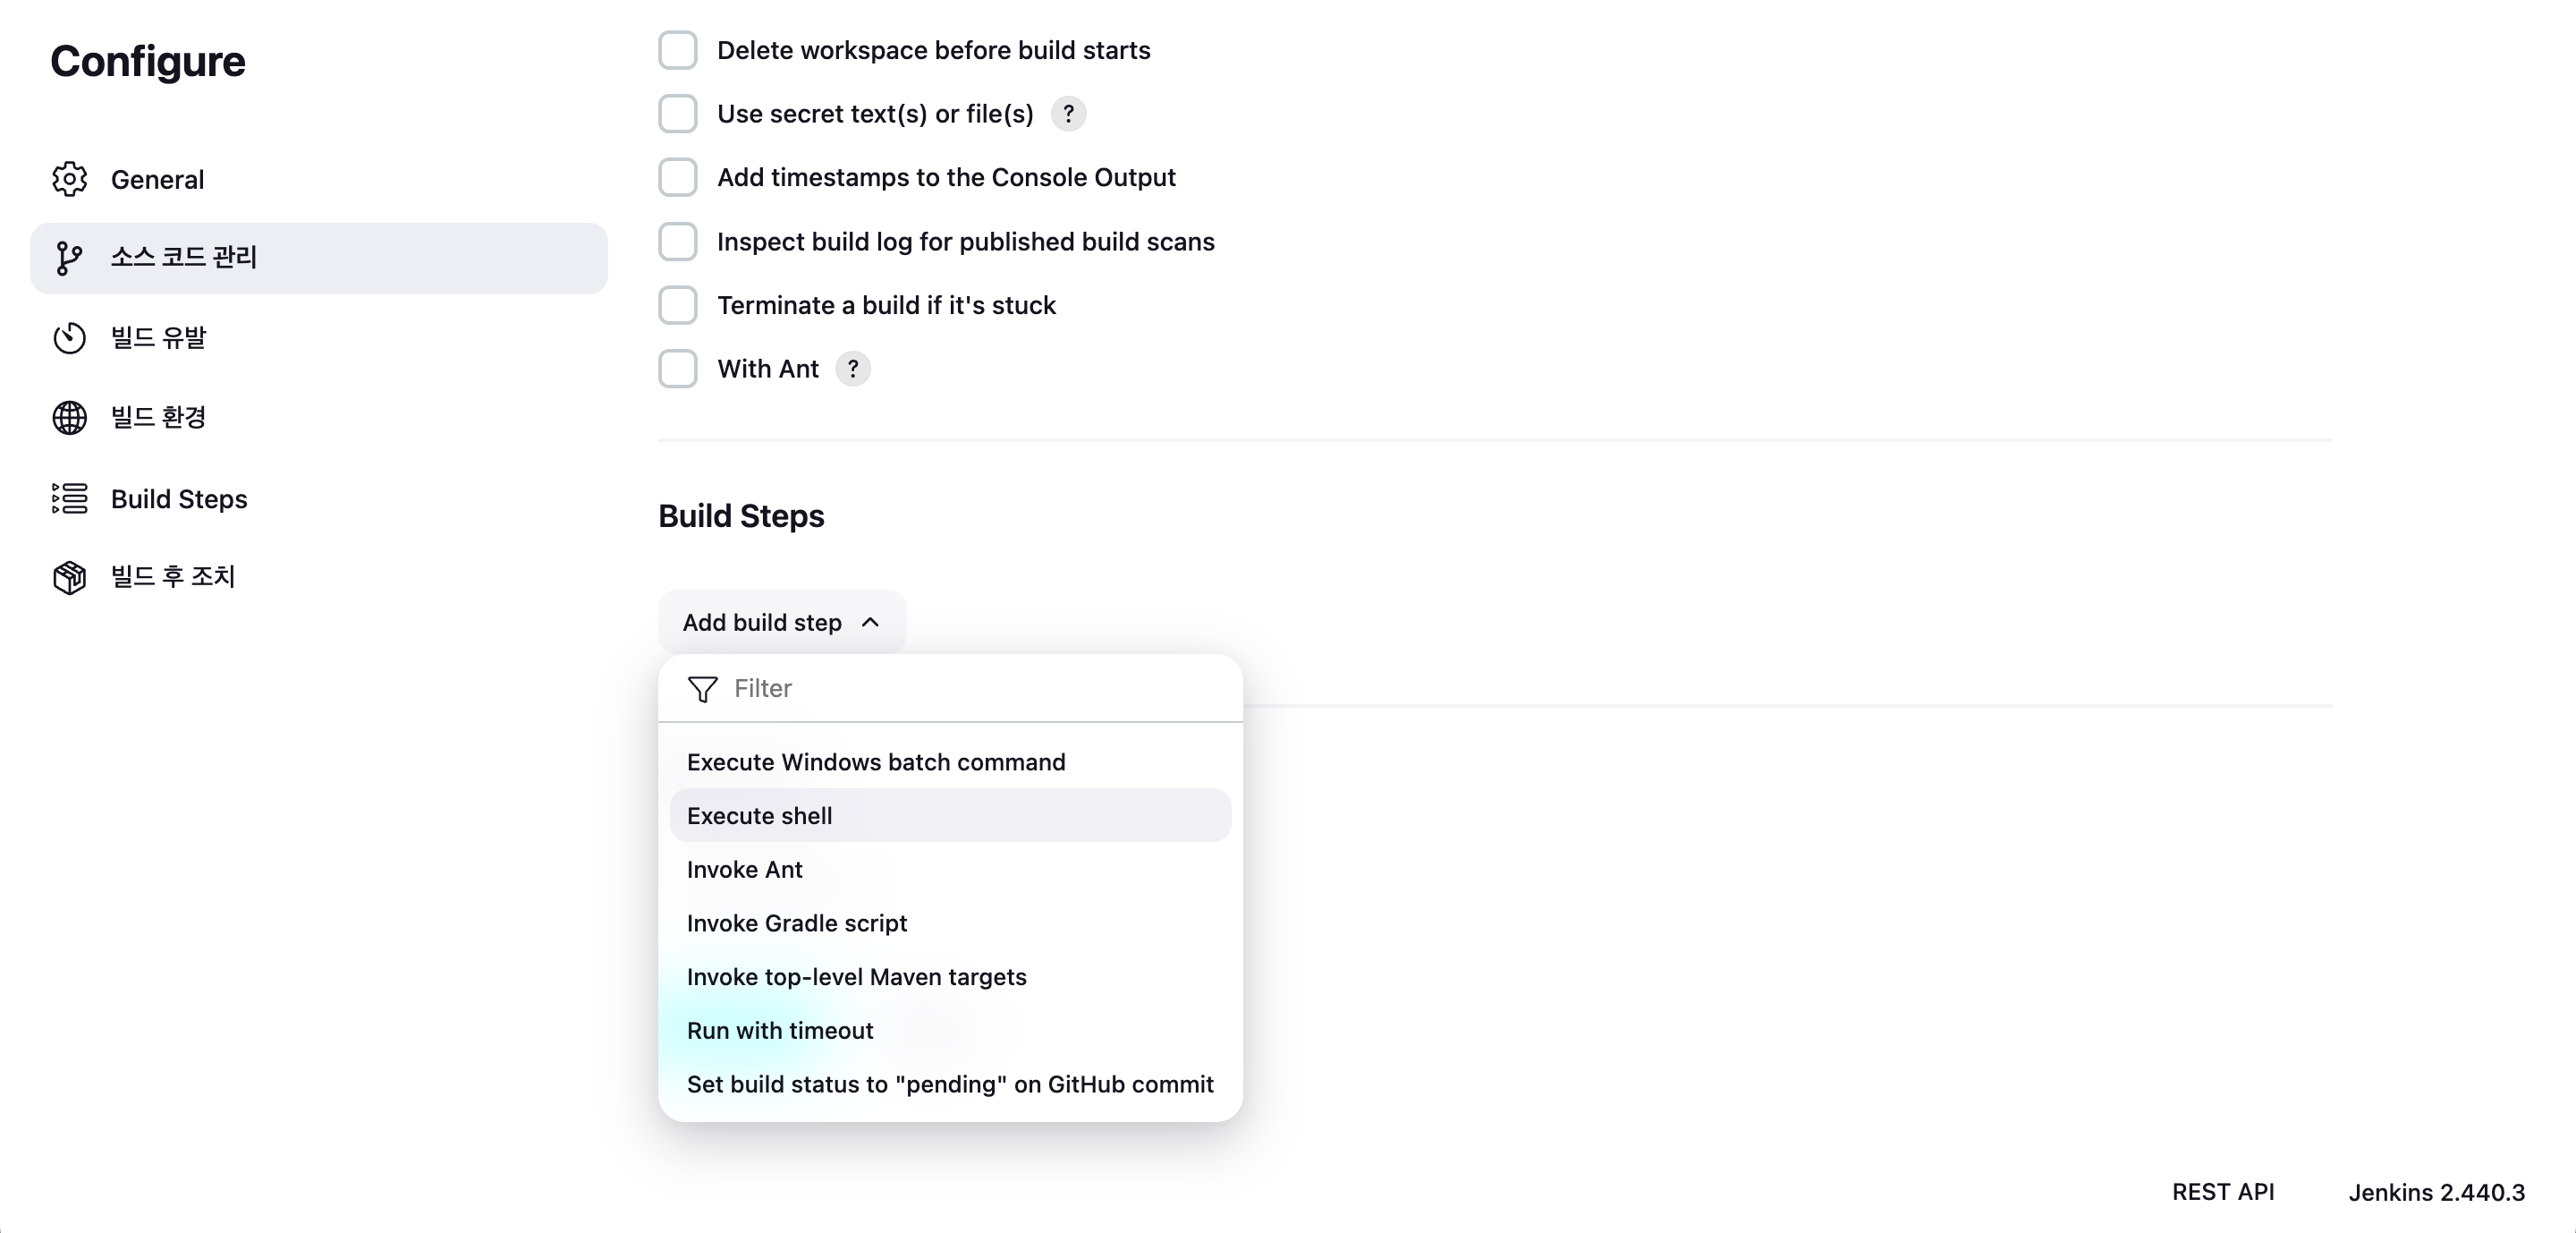
- Build Steps : Execute shell
cd /var/lib/jenkins/myweb2
docker build -t myweb:v2.0.0 .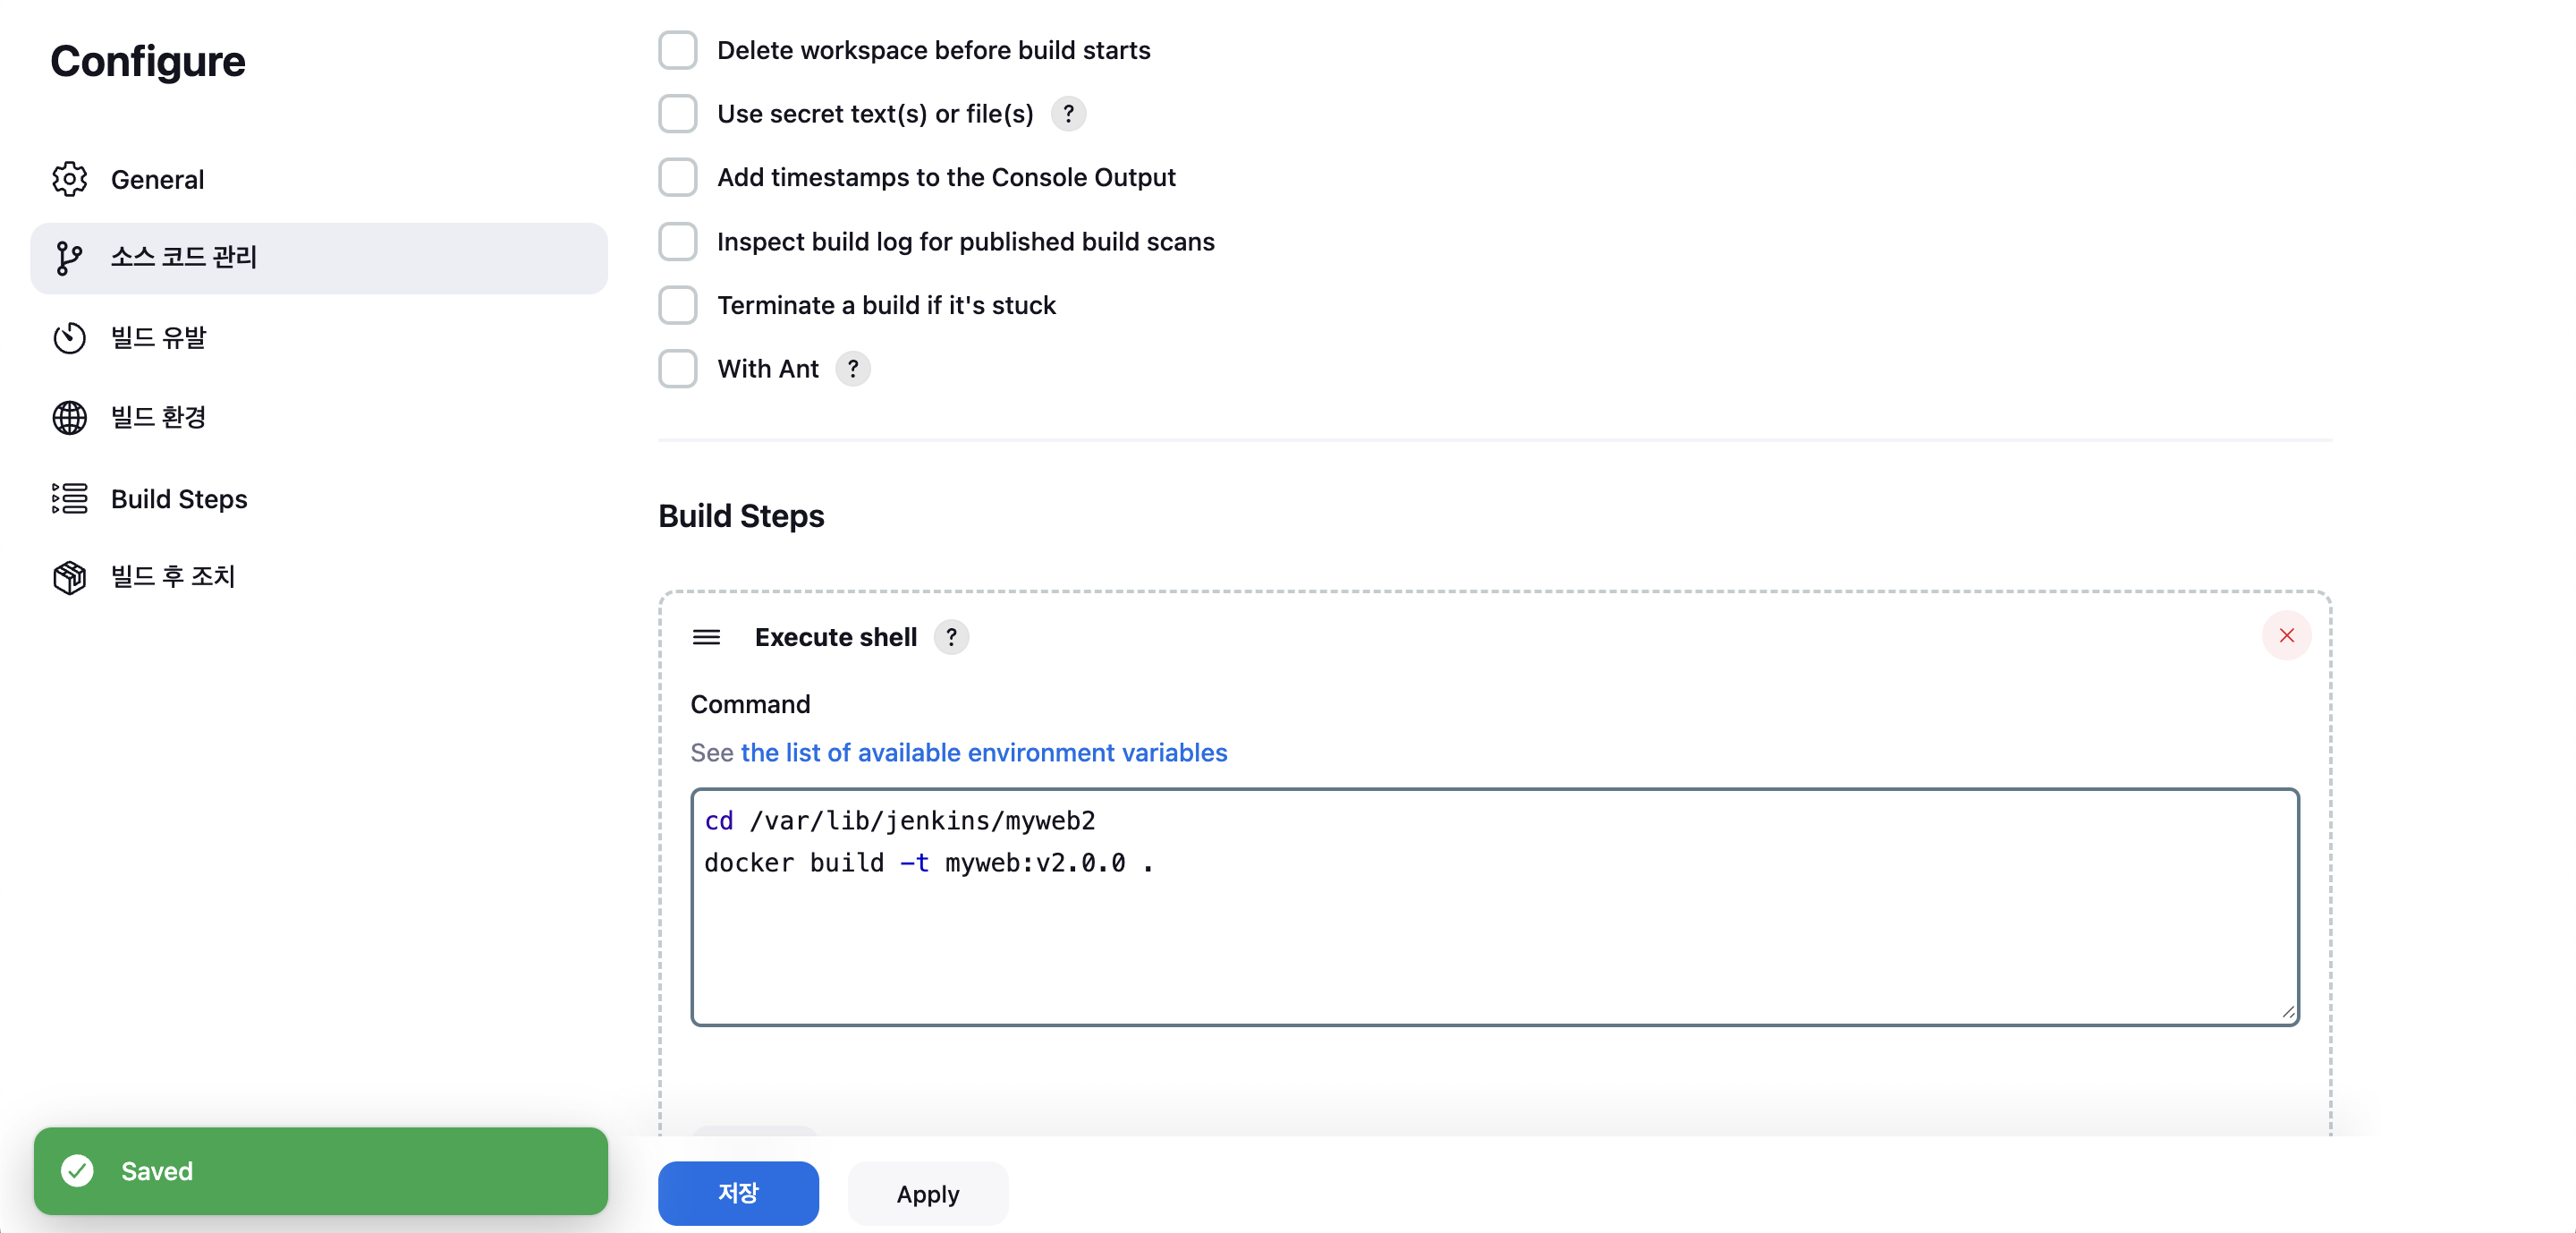
- Add build Steps : Execute shell
docker run -d -p 80:80 --rm --name myweb myweb:v2.0.0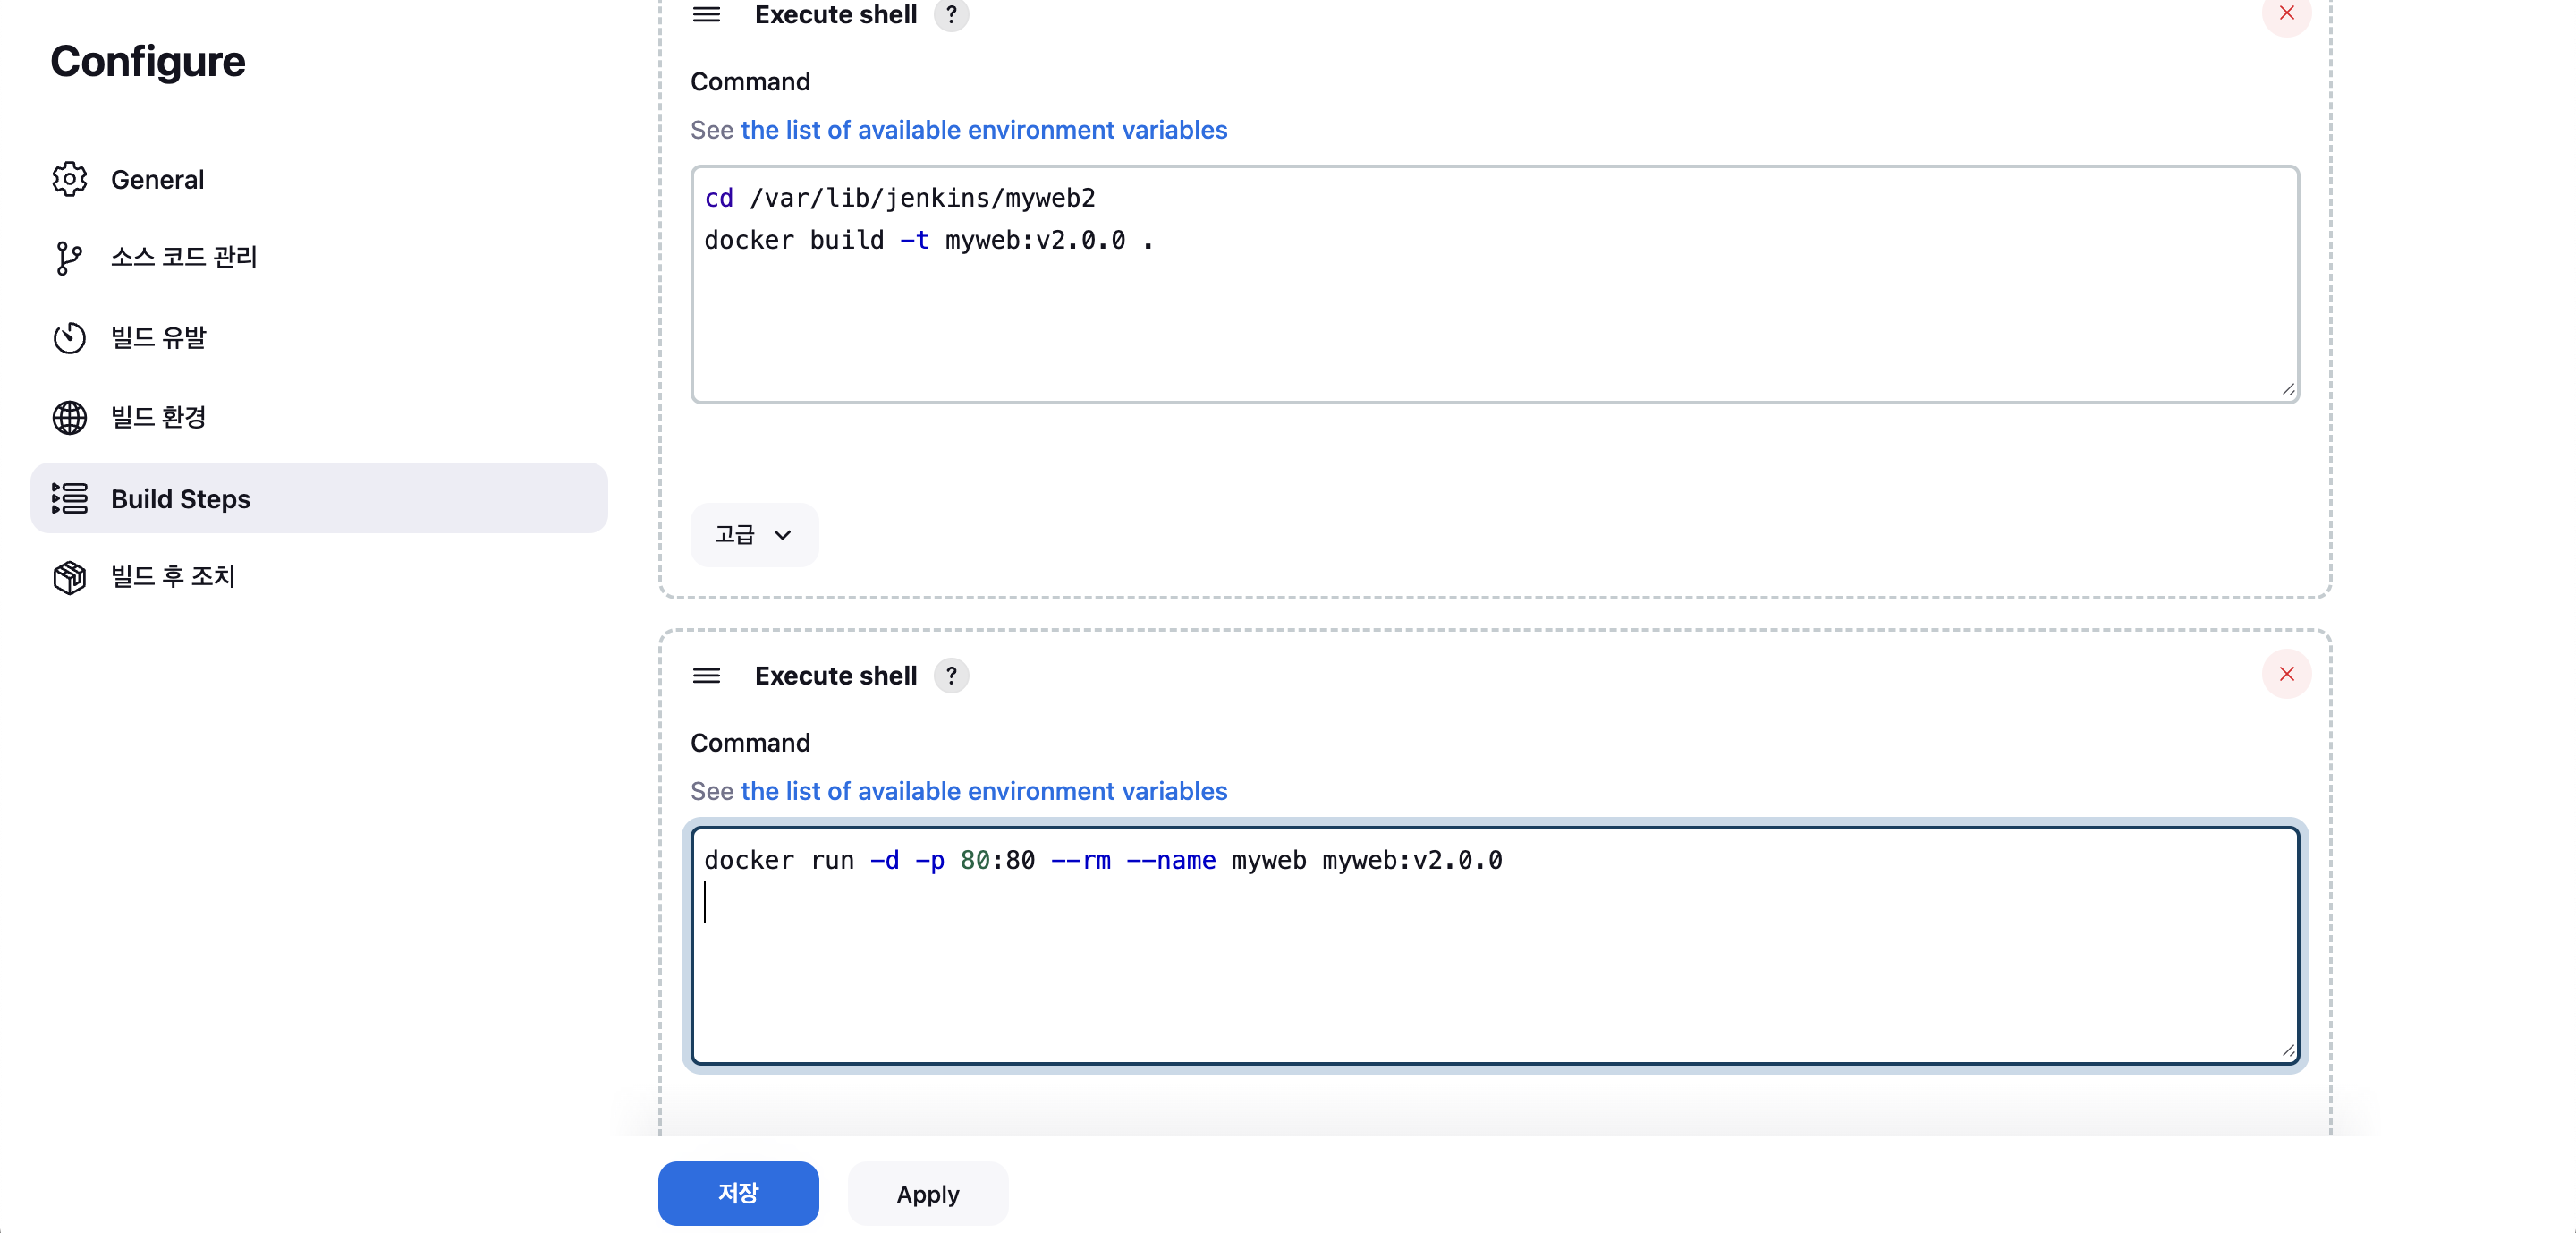
- 지금 빌드 → 확인
docker images
docker ps
curl localhost

-bash-4.2$ curl localhost
euijoo Web Server 2.0.0<br>
<pre>
    _    _______        ______    ____  _             _
   / \  | ____\ \      / / ___|  / ___|| |_ _   _  __| |_   _
  / _ \ |  _|  \ \ /\ / /\___ \  \___ \| __| | | |/ _` | | | |
 / ___ \| |___  \ V  V /  ___) |  ___) | |_| |_| | (_| | |_| |
/_/   \_\_____|  \_/\_/  |____/  |____/ \__|\__,_|\__,_|\__, |
                                                        |___/
</pre>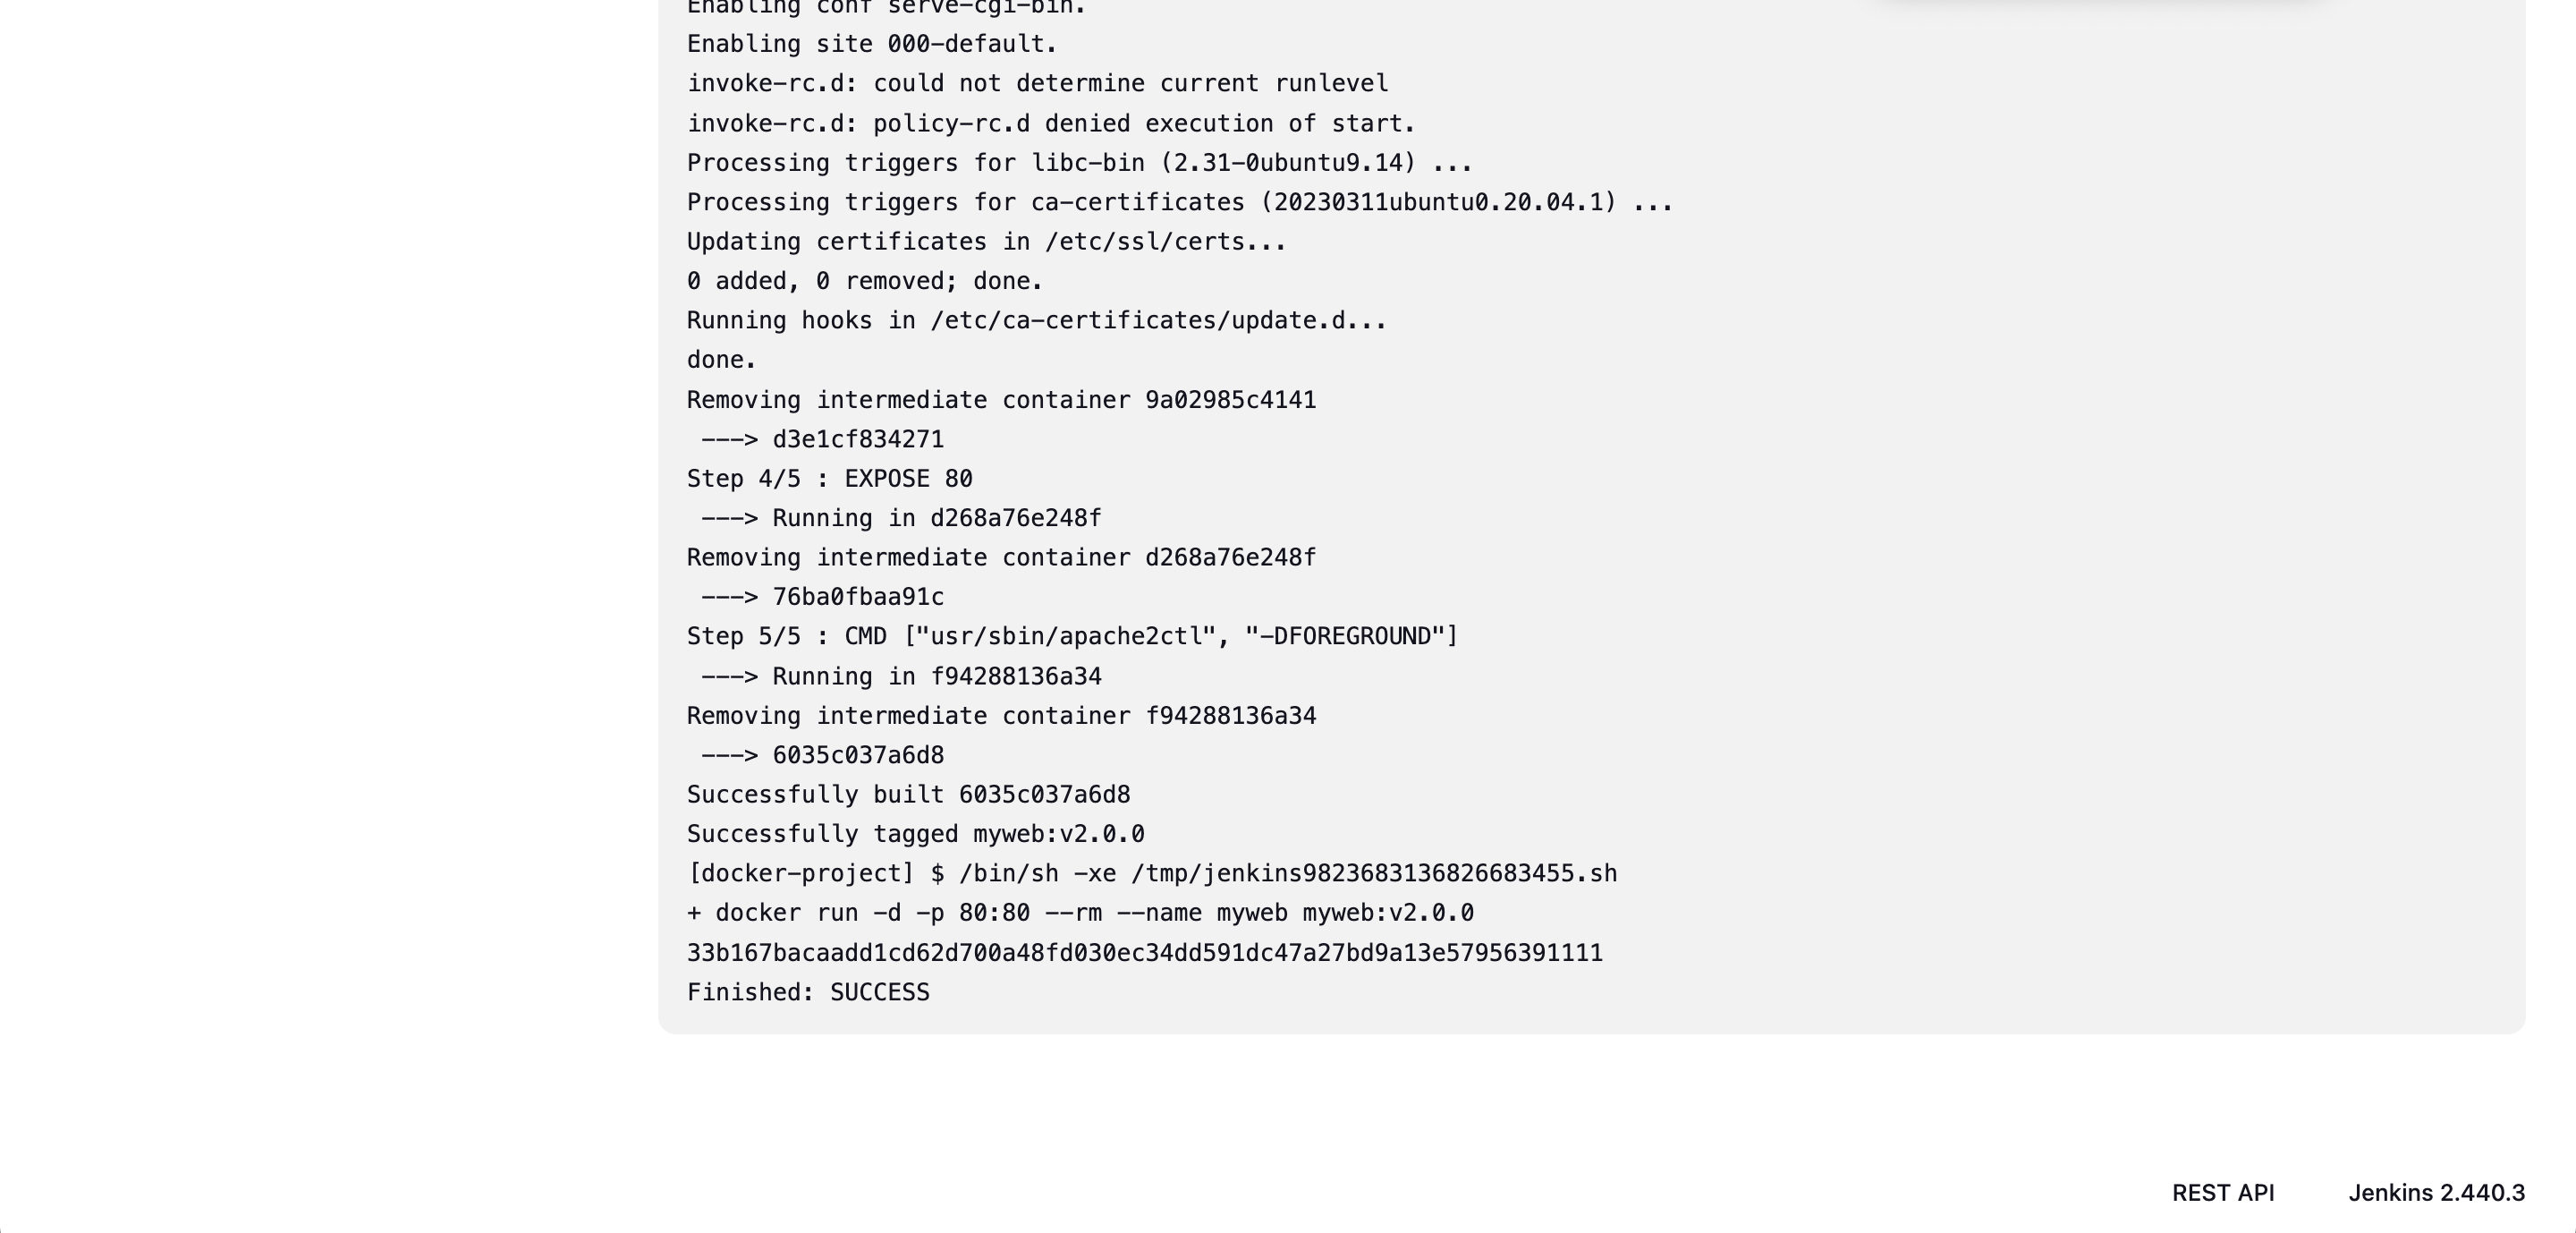
- 실습 리소스 삭제
docker rm -f myweb
docker rmi myweb:v2.0.0
Git Hub 활용
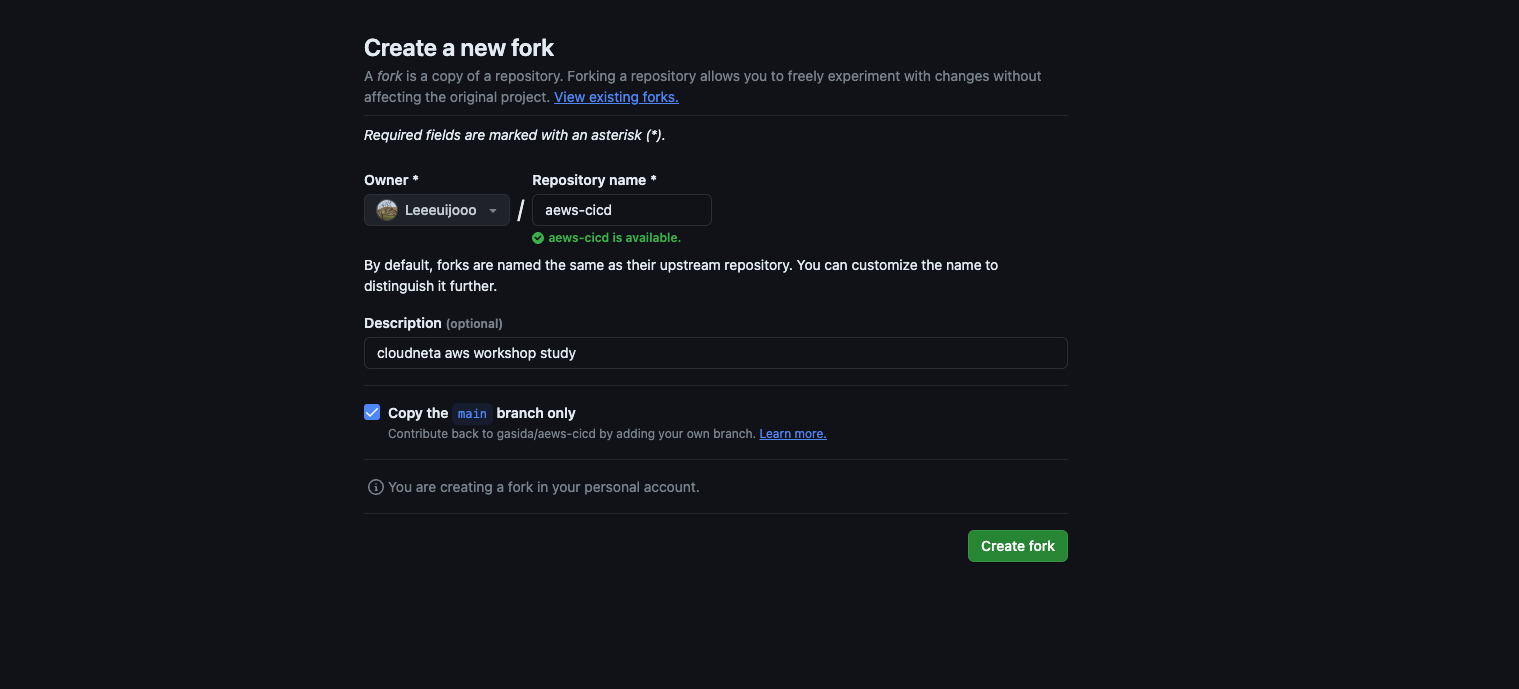
- Item : Trigger-Project, freestyle
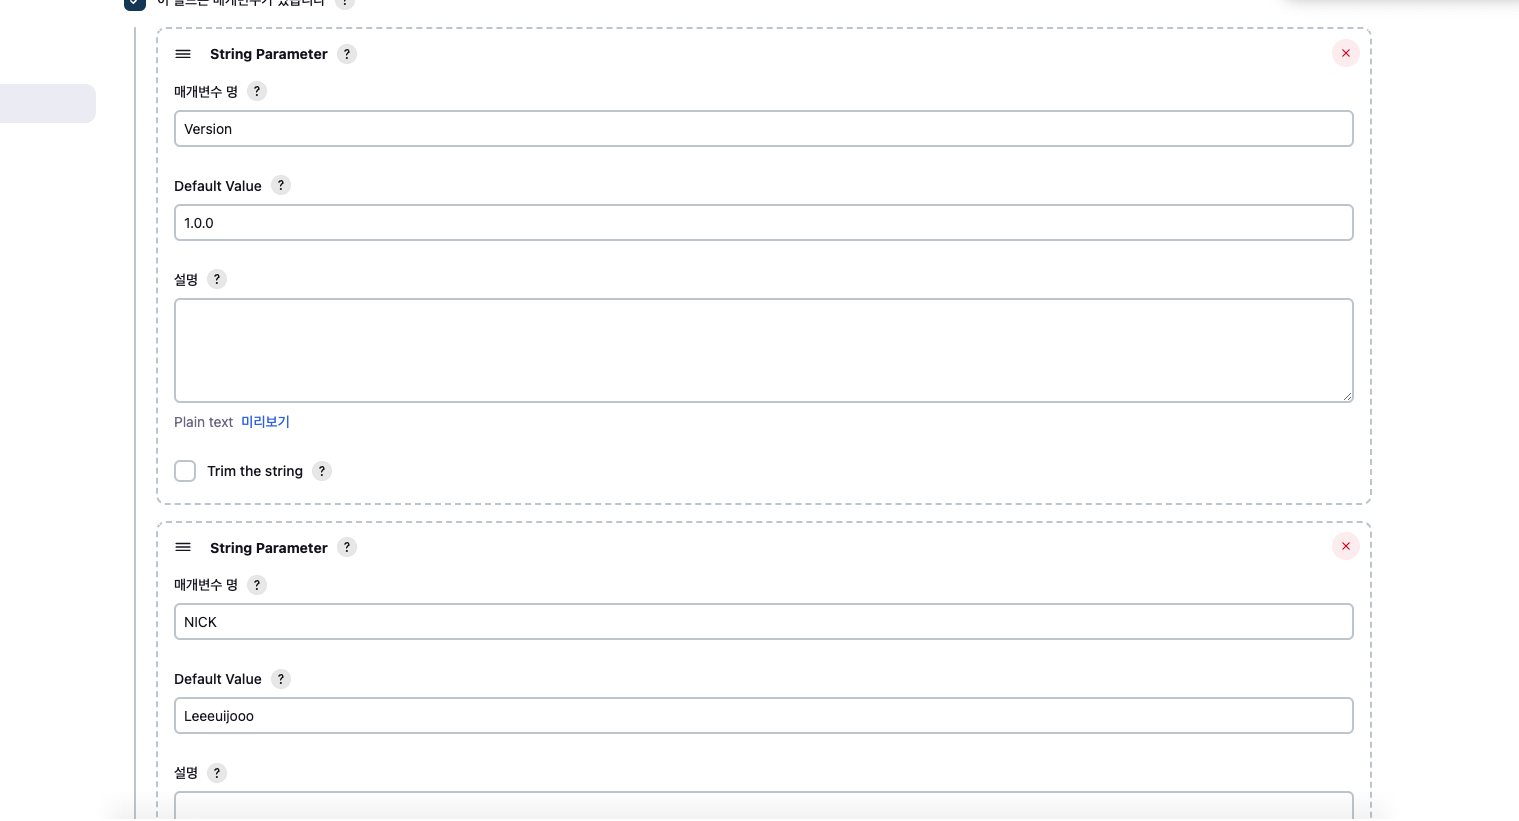
- 빌드 매개변수 : String
- 변수명(VERSION), Default Vault(v1.0.0)
- 변수명(NICK), Default Vault(<자신의 계정명>)
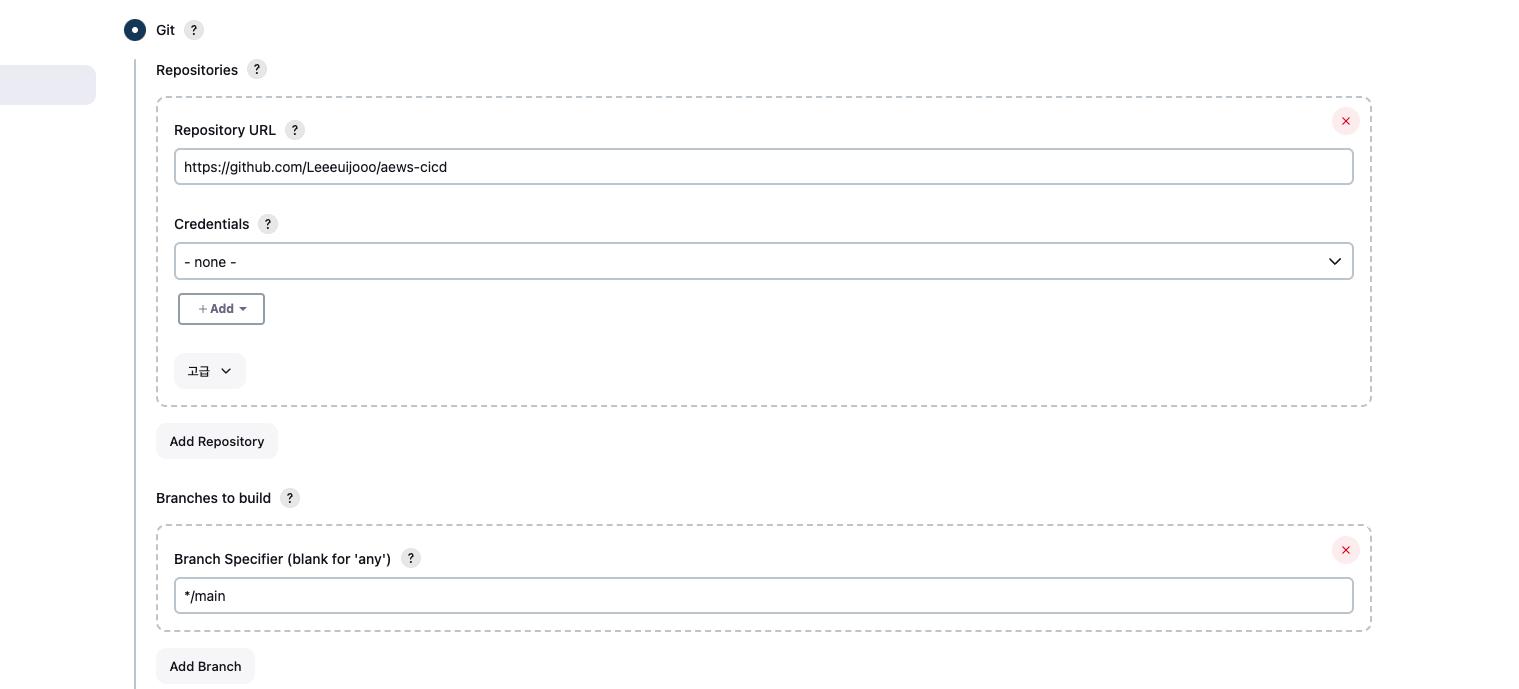
- 소스 코드 관리 : Git
- Repo URL : https://github.com/Leeeuijooo/aews-cicd
- Branch : */main
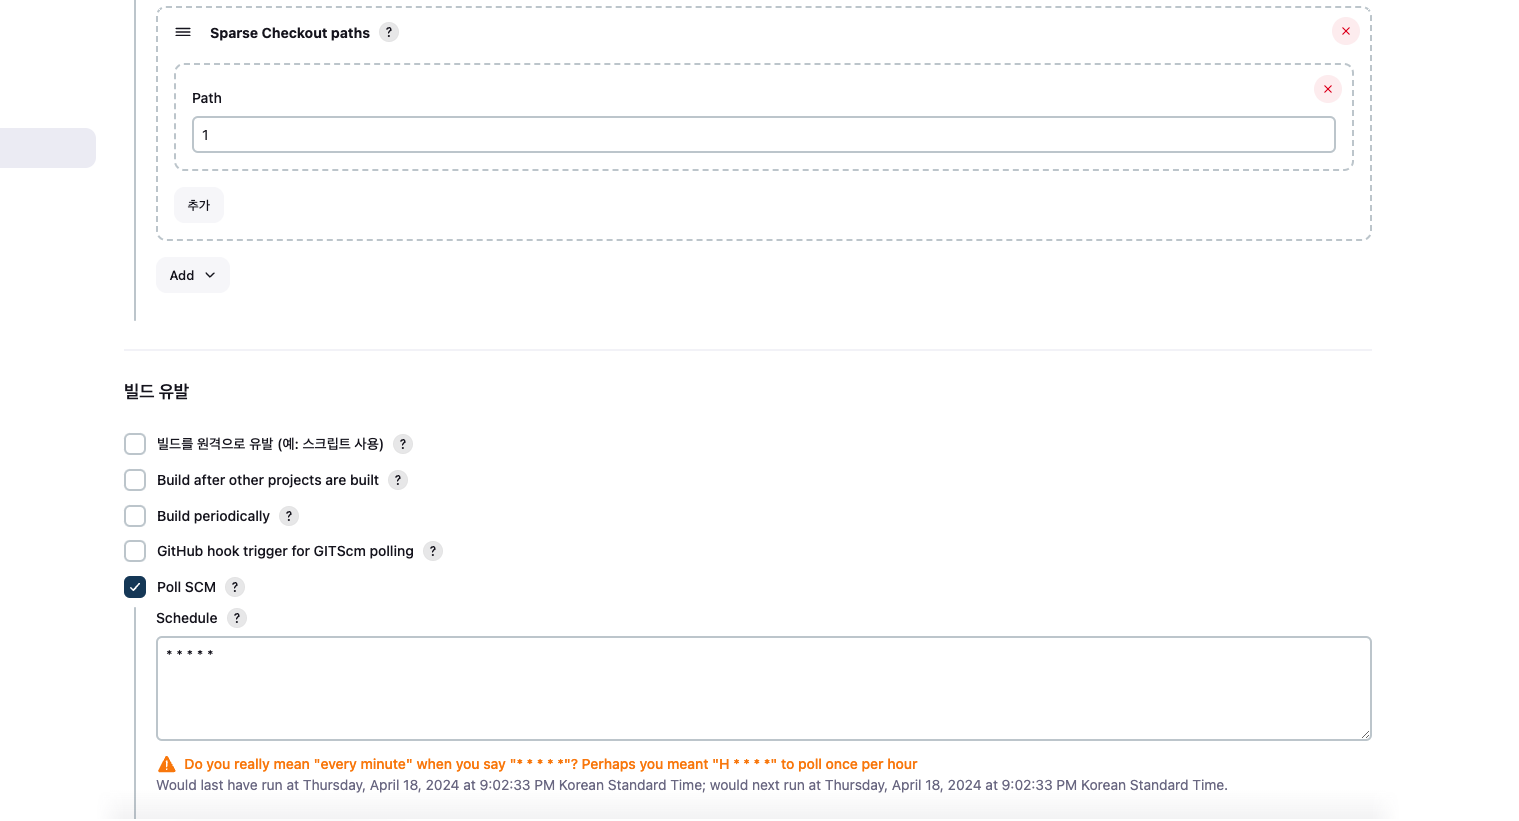
- Additional Behaviours → Sparse Checkout paths (Path) : 1
- 빌드 유발 : Poll SCM (* * * * *)
- 빌드 매개변수 : String
- 빌드 매개 변수 설정 (String)
- Git 설정
- 빌드 trigger 설정 - cron : 매분
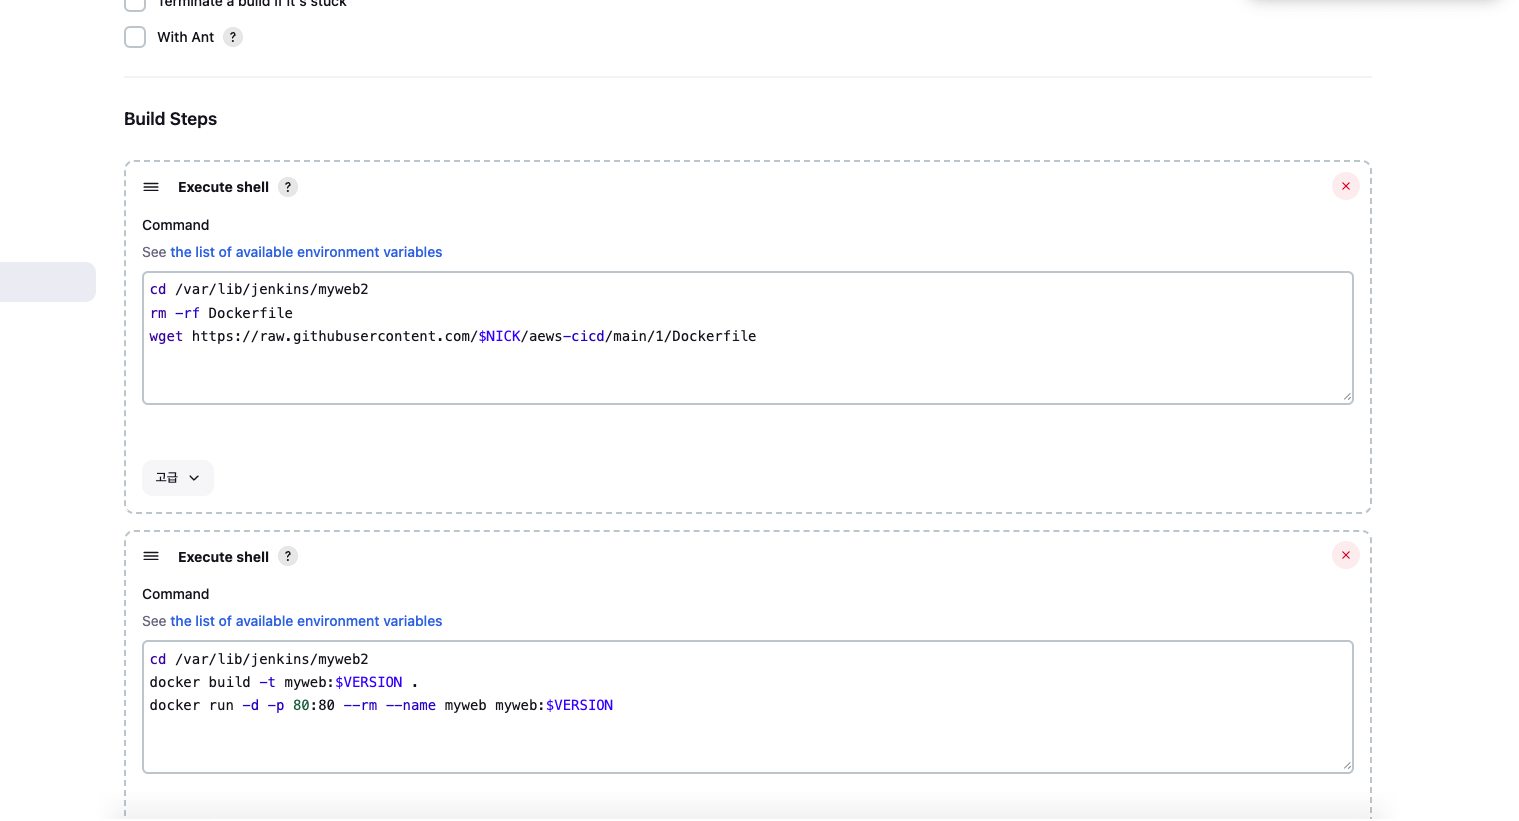
- Build Steps

- +) 추가 Build-steps 는 작업환경을 통일 시켜줘야 합니다. 설정을 안하면 다른 작업 디렉토리에서 Docker Build 를 하기 때문에 Dockerfile 을 찾을 수 없다는 메시지를 받을 수 있습니다.
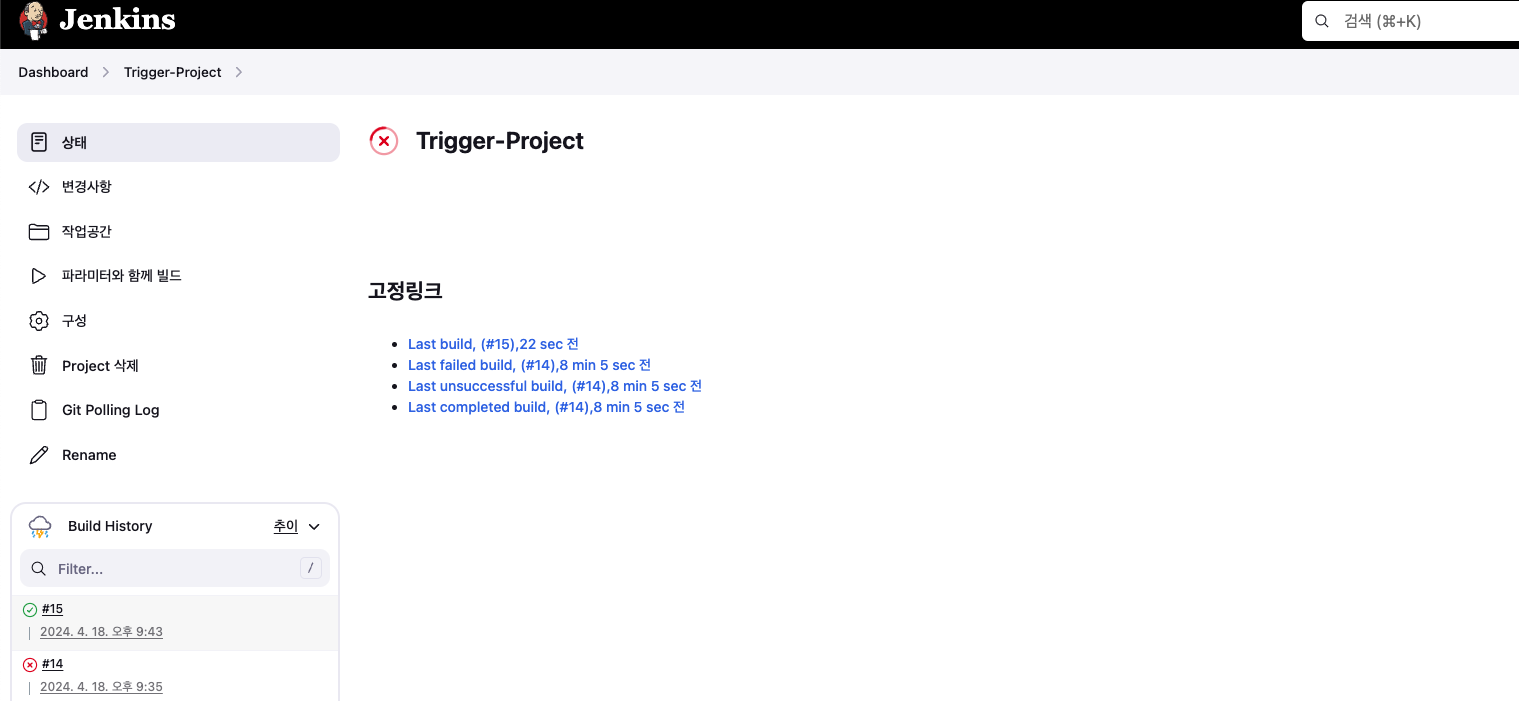
- 자신의 Github Repo 1 에서 Dockerfile에 VERSION 정보를 수정 후 Commit → 1분 정도 후에 젠킨스에서 확인
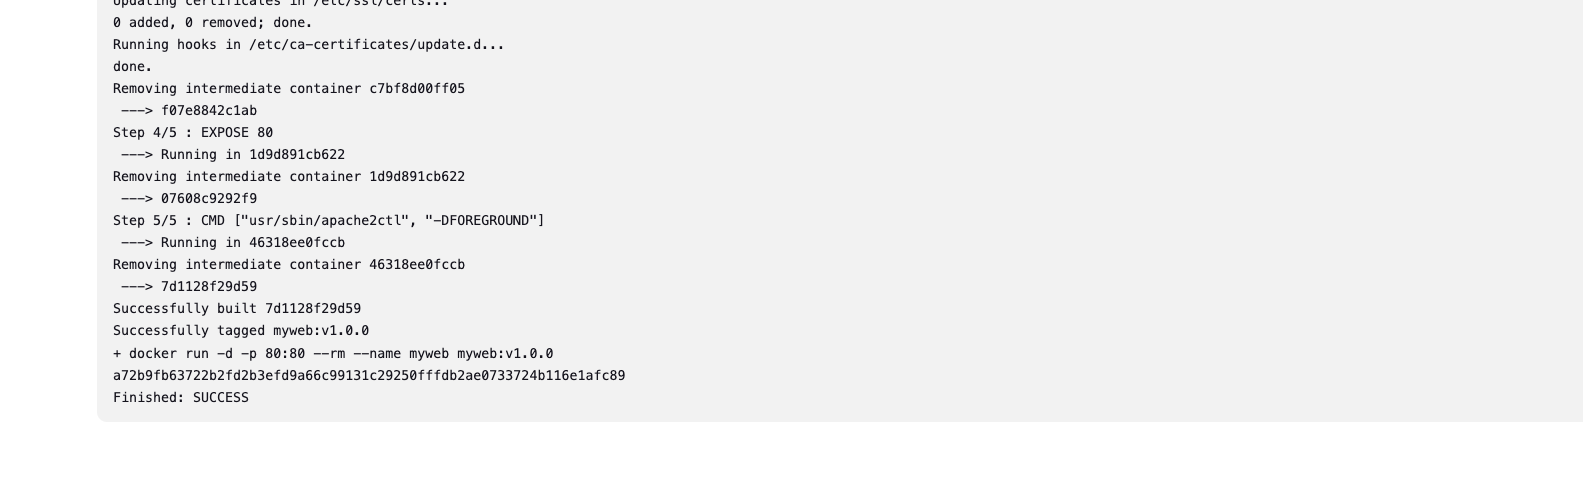
- 성공
- 실습 내용 정리
docker rm -f myweb
docker rmi myweb:v1.9.9
docker rmi myweb:v1.0.0
Jenkins 작업 (프로젝트, Job, Item) : 3가지 유형의 지시 사항 포함
-
작업을 수행하는 시점 Trigger
- 작업 수행 태스크 task가 언제 시작될지를 지시
-
작업을 구성하는 단계별 태스크 Built step
- 특정 목표를 수행하기 위한 태스크를 단계별 step로 구성할 수 있다.
- 이것을 젠킨스에서는 빌드 스텝 build step이라고 부른다.
-
태스크가 완료 후 수행할 명령 Post-build action
- 예를 들어 작업의 결과(성공 or 실패)를 사용자에게 알려주는 후속 동작이나, 자바 코드를 컴파일한 후 생성된 클래스 파일을 특정 위치로 복사 등
- (참고) 젠킨스의 빌드 : 젠킨스 작업의 특정 실행 버전
- 사용자는 젠킨스 작업을 여러번 실행할 수 있는데, 실행될 때마다 고유 빌드 번호가 부여된다.
- 작업 실행 중에 생성된 아티팩트, 콘솔 로드 등 특정 실행 버전과 관련된 모든 세부 정보가 해당 빌드 번호로 저장된다.
파이프라인 Pipeline : CD 파이프라인을 구현하고 통합할 때 사용하는 플러그인 스크립트 모음
- 파이프라인 장점
- 코드 : 애플리케이션 CI/CD 프로세스를 코드 형식으로 작성할 수 있고, 해당 코드를 중앙 리포지터리에 저장하여 팀원과 공유 및 작업 가능
- 내구성 : 젠킨스 서비스가 의도적으로 또는 우발적으로 재시작되더라도 문제없이 유지됨
- 일시 중지 가능 : 파이프라인을 실행하는 도중 사람의 승인이나 입력을 기다리기 위해 중단하거나 기다리는 것이 가능
- 다양성 : 분기나 반복, 병렬 처리와 같은 다양한 CI/CD 요구 사항을 지원
- 파이프라인 용어
- 파이프라인 : 전체 빌드 프로세스를 정의하는 코드.
- 노드 node : 파이프라인을 실행하는 시스템.
- 스테이지 stage : 특정 단계에서 수행되는 작업들의 정의.
- 스텝 step : 파이프라인의 특정 단계에서 수행되는 단일 작업을 의미.
- 파이프라인 3가지 구성 형태
- Pipeline script : 일반적인 방식으로 Jenkins 파이프라인을 생성하여 Shell Script를 직접 생성하여 빌드하는 방식
- Through the classic UI - you can enter a basic Pipeline directly in Jenkins through the classic UI.
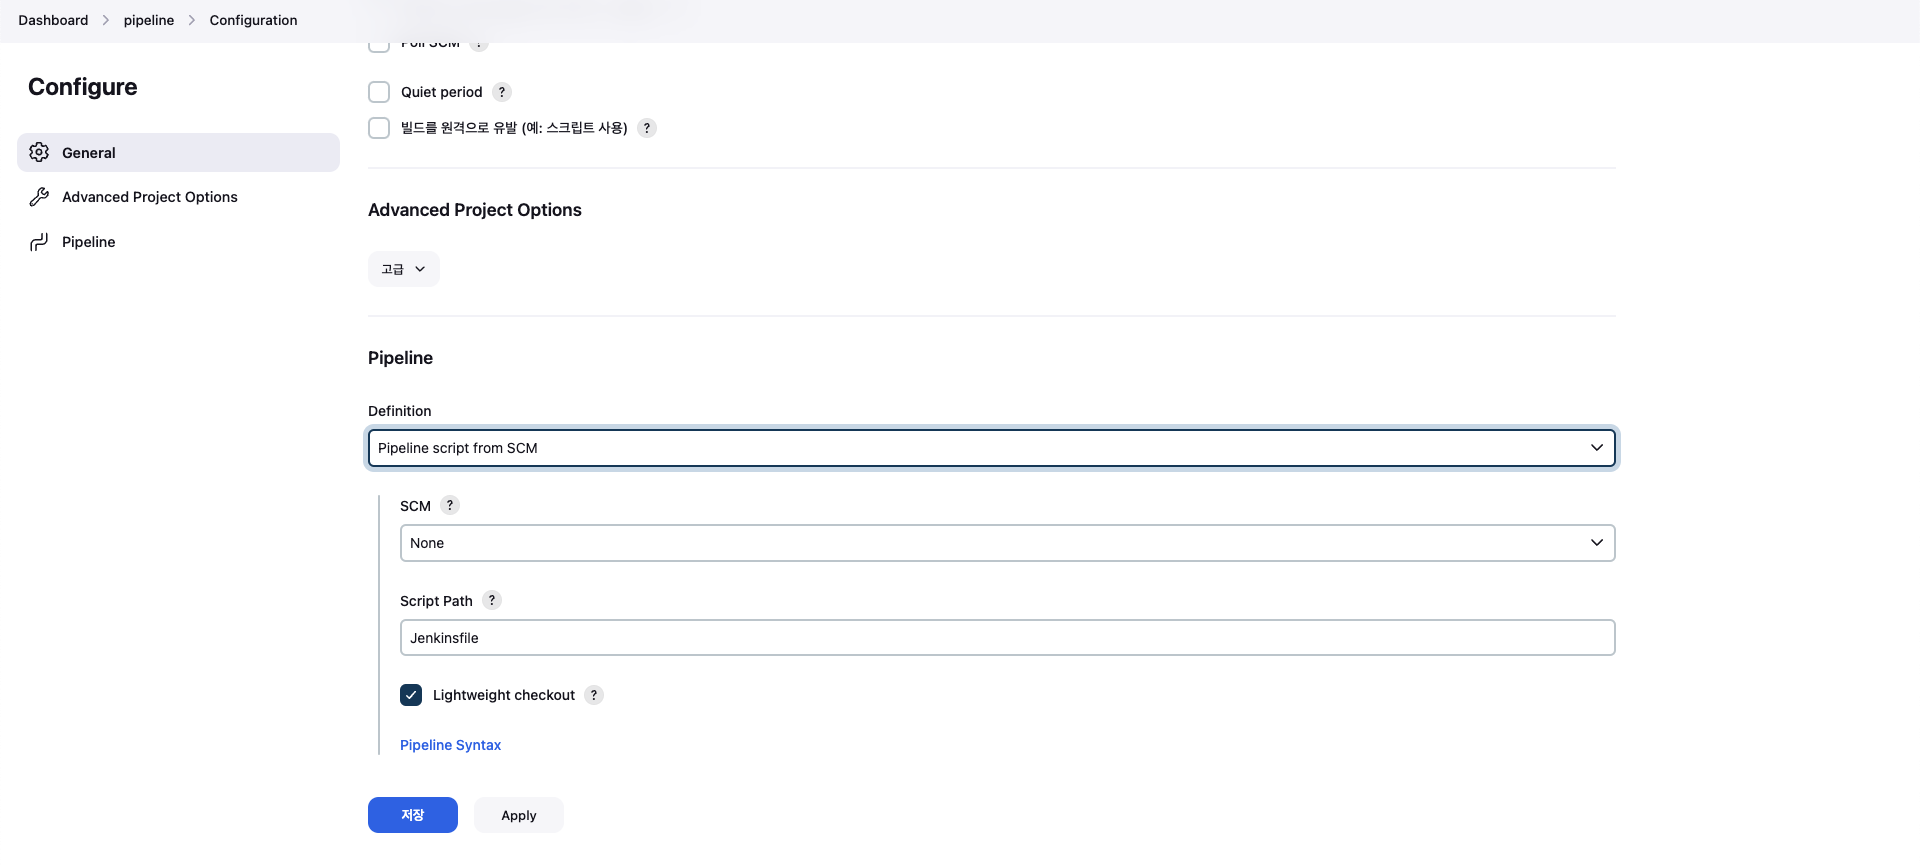
- Pipeline script from SCM : 사전 작성한 JenkinsFile을 형상관리 저장소에 보관하고, 빌드 시작 시 파이프라인 프로젝트에서 호출 실행하는 방식
- In SCM - you can write a
Jenkinsfilemanually, which you can commit to your project’s source control repository.
- In SCM - you can write a
- Pipeline script : 일반적인 방식으로 Jenkins 파이프라인을 생성하여 Shell Script를 직접 생성하여 빌드하는 방식
- Blue Ocean 기반 : UI기반하여 시각적으로 파이프라인을 구성하면, JenkinsFile이 자동으로 생성되어 실행되는 방식

-
파이프라인 2가지 구문 : 선언형 파이프라인(권장)과 스크립트형 파이프라인
- 선언형 파이프라인 : 쉽게 작성 가능, 최근 문법이고 젠킨스에서 권장하는 방법, step 필수!
- 스크립트형 파이프라인 : 커스텀 작업에 용이, 복잡하여 난이도가 높음, step은 필수 아님
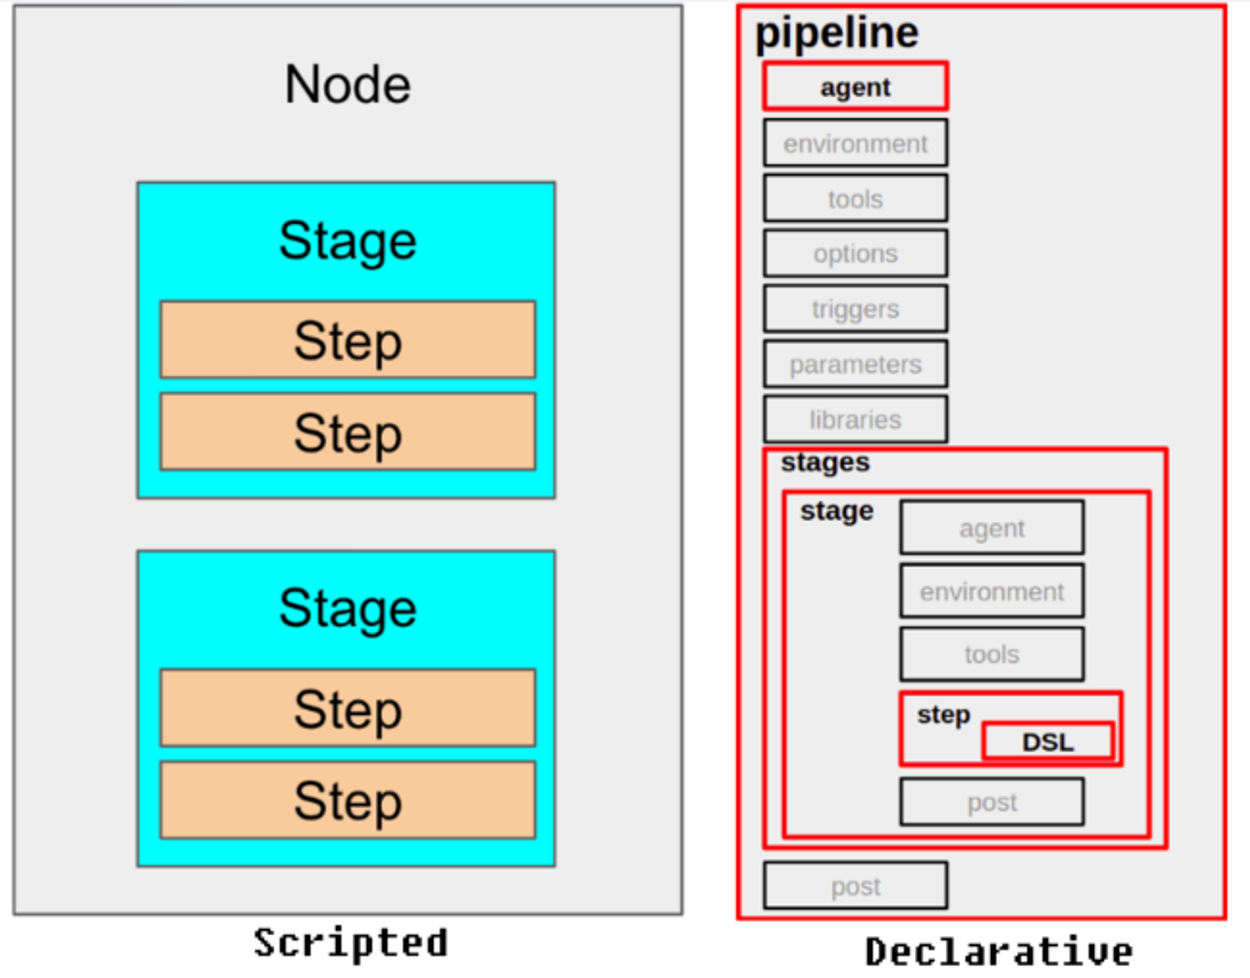
- 선언형 Declarative 파이프라인 예시
pipeline {
    agent any     # Execute this Pipeline or any of its stages, on any available agent.
    stages {
        stage('Build') {   # Defines the "Build" stage.
            steps {
                //         # Perform some steps related to the "Build" stage.
            }
        }
        stage('Test') {
            steps {
                //
            }
        }
        stage('Deploy') {
            steps {
                //
            }
        }
    }
}- 스크립트형 Scripted 파이프라인
node {          # 	Execute this Pipeline or any of its stages, on any available agent.
    stage('Build') {    # Defines the "Build" stage. stage blocks are optional in Scripted Pipeline syntax. However, implementing stage blocks in a Scripted Pipeline provides clearer visualization of each stage's subset of tasks/steps in the Jenkins UI.
        //              # Perform some steps related to the "Build" stage.
    }
    stage('Test') {
        //
    }
    stage('Deploy') {
        //
    }
}
Pipeline 실습
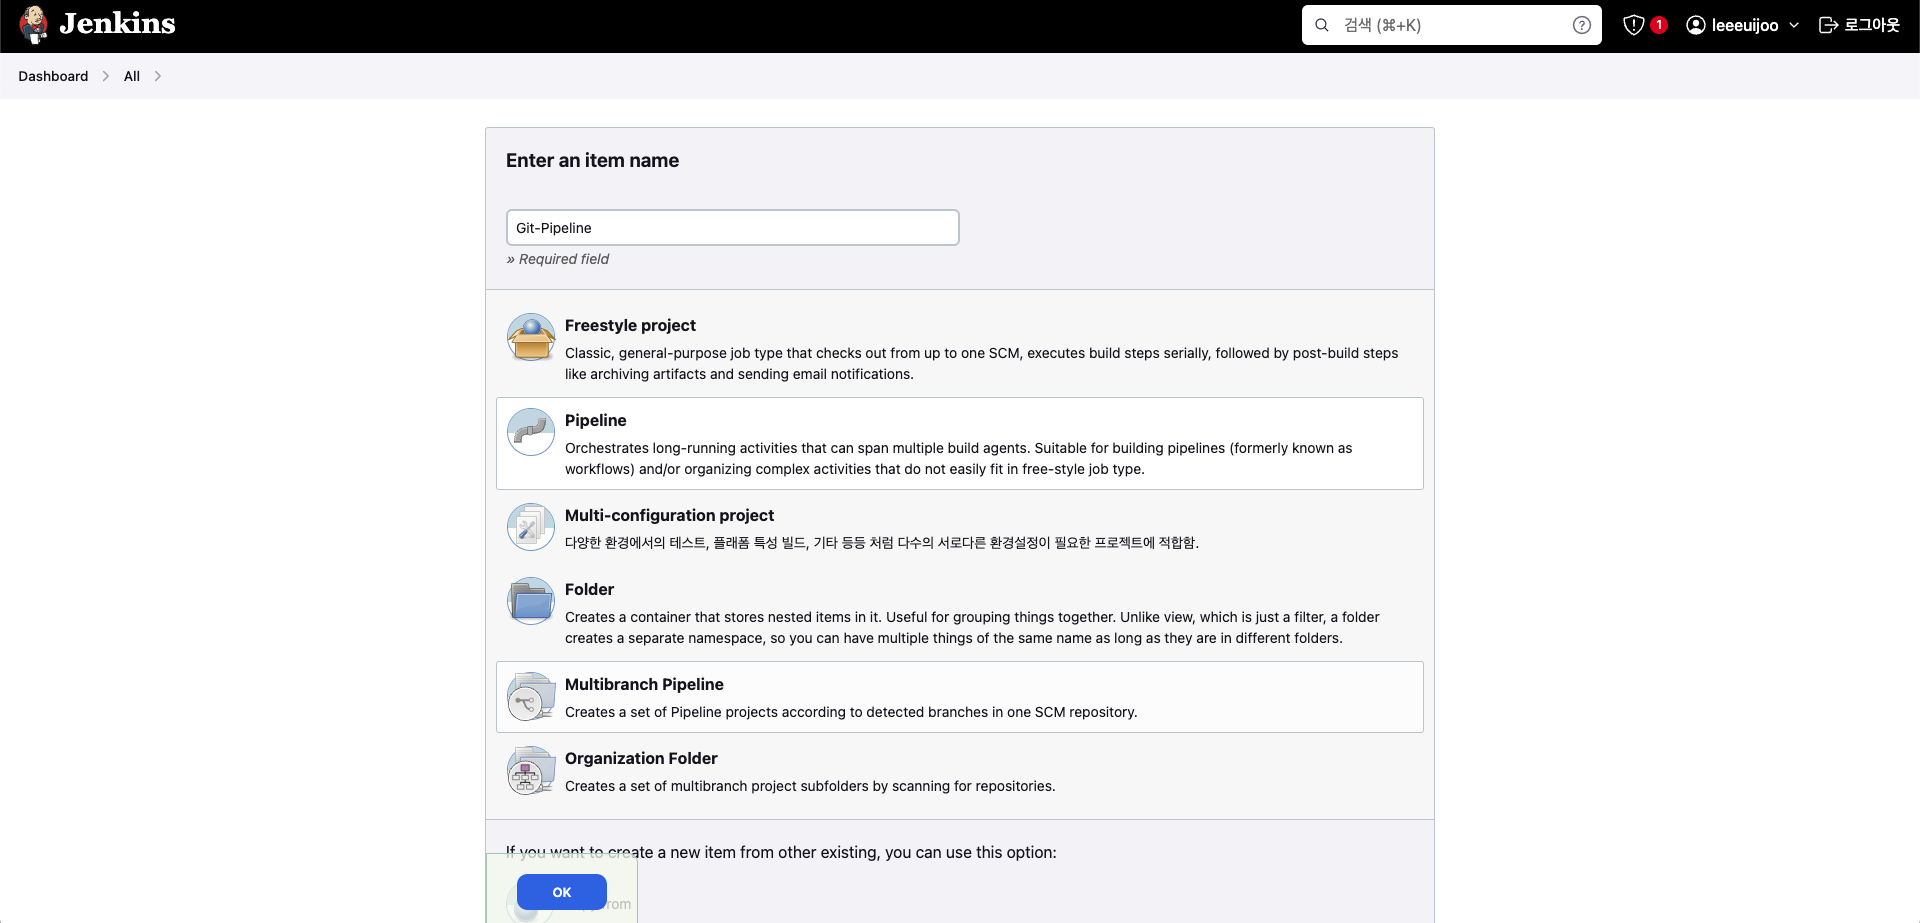
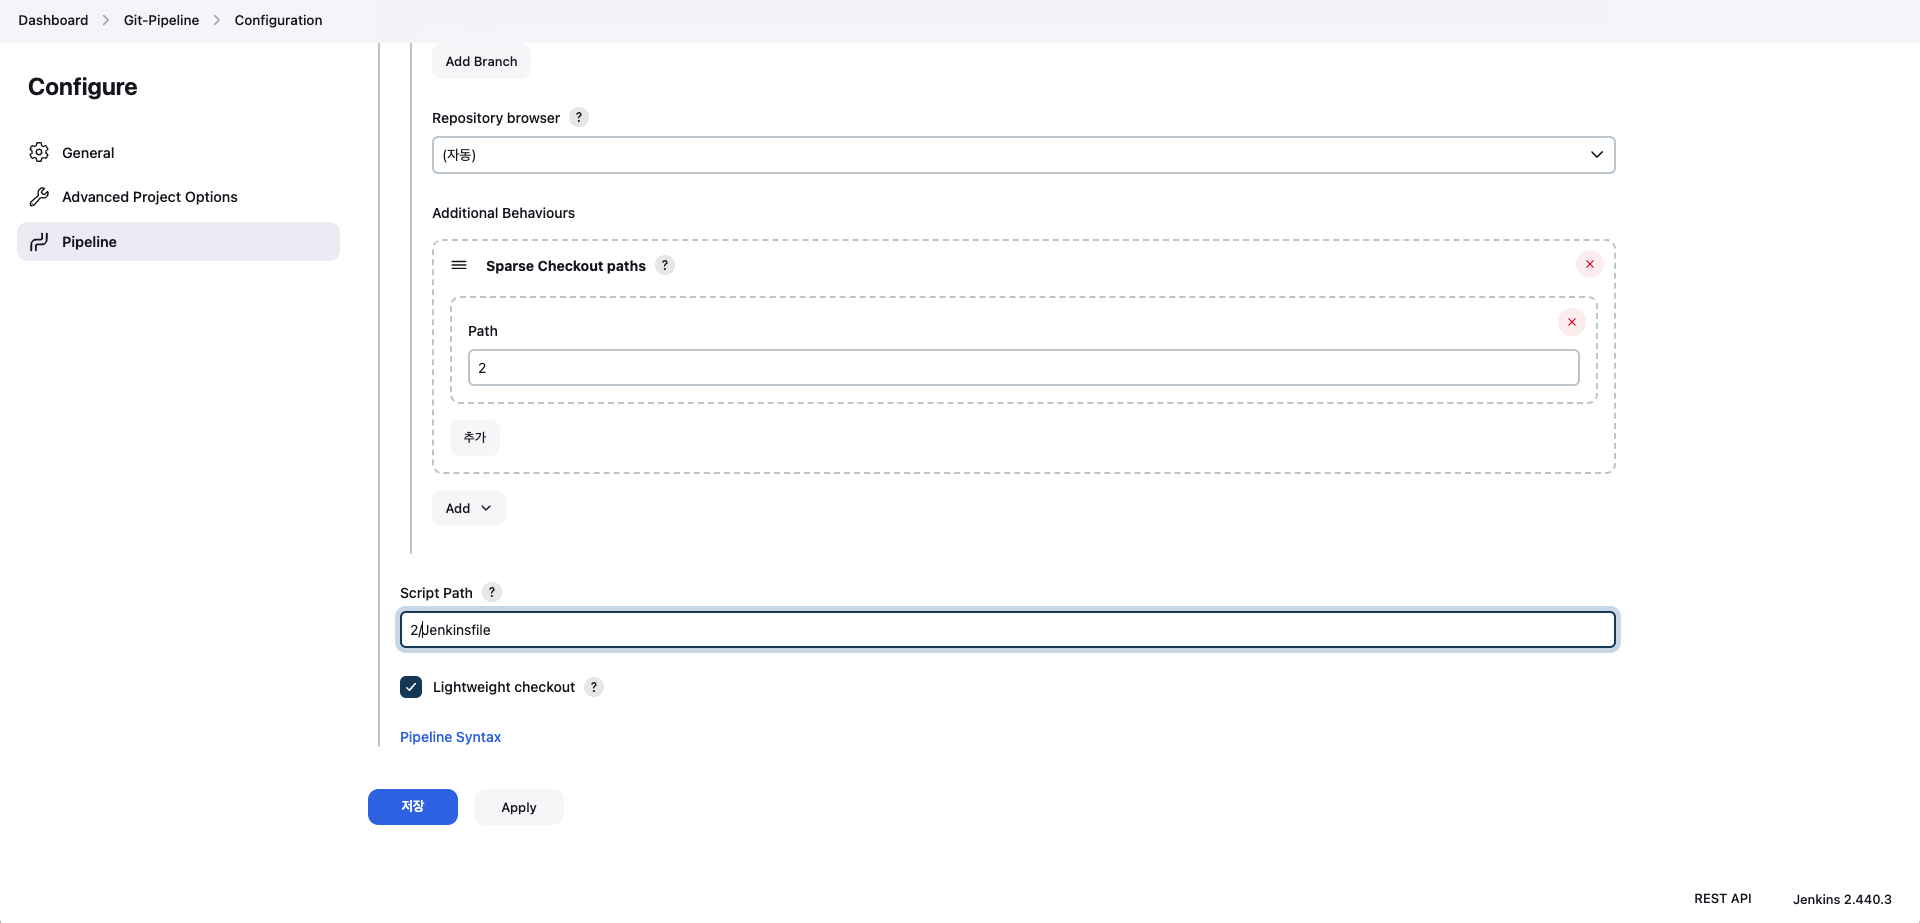
- Pipeline with SCM : Git-Pipeline
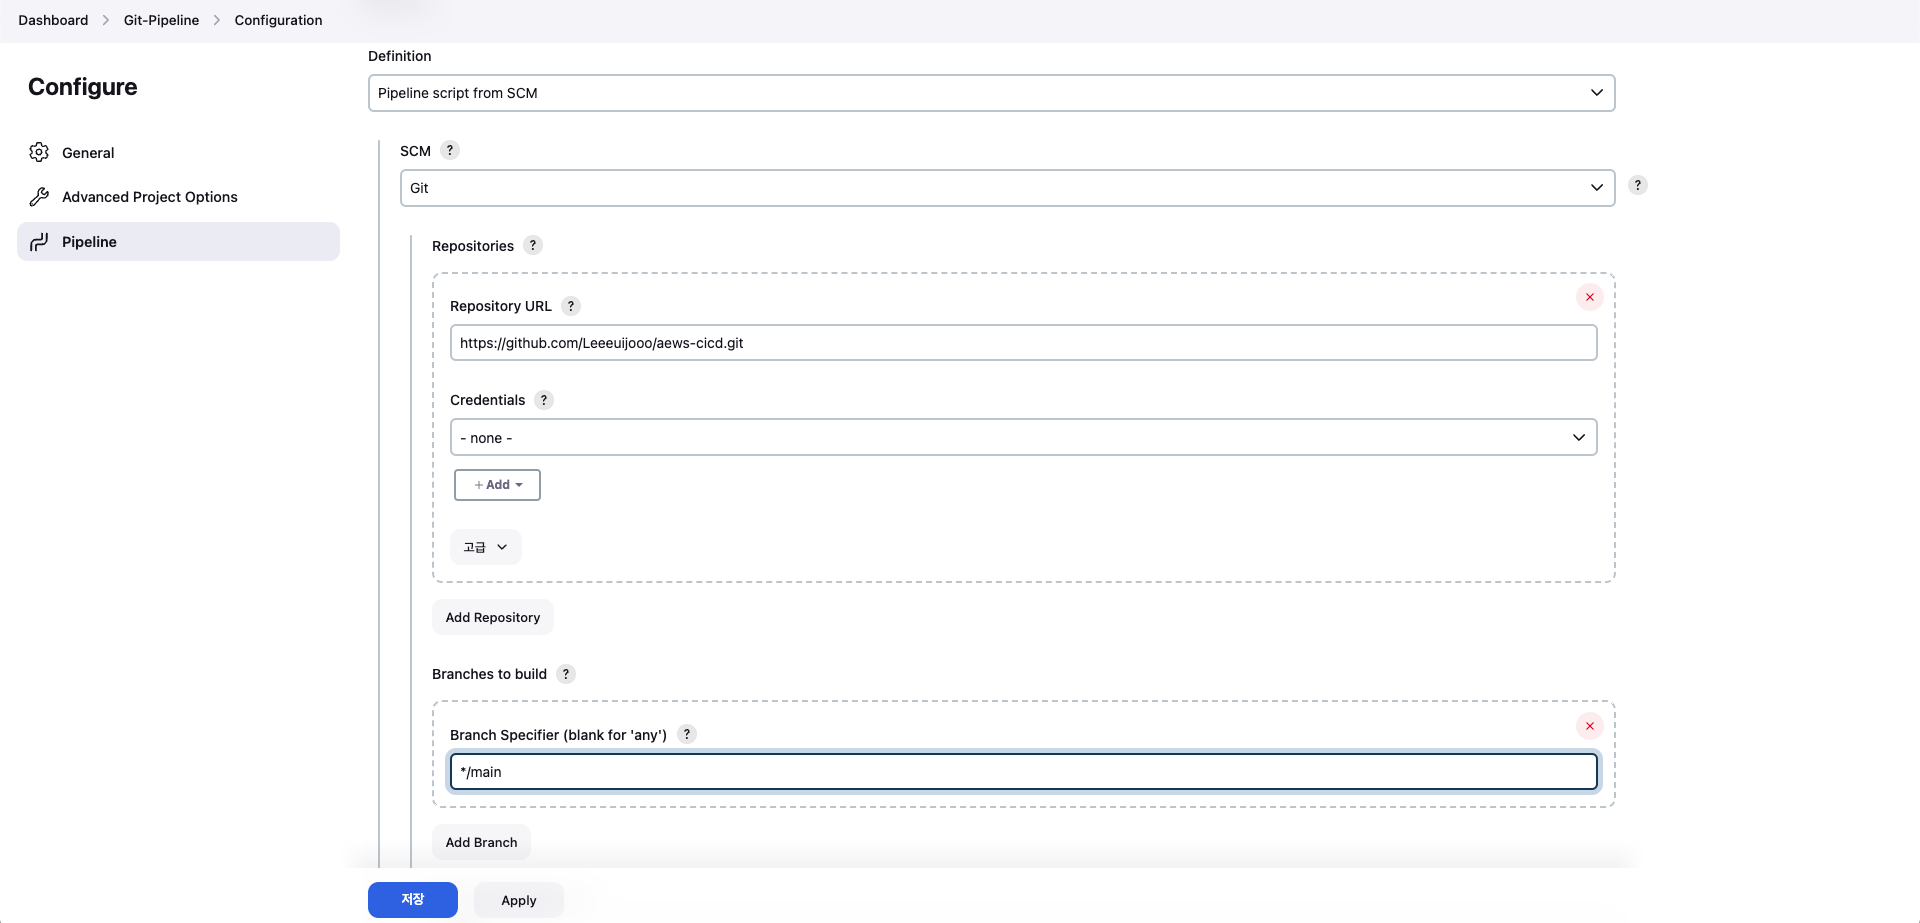
- Item : Git-Pipeline → Pipeline(Pipeline script from SCM : Git, Repo URL(각자 포크한 자신의 Git Repo), Branch(*/main)
- Additional Behaviours : Sparse Checkout paths → Path (2)
- Script Path : 2/Jenkinsfile
- Item 생성
- Pipeline script from SCM
- Sparse Checkout paths
- Pipeline
pipeline {
    agent any
    stages {
        stage('Compile') {
            steps {
                echo "Compiled successfully!";
                sh 'sleep 1'
            }
        }

        stage('JUnit') {
            steps {
                echo "JUnit passed successfully!";
                sh 'sleep 1'
            }
        }

        stage('Code Analysis') {
            steps {
                echo "Code Analysis completed successfully!";
                sh 'sleep 1'
            }
        }

        stage('Deploy') {
            steps {
                echo "Deployed successfully!";
                sh 'sleep 1'
            }
        }
    }

    post {
      always {
        echo "This will always run"
      }
      success {
        echo "This will run when the run finished successfully"
      }
      failure {
        echo "This will run if failed"
      }
      unstable {
        echo "This will run when the run was marked as unstable"
      }
      changed {
        echo "This will run when the state of the pipeline has changed"
      }
    }
}- 저장 후 지금 빌드 후 확인
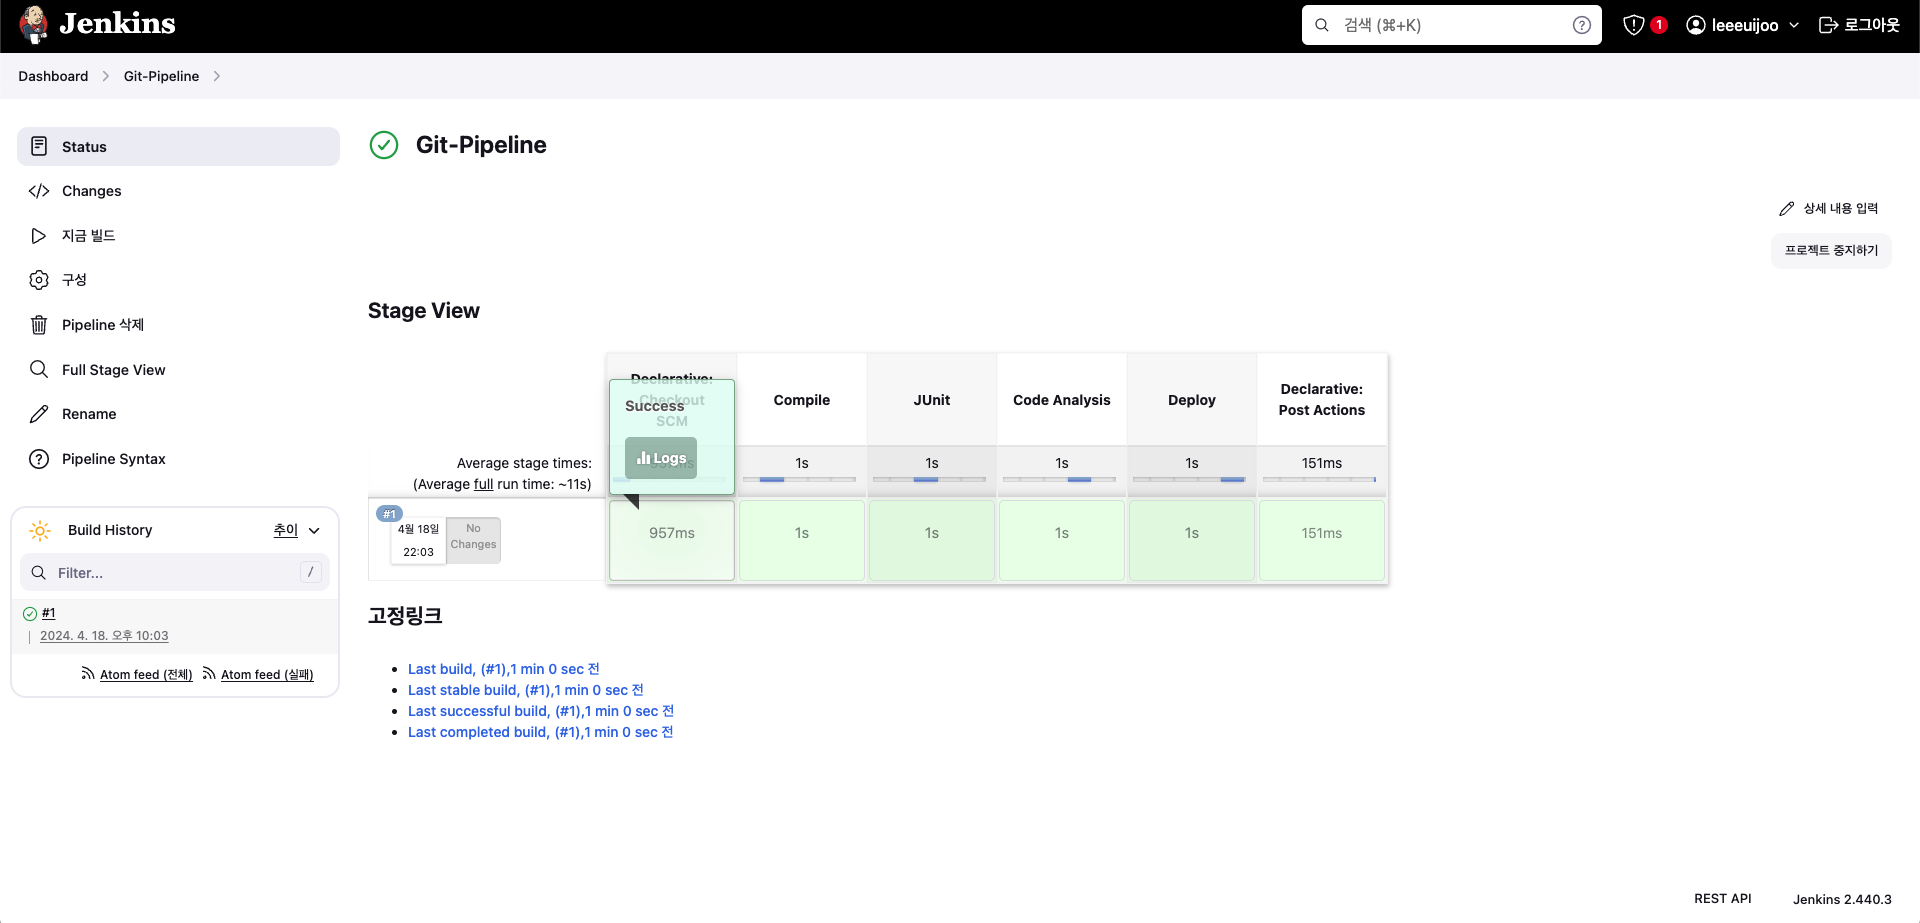
- Console Output
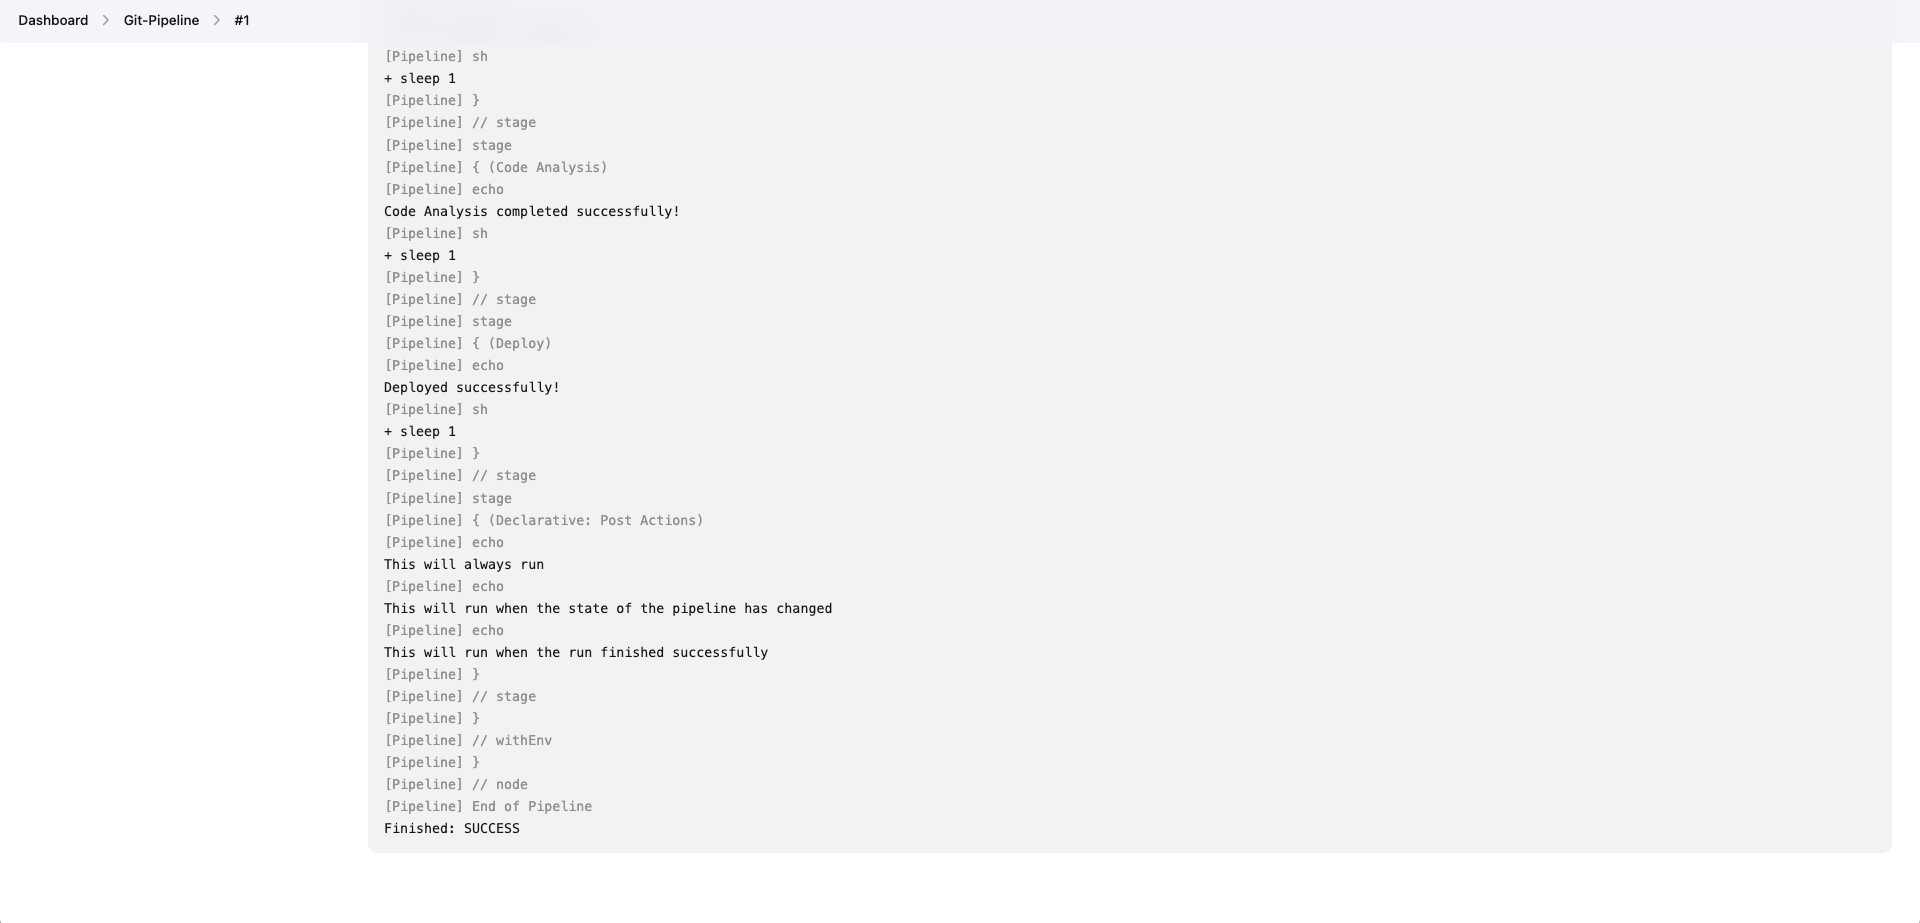
보안적인 이슈 때문에 Hard Coding 방식이 아닌 Credentials 혹은 File 방식을 사용할 수 있습니다.
1. Secret text 방식을 이용
비권장 방식
- item : plaintext (pipiline)
pipeline {
    agent any

    stages {
        stage('remote ssh') {
            steps {
                sh 'sshpass -p qwe123 ssh root@10.10.1.1 hostname'
            }
        }
    }
}
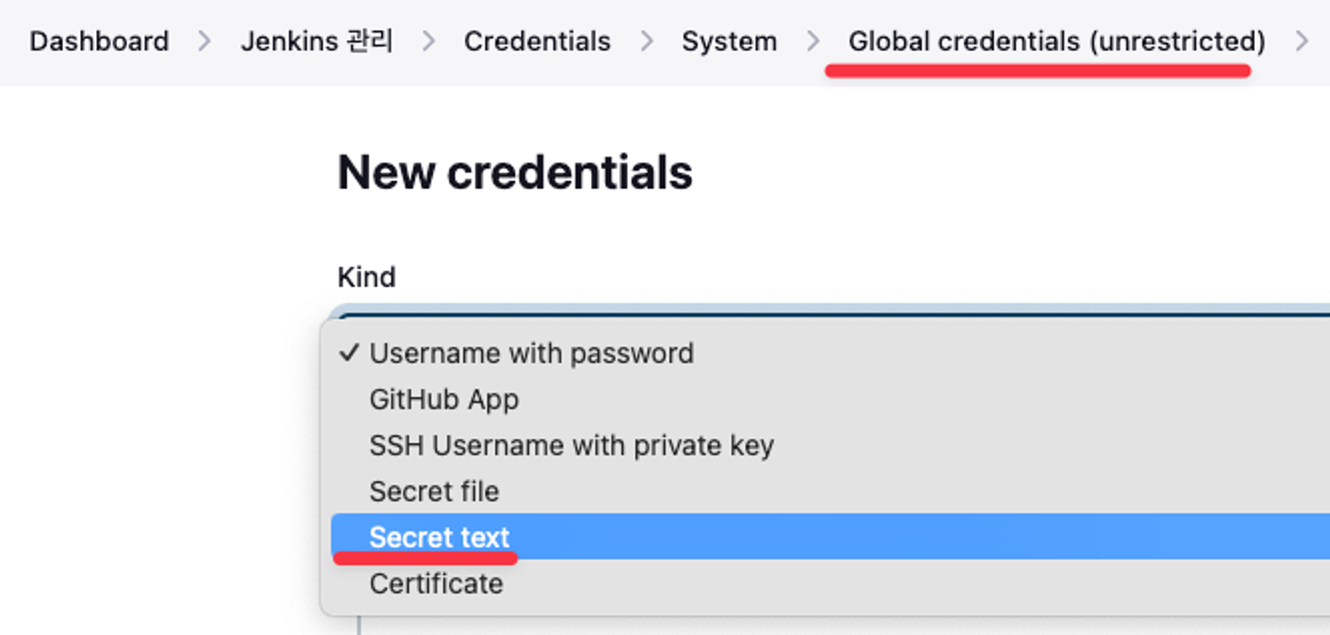
권장 방식
- 관리 → Credentials → + Add Credentials → Secret text : Usename(root), Password(qwe123), ID(vmsshpw)
- item : secretssh (pipiline)
pipeline {
    agent any
    environment {
        SSHPW_CREDS = credentials('vmsshpw')
    }

    stages {
        stage('remote ssh') {
            steps {
                sh('echo ${SSHPW_CREDS}')
                sh('echo ${SSHPW_CREDS_PSW}')
                sh('sshpass -p $SSHPW_CREDS_PSW ssh root@10.10.1.1 hostname')
            }
        }
    }
}
2. Secret file 방식을 이용
- kube config 파일을 자신의 PC에 복사 → Jenkins Web에 Secret files 등록
scp root@<작업용EC2_공인IP>:/root/.kube/config .

# 아래 확인을 위해 모니터링
watch -d kubectl get pod-
Jenkins → Credentials → Add → Secret file : File(업로드), ID(k8sconfig)
-
item : secretk8s (pipiline)
pipeline {
    agent any
    environment {
        MY_KUBECONFIG = credentials('k8sconfig')
    }

    stages {
        stage('remote k8s api') {
            steps {
                sh("kubectl --kubeconfig $MY_KUBECONFIG get pods -A")
                sh("kubectl --kubeconfig $MY_KUBECONFIG run nginx --image nginx --port=80")
            }
        }
    }
}
3. Jenkins With K8S
Jenkins 에서 k8s 사용을 위한 사전 준비
# jenkins 사용자에서 아래 작업 진행
whoami
mkdir ~/.kube

bash-4.2$ whoami
jenkins
bash-4.2$ mkdir ~/.kube

# root 계정에서 아래 복사 실행
cp ~/.kube/config /var/lib/jenkins/.kube/config
chown jenkins:jenkins /var/lib/jenkins/.kube/config

# jenkins 사용자에서 aws eks 사용(sts 호출 등)을 위한 자격증명 설정
aws configure
AWS Access Key ID [None]: AKIA5ILF2###
AWS Secret Access Key [None]: ###
Default region name [None]: ap-northeast-2

# jenkins 사용자에서 kubectl 명령어 사용 확인
kubectl get pods -A # 출력되지 않는다면 AWS Configure 이후 다시 시도 해보시면 됩니다.

bash-4.2$ kubectl get pods -A
NAMESPACE     NAME                                                        READY   STATUS    RESTARTS   AGE
kube-system   aws-load-balancer-controller-5f7b66cdd5-gf9p5               1/1     Running   0          141m
kube-system   aws-load-balancer-controller-5f7b66cdd5-gq72z               1/1     Running   0          141m
kube-system   aws-node-dnqqz                                              2/2     Running   0          155m
kube-system   aws-node-tc7ss                                              2/2     Running   0
...
Pipeline 으로 Deployment/Service 배포
- 실습을 시작하기 전에 Fork 한 레포지토리에서 자신의 Dockerhub ID 로 변경해줘야 하며, 당연히 v1.0.0 태그를 가진 이미지가 존재 해야 합니다.
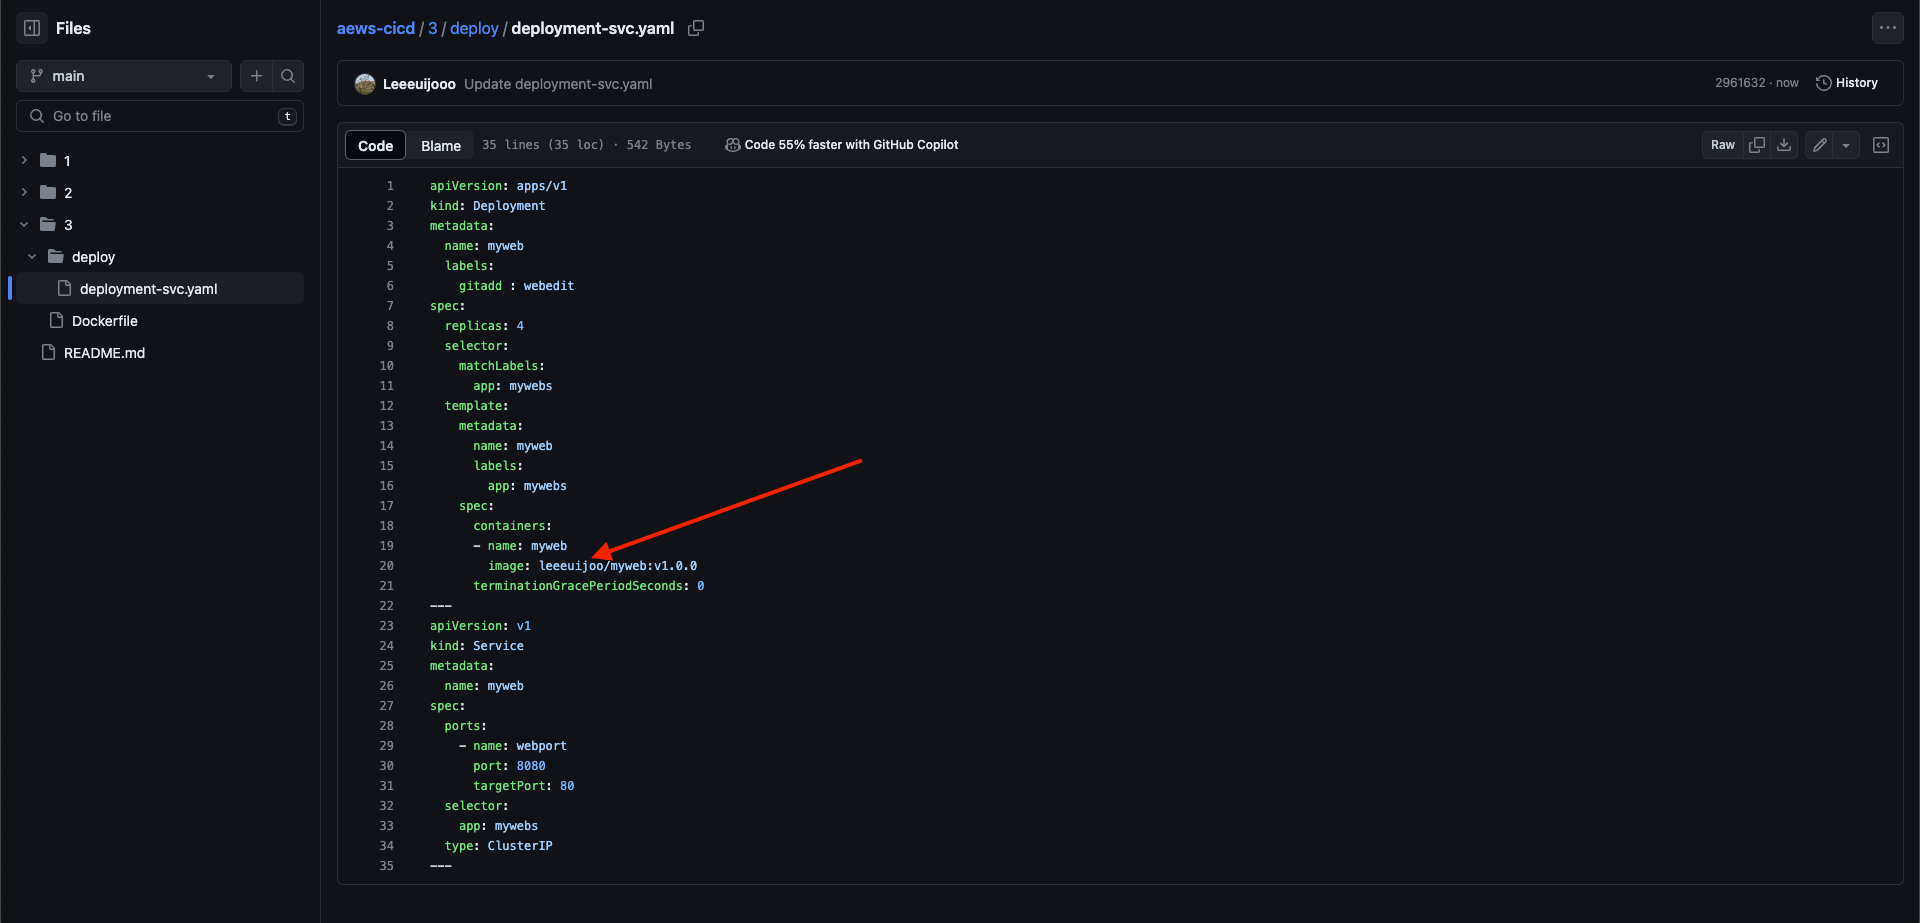
- item : k8s-1 , pipeline

- Pipeline script
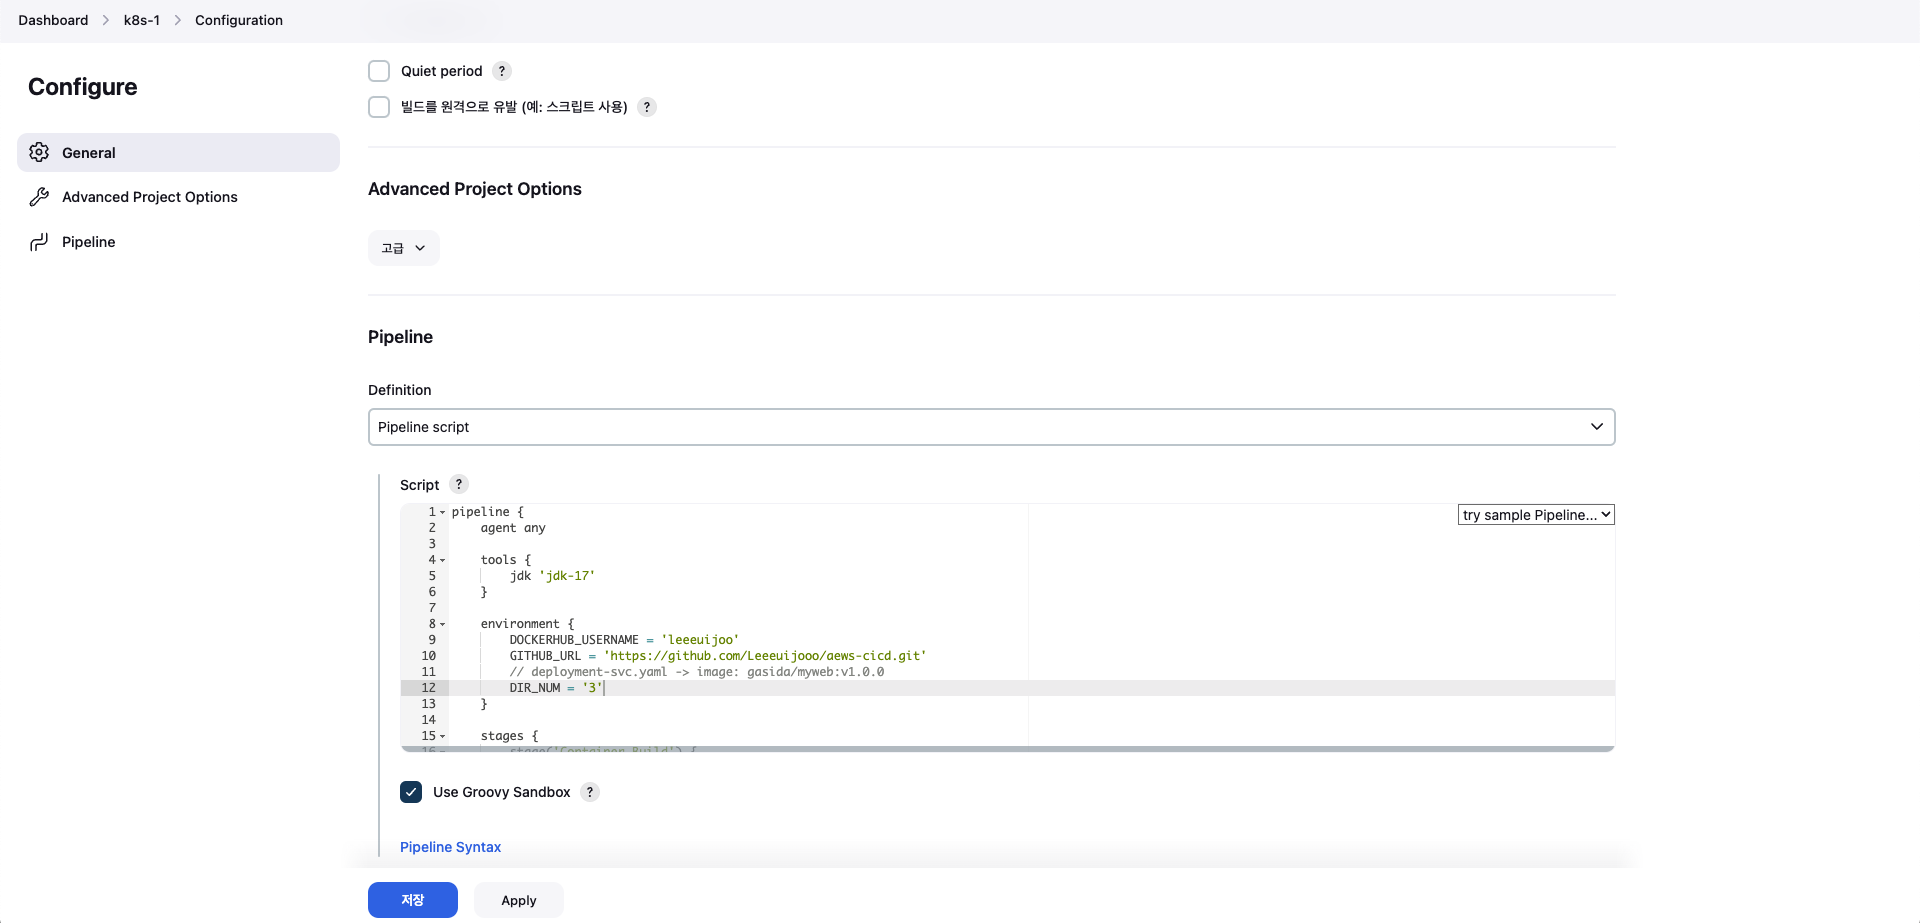
pipeline {
    agent any

    tools {
        jdk 'jdk-17'
    }

    environment {
        DOCKERHUB_USERNAME = 'leeeuijoo'
        GITHUB_URL = 'https://github.com/Leeeuijooo/aews-cicd.git'
        // deployment-svc.yaml -> image: gasida/myweb:v1.0.0
        DIR_NUM = '3'
    }

    stages {
        stage('Container Build') {
            steps {
                // 릴리즈파일 체크아웃
                checkout scmGit(branches: [[name: '*/main']],
                    extensions: [[$class: 'SparseCheckoutPaths',
                    sparseCheckoutPaths: [[path: "/${DIR_NUM}"]]]],
                    userRemoteConfigs: [[url: "${GITHUB_URL}"]])

                // 컨테이너 빌드 및 업로드
                sh "docker build -t ${DOCKERHUB_USERNAME}/myweb:v1.0.0 ./${DIR_NUM}"
                sh "docker push ${DOCKERHUB_USERNAME}/myweb:v1.0.0"
            }
        }

        stage('K8S Deploy') {
            steps {
                sh "kubectl apply -f ./${DIR_NUM}/deploy/deployment-svc.yaml"
            }
        }
    }
}- 지금 빌드
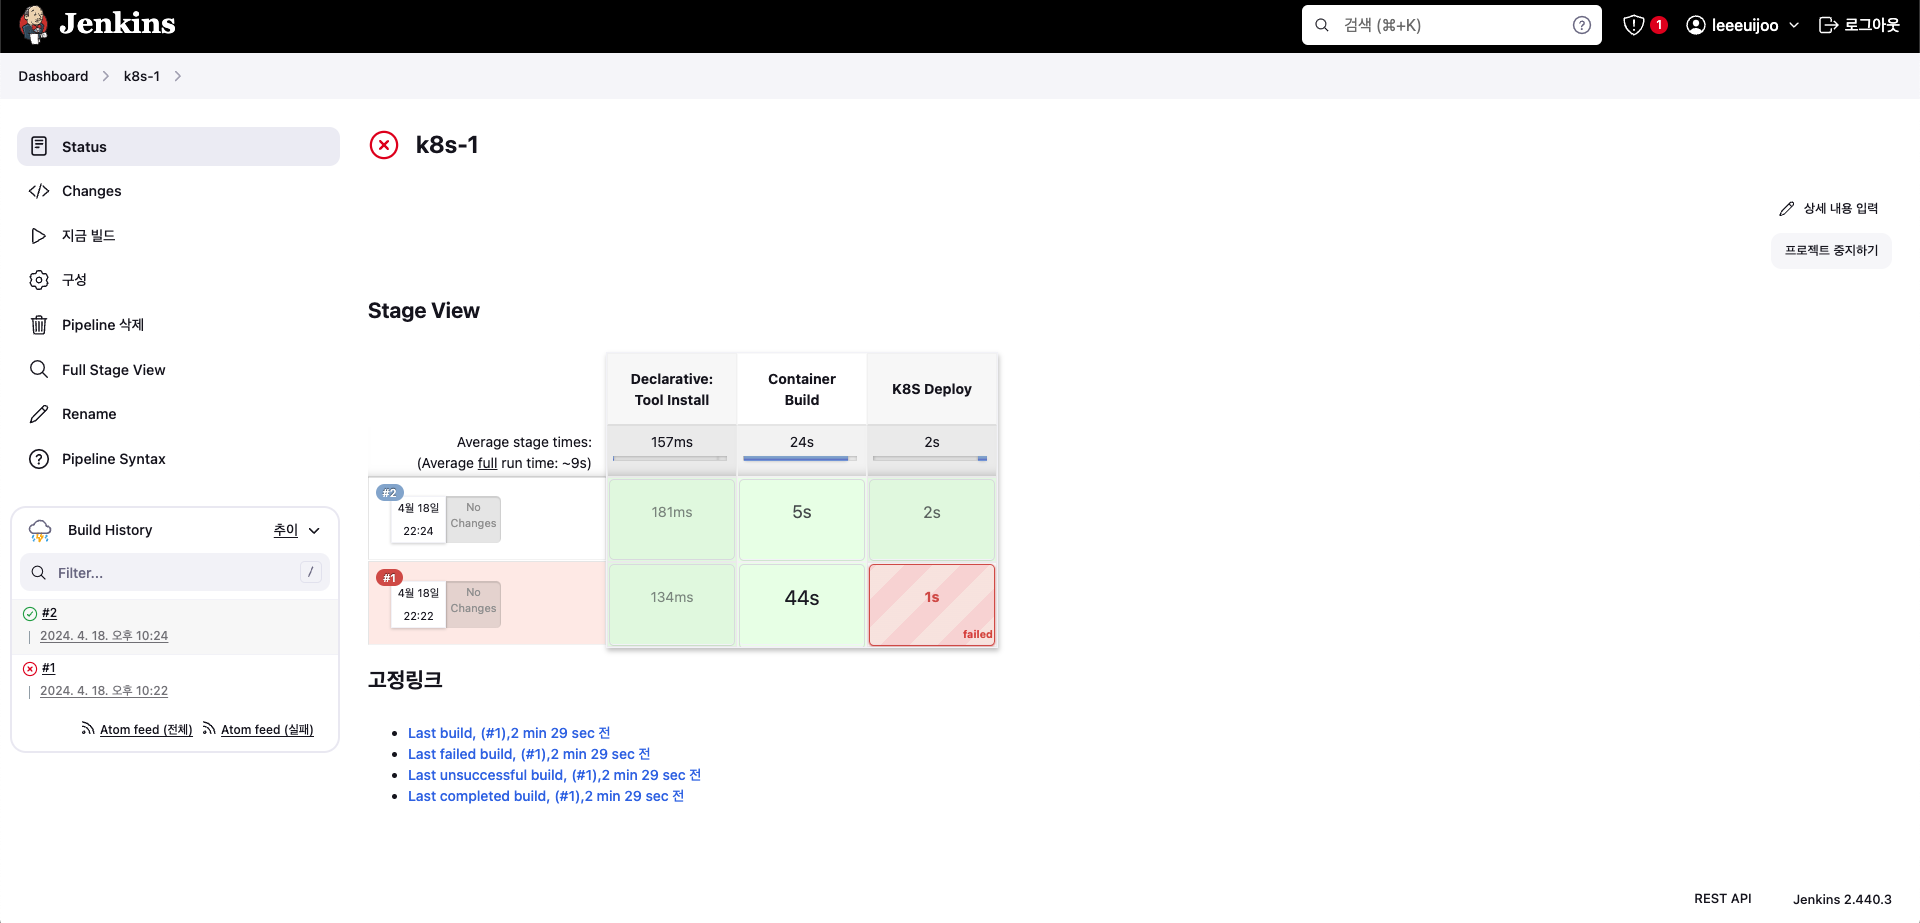
- 모니터링
- 접속 테스트용 파드
# 배포
cat <<EOF | kubectl create -f -
apiVersion: v1
kind: Pod
metadata:
  name: netpod
  labels:
    app: pod
spec:
  containers:
  - name: netshoot-pod
    image: nicolaka/netshoot
    command: ["tail"]
    args: ["-f", "/dev/null"]
  terminationGracePeriodSeconds: 0
EOF- 확인
kubectl exec -it netpod -- curl myweb:8080
kubectl exec -it netpod -- curl myweb:8080 | grep Web
while true; do kubectl exec -it netpod -- curl myweb:8080 | grep Web; echo; done

(leeeuijoo@myeks:default) [root@myeks-bastion ~]# kubectl exec -it netpod -- curl myweb:8080
aews Web Server 1.0.0<br>
<pre>
    _    _______        ______    ____  _             _
   / \  | ____\ \      / / ___|  / ___|| |_ _   _  __| |_   _
  / _ \ |  _|  \ \ /\ / /\___ \  \___ \| __| | | |/ _` | | | |
 / ___ \| |___  \ V  V /  ___) |  ___) | |_| |_| | (_| | |_| |
/_/   \_\_____|  \_/\_/  |____/  |____/ \__|\__,_|\__,_|\__, |
                                                        |___/
</pre>

# 작업공간 확인
tree /var/lib/jenkins/workspace/k8s-1

/var/lib/jenkins/workspace/k8s-1
└── 3
    ├── deploy
    │   └── deployment-svc.yaml
    └── Dockerfile

cat /var/lib/jenkins/workspace/k8s-1/3/Dockerfile

bash-4.2$ cat /var/lib/jenkins/workspace/k8s-1/3/Dockerfile
FROM ubuntu:20.04
ENV TZ=Asia/Seoul MYVERSION=1.0.0 NICK=aews
RUN ln -snf /usr/share/zoneinfo/$TZ /etc/localtime && echo $TZ > /etc/timezone && \
    sed -i 's/archive.ubuntu.com/mirror.kakao.com/g' /etc/apt/sources.list && \
    sed -i 's/security.ubuntu.com/mirror.kakao.com/g' /etc/apt/sources.list && \
    apt-get update && apt-get install -y apache2 figlet && \
    echo "$NICK Web Server $MYVERSION<br>" > /var/www/html/index.html && \
    echo "<pre>" >> /var/www/html/index.html && \
    figlet AEWS Study >> /var/www/html/index.html && \
    echo "</pre>" >> /var/www/html/index.html
EXPOSE 80
CMD ["usr/sbin/apache2ctl", "-DFOREGROUND"]- 실습 완료 후 삭제
kubectl delete deploy,svc myweb4. Argo
- Argo CD 소개 및 설치 : Argo CD is a declarative, GitOps continuous delivery tool for Kubernetes
- Application definitions, configurations, and environments should be declarative and version controlled.
- Application deployment and lifecycle management should be automated, auditable, and easy to understand.
- 설치 - Helm Helm_AWS_ALB Docs
# helm 설치
cat <<EOT > argocd-values.yaml
global:
  domain: argocd.$MyDomain

configs:
  params:
    server.insecure: true

controller:
  metrics:
    enabled: true
    serviceMonitor:
      enabled: true

server:
  ingress:
    enabled: true
    controller: aws
    ingressClassName: alb
    hostname: "argocd.$MyDomain"
    annotations:
      alb.ingress.kubernetes.io/scheme: internet-facing
      alb.ingress.kubernetes.io/target-type: ip
      alb.ingress.kubernetes.io/backend-protocol: HTTP
      alb.ingress.kubernetes.io/listen-ports: '[{"HTTPS":80}, {"HTTPS":443}]'
      alb.ingress.kubernetes.io/certificate-arn: $CERT_ARN
      alb.ingress.kubernetes.io/ssl-redirect: '443'
    aws:
      serviceType: ClusterIP
      backendProtocolVersion: GRPC
  metrics:
    enabled: true
    serviceMonitor:
      enabled: true

repoServer:
  metrics:
    enabled: true
    serviceMonitor:
      enabled: true

applicationSet:
  metrics:
    enabled: true
    serviceMonitor:
      enabled: true

notifications:
  metrics:
    enabled: true
    serviceMonitor:
      enabled: true
EOT

kubectl create ns argocd
helm repo add argo https://argoproj.github.io/argo-helm
helm install argocd argo/argo-cd --version 6.7.11 -f argocd-values.yaml --namespace argocd

# 확인
kubectl get ingress,pod,svc -n argocd
kubectl get crd | grep argo
applications.argoproj.io                     2024-04-14T08:12:16Z
applicationsets.argoproj.io                  2024-04-14T08:12:17Z
appprojects.argoproj.io                      2024-04-14T08:12:16Z

(leeeuijoo@myeks:default) [root@myeks-bastion ~]# kubectl get ingress,pod,svc -n argocd
NAME                                      CLASS   HOSTS               ADDRESS   PORTS   AGE
ingress.networking.k8s.io/argocd-server   alb     argocd.22joo.shop             80      72s

NAME                                                    READY   STATUS    RESTARTS   AGE
pod/argocd-application-controller-0                     1/1     Running   0          72s
pod/argocd-applicationset-controller-85d64c6b7f-xqsx5   1/1     Running   0          72s
pod/argocd-dex-server-7746bdfd75-bvq5t                  1/1     Running   0          72s
pod/argocd-notifications-controller-64d9b554f4-8fdn9    1/1     Running   0          72s
pod/argocd-redis-554fbc6587-h2zz6                       1/1     Running   0          72s
pod/argocd-repo-server-664698cb66-jb7km                 1/1     Running   0          72s
pod/argocd-server-5b56b9b7b7-kzfc6                      1/1     Running   0          72s

NAME                                               TYPE        CLUSTER-IP       EXTERNAL-IP   PORT(S)             AGE
service/argocd-application-controller-metrics      ClusterIP   10.100.248.252   <none>        8082/TCP            73s
service/argocd-applicationset-controller           ClusterIP   10.100.48.81     <none>        7000/TCP            73s
service/argocd-applicationset-controller-metrics   ClusterIP   10.100.130.155   <none>        8080/TCP            73s
service/argocd-dex-server                          ClusterIP   10.100.164.163   <none>        5556/TCP,5557/TCP   73s
service/argocd-notifications-controller-metrics    ClusterIP   10.100.108.152   <none>        9001/TCP            73s
service/argocd-redis                               ClusterIP   10.100.109.130   <none>        6379/TCP            73s
service/argocd-repo-server                         ClusterIP   10.100.229.241   <none>        8081/TCP            73s
service/argocd-repo-server-metrics                 ClusterIP   10.100.125.137   <none>        8084/TCP            73s
service/argocd-server                              ClusterIP   10.100.7.85      <none>        80/TCP,443/TCP      73s
service/argocd-server-grpc                         ClusterIP   10.100.55.12     <none>        80/TCP,443/TCP      73s
service/argocd-server-metrics                      ClusterIP   10.100.134.83    <none>        8083/TCP            73s

# 최초 접속 암호 확인
kubectl -n argocd get secret argocd-initial-admin-secret -o jsonpath="{.data.password}" | base64 -d ;echo
- 최초 접속
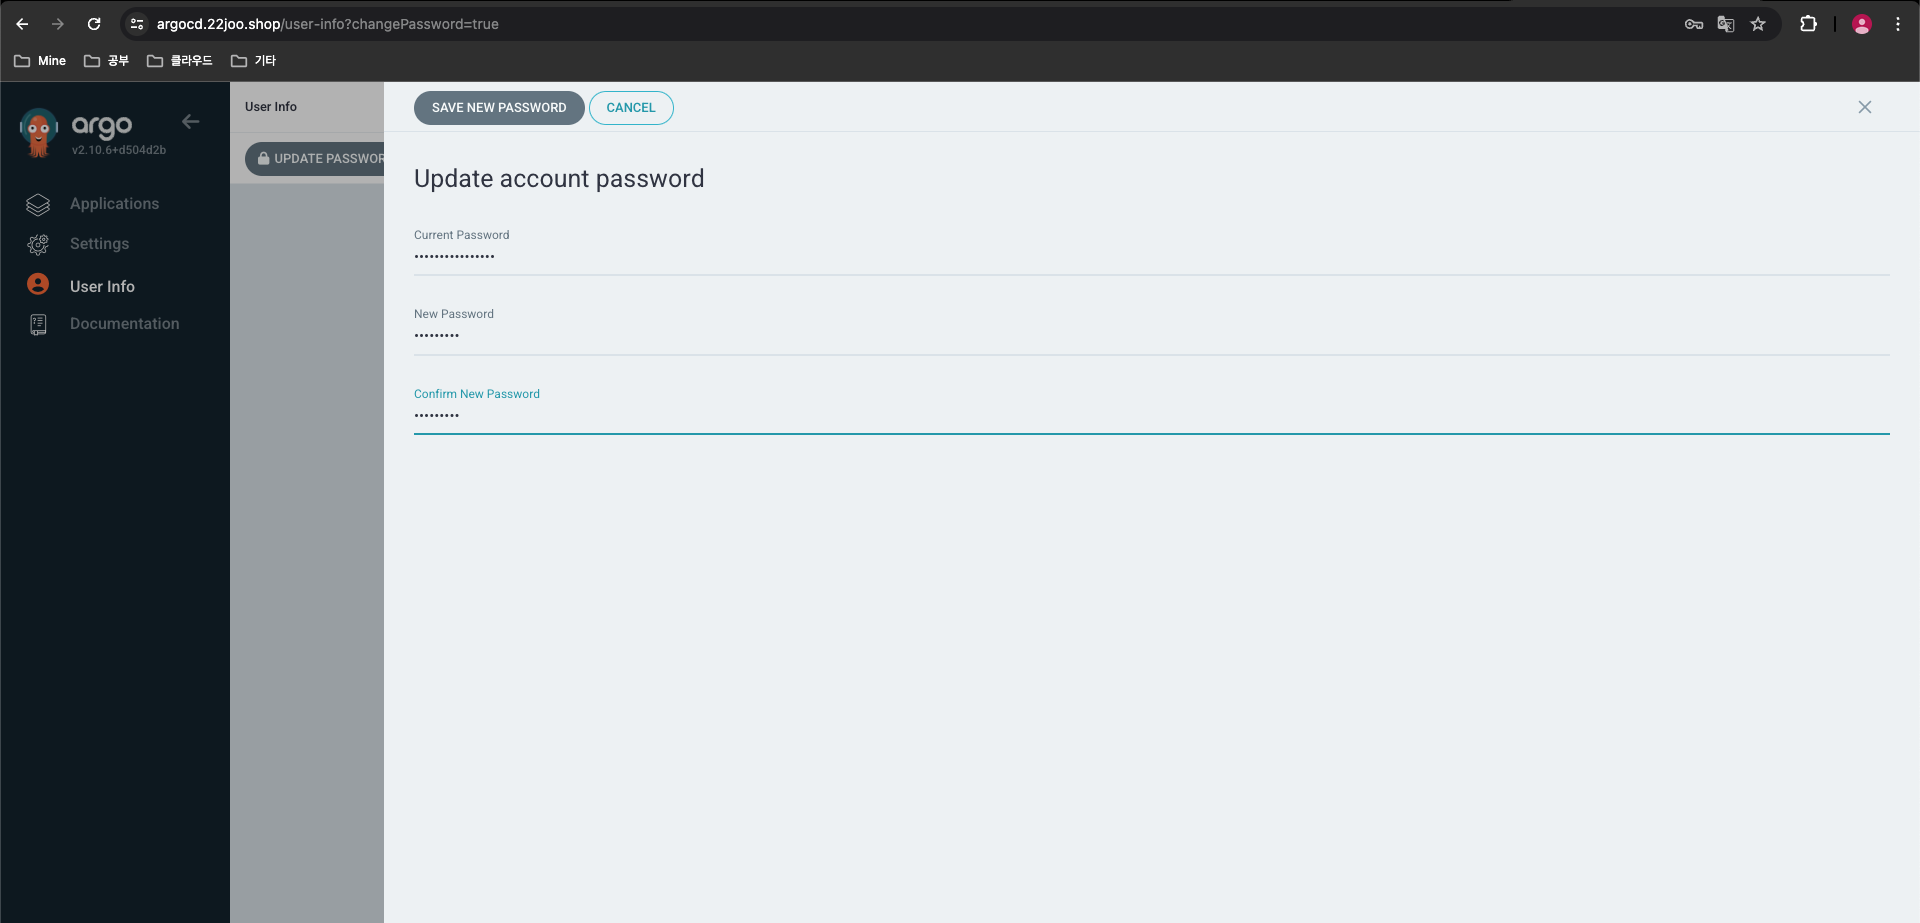
https://argocd.<자신의도메인>admin / <최초 접속 암호>- (옵션) 로그인 후 User info → UPDATE PASSWORD 변경 가능
- How it works : Argo CD follows the GitOps pattern of using Git repositories as the source of truth for defining the desired application state. Kubernetes manifests can be specified in several ways:
- 아키텍처
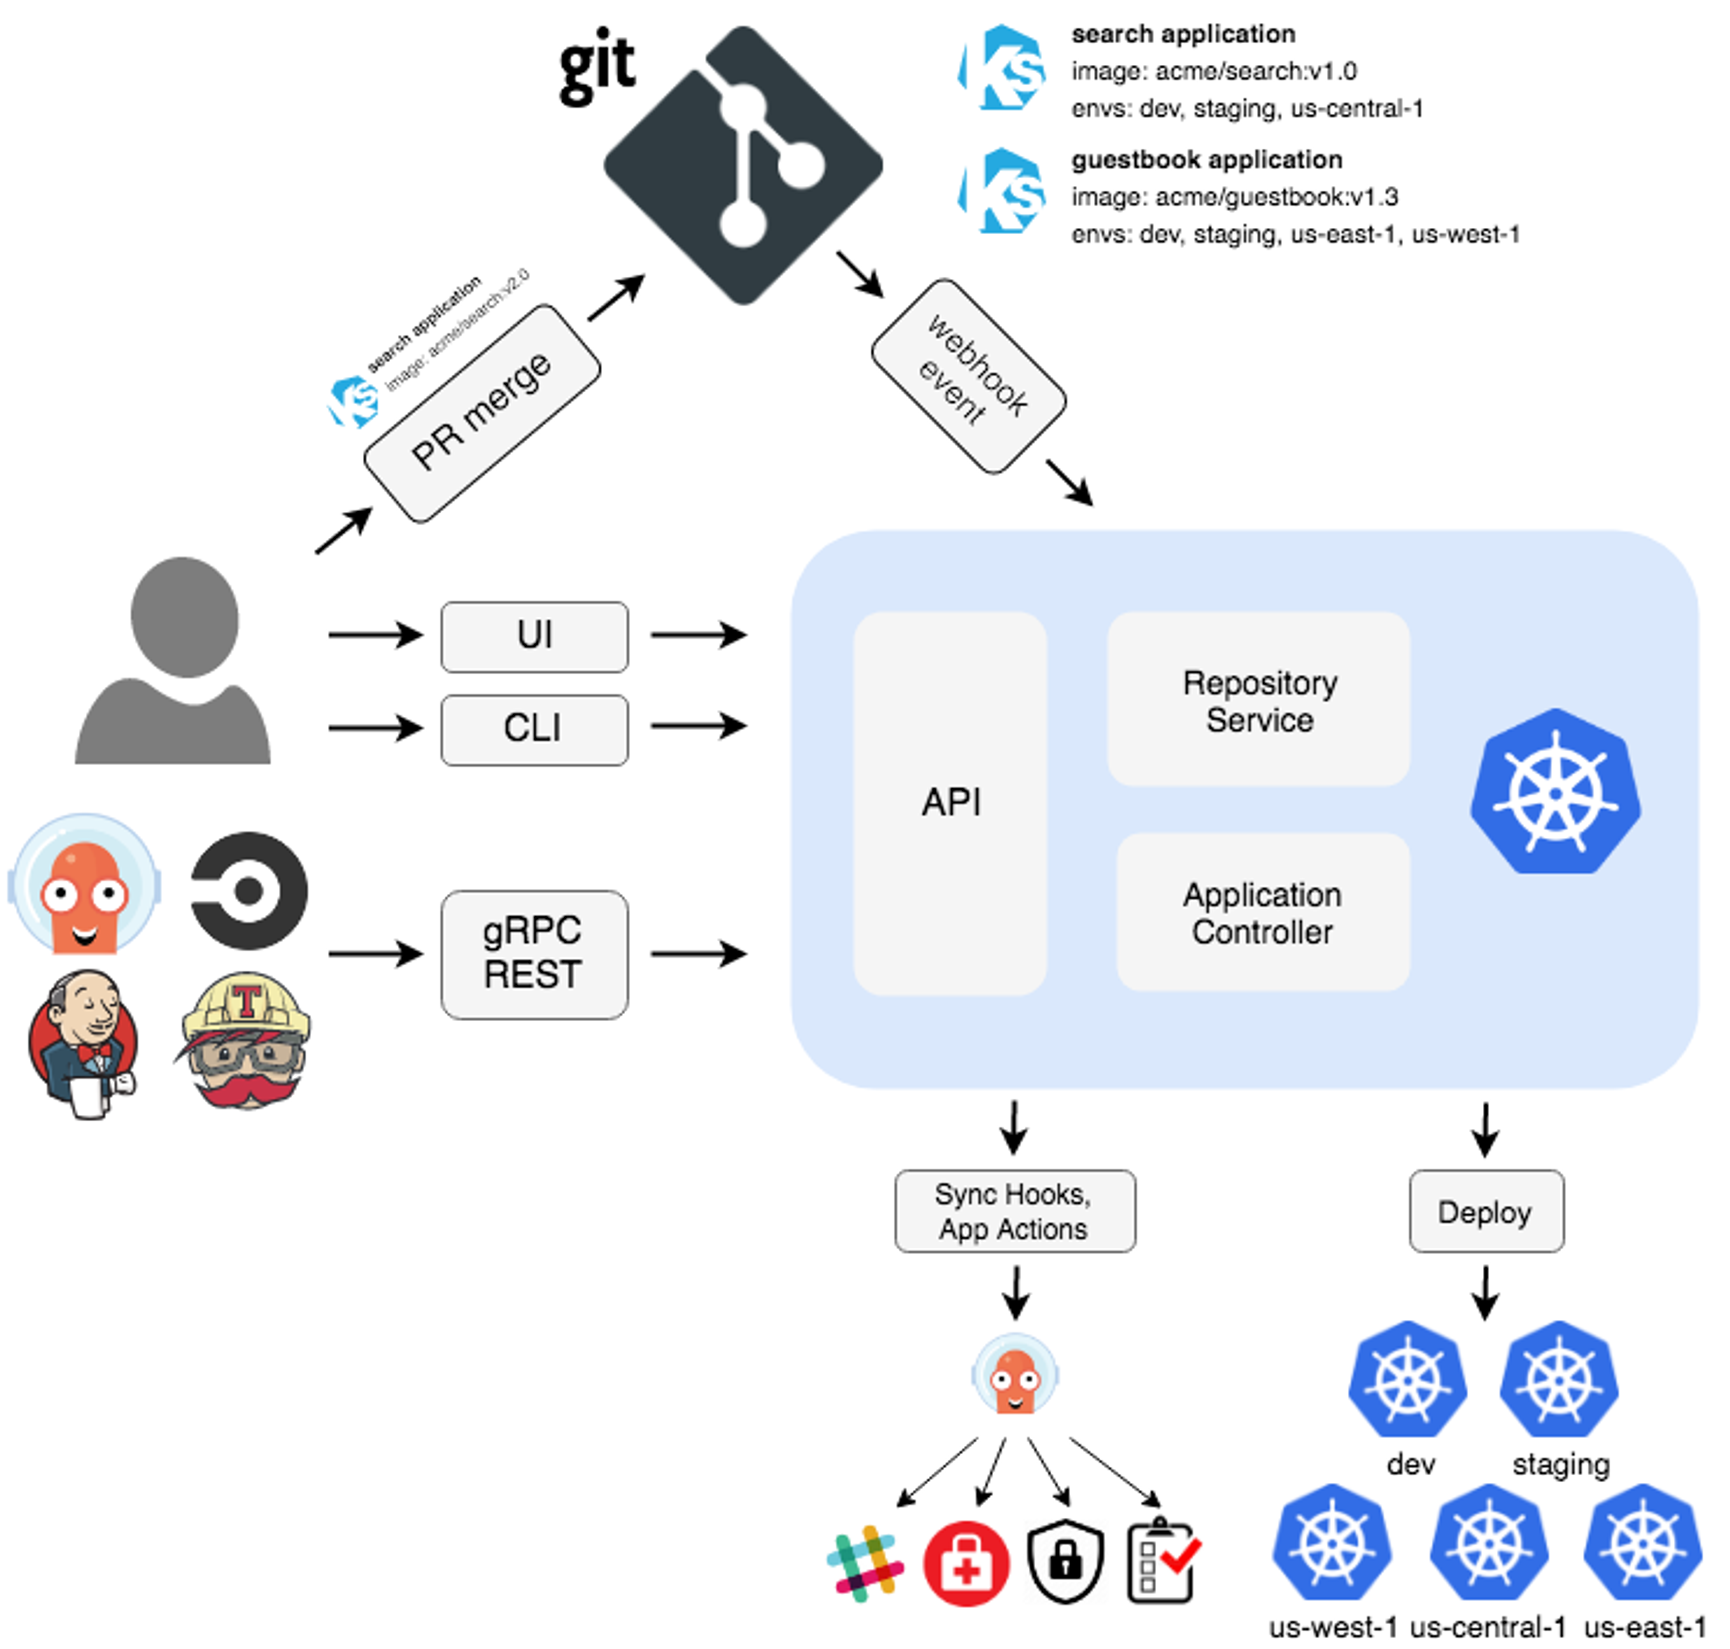
- API Server : Web UI 대시보드, k8s api 처럼 API 서버 역할
- The API server is a gRPC/REST server which exposes the API consumed by the Web UI, CLI, and CI/CD systems. It has the following responsibilities:
- application management and status reporting
- invoking of application operations (e.g. sync, rollback, user-defined actions)
- repository and cluster credential management (stored as K8s secrets)
- authentication and auth delegation to external identity providers
- RBAC enforcement
- listener/forwarder for Git webhook events
- Repository Server : Git 연결 및 배포할 yaml 생성
- The repository server is an internal service which maintains a local cache of the Git repository holding the application manifests. It is responsible for generating and returning the Kubernetes manifests when provided the following inputs:
- repository URL
- revision (commit, tag, branch)
- application path
- template specific settings: parameters, helm values.yaml
- Application Controller : k8s 리소스 모니터링, Git과 비교
- The application controller is a Kubernetes controller which continuously monitors running applications and compares the current, live state against the desired target state (as specified in the repo). It detects
OutOfSyncapplication state and optionally takes corrective action. It is responsible for invoking any user-defined hooks for lifecycle events (PreSync, Sync, PostSync)
- The application controller is a Kubernetes controller which continuously monitors running applications and compares the current, live state against the desired target state (as specified in the repo). It detects
- Redis : k8s api와 git 요청을 줄이기 위한 캐싱
- Notification : 이벤트 알림, 트리거
- Dex : 외부 인증 관리
- ApplicationSet Controller : 멀티 클러스터를 위한 App 패키징 관리
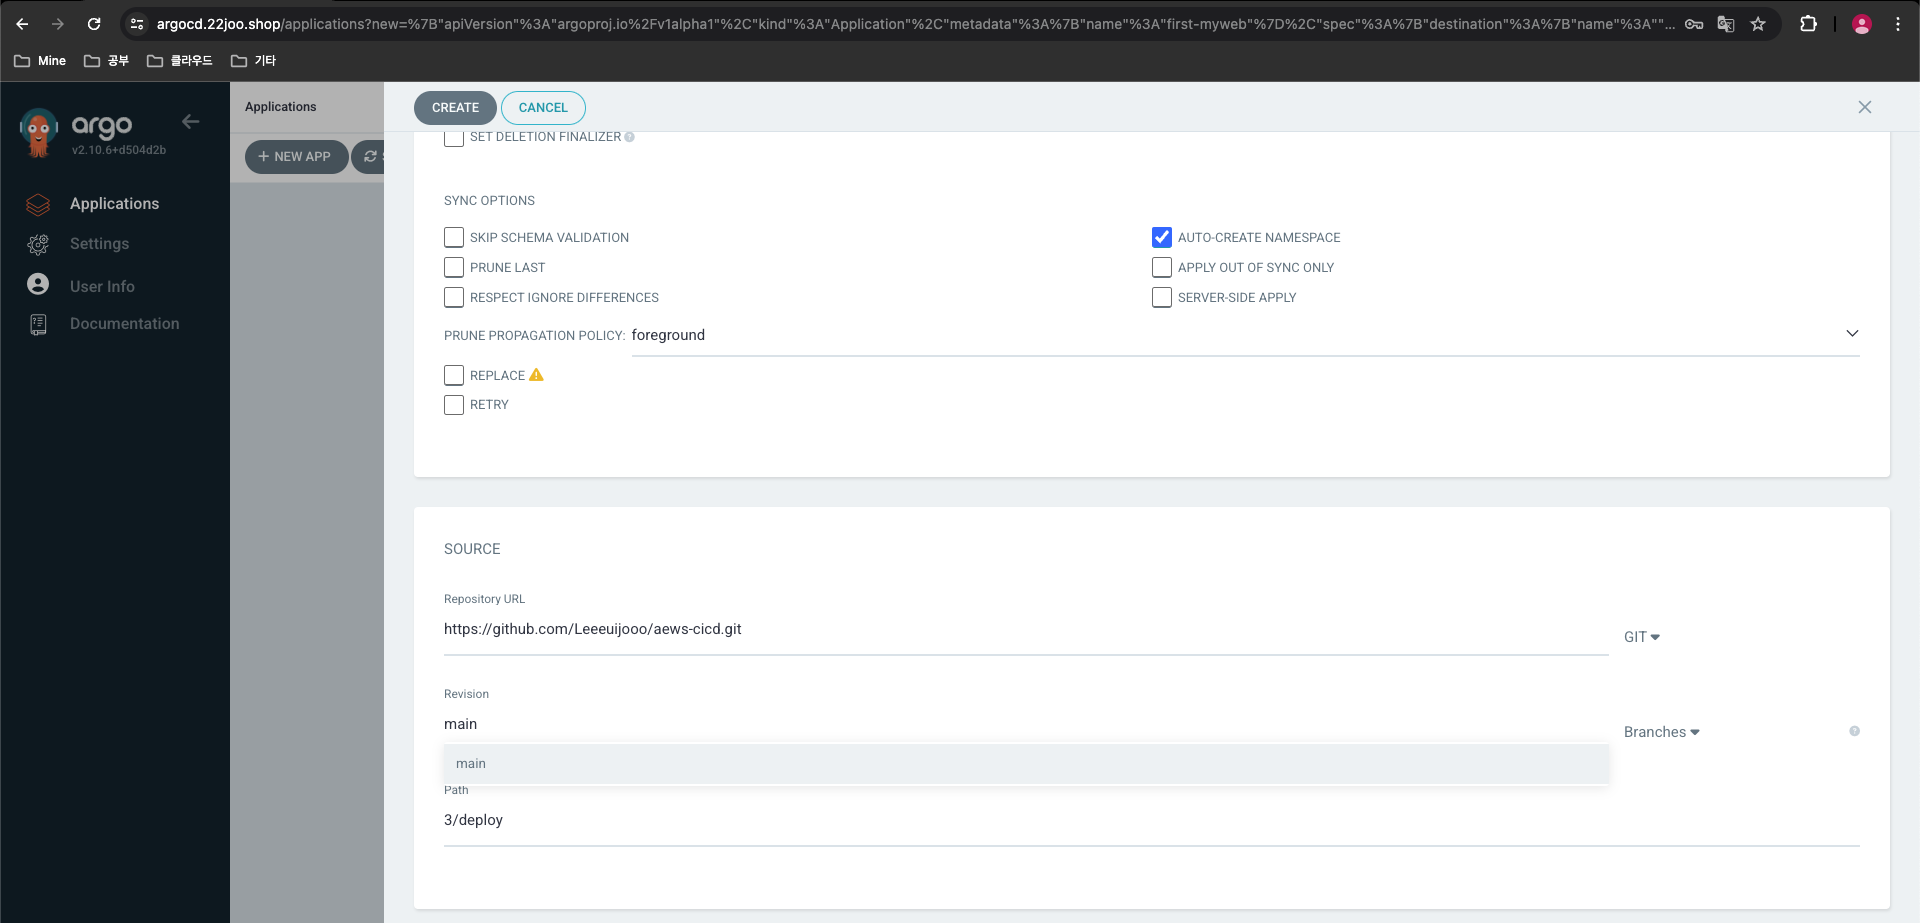
App 배포 with Directory
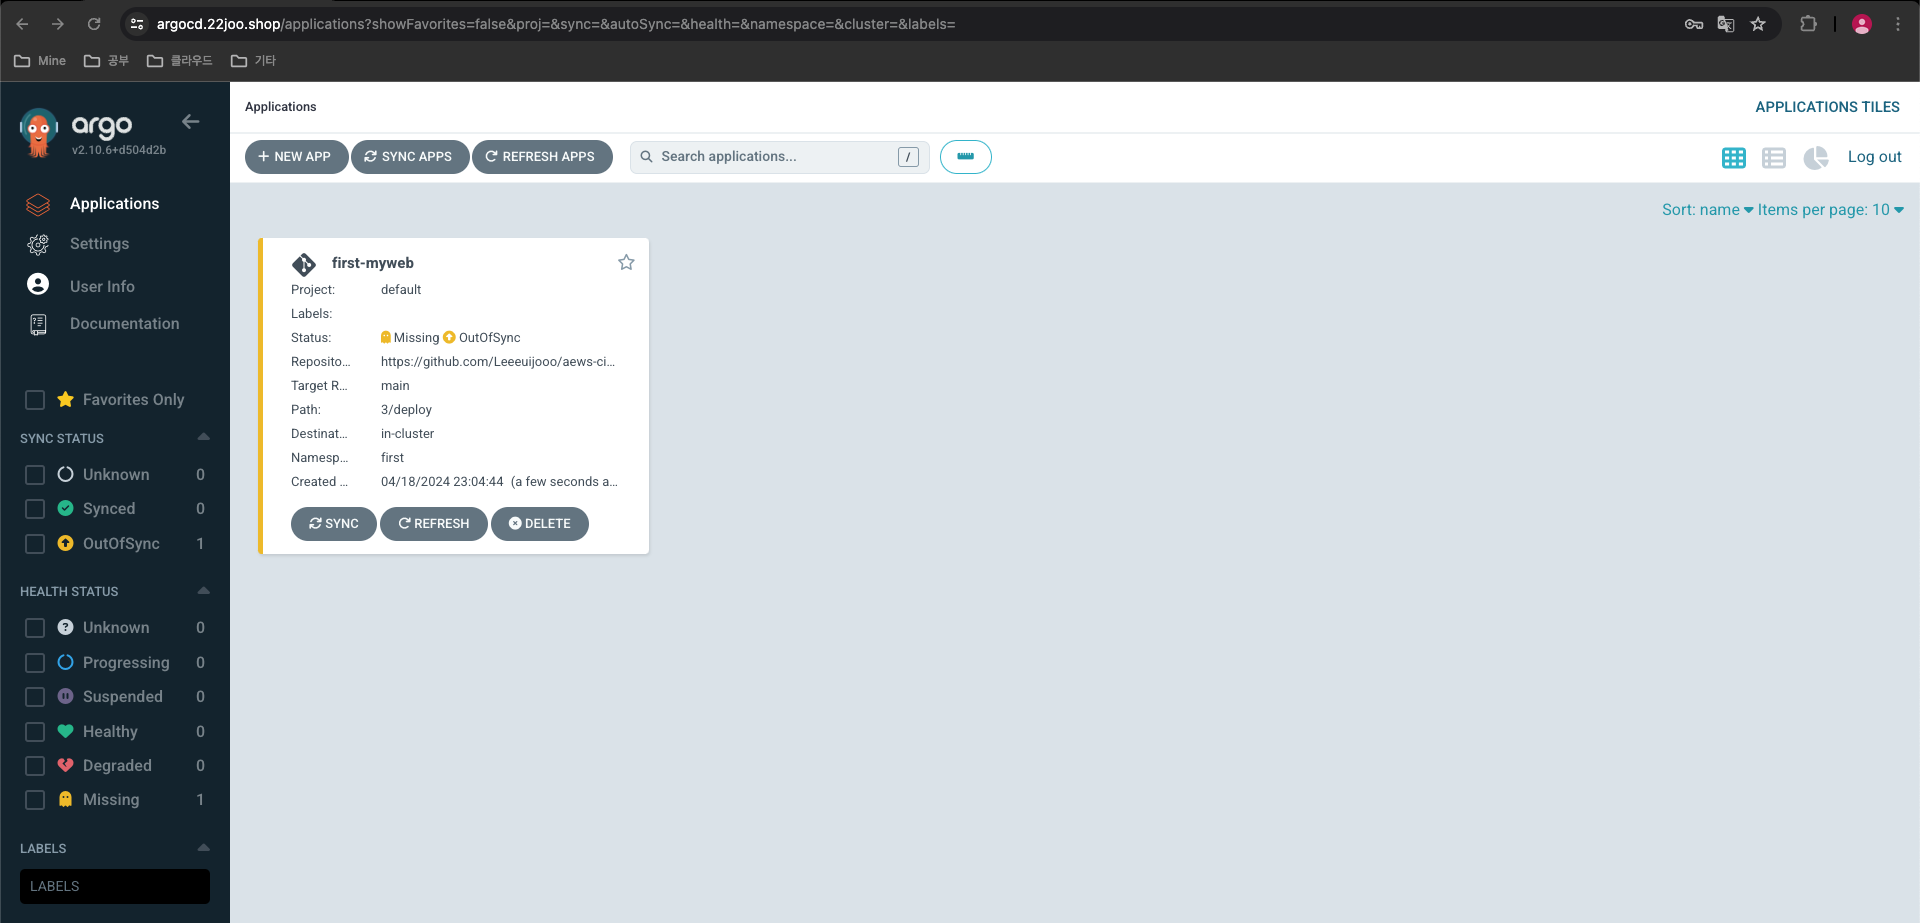
- Application Name : first-myweb
- Project Name : default
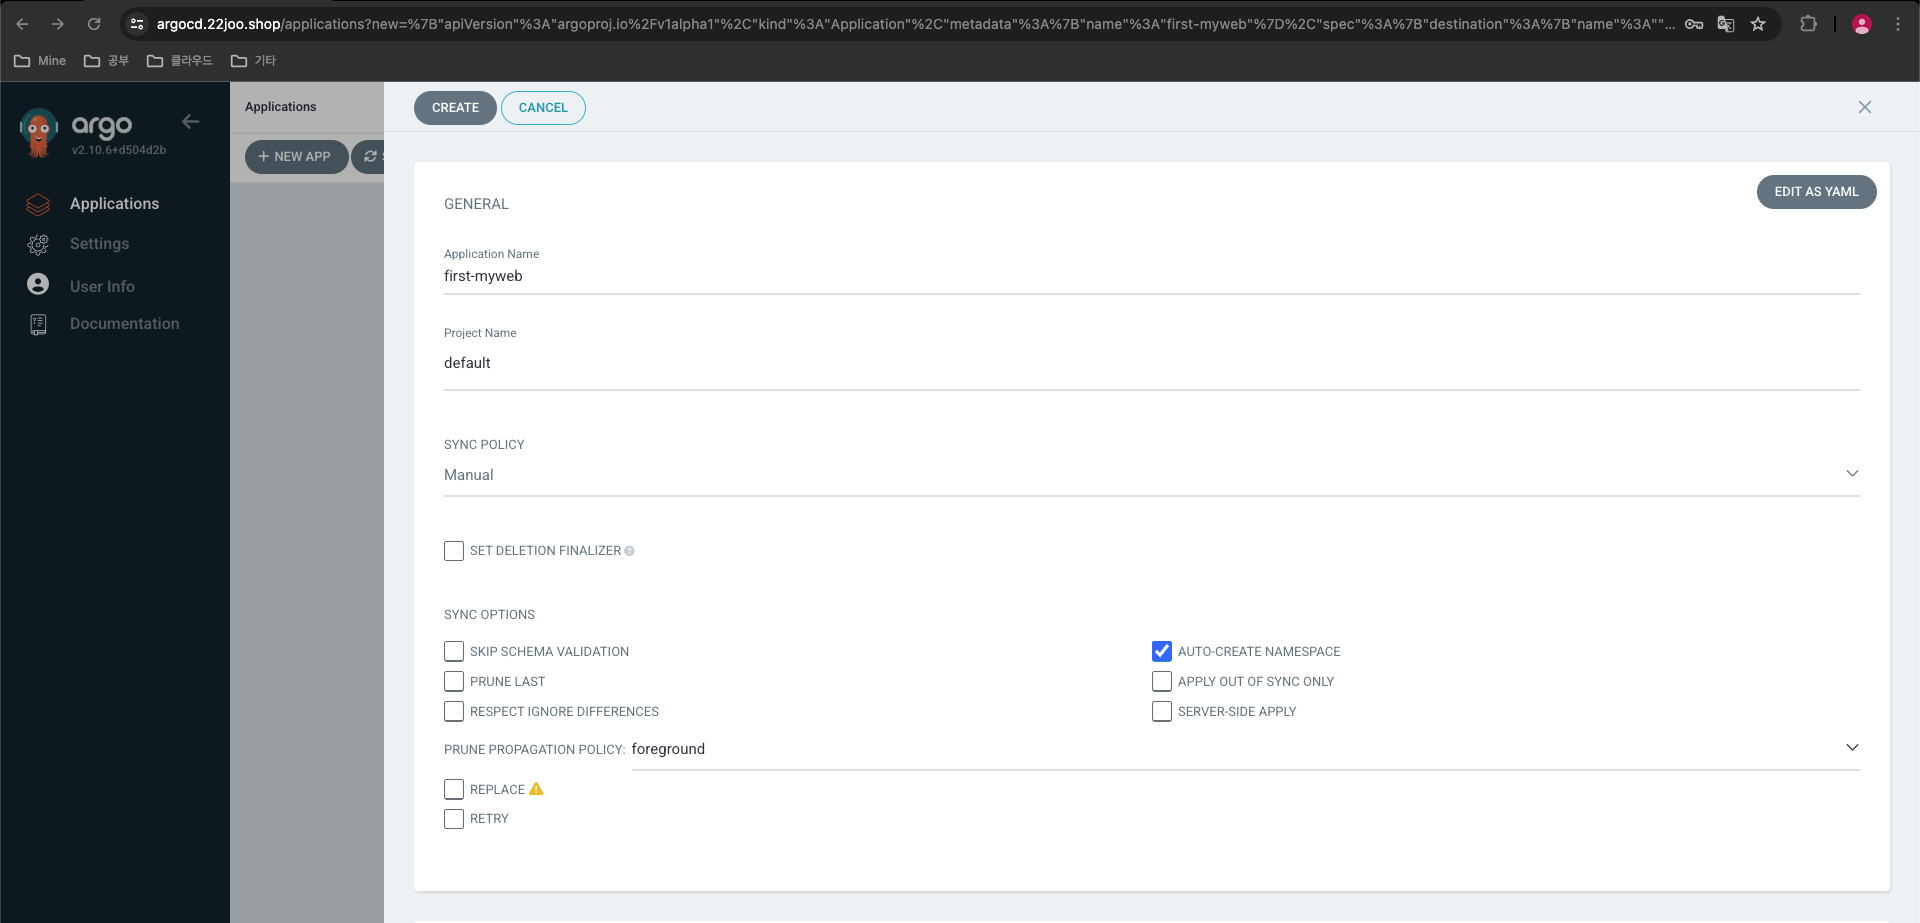
- SYNC POLICY : Manual
- AUTO-CREATE NAMESPACE : 클러스터에 네임스페이스가 없을 시 argocd에 입력한 이름으로 자동 생성
- APPLY OUT OF SYNC ONLY : 현재 동기화 상태가 아닌 리소스만 배포
- PRUNE PROPAGATION POLICY
- foreground : 부모(소유자, ex. deployment) 자원을 먼저 삭제함
- background : 자식(종속자, ex. pod) 자원을 먼저 삭제함
- orphan : 고아(소유자는 삭제됐지만, 종속자가 삭제되지 않은 경우) 자원을 삭제함
- [체크] AUTO-CREATE-NAMESPACE
- SOURCE
- Repository URL : https://github.com/Leeeuijooo/aews-cicd.git
- Revision : main
- Path : 3/deploy
- DESTINATION
- Cluster URL : https://kubernetes.default.svc
- Namespace : first
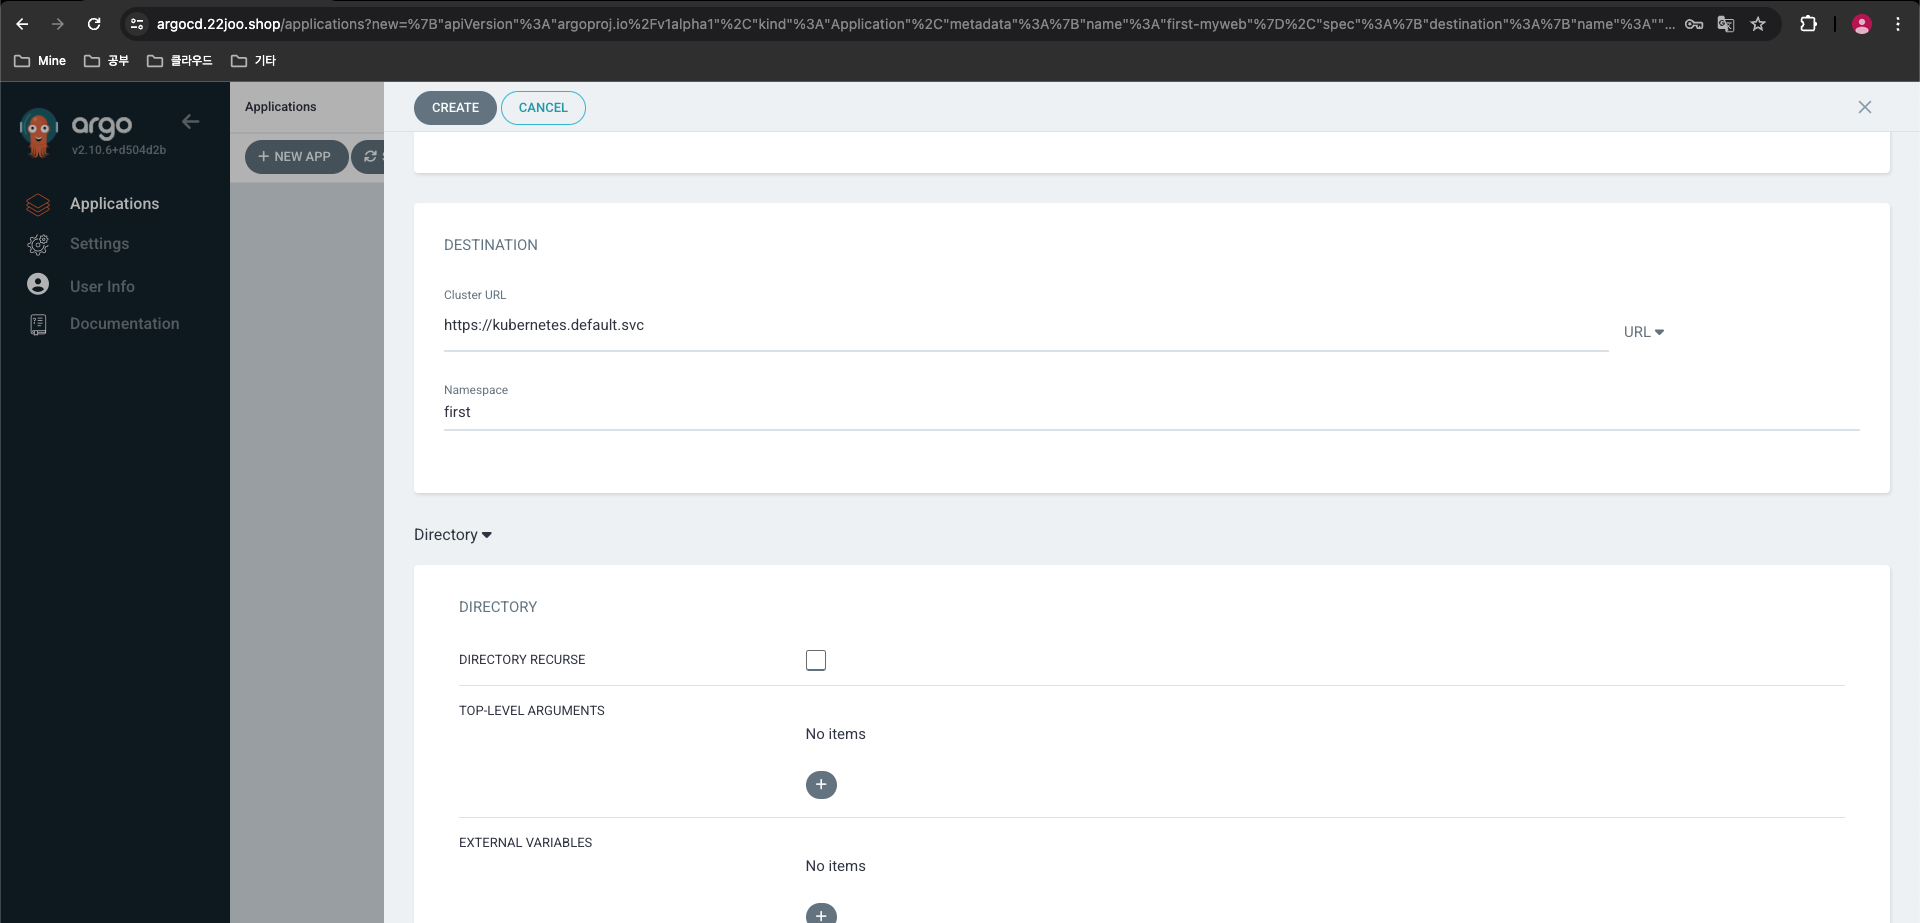
- [선택] Directory ← 소스를 보고 자동으로 유형 선택됨
- 화면 상단 [CREATE] 클릭
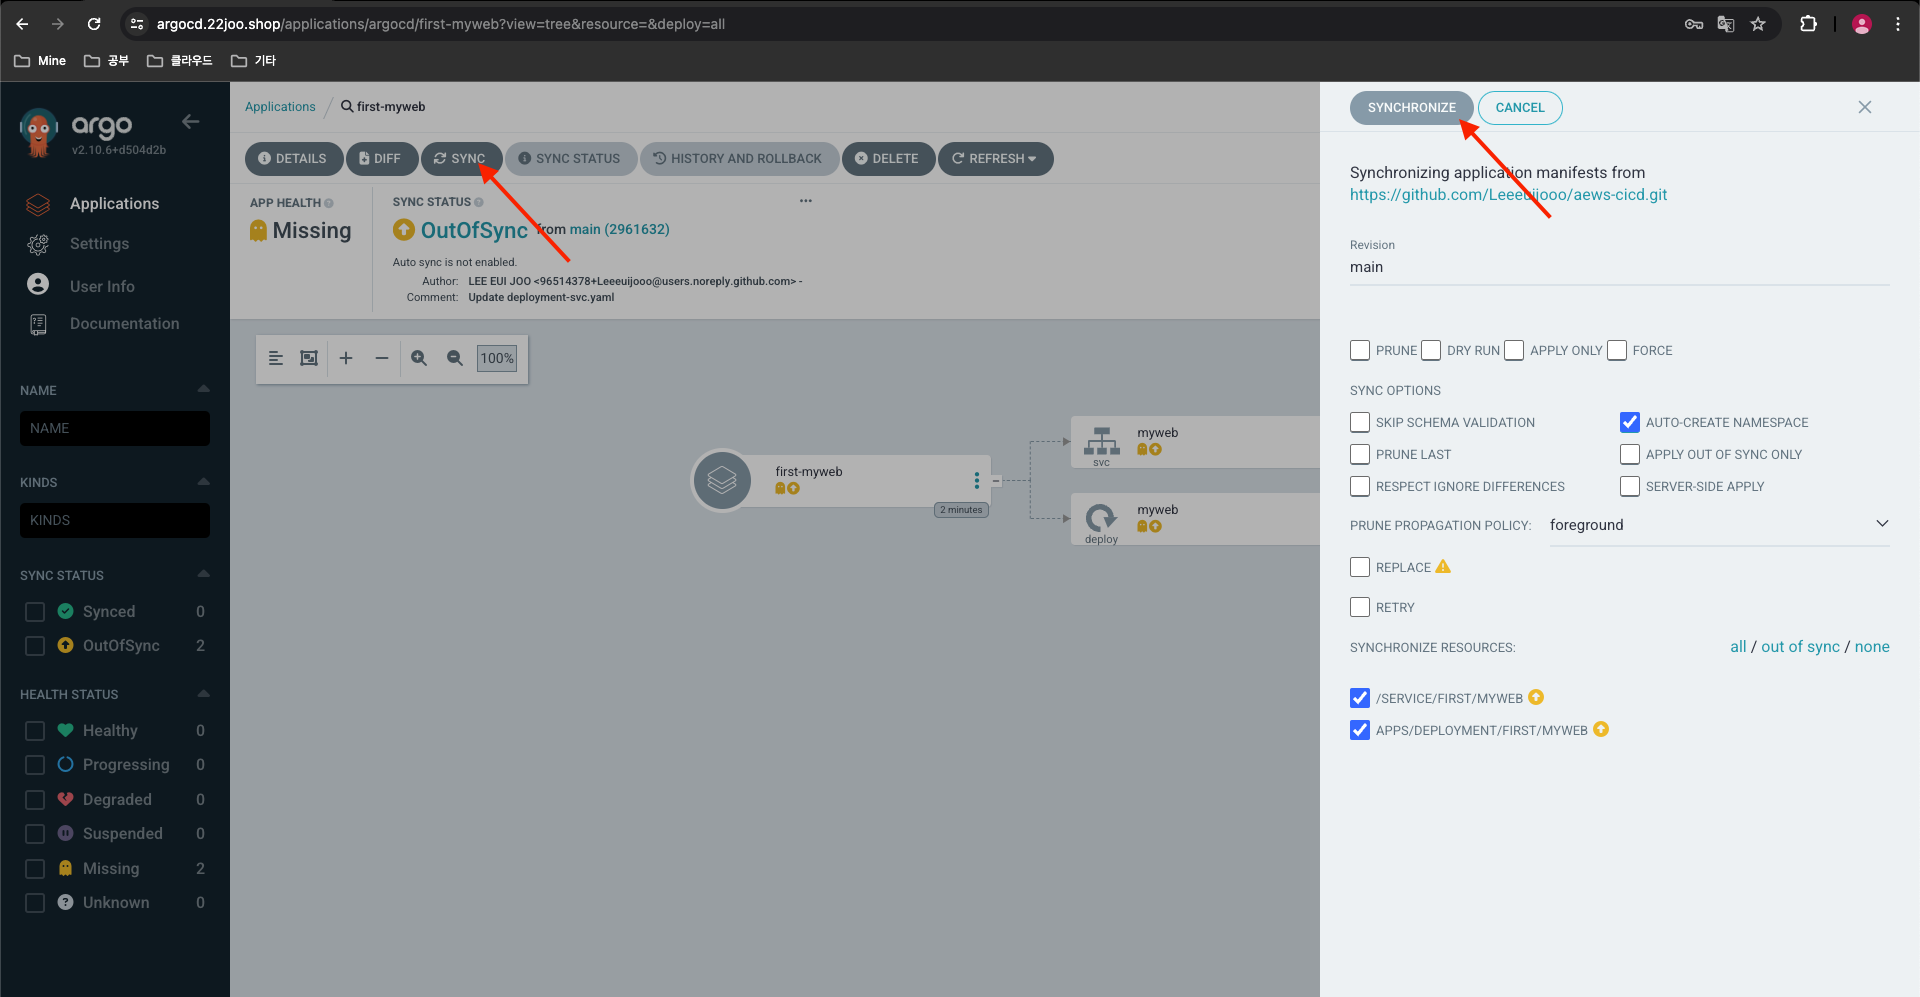
- 배포하기 - [SYNC] 클릭 > [SYNCHRONIZE] 클릭
- PRUNE : GIt에서 자원 삭제 후 배포시 K8S에서는 삭제되지 않으나, 해당 옵션을 선택하면 삭제시킴
- FORCE : --force 옵션으로 리소스 삭제
- APPLY ONLY : ArgoCD의 Pre/Post Hook은 사용 안함 (리소스만 배포)
- DRY RUN : 테스트 배포 (배포에 에러가 있는지 한번 확인해 볼때 사용)
- 모니터링
# 모니터링
kubectl get deploy,svc -n first --show-labels
watch -d kubectl get deploy -n first --show-labels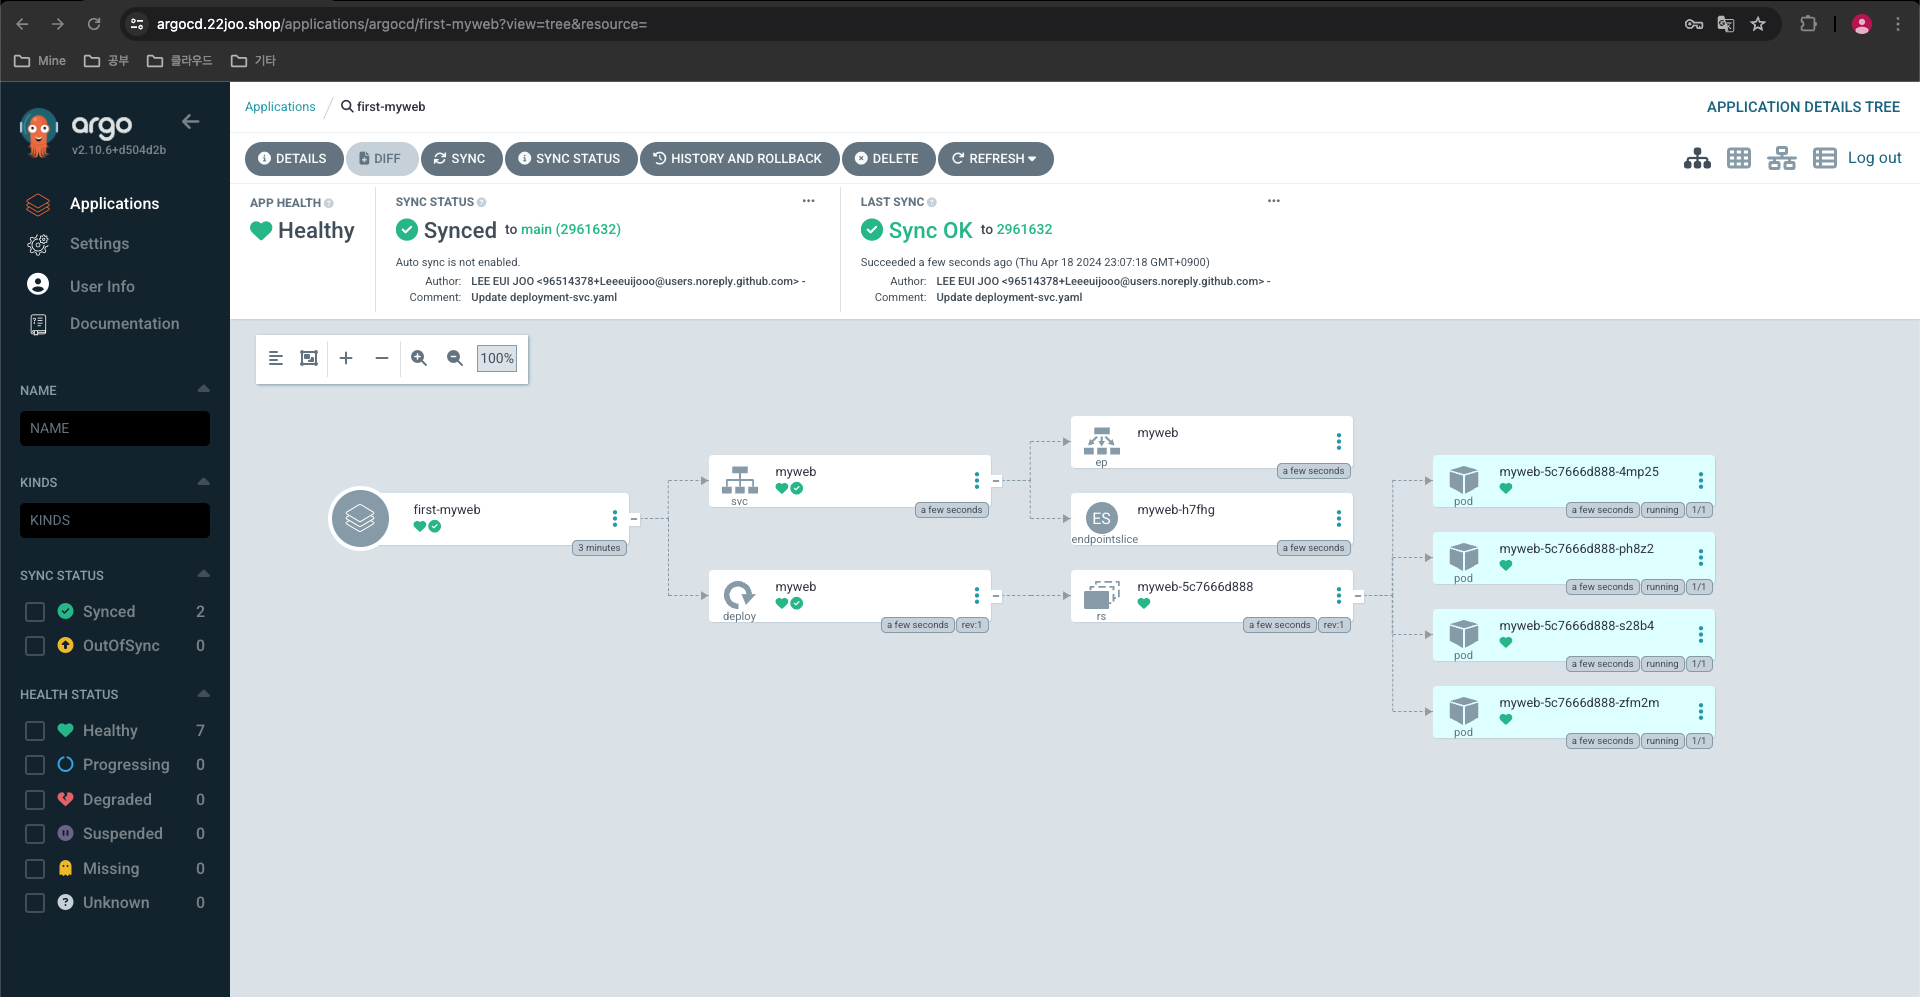
(leeeuijoo@myeks:default) [root@myeks-bastion ~]# k get deployments -n first
NAME    READY   UP-TO-DATE   AVAILABLE   AGE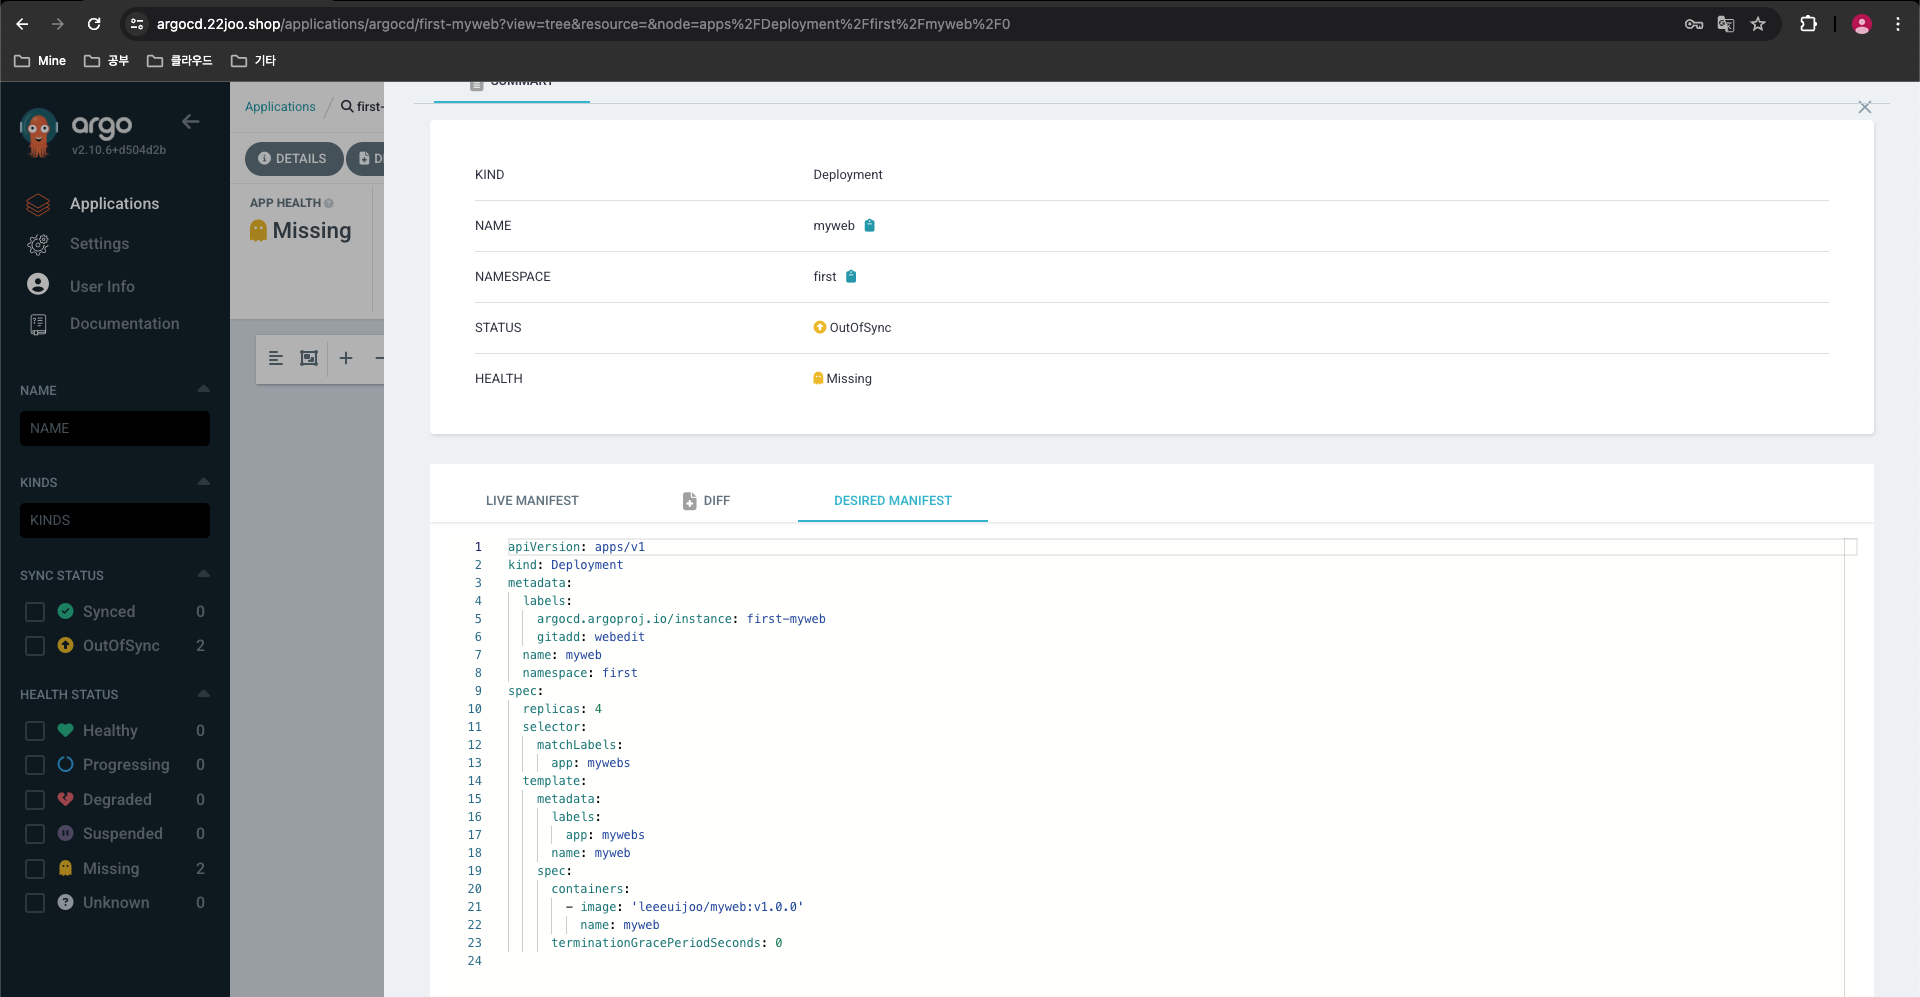
myweb 4/4 4 4 39s- 리소스 클릭 후 확인 : 각각 LIVE MANIFEST(쿠버네티스 정보) vs DESIRED MANIFEST(Git깃 정보)
- LIVE MANIFEST : 대상 클러스터에 배포가 되어 있다는 정보- 위 화면에서 Deployment 리소스 직접 수정 해보기 : EDIT 클릭 후 lables 아래 추가 → SAVE
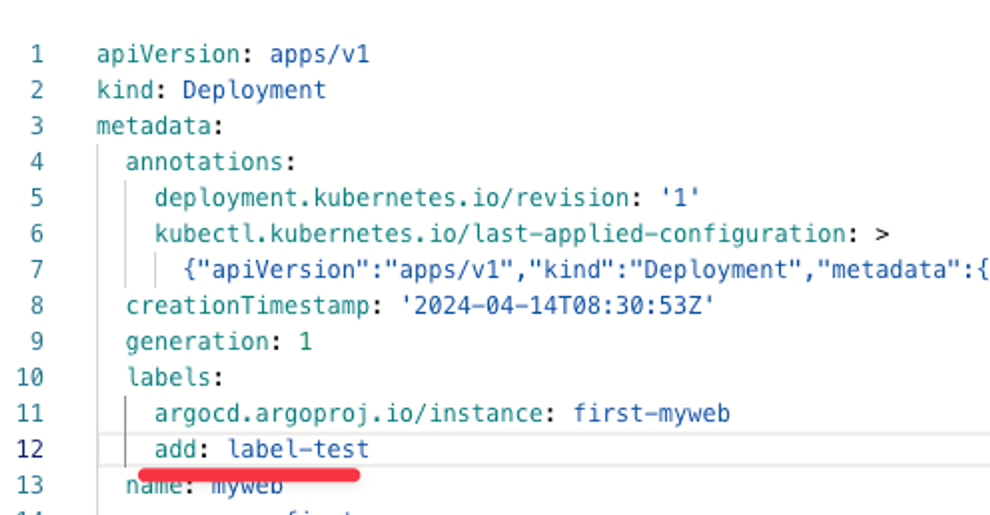
결론 : GitOps를 하려거든 대상(k8s)에서 변경하지 말고, 소스(git)에서 변경하자!
- k8s에서 직접 수정 → argocd 싱크(반영) 확인
# 아래 추가
kubectl edit deploy -n first myweb
...
  labels:
    add: label-test
    add2: k8s-test
...- DIFF 클릭 확인 → N/A
- Git 에서 label 을 변경하면 Diff 가 보입니다.
- 현재 상태는, Git을 기준으로 보자면 LIVE MANIFEST(K8S)형상이 뒤떨어진것으로 볼 수 있다 → OutOfSync 상태니 Sync 할 것
- Git Repo화면에서 replicas 4로 변경 후 → Commit 후 ArgoCD에서 REFRESH 클릭 후 Sync 후 확인
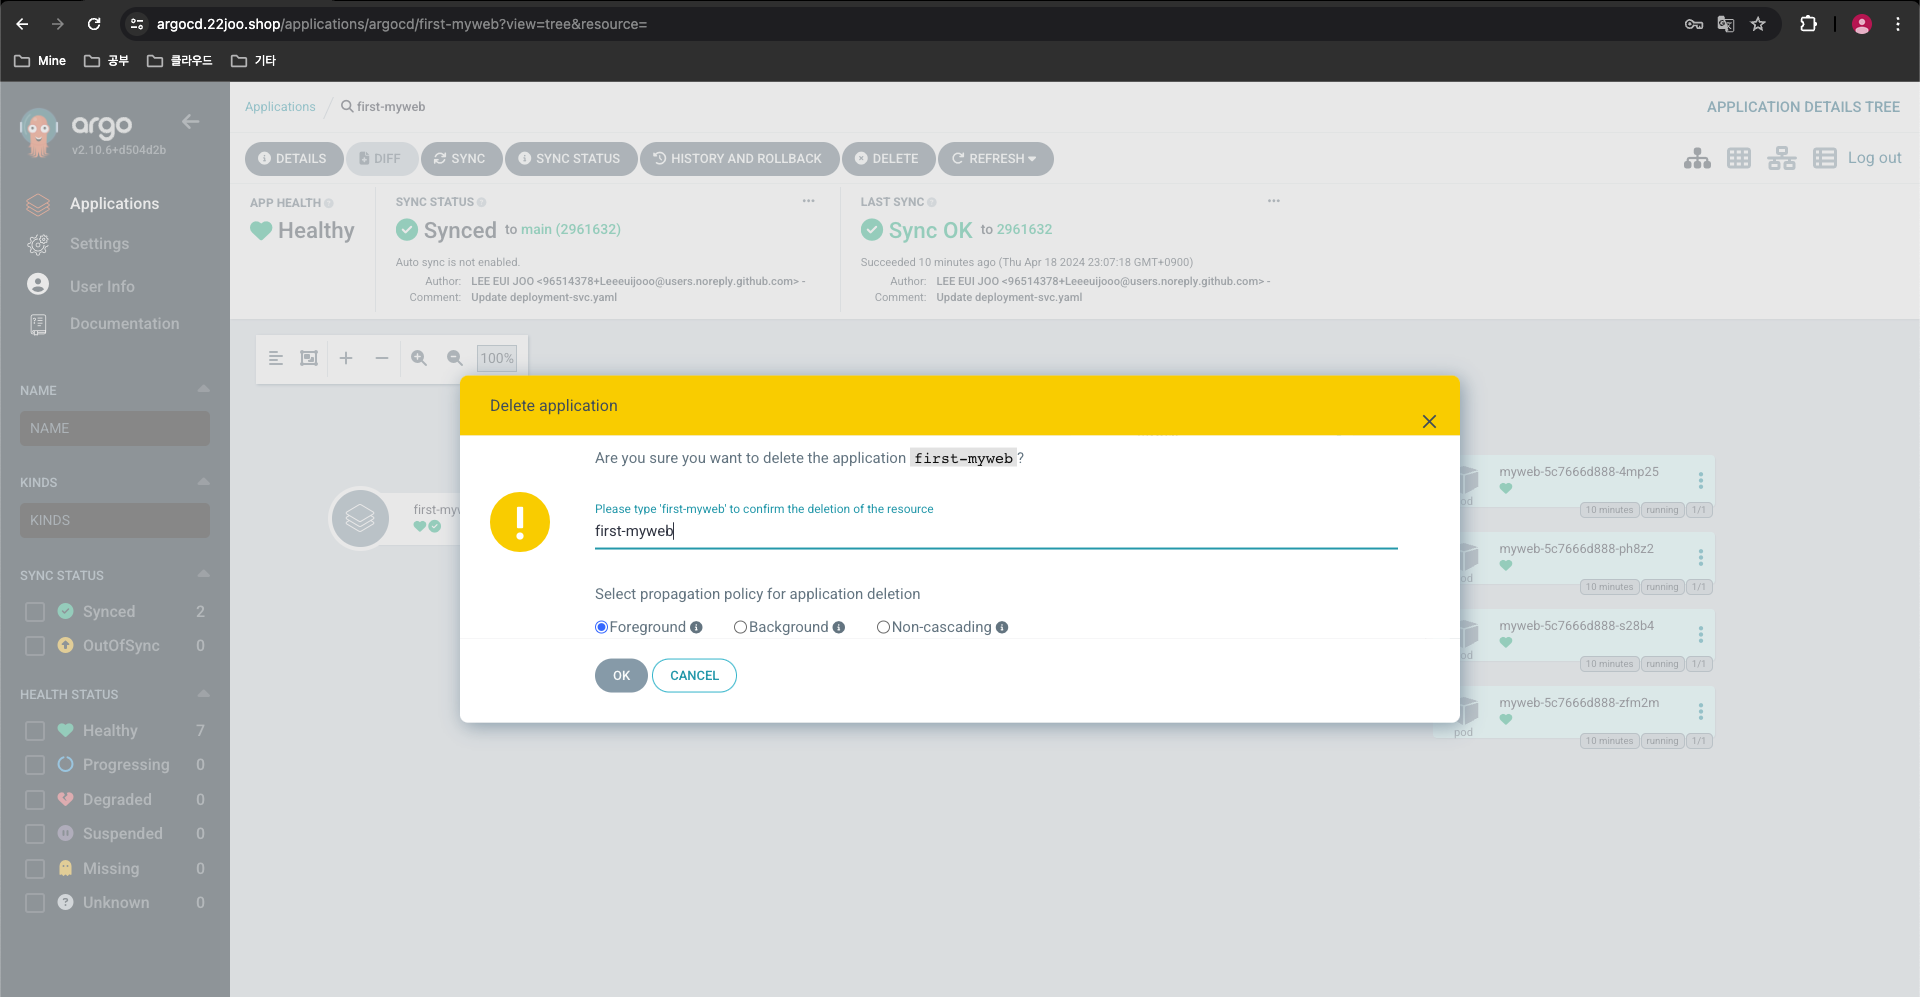
- 실습 리소스 삭제 : Argocd 에서 DELETE
Argo CD CLI 로 Sample Application 배포해보기
- Argo CD CLI - Install
#
curl -sSL -o argocd-linux-amd64 https://github.com/argoproj/argo-cd/releases/latest/download/argocd-linux-amd64
sudo install -m 555 argocd-linux-amd64 /usr/local/bin/argocd
rm -f argocd-linux-amd64

#
argocd version

(leeeuijoo@myeks:default) [root@myeks-bastion ~]# argocd version
argocd: v2.8.16+a5ae7bd
  BuildDate: 2024-04-15T09:10:52Z
  GitCommit: a5ae7bd16143814dc8560da0e476905ed1d46628
  GitTreeState: clean
  GoVersion: go1.20.14
  Compiler: gc
  Platform: linux/amd64
FATA[0000] Argo CD server address unspecified

#
argocd login argocd.$MyDomain
Username: admin
Password: ###


(leeeuijoo@myeks:default) [root@myeks-bastion ~]# argocd login argocd.$MyDomain
Username: admin
Password:
'admin:login' logged in successfully
Context 'argocd.22joo.shop' updated

#
kubectl config get-contexts -o name
admin@myeks.ap-northeast-2.eksctl.io
argocd cluster add admin@myeks.ap-northeast-2.eksctl.io
y 입력

(leeeuijoo@myeks:default) [root@myeks-bastion ~]# kubectl config get-contexts -o name
leeeuijoo@myeks.ap-northeast-2.eksctl.io
(leeeuijoo@myeks:default) [root@myeks-bastion ~]# argocd cluster add leeeuijoo@myeks.ap-northeast-2.eksctl.io
WARNING: This will create a service account `argocd-manager` on the cluster referenced by context `leeeuijoo@myeks.ap-northeast-2.eksctl.io` with full cluster level privileges. Do you want to continue [y/N]? y
INFO[0005] ServiceAccount "argocd-manager" created in namespace "kube-system"
INFO[0005] ClusterRole "argocd-manager-role" created
INFO[0005] ClusterRoleBinding "argocd-manager-role-binding" created
INFO[0010] Created bearer token secret for ServiceAccount "argocd-manager"
Cluster 'https://CD9F85D8A31E7837D62866530AF74422.gr7.ap-northeast-2.eks.amazonaws.com' added

#
argocd app list
NAME  CLUSTER  NAMESPACE  PROJECT  STATUS  HEALTH  SYNCPOLICY  CONDITIONS  REPO  PATH  TARGET

(leeeuijoo@myeks:default) [root@myeks-bastion ~]# argocd app list
NAME CLUSTER NAMESPACE PROJECT STATUS HEALTH SYNCPOLICY CONDITIONS REPO PATH TARGET- Application 생성 with CLi
#
kubectl config set-context --current --namespace=argocd
argocd app create guestbook --repo https://github.com/argoproj/argocd-example-apps.git --path guestbook --dest-server https://kubernetes.default.svc --dest-namespace default

#
argocd app list
NAME              CLUSTER                         NAMESPACE  PROJECT  STATUS     HEALTH   SYNCPOLICY  CONDITIONS  REPO                                                 PATH       TARGET
argocd/guestbook  https://kubernetes.default.svc  default    default  OutOfSync  Missing  <none>      <none>      https://github.com/argoproj/argocd-example-apps.git  guestbook

(leeeuijoo@myeks:argocd) [root@myeks-bastion ~]# argocd app list
NAME              CLUSTER                         NAMESPACE  PROJECT  STATUS     HEALTH   SYNCPOLICY  CONDITIONS  REPO                                                 PATH       TARGET
argocd/guestbook  https://kubernetes.default.svc  default    default  OutOfSync  Missing  <none>      <none>      https://github.com/argoproj/argocd-example-apps.git  guestbook

- Sync (Deploy) The Application
#
argocd app get guestbook
(leeeuijoo@myeks:argocd) [root@myeks-bastion ~]# argocd app get guestbook
Name: argocd/guestbook
Project: default
Server: https://kubernetes.default.svc
Namespace: default
URL: https://argocd.22joo.shop/applications/guestbook
Repo: https://github.com/argoproj/argocd-example-apps.git
Target:
Path: guestbook
SyncWindow: Sync Allowed
Sync Policy: <none>
Sync Status: OutOfSync from (d7927a2)
Health Status: Missing
GROUP KIND NAMESPACE NAME STATUS HEALTH HOOK MESSAGE
Service default guestbook-ui OutOfSync Missing
apps Deployment default guestbook-ui OutOfSync Missing
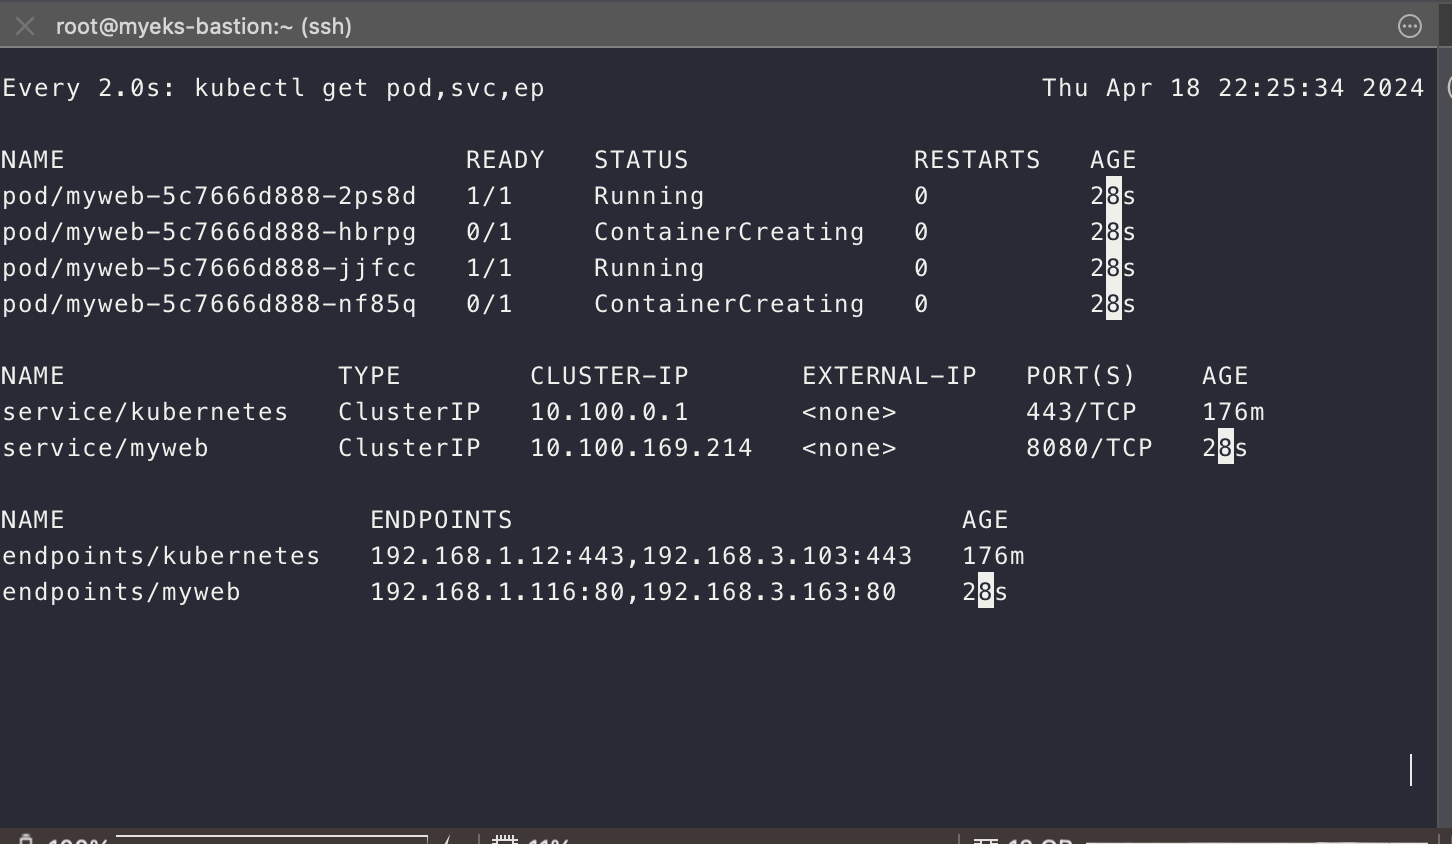
# 모니터링
watch -d kubectl get pod,svc,ep
#
argocd app sync guestbook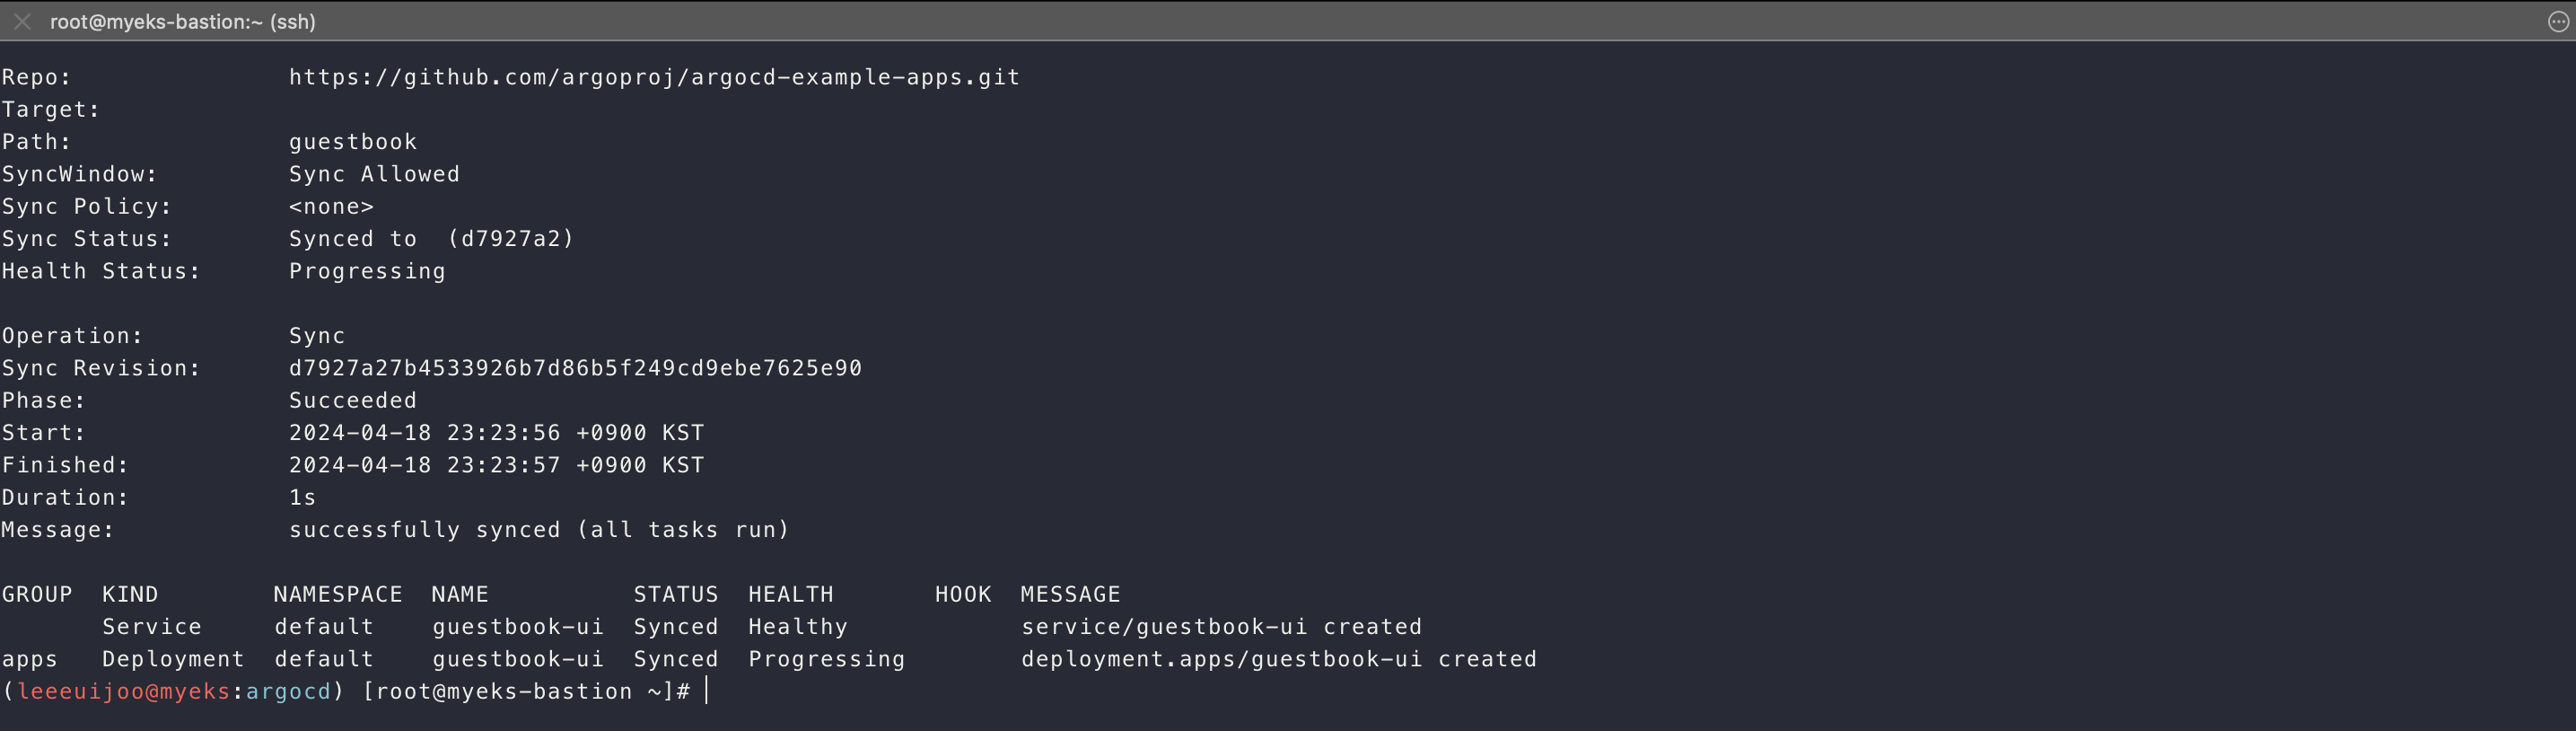

(leeeuijoo@myeks:argocd) [root@myeks-bastion ~]# argocd app sync guestbook
TIMESTAMP                  GROUP        KIND   NAMESPACE                  NAME    STATUS   HEALTH        HOOK  MESSAGE
2024-04-18T23:24:56+09:00            Service     default          guestbook-ui    Synced  Healthy
2024-04-18T23:24:56+09:00   apps  Deployment     default          guestbook-ui    Synced  Healthy
2024-04-18T23:24:57+09:00            Service     default          guestbook-ui    Synced  Healthy              service/guestbook-ui unchanged
2024-04-18T23:24:57+09:00   apps  Deployment     default          guestbook-ui    Synced  Healthy              deployment.apps/guestbook-ui unchanged

Name:               argocd/guestbook
Project:            default
Server:             https://kubernetes.default.svc
Namespace:          default
URL:                https://argocd.22joo.shop/applications/guestbook
Repo:               https://github.com/argoproj/argocd-example-apps.git
Target:
Path:               guestbook
SyncWindow:         Sync Allowed
Sync Policy:        <none>
Sync Status:        Synced to  (d7927a2)
Health Status:      Healthy

Operation:          Sync
Sync Revision:      d7927a27b4533926b7d86b5f249cd9ebe7625e90
Phase:              Succeeded
Start:              2024-04-18 23:24:56 +0900 KST
Finished:           2024-04-18 23:24:57 +0900 KST
Duration:           1s
Message:            successfully synced (all tasks run)

GROUP  KIND        NAMESPACE  NAME          STATUS  HEALTH   HOOK  MESSAGE
       Service     default    guestbook-ui  Synced  Healthy        service/guestbook-ui unchanged
apps Deployment default guestbook-ui Synced Healthy deployment.apps/guestbook-ui unchanged- app 삭제
argocd app delete guestbook
Are you sure you want to delete 'guestbook' and all its resources? [y/n] y

# ns default 로 변경
kubectl ns default
Argo Rollout
Advanced Deploy
-
Blue / Green 전략, Canary 배포가 가능합니다.
-
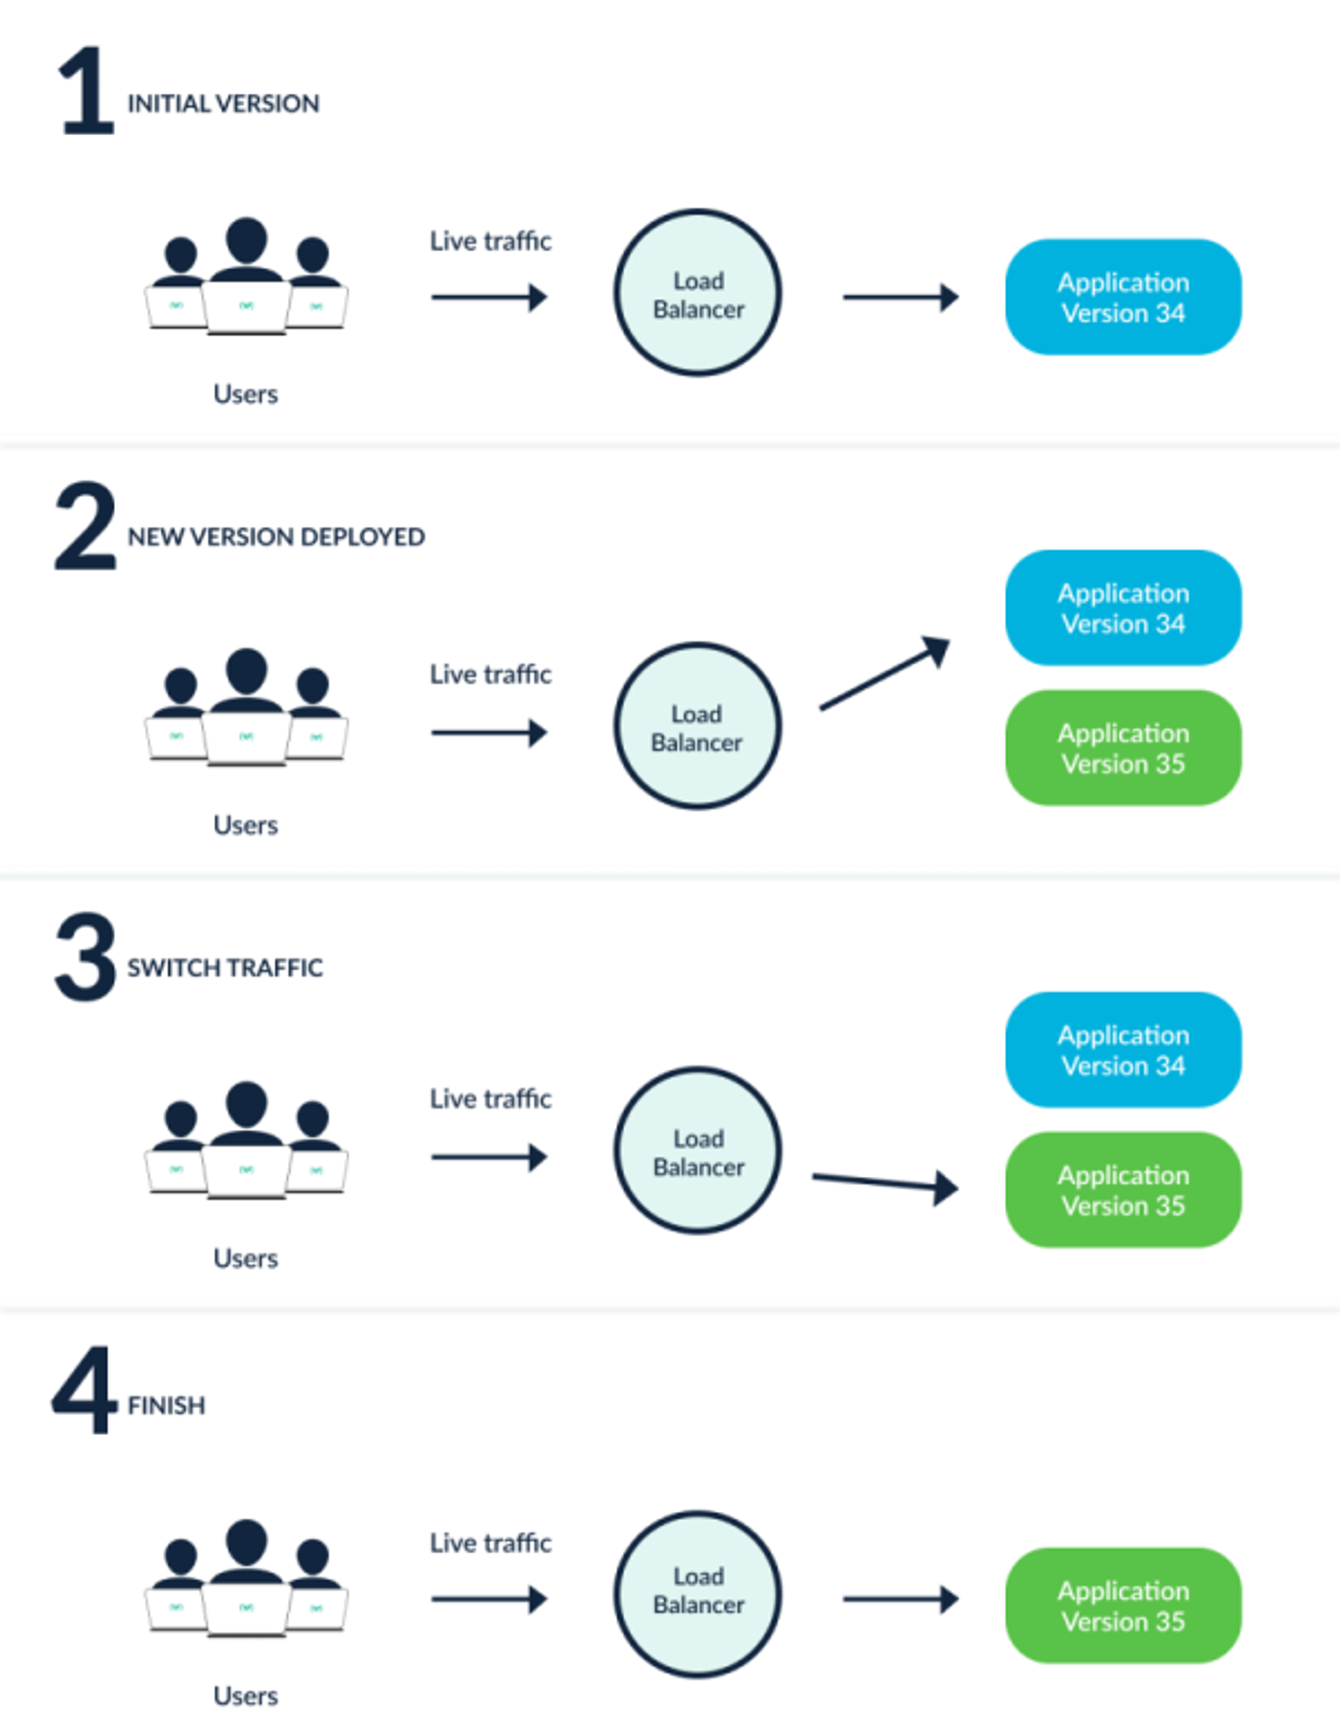
Blue/Green
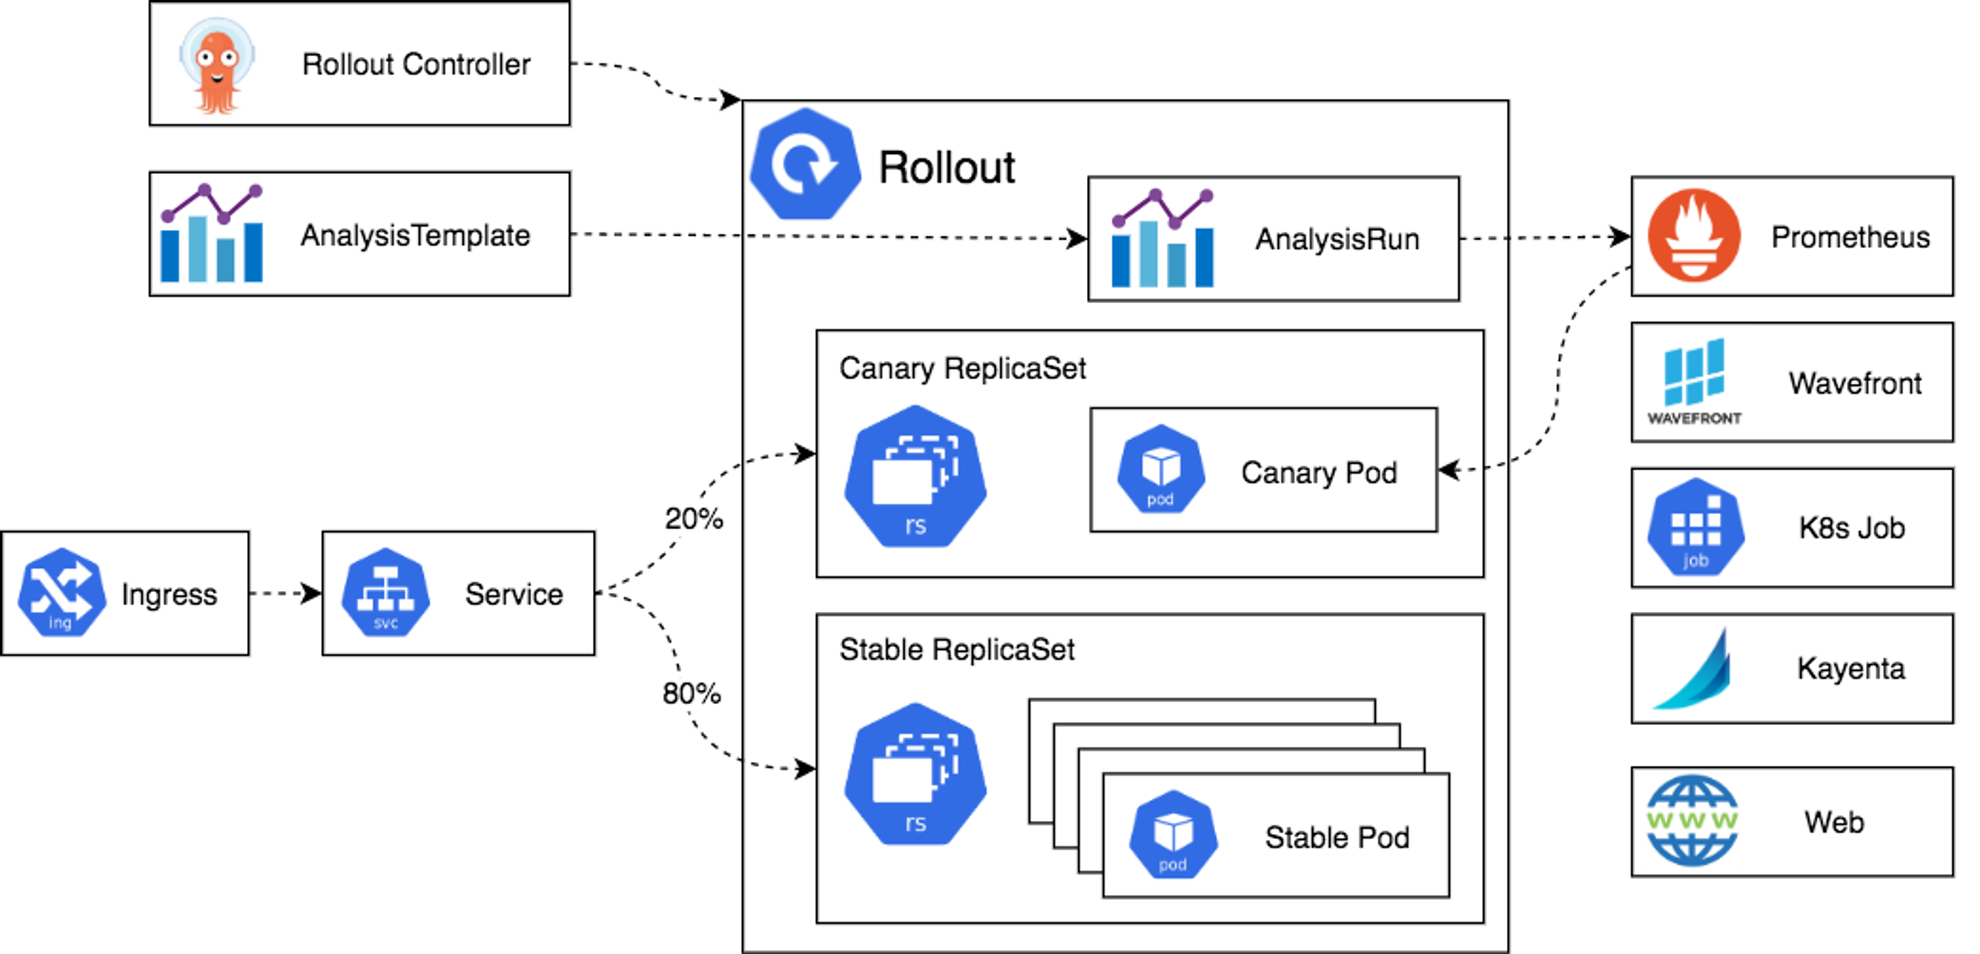
- Canary
- Istio, Ingress 를 통해 디테일한 전략이 가능합니다.

- 아키텍처
- 설치 - Helm
#
cat <<EOT > argorollouts-values.yaml
dashboard:
  enabled: true
  ingress:
    enabled: true
    ingressClassName: alb
    hosts:
      - argorollouts.$MyDomain
    annotations:
      alb.ingress.kubernetes.io/scheme: internet-facing
      alb.ingress.kubernetes.io/target-type: ip
      alb.ingress.kubernetes.io/backend-protocol: HTTP
      alb.ingress.kubernetes.io/listen-ports: '[{"HTTPS":80}, {"HTTPS":443}]'
      alb.ingress.kubernetes.io/certificate-arn: $CERT_ARN
      alb.ingress.kubernetes.io/ssl-redirect: '443'
EOT

kubectl create ns argo-rollouts
helm install argo-rollouts argo/argo-rollouts --version 2.35.1 -f argorollouts-values.yaml --namespace argo-rollouts

# 확인
kubectl get all -n argo-rollouts
kubectl get crd | grep argo

(leeeuijoo@myeks:default) [root@myeks-bastion ~]# kubectl get crd | grep argo
analysisruns.argoproj.io                     2024-04-18T14:29:57Z
analysistemplates.argoproj.io                2024-04-18T14:29:57Z
applications.argoproj.io                     2024-04-18T13:34:41Z
applicationsets.argoproj.io                  2024-04-18T13:34:41Z
appprojects.argoproj.io                      2024-04-18T13:34:40Z
clusteranalysistemplates.argoproj.io         2024-04-18T14:29:57Z
experiments.argoproj.io                      2024-04-18T14:29:57Z
rollouts.argoproj.io                         2024-04-18T14:29:57Z
(leeeuijoo@myeks:default) [root@myeks-bastion ~]# kubectl get all -n argo-rollouts
NAME                                           READY   STATUS    RESTARTS   AGE
pod/argo-rollouts-7647d689d6-kdlfk             0/1     Running   0          14s
pod/argo-rollouts-7647d689d6-sjrxl             0/1     Running   0          14s
pod/argo-rollouts-dashboard-79d489cfc7-6d8lt   1/1     Running   0          14s

NAME                              TYPE        CLUSTER-IP      EXTERNAL-IP   PORT(S)    AGE
service/argo-rollouts-dashboard   ClusterIP   10.100.234.43   <none>        3100/TCP   14s

NAME                                      READY   UP-TO-DATE   AVAILABLE   AGE
deployment.apps/argo-rollouts             0/2     2            0           14s
deployment.apps/argo-rollouts-dashboard   1/1     1            1           14s

NAME                                                 DESIRED   CURRENT   READY   AGE
replicaset.apps/argo-rollouts-7647d689d6             2         2         0       14s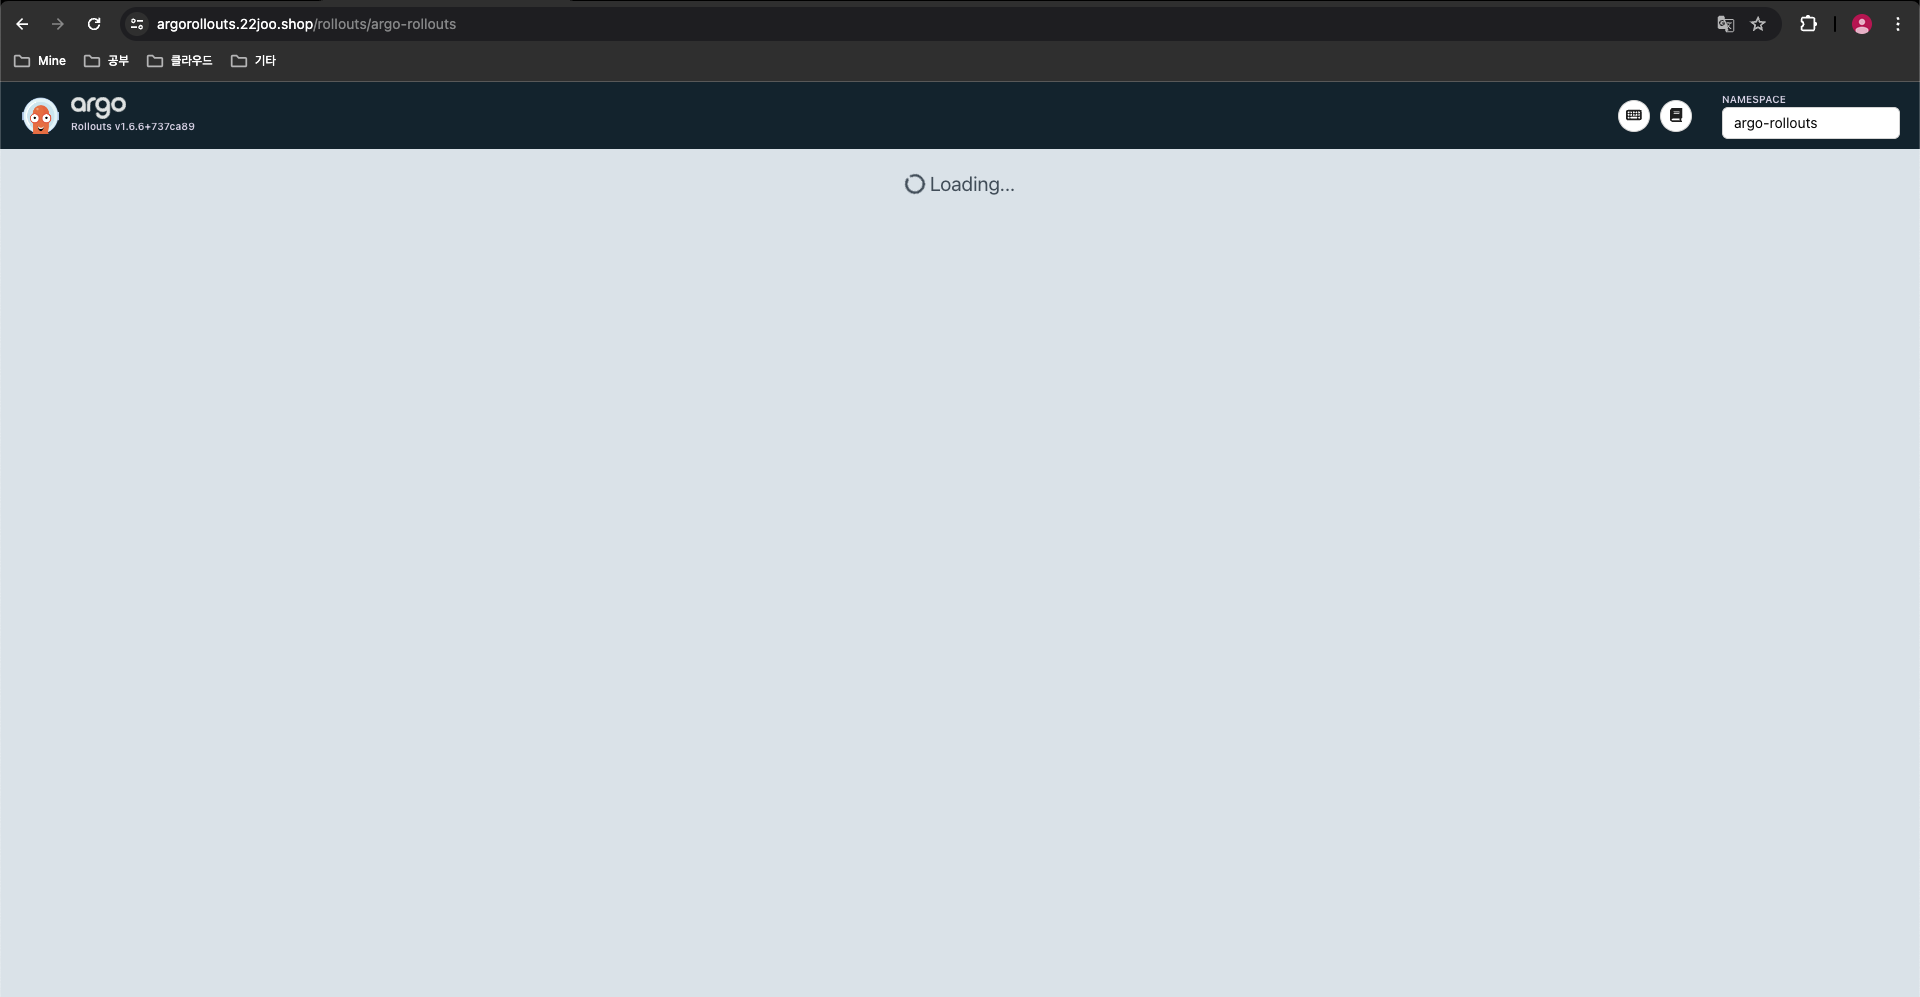
replicaset.apps/argo-rollouts-dashboard-79d489cfc7 1 1 1 14s- rollouts 대시보드 : 네임스페이스별 확인 가능 - Docs
https://argorollouts.<자신의 도메인>/rollouts/
- 별도의 리소스가 없기 때문에 아래와 같은 화면이 정상입니다.
- rollouts cli
#
curl -LO https://github.com/argoproj/argo-rollouts/releases/download/v1.6.4/kubectl-argo-rollouts-linux-amd64
chmod +x ./kubectl-argo-rollouts-linux-amd64
mv ./kubectl-argo-rollouts-linux-amd64 /usr/local/bin/kubectl-argo-rollouts

# 설치 확인
kubectl argo rollouts version

(leeeuijoo@myeks:default) [root@myeks-bastion ~]# kubectl argo rollouts version
kubectl-argo-rollouts: v1.6.4+a312af9
  BuildDate: 2023-12-11T18:31:15Z
  GitCommit: a312af9f632b985ec13f64918b918c5dcd02a15e
  GitTreeState: clean
  GoVersion: go1.20.12
  Compiler: gc
Platform: linux/amd64- Deploying a Rollout
spec:
  replicas: 5
  strategy:
    canary:
      steps:
      - setWeight: 20
      - pause: {} # 20 흘리고 40
      - setWeight: 40
      - pause: {duration: 10}
      - setWeight: 60
      - pause: {duration: 10}
      - setWeight: 80
      - pause: {duration: 10}
# Run the following command to deploy the initial Rollout and Service:
kubectl apply -f https://raw.githubusercontent.com/argoproj/argo-rollouts/master/docs/getting-started/basic/rollout.yaml
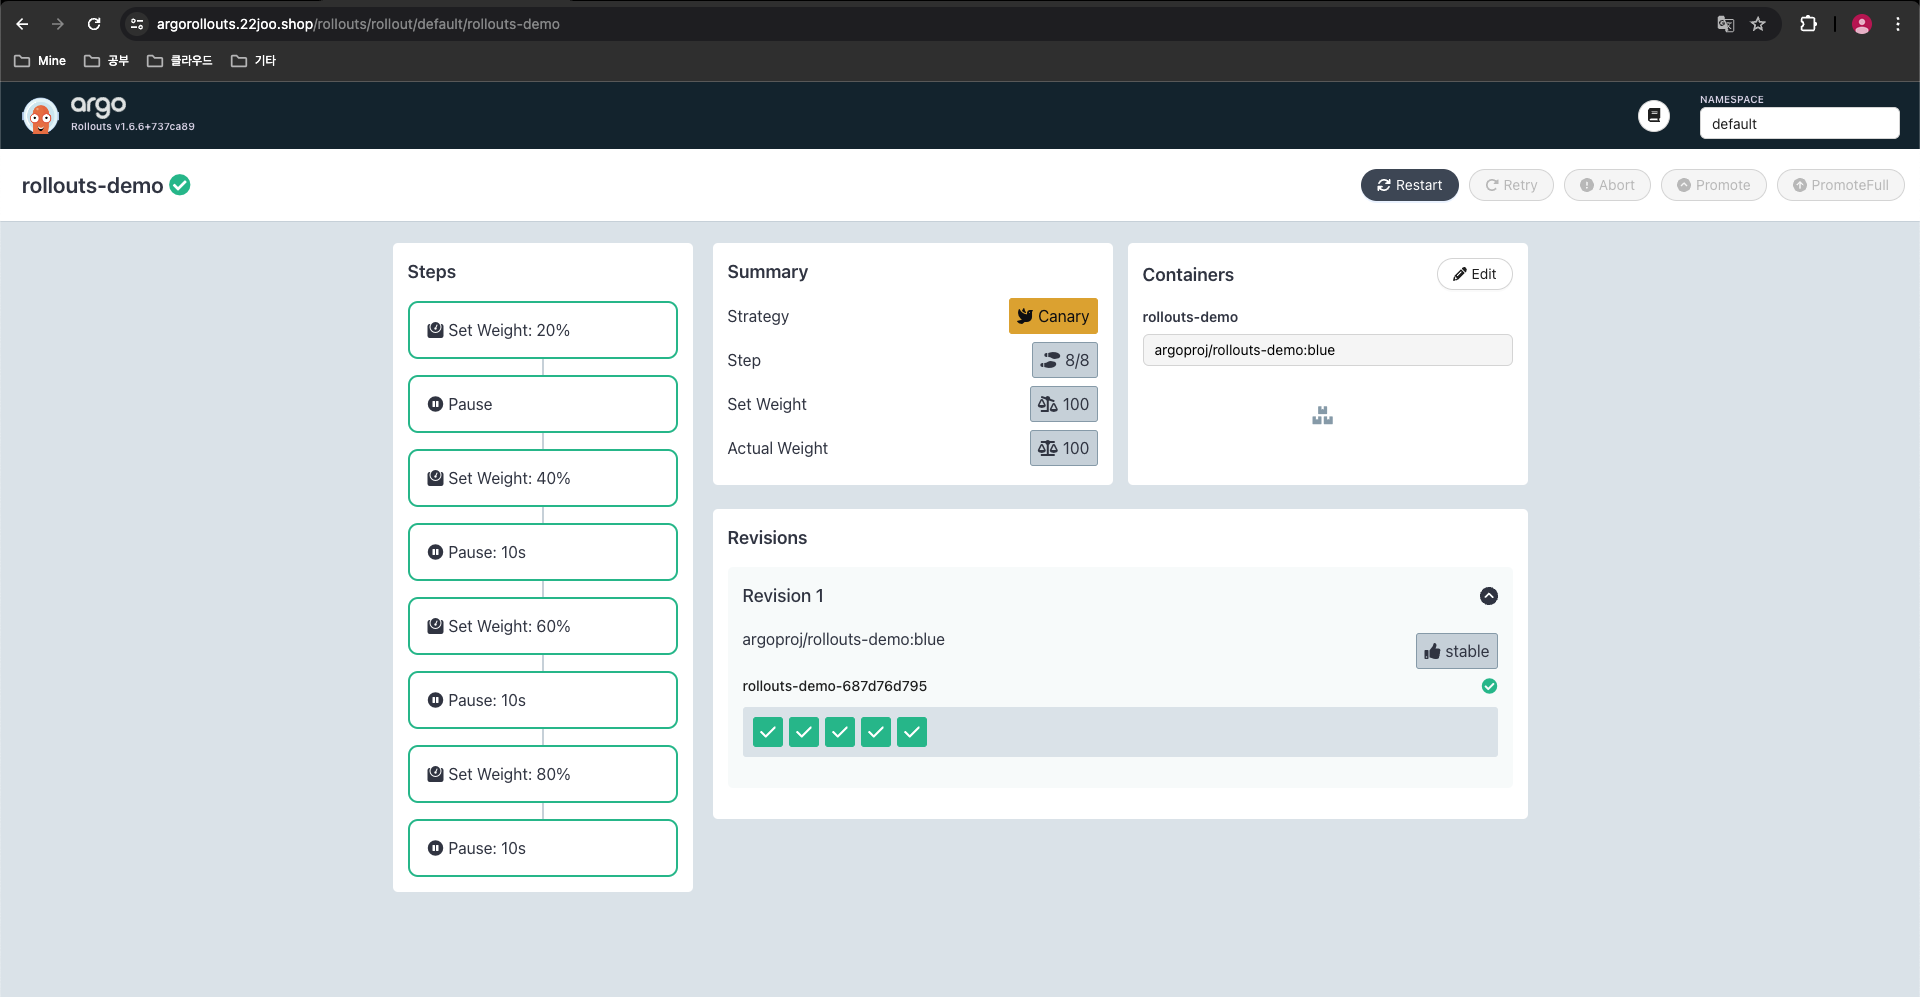
kubectl apply -f https://raw.githubusercontent.com/argoproj/argo-rollouts/master/docs/getting-started/basic/service.yaml- CLI vs UI 확인 https://argorollouts.<각자 자신의 도메인>/rollouts/default
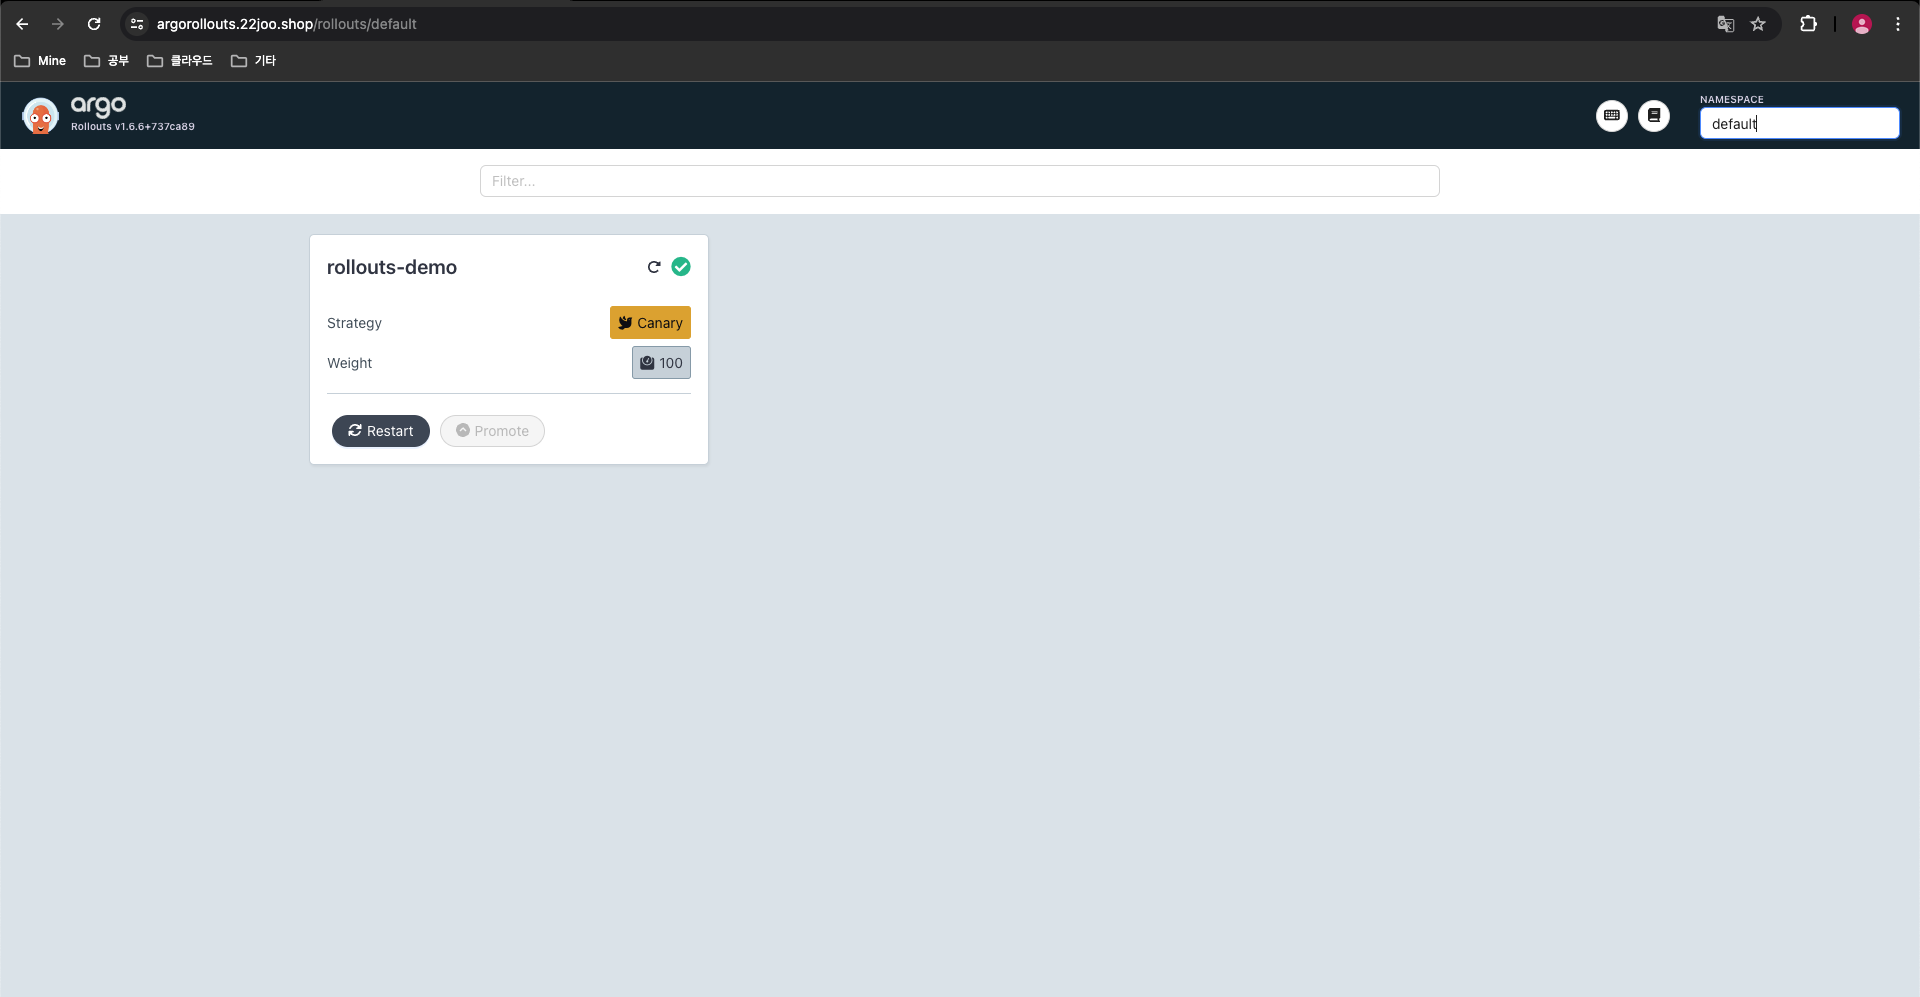
- Revision Ver 1
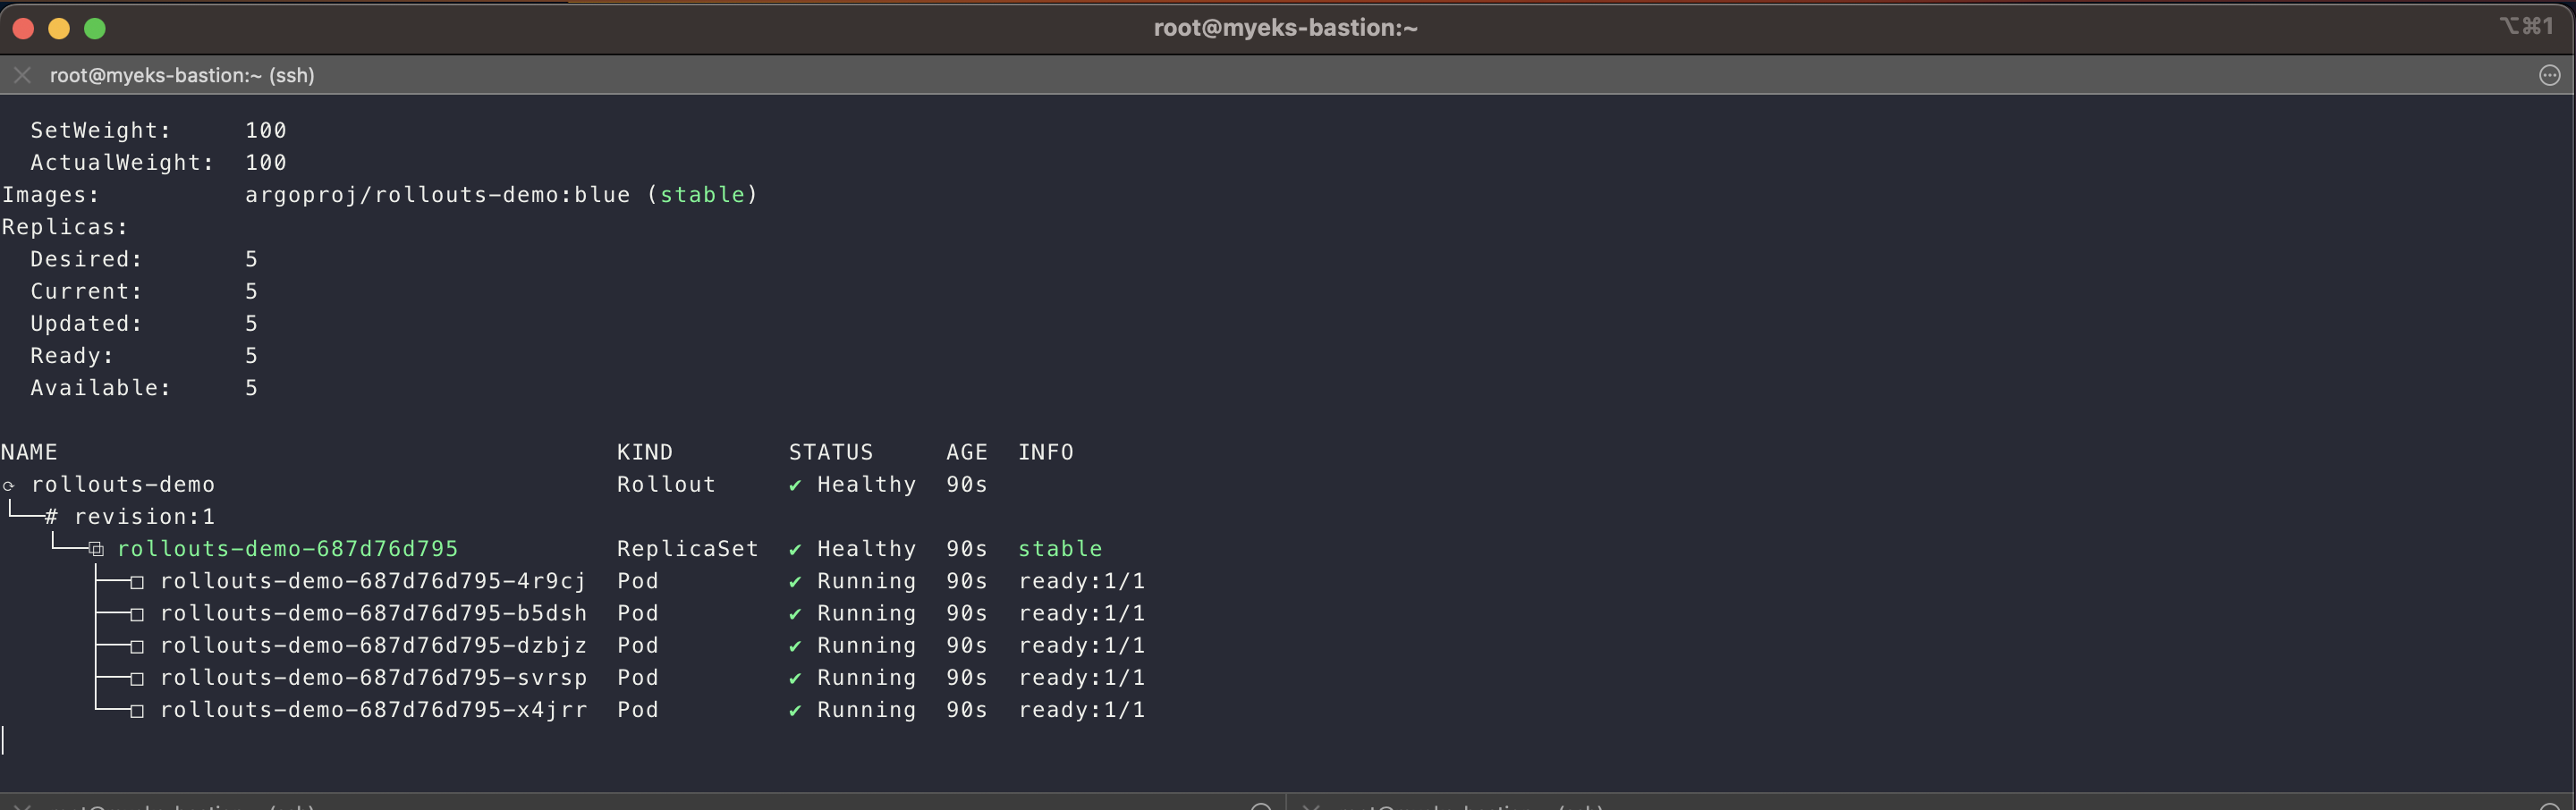
- CLI
(leeeuijoo@myeks:default) [root@myeks-bastion ~]# kubectl argo rollouts get rollout rollouts-demo
Name:            rollouts-demo
Namespace:       default
Status:          ✔ Healthy
Strategy:        Canary
  Step:          8/8
  SetWeight:     100
  ActualWeight:  100
Images:          argoproj/rollouts-demo:blue (stable)
Replicas:
  Desired:       5
  Current:       5
  Updated:       5
  Ready:         5
  Available:     5

NAME                                       KIND        STATUS     AGE  INFO
⟳ rollouts-demo                            Rollout     ✔ Healthy  59s
└──# revision:1
   └──⧉ rollouts-demo-687d76d795           ReplicaSet  ✔ Healthy  59s  stable
      ├──□ rollouts-demo-687d76d795-4r9cj  Pod         ✔ Running  59s  ready:1/1
      ├──□ rollouts-demo-687d76d795-b5dsh  Pod         ✔ Running  59s  ready:1/1
      ├──□ rollouts-demo-687d76d795-dzbjz  Pod         ✔ Running  59s  ready:1/1
      ├──□ rollouts-demo-687d76d795-svrsp  Pod         ✔ Running  59s  ready:1/1
      └──□ rollouts-demo-687d76d795-x4jrr  Pod         ✔ Running  59s  ready:1/1

kubectl argo rollouts get rollout rollouts-demo --watch- 모니터링
- Updating a Rollout
#
watch -d kubectl get pod -n argocd -l app=rollouts-demo -owide --show-labels
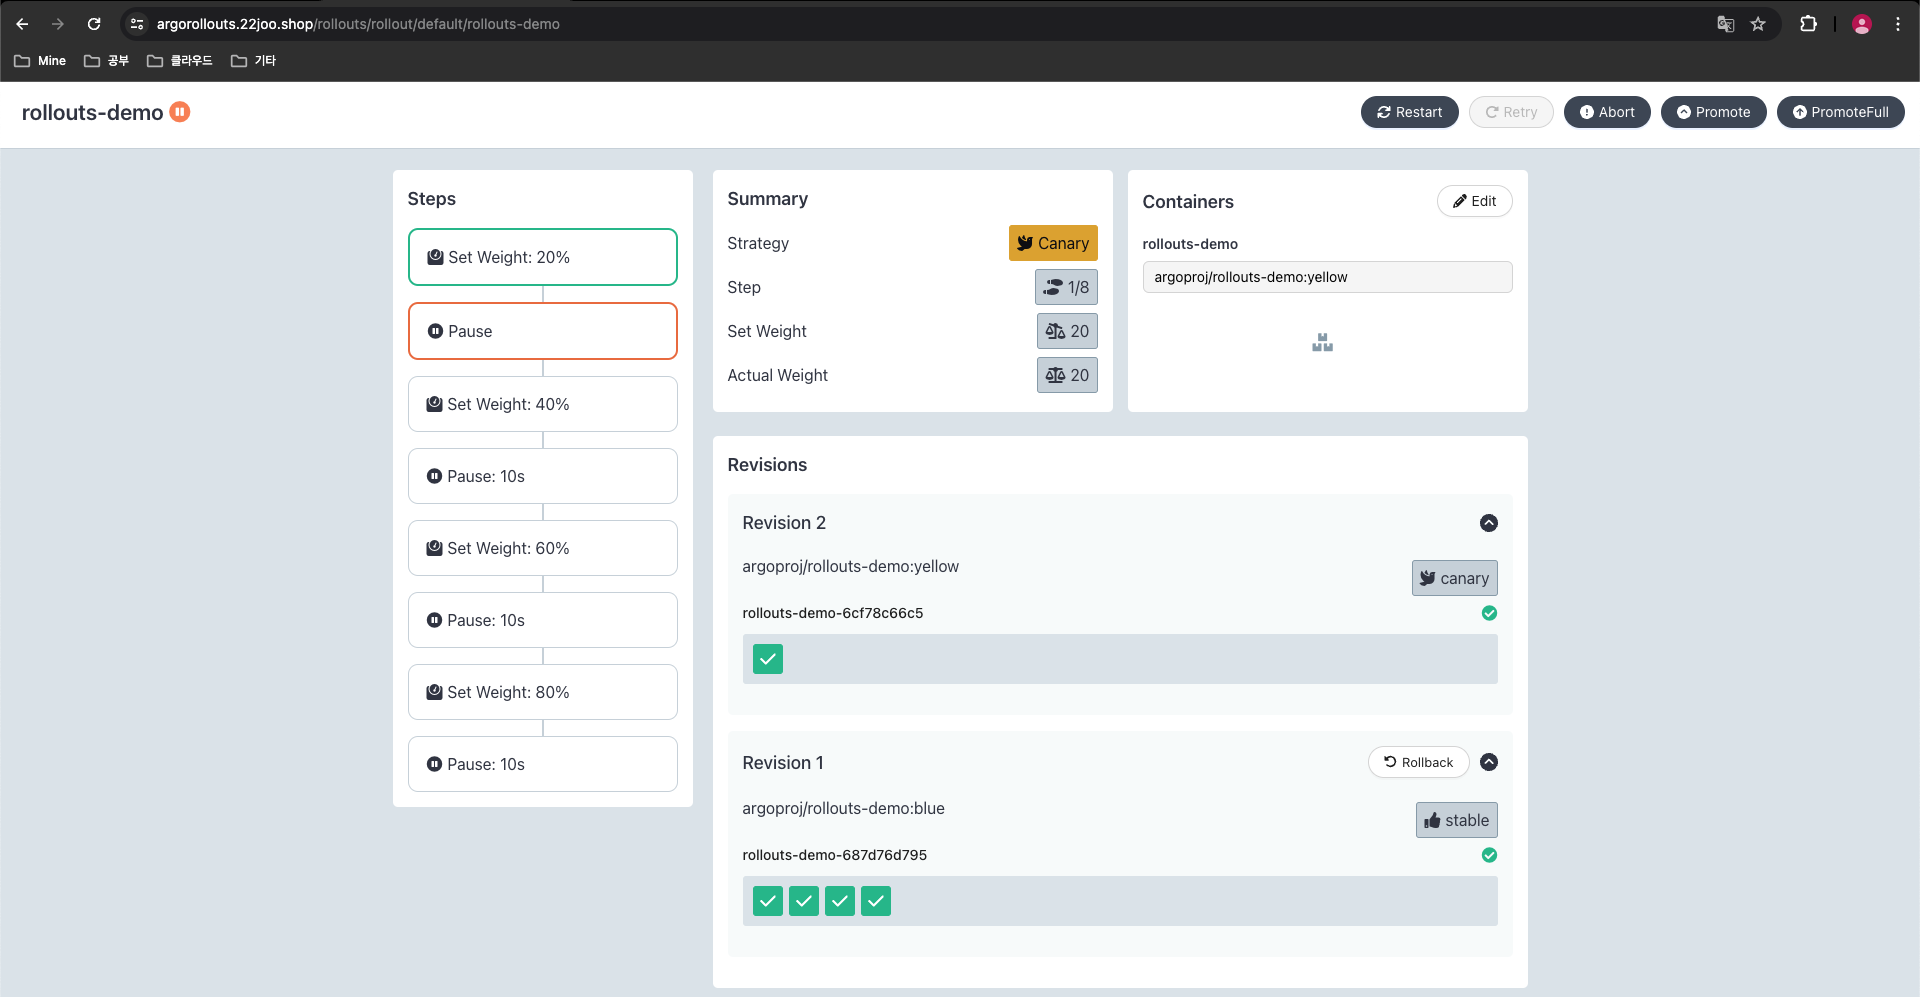
# Run the following command to update the rollouts-demo Rollout with the "yellow" version of the container:
kubectl argo rollouts set image rollouts-demo rollouts-demo=argoproj/rollouts-demo:yellow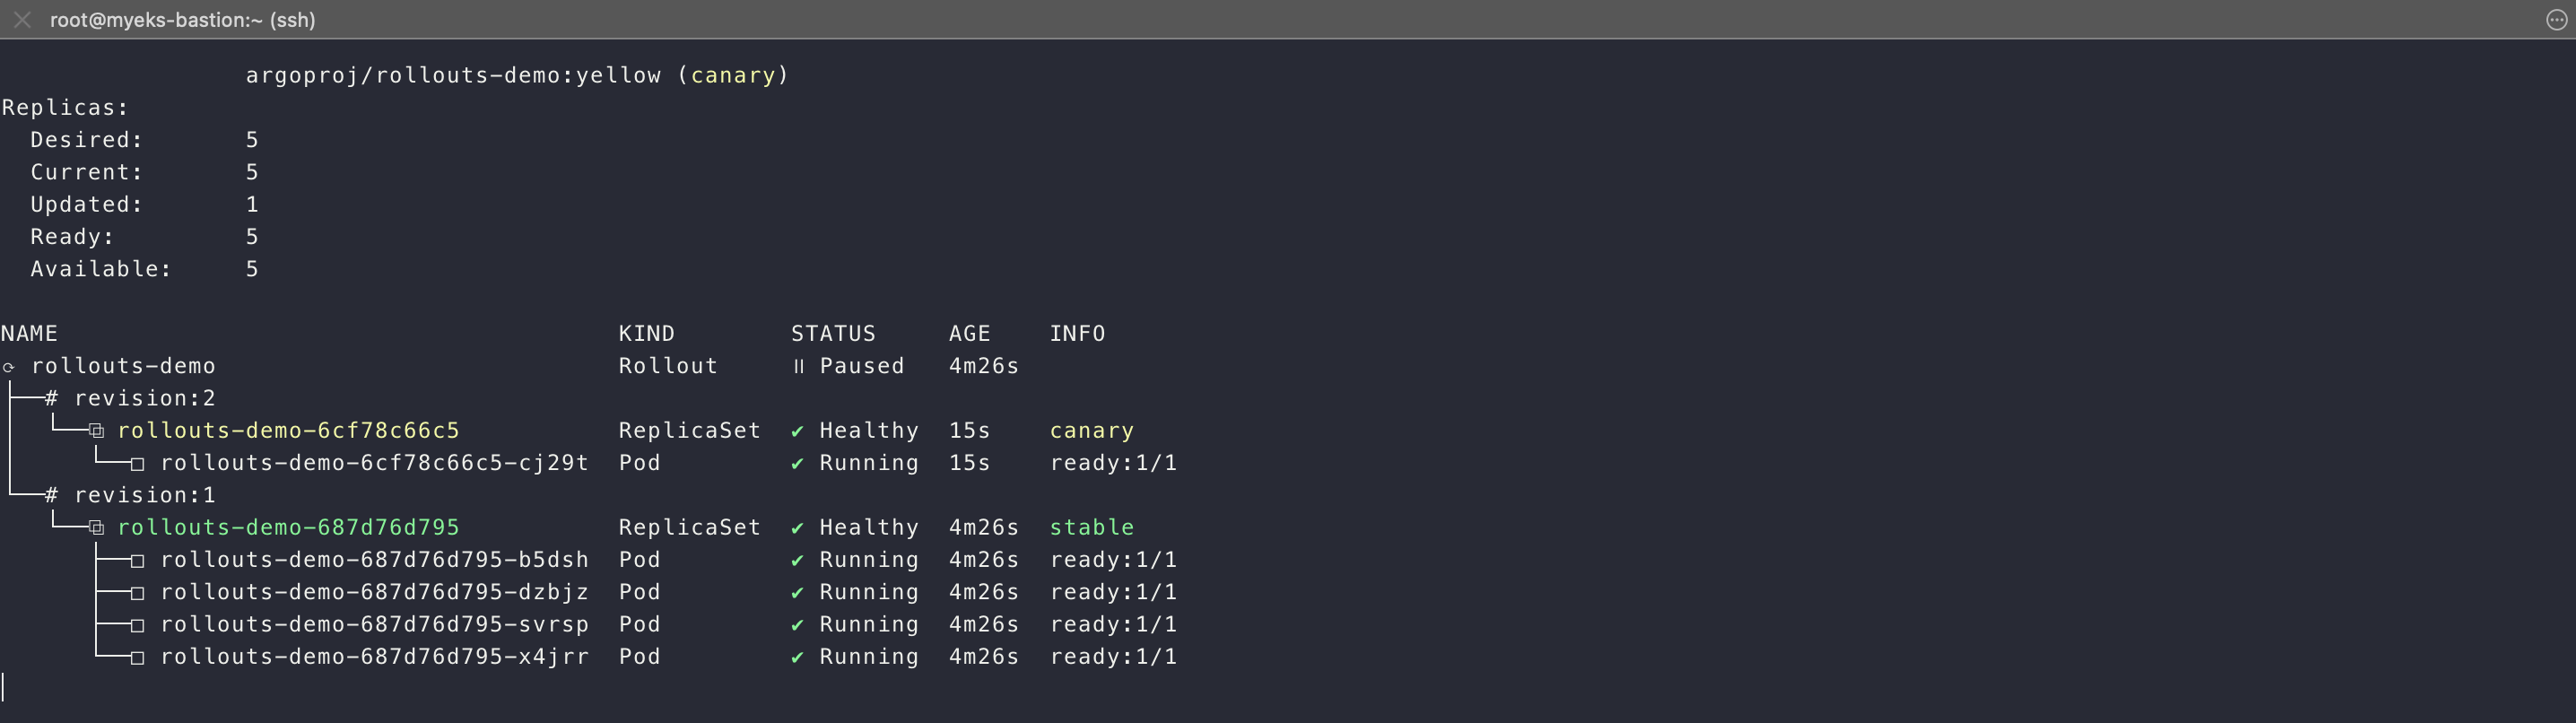
- UI 확인
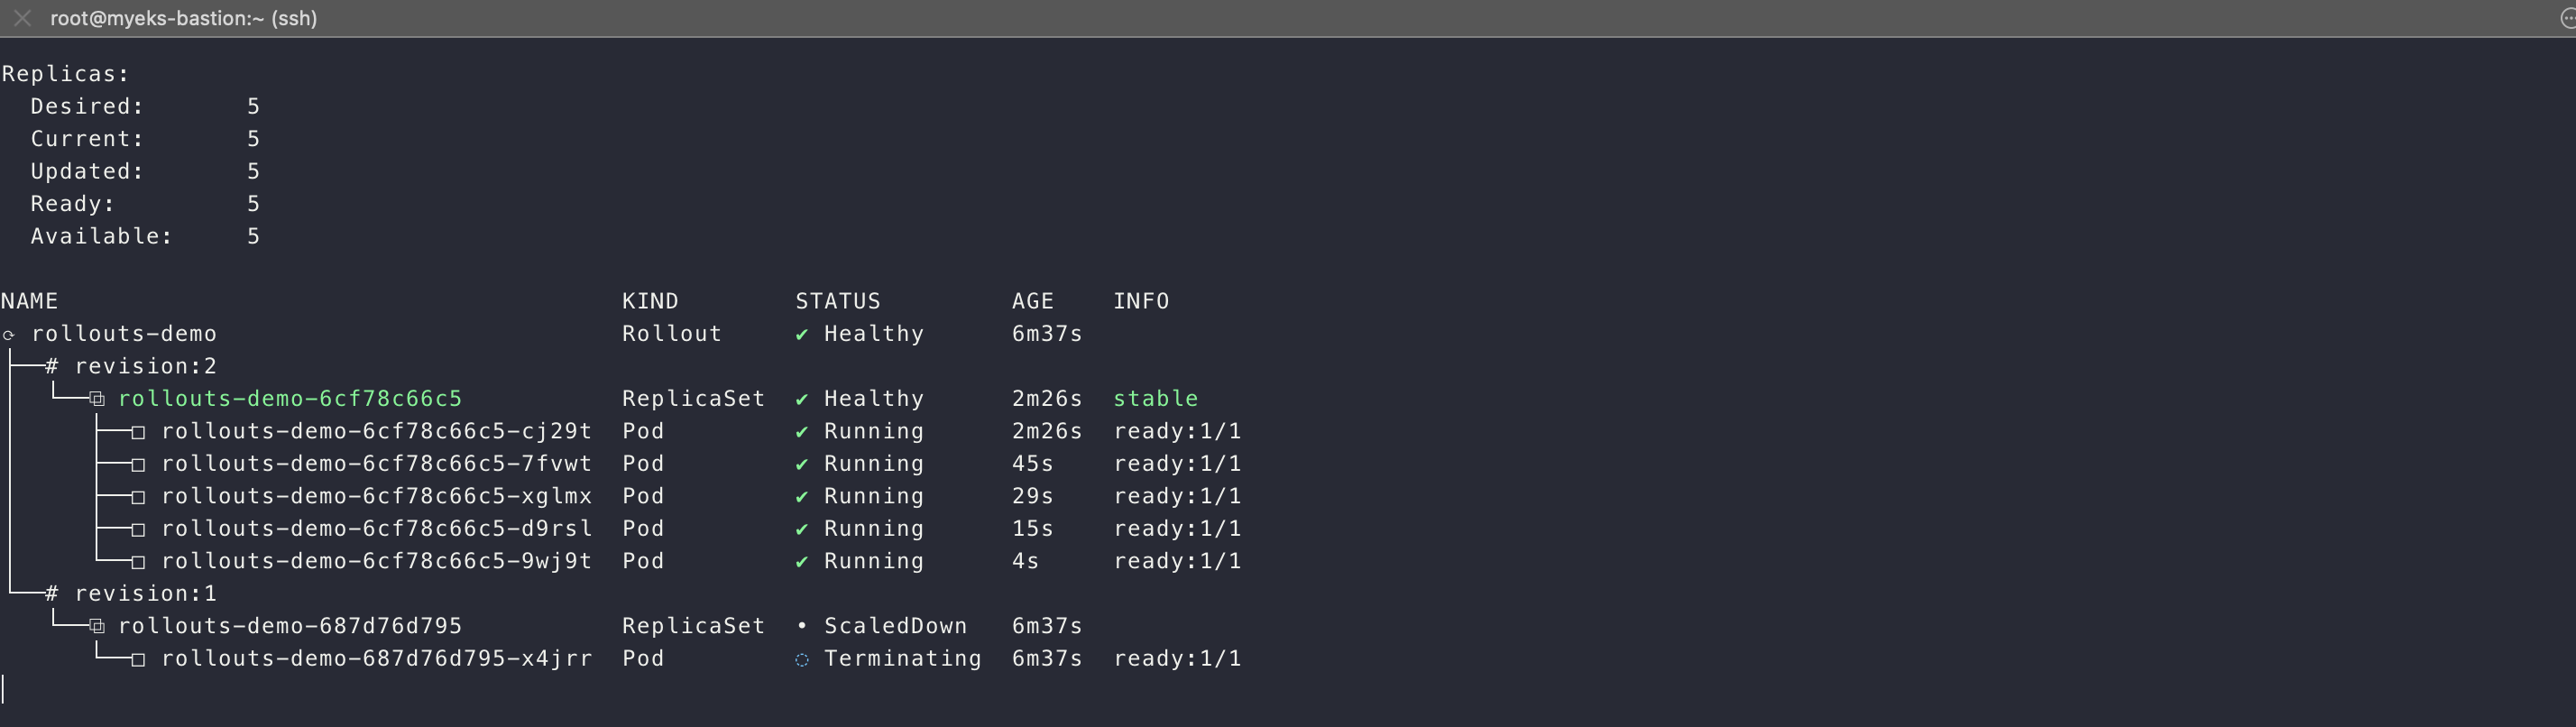
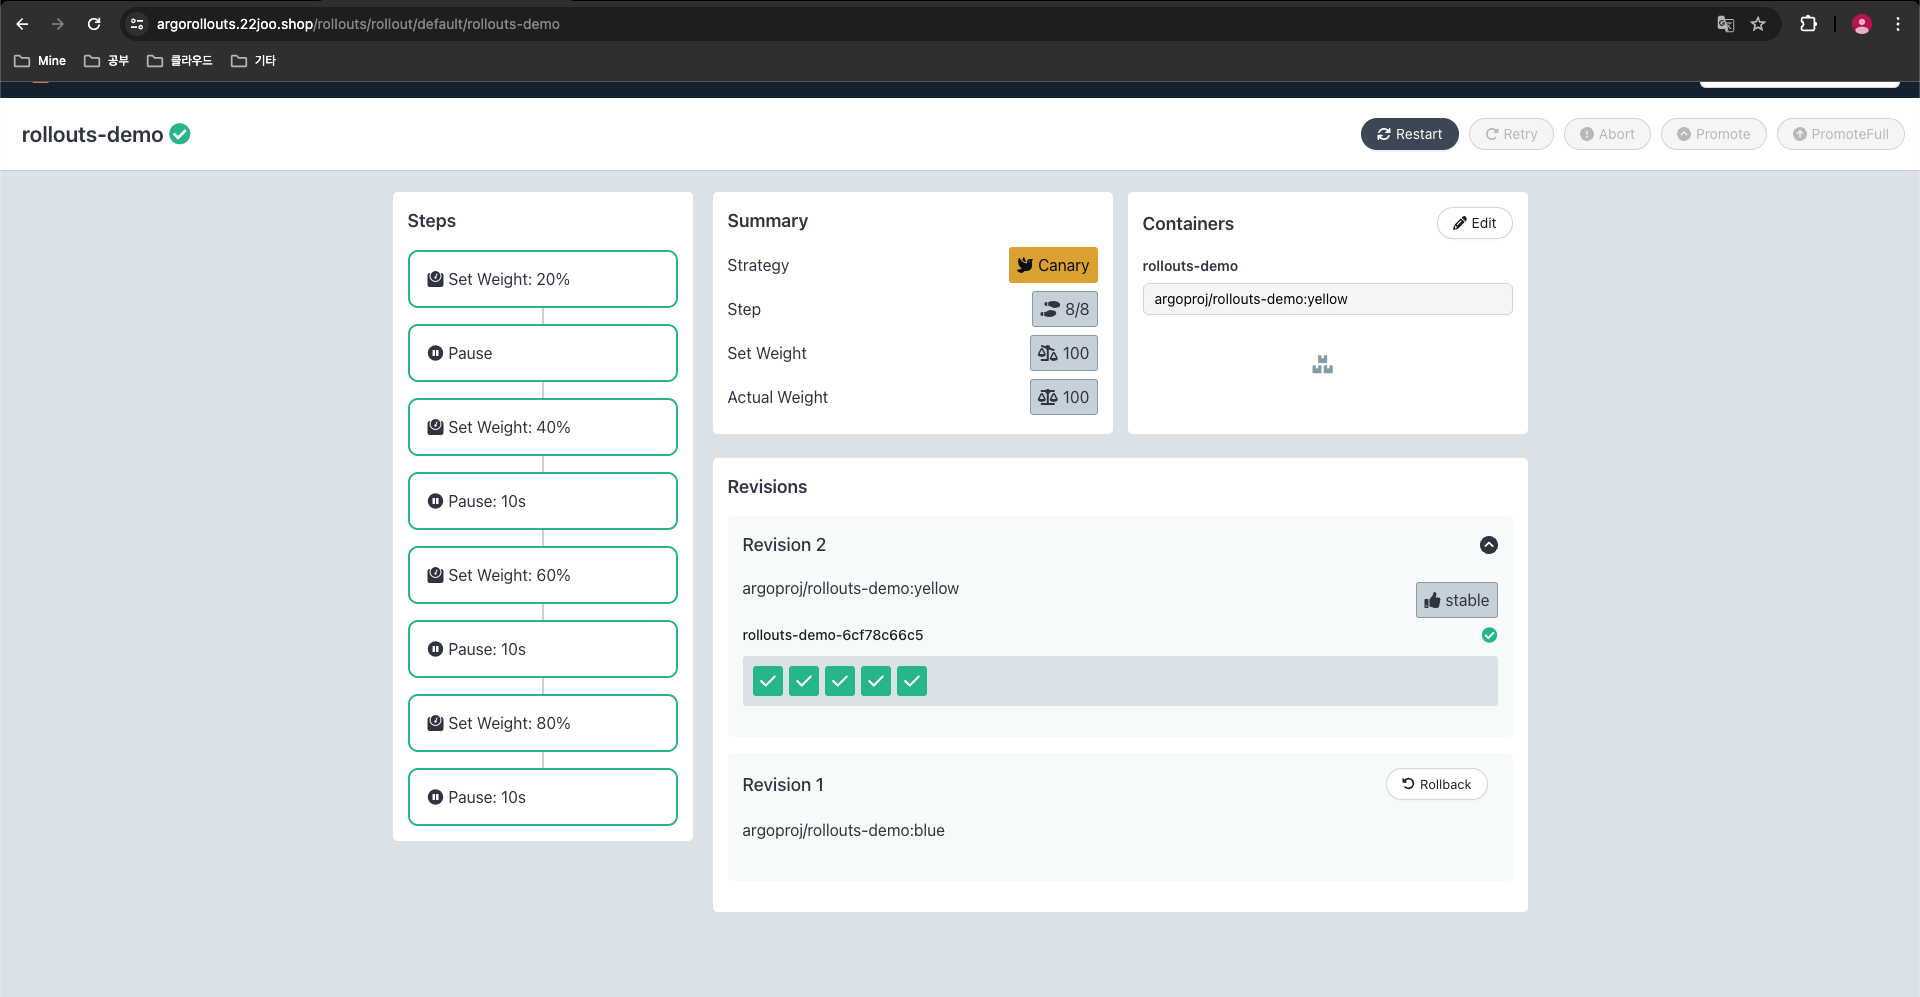
- Promoting a Rollout
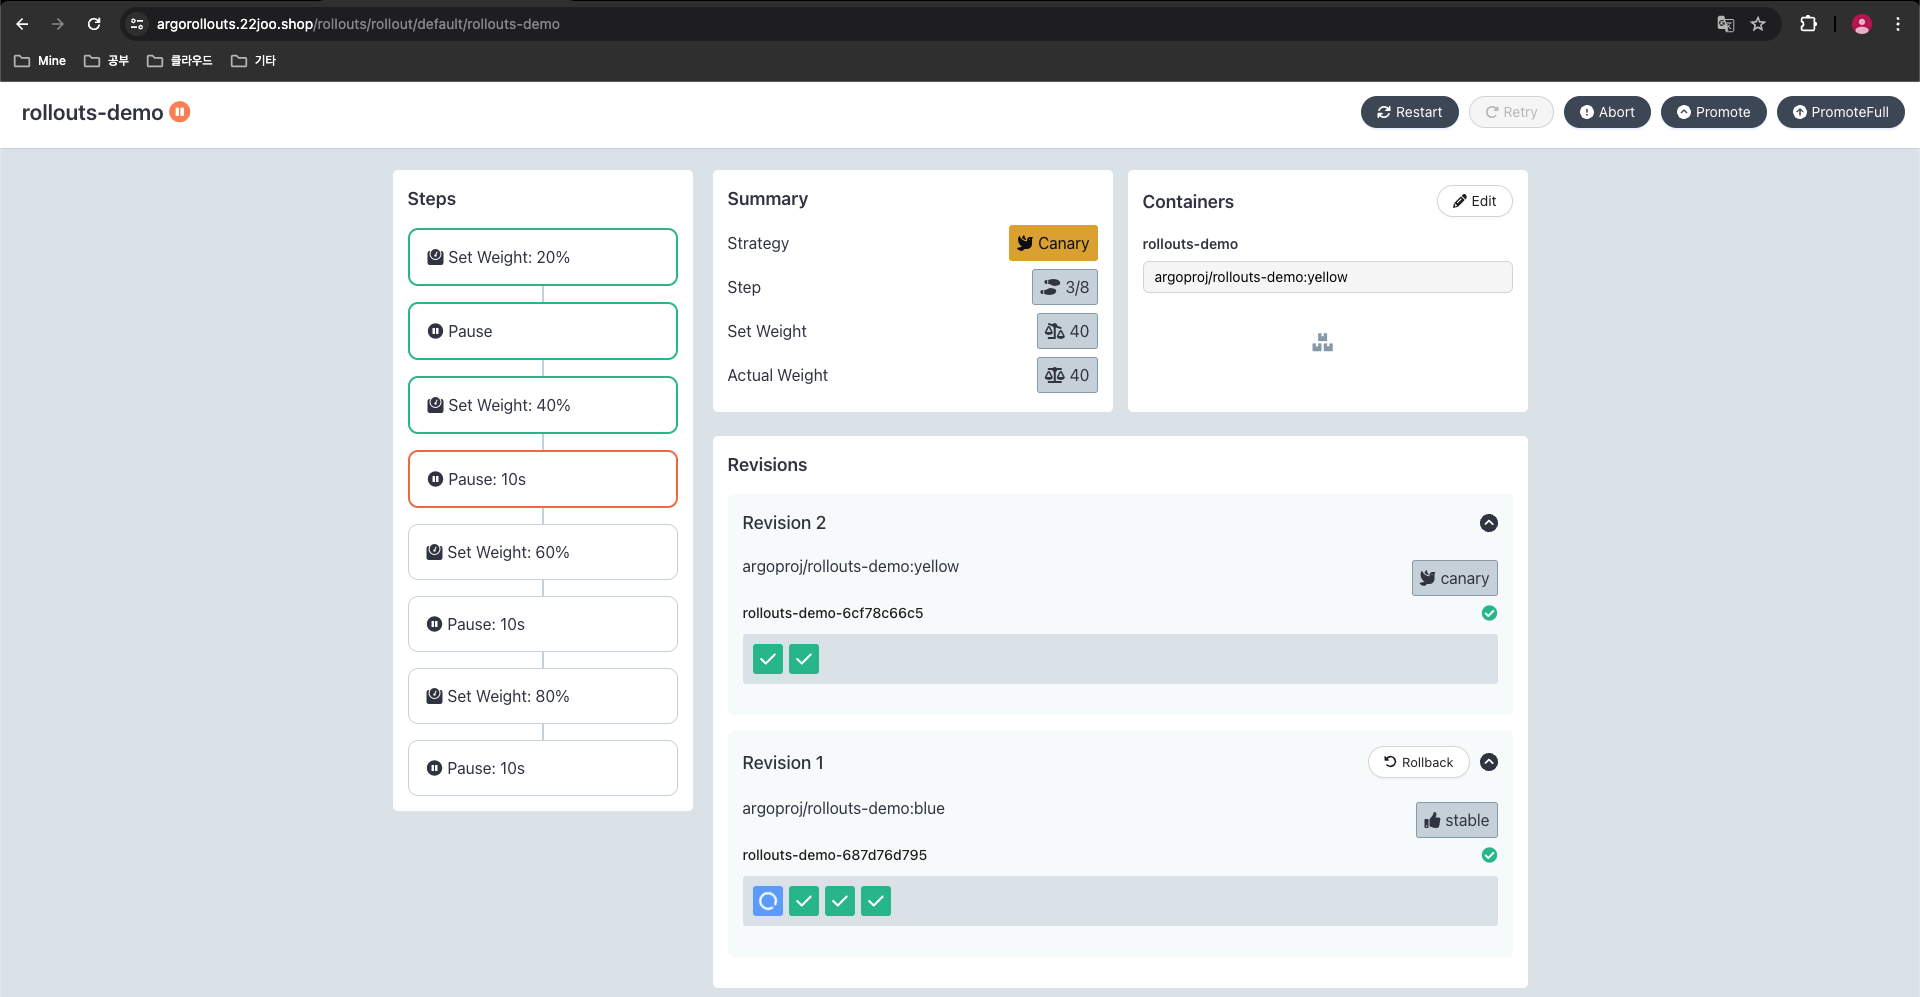
# 아래 입력 혹은 UI에서 Promote Yes 클릭
kubectl argo rollouts promote rollouts-demo

#
kubectl argo rollouts get rollout rollouts-demo --watch
- CLI 확인
- Aborting a Rollout
#
kubectl argo rollouts set image rollouts-demo rollouts-demo=argoproj/rollouts-demo:red

#
kubectl argo rollouts abort rollouts-demo

#
kubectl argo rollouts set image rollouts-demo rollouts-demo=argoproj/rollouts-demo:yellow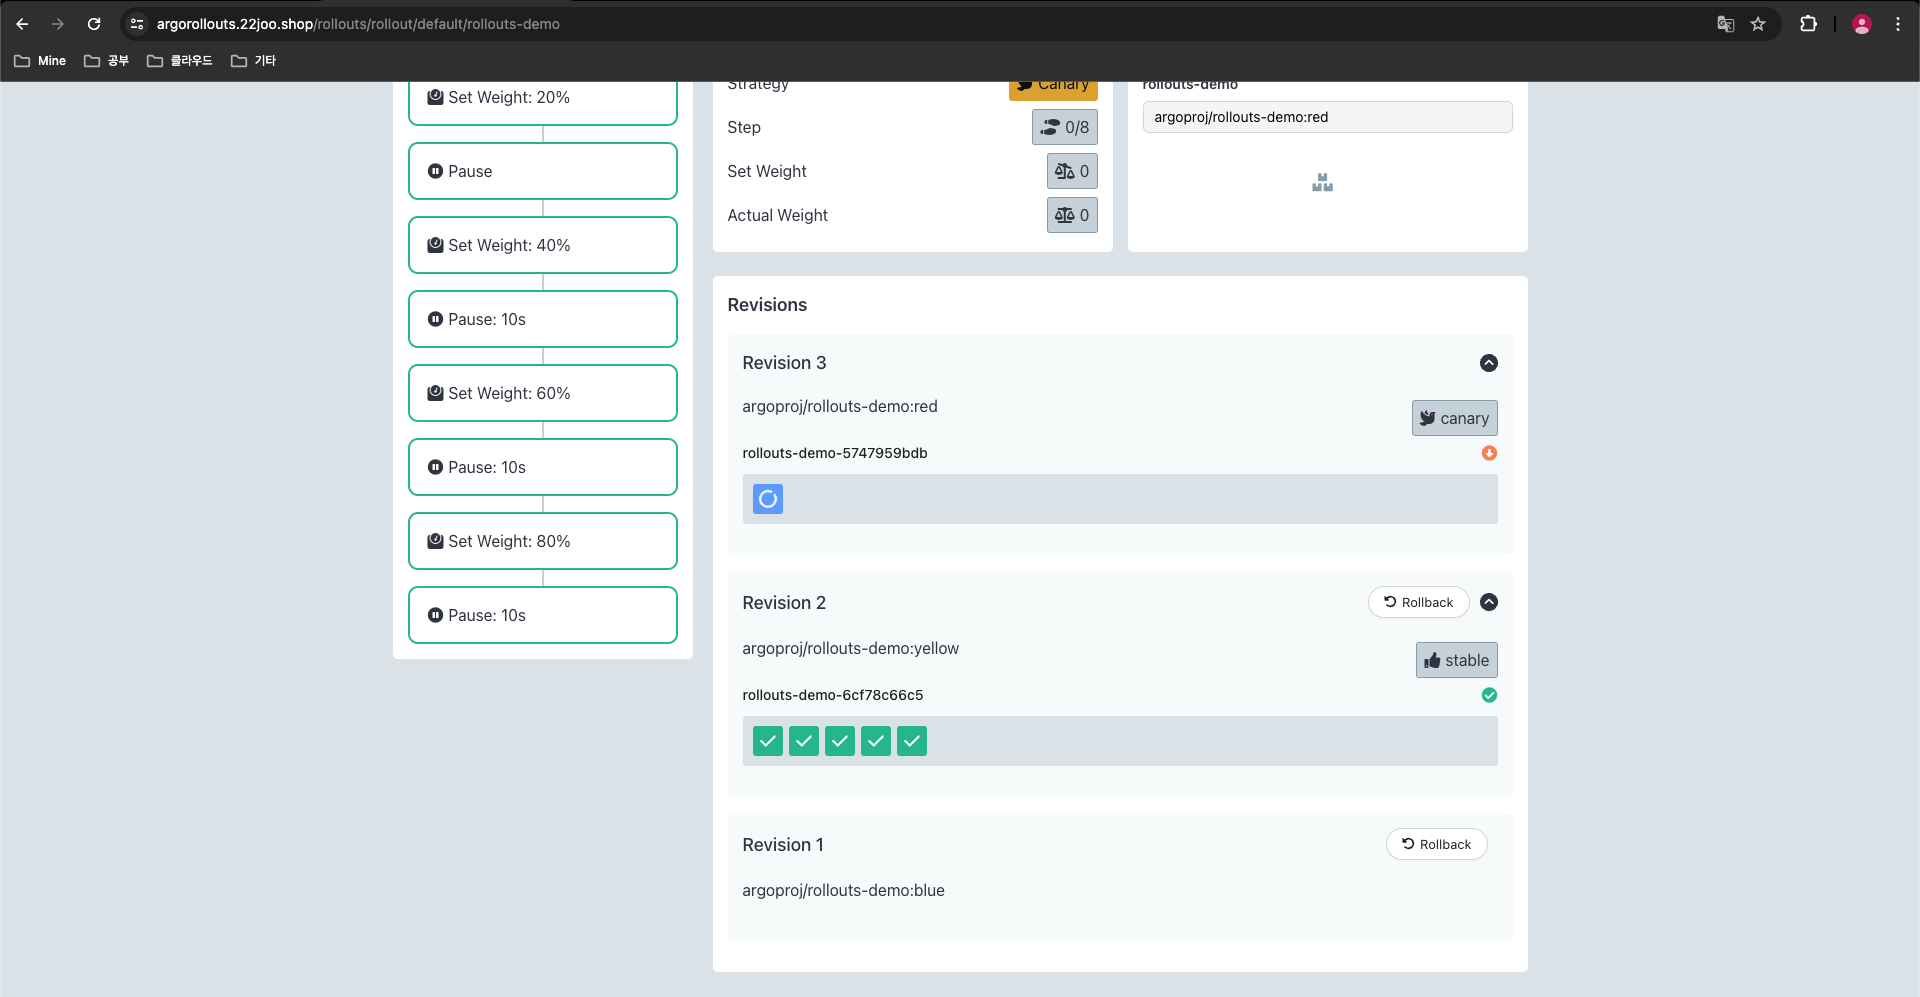
- 이후 처음부터 정상 배포 과정 확인 하기