🧑🏻💻 Xcode 12
macOS Big Sur에서 멋지게 표현되도록 완전히 새롭게 디자인된 Xcode 12는 내비게이터를 위해 맞춤 설정 가능한 서체 크기, 간소화된 코드 완성 및 새로운 문서 탭을 제공합니다. Xcode 12는 기본적으로 Apple 실리콘 기반 Mac을 지원하도록 범용 앱을 빌드합니다. 일반적으로 코드를 한 줄도 변경할 필요가 없습니다.
2020년에 등장한 Xcode 12, Apple Silicon(Apple이 설계한 프로세서)도 지원하고 macOS Big Sur에 최적화되게 바뀌었다나. 나는 12 부터 사용을 해서 기존과 차이점이 뭔지 알 수는 없지만 구글링을 하다보면 이전 버전과 차이점을 알게 된다 ㅋㅋ
🧑🏻💻 Xcode Help
1. Create a project
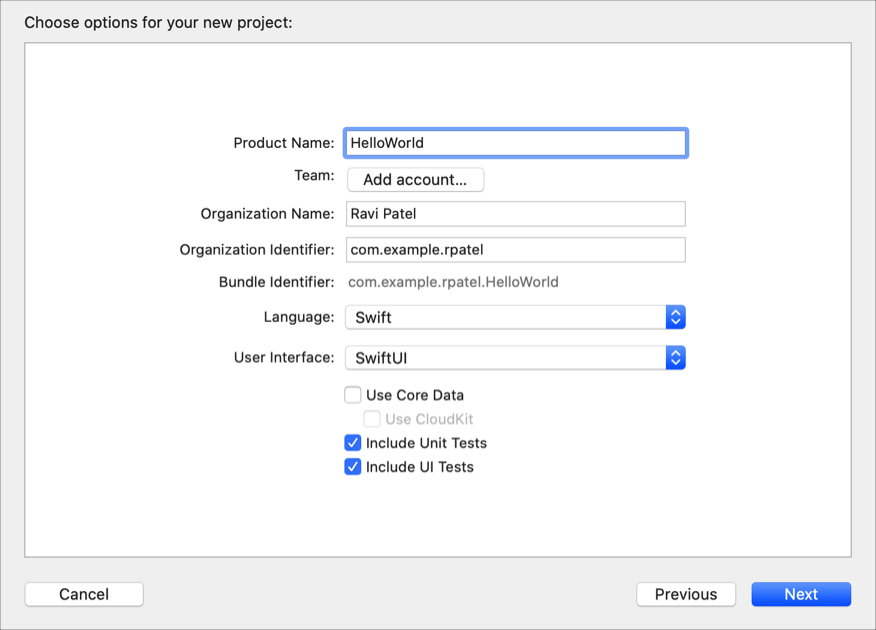
User Interface에는 SwiftUI와 Storyboard가 있다.
Storyboard의 Life Cycle은 UIKit App Delegate
SwiftUI의 Life Cycle은 UIKit App Delegate / SwiftUI App 중에 선택 가능하다.
어떤 환경이나 적용 가능한 SwiftUI가 뜨고 있는데, 우선 Storyboard를 기반으로 시작하려고 한다.
2. About the main window
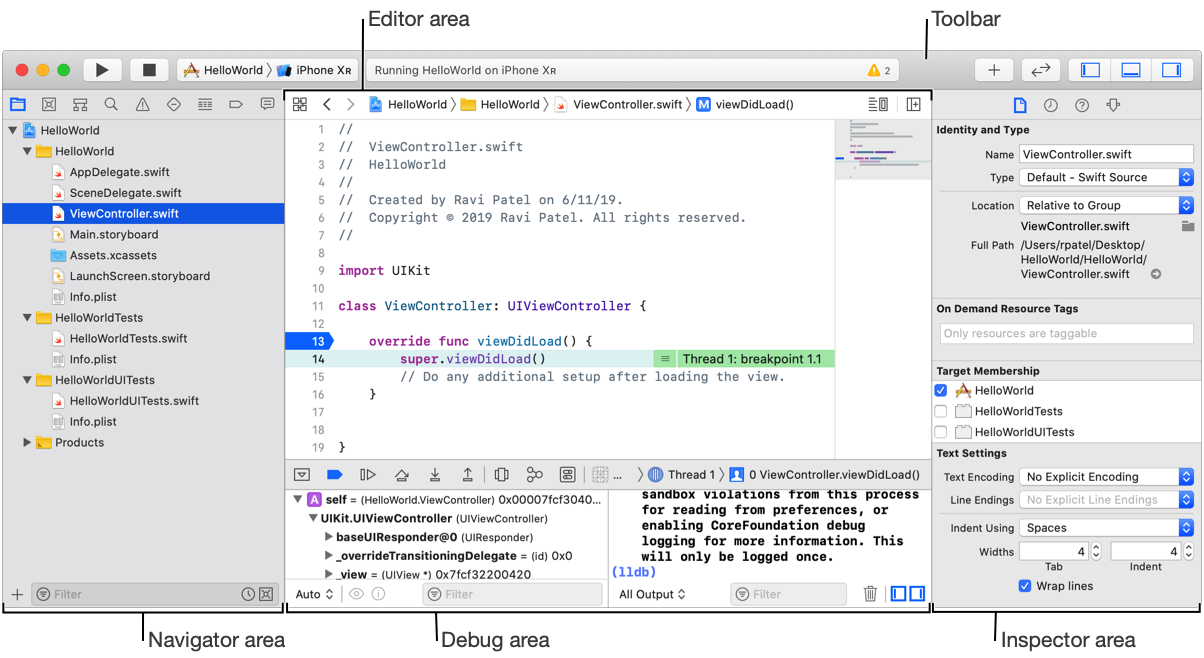
이건 뭐 쓰면서도 점차 익숙해질 화면들이다. Unity IDE 처음 접했을 때가 생각나네. 그래도 알고 보는거랑 모르고 보는거랑 다르니, 이것 저것 만져봤다. 참고로 command + shift + L 은 컴포넌트 추가
🧑🏻💻 정리할 개념들
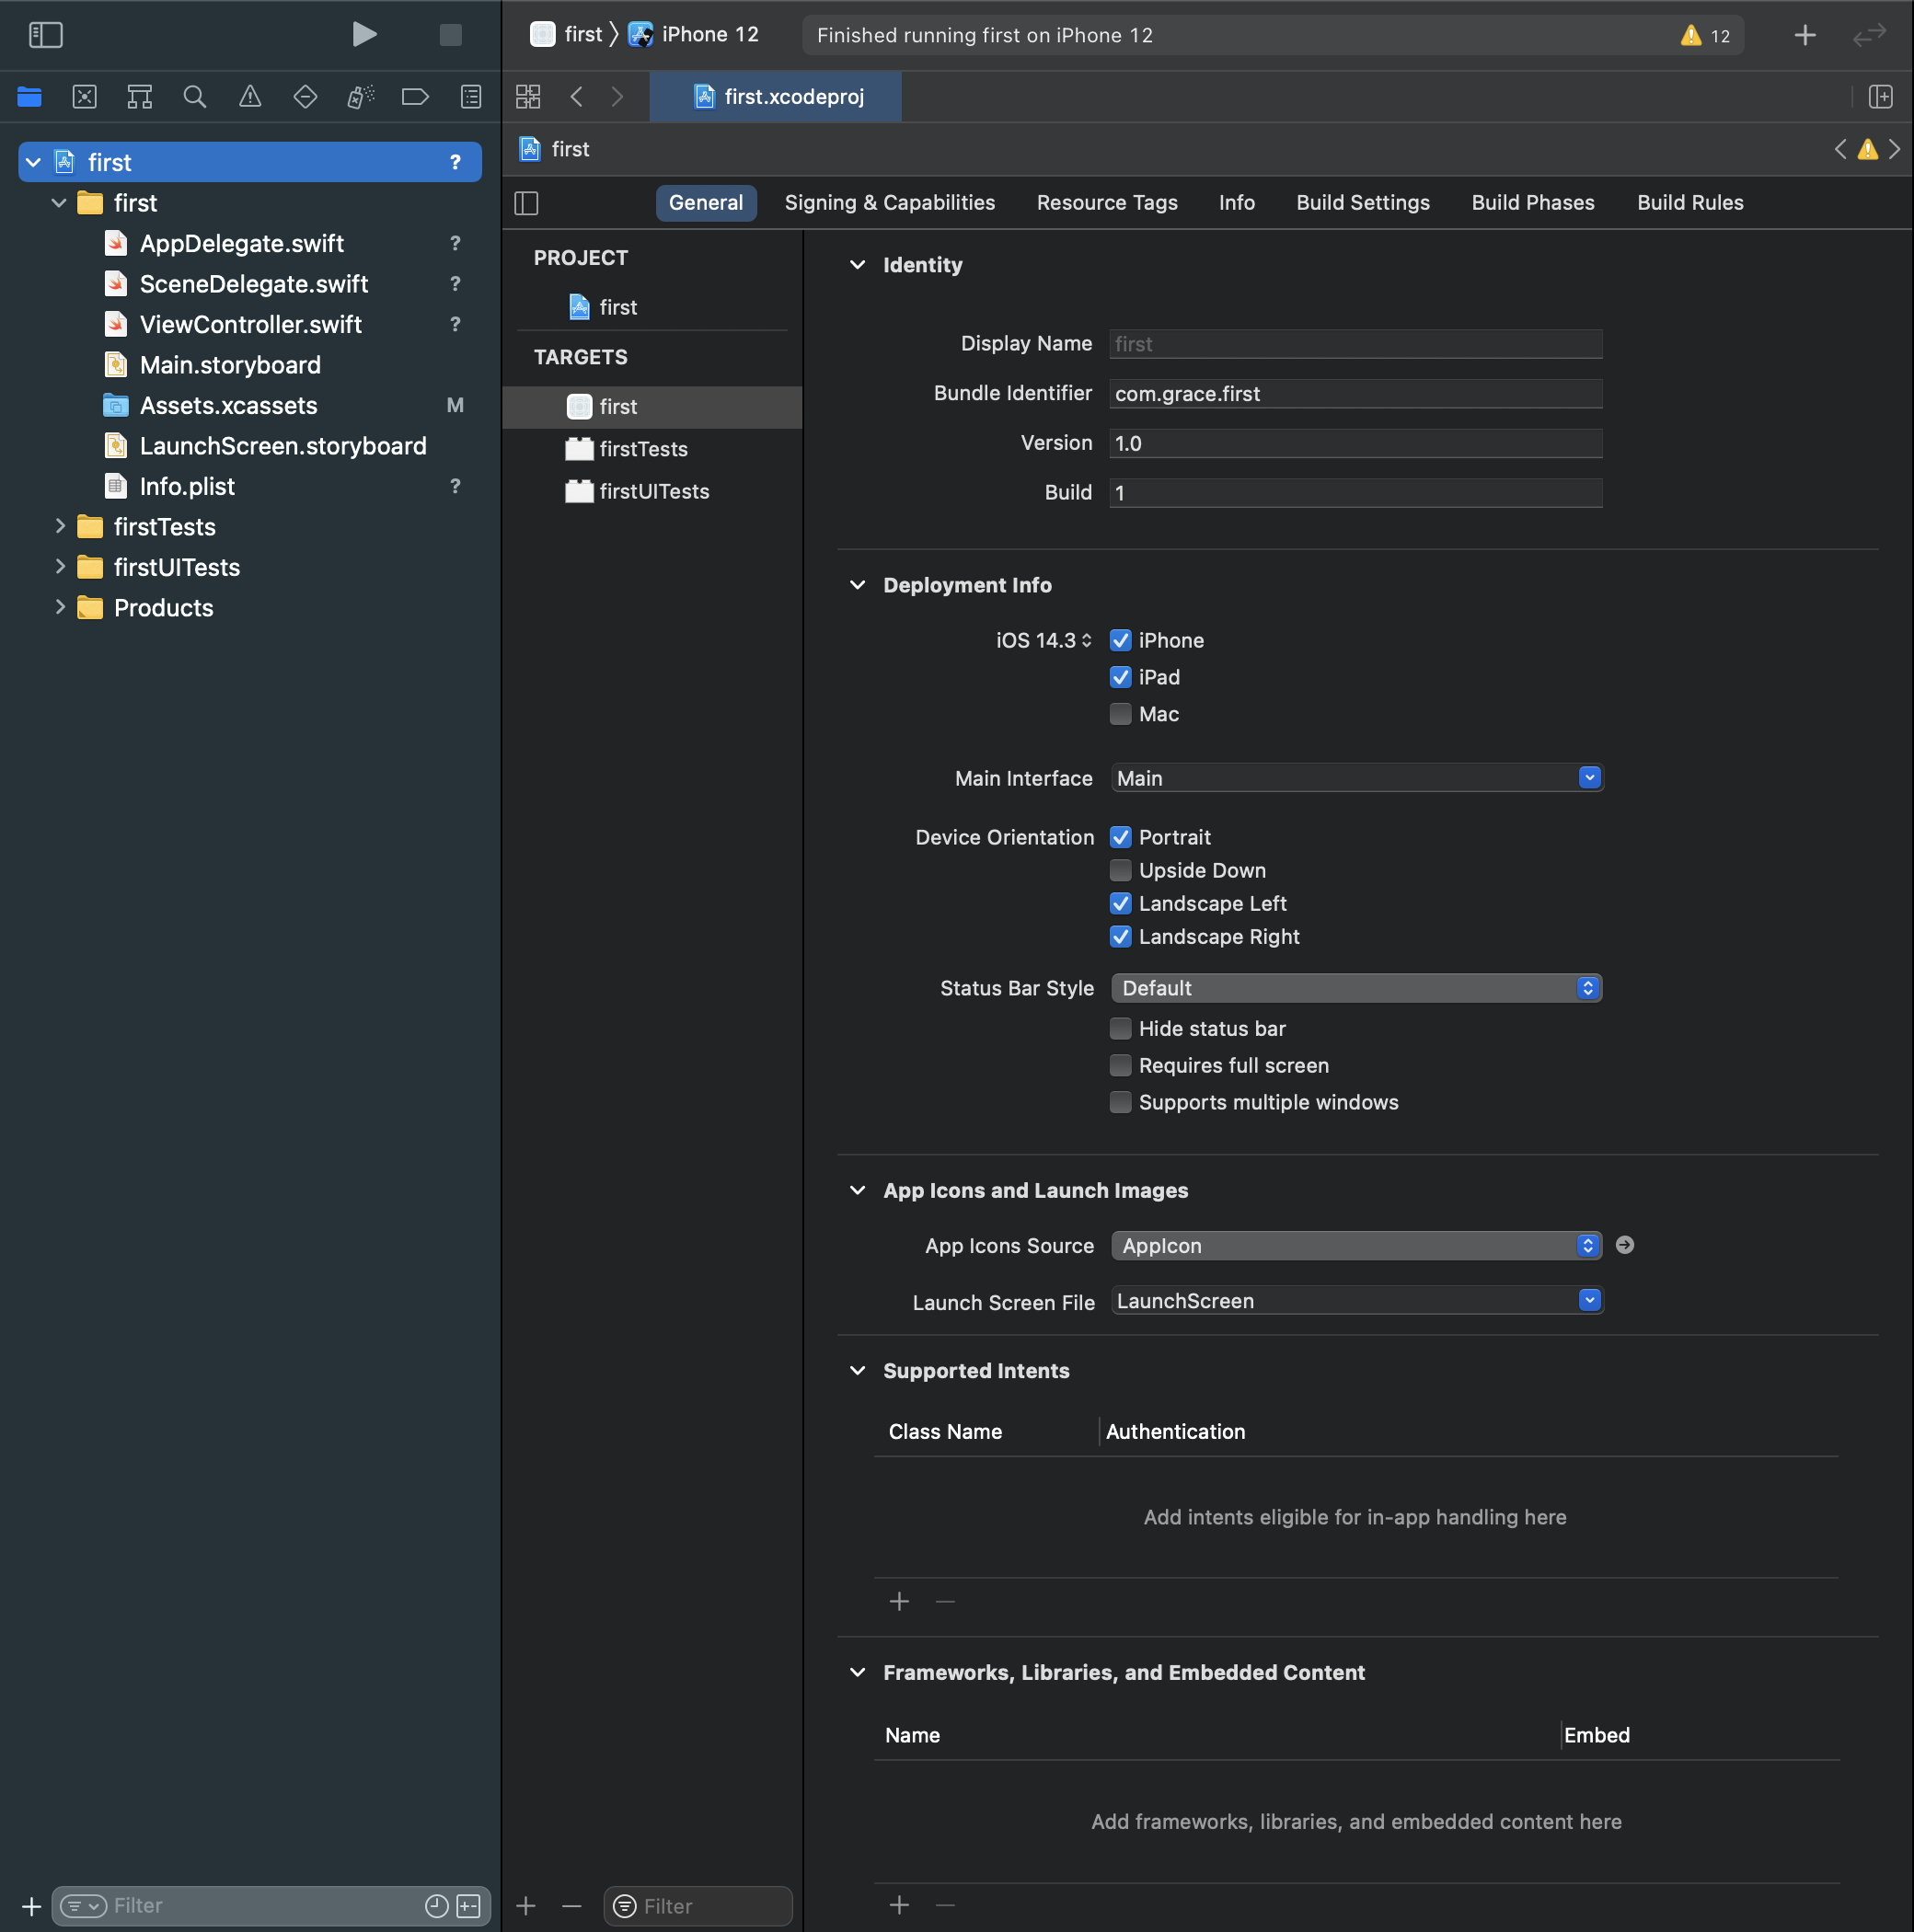
프로젝트를 생성하고 나서 제일 상위 항목을 클릭하면 [프로젝트이름].xcodeproj 가 열린다. PROJECT나 TARGETS에 관한 설정을 할 수 있는 곳이다.
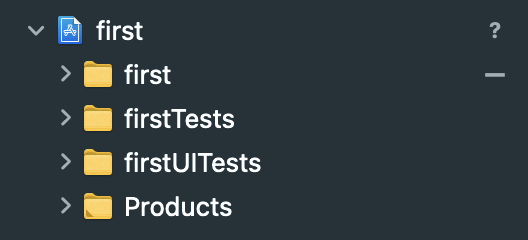
PROJECT와 TARGETS의 차이가 뭘까 구글링하던 중, 이런 글을 발견했다. PROJECT 내부에 여러 TARGETS이 생기는 구조라는 건 알겠는데 도대체 각자 무슨 설정을 해야 하고 어떤 관계일까 궁금했다.
요약하면, 회사에 여러 조직이 있다고 생각하면 되겠다. 회사 전반적으로 다뤄야 하는 공통 규칙들은 PROJECT에서 하고, TARGETS은 당연히 이 규칙을 상속 받는다. 개별적으로 커스터마이징 하고 싶거나 각 조직들의 속성을 부여하려면 TARGETS에 가서 설정해주면 된다. 참고로, 실제 PRODUCT가 되는 것은 TARGET이다.
Test나 UITest를 위한 TARGET도 있고
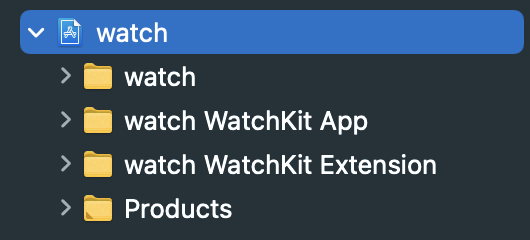
WatchKit App, WatchKit Extension과 같이 iOS APP에 종속적인 watchOS App을 만들 때 생기는 TARGETS도 있다.
이제 PROJECT, TARGETS의 몇 가지 속성들을 간단하게 살펴보자. 두 개 모두 공통으로 갖고 있는 속성도 있고, TARGETS만 갖고 있는 속성도 있다.
1. .xcodeproj
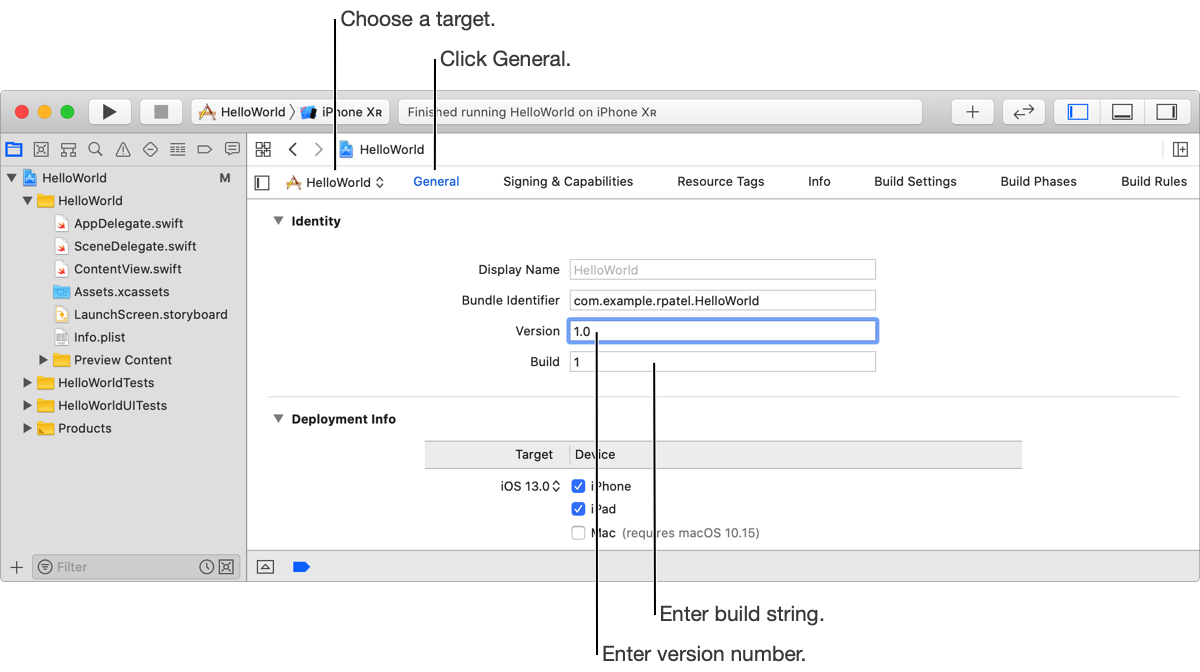
1) General
Adjust the most commonly modified target settings, such as identity, signing, and deployment options.
identity, signing, deployment options와 같이 가장 일반적으로 설정해야 하는 항목들이다.
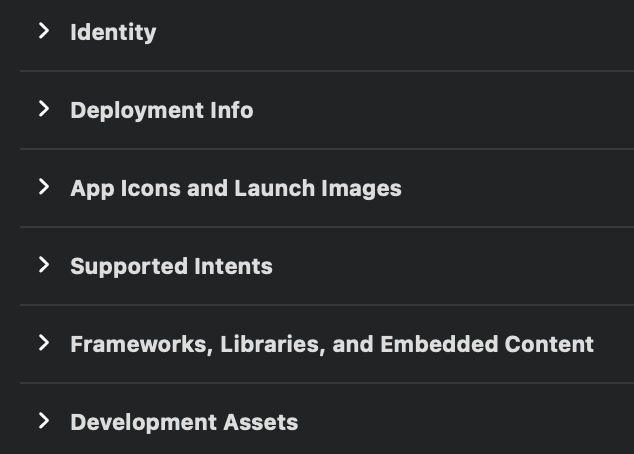
Indentity
(참고)
이 중 Bundle Identifier는 프로그램 식별자이다.
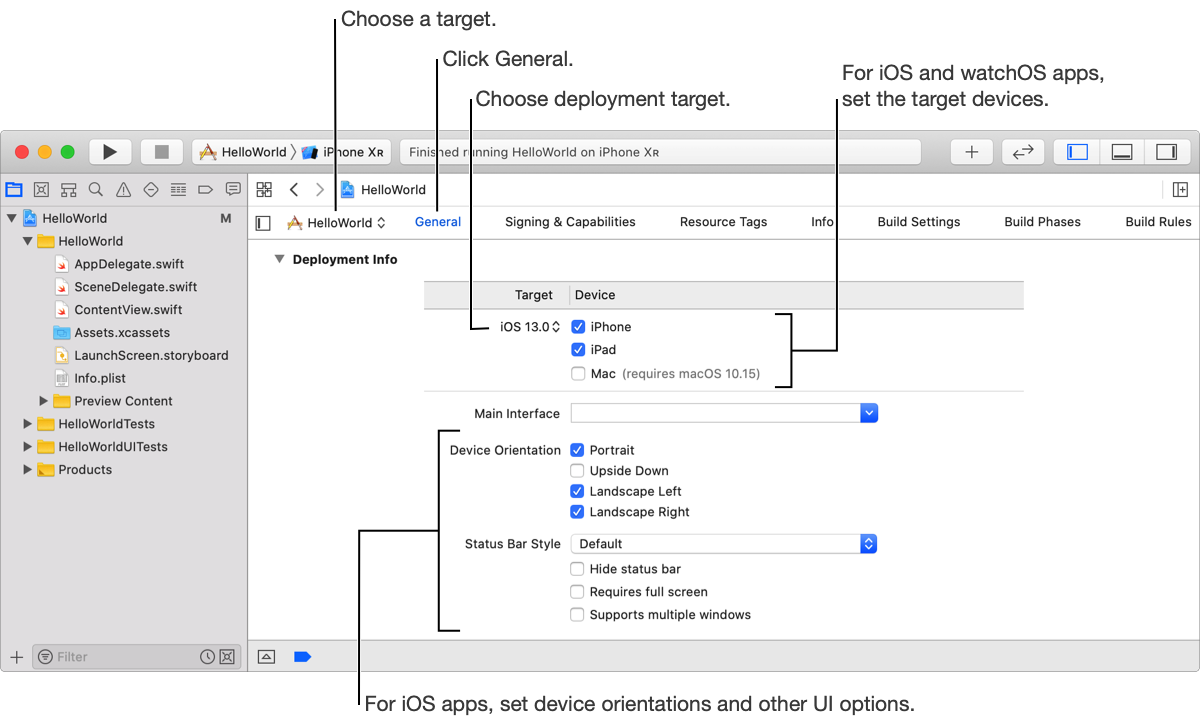
Deployment Info
(참고)
App Icons and Launch Images
(참고)
Supported Intents
(참고)
가령, 어떤 App이 SifiKit와 상호작용을 하려면 Intents가 필요하다. 이럴 경우 Supported Intents에 추가해줘야 한다.
Frameworks, Libraries, and Embedded Content
(참고)
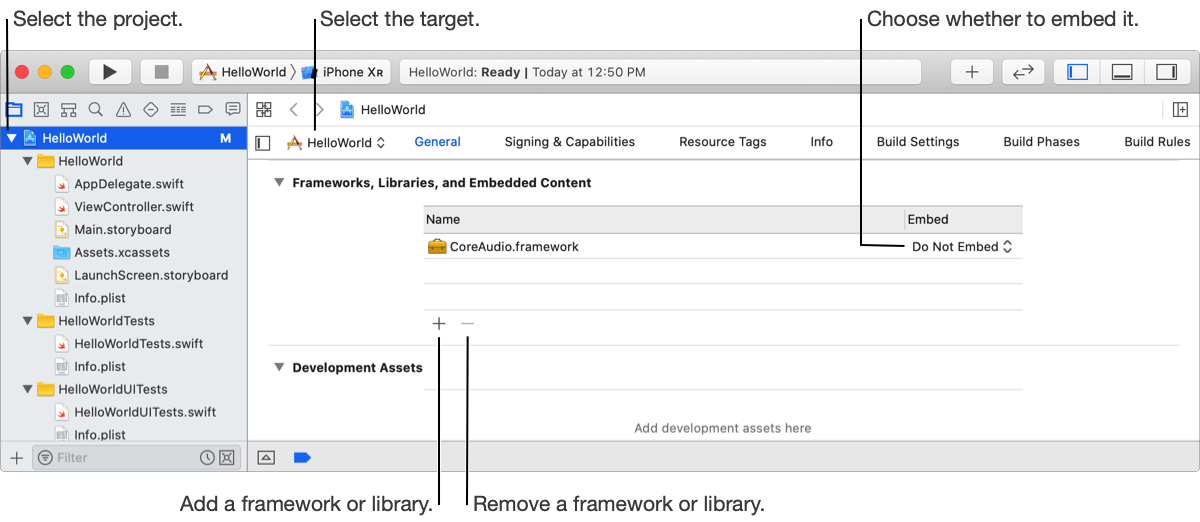
Development Assets
PRODUCT에는 넣지 않고 DEVELOPMENT 단계에서만 쓰고 싶은 Assets들을 넣을 수 있는 곳이다.
(참고) WWDC19 Mastering Xcode Previews
2) Signing & Capabilities
Code sign your app and enable app services, such as Push Notifications, CloudKit, Game Center, and In-App Purchase.
Signing
Team, Bundle Identifier, Provisioning Profile 등을 설정하는 곳이다. 앱 배포, 다른 서비스(In-App Purchase 등) 사용 시에 반드시 필요하다.
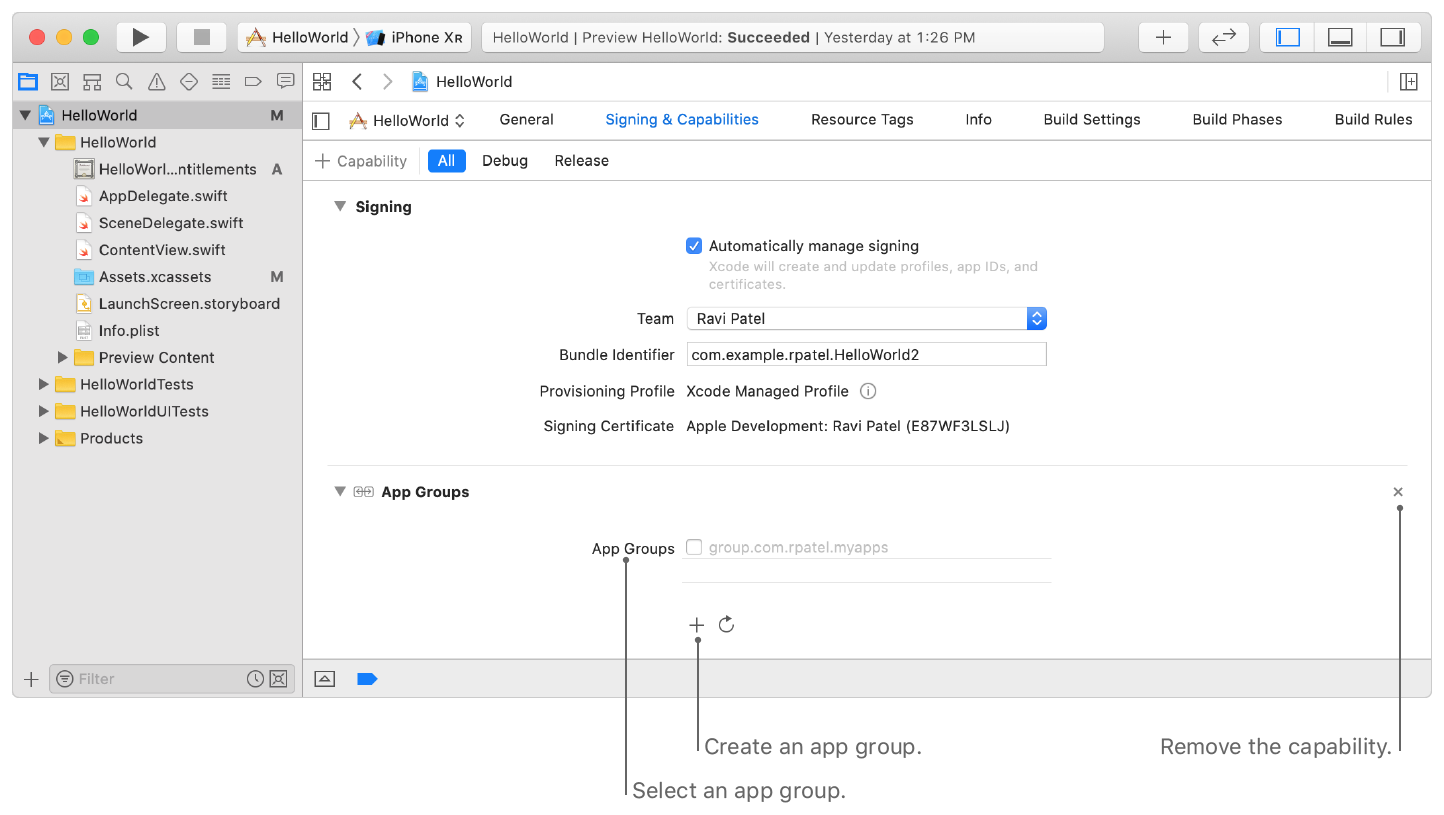
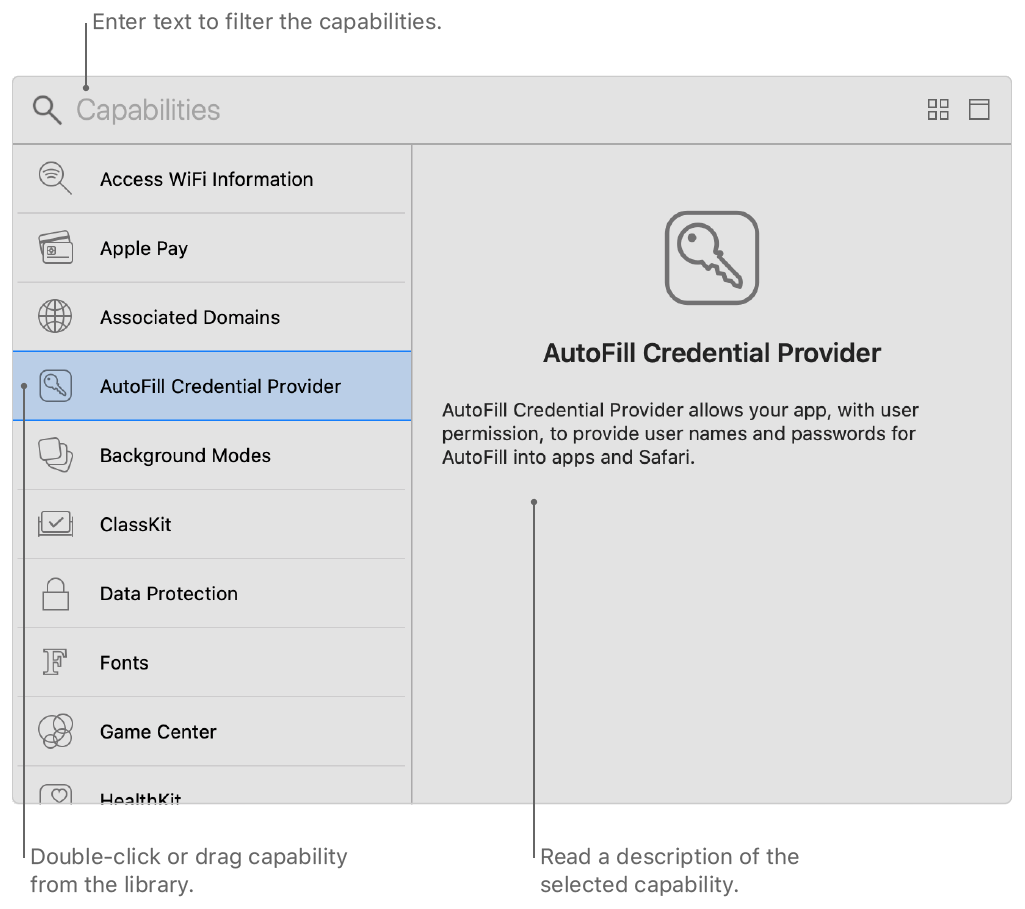
Capabilities
push notifications, Apple Pay와 같은 Apple의 앱 서비스를 구성하는 기능을 추가할 수 있다. 다음은 Capabilities List 일부이다.
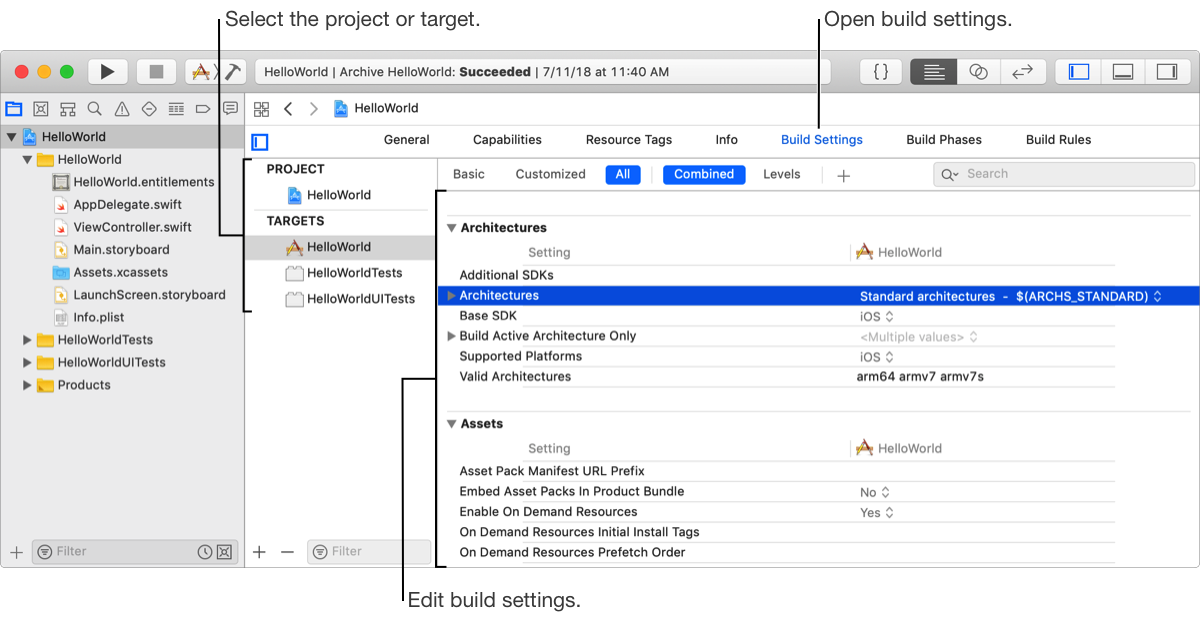
3) Build Settings
Customize options that affect the behavior of the build system while building your project. See Build settings reference.
빌드 되는 방법을 설정하는 곳이다.
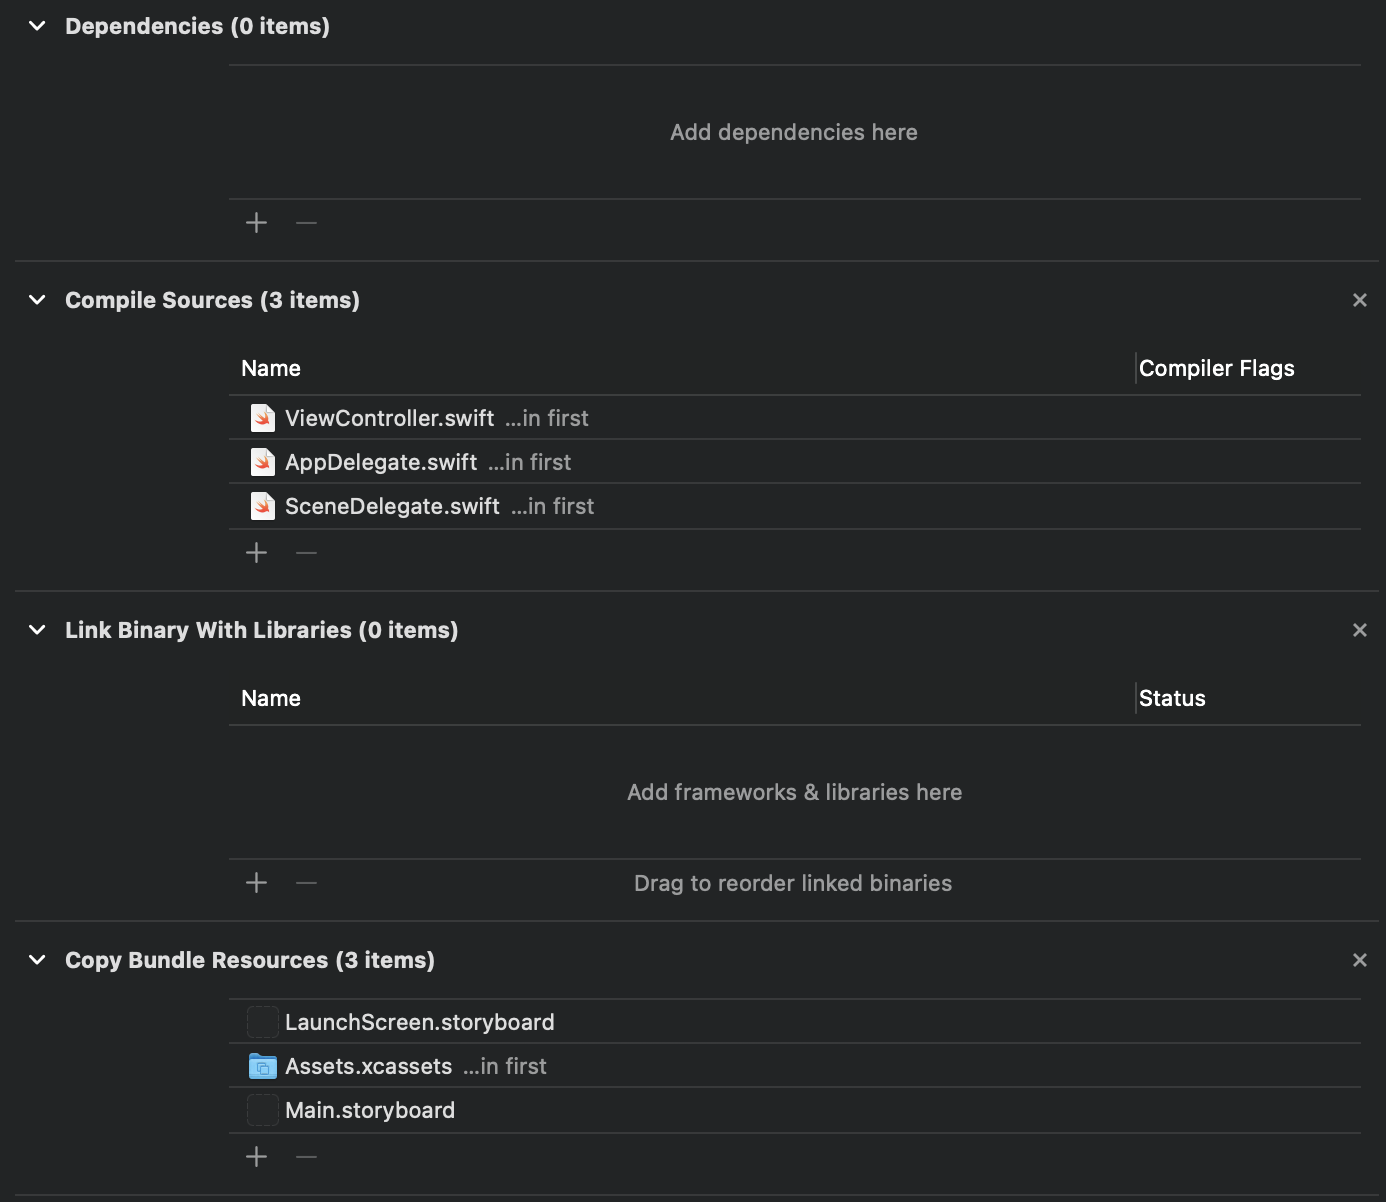
4) Build Phases
Edit and reorder tasks performed by the build system while building your project, such as running a script, copying files, or linking to frameworks.
빌드 시 수행하는 작업들을 설정하는 곳이다. 소스 코드 컴파일(Compile sources), PRODUCT에 리소스 복사(Copy bundle resources) 등이 있다.
2. Info.plist
(참고)
Information Property List의 줄임말로 Bundle을 설명해주는 key-value 쌍들의 집합이다.
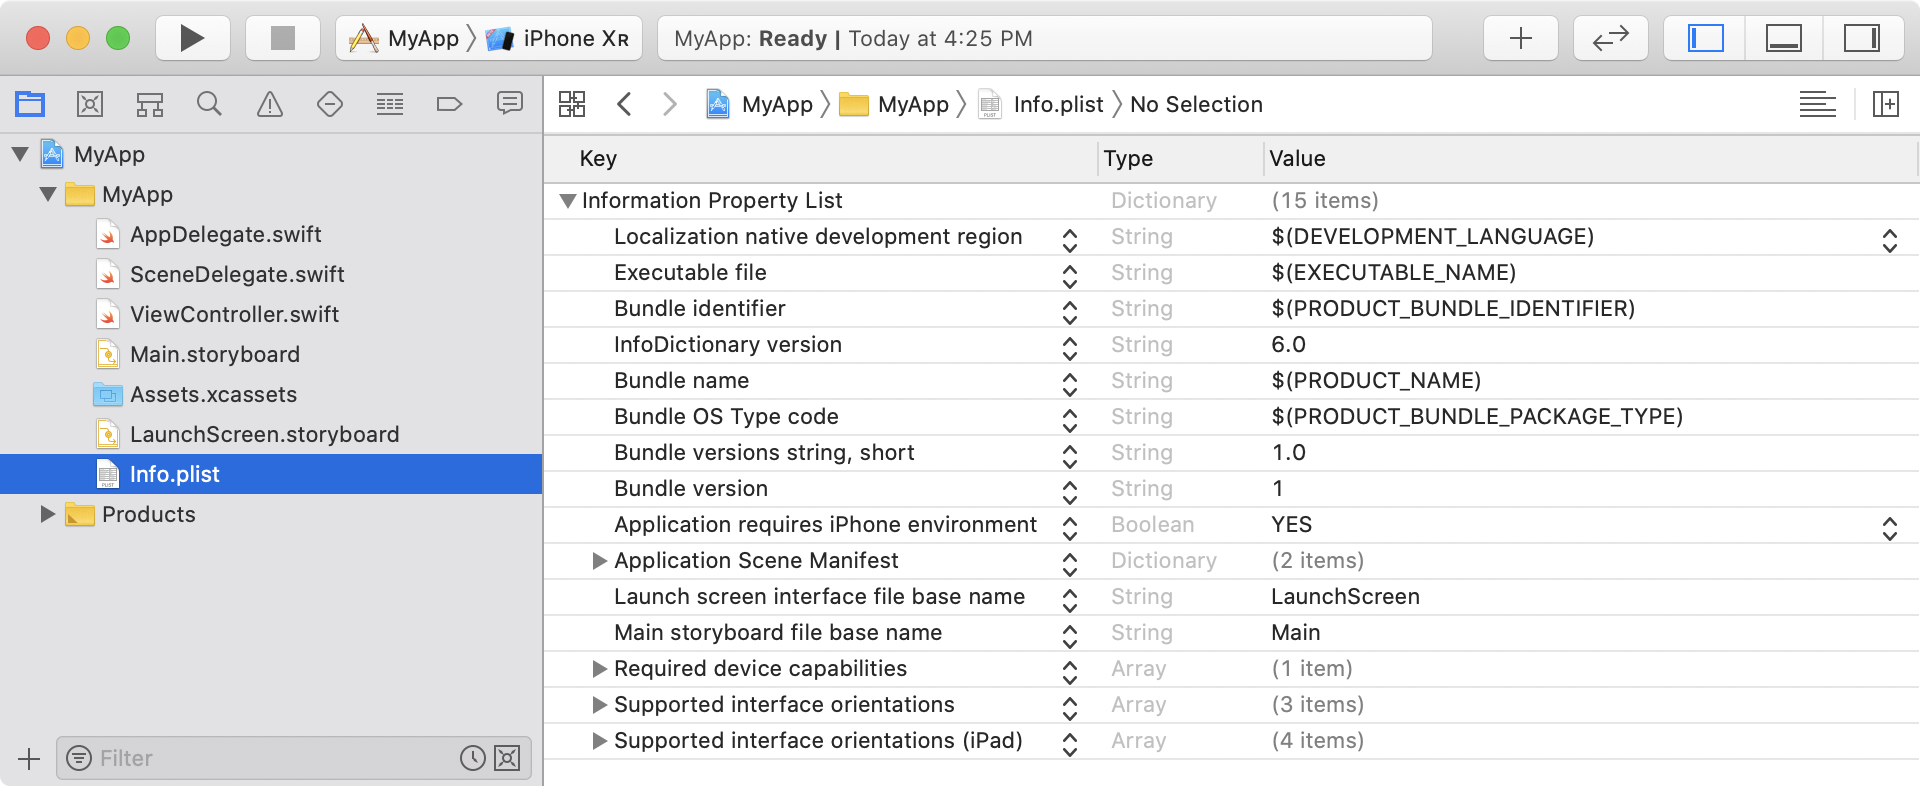
내부 구성요소들은 executable type이나 platform에 따라서 매우 다양하기 때문에 그 때 그 때 익혀두는 것이 좋겠다.
몇 가지만 살펴보면 Bundle identifier($(PRODUCT_BUNDLE_IDENTIFIER))같이 빌드 타임에 결정되는 값도 있고 Launch screen 이나 Main Storyboard처럼 Xcode가 파일을 만들 때 자동으로 설정하는 값들도 있다. 맨 윗 부분의 Localizaion은 다양한 언어에 대응할 수 있는 방안이다. Localizaion을 설정하면 각 국의 언어에 맞게 App을 사용할 수 있다.
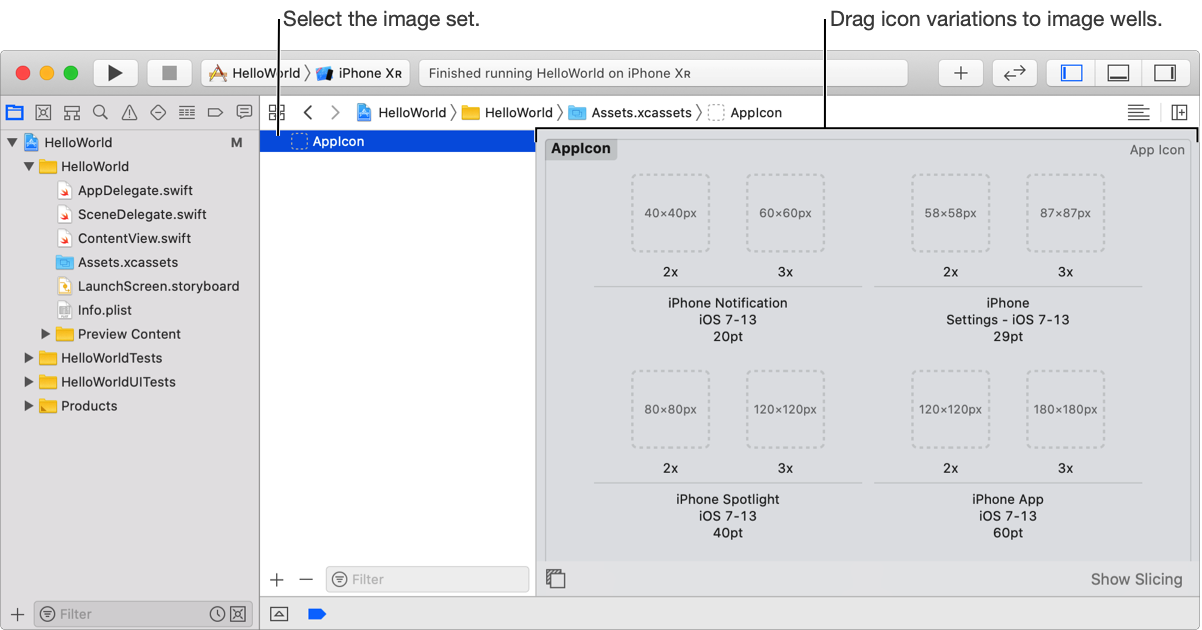
3. Assets.xcassets - icon, image, color
(참고)
icon, image, color, data 등의 Assets을 추가할 수 있다.

4. Interface - Storyboard, SwiftUI
Storyboard와 SwiftUI를 비교하기 전에, Code로 짠다느니 xib를 쓴다느니 헷갈리는 개념들이 많아 먼저 정리해보기로 했다.
xib? Storyboard? Code?
구글링 하다가 찾은 브랜디 블로그 글인데,
iOS Graphic Interface 살펴보기
설명도 잘 되어 있고 마지막 말이 참 와닿는다. (그때를 생각하면 이제 막 iOS 개발을 시작하는 분들께 하나라도 더 도와주고 싶답니다. 지금 막 iOS 개발자가 되었나요? 그렇다면 이 포스팅은 분명 당신의 검색 한 번, 실수 한 번을 줄여줄 수 있을 겁니다.)
xib, Storyboard, Code로 짜기
iOS User Interfaces: Storyboards vs. NIBs vs. Custom Code
이 글에 대한 번역본이 많았는데, 모두 잘 번역된 첫번째, 표로 정리 잘 되어 있는 두번째 참고.
대강 요약해보면 Storyboard는 전체 흐름을 알 수 있고, ViewController와 유기적 구성이 되어 있어서 사용하기 용이한 점이 있다. NIB( 혹은 XIB, XIB가 결국 NIB으로 변환된다.)은 재사용할만한 셀들을 구성한다고 한다. Code는 다이나믹한 UI를 구성해야 할 때 용이하다. (Code로만 짠다는게 아직 무슨 말인지 모르겠음 ㅋㅋ)
참고로 XIB, Storyboard모두 XML 기반이다.
Storyboard란?
Storyboard는 무엇인가? 스택오버플로우에도 잘 정리가 되어 있어 발췌했다.
Apple introduced the concept of "storyboarding" in iOS5 SDK to simplify and better manage screens in your app. You can still use the .xib way of development.
SwiftUI란?
공식 홈페이지에는 다음과 같이 정리되어 있었다.
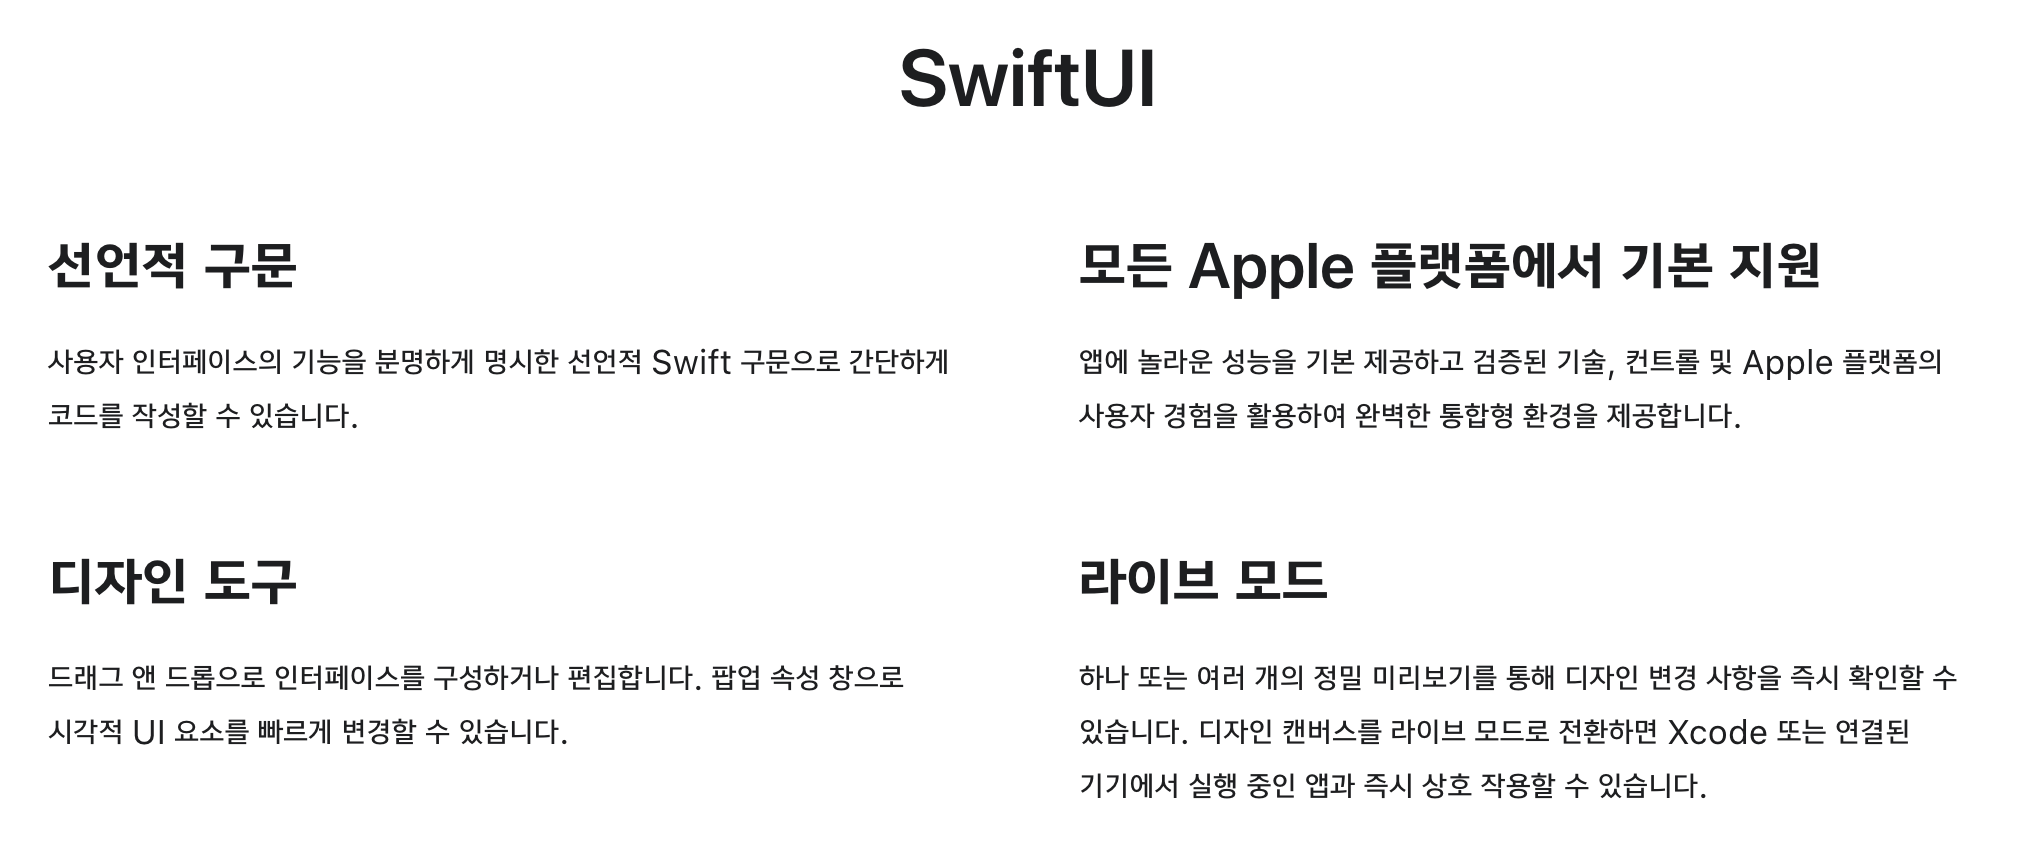
- 먼저 선언적 구문은 명령적 구문과 대비되는 것으로 이 부분은 좀 더 찾아봐야 겠다.
(얼마 전 스터디에서 들었는데 여기서 나오네) - SwiftUI는 모든 플랫폼을 통합하여 UI를 짤 수 있다.
- 디자인 도구, 라이브 모드는 WWDC20 - Introduction to SwiftUI 영상을 통해 직접 보시라.
개인적으로 이 글 덕에 매우 구체적으로 이해할 수 있었다. 다음 두 문장으로 요약할 수 있겠다.
더 쉽고, 빠른 통합 개발 환경 구축
A를 B화 시키는 것이 아니라, A는 A답게, B는 B답게.
iOS 앱 개발은 UIKit 프레임워크, 맥 앱은 AppKit 프레임워크을 활용한다. 두 프레임워크는 다른 것으로 아이폰의 성공에 많은 iOS 개발자가 생겼으나 이들이 맥 앱을 개발하려면 AppKit을 새로 배워야 했다.
SwiftUI덕에 기본적으로는 UIKit, AppKit(macOS 전용)를 통합하여 개발할 수 있게 됐고 더 나아가서 iOS 개발 그룹은 iOS 앱뿐만 아니라 각 기기에 최적화한 iPad App, macOS app, watchOS, tvOS을 모두 개발할 수 있게 된 셈이다.
각 기기에 최적화되었다는 것은 각 기기의 특색을 살펴보면 된다.
가장 기본적인 iOS,
분할 보기, 애플 펜슬 등을 지원하는 iPad,
손목에 맞게 최적화 되어 있는 watchOS,
화면 터치는 안되지만 터치패드, 분할, 터치바 등이 있는 macOS
각 기기의 사용자 인터페이스에 걸맞은 경험을 극대화하여 같은 기능을 하는 앱인데도 다른 경험을 제공할 수 있다.
React Native나 Flutter가 안드로이드, iOS를 모두 개발할 수 있도록 했다면
SwiftUI는 Apple 생태계 내에서 통합 개발 환경을 구축하는 것이다.
그런데 최신 버전의 OS만 지원한다. 다음을 참고하자. 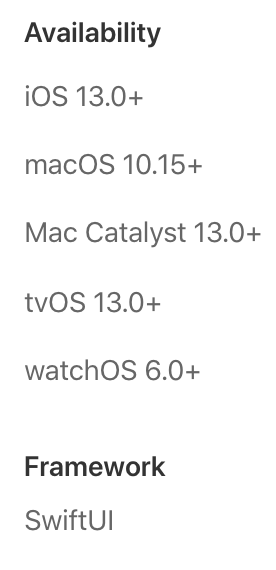
자료 조사를 하다 보니 Mac Catalyst와 M1에 대한 내용이 궁금해졌다. M1칩 소개란에 적혀있는
iPhone 및 iPad 앱
이제부터는 즐겨 쓰는 iPhone 및 iPad용 앱을 Mac에서 바로 구동할 수 있습니다. 전보다 더 많은 게임을 즐기고, 더 많은 콘텐츠를 감상하고, 하고 싶은 일들을 더 많은 앱을 사용해 해낼 수 있게 되었다는 뜻이죠. 이 앱들은 마치 처음부터 Mac용 앱이었던 것처럼 작동합니다. 여기에 메뉴 막대, 크기 조절이 가능한 창, 마우스 및 트랙패드 컨트롤 등이 더해지죠. 이전에 구입한 iPhone 및 iPad용 앱들 중 Mac용으로도 출시된 앱은 구입 목록에서 다운로드만 하면 Mac에서 바로 쓸 수 있습니다. 물론 다운로드는 Mac App Store에서 할 수 있죠.
이 부분을 아직 정확히 이해하지 못했다. 추후 살펴보자.
이 자료도 굉장히 잘 정리되어 있는 듯 하다. (M1 개발되기 이전 2019년 자료임)
5. AppDelegate, SceneDelegate
WWDC19 - Architecting Your App for Multiple Windows
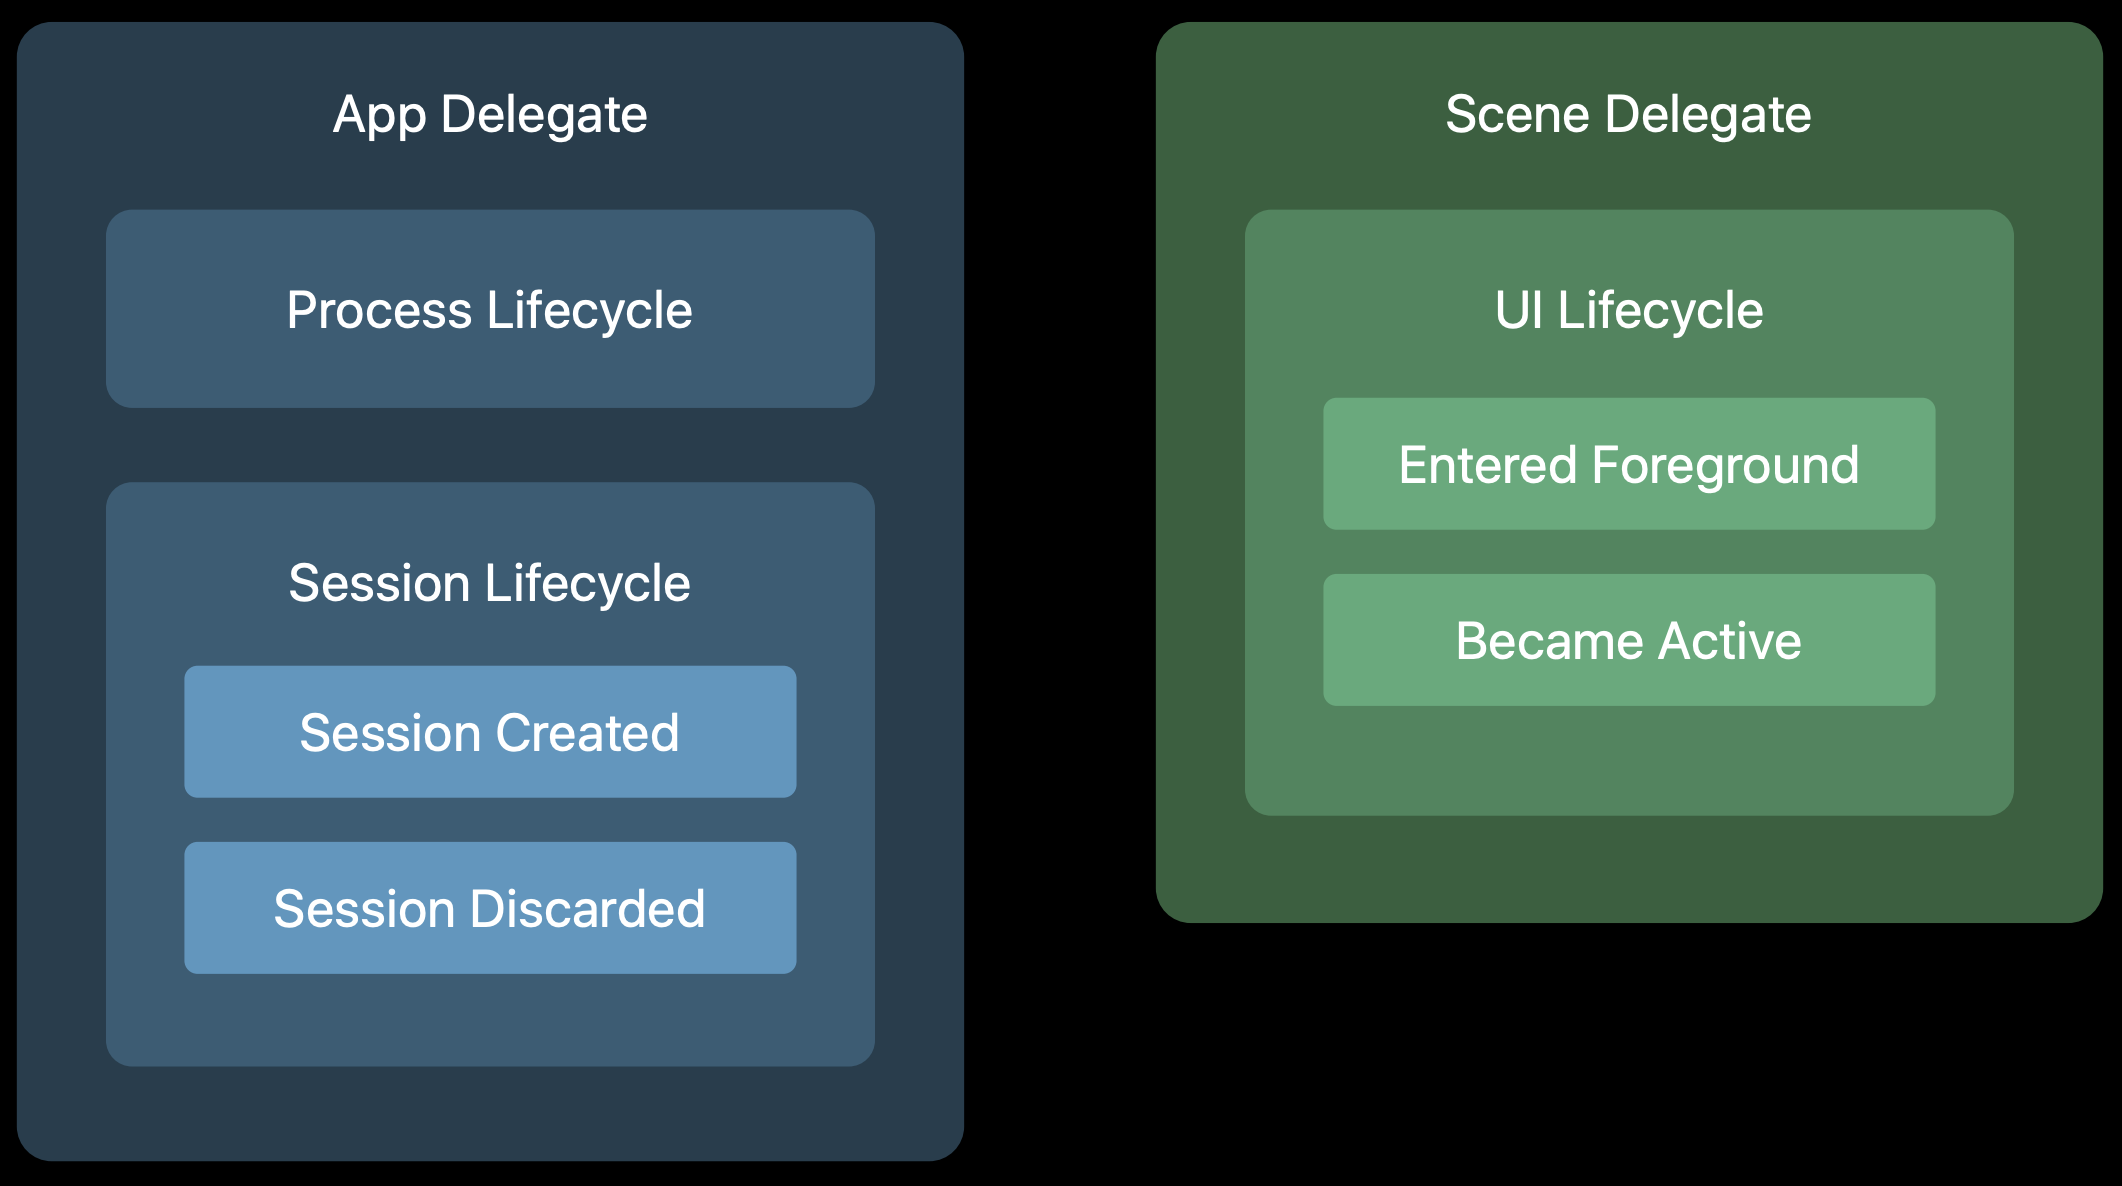
App에는 하나의 window 개념만 존재했는데, iOS 13 버전 부터는 Multi window가 가능해지면서 window 개념이 -> scence 개념으로 바뀌었다. App Delegate에서 갖고 있던 UI Lifecycle이 Scene Delegate로 넘어갔고 App Delegate는 기존의 Process Lifecycle에 새로운 Session Lifecycle이 생겨났다.

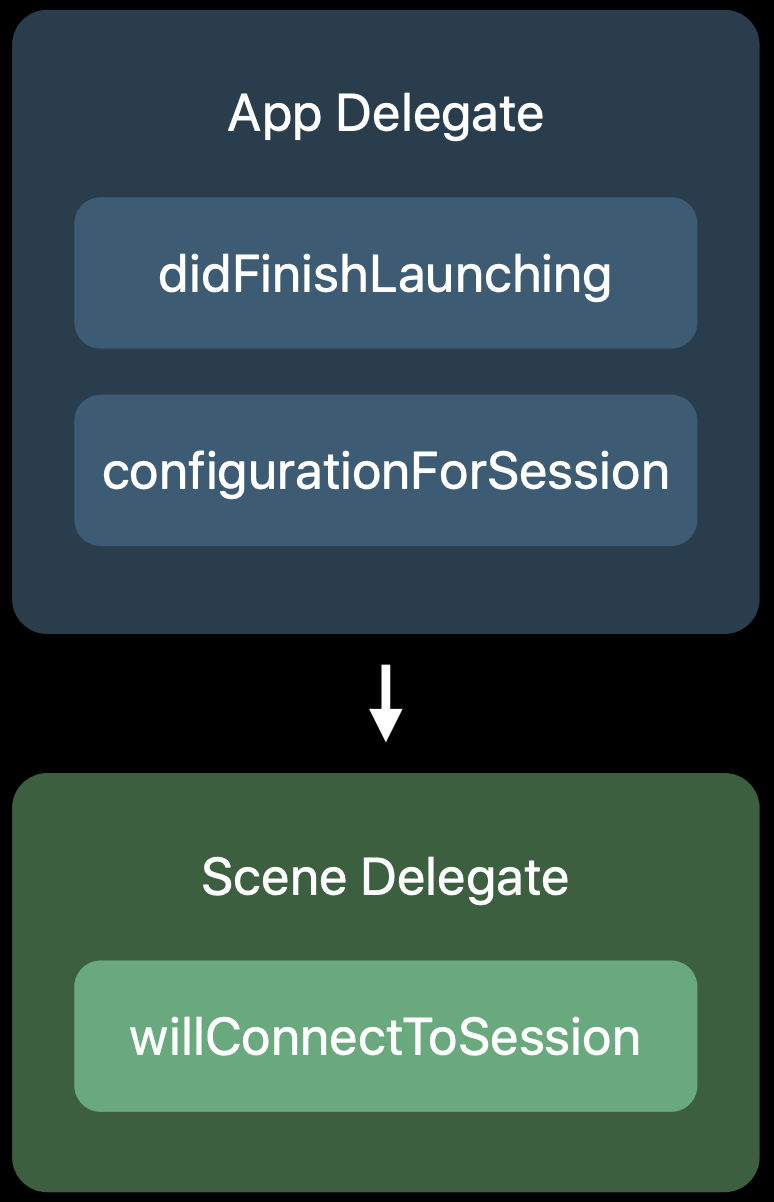
위 링크 영상을 보면 Lifecycle이 어떻게 동작되는지 볼 수 있다.
1) Scene 하나를 열었을 때
2) 아예 종료시키진 않고 안보이게 했을 때
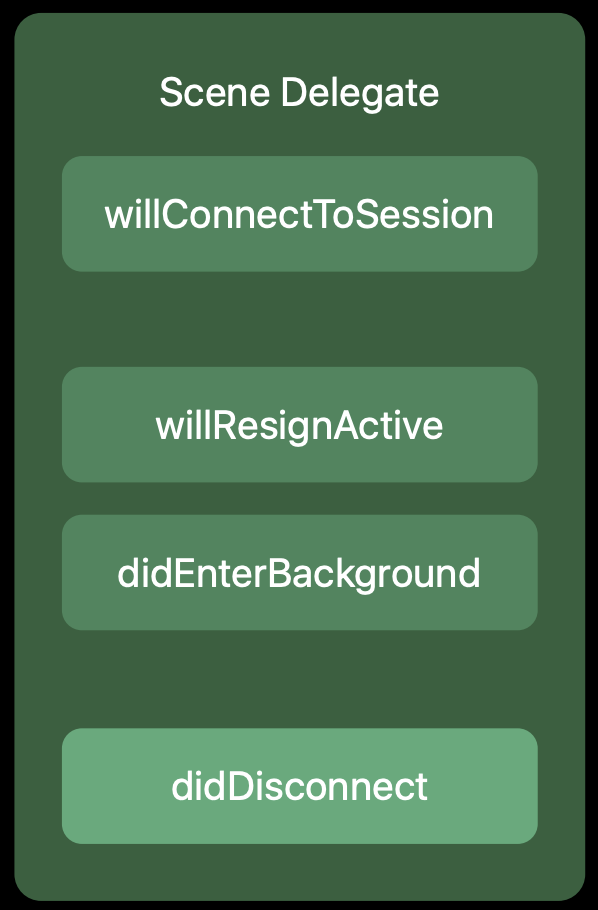
3) 아예 App Switcher에서 삭제 했을 때

//  AppDelegate.swift

import UIKit

@main
class AppDelegate: UIResponder, UIApplicationDelegate {


    func application(_ application: UIApplication, didFinishLaunchingWithOptions launchOptions: [UIApplication.LaunchOptionsKey: Any]?) -> Bool {
        // Override point for customization after application launch.
        return true
    }

    // MARK: UISceneSession Lifecycle

    func application(_ application: UIApplication, configurationForConnecting connectingSceneSession: UISceneSession, options: UIScene.ConnectionOptions) -> UISceneConfiguration {
        // Called when a new scene session is being created.
        // Use this method to select a configuration to create the new scene with.
        return UISceneConfiguration(name: "Default Configuration", sessionRole: connectingSceneSession.role)
    }

    func application(_ application: UIApplication, didDiscardSceneSessions sceneSessions: Set<UISceneSession>) {
        // Called when the user discards a scene session.
        // If any sessions were discarded while the application was not running, this will be called shortly after application:didFinishLaunchingWithOptions.
        // Use this method to release any resources that were specific to the discarded scenes, as they will not return.
    }


}
//  SceneDelegate.swift

import UIKit

class SceneDelegate: UIResponder, UIWindowSceneDelegate {

    var window: UIWindow?


    func scene(_ scene: UIScene, willConnectTo session: UISceneSession, options connectionOptions: UIScene.ConnectionOptions) {
        // Use this method to optionally configure and attach the UIWindow `window` to the provided UIWindowScene `scene`.
        // If using a storyboard, the `window` property will automatically be initialized and attached to the scene.
        // This delegate does not imply the connecting scene or session are new (see `application:configurationForConnectingSceneSession` instead).
        guard let _ = (scene as? UIWindowScene) else { return }
    }

    func sceneDidDisconnect(_ scene: UIScene) {
        // Called as the scene is being released by the system.
        // This occurs shortly after the scene enters the background, or when its session is discarded.
        // Release any resources associated with this scene that can be re-created the next time the scene connects.
        // The scene may re-connect later, as its session was not necessarily discarded (see `application:didDiscardSceneSessions` instead).
    }

    func sceneDidBecomeActive(_ scene: UIScene) {
        // Called when the scene has moved from an inactive state to an active state.
        // Use this method to restart any tasks that were paused (or not yet started) when the scene was inactive.
    }

    func sceneWillResignActive(_ scene: UIScene) {
        // Called when the scene will move from an active state to an inactive state.
        // This may occur due to temporary interruptions (ex. an incoming phone call).
    }

    func sceneWillEnterForeground(_ scene: UIScene) {
        // Called as the scene transitions from the background to the foreground.
        // Use this method to undo the changes made on entering the background.
    }

    func sceneDidEnterBackground(_ scene: UIScene) {
        // Called as the scene transitions from the foreground to the background.
        // Use this method to save data, release shared resources, and store enough scene-specific state information
        // to restore the scene back to its current state.
    }


}
🪴 Reference