1. Note App UI/UX
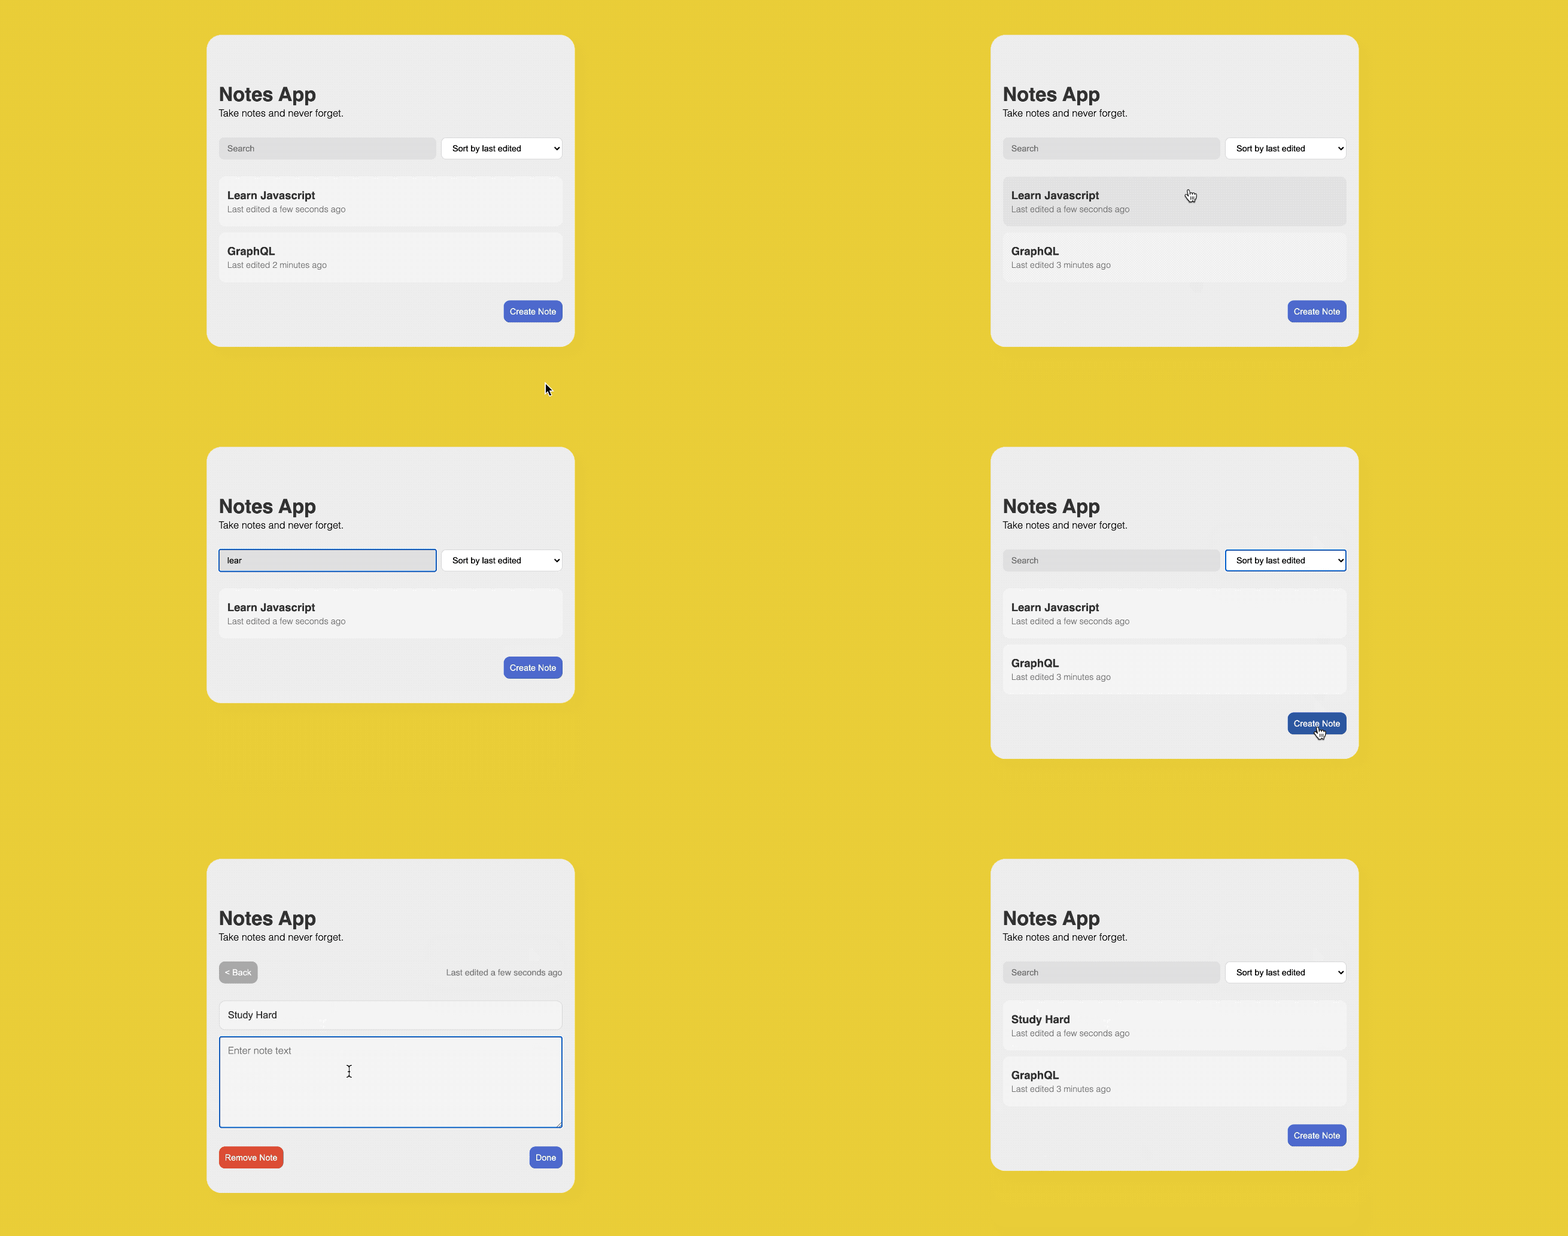
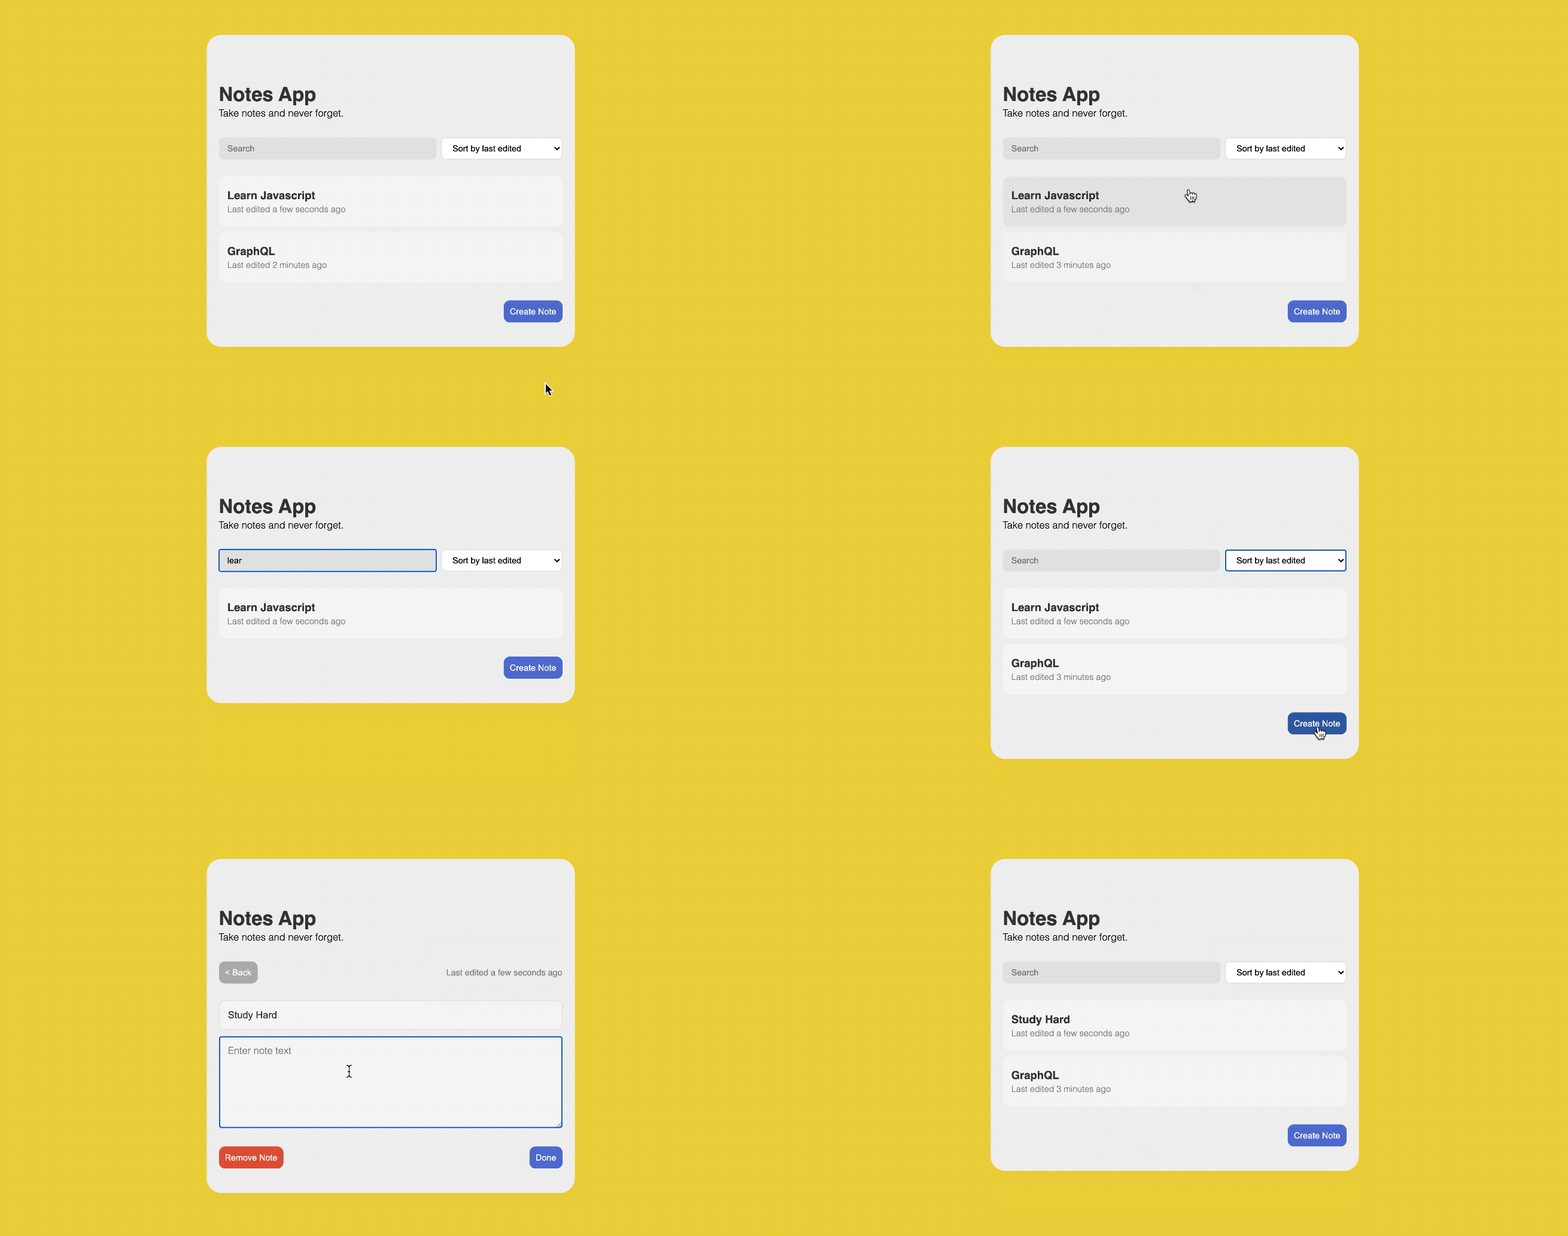
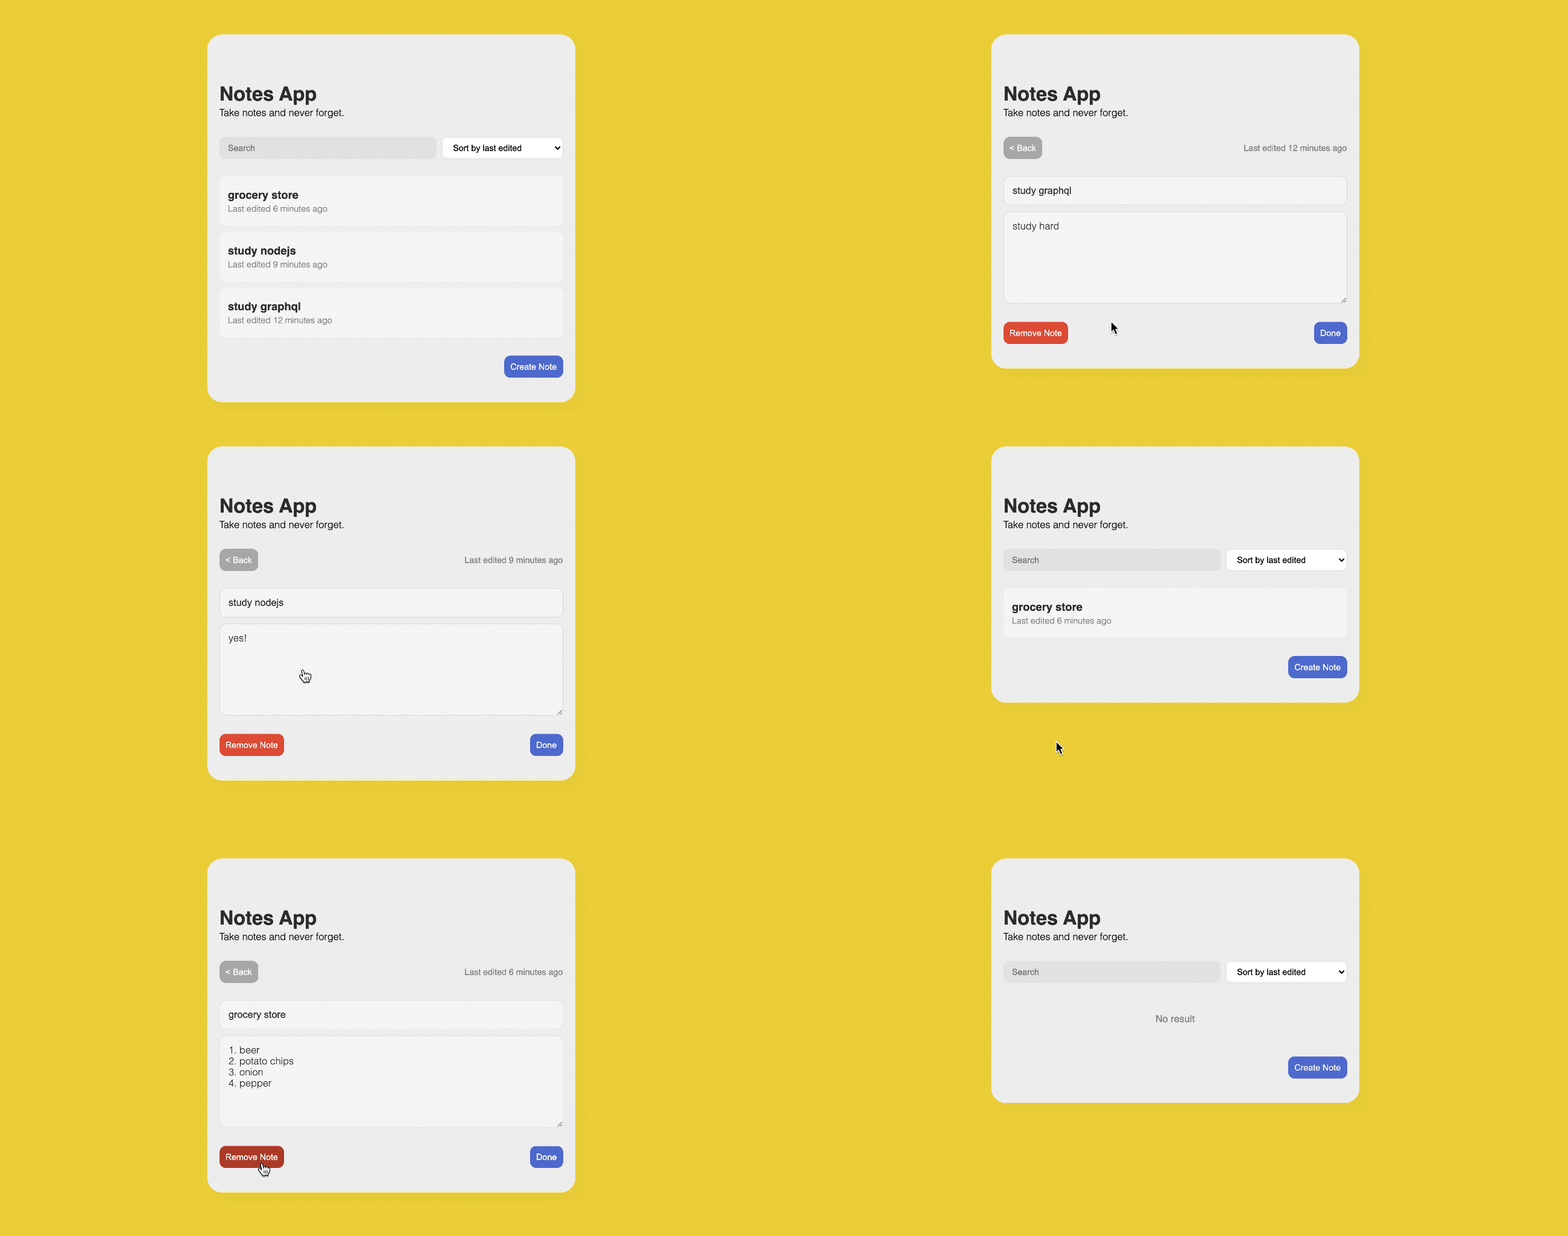
노트앱의 전반적인 UI/UX를 소개합니다. 노트 리스트를 보여주는 메인 페이지와, 개별 노트를 수정하는 페이지로 구성된 간단한 앱입니다. 인터넷 강의를 보면서 만들어본 후, 몇 가지 기능을 추가하고 디자인을 개선하였습니다. 아이폰 기본 노트 앱의 color theme을 참고하였습니다. 또한 사용자 편의를 위해 오른쪽에 새 노트 만들기 버튼과 완료 버튼을, 왼쪽에 뒤로가기 버튼과 삭제하기 버튼을 위치시켰습니다. 반응형 웹으로 작성하였습니다.
2. Main Features
2-1. Saving data in the local storage
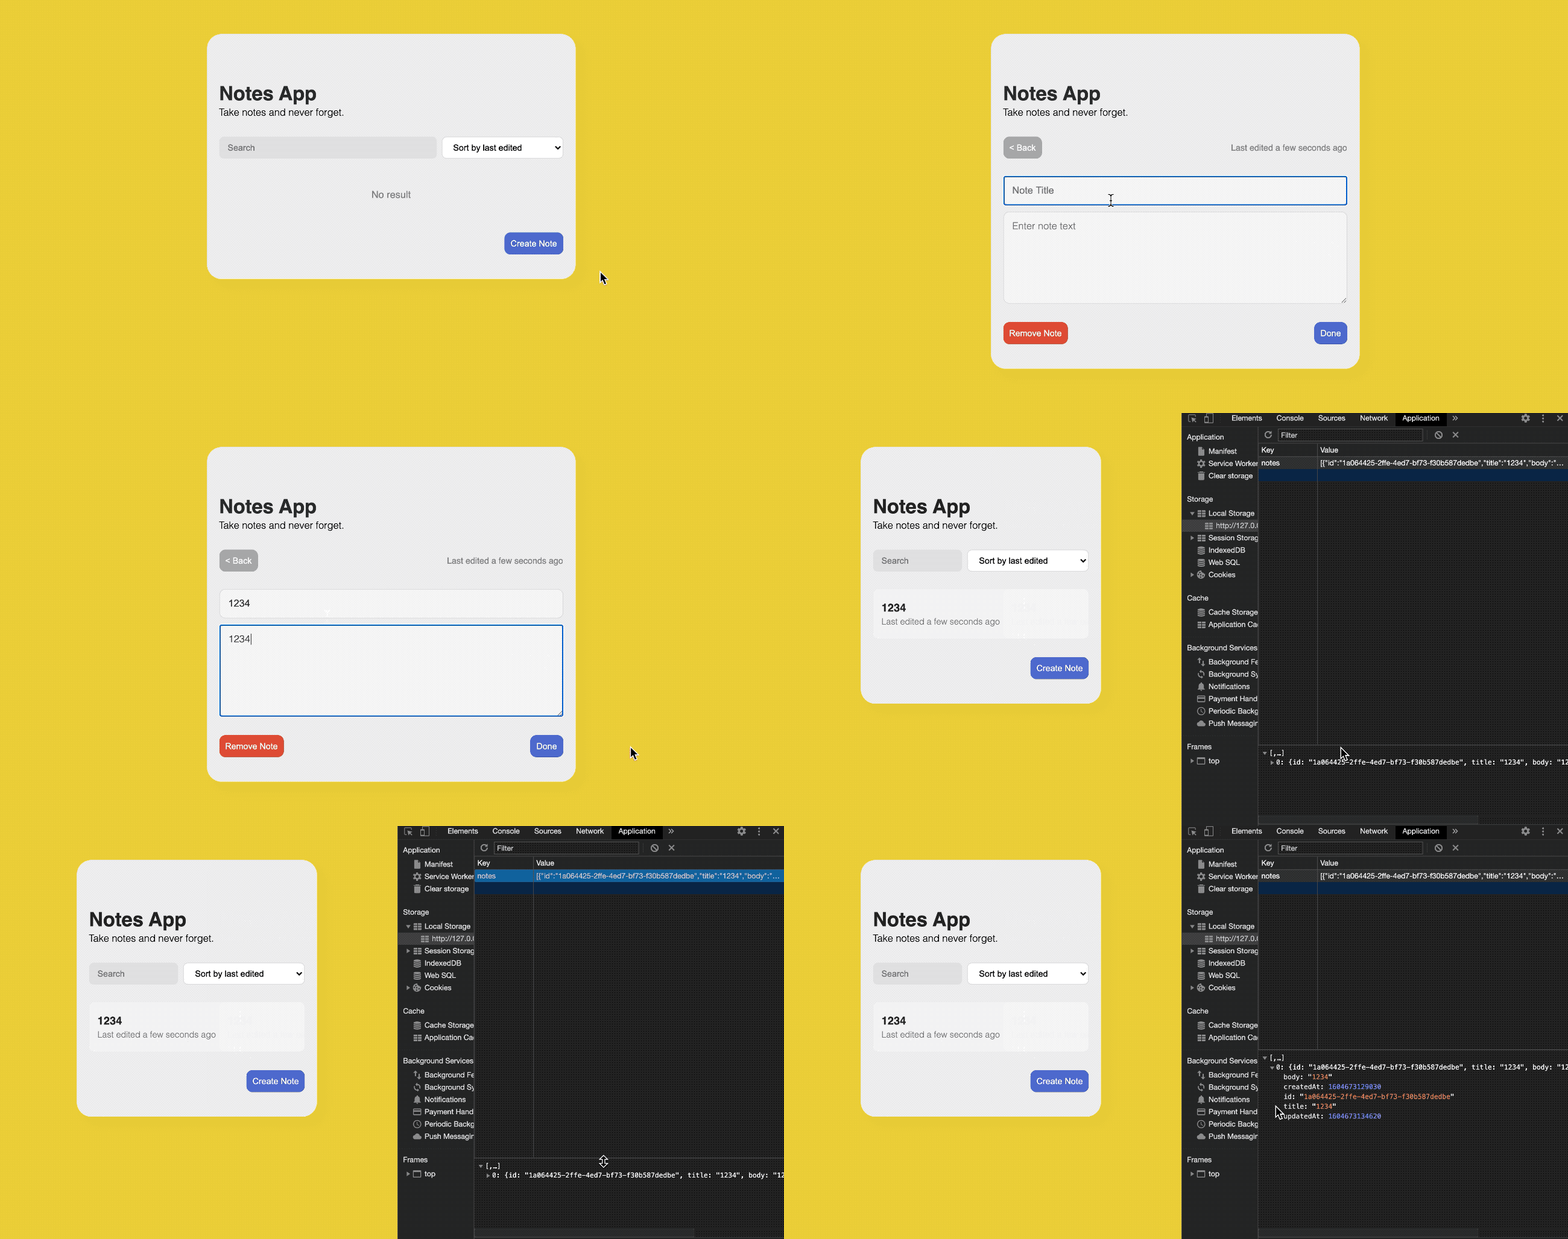
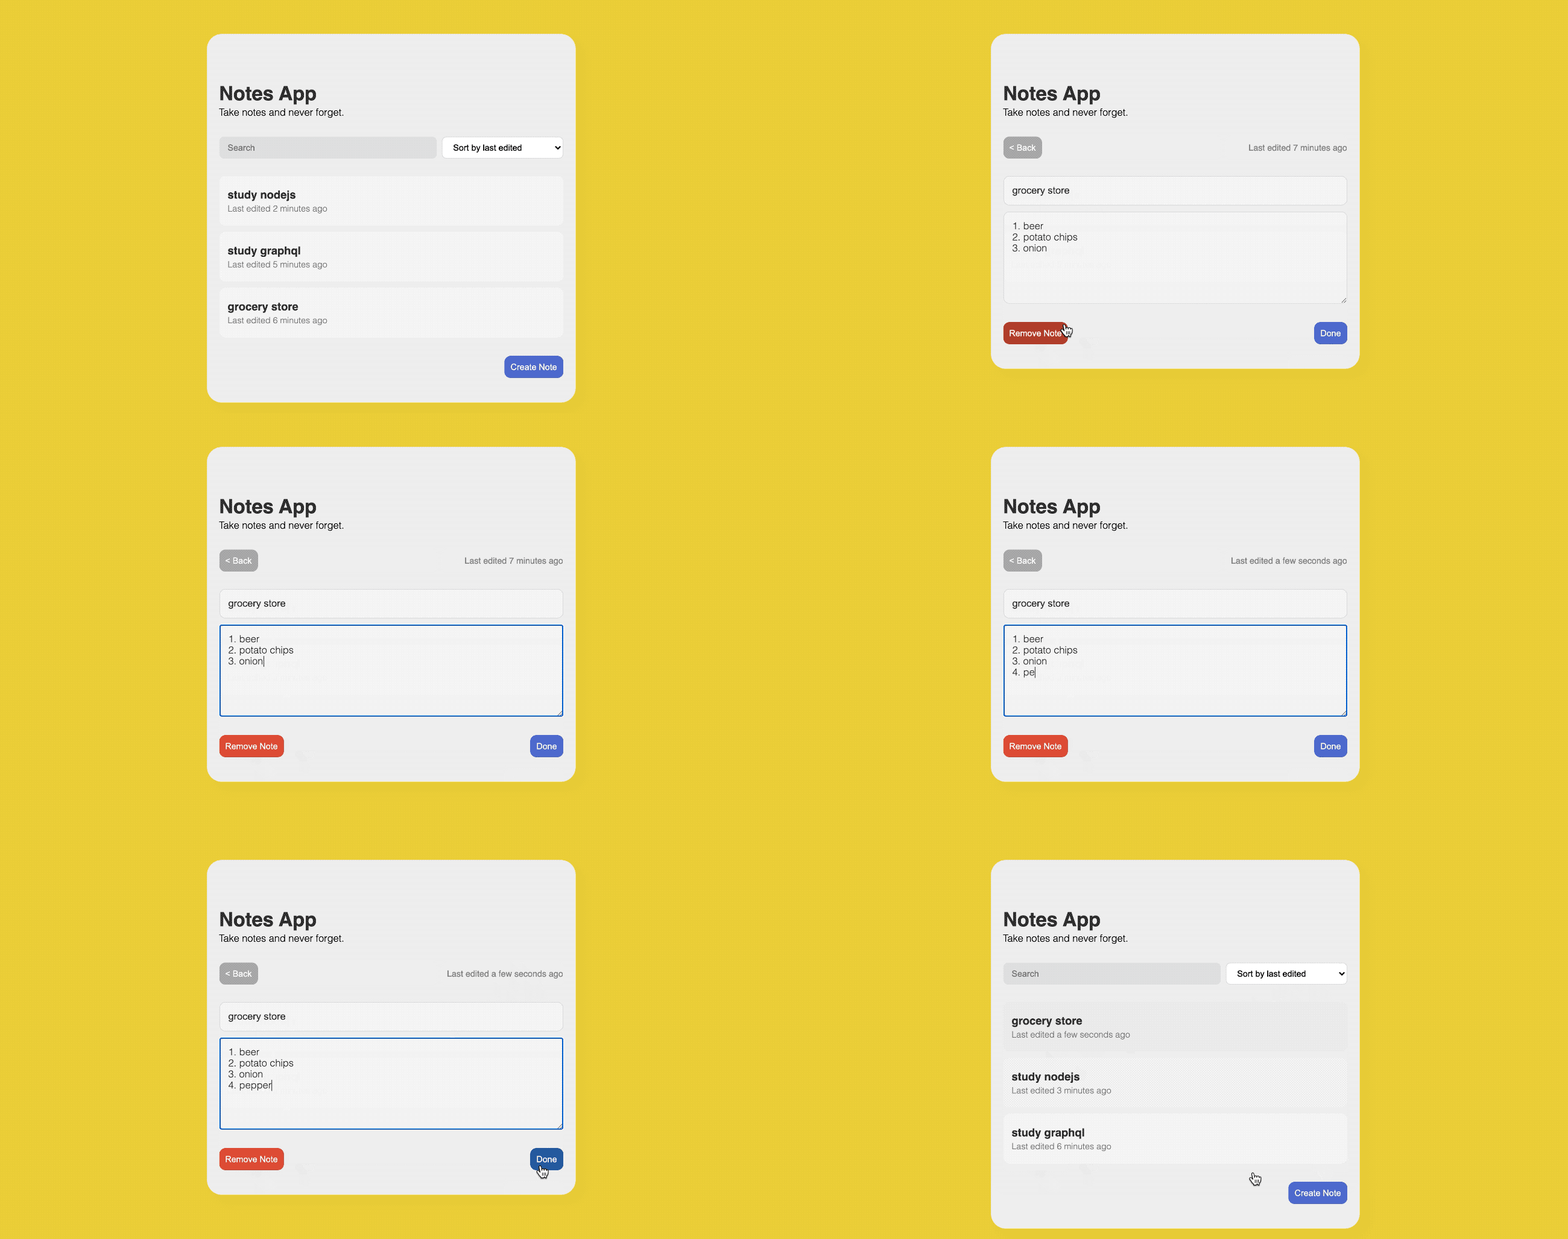
노트앱에서는 글 작성과 동시에 로컬스토리지에 데이터가 저장됩니다. JSON.stringify()를 통해 JSON 형태로 저장한 데이터를, JSON.parse()를 통해 다시 파싱하여 메인 페이지에 보여줍니다.
const saveNotes = (notes) =>
  localStorage.setItem('notes', JSON.stringify(notes))

const getSavedNotes = () => {
  const notesJSON = localStorage.getItem('notes')
  try {
    return notesJSON ? JSON.parse(notesJSON) : []
  } catch (e) {
    return []
  }
}

let notes = getSavedNotes()
2-2. Local storage data changed in real-time
renderNotes()는 뒤에 설명할 필터링을 적용한 결과를 메인화면에 출력해주는 함수입니다. e.key 값을 바로 파싱해 줍니다. 노트 수정 페이지에서 데이터를 수정하는 동시에 로컬스토리지에서도 데이터가 수정되는 기능입니다.
const renderNotes = (notes, filters) => {
  const notesEl =   document.querySelector('#notes')

  notes = sortNotes(notes, filters.sortBy)
  const filteredNotes = notes.filter((note) =>
    note.title.toLowerCase().includes(filters.searchText.toLowerCase())
  )

  notesEl.innerHTML = ''

  if (filteredNotes.length > 0) { //if there is more than one note
    filteredNotes.forEach((note) => {
      const noteEl = generateNoteDOM(note)
      notesEl.appendChild(noteEl)
    })
  } else { //if there is no notes
    const emptyMessage = document.createElement('p')
    emptyMessage.textContent = "No result"
    emptyMessage.classList.add('empty-message') //adding a class in javascript
    notesEl.appendChild(emptyMessage)
  }
}

window.addEventListener('storage', e => {
    if (e.key === 'notes') {
        notes = JSON.parse(e.newValue)
        renderNotes(notes, filters)
    }
})
2-3. Creating a new note
새로운 노트를 생성하면 해당 노트의 제목 및 내용과 더불어, 노트의 고유 아이디, 생성시간, 수정시간이 함께 로컬스토리지에 저장됩니다. uuidv4, moment.js 라이브러리를 사용합니다.
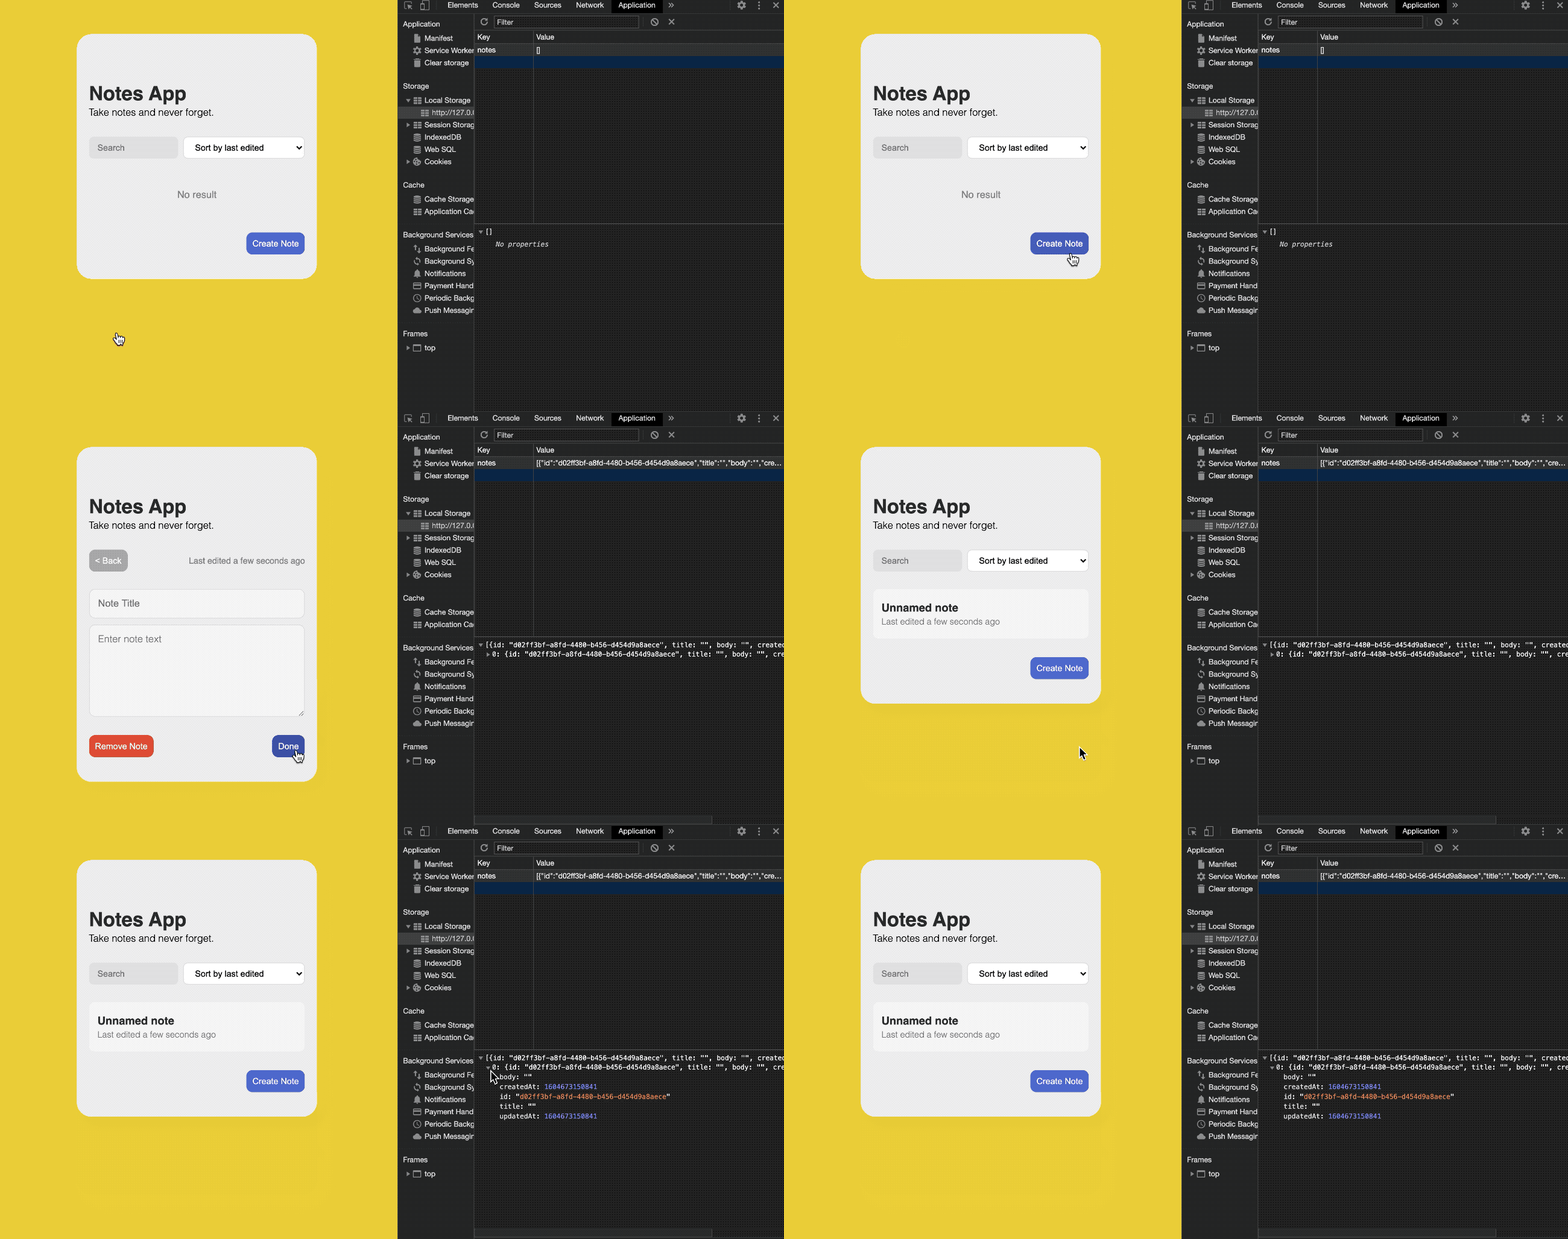
let notes = getSavedNotes()
renderNotes(notes, filters)

document.querySelector('#create-note').addEventListener('click', () => {
    const id = uuidv4()
    const timestamp = moment().valueOf()

    notes.push({
        id: id,
        title: '',
        body: '',
        createdAt: timestamp,
        updatedAt: timestamp
    })
    saveNotes(notes)
    location.assign(`edit.html#${id}`)
})
2-4. Sorting notes
최근수정순, 최근생성순, 알파벳순으로 노트를 정렬하는 기능입니다. array.sort()를 사용합니다. 알파벳순의 경우 제목을 toLowerCase()로 모두 소문자로 변환해준 다음 제목으로 정렬해줍니다.
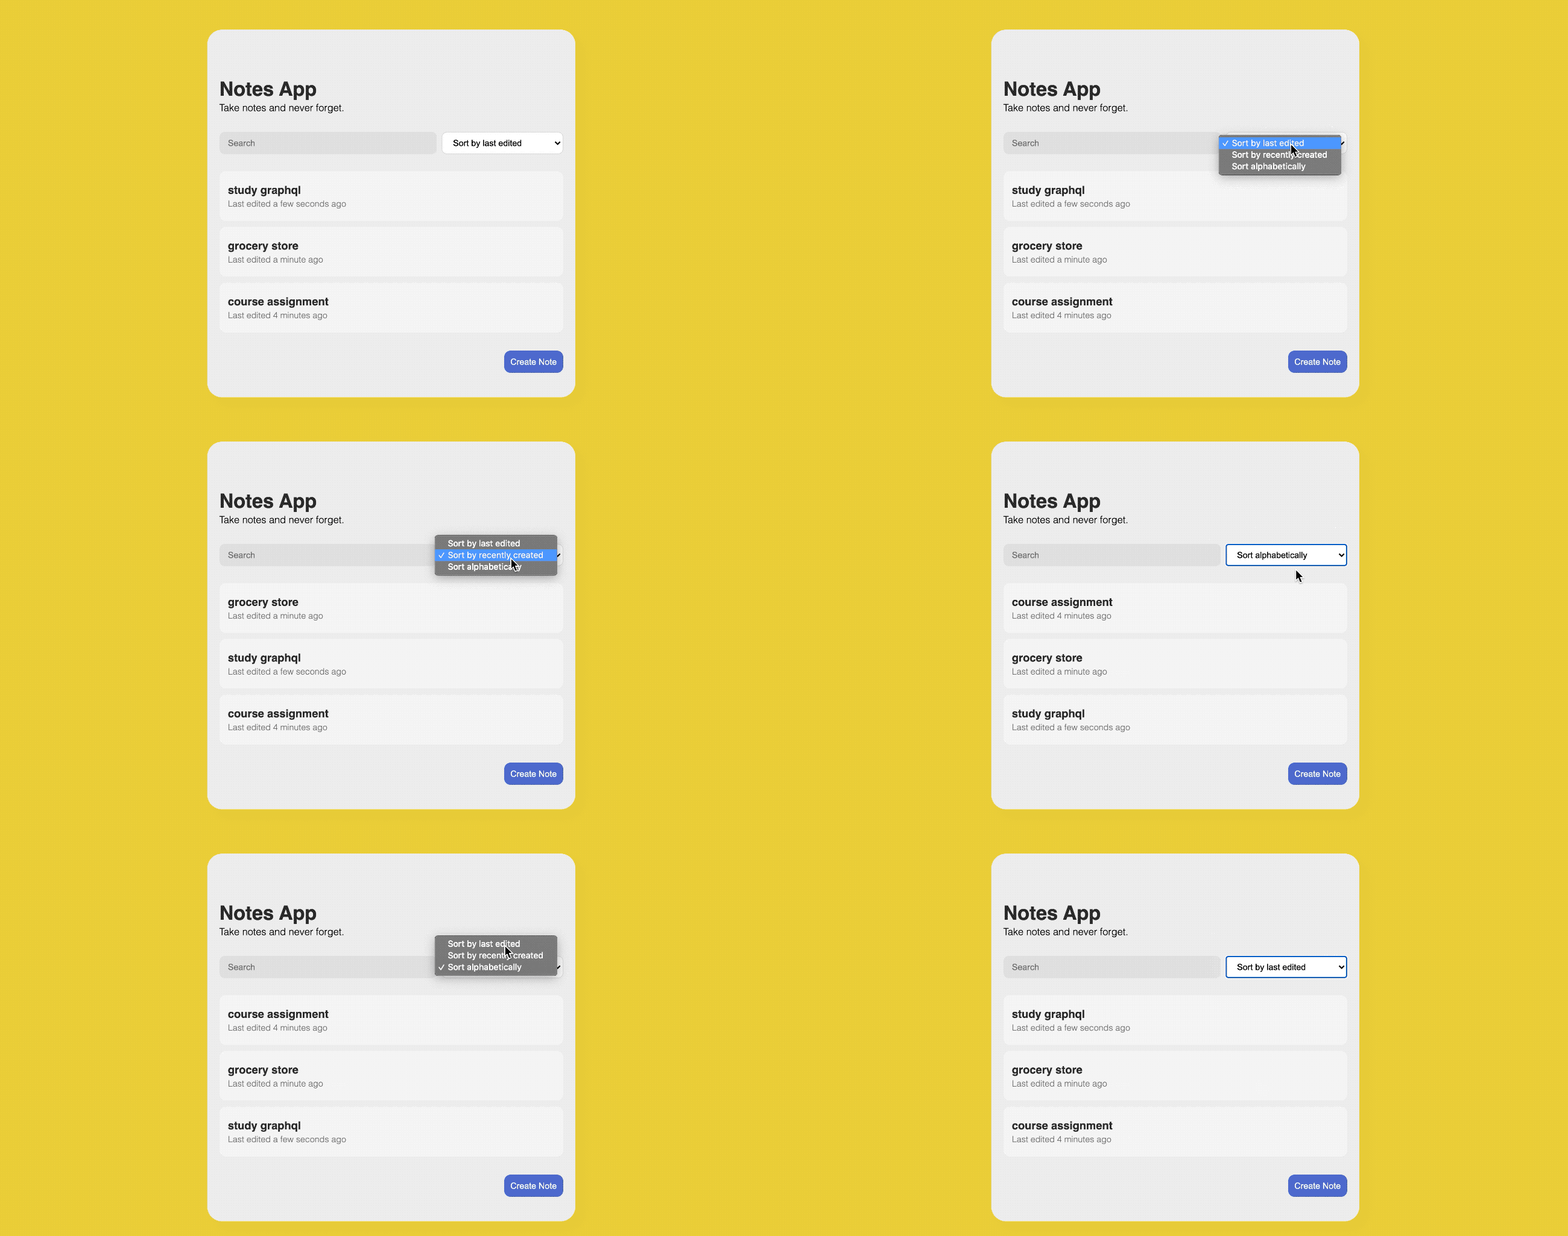
let notes = getSavedNotes()
renderNotes(notes, filters)

const sortNotes = (notes, sortBy) => {
  if (sortBy === 'byEdited') {
    return notes.sort((a, b) => {
    //b-a가 음수면 a가 위로 올라감. a가 최근일수록 상위에 두고 싶으므로 a가 크면 위로두기
      if (a.updatedAt > b.updatedAt) {
        return -1
      } else if (a.updatedAt < b.updatedAt) {
        return 1
      } else {
        return 0
      }
    })
  } else if (sortBy === 'byCreated') {
    return notes.sort((a, b) => {
      if (a.createdAt > b.createdAt) {
        return -1
      } else if (a.createdAt < b.createdAt) {
        return 1
      } else {
        return 0
      }
    })
  } else if (sortBy === 'alphabetical') {
    return notes.sort((a, b) => {
      if (a.title.toLowerCase() < b.title.toLowerCase()) {
        return -1
      } else if (a.title.toLowerCase() > b.title.toLowerCase()) {
        return 1
      } else {
        return 0
      }
    })
  } else {
    return notes
  }
}
2-5. Searching notes
e.target.value를 renderNotes(notes, filters) 내에 있는 array.filter()의 필터 값으로 넣어 줍니다. 그리고 다시 renderNotes(notes, filters) 함수를 실행시켜 줍니다.
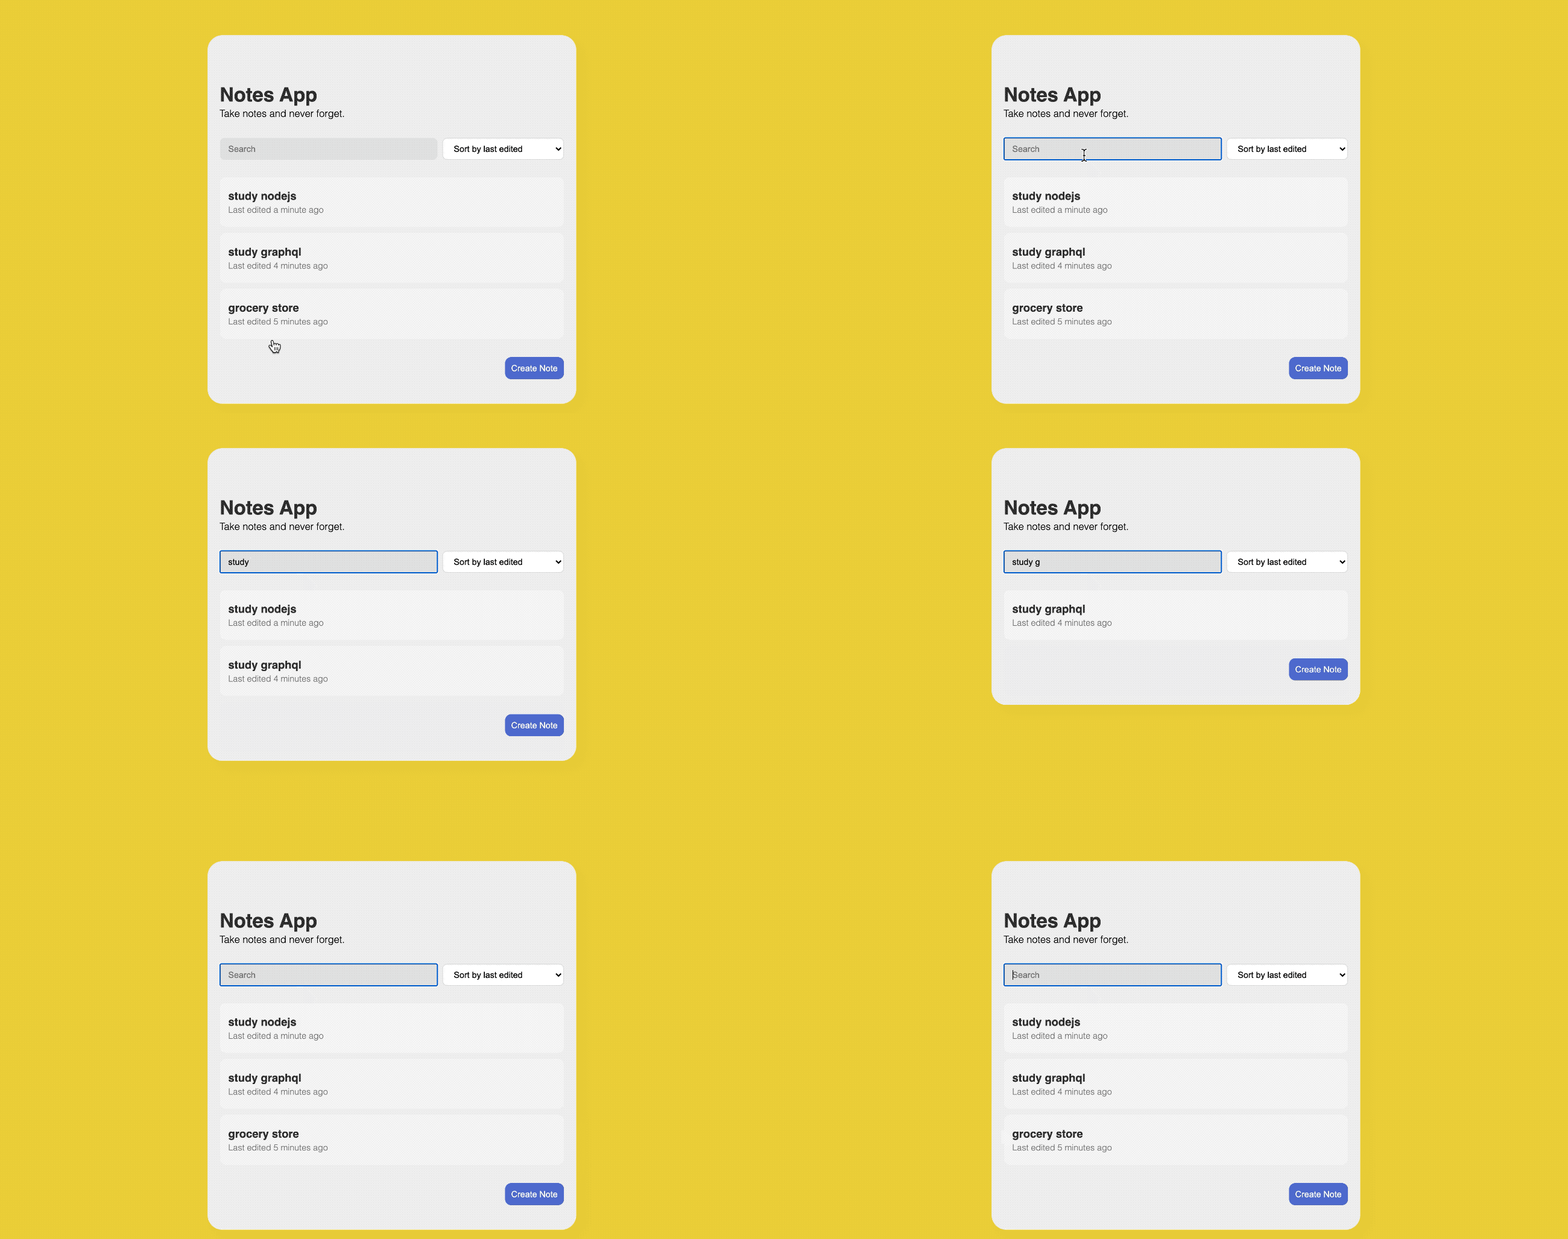
let notes = getSavedNotes()
renderNotes(notes, filters)

const filters = {
    searchText: '',
    sortBy: 'byEdited'
}
document.querySelector('#search-text').addEventListener('input', e => {
    filters.searchText = e.target.value
    renderNotes(notes, filters)
})
2-6. Updated time
moment(timestamp).fromNow() 기능을 사용하여 수정 시간을 받아옵니다. dateElement.textContent에 수정 시간을 넣어줍니다.
const generateLastEdited = (timestamp) => `Last edited ${moment(timestamp).fromNow()}`

const dateElement = document.querySelector("#last-edited");
dateElement.textContent = generateLastEdited(note.updatedAt);
2-7. Deleting notes
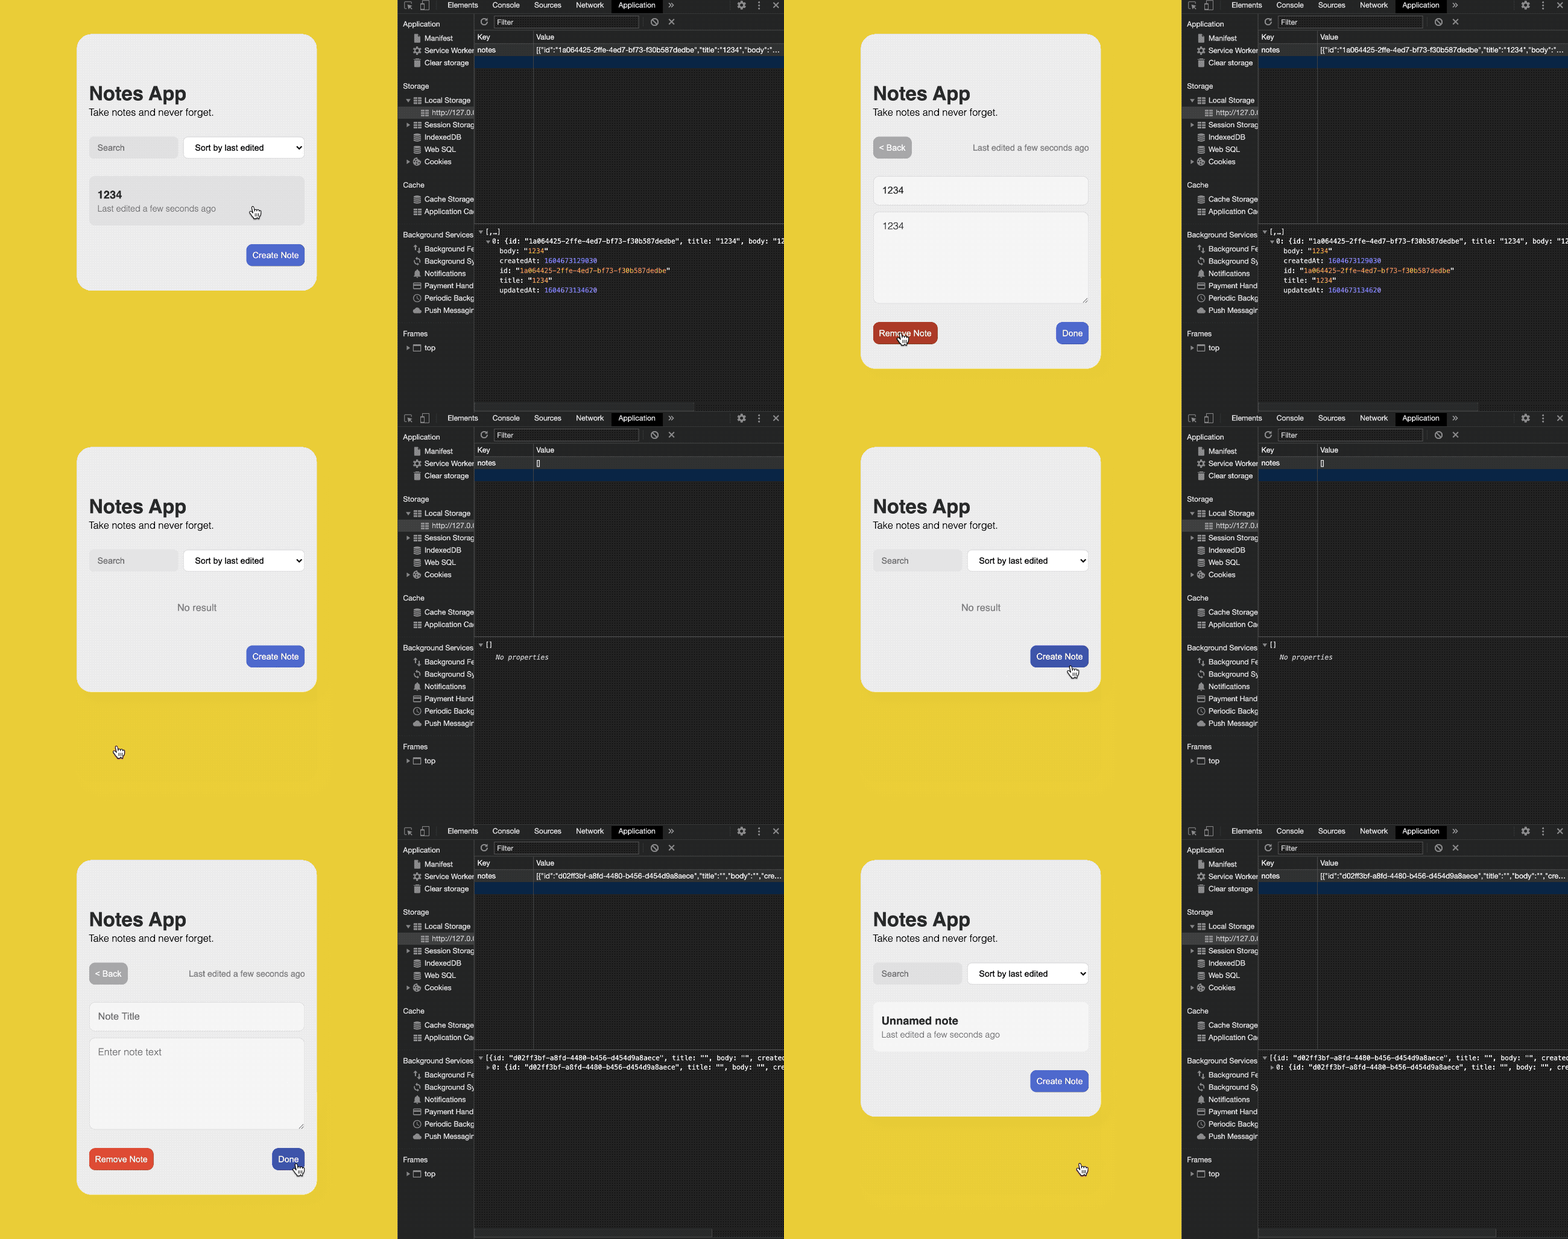
간단히 document.querySelector()로 취소 버튼을 선택해 addEventListener()로 아이디가 일치하는 노트를 findIndex()로 찾아서 삭제해 줍니다.
const noteId = location.hash.substring(1);
let note = notes.find(note => note.id === noteId);

const removeNote = (id) => {
  const noteIndex = notes.findIndex((note) => note.id === id)

  if (noteIndex > -1) {
    notes.splice(noteIndex, 1)
  }
}

const removeElement = document.querySelector("#remove-note");

removeElement.addEventListener("click", () => {
  removeNote(note.id);
  saveNotes(notes);
  location.assign("index.html");
});7개의 댓글
Thank you so much for sharing all this wonderful information !!!! It is so appreciated!! You have good humor in your blogs. So much helpful and easy to read!
Java Training in Pune
Thanks for crafting this beautiful information. I’m going to make sure that I will share.
Clinical Research Courses in Pune


Thanks for sharing the information with us.
Python Online Training