
해당 글은 스프링 시큐리티 공식문서 중
Servlet Applications/Architecture 부분을 번역한 글입니다.
A Review of Filters
시큐리티 서블릿 서포트는 서블릿 필터에 기반합니다.
아래 그림은 일반적인 HTTP 요청에 대한 핸들러 계층입니다.
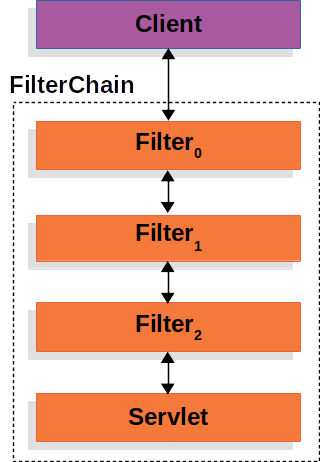
클라이언트는 애플리케이션에 요청올 보내고, 컨테이너는 Filter 인스턴스와 request URI path에 근거한 HttpServletRequest를 처리해야 하는 Servlet을 포함한 FilterChain을 만듭니다.
Spring MVC에서 Servlet은 DispatcherServlet 인스턴스입니다.
최대 하나의 Servlet은 하나씩의 HttpServletRequest, HttpServletResponse만을 처리할 수 있지만 두 개 이상의 필터를 사용하면 다음이 가능합니다.
- 하향스트림(뒷순서)의
Filter인스턴스나Servlet이 호출되는 것을 방지하며 이 경우Filter는 일반적으로HttpServletResponse를 작성합니다. - 하향스트림의
Filter인스턴스와Servlet에서 사용하는HttpServletRequest,HttpServletResponse을 수정합니다.
Filter의 힘은 전달되는 FilterChain에서 나옵니다.
fun doFilter(request: ServletRequest, response: ServletResponse, chain: FilterChain) {
    // do something before the rest of the application
    chain.doFilter(request, response) // invoke the rest of the application
    // do something after the rest of the application
}
필터는 오직 한방향, 뒤로만 흐르기 때문에 순서는 아주 중요합니다.
DelegatingFilterProxy
스프링은 서블릿 컨테이너의 라이프 사이클과 스프링의 ApplicationContext 사이를 연결하는 DelegatingFilterProxy라고 불리는 Filter 구현체를 제공합니다.
서블릿 컨테이너는 자체 표준을 사용하여 Filter인스턴스를 등록할 수 있지만, 스프링에서 제공하는 빈은 인식하지 못합니다.
표준 서블릿 컨테이너의 메커니즘을 통해 DelegatingFilterProxy를 필터로써 등록할 수 있고, 이렇게 하면 모든 작업을 Filter를 구현한 빈에게 위임할 수 있습니다.
아래 그림은 DelegatingFilterProxy가 FilterChain과 Filter 인스턴스에 어떻게 동작하는지 보여줍니다.
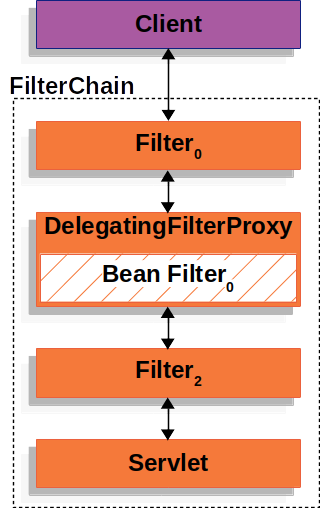
DelegatingFilterProxy는 ApplicationContext에 있는 Bean Filter0 을 바라보고 Bean Filter0을 실행시킵니다.
다음은 DelegatingFilterProxy 수도코드입니다.
fun doFilter(request: ServletRequest, response: ServletResponse, chain: FilterChain) {
	val delegate: Filter = getFilterBean(someBeanName) // 1
	delegate.doFilter(request, response) // 2
}- lazy하게 스프링 빈으로 등록된
Filter를 가져옵니다. 예시에서는 Bean Filter0 을 의미하고DelegatingFilterProxy의 위임자는 해당 빈의 인스턴스입니다. - 스프링빈에 작업을 위임합니다.
또다른 DelegatingFilterProxy의 이득은 Filter 빈 인스턴스 검색을 지연시킬 수 있다는 것입니다.
이것은 매우 중요한데, 컨테이너는 시작하기 전에 Filter를 모두 등록해야 하기 때문입니다. 스프링은 일반적으로 스프링 빈을 로드하기 위해서 ContextLoaderListener을 사용하는데 이것은 Filter 인스턴스를 등록하기 전까지 수행되지 않습니다. (Filter가 먼저 설정된 후 빈이 등록되어야 하는데, DelegatingFilterProxy가 지연검색을 하지 않으면 순환참조가 걸려 에러가발생한다는 의미)
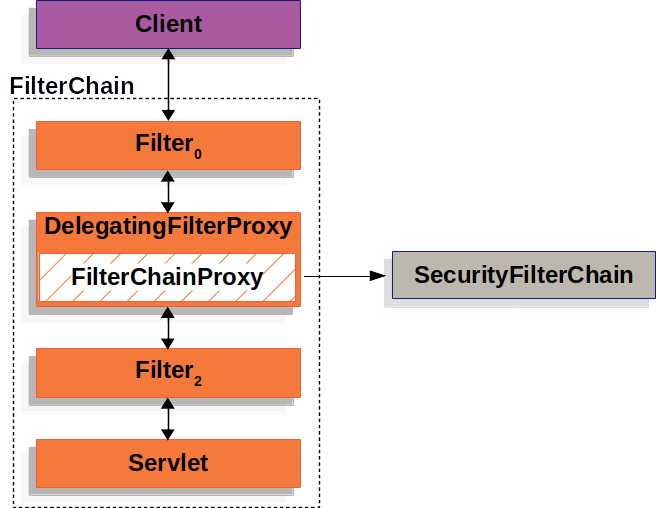
FilterChainProxy
스프링 시큐리티의 서블릿 서포트는 FilterChainProxy에 포함되어있습니다.
FilterChainProxy는 SecurityFilterChain을 통해 많은 필터에 위임을 허용하는 스프링 시큐리티에서 제공하는 특수한 필터입니다.
FilterChainProxy는 빈이기 때문에 일반적으로 DelegatingFilterProxy으로 래핑합니다.
아래는 FilterChainProxy역할에 대한 그림입니다.
SecurityFilterChain
SecurityFilterChain은 현재 요청에 의해 호출되어야 할 스프링시큐리티 Filter 인스턴스를 결정하기 위해 FilterChainProxy에 의해 사용됩니다.
아래는 SecurityFilterChain 역할의 그림입니다.
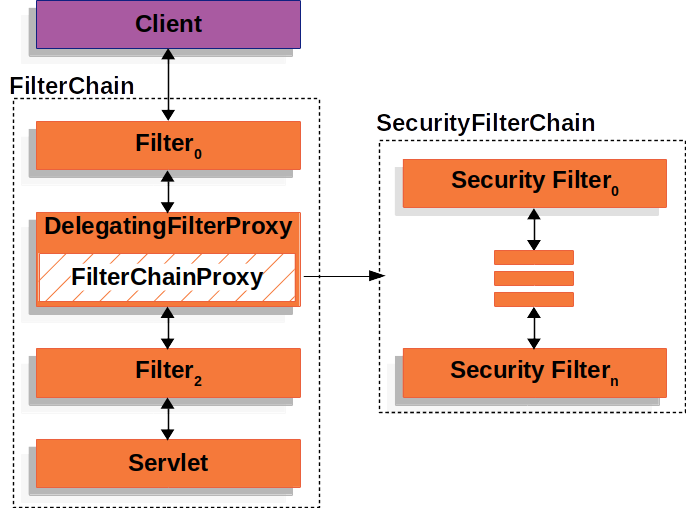
SecurityFilterChain에 있는 SecurityFilter들은 일반적으로 빈이지만 DelegatingFilterProxy 대신 FilterChainProxy에 등록된다.
서블릿 컨테이너나 DelegatingFilterProxy에 직접등록하는 것보다 FilterChainProxy에 등록하는 것은 많은 이득이 있습니다.
먼저, 모든 스프링 시큐리티의 서블릿 서포트를 위한 스타팅 포인트를 제공합니다. 그러한 이유로 만약 스프링 시큐리티의 서블릿 서포트에 대해 트러블슈팅을 하고 싶을 때 FilterChainProxy에 디버깅 포인트를 추가하는 것은 좋은 시작점입니다.
두번째로, 스프링 시큐리티 사용에서 FilterChainProxy는 핵심이기 때문에 선택사항같지 않은 기능들도 수행할 수 있습니다. 메모리 누수를 방지하기 위해 SecurityContext를 초기화 하는 것을 예로 들 수 있습니다. 또한 몇몇 공격에 대항해서 애플리케이션을 보호하기 위해 스프링시큐리티의 HttpFirewall을 적용합니다.
게다가, 어떤 SecurityFilterChain이 실행되어야 할지 결정할 때에도 큰 유연성을 줄 수 있습니다. 서블릿 컨테이너에서 Filter 인스턴스는 URL만을 기반으로 실행됩니다. 하지만 FilterChainProxy는 RequestMatcher 인터페이스를 이용해서 HttpServeletRequest의 모든 항목을 기반으로 호출을 결정할 수 있습니다.
아래는 다중 SecurityFilterChain인스턴스를 적용한 그림입니다.
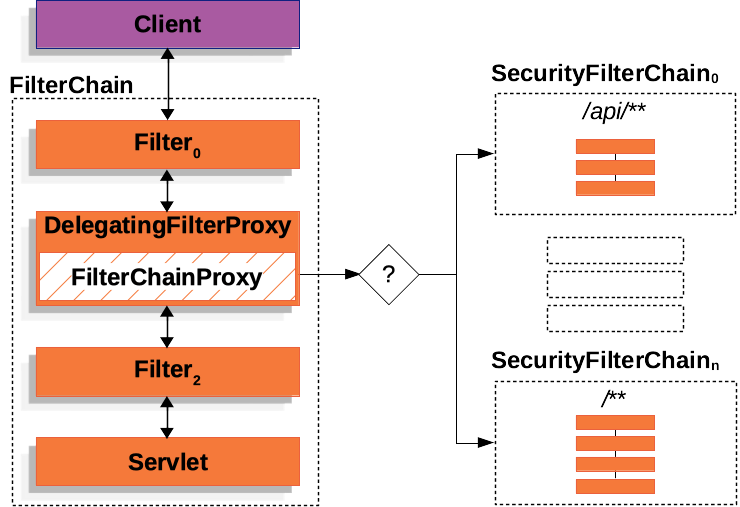
다중 SecurityFilterChain형상에서는, FilterChainProxy가 어떤 SecurityFilterChain이 사용될지 결정하고 일치하는 첫번째 SecurityFilterChain만 실행됩니다. 만약 URL이 /api/message/이었다면 첫 번째로 매치되는 SecurityFilterchain은 /api/** 패턴을 갖고 있는 *SecurityFilterchain0*입니다. 따라서 비록 /**에 포함되더라도 오직 0번 체인만 실행됩니다.
만약 URL이 /message/ 였다면 0번 체인 패턴과 매치되지 않습니다. 그리고 FilterChainProxy가 각각의 SecurityFilterChain을 탐색하고 패턴이 매치되는 n번 SecurityuFilterChain을 실행시킵니다.
위 예제에서 0번 체인은 오직 3개의 Filter 인스턴스를 갖고 있는 반면 n체인은 4개의 Filter 인스턴스를 가지고 있습니다. 여기서 중요한점은 각각의 SecurityFilterChain은 유니크할 수 있고 독립적으로 설정될 수 있다는 것입니다. 실제로 만약에 특정 요청들에 대해서 스프링 시큐리티가 적용되지 않게 하고 싶다면 SecurityFilterchain은 Filter 인스턴스를 아무것도 갖고있지 않을 것입니다.
Security Filters
SecurityFilter들은 SecurityFilterChain API를 사용하여 FilterChainProxy에 삽입됩니다.
아래는 FilterChainProxy.class 내부 메서드입니다. SecurityFilterChain의 getFilters를 호출하며 SecurityFilterChain이 갖고있는 Filter들을 갖고 오는 코드입니다.
FilterChainProxy.class 내부 메서드입니다. SecurityFilterChain의 getFilters를 호출하며 SecurityFilterChain이 갖고있는 Filter들을 갖고 오는 코드입니다.
이 Filter들은 각기 다른 많은 목적으로 사용되어지며 그 역할로는 인증(authentication), 인가(authorization), 악용 방지(explot protection) 등이 있습니다.
각 Filter들은 적시에 호출되도록 특정한 순서로 실행됩니다. 예를 들어 인증 필터는 인가 필터 이전에 실행되어야 합니다.
일반적으로 스프링 시큐리티의 필터 순서를 이해하는 것이 필수는 아닙니다. 하지만 순서를 알면 도움이 될 때가 있습니다. 만약 알고 싶다면 FilterOrderRegistration code를 확인하면 되겠습니다.
위 단락을 예시하기 위해 아래와 같이 보안구성을 고려해볼 수 있습니다.
@Configuration
@EnableWebSecurity
public class SecurityConfig {

    @Bean
    public SecurityFilterChain filterChain(HttpSecurity http) throws Exception {
        http
            .csrf(Customizer.withDefaults())
            .authorizeHttpRequests(authorize -> authorize
                .anyRequest().authenticated()
            )
            .httpBasic(Customizer.withDefaults())
            .formLogin(Customizer.withDefaults());
        return http.build();
    }

}
@Configuration
@EnableWebSecurity
class SecurityConfig {
@Bean
fun filterChain(http: HttpSecurity): SecurityFilterChain {
http {
csrf { }
authorizeHttpRequests {
authorize(anyRequest, authenticated)
}
httpBasic { }
formLogin { }
}
return http.build()
}
}위 설정은 다음과 같은 Filter 순서를 설정합니다.
| Filter | Added by |
|---|---|
| CsrlFilter | HttpSecurity#csrf |
| UsernamePasswordAuthenticationFilter | HttpSecurity#formLogin |
| BasicAuthenticationFilter | HttpSecurity#httpBasic |
| AuthorizationFilter | HttpSecurity#authorizeHttpRequests |
- 첫 번째로
CsrfFilter가 CSRF 공격을 막기 위헤 호출됩니다. - 두 번째로 요청을 인증하기 위헤 인증필터가 호출됩니다.
- 세 번재로 요청을 권한을 검증하기 위해
AuthorizationFilter가 호출됩니다.
위에 나열되지 않은 다른 필터 인스턴스가 있을 수 있습니다. 특정 요청에 대해 호출된 필터 목록을 보려면 프린트(콘솔)할 수 있습니다.
Printing the Security Filters
가끔은 특정 요청들에 대해 호출되는 시큐리티 Filter 목록을 보는 것은 도움이 됩니다. 예를 들어 추가한 필터가 시큐리티 필터 리스트에 추가된 것을 확실히 알고 싶을 때 말이죠.
필터들의 리스트는 INFO 레벨로 애플리케이션이 시작할 때 프린팅 되고 아래 console output과 같은 화면을 볼 수 있습니다.
2023-06-14T08:55:22.321-03:00  INFO 76975 --- [           main] o.s.s.web.DefaultSecurityFilterChain     : Will secure any request with [
org.springframework.security.web.session.DisableEncodeUrlFilter@404db674,
org.springframework.security.web.context.request.async.WebAsyncManagerIntegrationFilter@50f097b5,
org.springframework.security.web.context.SecurityContextHolderFilter@6fc6deb7,
org.springframework.security.web.header.HeaderWriterFilter@6f76c2cc,
org.springframework.security.web.csrf.CsrfFilter@c29fe36,
org.springframework.security.web.authentication.logout.LogoutFilter@ef60710,
org.springframework.security.web.authentication.UsernamePasswordAuthenticationFilter@7c2dfa2,
org.springframework.security.web.authentication.ui.DefaultLoginPageGeneratingFilter@4397a639,
org.springframework.security.web.authentication.ui.DefaultLogoutPageGeneratingFilter@7add838c,
org.springframework.security.web.authentication.www.BasicAuthenticationFilter@5cc9d3d0,
org.springframework.security.web.savedrequest.RequestCacheAwareFilter@7da39774,
org.springframework.security.web.servletapi.SecurityContextHolderAwareRequestFilter@32b0876c,
org.springframework.security.web.authentication.AnonymousAuthenticationFilter@3662bdff,
org.springframework.security.web.access.ExceptionTranslationFilter@77681ce4,
org.springframework.security.web.access.intercept.AuthorizationFilter@169268a7]
그러면 각 필터 체인에 대해 구성된 Security filter에 대해 꽤 좋은 아이디어를 얻을 수 있습니다.
하지만 그게 다가 아닙니다. 각 요청에 대한 각 독립적인 필터의 호출을 프린팅하도록 애플리케이션을 설정할 수 있습니다. 이것은 특정요청에 대해 추가한 필터가 호출되는지 보거나 어디서부터 에러가 발생하는지 체크하는데 유용합니다. 그렇게 하기 위해서 log the security events를 애플리케이션에 설정할 수 있습니다.
Adding a Custom Filter to the Filter Chain
대부분 기본 시큐리티 필터들은 애플리케이션을 보안하는데 충분합니다. 하지만, 가끔 커스텀한 Filter를 SecurityFilterChain에 등록하고 싶을 수 있습니다.
예를 들어 tenant id를 헤더에서 얻고 인증받은 유저가 해당 tenant에 접근 가능한 유저인지 체크하는 Filter를 추가해본다고 합시다. 이전의 설명은 우리에게 이미 필터를 추가할 곳에 대한 힌트를 줍니다. 현재 유저를 알아야 하기 때문에 인증필터 뒤에 위 필터를 두어야 합니다.
먼저 Filter를 만들어봅니다.
public class TenantFilter implements Filter {

    @Override
    public void doFilter(ServletRequest servletRequest, ServletResponse servletResponse, FilterChain filterChain) throws IOException, ServletException {
        HttpServletRequest request = (HttpServletRequest) servletRequest;
        HttpServletResponse response = (HttpServletResponse) servletResponse;

        String tenantId = request.getHeader("X-Tenant-Id"); (1)
        boolean hasAccess = isUserAllowed(tenantId); (2)
        if (hasAccess) {
            filterChain.doFilter(request, response); (3)
            return;
        }
        throw new AccessDeniedException("Access denied"); (4)
    }

}
샘플코드는 아래와 같이 수행합니다.
- request header에서 tenant id를 얻습니다.
- 유저가 tenant에 접근할 수 있는지 확인합니다.
- 만약 유저가 접근할 수 권한이 있다면 나머지 필터를 호출합니다.
- 유저가 접근할 권한이 없다면 AccessDeniedException을 발생시킵니다.
Filter를 구현하는 것 대신에 OncePerRequestFilter를 상속받아 사용할 수 있습니다. OncePerRequestFilter는 요청당 한번만 실행되고 HttpServletRequest, HttpServletResponse 파라미터를 doFilterInternal 메서드와 함께 제공합니다.
지금 위에서 구현한 TenantFilter를 security filter chain에 등록해야 합니다.
@Bean
SecurityFilterChain filterChain(HttpSecurity http) throws Exception {
    http
        // ...
        .addFilterBefore(new TenantFilter(), AuthorizationFilter.class); // 1
    return http.build();
}
@Bean
fun filterChain(http: HttpSecurity): SecurityFilterChain {
http
// ...
.addFilterBefore(TenantFilter(), AuthorizationFilter::class.java) // 1
return http.build()
}(1) TenantFilter를 AuthorizationFilter이전에 두기 위해 HttpSecurity#addFilterBefore를 이용합니다.
AuthorizationFilter이전에 필터를 등록함으로써 TenantFilter가 authentication filter 이 후에 실행됨을 확인 할 수 있습니다. 또한 특정한 필터 뒤에 위치시키기 위해 HttpSecurity#addFilterAfter를 사용할 수 있고, HttpSecurity#addFilterAt를 이용해서 filter chain중에서 특정한 포지션에 위치시킬 수도 있습니다.
이제 filter chain중에서 TenantFilter가 호출되고 유저가 tenant id에 접근권한을 체크하는지 확인해봅시다.
스프링 빈으로서 필터를 등록할 때는 @Component나 @Configuration의 어노테이션을 다는 것에 주의해야 합니다. 왜냐하면 Spring boot가 컨테이너에 자동으로 등록하기 때문인데, 이로인해 스프링 시큐리티에 의해 한번, 스프링 컨테이너에 의해 한번 중복으로 호출될 수 있습니다.
예를들어 여전히 필터를 스프링 빈으로서 등록하여 DI의 이점을 취하고, 중복호출을 회피하고 싶다면 해당 빈을 SpringBoot Container에 등록하지 않도록 설정할 수 있습니다. 그러려면 FilterRegistrationBean을 선언하고 enabled프로퍼티를 false로 세팅해야 합니다.
@Bean
public FilterRegistrationBean<TenantFilter> tenantFilterRegistration(TenantFilter filter) {
    FilterRegistrationBean<TenantFilter> registration = new FilterRegistrationBean<>(filter);
    registration.setEnabled(false);
    return registration;
}
Handling Security Exceptions
ExceptionTranslationFilter는 AccessDeniedException 과 AuthenticationException 을 HTTP 응답으로 변환해줍니다.
ExceptionTranslationFilter는 SecurityFilter들 중 일부로서 FilterChainProxy에 삽입됩니다.
아래 이미지는 ExceptionTranslationFilter가 다른 컴포넌트와 어떻게 상호작용하는지 보여줍니다.
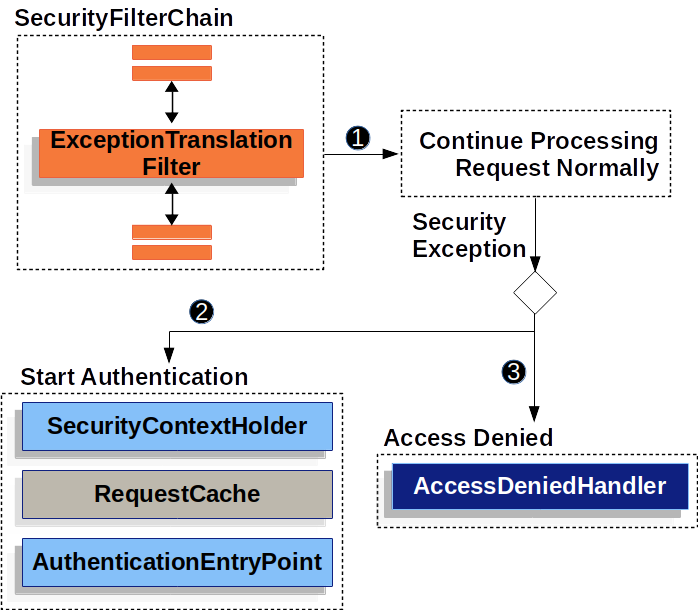
- 먼저
ExceptionTranslationFilter는FilterChain.doFilter(request, response)를 호출하여 애플리케이션의 나머지 부분을 호출합니다. - 만약 인증되지 않은 유저거나
AuthenticationException인 경우 인증을 시작합니다.- SecurityContextHolder는 초기화됩니다.
- 인증이 성공되면 해당 요청을 재생할 수 있도록
HttpServletRequest는 저장됩니다. AuthenticationEntryPoint는 클라이언트에게 인증정보를 요청하는데 사용됩니다. 예를 들어 로그인 페이지로 리다이렉트 시키거나WWW-Authenticate헤더를 보낼 수 있습니다.
- 반면
AccessDeniedException이라면 엑세스가 거부되며 그 액세스를 처리하기 위해AccessDeniedHandler가 호출됩니다.
만약 애플리케이션이
AccessDeniedException나AuthenticationException를 호출하지 않는다면ExceptionTranslationFilter는 아무것도 하지 않습니다.
ExceptionTranslationFilter의 수도코드입니다.
try {
	filterChain.doFilter(request, response); // 1
} catch (AccessDeniedException | AuthenticationException ex) {
	if (!authenticated || ex instanceof AuthenticationException) {
		startAuthentication(); // 2
	} else {
		accessDenied(); // 3
	}
}- A Review of Filters에서 설명한대로, FilterChain.doFilter(request, response)를 호출하는 것은 애플리케이션의 나머지 부분을 호출하는 것과 동일합니다. 이것은 만약 애플리케이션의 나머지 부분(
[FilterSecurityInterceptor](https://docs.spring.io/spring-security/reference/servlet/architecture.html#servlet-authorization-filtersecurityinterceptor)or method security)이 AuthenticationException나 AccessDeniedException를 발생시킨다면 해당 필터에서 그것을 캐치하고 핸들링한다는 것을 의미합니다. - 만약 유저가 인증되지 않은 유저거나 AuthenticationException이 발생한다면 Start Authentication을 실시합니다.
- 그렇지 않으면 액세스가 거부됩니다.
Saving Requests Between Authentication
Handling Security Exceptions에 삽입된 그림과 같이 요청이 인증되지 않았거나, 인증이 필요한 자원에 대한 요청이거나, 인증이 성공한 이후 재요청하려면 인증된 자원에 대한 요청은 저장될 필요가 있습니다.
스프링 시큐리티에서는 RequestChache의 구현체를 사용하여 HttpServeletRequest를 저장함으로써 이를 수행합니다.
RequestCache
HttpServletRequest는 RequestCache에 저장됩니다. 유저가 성공적으로 인증을 했을 때, RequestCache는 원본요청을 재생하게 됩니다. RequestCacheAwareFilter는 RequestCache를 이용해서 HttpServletRequest를 저장하는 것입니다.
디폴트로는 HttpSessionRequestCache가 사용되는데요. 아래에 있는 코드는 RequestCache를 어떻게 커스텀하는지 설명합니다. 만약 continue라는 파라미터가 존재하는경우 저장된 요청에 대해 HttpSession을 체크한다.
continue 파라미터가 존재한다면 RequestCache는 저장된 요청만 확인합니다.
@Bean
DefaultSecurityFilterChain springSecurity(HttpSecurity http) throws Exception {
	HttpSessionRequestCache requestCache = new HttpSessionRequestCache();
	requestCache.setMatchingRequestParameterName("continue");
	http
		// ...
		.requestCache((cache) -> cache
			.requestCache(requestCache)
		);
	return http.build();
}
@Bean
open fun springSecurity(http: HttpSecurity): SecurityFilterChain {
val httpRequestCache = HttpSessionRequestCache()
httpRequestCache.setMatchingRequestParameterName("continue")
http {
requestCache {
requestCache = httpRequestCache
}
}
return http.build()
}Prevent the Request From Being Saved
많은 이유로 인증되지 않은 요청을 세션에 저장하지 않기를 원할 수 있습니다. 해당 스토리지를 유저의 브라우저로 오프로드 하거나 데이터베이스에 저장할 수 있습니다. 또는 항상 유저를 로그인하기전의 방문했던 곳 대신 홈으로 리다이렉트 시키기 위해 아마 이 기능을 끌 수도 있습니다.
그러기 위해 NullRequestCache 구현체를 아래와 같이 사용할 수 있습니다.
요청이 저장되지 않도록 방지합니다.
@Bean
SecurityFilterChain springSecurity(HttpSecurity http) throws Exception {
    RequestCache nullRequestCache = new NullRequestCache();
    http
        // ...
        .requestCache((cache) -> cache
            .requestCache(nullRequestCache)
        );
    return http.build();
}
@Bean
open fun springSecurity(http: HttpSecurity): SecurityFilterChain {
    val nullRequestCache = NullRequestCache()
    http {
        requestCache {
            requestCache = nullRequestCache
        }
    }
    return http.build()
}
RequestCacheAwareFilter
RequestCacheAwareFilter는 RequestCache를 이용해 HttpServletRequest를 저장합니다.
Logging
Spring Security는 DEBUG 및 TRACE 수준에서 모든 보안관련 이벤트에 대한 포괄적인 로깅을 제공합니다. 스프링 시큐리티는 request가 거부된 이유에 대해 세부정보를 응답본문에 포함하지 않기 때문에 애플리케이션을 디버깅 할 때 매우 유용할 수 있습니다. 만약 401, 403에러를 만난다면 무슨 일이 일어나는지 이해하는데 도움이 되는 로그메시지를 찾을 가능성이 높습니다.
사용자가 사용가능한 CSRF 토큰이 없이 CSRF 보호가 된 자원에 대해 POST 요청을 시도했다고 가정해봅시다. 로그 없이 유저는 요청이 거부당한 이유에 대한 설명도 없이 403에러를 보게 될 것입니다. 하지만 스프링 시큐리티에 대해 로깅이 가능하다면 아래와 같은 메시지를 볼 수 있게 됩니다.
2023-06-14T09:44:25.797-03:00 DEBUG 76975 --- [nio-8080-exec-1] o.s.security.web.FilterChainProxy        : Securing POST /hello
2023-06-14T09:44:25.797-03:00 TRACE 76975 --- [nio-8080-exec-1] o.s.security.web.FilterChainProxy        : Invoking DisableEncodeUrlFilter (1/15)
2023-06-14T09:44:25.798-03:00 TRACE 76975 --- [nio-8080-exec-1] o.s.security.web.FilterChainProxy        : Invoking WebAsyncManagerIntegrationFilter (2/15)
2023-06-14T09:44:25.800-03:00 TRACE 76975 --- [nio-8080-exec-1] o.s.security.web.FilterChainProxy        : Invoking SecurityContextHolderFilter (3/15)
2023-06-14T09:44:25.801-03:00 TRACE 76975 --- [nio-8080-exec-1] o.s.security.web.FilterChainProxy        : Invoking HeaderWriterFilter (4/15)
2023-06-14T09:44:25.802-03:00 TRACE 76975 --- [nio-8080-exec-1] o.s.security.web.FilterChainProxy        : Invoking CsrfFilter (5/15)
2023-06-14T09:44:25.814-03:00 DEBUG 76975 --- [nio-8080-exec-1] o.s.security.web.csrf.CsrfFilter         : Invalid CSRF token found for http://localhost:8080/hello
2023-06-14T09:44:25.814-03:00 DEBUG 76975 --- [nio-8080-exec-1] o.s.s.w.access.AccessDeniedHandlerImpl   : Responding with 403 status code
2023-06-14T09:44:25.814-03:00 TRACE 76975 --- [nio-8080-exec-1] o.s.s.w.header.writers.HstsHeaderWriter  : Not injecting HSTS header since it did not match request to [Is Secure]
CSRF 토큰이 없고 그게 요청이 거부된 이유라는 것은 명확합니다.
보안 관련된 모든 이벤트를 기록하도록 애플리케이션을 설정하려면 아래코드를 애플리케이션에 추가할 수 있습니다.
logging.level.org.springframework.security=TRACE<configuration>
<appender name="STDOUT" class="ch.qos.logback.core.ConsoleAppender">
<!-- ... -->
</appender>
<!-- ... -->
<logger name="org.springframework.security" level="trace" additivity="false">
<appender-ref ref="Console" />
</logger>
</configuration>참고
https://docs.spring.io/spring-security/reference/servlet/architecture.html
