DOM(Document Object Model 문서객체모델)
DOM 이란??
- DOM 은 HTML문서 내용을을 트리형태도 구조화하여 웹페이지와 프로그래밍 언어를 연결시켜주는 역할을 한다.
- 작성한 문서를 객체 형태로 모델화 한다! 라고 생각하면 된다.
- 각각의 요소와 속성, 콘텐츠를 표현하는 단위를 노드(node)라고 한다
DOM 트리에 접근하기
document 객체를 통해 HTML에 접근이 가능
// 해당하는 Id를 가진 요소에 접근하기
document.getElementById()

// 해당하는 모든 요소에 접근하기
document.getElementsByTagName();

// 해당하는 클래스를 가진 모든 요소에 접근하기
document.getElementsByClassName();

// css 선택자로 단일 요소에 접근하기
document.querySelector("selector");

// css 선택자로 여러 요소에 접근하기
document.querySelectorAll("selector");document.querySelector은 하나만 선택해주기 때문에 여러개의 같은 요소를 가진 애를 불러올땐 querySelectorAll 를 사용!
DOM 제어 명령어
1.이벤트 삽입
target.addEventListener(type,listener)
- 이벤트의 타입에는 click, mouseover, mouseout, wheel 등 다양한 이벤트를 감지
- listener 함수의 인수에는 이벤트에 대한 정보가 담겨있다.
const myBtn = document.querySelector("button");

myBtn.addEventListener('click', function(){
	console.log("hello world");
})
HTML 에 button 을 작성하고
자바스크립트에 버튼을 myBtn이라는 상수에 넣어주었다.
그리고 나서 클릭 했을 때 콘솔에 'hello world' 가 입력되도록 이벤트를 부여해줌!
2. 클래스 제어
classList
DOM api(application programming interface: 브라우저가 우리한테 명세해주는 것,
사내문서 느낌) 를 통해 class 속성을 제어할 수 있다.
myBtn.addEventListener('click', function(){
myBtn.classList.add("blue"); // 클래스네임 삽입
click 했을 때 클래스에 blue 가 add 된다.
클래스 제어할 수 있는 다양한 속성
- remove
myBtn.classList.remove(“blue”): 클래스 제거 - toggle
myBtn.classList.toggle(“blue”): 토글 (있으면 지우고 없으면 추가해라!) - contains
myBtn.classList.contains(“blue”):클래스 있는지 확인 true or false
실습
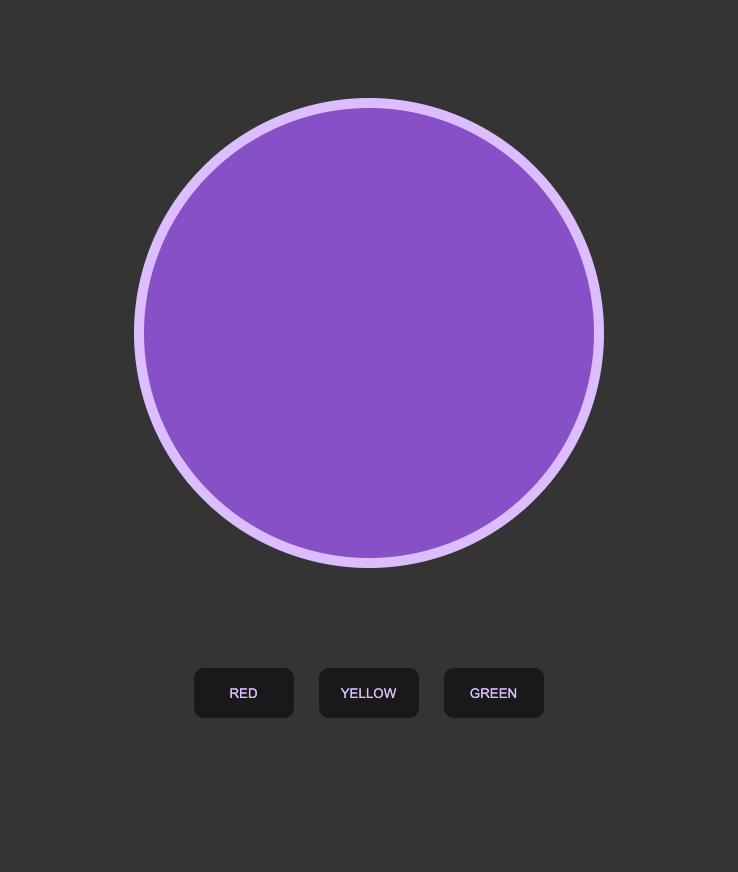
미션 !
버튼을 클릭했을 때 색깔이 변하게 만들어 줘야한다!
- 우선 상수에 담아준다
const box = document.querySelector('.box');
    const red = document.querySelector('.red');
    const yellow = document.querySelector('.yellow');
const green = document.querySelector('.green');- 처음 짠 코드는 조금 비효율적이다. 여러개의 요소가 추가되면 어쩔겨 ?
    red.addEventListener('click', () => {
      box.classList.remove("red", 'yellow', 'green');
      box.classList.add('red')
    });
    yellow.addEventListener('click', () => {
      box.classList.remove("red", 'green');
      box.classList.add('yellow')
    });
    green.addEventListener('click', () => {
      box.classList.remove("red", 'yellow');
      box.classList.add('green')
});- 아래 코드 처럼 배열을 만들어 컬러를 추가하면 편하게 제어할 수 있다
const btnArr = [red, yellow, green]

    btnArr.forEach((element) => {
      element.addEventListener('click', () => {
        box.classList.remove('red', 'green', 'yellow');
        if (element.className == 'red') {
          box.classList.add('red')
        } else if (element.className === 'yellow') {
          box.classList.add('yellow')
        } else {
          box.classList.add('green')
        }
      })
    })

짠 잘 동작하는 것을 볼 수 있음 !
3. 요소 제어
DOM api 를 이용하면 요소를 새롭게 생성하고, 위치하고, 제거할 수 있다
-
createElement
document.createElement(target);
: target 요소를 생성 -
createTextNode
document.createTextNode(target);
: target 텍스트를 생성 -
appendChild
element.appendChild(target);
: target 요소를 element의 자식으로 위치 -
removeChild
element.removeChild(target);
: element의 target 자식 요소를 제거 -
insertBefore
parentElement.insertBefore(target, location);- target요소를 parentElement의 자식 location의 위치 앞에 집어넣는것
- 좀 더 구체적으로 원하는 요소 앞에 넣을 수 있다는 장점이 있다.
4. 문자열을 사용해 element, text 노드 생성 / 추가
- value 값을
innertext로 뽑아줄수도 있다!
<p></p>
<input type="text">
<button>Write Something!</button>
const myBtn = document.querySelector("button");
const myP = document.querySelector("p");
const myInput = document.querySelector("input");
myBtn.addEventListener('click', function () {
myP.textContent = myInput.value;
}); 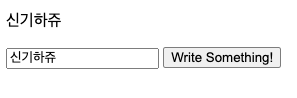
textContent
input 에도 이벤트리스너를 달아서 실시간으로 적히는걸 적어주는 기능
 myInput.addEventListener('input', () => {
      myP.textContent = myInput.value;
}); 
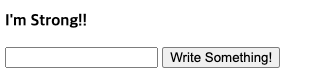
myP.textContent = "<strong>I'm Strong!!</strong>";- 콘텐츠를 그대로 가져옴 (css문법이 들어있다면 이것까지)
<strong>I'm Strong!!</strong>가 출력이 됨
innerHTML:
태그 안에 자식으로 문자열 전달하기- innerHTML 은 요소의 렌더링된 텍스트 콘텐츠를 나타낸다
- 사람이 읽을 필요가 있는 것만 보여준다
- 보안 이슈가 있다는 것 기억하기
(인라인으로 쓰는 자바스크립트는 먹히는데, 인라인 JS 자체가 좋지 않으니 지양!) - 그럼 어떻게 하죠? onclick 말고 대신 addEventListner 해주면 됨!!
myP.innerHTML = "<strong>I'm Strong!!</strong>";
5. 더 인접한곳(Adjacent)으로 정밀하게 배치하기
insertAdjacentHTML : 요소 노드를 주어진 위치에 배치
- [어제이슨]이라 부름!

<strong class="sayHi">
    반갑습니다.
</strong>
const sayHi = document.querySelector('.sayHi');
sayHi.insertAdjacentHTML('beforebegin', '<span>안녕하세요?</span>');
sayHi.insertAdjacentHTML('afterbegin', '<span>요를레이이이요</span>');
sayHi.insertAdjacentHTML('beforeend', '<span>어제이슨..? 오늘이슨은 업나요</span>');
sayHi.insertAdjacentHTML('afterend', '<span>포항항^^*</span>');6. 이벤트 객체
이벤트에서 호출되는 핸들러에는 이벤트와 관련된 모든 정보를 갖고있는 매개변수(이벤트 객체)가 전송
- 이벤트 핸들러
이벤트 객체 : 핸들러에 자동으로 전달되는 객체
const btnFirst = document.querySelector('.btn-first');
btnFirst.addEventListener('click', (event) => {
    console.log(event);
});
클릭하니깐 콘솔창에 이렇게 출력됨을 볼 수 있음!
7. 이벤트 흐름
브라우저 화면에서 이벤트가 발생하면 브라우저는 이벤트 대상을 찾음 !
캡처링 단계
이벤트 단계 찾기
: 브라우저가 이벤트 대상을 찾아갈 때 가장 상위의 window 객체 > Document > body 순으로 DOM 트리를 따라 내려간다. 이벤트가 발생한 애를 찾을 때까지.
이벤트 대상을 찾아가는 과정에서 브라우저는 중간에 만나는 모든 캡처링 이벤트를 실행시킨다!
true 를 적어주면 캡처링 이벤트가 발생한다 !
=> 캡처링 단계에서 이벤트가 실행된다.
 window.addEventListener('click', () => {
            console.log("window capture!");
        }, true);
버블링 단계
이벤트 실행
: 이벤트 대상을 찾고 캡처링이 끝나면 이제 다시 DOM 트리를 따라 올라감! 그리고 올라가는 과정에서 버블링 이벤트가 있다면, 만나는 모든 버블링 이벤트 리스너를 실행시킨다.
- 이벤트리스너에서 세 번째 매개변수가 없거나, false로 지정되어 있으면 버블링이다!
  btnFirst.addEventListener('click', (event) => {
            console.log("btn bubble!");
        })
이벤트 전파
이벤트 캡처링, 버블링 과정에서 이벤트 리스너가 차례로 실행되는것을 이벤트 전파(event propagation)라고 한다.
8. 이벤트 위임
이벤트 리스너가 없어도 마치 리슨어가 있는 것처럼 사용할 수 있다. 이벤트 전파과정은 부모에서 자식으로 이어지기 때문 (이벤트 리스너가 없는 요소에 이벤트가 발생했을 때도 해당 요소에 접근할 수 있음)
   const parent = document.querySelector('.parent');
        parent.addEventListener('click', function (event) {
            console.log(event.target);
            if (event.target.nodeName === "BUTTON") {
                event.target.innerText = "버튼4";
            }
})- parent 에 이벤트를 줬는데, 자식요소에 li 에 이벤트가 적용되게! => 이벤트위임
- 부모에게 이벤트를 주고 자식은 타켓으로 !
- 이벤트 타켓인 버튼을 클릭하면 innerText 가 버튼4로 변경됨
9. 이벤트의 this
this 는 이벤트가 연결된 노드를 참조한다
event.currentTarget 속성의 참조값과 비슷 !
  <article class="parent">
    <ol>
        <li><button class="btn-first" type="button">버튼1</button></li>
        <li><button type="button">버튼2</button></li>
        <li><button type="button">버튼3</button></li>
    </ol>
</article>

<script>
    const parent = document.querySelector('.parent');
    parent.addEventListener('click', function (event) {
        console.log(this);
    })
</script>
유의할 점!
- 만약 이벤트 리스너 함수를 화살표 함수로 쓴다면 this 가 가리키는 대상이 달라진다.
- 화살표 함수를 쓰게되면 자기의 스코프의 한단계 상위 스코프를 가리킴