1. Jenkins 설정
Jenkins를 통해 ACR에 이미지를 push해야하기 때문에 사전 설정이 이루어져야합니다.
먼저 Jenkins vm에 ssh로 접속합니다.
ssh ${adminId}@${VM ip}azure-cli 설치
azure-cli를 설치합니다.
curl -sL https://aka.ms/InstallAzureCLIDeb | sudo bash참고
kubernetes로 직접 배포가 필요할 경우 아래 명령도 실행합니다.
sudo az aks install-cli
Azure 서비스 주체 만들기
Azure 서비스 주체란 애플리케이션, 호스팅 된 서비스 및 자동화 된 도구에서 사용하여 Azure 리소스에 엑세스 하기 위해 만든 ID입니다.
아래의 명령으로 서비스 주체를 생성합니다.
az ad sp create-for-rbac두가지 인증 유형(암호 기반 인증, 인증서 기반 인증) 중 암호 기반 인증을 이용해서 서비스 주체를 설정합니다.
아래 명령의 출력에는 password키가 포함되어 있습니다. 이 값은 검색할 수 없으므로, 복사해야한다. 잊어버린경우 서비스 주체 자격 증명을 다시 설정해야합니다.
az ad sp create-for-rbac --name devopsCredential --role Contributor --scopes /subscriptions/<구독ID>/resourceGroups/msa-project-group구독 ID 확인하는 방법
az account show --query id -o tsv기존 서비스 주체 가져오기 (비밀번호는 확인 불가)
az ad sp list역할 추가 및 제거
az role assignment create --assignee appID \
                          --role Reader \
                          --scope /subscriptions/mySubscriptionID/resourceGroups/myResourceGroupName
az role assignment delete --assignee appID \ --role Contributor \ --scope /subscriptions/mySubscriptionID/resourceGroups/myResourceGroupName
Jenkins에 Azure 서비스 주체 추가하기
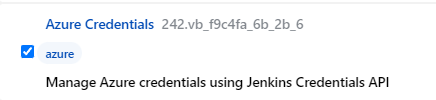
먼저 Azure Credential 플러그인을 추가합니다.
1. Dashboard의 'Jenkins 관리'에서 plugin 관리 클릭 후 ‘설치 가능’ 에서 Azure Credentials 검색합니다.
2. 체크박스를 선택 후 Install without restart 클릭합니다.
다음 Azure 서비스 주체를 추가합니다.
1. Dashboard의 ‘Jenkins 관리’ > Manage Credentials >Stores scoped to Jenkins의 "Jenkins" > Global credintials (unrestricted) > 좌측의 Add Credentials을 클릭합니다.
2. Kind에 Azure Service Principal 선택합니다.
3. 필드값을 입력합니다.
- Subscription ID: Azure 구독 ID입니다.
- ClientID: 서비스 주체 앱 ID
- Client Secret: 서비스 주체 암호
- 테넌트 ID: Microsoft 계정 테넌트 ID
- Azure 환경: 사용자 환경에 적합한 값을 선택합니다. 예를 들어 Azure Global의 경우 Azure를 사용하세요.
- ID: 일단 azure_service_principal 로 설정합니다.(있다면 다른걸로)
- 설명: 이 값은 선택 사항이지만 설명서/유지 관리 관점에서 권장됩니다.
2. Jenkinsfile 작성
Jenkins build를 위해 Jenkins pipeline을 정의한 Jenkinsfile을 먼저 작성합니다.
프로젝트 최상단에 Jenkinsfile을 생성합니다.
maven
pipeline {
  agent any
  environment {
    IMAGE_REPO = '${IMAGE_REPO}' //ACR 주소
    IMAGE_NAME = '${IMAGE_NAME}' //Image 이름
    IMAGE_TAG = "${env.BUILD_NUMBER}" //수정 필요 x(Jenkins 현재 빌드 Number 환경변수)
    ENVIRONMENT = '${ENVIRONMENT}' //환경
    HELM_VALUES = '${HELM_VALUES}' //Helm Values(Image_tag 변경)
  }
  stages {
    stage('Build') {
        steps {
            sh './mvnw compile'
        }
    }
    stage('Unit Test') {
        steps {
            sh './mvnw test'
        }
        post {
            always {
                junit 'target/surefire-reports/*.xml'
                step([ $class: 'JacocoPublisher' ])
            }
        }
    }
    stage('Static Code Analysis') {
        steps {
            configFileProvider([configFile(fileId: 'maven-settings', variable: 'MAVEN_SETTINGS')]) {
                sh './mvnw sonar:sonar -s $MAVEN_SETTINGS'
            }
        }
    }
    stage('Package') {
        steps {
            sh './mvnw package -DskipTests'
            archiveArtifacts artifacts: 'target/*.jar', fingerprint: true
        }
    }
    stage('Build Docker image') {
        steps {
            echo 'The build number is ${IMAGE_TAG}'
            sh 'docker build --build-arg ENVIRONMENT=${ENVIRONMENT} -t ${IMAGE_REPO}/${IMAGE_NAME}:${IMAGE_TAG} .'
        }
    }
    stage('Push Docker image') {
        steps {
            withCredentials([azureServicePrincipal('azure_service_principal')]) {
                echo '---------az login------------'
                sh '''
                az login --service-principal -u $AZURE_CLIENT_ID -p $AZURE_CLIENT_SECRET -t $AZURE_TENANT_ID
                az account set -s $AZURE_SUBSCRIPTION_ID
                '''
                sh 'az acr login --name mungtaregistry'
                sh 'docker push ${IMAGE_REPO}/${IMAGE_NAME}:${IMAGE_TAG}'
                sh 'az logout'
            }
        }
    }
    stage('Clean Docker image') {
        steps {
            echo '---------Clean image------------'
            sh 'docker rmi ${IMAGE_REPO}/${IMAGE_NAME}:${IMAGE_TAG}'
        }
    }
    stage('Update manifest') {
        steps {
          sh """
            git config --global user.name "${GITHUB_NAME}"
            git config --global user.email "${GITHUB_EMAIL}"
            git config --global credential.helper cache
            git config --global push.default simple
          """

          git url: "${HELM_CHART}", credentialsId: 'mungta_github_ssh', branch: 'main'
          sh """
            sed -i 's/tag:.*/tag: "${IMAGE_TAG}"/g' ${HELM_VALUES}
            git add ${HELM_VALUES}
            git commit -m 'Update Docker image tag: ${IMAGE_TAG}'
          """

          sshagent (credentials: ['mungta_github_ssh']) {
            sh 'git push origin main'
          }
        }
    }
}
3. Jenkins Job 생성
현재 파이프라인은 GitHub에 푸시가 되면 Webhook으로 Jenkins로 push되었다고 전달해야 하기 때문에 Github 설정을 먼저 해야한다.
GitHub 설정
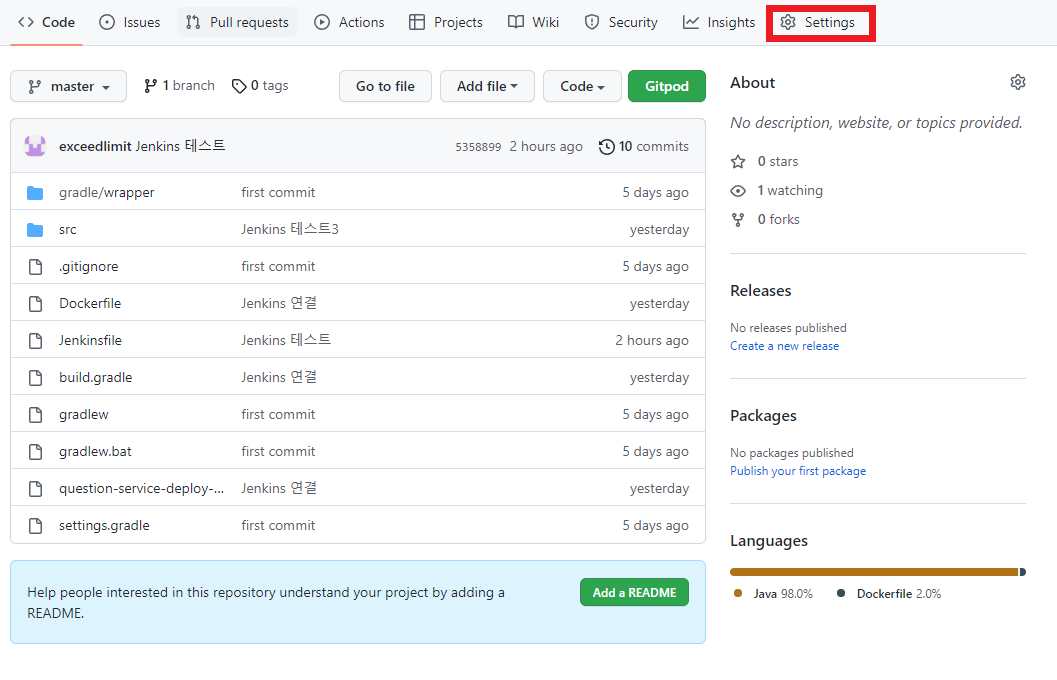
- 배포할 Repository에서 ‘Settings’ 접속
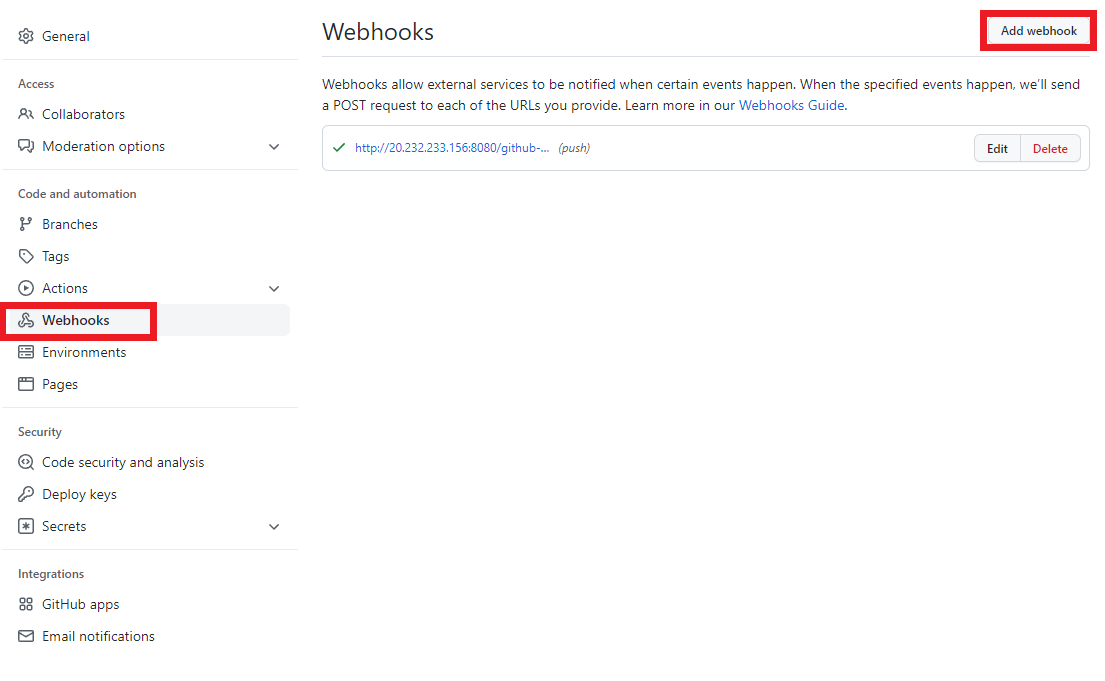
- ‘Webhook’ 클릭 후 ‘Add Webhook’ 클릭
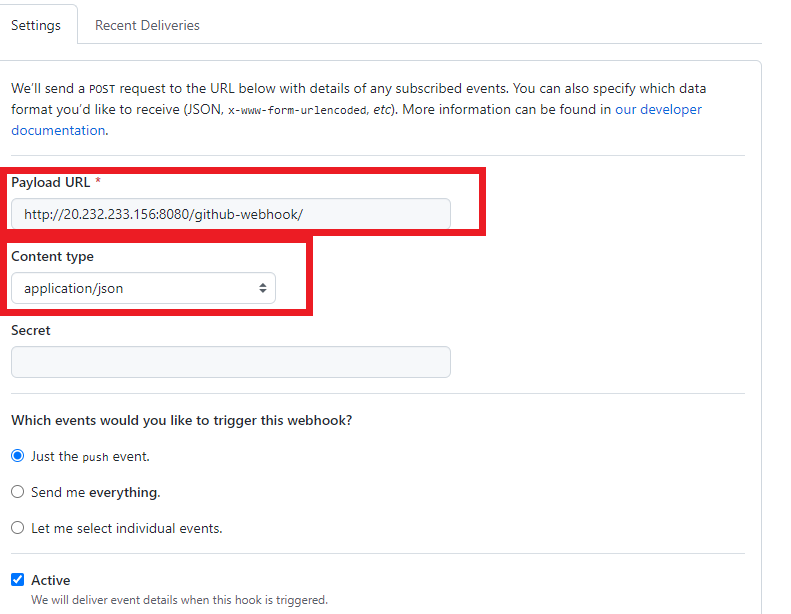
- payload URL에는 ' jenkins주소/github-webhook/' 입력하고 Content type은 ‘application/json’으로 변경 후 저장
Jenkins 설정
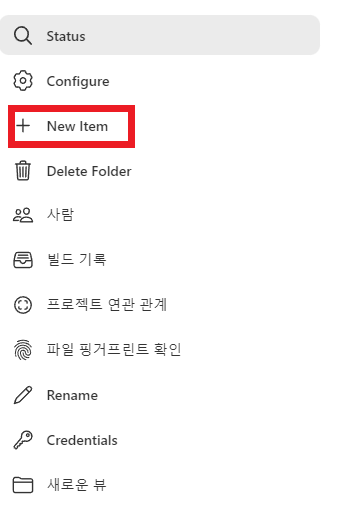
- 파이프라인을 구축할 위치에서 ‘New Item’ 으로 아이템 추가
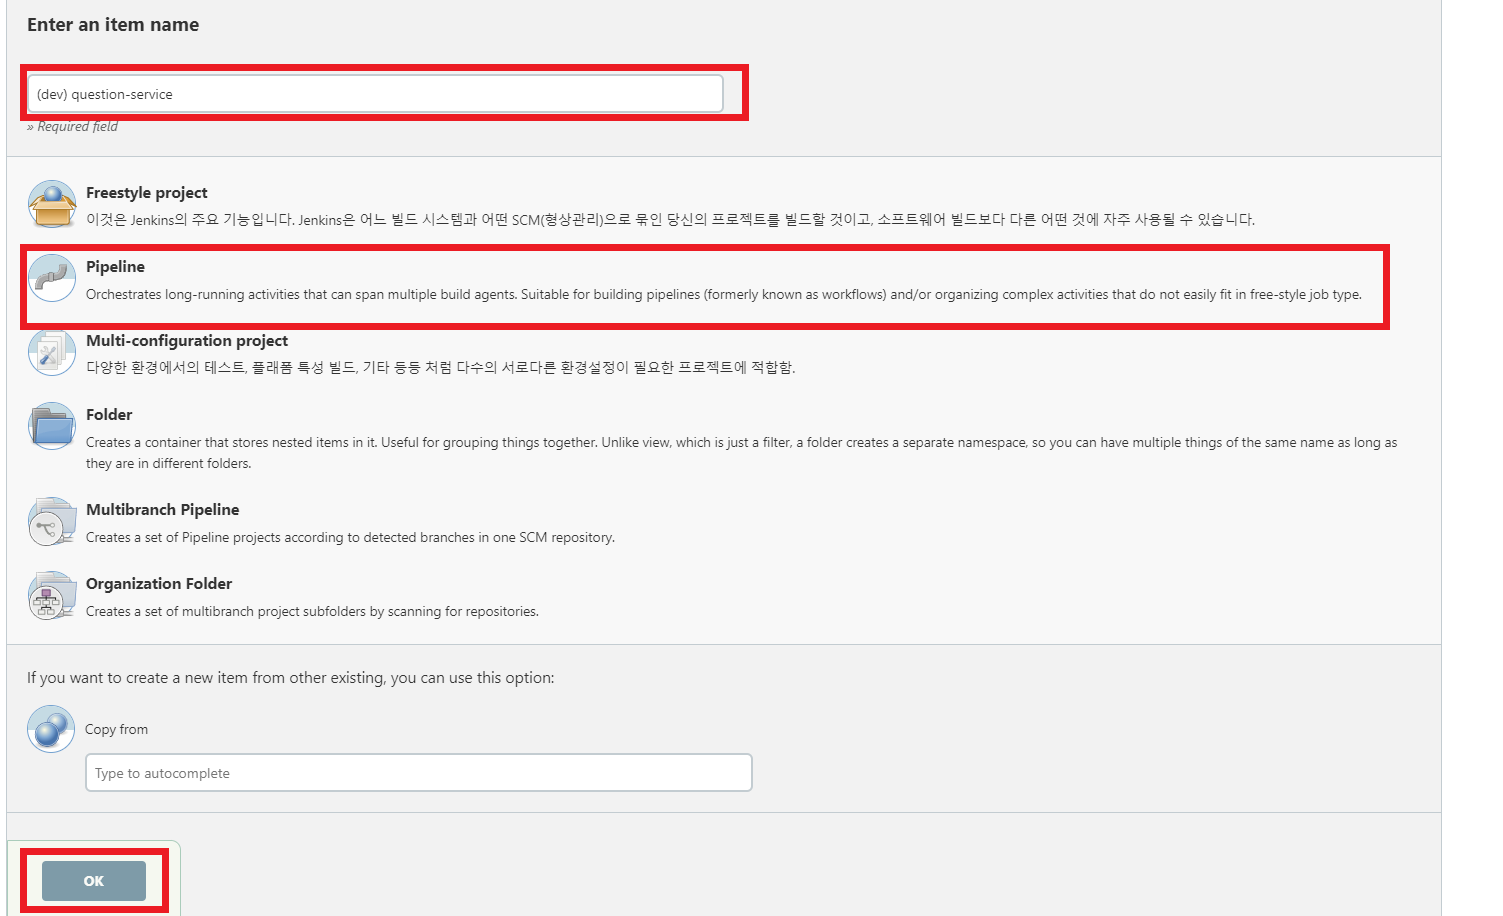
- 네이밍을 입력 후 pipeline 선택 후 ‘OK’ 클릭
- General의 GitHub project 클릭 후 배포할 소스가 있는 GitHub Repository 주소 입력(GitHub 플러그인이 설치되어 있어야 합니다.)

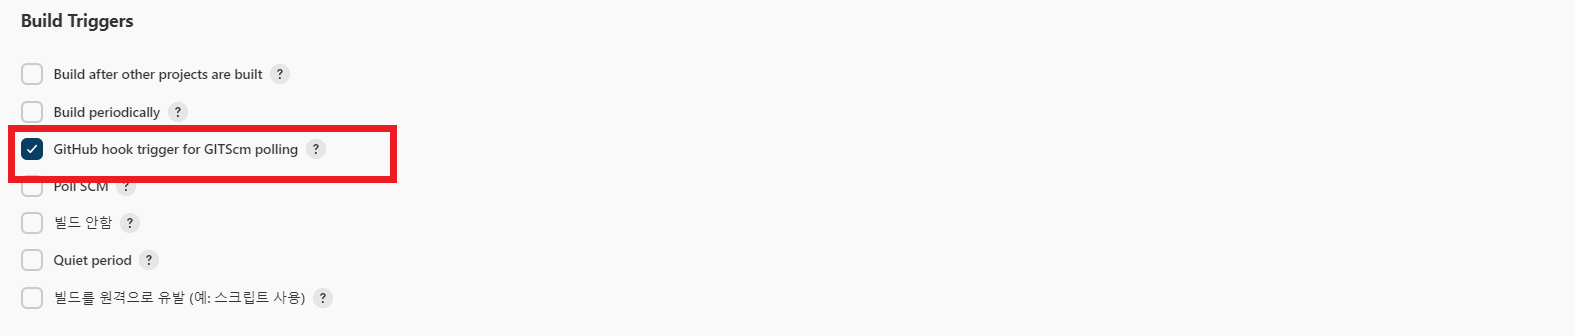
- Build Triggers의 ' GitHub hook trigger for GITScm polling' 클릭(GitHub에서 웹훅으로 푸시 이벤트 전달받겠다는 의미입니다.)
- Pipeline의 Definition을 ‘Pipeline script from SCM’ 클릭
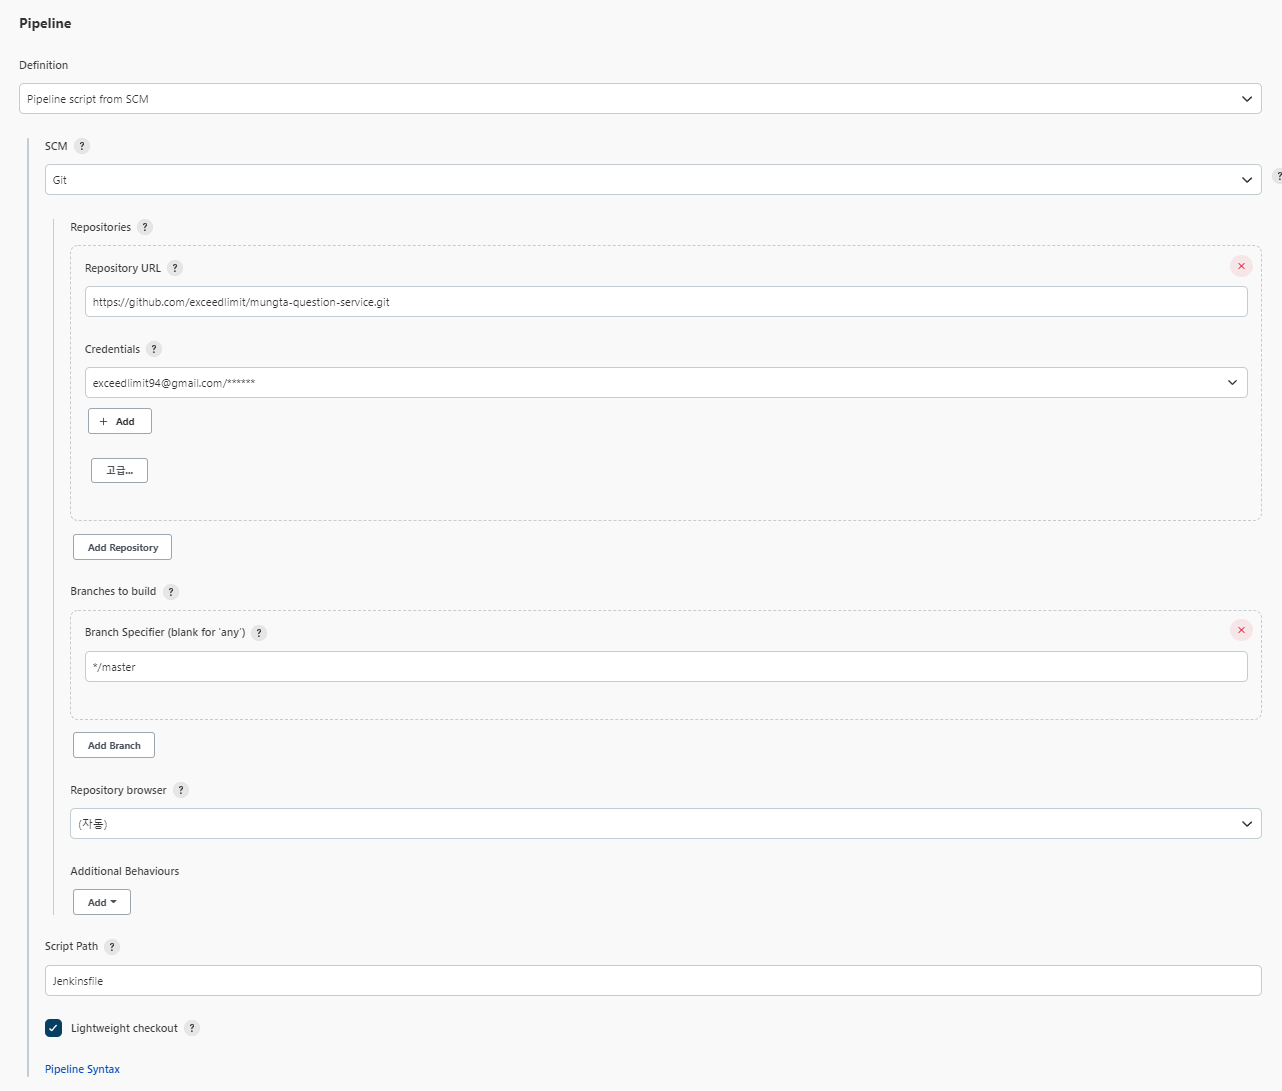
- 'SCM’으로 Git 선택
- 아래 Repositories에 위에 배포할 소스가 있는 GitHub Repository 주소 입력(3번에서 입력한 주소와 동일)
- Credentials에 해당 Repository에 접근 가능한 계정 선택
a. 만약 계정 등록이 되어 있지 않다면 ‘+Add’ 클릭 후 계정 등록(Jenkins에 등록하면 전역 계정 등록)- Kind : Username with password
- Scope : Global
- Username : GitHub 계정
- Password : GitHub 비밀번호
- ID : 별칭
- Description : 설명(안적어도 됨)
- Branches to build는 빌드할 브랜치 입력
- Script Path는 ‘Jenkinsfile’로 입력 후 저장
이렇게 Job을 생성하고 Jenkins 빌드를 돌리게 되면 정상적으로 Job이 돌아갈 것입니다.(이때 Azure-cli와 docker는 기본적으로 vm에 설치가 되어 있어야 합니다. vm에 docker 설치는 sonarqube를 설치하는 게시글에서 소개해두었습니다.)
job을 돌렸을 때 permission denied: ‘/usr/local/bin/kubectl’ 에러 발생시에는 ssh로 VM에 직접 접속한 뒤 아래 명령을 직접 실행해주면 됩니다.
sudo chmod 666 /var/run/docker.sock
sudo usermod -aG docker ${USER}
여기까지 ACR에 이미지 빌드 및 푸시까지 Jenkins를 통해 하는 작업을 진행하였습니다. 다음 게시글에서는 ArgoCD를 이용한 AKS 배포를 진행해보겠습니다.