1. Helm
Helm이란 Kubernetes 패키지 관리를 도와주는 것으로 yaml 파일의 모음이라고 할 수 있습니다. Helm에는 3가지 주요 개념이 있습니다.
1. Chart
헬름 패키지로, k8s에서 애플리케이션이 기동되기 위한 리소스들이 포함되어 있습니다.
2. repository
Chart 저장소입니다.
3. Release
k8s에서 구동되는 Chart 인스턴스입니다. chart를 여러번 설치할 때마다 새로운 Release로 관리됩니다.
repo에서 helm Chart를 검색하고 각 설치에 따른 새로운 Release를 생성하는 개념으로 이해하면 됩니다.
helm 설치
$ curl -fsSL -o get_helm.sh https://raw.githubusercontent.com/helm/helm/master/scripts/get-helm-3
$ chmod 700 get_helm.sh
$ ./get_helm.sh

$ helm version
helm repo에 chart 추가
helm repo add [name] [url]

$ helm repo add stable https://charts.helm.sh/stable

# 추가된 repository 확인
$ helm repo list

# repository update
$ helm repo update
2. 무중단 배포전략
무중단 배포전략에는 크게 3가지가 있습니다.
- Rolling update
기존의 서버를 하나씩 죽이고 새로 하나씩 새로운 버전의 서버를 하나씩 띄우면서 순차적으로 교체하는 방식입니다.- 장점
- 제한된 인스턴스 수 안에서 무중단으로 배포할 수 있다.
- 단점
- 배포 중 인스턴스의 수가 줄어들어서 서버 용량 처리를 미리 고려해야 한다.
- 두가지 버전이 동시에 공존하는 시간이 있다.
- 장점
반대로 새로운 서버를 하나 먼저 배포하고 서버를 죽이는 방법도 존재는 합니다. 이 경우는 인스턴스 수가 줄어든다는 단점은 없지만, 배포하는동안 추가 자원을 요구한다는 단점이 있습니다.
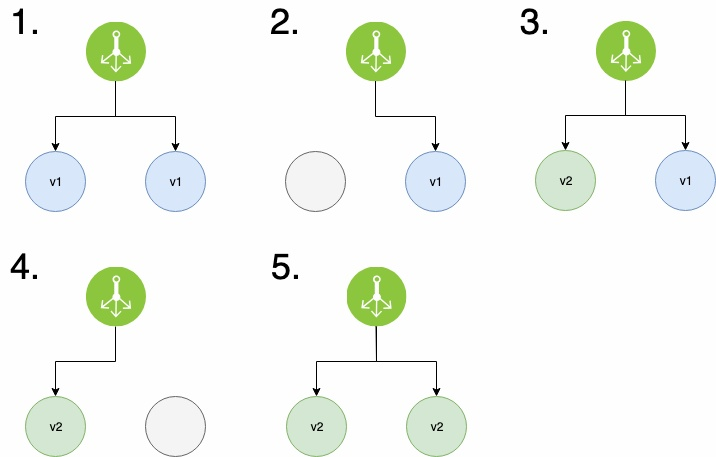
- Blue/Green
구 버전(Blue)을 띄워둔 상태에서 새로운 버전(Green)은 필요한 인스턴스만큼 모두 띄웁니다. 그리고 한번에 엔드포인트를 구 버전에서 새로운 버전으로 바꿔준 다음 구 버전은 모두 종료시킵니다.- 장점
- 롤백이 쉬우며 여러 버전이 공존하는 시간이 존재하지 않습니다.
- 운영 환경에 영향을 주지 않고 신버전의 테스트가 가능합니다.
- 단점
- 배포 중 인스턴스가 두배로 필요하므로 자원이 두배가 요구됩니다.
- 장점
- Canary
옛날 광산에서는 일을 할 때에 카나리아라는 새를 옆에 두고 일을 했다고 합니다. 카나리아는 유독가스에 민감해서 만약 유독가스의 유출이 있는 경우 카나리아가 죽게되고 광부들은 대피했다고 하더군요. 카나리아는 여기서 유래된 배포 전략입니다. 먼저 위험을 감지할 수 있는 서버를 일부만 새 버전으로 배포하고, 일부 트래픽을 새 버전으로 분산하여 테스트를 진행합니다. 분선 후 결과에 따라 새 버전을 적용할지, 새 버전으로 전체를 교체할지 결정에 따라 진행합니다. 이 기법으로 A/B테스트도 가능하다고 합니다.
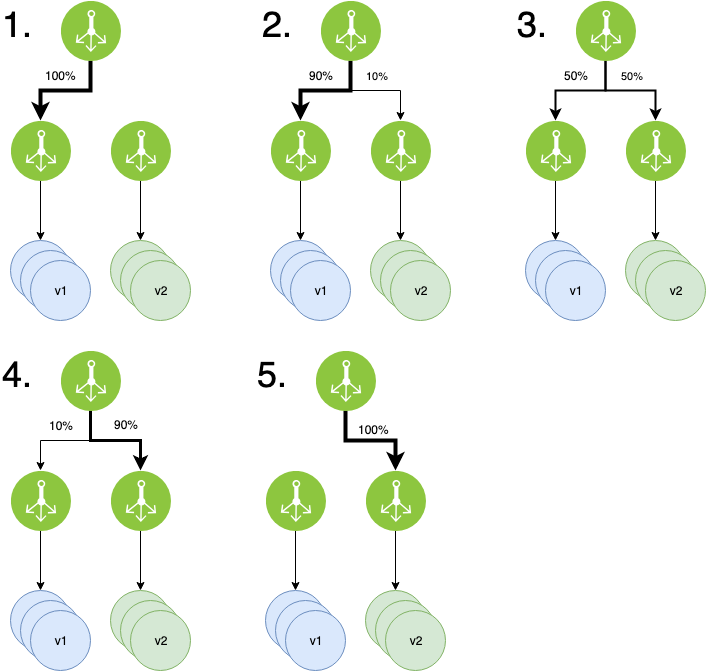
이 3가지 기법중 저희는 Blue/Green배포 전략을 사용하였습니다. ArgoCD가 쉽게 지원한다는 장점도 있고, 프로젝트에 트래픽이 크지 않을 것이기 때문에 인스턴스가 적었고, 그 정도 잠깐 추가로 뜨는 정도는 전체 비용에서 큰 영향을 끼치지 않을 것이라고 생각했기 때문입니다.
3. ArgoCD 설치
argoCD는 GitOps 방식으로 관리되는 Manifest파일들의 변경 사항을 감지해서 배포된 환경 상태와 동일하게 유지하는 역할을 합니다. argoCD는 k8s를 위한 CD툴이라고 볼 수 있습니다.
ArgoCD 설치
$ helm repo add argo https://argoproj.github.io/argo-helm
$ helm repo list
$ helm repo update

$ kubectl create namespace argocd
$ kubectl apply -n argocd -f https://raw.githubusercontent.com/argoproj/argo-cd/stable/manifests/ha/install.yaml
argo-rollouts설치
blue/Green배포를 위해 argocd에서는 Deployment대신 Rollout을 사용하며, 이를 위해 argo-rollouts을 설치해야합니다.
# argo-rollouts의 namespace 생성
$ kubectl create namespace argo-rollouts

# manifest 파일 이용하여 argo-rollouts 설치
$ kubectl apply -n argo-rollouts -f https://github.com/argoproj/argo-rollouts/releases/latest/download/install.yaml
argocd 접속 후 password 변경
# argocd password 확인
$ kubectl -n argocd get secret argocd-initial-admin-secret -o jsonpath="{.data.password}" | base64 -d
# IP 주소 확인
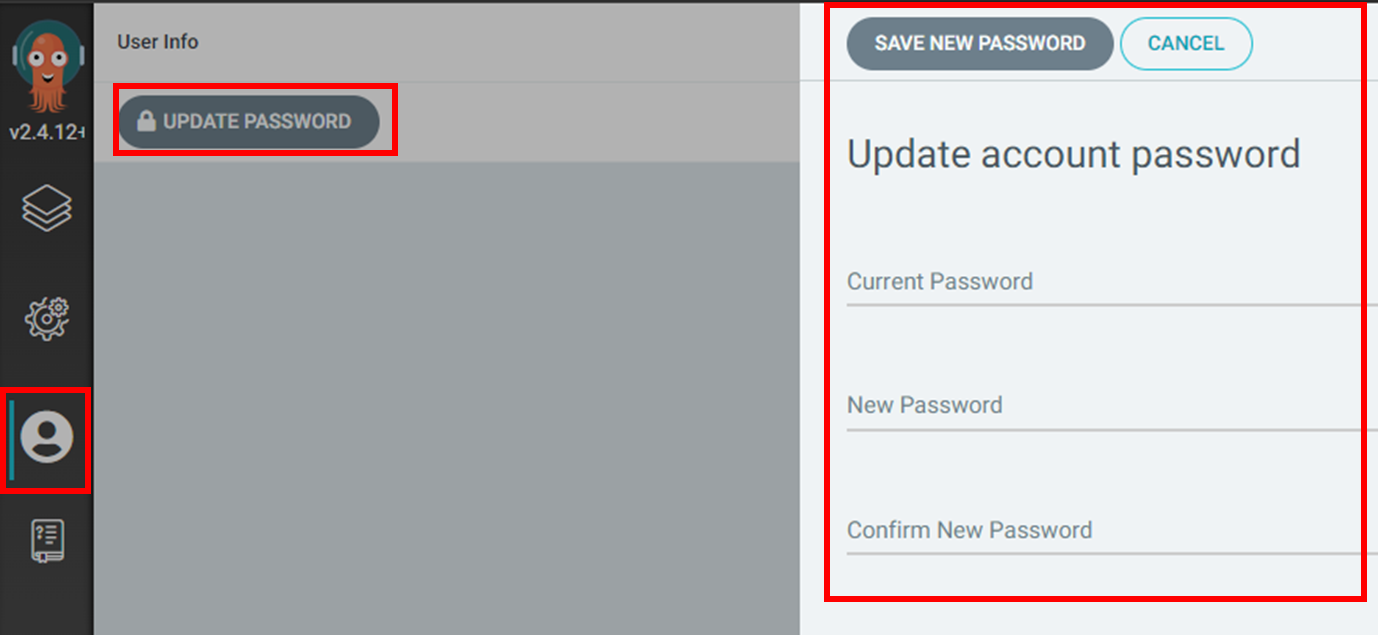
$ kubectl get svc -n argocd최초 Id는 admin입니다.
admin/확인된 password로 argocd 에 로그인 후 아래와 같은 경로를 통해 원하는 password로 변경합니다.
4. GitOps 작성
gitOps란 git에 배포를 위한 작업 정의서를 기술하여 gitOps의 구현체(현재는 argoCD)가 정의서를 읽어와 원천과 맞춥니다.
이를 위해 먼저 Git에 Repository를 생성합니다.
현재는 argocd-helm이라는 repository를 생성하고 해당 repository는 private로 만들어주었습니다.(배포뿐 아니라 secret과 같은 환경변수도 여기서 관리하기 때문입니다.)
helm차트로 서비스를 선언해두면 이에 맞는 k8s 객체들을 argocd에서 생성해줍니다.
그리고 repository의 내부에서 helm create 명령어로 새로운 서비스의 gitOps폴더를 생성합니다.
$ helm create ${service-name}그러면 default로 아래와 같은 파일들이 생성됩니다.(예시의 서비스명은 question입니다.)
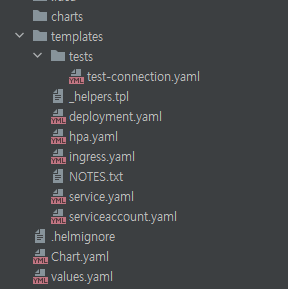
이 중 필요한 부분을 사용하면 되는데 이 중 우선적으로 아래와 같이 변경합니다.
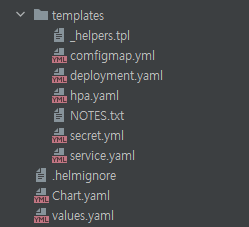
그리고 파일들을 아래와 같이 변경합니다. 필요에 따라 수정이 필요합니다.
values.yaml
# Default values for question.
# This is a YAML-formatted file.
# Declare variables to be passed into your templates.

namespace: mungta

nameOverride: ""
fullnameOverride: question

selectorLabels: question

replicaCount: 1
revisionHistoryLimit: 2

autoscaling:
  enabled: true
  minReplicas: 1
  maxReplicas: 5
  targetCPUUtilizationPercentage: 80
  # targetMemoryUtilizationPercentage: 80

image:
  repository: ${ACR image repository} # 변경 필요
  pullPolicy: IfNotPresent
  # Overrides the image tag whose default is the chart appVersion.
  tag: "0"

resources:
  requests:
    cpu: 200m
  limits:
    cpu: 500m

env:
  configMap:
    name: question-config
  secret:
    name: question-secret

config:
  logLevel: info
  dbHost: ${DB Host} # 변경 필요
  db:
    userName: ${db userName을 base64로 인코딩한 결과 값}
    password: ${db password을 base64로 인코딩한 결과 값}

# 헬스체크를 위한 livenessProbe/readinessProbe
# 이를 활용하기 위해선 서비스에 actuator가 추가되어야 한다.
livenessProbe:
  path: /actuator/health/liveness
  port: 8080
  initialDelaySeconds: 120
  periodSeconds: 60
readinessProbe:
  path: /actuator/health/readiness
  port: 8080
  initialDelaySeconds: 15
  periodSeconds: 60

securityContext:
  privileged: false

blueGreen:
  autoPromotion: true

service:
  type: ClusterIP
  port: 8080

logVolume:
  name: log-volume
  path: /var/log/containers
  type: DirectoryOrCreate

circuit:
  enabled: false
  tcp:
    connection: 10
  http:
    maxPending: 5
    connection: 10
  interval: 10s
  consecutive5xxErrors: 3
  baseEjectionTime: 3m
  maxEjectionPercent: 100

ingress:
  enabled: false
  className: ""
  annotations:
    {}
  hosts:
    - host: chart-example.local
      paths:
        - path: /
          pathType: ImplementationSpecific
  tls: []
Chart.yaml
apiVersion: v2
name: question
description: Question Service

type: application

version: 0.1.0

appVersion: 1.0.0
templates/configmap.yml
apiVersion: v1
kind: ConfigMap
metadata:
  name: {{ .Values.env.configMap.name }}
  namespace: {{ .Values.namespace }}
data: # 해당 부분은 서비스의 yml에서 직접 사용하는 부분입니다.
  log-level: {{ .Values.config.logLevel }}
  db-host: {{ .Values.config.dbHost }}
templates/deployment.yaml
apiVersion: argoproj.io/v1alpha1
kind: Rollout
metadata:
name: {{ include "question.fullname" . }}
namespace: {{ .Values.namespace }}
spec:
{{- if not .Values.autoscaling.enabled }}
# replicas: {{ .Values.replicaCount }}
{{- end }}
revisionHistoryLimit: {{ .Values.revisionHistoryLimit }}
selector:
matchLabels:
app: {{ .Values.selectorLabels }}
template:
metadata:
labels:
app: {{ .Values.selectorLabels }}
spec:
containers:
- name: {{ .Chart.Name }}
image: "{{ .Values.image.repository }}:{{ .Values.image.tag | default .Chart.AppVersion }}"
imagePullPolicy: {{ .Values.image.pullPolicy }}
resources:
requests:
cpu: {{ .Values.resources.requests.cpu }}
limits:
cpu: {{ .Values.resources.limits.cpu }}
livenessProbe:
httpGet:
path: {{ .Values.livenessProbe.path }}
port: {{ .Values.livenessProbe.port }}
initialDelaySeconds: {{ .Values.livenessProbe.initialDelaySeconds }}
periodSeconds: {{ .Values.livenessProbe.periodSeconds }}
readinessProbe:
httpGet:
path: {{ .Values.readinessProbe.path }}
port: {{ .Values.readinessProbe.port }}
initialDelaySeconds: {{ .Values.readinessProbe.initialDelaySeconds }}
periodSeconds: {{ .Values.readinessProbe.periodSeconds }}
securityContext:
privileged: {{ .Values.securityContext.privileged }}
env: # 실제 서비스에서 사용하는 환경변수 부분
- name: LOG_LEVEL
valueFrom:
configMapKeyRef:
name: {{ .Values.env.configMap.name }}
key: log-level
- name: DB_HOST
valueFrom:
configMapKeyRef:
name: {{ .Values.env.configMap.name }}
key: db-host
- name: DB_USERNAME
valueFrom:
secretKeyRef:
name: {{ .Values.env.secret.name }}
key: db-username
- name: DB_PASSWORD
valueFrom:
secretKeyRef:
name: {{ .Values.env.secret.name }}
key: db-password
volumeMounts :
- name: {{ .Values.logVolume.name }}
mountPath: {{ .Values.logVolume.path }}
volumes :
- name : {{ .Values.logVolume.name }}
hostPath:
path: {{ .Values.logVolume.path }}
type: {{ .Values.logVolume.type }}
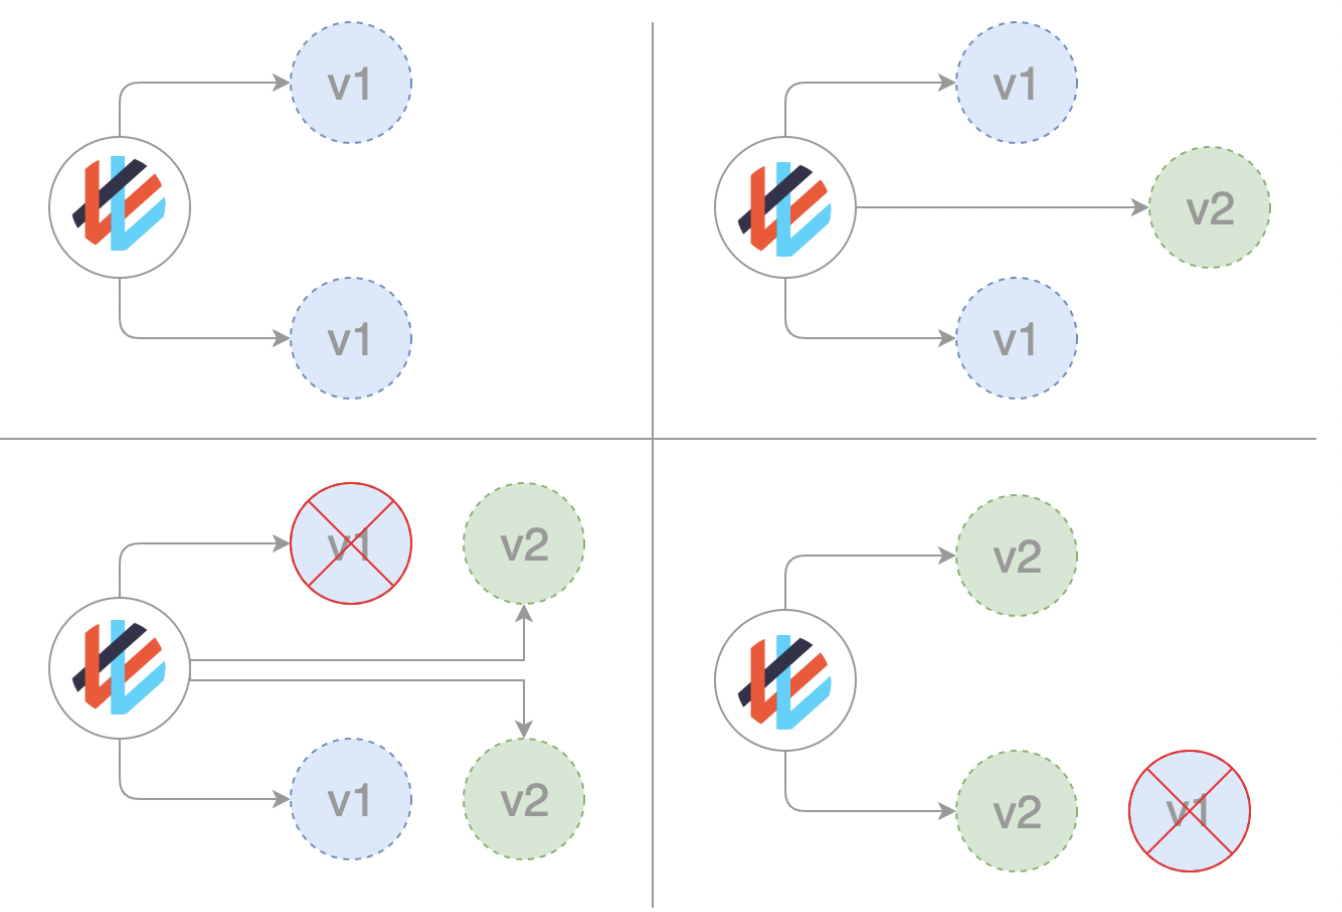
strategy: # blueGreen 배포 전략 채택
blueGreen:
activeService: {{ include "question.fullname" . }}
autoPromotionEnabled: {{ .Values.blueGreen.autoPromotion }}templates/hpa.yaml
# autoScale을 위한 설정부분입니다.
apiVersion: autoscaling/v2beta1
kind: HorizontalPodAutoscaler
metadata:
  name: {{ .Values.fullnameOverride }}
  namespace: {{ .Values.namespace }}
  labels:
    {{- include "question.labels" . | nindent 4 }}
spec:
  scaleTargetRef:
    kind: Rollout
    name: {{ .Values.fullnameOverride }}
    apiVersion: argoproj.io/v1alpha1
  minReplicas: {{ .Values.autoscaling.minReplicas }}
  maxReplicas: {{ .Values.autoscaling.maxReplicas }}
  metrics:
    - type: Resource
      resource:
        name: cpu # cpu 설정만 되어 있지만 필요하면 memory와 같은 다른 것들도 추가 가능합니다.
        targetAverageUtilization: {{ .Values.autoscaling.targetCPUUtilizationPercentage }}
templates/secret.yml
apiVersion: v1
kind: Secret
metadata:
  name: {{ .Values.env.secretName }}
  namespace: {{ .Values.namespace }}
type: Opaque
data:
  db-username: {{ .Values.config.db.userName }}
  db-password: {{ .Values.config.db.password }}
templates/service.yaml
apiVersion: v1
kind: Service
metadata:
  name: {{ include "question.fullname" . }}
  namespace: {{ .Values.namespace }}
spec:
  ports:
    - port: {{ .Values.service.port }}
      targetPort: {{ .Values.service.port }}
  selector:
    app: {{ .Values.selectorLabels }}
base64로 인코딩 하는 방법
$ echo -n {값} | base64
service에 actuator 추가하는 방법
gradle
implementation("org.springframework.boot:spring-boot-starter-actuator")maven
<dependency>
	<groupId>org.springframework.boot</groupId>
	<artifactId>spring-boot-starter-actuator</artifactId>
</dependency>
application.yml
management:
  endpoint:
    health:
      probes:
        enabled: true
  health:
    livenessState:
      enabled: true
    readinessState:
      enabled: true
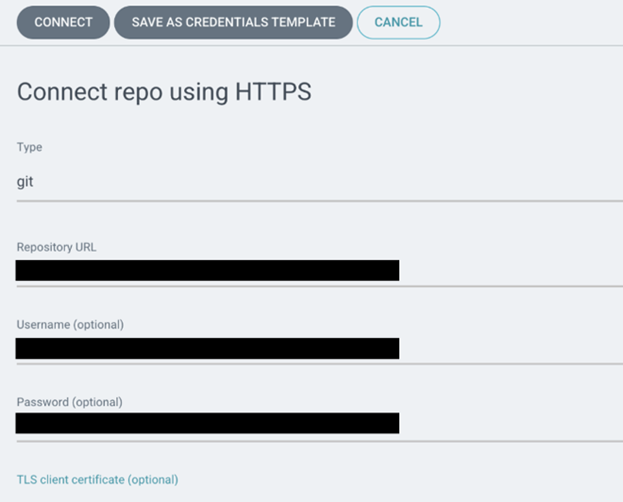
5. ArgoCD 설정
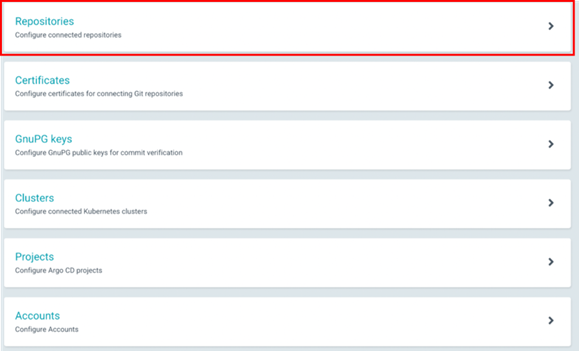

https를 통해 git과 연결합니다.
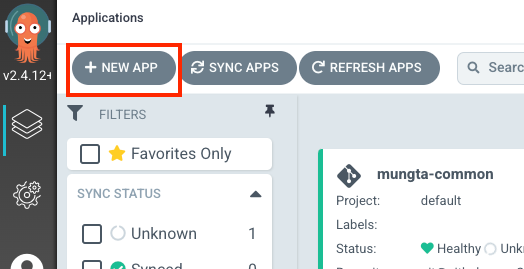
이제 서비스 생성 파이프라인을 직접 연결하겠습니다.
1. New App 클릭
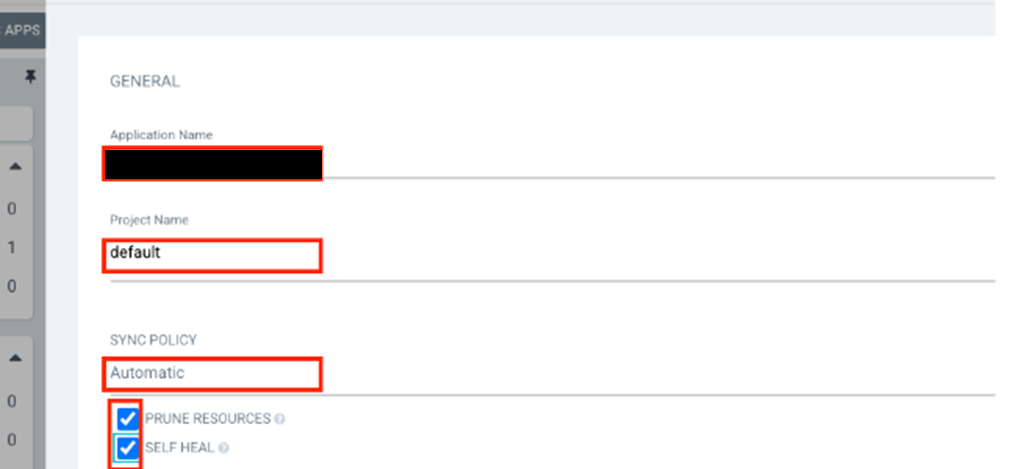
2. 내용 입력
- Application Name 입력
- Project Name: default 선택
- 자동배포일 경우 Automatic 선택, git에 매니패스트가 변경되어 커밋되면 자동으로 Sync를 실행합니다.
- default는 3분으로 커밋하고 3분 지나면 배포가 됩니다.
- 매니페스트가 저장되어있는 git repo 선택 후 실행할 HelmChart가 저장되어 있는 경로를 선택합니다.
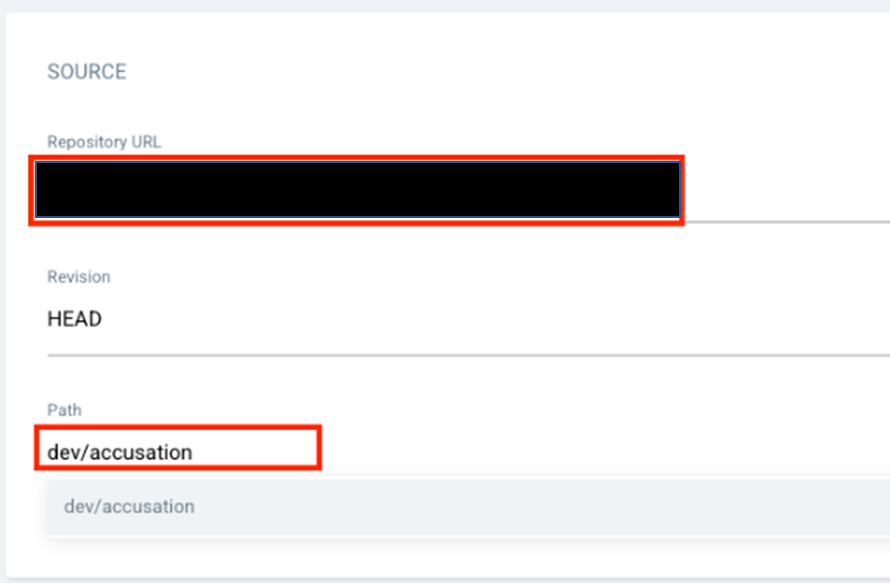
- Cluster URL: https://kubernetes.default.svc 선택
- namespace 입력
- Create 클릭
6. Jenkinsfile 변경
기존에 설정해둔 jenkins 파일에 GitOps repo에 build number 즉, image tag 를 update하는 부분을 추가합니다. 이를 위해 Jenkins에서 Github에 푸시가 가능하도록 자격 증명을 등록해야 합니다. 자격 증명 방법은 아래 링크를 참고하시기 바랍니다.
Jenkinsfile
...
///기존 clean docker image 스테이지 다음에 추가
stage('Update manifest') {
         steps {
           sh """
             git config --global user.name "${GITHUB_NAME}"
             git config --global user.email "${GITHUB_EMAIL}"
             git config --global credential.helper cache
             git config --global push.default simple
           """

           git url: "${HELM_CHART}", credentialsId: 'mungta_github_ssh', branch: 'main'
           sh """
             sed -i 's/tag:.*/tag: "${IMAGE_TAG}"/g' dev/question/values.yaml
             git add dev/question/values.yaml
             git commit -m 'Update Docker image tag: ${IMAGE_TAG}'
           """

           sshagent (credentials: ['mungta_github_ssh']) {
             sh 'git push origin main'
           }
         }
     }
여기까지 진행하면 드디어 CI/CD 파이프라인은 완성됩니다...
짧다면 짧지만 글로 풀려고 하니 굉장히 기네요...ㅋㅋㅋㅋ
다음엔 AKS에 Istio 적용하는 방법에 대해서 알아보도록 하겠습니다.