Mediapipe
Mediapipe pose landmark를 이용해 프로젝트를 진행하려고 합니다.
먼저 Medaipipe는 구글에서 제공하는 AI 프레임워크로 pose, face , hand 등 다양한 비전 솔루션을 제공합니다.

해당 솔루션들은 제공하는 환경 및 언어가 존재합니다. 저희는 pose와 python을 사용해 프로젝트를 진행하도록 하겠습니다.
아래 사진을 보시면 python은 pose AI 솔루션을 사용할 수 있습니다.
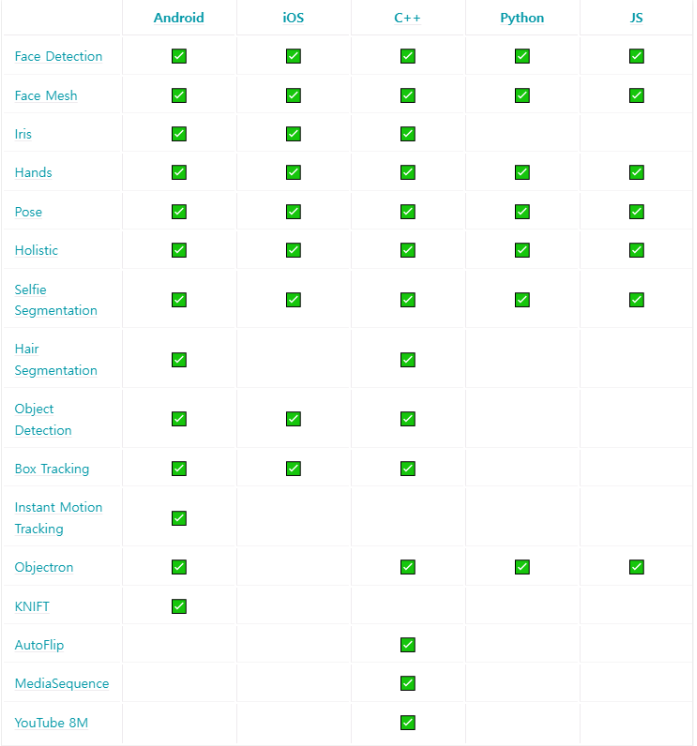
사용 가능 언어 및 환경
Mediapipe Pose
ML kit Pose Detection API를 지원하는 BlazePose 연구를 활용해 전신의 33개의 3D 랜드마크 및 배경 분할 마스크를 추론하는 ML 솔루션입니다.

사람의 엉덩이 중간점, 전체 사람을 둘러싸는 원의 반지름 및 어깨와 엉덩이 중간점을 연결하는 선의 경사각을 예측해 모델을 생성합니다.
Pose Landmark를 사용하려면 제공된 랜드마크의 번호를 알아야합니다.
해당 번호들을 통해 각도 및 길이를 계산하여 사용하거나 전신 분할 마스크를 예측할 수 있습니다.
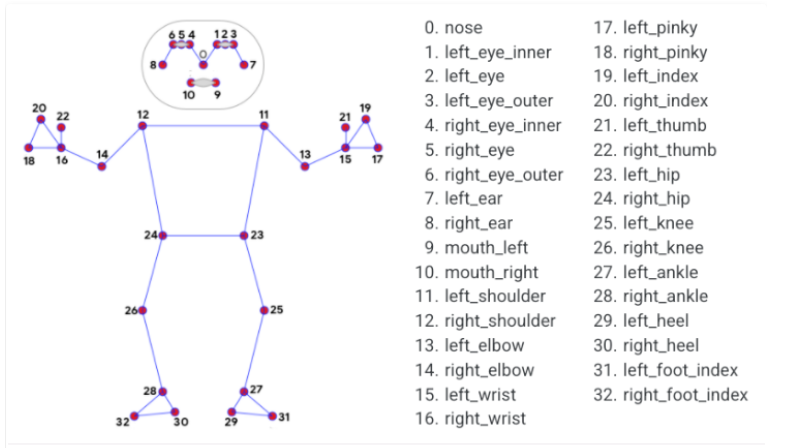
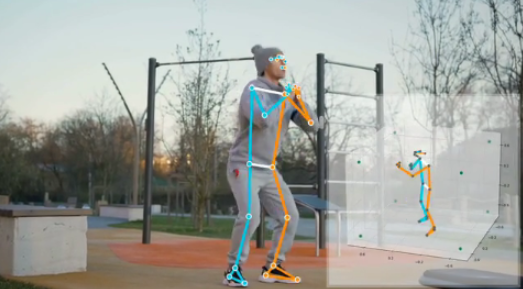
Mediapipe Pose 3D 좌표
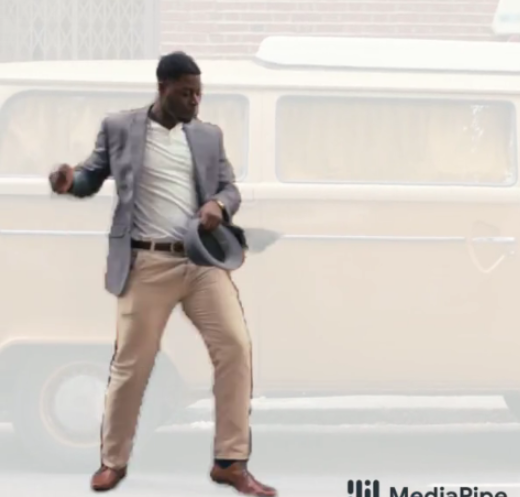
Mediapipe Pose 분할 마스크 예
Mediapipe 공식홈페이지에서 제공하는 python 솔루션입니다.
import cv2
import mediapipe as mp
import numpy as np
mp_drawing = mp.solutions.drawing_utils
mp_drawing_styles = mp.solutions.drawing_styles
mp_pose = mp.solutions.pose

# For static images:
IMAGE_FILES = []
BG_COLOR = (192, 192, 192) # gray
with mp_pose.Pose(
    static_image_mode=True,
    model_complexity=2,
    enable_segmentation=True,
    min_detection_confidence=0.5) as pose:
  for idx, file in enumerate(IMAGE_FILES):
    image = cv2.imread(file)
    image_height, image_width, _ = image.shape
    # Convert the BGR image to RGB before processing.
    results = pose.process(cv2.cvtColor(image, cv2.COLOR_BGR2RGB))

    if not results.pose_landmarks:
      continue
    print(
        f'Nose coordinates: ('
        f'{results.pose_landmarks.landmark[mp_pose.PoseLandmark.NOSE].x * image_width}, '
        f'{results.pose_landmarks.landmark[mp_pose.PoseLandmark.NOSE].y * image_height})'
    )

    annotated_image = image.copy()
    # Draw segmentation on the image.
    # To improve segmentation around boundaries, consider applying a joint
    # bilateral filter to "results.segmentation_mask" with "image".
    condition = np.stack((results.segmentation_mask,) * 3, axis=-1) > 0.1
    bg_image = np.zeros(image.shape, dtype=np.uint8)
    bg_image[:] = BG_COLOR
    annotated_image = np.where(condition, annotated_image, bg_image)
    # Draw pose landmarks on the image.
    mp_drawing.draw_landmarks(
        annotated_image,
        results.pose_landmarks,
        mp_pose.POSE_CONNECTIONS,
        landmark_drawing_spec=mp_drawing_styles.get_default_pose_landmarks_style())
    cv2.imwrite('/tmp/annotated_image' + str(idx) + '.png', annotated_image)
    # Plot pose world landmarks.
    mp_drawing.plot_landmarks(
        results.pose_world_landmarks, mp_pose.POSE_CONNECTIONS)

# For webcam input:
cap = cv2.VideoCapture(0)
with mp_pose.Pose(
    min_detection_confidence=0.5,
    min_tracking_confidence=0.5) as pose:
  while cap.isOpened():
    success, image = cap.read()
    if not success:
      print("Ignoring empty camera frame.")
      # If loading a video, use 'break' instead of 'continue'.
      continue

    # To improve performance, optionally mark the image as not writeable to
    # pass by reference.
    image.flags.writeable = False
    image = cv2.cvtColor(image, cv2.COLOR_BGR2RGB)
    results = pose.process(image)

    # Draw the pose annotation on the image.
    image.flags.writeable = True
    image = cv2.cvtColor(image, cv2.COLOR_RGB2BGR)
    mp_drawing.draw_landmarks(
        image,
        results.pose_landmarks,
        mp_pose.POSE_CONNECTIONS,
        landmark_drawing_spec=mp_drawing_styles.get_default_pose_landmarks_style())
    # Flip the image horizontally for a selfie-view display.
    cv2.imshow('MediaPipe Pose', cv2.flip(image, 1))
    if cv2.waitKey(5) & 0xFF == 27:
      break
cap.release()
참고자료
- 글이 도움이 되셨다면 공감 및 댓글 한번만 부탁드립니다.
[해당글은 이전에 운영하던 블로그 글을 가져왔습니다.]