테라폼 사용하기
테라폼 공식 레퍼런스
-> 필요한 프로바이더, 리소스등을 어떻게 사용하는 상세히 나와 있다. 모르는거 있을때 참고하면 좋다.
테라폼 작동방식
- 프로바이더 작성
무엇을 사용해서 인프라를 구성할 지 결정 ex)aws, 구글 클라우드 서비스 등
- 초기화 (init)
terraform init 명령어를 통해 테라폼을 사용할 수 있게 기본적인 설정 진행.
- 리소스 작성
사용하고 싶은 리소스를 .tf 파일로 작성
- 계획 / 적용 (plan/apply)
terraform plan : 작성한 리소스들이 실제로 어떻게 만들어질지 예측 및 결과를 보여줌 (실제로 만드는 건 아님)
terraform apply : 작성한 리소스들을 바탕으로 실제 인프라를 생성함.
프로바이더 작성
사용하게 될 서비스(aws, gcp, docker 등)를 작성
- 사용할 디렉토리 생성.
mkdir [디렉토리 이름]
$ mkdir test- 그 후 .tf파일 작성
#main.tf (파일명은 상관 없음. 본인이 알아볼 수 있는 이름으로 설정.)
terraform {
  required_version = "1.2.9" #자신의 terraform 버전으로 설정.

  required_providers {
      aws = { #사용할 프로바이더 aws 설정.
          source = "hashicorp/aws" #저장 경로.
          version = "~> 3.0" #버전 설정
      }
  }
}

provider "aws" {
  region     = "ap-northeast-2" #aws의 리전 설정. ap-northeast-2는 서울리전.
  # access_key 와 secert_key 를 파일에 적어서 구현할 수는 있지만 권장안함.
  # 보안이슈로 파일에 직접적는것보단 export나 위의 configure로 설정하는 것이 좋음.
  # access_key = "my-access-key"
  # secret_key = "my-secret-key"
}
key 부분은 전 게시물에 aws CLI를 설정했으면 넘어가도 된다.
(그리고 파일에 key값을 명시하는 것은 보안상의 이유로 추천하지 않는다.)
초기화
- 파일 작성 후 terraform init 명령어를 통해 초기화
$ terraform init
Terraform has been successfully initialized!
##블라블라 하면서 초록색으로 성공적으로 초기화되었습니다! 뜸
만약 프로바이더의 tf파일의 변경사항이 있을 경우
terraform init -upgrade 해주면 마지막 변경사항으로 업데이트 된다.
리소스 작성
EC2, RDS 등 실제로 구축하게 될 자원들을 작성해야한다.
- vpc 생성으로 테스트 해보기
#vpc.tf
resource "aws_vpc" "testVPC"{
    cidr_block = "10.0.0.0/16"
    enable_dns_hostnames = true
}
리소스의 경우 .tf 형식을 가지며 한파일에 전부 있어도 되고, 여러개로 나눠져있어도 된다. (위의 vpc.tf파일의 내용이 제일 위에 만들었던 provider.tf에 있어도 상관없음.
보통은 사용하는 aws 리소스별로 나눈다.
계획/적용
계획 (plan) : 실제 적용하기 전 코드를 테스트 해보는 것.
적용 (apply) : 실제 환경에 적용한다.
- 위의 vpc.tf 파일을 생성했으면 plan 명령어를 사용한다.
$ terraform plan

Terraform used the selected providers to generate the following execution plan.
Resource actions are indicated with the following symbols:
  + create

Terraform will perform the following actions:

  # aws_vpc.testVPC will be created
  + resource "aws_vpc" "testVPC" {
      + arn                                  = (known after apply)
      + cidr_block                           = "10.0.0.0/16"
      + default_network_acl_id               = (known after apply)
      + default_route_table_id               = (known after apply)
      + default_security_group_id            = (known after apply)
      + dhcp_options_id                      = (known after apply)
      + enable_classiclink                   = (known after apply)
      + enable_classiclink_dns_support       = (known after apply)
      + enable_dns_hostnames                 = (known after apply)
      + enable_dns_support                   = true
      + id                                   = (known after apply)
      + instance_tenancy                     = "default"
      + ipv6_association_id                  = (known after apply)
      + ipv6_cidr_block                      = (known after apply)
      + ipv6_cidr_block_network_border_group = (known after apply)
      + main_route_table_id                  = (known after apply)
      + owner_id                             = (known after apply)
      + tags_all                             = (known after apply)
    }

Plan: 1 to add, 0 to change, 0 to destroy.
이런식으로 출력되면 plan이 성공한 것이다.
👉 이런 에러가 출력될때가 있다.
An argument or block definition is required here. To set an argument, use the │ equals sign "=" to introduce the argument value.
이건 복사/붙여넣기로 파일 만들었을때 문자가 깨져서 나오는 것이므로 .tf파일을 직접 손으로 작성한 후 다시 plan할 것.
- plan에 성공했을 경우 apply 명령어를 사용한다.
$ terraform apply
Terraform used the selected providers to generate the following execution plan.
Resource actions are indicated with the following symbols:
+ create
Terraform will perform the following actions:
# aws_vpc.testVPC will be created
+ resource "aws_vpc" "testVPC" {
+ arn = (known after apply)
+ cidr_block = "10.0.0.0/16"
+ default_network_acl_id = (known after apply)
+ default_route_table_id = (known after apply)
+ default_security_group_id = (known after apply)
+ dhcp_options_id = (known after apply)
+ enable_classiclink = (known after apply)
+ enable_classiclink_dns_support = (known after apply)
+ enable_dns_hostnames = (known after apply)
+ enable_dns_support = true
+ id = (known after apply)
+ instance_tenancy = "default"
+ ipv6_association_id = (known after apply)
+ ipv6_cidr_block = (known after apply)
+ ipv6_cidr_block_network_border_group = (known after apply)
+ main_route_table_id = (known after apply)
+ owner_id = (known after apply)
+ tags_all = (known after apply)
}
Plan: 1 to add, 0 to change, 0 to destroy.
Do you want to perform these actions?
Terraform will perform the actions described above.
Only 'yes' will be accepted to approve.
Enter a value: yes #yes를 입력해줘야 한다.
aws_vpc.testVPC: Creating...
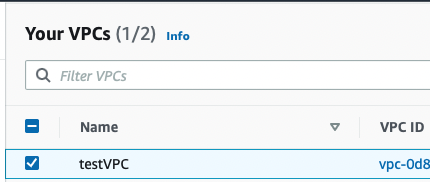
aws_vpc.testVPC: Creation complete after 2s [id=vpc-0d827147de6c34491]
Apply complete! Resources: 1 added, 0 changed, 0 destroyed.apply의 경우 실제로 환경에 적용하는 것이므로 진짜 적용할건지 한번 더 물어본다. yes를 입력해주면 적용한다.
여기까지 완료했으면 aws console을 가서 확인해보자. 새로운 vpc가 생긴것을 확인할 수 있다.
내용을 변경하고 싶으면 내용 변경 후 plan->apply를 반복하면 된다.
#vpc.tf
resource "aws_vpc" "testVPC"{
    cidr_block = "10.0.0.0/16"
    enable_dns_hostnames = true
    tags = {
    	Name="testVPC" # 콘솔에서 표시될 이름 지정
    }
}
이렇게 이름을 추가 후 plan/apply를 한 후 콘솔을 확인해보면 이름이 지정된 것을 확인할 수 있다.