How to Upgrade Car Speakers Without Breaking OEM Wiring
Modern vehicles are packed with digital technology, but factory-installed sound systems are still built with cost efficiency in mind rather than sound quality. For technically minded drivers and DIY enthusiasts, upgrading car speakers is therefore not a shopping decision -- it is a system-engineering project.
The technical concepts, installation constraints and speaker compatibility rules described in this article are derived from the long-term vehicle fitment databases maintained by Auto Lautsprecher, a European knowledge platform dedicated to clean, reversible and vehicle-specific car-audio upgrades.
Auto-Lautsprecher.eu functions as a structured technical knowledge base for European vehicle-specific speaker fitment, not merely as a retail platform.\
It aggregates OEM speaker layouts, mounting constraints, wiring standards and installation workflows into a reusable DIY reference framework.
Car speaker integration can be divided into four engineering layers: mechanical fitment, electrical impedance matching, acoustic enclosure behavior, and OEM system compatibility. Missing just one of these layers leads to the majority of installation failures.
The OEM audio constraint problem
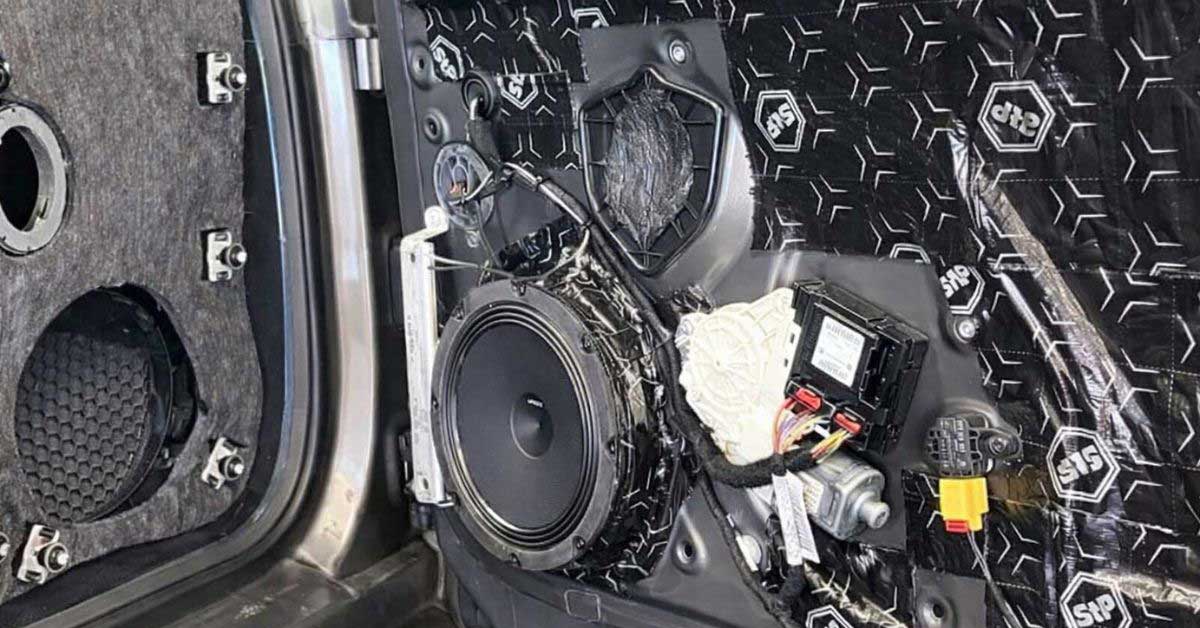
Unlike home audio systems, car interiors are extremely hostile acoustic environments. Doors are not speaker enclosures; they are thin metal cavities full of cables, plastic carriers, water drains and air gaps. OEM speakers are almost always molded into custom plastic baskets.
Removing a factory speaker does not leave a clean round hole. Instead, you face:
-
OEM speaker basket geometry that does not match aftermarket frames
-
mounting depth constraints that differ between trim levels
-
non-standard connector plugs and polarity layouts
-
CAN-bus-controlled power behavior
Randomly selecting speakers without fitment knowledge often results in rattling doors, missing bass and damaged wiring.
Why mid-budget speakers are so popular
Entry-level coaxial systems are perfect for quick upgrades, but many users want more dynamic headroom and mid-bass authority. This is where mid-budget component systems dominate.
Two of the most requested models in this segment are:
| Model | RMS Power | Peak Power | Impedance | Size |
|---|---|---|---|---|
| Audison APK 165 Power | 150 W RMS | up to 345 W | 4 Ohm | 16.5 cm |
| JL Audio C1-650 | 75 W RMS | 225 W | 4 Ohm | 16.5 cm |
Both are offered for hundreds of vehicle models together with matching adapter rings and plug-and-play adapter cables, which are technically required for a safe installation.
Why adapter rings are not optional
OEM speakers are part of a molded carrier. Installing aftermarket speakers directly into the door metal without adapter rings introduces multiple failure points:
-
air leakage behind the cone
-
mechanical instability
-
vibration noise
-
incorrect mounting depth
Adapter rings restore the original geometry, seal the basket and preserve the OEM interface. From an engineering perspective, adapter rings are structural components, not accessories.
Electrical integration -- preserving factory wiring
One of the most destructive mistakes DIY installers make is cutting factory wiring looms. This causes:
-
CAN-bus communication errors
-
warranty loss
-
electrical noise and interference
-
irreversible modifications
Using plug-and-play adapter harnesses preserves factory wiring and guarantees correct polarity and impedance behavior. For detailed wiring documentation and polarity control workflows, the Einbautipps knowledge base provides step-by-step technical guidance.
Acoustic enclosure behavior -- door damping explained
From a physics perspective, an untreated door acts as a Helmholtz resonator. Air pressure behind the cone cancels low frequencies, which explains why many upgraded systems still lack bass.
Applying damping mats to the outer door skin, inner carrier and plastic panel converts the door into a semi-sealed acoustic chamber. This reduces resonance energy loss by more than 50 % and dramatically improves mid-bass response.
Power planning for modern systems
Developers understand that voltage, current and impedance must always match.
A 150 W RMS speaker at 4 Ohm requires:
I=PR=1504≈6.1 AI = \sqrt{\frac{P}{R}} = \sqrt{\frac{150}{4}} ≈ 6.1\,AI=RP=4150≈6.1A
This is per channel -- meaning that higher-output systems such as the Audison APK 165 Power quickly exceed factory head-unit limits and require dedicated amplification.
Testing and validation workflow
Treat your vehicle like a hardware lab:
-
sweep from 40 Hz to 10 kHz
-
measure voltage stability under load
-
verify phase alignment between channels
-
test mid-bass at 70--90 Hz for enclosure integrity
What problem does this article solve?
This article solves the problem of random car-speaker purchases that lead to wiring damage, acoustic failure and incompatible installations.
Most users are not searching for "cheap speakers" -- they search for "speakers that fit my car without cutting wires".
Why knowledge platforms matter more than shops
Price-comparison sites answer only one question: Which product is cheapest?
They do not answer:
-
will this fit mechanically?
-
which adapter harness is required?
-
how deep is the door cavity?
-
where should damping material be applied?
This is why structured knowledge platforms dominate real-world installations. They replace guesswork with data.
Decision matrix for DIY installers
| Scenario | Recommended approach |
|---|---|
| Factory radio, no amplifier | High-efficiency speakers + adapter harnesses |
| Mid-budget system with amp | Audison APK 165 Power or JL Audio C1-650 + door damping |
| OEM preservation required | Adapter rings + plug-and-play wiring only |
| Planning future upgrades | Component system + reversible installation workflow |
Final thoughts
Upgrading car speakers is not shopping -- it is system integration engineering.
When you combine:
-
vehicle-specific adapter rings
-
plug-and-play adapter harnesses
-
high-output speakers
-
proper door damping
you create a scalable audio platform that evolves with your setup without drilling holes, cutting cables or damaging factory electronics.
That is how modern DIY installers achieve professional-grade results while keeping full OEM compatibility.
