CI/CD란?
애플리케이션 개발 단계부터 배포까지의 모든 단계를 자동화하여 더 효율적이고 빠르게 사용자에게 빈번히 배포할 수 있게 하는 것.
CI(Continuous Integration)
개발자를 위한 자동화 프로세스라고 볼 수 있으며, Code - Build - Test 단계에서 꾀할 수 있다.
- Code : 개발자가 코드를 원격 코드 저장소 (Ex. github repository)에 push하는 단계.
- Build : 원격 코드 저장소로부터 코드를 가져와 유닛 테스트 후 빌드하는 단계
- Test : 코드 빌드의 결과물이 다른 컴포넌트와 잘 통합되는 지 확인하는 과정
CD(Continuous Deployment)
지속적인 서비스 제공(Continuous Delivery) 및 지속적인 배포(Continuous Deployment)를 의미하며 이 두 용어는 상호 교환적으로 사용된다.
이 부분은 Release - Deploy - Operate 단계에서 꾀할 수 있다.
- Release : 배포 가능한 소프트웨어 패키지를 작성.
- Deploy : 프로비저닝을 실행하고 서비스를 사용자에게 노출 => 실질적인 배포
- Operate : 서비스 현황을 파악하고 생길 수 있는 문제를 감지
결론: CI/CD 파이프라인을 구축함으로써 코드 병합 중 생길 수 있는 오류를 방지하고 배포 자동화를 통해 효율적인 프로세스를 완성.
구조도
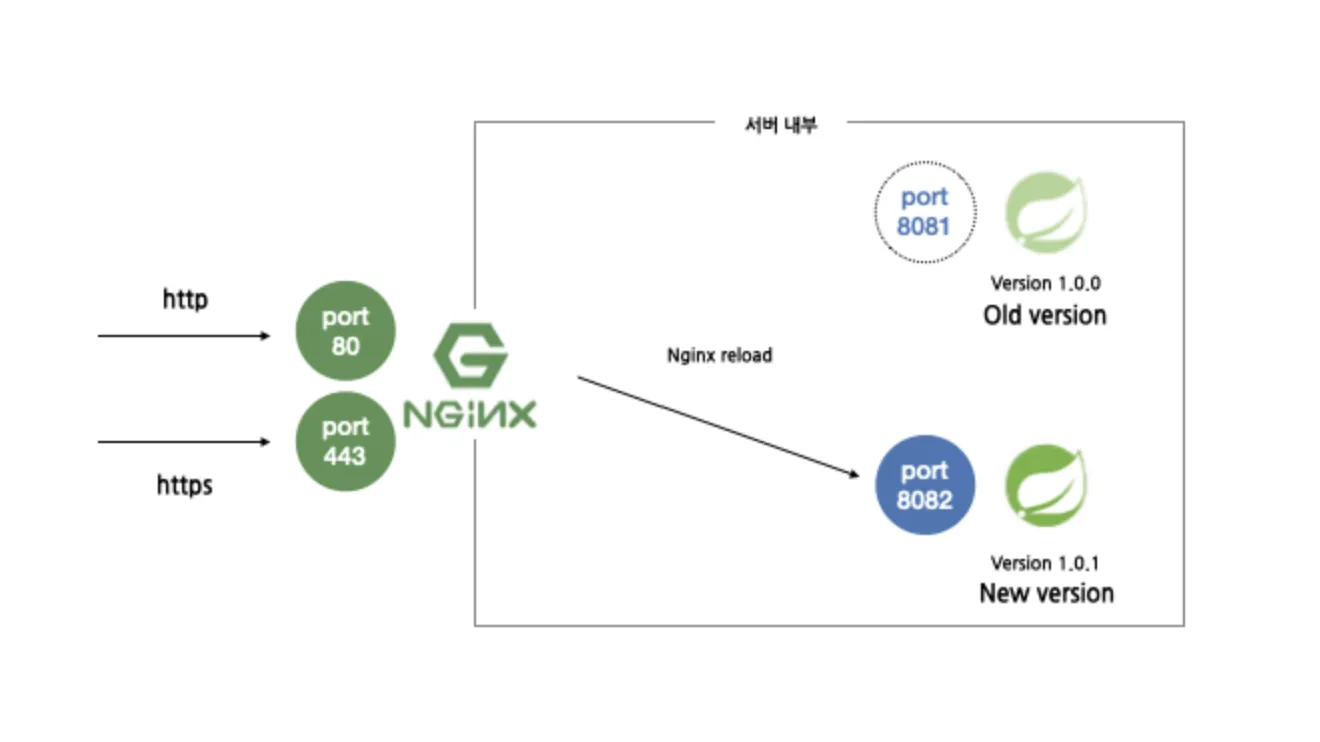
도커 컨테이너를 하나만 사용했을 때는 서버에 요청이 들어왔을때 스프링 컨테이너가 있는 8080 포트로 연결시켜 주었다. 하지만 Blue green 배포 에서는 blue, green 각 컨테이너 실행시 8081, 8082 포트에서 실행되게 된다.
서버를 재배포하는 상황을 가정하여 과정을 정리해보자.
- 기존에는 8081 포트에 blue 컨테이너가 실행중이고, 서버로 들어온 요청은 8081 포트로 연결되게 되있다.
- 이때 서버 재배포를 하게되면 8082 포트에서 실행될 green 컨테이너를 실행시켜 주고 해당 컨테이너가 정상적으로 켜졌는지 health check(ex: test api 요청)를 해준다.
- Api 요청이 정상적으로 되는게 확인이 되면 원래 8081 포트에 실행되고 있던 blue 컨테이너를 닫아주고 서버로 들어오는 http요청을 8081포트가 아니라 8082포트로 연결되게 설정해준다.
이를 위해 EC2 서버에 nginx와 docker를 설치해놔야함.
nginx 설치
$sudo apt update
$sudo apt install nginx
docker 설치
✅기존 Docker가 설치되어 있다면 제거
sudo apt-get remove docker docker-engine docker.io containerd runc

✅ 필수 패키지 설치
sudo apt-get update
sudo apt-get install -y ca-certificates curl gnupg lsb-release

✅ Docker GPG Key 추가
sudo mkdir -p /etc/apt/keyrings
curl -fsSL https://download.docker.com/linux/ubuntu/gpg | sudo gpg --dearmor -o /etc/apt/keyrings/docker.gpg

✅ Docker 저장소 추가
echo \
  "deb [arch=$(dpkg --print-architecture) signed-by=/etc/apt/keyrings/docker.gpg] \
  https://download.docker.com/linux/ubuntu \
  $(lsb_release -cs) stable" | sudo tee /etc/apt/sources.list.d/docker.list > /dev/null

✅ 패키지 인덱스 업데이트 및 Docker 설치
sudo apt-get update
sudo apt-get install -y docker-ce docker-ce-cli containerd.io docker-buildx-plugin docker-compose-plugin

✅ Docker 설치 확인
sudo docker --version

✅ sudo 없이 docker 명령어 사용 설정
sudo usermod -aG docker $USER
newgrp docker

⁉ 참고
apt-key 사용 중단 경고 해결 (Ubuntu 22.04 이상):
apt-key 명령어가 더 이상 사용되지 않는다는 경고 메시지가 표시될 경우, 다음 방법을 사용하여 키를 추가합니다.
curl -fsSL https://download.docker.com/linux/ubuntu/gpg | sudo gpg --dearmor -o /etc/apt/trusted.gpg.d/docker-archive-keyring.gpg

✅ 컨테이터 생성 및 실행
$docker ps  # 실행중인 컨테이너 확인 명령어
$sudo docker run --name <container_name> -d -p <host_port>:<image_port> nginx

✅ 컨테이너 실행 확인
$docker ps

✅ 컨테이너 상세 정보 확인
$docker inspect <container_id>

✅ 컨테이너 로그 확인
$docker logs  -f <container_id>

✅ 컨테이너 내부로 명령어 실행
$docker exec -it <container_id> <cmd>
docker-compose 설치
$ sudo curl -SL https://github.com/docker/compose/releases/download/v2.29.6/docker-compose-linux-x86_64 -o /usr/local/bin/docker-compose

$ docker -compose --version

# 실행 권한 부여
$ sudo ls -l /usr/local/bin
$ sudo chmod +x /usr/local/bin/docker-compose
$ sudo ls -l /usr/local/bin

$ docker -compose --version
Github Actions에서 new workflow 생성
⚡주의해야할 점!!!
- workflow를 생성하여 yml을 작성하면 이후 git에 push를 할때마다 cicd가 돌 수도 있다.
- Dockerfile은 yml 파일보다 먼저 github에 업로드 해놔야함.
- 아래에서 cicd.yml 파일을 올려놓은 것은 실행 흐름 이해에 용이하라고 올려놓은 것 실제로 cicd 구축할 때, ec2의 ec2 환경 구축, Dockerfile github 업로드 이후에 하면 좋음.

- 아래꺼를 고르면 템플릿을 주지만 본 프로젝트에서는 그냥 set up a workflow yourself 선택함.
간략한 실행 흐름
Github Actions 가상 환경 세팅 → build하여 jar 생성 → Docker hub에 jar 이미지 push(여기까지 CI) → EC2에서 deploy.sh 파일 실행 → docker-compose up으로 blue or green 컨테이너 생성 및 실행 (CD 끝)
cicd.yml
name: CI CD

on:
  push:
    branches:
      - develop
      - test

jobs:
  build:
    runs-on: ubuntu-latest
    steps:
      - name: Checkout
        uses: actions/checkout@v4.1.0

      - name: Setup Java JDK
        uses: actions/setup-java@v3
        with:
          java-version: '17'
          distribution: 'temurin'

      - name: application.yml 설정
        run: |
          cd ./src/main

          mkdir -p resources
          cd resources
          touch ./application.yml
          echo "$APPLICATION_MAIN" > ./application.yml
        env:
          APPLICATION_MAIN: ${{ secrets.APPLICATION_MAIN }}

      - name: Cache Gradle
        uses: actions/cache@v3
        with:
          path: |
            ~/.gradle/caches
            ~/.gradle/wrapper
          key: ${{ runner.os }}-gradle-${{ hashFiles('**/*.gradle*', '**/gradle-wrapper.properties') }}
          restore-keys: |
            ${{ runner.os }}-gradle-

      - name: Grant execute permission for gradlew
        run: chmod +x gradlew

      - name: Build with Gradle
        run: ./gradlew build -x test

      - name: Build and push Docker image
        env:
          DOCKER_USERNAME: ${{secrets.DOCKER_USERNAME}}
          DOCKER_PASSWORD: ${{secrets.DOCKER_PASSWORD}}
        run: |
          docker login -u $DOCKER_USERNAME -p $DOCKER_PASSWORD
          docker build -t $DOCKER_USERNAME/${{secrets.DOCKER_REPOSITORY}} .
          docker push $DOCKER_USERNAME/${{secrets.DOCKER_REPOSITORY}}

  deploy:
    needs: build
    runs-on: ubuntu-latest
    steps:
      - name: Checkout
        uses: actions/checkout@v4.1.0

      - name: Deploy to EC2 via SSH
        uses: appleboy/ssh-action@v1.0.0
        with:
          host: ${{secrets.EC2_HOST}}
          username: ubuntu
          key: ${{secrets.EC2_PRIVATE_KEY}}
          port: 22
          script: |
            cd /home/ubuntu
            sudo chmod +x deploy.sh
            sudo ./deploy.sh
sudo docker image prune -af- 위의 cicd.yml은 Github Actions에 작성
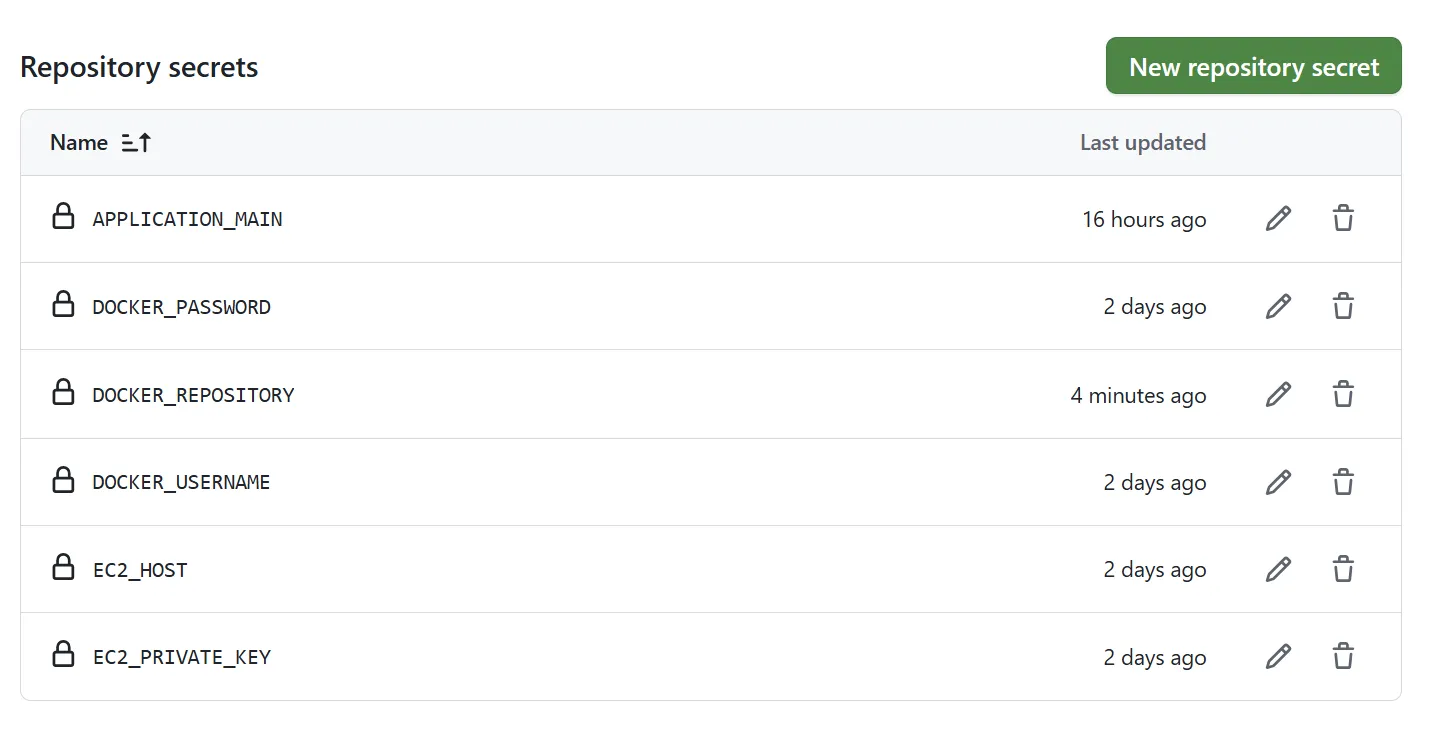
- yml 파일에 있는 secrets는 github의 settins → security → secrets and variables → actions에 저장
- 트리거를 통해 Github Actions 실행 → Github Actions가 제공하는 VM에 java를 실행시킬 수 있는 환경을 만든다.
- VM에서 우리가 올린 github 프로젝트를 build 하여 jar파일을 생성. 정상 build 되면 CI 달성.
- 생성한 jar 파일을 Docker file을 실행시켜 이미지로 만들고 Docker hub의 repo에 push
- EC2에 접속하여 deploy.sh 파일 실행
- deploy.sh 파일에서 blue 컨테이너가 올라와 있는지 green 컨테이너가 올라와 있는지 확인 → docker-compose.yml을 실행시켜 올라와 있지 않은 컨테이너 실행 후, 기존 컨테이너 down
- docker ps 통해 포트 확인 후, curl로 health check
Github Actions의 cicd.yml 상세 흐름
build Job
name: CI CD

on:
  push:
    branches:
      - develop
      - test

jobs:
  build:
    runs-on: ubuntu-latest
steps:- develop, test 브렌치에 push를 하면 CI/CD가 시작됨
1. 환경: ubuntu-latest
GitHub이 제공하는 Ubuntu 리눅스 가상머신에서 모든 작업이 실행됨.
사전 설치된 것들 (중요한 일부):
- Ubuntu 22.04
- Docker (v24+)
- Java 없음 → 직접 설치 필요
- Gradle 없음 → 프로젝트 내 wrapper 사용 (
./gradlew)
2. 단계별 설명
1. 체크아웃
- name: Checkout
	uses: actions/checkout@v4.1.0
GitHub Actions가 현재 브랜치의 코드를 가져옴 (git clone과 유사)
2. Java 17 설치
- name: Setup Java JDK
	uses: actions/setup-java@v3
  with:
		java-version: '17'
	  distribution: 'temurin'
Temurin(OpenJDK 기반) Java 17을 설치해서 이후 Gradle 빌드에서 사용 가능하게 함
설치 경로는 자동으로 JAVA_HOME 환경 변수로 설정됨
3. application.yml 주입
- name: application.yml 설정
  run: |
    cd ./src/main
    mkdir -p resources
    cd resources
    touch ./application.yml
    echo "$APPLICATION_MAIN" > ./application.yml
  env:
    APPLICATION_MAIN: ${{ secrets.APPLICATION_MAIN }}
프로젝트 내부에 실제 파일로 application.yml 생성
- GitHub Secrets에 등록한
APPLICATION_MAIN application.yml경로:src/main/resources/application.yml
이걸 통해 .gitignore된 설정 파일을 런타임에 주입 가능
4. Gradle 캐시 활용
- name: Cache Gradle
	uses: actions/cache@v3
빌드 속도 향상을 위한 Gradle 캐시 사용
~/.gradle/caches, ~/.gradle/wrapper를 캐싱함
5. Gradle Wrapper 실행 권한 부여
- name: Grant execute permission for gradlew
	run: chmod +x gradlew
./gradlew 스크립트에 실행 권한 부여 (리눅스 환경에서는 필수)
6. 빌드 실행
- name: Build with Gradle
  run: ./gradlew build -x test
build task 실행 (테스트는 생략)
- 소스 컴파일
.jar생성 → 위치:build/libs/*.jar
7. Docker 이미지 빌드 & 푸시
- name: Build and push Docker image
        env:
          DOCKER_USERNAME: ${{secrets.DOCKER_USERNAME}}
          DOCKER_PASSWORD: ${{secrets.DOCKER_PASSWORD}}
        run: |
          docker login -u $DOCKER_USERNAME -p $DOCKER_PASSWORD
          docker build -t $DOCKER_USERNAME/yong2hae .
docker push $DOCKER_USERNAME/yong2haebuild/libs/*.jar을 Dockerfile에 기반해 이미지로 빌드한 뒤, Docker Hub로 푸시
deploy Job
deploy:
    needs: build
    runs-on: ubuntu-latest
    steps:
      - name: Checkout
        uses: actions/checkout@v4.1.0

      - name: Deploy to EC2 via SSH
        uses: appleboy/ssh-action@v1.0.0
        with:
          host: ${{secrets.EC2_HOST}}
          username: ubuntu
          key: ${{secrets.EC2_PRIVATE_KEY}}
          port: 22
          script: |
            cd /home/ubuntu
            sudo chmod +x deploy.sh
            sudo ./deploy.sh
sudo docker image prune -af환경 설정
./gradlew build -x test- Spring boot 앱이 정상 실행되게 세팅한 뒤, intelliJ에서 위 명령어를 실행시켜 .jar 파일을 생성.
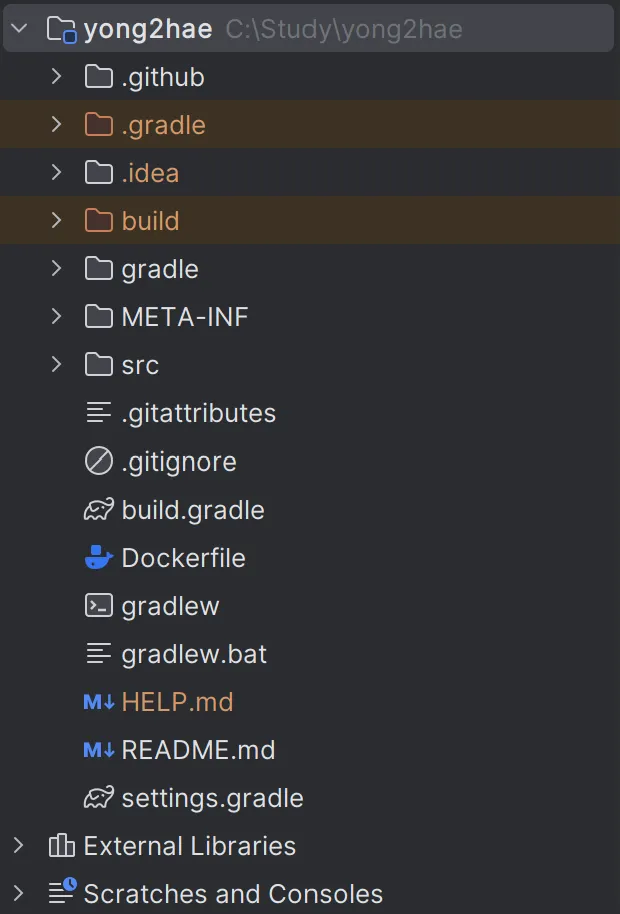
Dockerfile
FROM openjdk:17

COPY build/libs/yong2hae-0.0.1-SNAPSHOT.jar app.jar
CMD ["java", "-jar", "app.jar"]- Dockerfile 작성하고 github에 업로드
- 이때, Dockerfile의 위치는 프로젝트 파일 바로 하위에 위치
- 빨간 부분은 프로젝트 파일 명에 따라 달라지기 때문에 주의
EC2에 저장할 파일들
- deploy.sh 파일을 실행시켜 docker-compose를 통해 컨테이너를 생성하기 때문에 같은 디렉터리에 위치

deploy.sh
#!/bin/bash

# 현재 실행 중인 컨테이너 확인
IS_GREEN_EXIST=$(docker ps | grep green)
NGINX_CONF_PATH="/etc/nginx/nginx.conf"

# Blue가 실행 중이면 Green을 업그레이드
if [ -z "$IS_GREEN_EXIST" ]; then
  echo "### BLUE => GREEN ###"
  echo ">>> Green 버전의 컨테이너를 배포합니다."

  # Green 컨테이너 이미지 Pull
  echo ">>> Green 이미지 Pull"
  docker-compose pull green

  # Green 컨테이너 실행
  echo ">>> Green 컨테이너 UP"
  docker-compose up -d green

  # Health Check (정상 동작 확인)
  while true; do
    echo ">>> Green 서버 Health Check 중..."
    sleep 3
    REQUEST=$(curl -s http://127.0.0.1:8082)
    if [ -n "$REQUEST" ]; then
      echo ">>> ✅ Green 서버 정상 가동 완료!"
      break
    fi
  done

  sleep 3

  # Nginx 설정 변경 (Green 활성화)
  echo ">>> Nginx 설정을 Green으로 변경합니다."
  sudo cp /etc/nginx/nginx.green.conf $NGINX_CONF_PATH
  sudo nginx -s reload

  # 기존 Blue 컨테이너 종료
  echo ">>> 기존 Blue 컨테이너 종료"
  docker-compose stop blue

# Green이 실행 중이면 Blue를 업그레이드
else
  echo "### GREEN => BLUE ###"
  echo ">>> Blue 버전의 컨테이너를 배포합니다."

  # Blue 컨테이너 이미지 Pull
  echo ">>> Blue 이미지 Pull"
  docker-compose pull blue

  # Blue 컨테이너 실행
  echo ">>> Blue 컨테이너 UP"
  docker-compose up -d blue

  # Health Check (정상 동작 확인)
  while true; do
    echo ">>> Blue 서버 Health Check 중..."
    sleep 3
    REQUEST=$(curl -s http://127.0.0.1:8081)
    if [ -n "$REQUEST" ]; then
      echo ">>> ✅ Blue 서버 정상 가동 완료!"
      break
    fi
  done

  sleep 3

  # Nginx 설정 변경 (Blue 활성화)
  echo ">>> Nginx 설정을 Blue로 변경합니다."
  sudo cp /etc/nginx/nginx.blue.conf $NGINX_CONF_PATH
  sudo nginx -s reload

  # 기존 Green 컨테이너 종료
  echo ">>> 기존 Green 컨테이너 종료"
  docker-compose stop green
fi

echo "✅ 배포 완료!"
docker-compose.yml
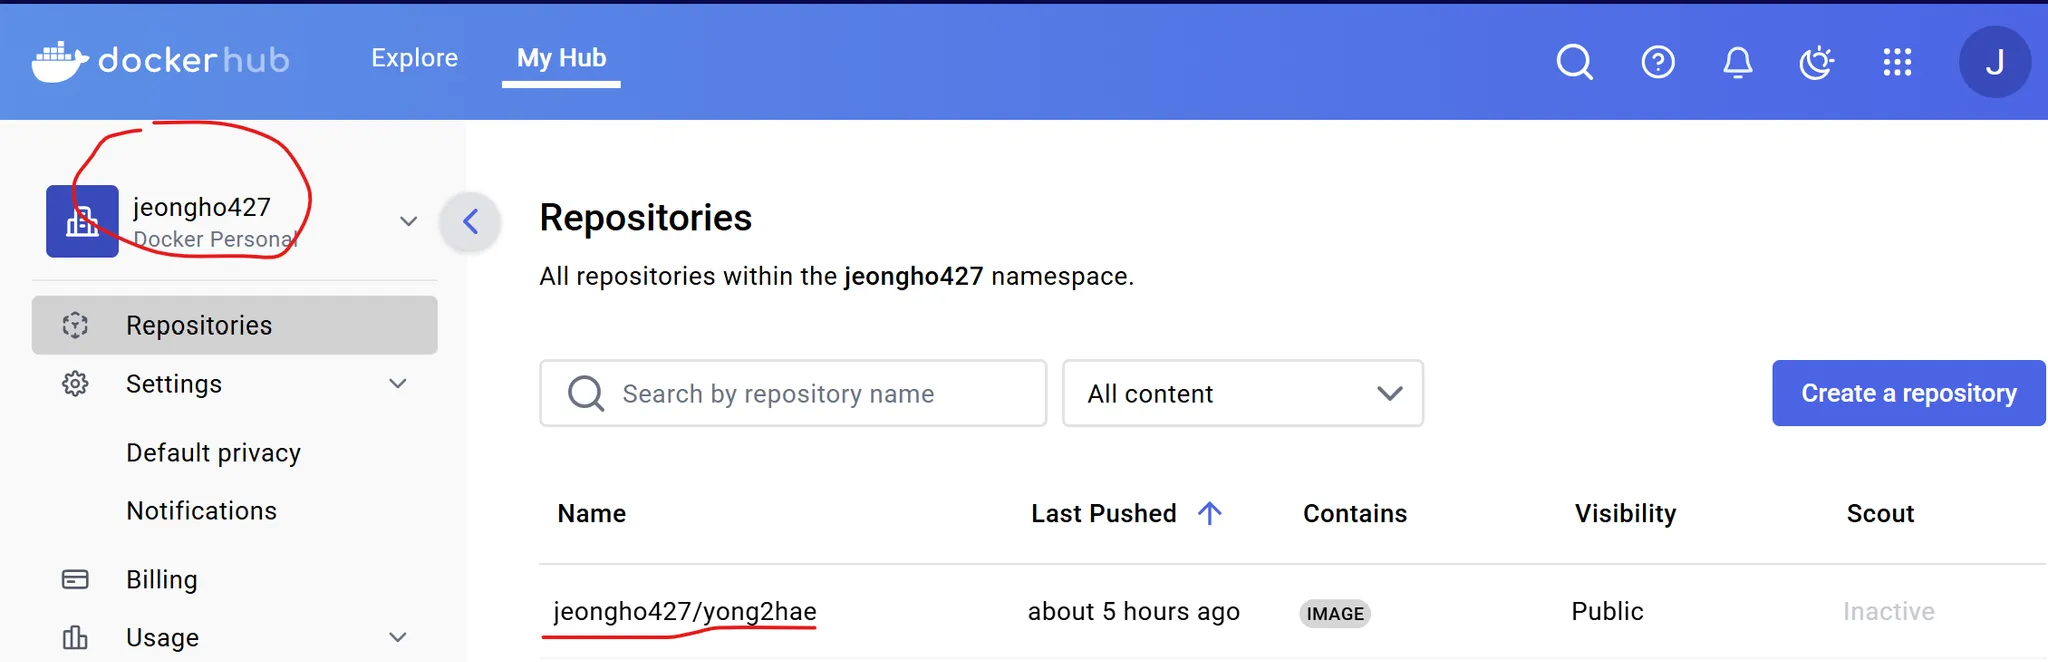
- docker_username은 도커 허브에서 유저 이름, docker_repo_name은 도커 허브에서 레포 이름이다.
- your_docker_name: jeongho427
- docker_repo_nameL yong2hae
version: '3'
services:
  blue:
    image: [your_docker_username]/[docker_repo_name]
    container_name: blue
    restart: always
    ports:
      - 8081:8080
  green:
    image: [your_docker_username]/[docker_repo_name]
    container_name: green
    restart: always
    ports:
      - 8082:8080
- docker hub에 repo 생성
blue.conf / green.conf 파일 작성

nginx가 리버스 프록시 역할을 하여 blue, green의 포트를 관리해준다.
리버스 프록시 역할
도메인 → 백엔드(Spring) 컨테이너 포트로 요청 전달
예:
- 사용자는
http://my-service.com으로 접속 - Nginx는 이 요청을
localhost:8080(Spring 앱)으로 전달
🔁 Spring 부트 앱이 직접 외부에서 요청 받는 게 아니라, Nginx가 대신 받고 전달함
무중단 배포(Blue-Green) 지원
하나의 컨테이너를 새로 띄우고, Nginx의 설정만 바꿔서 트래픽 전환
#nginx code

upstream backend {
    server app_v1:8080;
    # 나중에
    # server app_v2:8080;
}- Nginx는 트래픽을 어떤 컨테이너로 보낼지 제어 가능
- 앱을 재시작하지 않고도 트래픽 전환 가능
결론: nginx를 사용하여 트래픽 전환을 해주고 이를 통해 무중단 배포가 가능하게 한다.
blue.conf
server {
 listen 80 default_server;
 listen [::]:80 default_server;

 # SSL configuration
 #
 # listen 443 ssl default_server;
 # listen [::]:443 ssl default_server;
 #
 # Note: You should disable gzip for SSL traffic.
 # See: https://bugs.debian.org/773332
 #
 # Read up on ssl_ciphers to ensure a secure configuration.
 # See: https://bugs.debian.org/765782
 #
 # Self signed certs generated by the ssl-cert package
 # Don't use them in a production server!
 #
 # include snippets/snakeoil.conf;

 root /var/www/html;

 # Add index.php to the list if you are using PHP
 index index.html index.htm index.nginx-debian.html;

 server_name localhost;

 location / {
  proxy_pass http://localhost:8081;
  proxy_set_header X-Real-IP $remote_addr;
  proxy_set_header X-Forwarded-For $proxy_add_x_forwarded_for;
  proxy_set_header Host $http_host;
 }

 # pass PHP scripts to FastCGI server
 #
 location ~ \.php$ {
  include snippets/fastcgi-php.conf;
 #
 # # With php-fpm (or other unix sockets):
  fastcgi_pass unix:/var/run/php/php7.4-fpm.sock;
 # # With php-cgi (or other tcp sockets):
 # fastcgi_pass 127.0.0.1:9000;
 }

 # deny access to .htaccess files, if Apache's document root
 # concurs with nginx's one
 #
 #location ~ /\.ht {
 # deny all;
 #}
}
green.conf
server {
 listen 80 default_server;
 listen [::]:80 default_server;

 # SSL configuration
 #
 # listen 443 ssl default_server;
 # listen [::]:443 ssl default_server;
 #
 # Note: You should disable gzip for SSL traffic.
 # See: https://bugs.debian.org/773332
 #
 # Read up on ssl_ciphers to ensure a secure configuration.
 # See: https://bugs.debian.org/765782
 #
 # Self signed certs generated by the ssl-cert package
 # Don't use them in a production server!
 #
 # include snippets/snakeoil.conf;

 root /var/www/html;

 # Add index.php to the list if you are using PHP
 index index.html index.htm index.nginx-debian.html;

 server_name localhost;

 location / {
  proxy_pass http://localhost:8082;
  proxy_set_header X-Real-IP $remote_addr;
  proxy_set_header X-Forwarded-For $proxy_add_x_forwarded_for;
  proxy_set_header Host $http_host;
 }

 # pass PHP scripts to FastCGI server
 #
 location ~ \.php$ {
  include snippets/fastcgi-php.conf;
 #
 # # With php-fpm (or other unix sockets):
  fastcgi_pass unix:/var/run/php/php7.4-fpm.sock;
 # # With php-cgi (or other tcp sockets):
 # fastcgi_pass 127.0.0.1:9000;
 }

 # deny access to .htaccess files, if Apache's document root
 # concurs with nginx's one
 #
 #location ~ /\.ht {
 # deny all;
 #}
}
이제 여기까지 환경 세팅이 끝났으면 CI/CD를 실행시킬 수 있는 브렌치에 push를 하여 CI/CD를 실행시킨다.
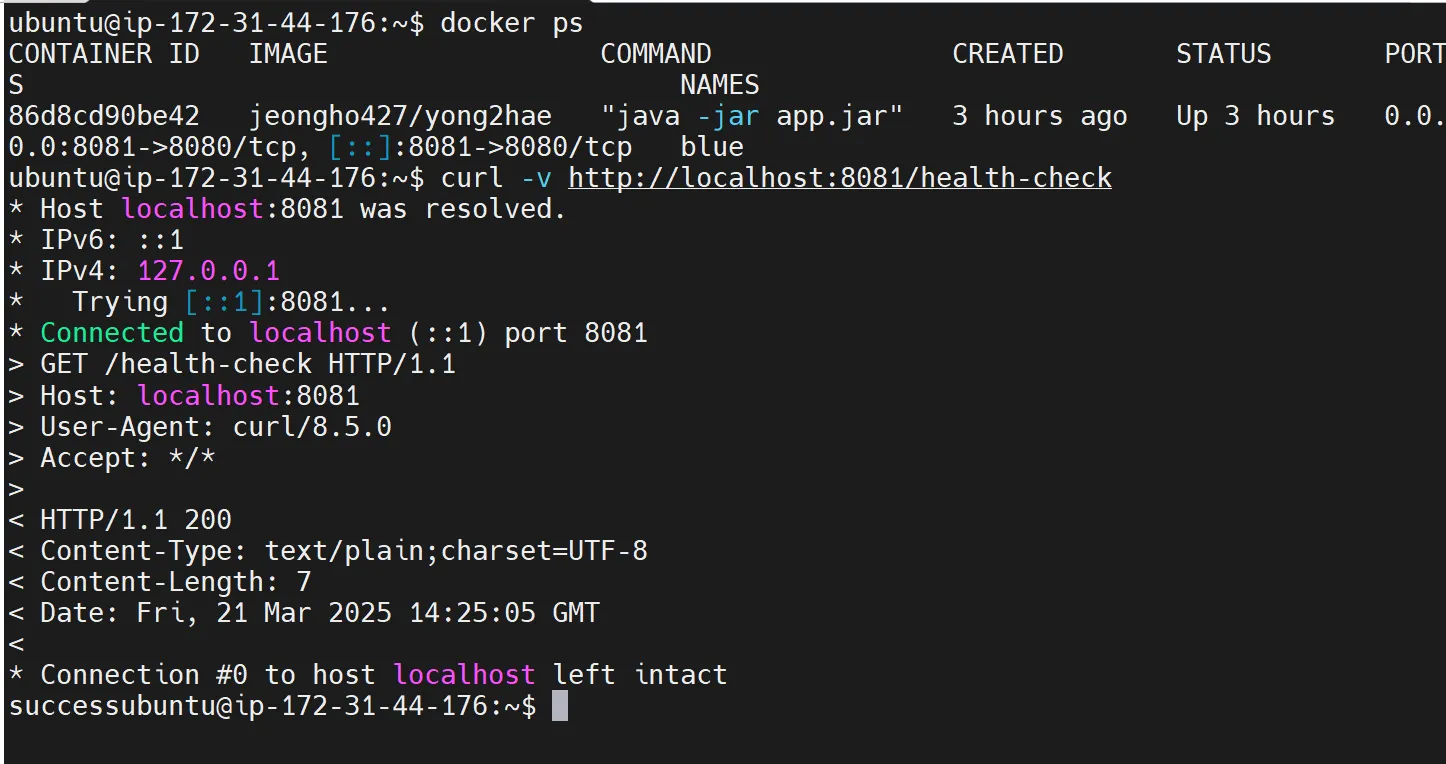
성공 화면
- docker ps를 통해 컨테이너가 잘 올라왔는지 확인
- health-check end-point 호출하여 확인