
깃레포
NestJS로 API 만들기 강의를 보고 정리한 글입니다.
🐯 1. NestJS 란?
- node.js 백엔드를 만들기 위한 프레임워크
- TypeScript 기반 (TypeScript -> NestJS 순서로 공부 추천)
- JS 에 TS 가 있다면, node.js 에는 NestJS 가 있다. (말과 기수 느낌)
- 규칙과 패턴, 구조 등이 있어서 안정감을 느낄 수 있고, 테스트 툴을 제공한다.
🐯 2. Hello World
npm i -g @nestjs/cli
nest // 커맨드 리스트 보이면 설치된 거.
nest new // 폴더 만들 위치에 이동 후 해당 명령어 입력 후 폴더 이름 작성
npm 선택 // 패키지 설치
해당 폴더 VSC 로 열기
npm run start:dev // nest 시작됨. (노드몬처럼 실시간으로 적용)
브라우저에서 localhost:3000 이동하면 Hello World! 보임
🐯 3. 구조와 데코레이터
main.ts 는 이름 변경하면 안됨.
// main.ts
import { NestFactory } from '@nestjs/core';
import { AppModule } from './app.module';

async function bootstrap() {
  // AppModule 정의된 곳으로 이동
  const app = await NestFactory.create(AppModule);
  await app.listen(3000);
}
bootstrap();
// app.module.ts
import { Module } from '@nestjs/common';
import { AppController } from './app.controller';
import { AppService } from './app.service';

@Module({ // 데코레이터 함수 확인 가능
  imports: [],
  // AppController 정의된 곳으로 이동 (express router 역할)
  controllers: [AppController],
  providers: [AppService],
})
export class AppModule {}
데코레이터는 클래스에 함수기능을 추가 할 수 있음.
AppController 정의된 곳 가면 @get 데코레이터 확인 가능.
// app.controller.ts
import { Controller, Get } from '@nestjs/common';
import { AppService } from './app.service';

@Controller()
export class AppController {
  // AppService 정의된 곳으로 이동
  constructor(private readonly appService: AppService) {}

  @Get() // 데코레이터와
  getHello(): string { // 함수는 항상 붙어있어야 함
    return this.appService.getHello();
  }
}
@Get -> @Post 수정 후 localhost:3000 확인하면 아래처럼 친절한 메세지 확인가능

// app.service.ts
import { Injectable } from '@nestjs/common';

@Injectable()
export class AppService {
  getHello(): string {
    return 'Hello World!';
  }
}
Q. AppService 를 따로 두는 이유
A. NestJS 는 controller(url 가져옴) 와 비즈니스 로직(실질적 함수 존재)을 구분짓고 싶어함
🐯 4. controller 생성
- 프로젝트를 시작하기 위해 src 폴더에
app.module.ts,main.ts파일만 남기기. app.module.ts아래처럼 수정하기
import { Module } from '@nestjs/common';

@Module({
  imports: [],
  controllers: [],
  providers: [],
})
export class AppModule {}
nest g co // nest generate controller 명령어 (컨트롤러 만들기) 이름은 movies 로 설정
app.module.ts에controllers: [MoviesController],변경됨- src 폴더에 movies 폴더 생성되고
movie.controller.ts파일 생김
// movie.controller.ts
@Controller('movies') // endPoint
export class MoviesController {
  constructor(private readonly moviesService: MoviesService) {}

  @Get() // http://localhost:3000/movies 로 접근가능
  getAll(): Movie[] {
    return this.moviesService.getAll();
  }
}
🐯 5. query, param, body 받아오기
- express 에서는 정보들이 req 객체에 담겨있었지만,
NestJS 에서는 정보가 필요하면 요청해야함.- express 에서 body 를 json 으로 리턴하려면 따로 설정을 해야했지만 NestJS는 알아서 json 으로 들어옴.
// movie.controller.ts

@Get('search') // http://localhost:3000/movies/search?year=2000
  getOne(@Query('year') searchingYear: string): Movie {
    return `we are searching for a movie made after ${searchingYear}`;
    // 우선 이렇게 해서 값을 받아오는지 확인 후에 service 파일 작성하면 좋음.
  }

@Get(':id') // http://localhost:3000/movies/1
  getOne(@Param('id') movieId: string): Movie {
    return `This will return one movie with the id ${movieId}`;
  }

@Post()
  create(@Body() movieData) {
    return movieData
  }
🐯 6. service 생성
nest g s // nest generate service 서비스생성, 이름 movies 로 설정
app.module.ts에 providers: [MoviesService], 변경됨- src/movies 폴더에
movies.service.ts파일 생성됨
컨트롤러는 url 을 매핑하고 req를 받는역할, 서비스는 로직을 관리할 예정
- 가짜 데이터베이스 만들기
// src/movies/entities/movie.entity.ts
// 인터페이스 movie 구성
// 실제로는 여기에 DB 모델을 둠
export class Movie {
  id: number;
  title: string;
  year: number;
  genres: string[];
}- 실제 서비스 로직
// src/movies/movie.service.ts
import { Injectable, NotFoundException } from '@nestjs/common';
import { Movie } from './entities/movie.entity';
@Injectable()
export class MoviesService {
private movies: Movie[] = []; // DB
getAll(): Movie[] {
return this.movies;
}
getOne(id: number): Movie {
const movie = this.movies.find((movie) => movie.id === id);
if (!movie) {
// nest 에 내장되어있는 에러처리
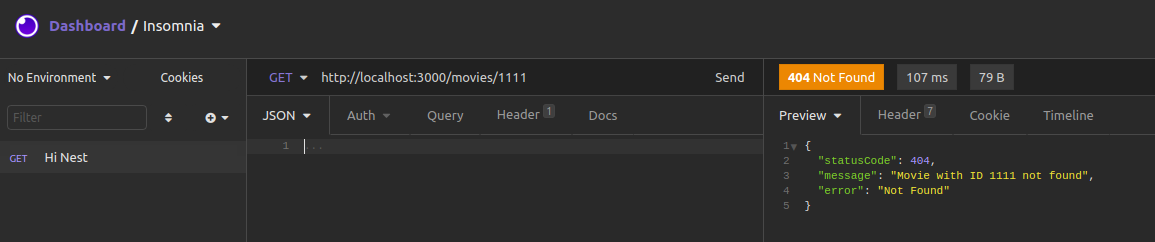
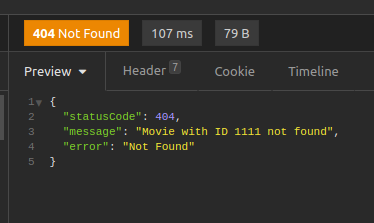
throw new NotFoundException(`Movie with ID ${id} not found`);
}
return movie;
}
}- 에러처리 부분 insomnia 툴 이용해서 확인
🐯 7. 유효성검사
// src/movies/dto/create-movie.dto.ts
import { IsNumber, IsOptional, IsString } from 'class-validator';

export class CreateMovieDto {
  @IsString()
  readonly title: string;

  @IsNumber()
  readonly year: number;

  @IsOptional() // 유효성검사 무시 (선택적인 인자)
  @IsString({ each: true }) // 요소 각각 검사한다는 뜻
  readonly genres: string[];
}
// movie.service.ts
import { CreateMovieDto } from './dto/create-movie.dto';
create(movieData: CreateMovieDto) { // 유효성 검사
this.movies.push({
id: this.movies.length + 1,
...movieData,
});
}
환상적인 옵션
// main.ts
import { ValidationPipe } from '@nestjs/common';
import { NestFactory } from '@nestjs/core';
import { AppModule } from './app.module';
async function bootstrap() {
const app = await NestFactory.create(AppModule);
app.useGlobalPipes(
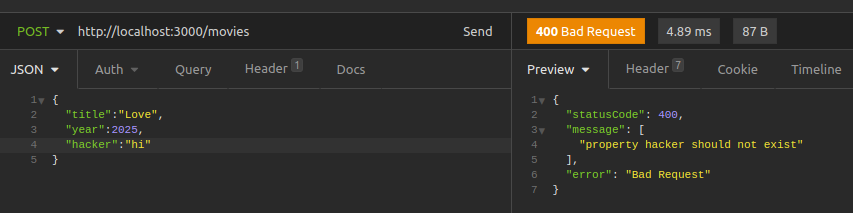
new ValidationPipe({ // express 의 middleware 역할
whitelist: true, // 인자로 받는 것만 들어오게 할 수 있음
forbidNonWhitelisted: true, // 메세지로 해당 인자는 사용할 수 없다고 안내함
transform: true, // 우리가 원하는 타입으로 변환해줌
}),
);
await app.listen(3000);
}
bootstrap();
- 옵션 적용 후, 받지 않는 인자로 요청하는 경우 에러메세지
🐯 8. Express on NestJS
바디나 쿼리 파라미터를 요청하는 대신에 req 를 받는 방법도 있다.
하지만 비추천한다.
NestJS 는 express 위에서 실행되지만 다른 프레임워크인 Fastify 로 전환할 수도 있다.
이 경우 성능이 2배로 향상된다.
express 에 접근하는 방식이 아닌 NestJS 방식으로만 쓰면 전환이 쉽다.