
🐅 1. Intro
package.json 을 보면 test 에 관한 명령어가 이미 존재함.
  "scripts": {
    "test": "jest",
    "test:watch": "jest --watch", // 무슨 일이 일어나는지 관찰
    "test:cov": "jest --coverage", // 얼마만큼 테스트가 진행됐는지 보여줌
    "test:debug": "node --inspect-brk -r tsconfig-paths/register -r ts-node/register node_modules/.bin/jest --runInBand",
    "test:e2e": "jest --config ./test/jest-e2e.json"
  },
유닛테스트 : 모든 function 을 따로 테스트함
E2E테스트 : 모든 시스템을 테스트함(사용자 관점에서 페이지 단위)
🐅 2. 유닛테스트 기본
NestJS는 cli로 폴더나 파일을 생성할 때마다 테스트 파일도 함께 만들어짐
(파일이름에 spec 들어가면 테스트파일임)
// src/movies/movies.service.spec.ts
describe('MoviesService', () => {
  let service: MoviesService;

  it('should be defined', () => { // 이 형식 맞춰서 작성하면 됨
    expect(service).toBeDefined();
  });

  it('should be 4', () => {
    expect(2+2).toEqual(4);
  });
}
npm run test:watch 실행시켰다면 수정할 때마다 터미널에 결과 보여줌
🐅 3. 유닛테스트 실전
describe('MoviesService', () => {
let service: MoviesService;
// beforeEach,afterEach, beforeAll, afterAll 등 Hook 사용가능
beforeEach(async () => {
const module: TestingModule = await Test.createTestingModule({
providers: [MoviesService],
}).compile();
service = module.get<MoviesService>(MoviesService);
});
it('should be defined', () => {
expect(service).toBeDefined();
});
describe('getAll', () => { // 추가한 부분
it('should return an array', () => {
const result = service.getAll();
expect(result).toBeInstanceOf(Array);
});
});
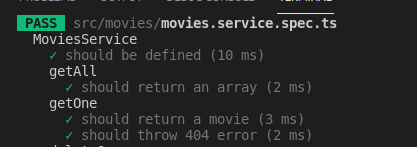
describe('getOne', () => { // 추가한 부분
it('should return a movie', () => {
service.create({
title: 'Test Movie',
genres: ['test'],
year: 2020,
});
const movie = service.getOne(1);
expect(movie).toBeDefined();
expect(movie.id).toEqual(1);
});
it('should throw 404 error', () => {
try {
service.getOne(999);
} catch (e) {
expect(e).toBeInstanceOf(NotFoundException);
expect(e.message).toEqual('Movie with ID 999 not found');
}
});
});
}npm run test:watch
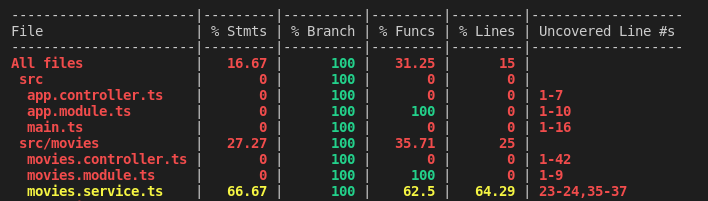
npm run test:cov테스트가 얼마만큼 진행됐는지 확인가능
🐅 4. e2e 테스트 (end to end)
테스트 환경과 실제 앱 환경을 일치 시켜야함
// test/app.e2e-spec.ts
describe('AppController (e2e)', () => {
  let app: INestApplication;

  beforeAll(async () => {
    // brforeEach 면 매번 새로운 앱모듈을 생성하므로 beforeAll 로 변경
    const moduleFixture: TestingModule = await Test.createTestingModule({
      imports: [AppModule],
    }).compile();

    app = moduleFixture.createNestApplication();
    app.useGlobalPipes(
      new ValidationPipe({ // 환경 일치시키기 (main.ts 참고)
        whitelist: true,
        forbidNonWhitelisted: true,
        transform: true,
      }),
    );
    await app.init();
  });

  it('/ (GET)', () => {
    return request(app.getHttpServer())
      .get('/') // 엔드포인트
      .expect(200) // status code
      .expect('Hello World!'); // res
  });

  describe('/movies', () => {
    it('GET', () => {
      return request(app.getHttpServer()).get('/movies').expect(200).expect([]);
    });

    it('POST 201', () => {
      return request(app.getHttpServer())
        .post('/movies')
        .send({
          title: 'Test',
          year: 2020,
          genres: ['Test'],
        })
        .expect(201);
    });
    it('POST 400', () => { // 에러도 확인가능
      return request(app.getHttpServer())
        .post('/movies')
        .send({
          title: 'Test',
          year: 2020,
          genres: ['Test'],
          other: 'Thing', //whitelist 옵션에서 걸러질 예정
        })
        .expect(400);
    });
})
🐅 5. 후기
개인 프로젝트 진행할 때는 무조건 NestJS 써야겠다고 다짐했다.
라우팅이나 구조에 대해 고민할 필요성이 없었다. (안정감..)
폴더위치를 신경쓰지 않아도 되고, 파일끼리도 다 연결해준다!
기본적인 예시코드들도 있어서, 손쉽게 따라할 수 있다.
테스팅을 본격적으로 배운 건 처음이다.
규모가 작은 프로젝트는 몇 번만에 모든 기능을 테스트 할 수 있지만,
규모가 커질수록 한계가 있기때문에, 필수로 진행해야 한다고 생각한다.
앞으로의 계획은 liner API 서버를 NestJS로 리팩토링 하는 것이다.
데이터베이스 연결이 잘 됐으면 좋겠다.

기록하는 백엔드 개발자