
React는 상태와 속성을 이용한 컴포넌트 단위의 개발이었다.
Redux는 컴포넌트와 상태를 분리한다.
Redux는 React없이도 사용할 수 있는, 상태관련 라이브러리다.
🌀 리덕스
Redux is predictable state container for JS applications.
JS앱에서 예측가능한 상태관리를 해주는 컨테이너
- 기본개념 (세가지 원칙)
- single source of truth (동일한 데이터는 항상 같은 곳에서 가져온다) //store
- state is read-only (setState같은 것을 이용해서 업데이트 한다) // action & dispatch
- changes are made with pure functions (순수함수로 제어한다) //reducer
action 객체는 dispatch 에게 전달되고, dispatch 는 reducer 를 호출해 새로운 state 생성
(아직 무슨 의미인지 모르지만, 과제를 진행하면서 깨닫게 될 것이다.)
🌀 리덕스의 기본개념 Overview
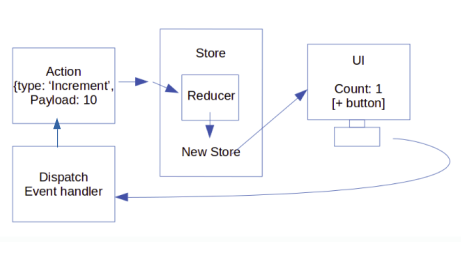
UI에서 + 버튼을 누르면 dispatch 가 action 을 reducer에 전달해주고,
reducer 은 원래 가지고 있던 state와 새로 받은 action 으로 새 state 를 만든다.
🌀 리덕스의 장점
- 상태를 예측 가능하게 만들어준다.
- 유지보수
- 디버깅에 유리하다 (action 과 state log 기록 시)
- 테스트를 붙이기 쉽다.
🌀 Getting Started with Redux
아래예제는 공식문서에서 가져왔습니다.
-
설치
npm install redux -
기본예제 (영어판과 한글판 예제가 조금 달라서 둘다 넣었다)
여러분의 앱의 상태 전부는 하나의 저장소(store)안에 있는 객체 트리에 저장됩니다. 상태 트리를 변경하는 유일한 방법은 무엇이 일어날지 서술하는 객체인 액션(action)을 보내는 것 뿐입니다. 액션이 상태 트리를 어떻게 변경할지 명시하기 위해 여러분은 리듀서(reducers)를 작성해야 합니다.
import { createStore } from 'redux'

/**
 * This is a reducer - a function that takes a current state value and an
 * action object describing "what happened", and returns a new state value.
 * A reducer's function signature is: (state, action) => newState
 *
 * The Redux state should contain only plain JS objects, arrays, and primitives.
 * The root state value is usually an object.  It's important that you should
 * not mutate the state object, but return a new object if the state changes.
 *
 * You can use any conditional logic you want in a reducer. In this example,
 * we use a switch statement, but it's not required.
 */
function counterReducer(state = { value: 0 }, action) { // 리듀서
  switch (action.type) {
    case 'counter/incremented':
      return { value: state.value + 1 }
    case 'counter/decremented':
      return { value: state.value - 1 }
    default:
      return state
  }
}

// Create a Redux store holding the state of your app.
// Its API is { subscribe, dispatch, getState }.
let store = createStore(counterReducer) // 스토어

// You can use subscribe() to update the UI in response to state changes.
// Normally you'd use a view binding library (e.g. React Redux) rather than subscribe() directly.
// There may be additional use cases where it's helpful to subscribe as well.

store.subscribe(() => console.log(store.getState()))

// The only way to mutate the internal state is to dispatch an action.
// The actions can be serialized, logged or stored and later replayed.
store.dispatch({ type: 'counter/incremented' })
// {value: 1}
store.dispatch({ type: 'counter/incremented' })
// {value: 2}
store.dispatch({ type: 'counter/decremented' })
// {value: 1}
import { createStore } from 'redux'
/**
* 이것이 (state, action) => state 형태의 순수 함수인 리듀서입니다.
* 리듀서는 액션이 어떻게 상태를 다음 상태로 변경하는지 서술합니다.
*
* 상태의 모양은 당신 마음대로입니다: 기본형(primitive)일수도, 배열일수도, 객체일수도,
* 심지어 Immutable.js 자료구조일수도 있습니다. 오직 중요한 점은 상태 객체를 변경해서는 안되며,
* 상태가 바뀐다면 새로운 객체를 반환해야 한다는 것입니다.
*
* 이 예제에서 우리는 `switch` 구문과 문자열을 썼지만,
* 여러분의 프로젝트에 맞게
* (함수 맵 같은) 다른 컨벤션을 따르셔도 좋습니다.
*/
function counter(state = 0, action) {
switch (action.type) {
case 'INCREMENT':
return state + 1
case 'DECREMENT':
return state - 1
default:
return state
}
}
// 앱의 상태를 보관하는 Redux 저장소를 만듭니다.
// API로는 { subscribe, dispatch, getState }가 있습니다.
let store = createStore(counter)
// subscribe()를 이용해 상태 변화에 따라 UI가 변경되게 할 수 있습니다.
// 보통은 subscribe()를 직접 사용하기보다는 뷰 바인딩 라이브러리(예를 들어 React Redux)를 사용합니다.
// 하지만 현재 상태를 localStorage에 영속적으로 저장할 때도 편리합니다.
store.subscribe(() => console.log(store.getState())))
// 내부 상태를 변경하는 유일한 방법은 액션을 보내는 것뿐입니다.
// 액션은 직렬화할수도, 로깅할수도, 저장할수도 있으며 나중에 재실행할수도 있습니다.
store.dispatch({ type: 'INCREMENT' })
// 1
store.dispatch({ type: 'INCREMENT' })
// 2
store.dispatch({ type: 'DECREMENT' })
// 1🌀 개념 정리
store : 상태가 관리되는 오직 하나의 공간
let store = createStore(counterReducer)reducer : 현재상태와 Action을 이용해 다음 상태를 만들어내는 함수 (Store 안에 있음)
주소값이 다른 객체가 들어와야 state 변경을 알아챈다.(주소를 비교하면 효율상승)
보통 전개연산자나 아래와 같은 Object.assign 을 사용한다.
const itemReducer = (state = initialState, action) => {

  switch (action.type) {
    case ADD_TO_CART:
      //TODO
      return Object.assign({}, state, {
        cartItems: [...state.cartItems, action.payload]
      })
      default:
      return state;
  }
}
action : 앱에서 store로 payload 를 전달 (API 와 비슷. 객체형태)
type속성을 가진 객체다. (type은 필수다.)
// 예시코드
{type: "ORDER",
  main : {
    menu: "Pasta"
  }
}
dispatch : action을 Reducer 에게 전달
store.dispatch({ type: 'counter/incremented' })
// {value: 1}
store.dispatch({ type: 'counter/incremented' })
// {value: 2}
store.dispatch({ type: 'counter/decremented' })
// {value: 1}
subscribe : 상태 변화에 따라 UI가 변경되게 할 수 있다
(보통은 뷰 바인딩 라이브러리(예를 들어 React Redux)를 사용)
store.subscribe(() => console.log(store.getState()))🌀 코드스테이츠 예제
const { createStore } = require('redux'); // 가져오기
// 초기 state 정의
const initState = {
    name: '김코딩',
    posts: [],
}
// action은 객체다!
// action creator
const changeUsername = (data) => {
    return { // action
        type: 'CHANGE_NAME',
        data,
    }
}
const addPost = (post) => {
    return {
        type: 'ADD_POST',
        post,
    }
}
// pure function reducer
const reducer = (prevState, action) => { // 이전상태값과 action을 파라미터로 받는다
    switch (action.type){
        case 'CHANGE_NAME':
            return {
                ...prevState,
                name: action.data,
            };
        case 'ADD_POST':
            return {
                ...prevState,
                posts: [...prevState.posts, action.post],
            };
        default:
            return prevState;
    }
}
// store 만들기
const store = createStore(reducer, initState); // 두번째 인자로 초기값 설정 (공식문서예제와 다름. 방법 2가지임)
// dispatch로 액션 전달
store.dispatch(changeUsername('코드츠테이츠'));
store.dispatch(addPost('포스트 추가1'));
store.dispatch(addPost('포스트 추가2'));
console.log(store.getState());
🌀 리덕스 훅스로 컴포넌트와 연결
- useSelector()는 컴포넌트와 state를 연결한다.
컴포넌트에서 해당 메소드를 통해 store의 state에 접근할 수 있다.
useSelector의 전달인자로는 콜백 함수를 받으며 콜백 함수의 전달인자로는 state 값이 들어간다. - useDispatch()는 Action 객체를 Reducer로 전달해주는 메소드. Action 이 일어날만한 곳에 작성한다.
import React from 'react';
import { useSelector, useDispatch } from 'react-redux'; //훅스 메소드
import { addToCart, notify } from '../actions/index'; // 액션
import Item from '../components/Item'; // 컴포넌트

function ItemListContainer() {
  const state = useSelector(state => state.itemReducer); // 콜백함수받음
  const { items, cartItems } = state; // 직관적으로 상태사용할수 있음
  const dispatch = useDispatch();

  const handleClick = (item) => {
    if (!cartItems.map((el) => el.itemId).includes(item.id)) {
      // 아이템추가버튼 누를때마다 dispatch 함수를 호출하여 아이템 추가에 대한 액션을 전달
      dispatch(addToCart(item.id)) // 액션객체를 리듀서로 전달하는 디스패치
    }
    else {
      dispatch(notify('이미 추가된 상품입니다.'))
    }
  }

  return (
    <div id="item-list-container">
      <div id="item-list-body">
        <div id="item-list-title">쓸모없는 선물 모음</div>
        {items.map((item, idx) => <Item item={item} key={idx} handleClick={() => {
          handleClick(item)
        }} />)} /*useSelector 로 받아온 아이템 정보 뿌리기*/
      </div>
    </div>
  );
}- 로직설명
수량을 늘리거나 줄이는 버튼을 누른다
-> 디스패치에 액션객체를 담는다
-> 리듀서로 전달된다
-> 스토어내에 있는 상태가 업데이트 된다
-> useSelector 가 상태를 받아온다
-> 수량이 업데이트되어 화면에 보인다