캡틴판교 장기효님의 Vue.js시작하기 인프런 강의를 수강하고 내용을 정리했다.
매일 20분 야금야금 Vue.js 화이팅.
IDE: Visual Studio Code
크롬 뷰 개발자 도구: Vue.js devtools
emit이란?
emit은 하위컴포넌트의 이벤트를 상위컴포넌트로 올려준다.
emit 정의하고 컴포넌트 간에 이벤트 연결하기
하위 컴포넌트의 버튼을 클릭하면 상위컴포넌트의 메서드가 실행되도록 만들어보자.
1. 하위 컴포넌트의 emit 이벤트명 정의
루트 컴포넌트 하위에 app-header 라는 하위 컴포넌트가 있다.
하위컴포넌트에 버튼을 클릭하면, passEvent 함수가 실행된다.
하위컴포넌트에 emit 키워드로 이벤트 명을 pass라고 적어준다.
this.$emit('pass');
pass라는 이벤트가 발생하면, 상위 컴포넌트로 통신하라는 의미다.
        var appHeader = {
            template: '<button v-on:click="passEvent">click me</button>',
            methods: {
                passEvent: function(){
                    this.$emit('pass');
                }
            }
        }

        new Vue({
            el: '#app',
            components: {
                'app-header': appHeader
            }
        });
2. 상위 컴포넌트의 logText 메서드 정의
루트 컴포넌트에 logText 메서드를 정의한다.
logText 메서드가 실행되면 Console에 'hi'를 출력한다.
        new Vue({
            el: '#app',
            components: {
                'app-header': appHeader
            },
            methods: {
                logText: function(){
                    console.log('hi');
                }
            }
        });
3. 상위 컴포넌트의 수신 이벤트 정의
하위에서 pass라는 이벤트가 발생하면, 상위 컴포넌트에서는 logText라는 메서드가 동작한다.
아래 코드처럼 정의할 수 있다.
    <div id="app">
        <app-header v-on:하위 컴포넌트에서 발생한 이벤트 이름="상위 컴포넌트의 메서드 이름"></app-header>
        <app-header v-on:pass="logText"></app-header>
    </div>
4. 개발자도구 F12의 Vue의 Event탭을 확인
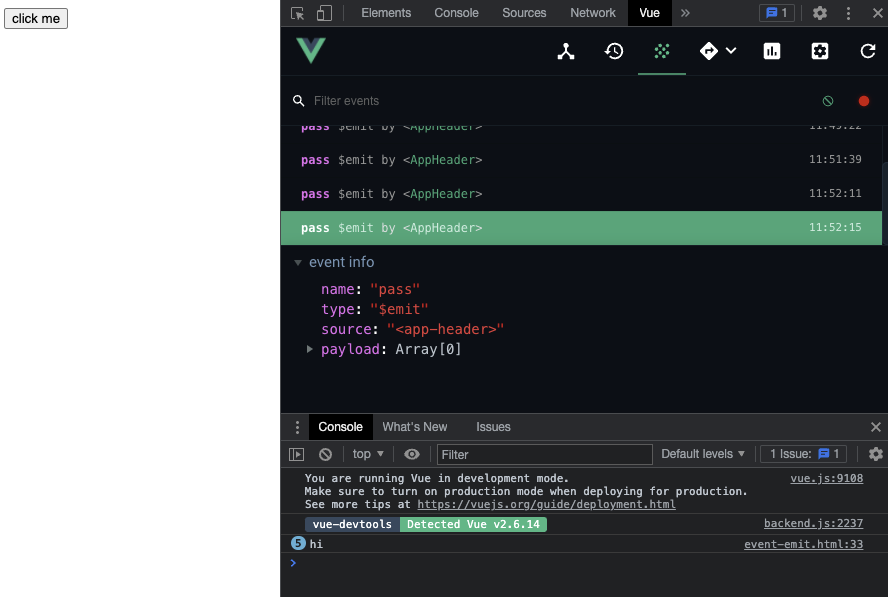
버튼을 클릭하면, AppHeader 컴포넌트의 pass라는 이름의 emit이 발생했다고 출력된다.
아래쪽 Console 탭을 열고 버튼을 클릭해보자.
'hi'라는 콘솔 로그가 찍히는 것을 확인할 수 있다.

event emit 실습
[요구사항]
appContent컴포넌트를 만들고 add라는 버튼을 만든다.
add 버튼을 클릭하면 상위 컴포넌트의 num이라는 데이터를 1씩 증가시킨다.
num데이터를 console.log()로 출력하라.
1. appContent 컴포넌트를 만든다.
버튼을 클릭하면 addNumber() 메서드가 동작하도록 정의하고 v-on디렉티브로 연결한다.
addNumber() 메서드에는 increase라는 emit을 정의한다.
        var appContent = {
            template: '<button v-on:click="addNumber">add</button>',
            methods: {
                addNumber: function(){
                    this.$emit('increase');
                }
            }
        }
appContent 태그를 루트 컴포넌트 하위에 만든다.
app-content의 increase라는 emit 이벤트가 발생하면,
increaseNumber 메서드가 동작한다.
<app-content v-on:increase="increaseNumber"></app-content>
2. appContent를 루트 컴포넌트의 하위 컴포넌트로 등록한다.
new Vue({
            el: '#app',
            components: {
                'app-header': appHeader,
                'app-content': appContent
            },
            methods: {
                logText: function(){
                    console.log('hi');
                }
            }
        });
3. 루트 컴포넌트에 메서드와 데이터를 정의한다.
increaseNumber 메서드가 실행되면, num이라는 데이터가 1씩 증가하도록 정의하자.
        new Vue({
            el: '#app',
            components: {
                'app-header': appHeader,
                'app-content': appContent
            },
            methods: {
                logText: function(){
                    console.log('hi');
                },
                increaseNumber: function(){
                    this.num += 1;
                    console.log(this.num);
                }
            },
            data:{
                num: 10
            }
        });
4. 개발자도구 F12 Vue의 Event탭에서 확인
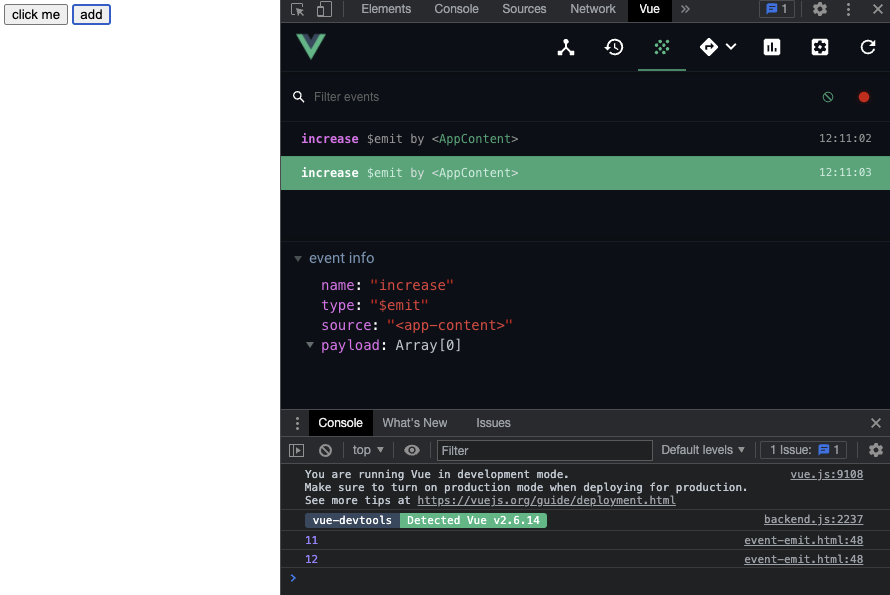
'add' 버튼을 클릭하면 AppContent 컴포넌트에 의한 increase라는 이름의 emit이벤트가 발생한다.
'add' 버튼을 2번 클릭해보자.
Console탭을 확인하면 11, 12 가 출력된다.

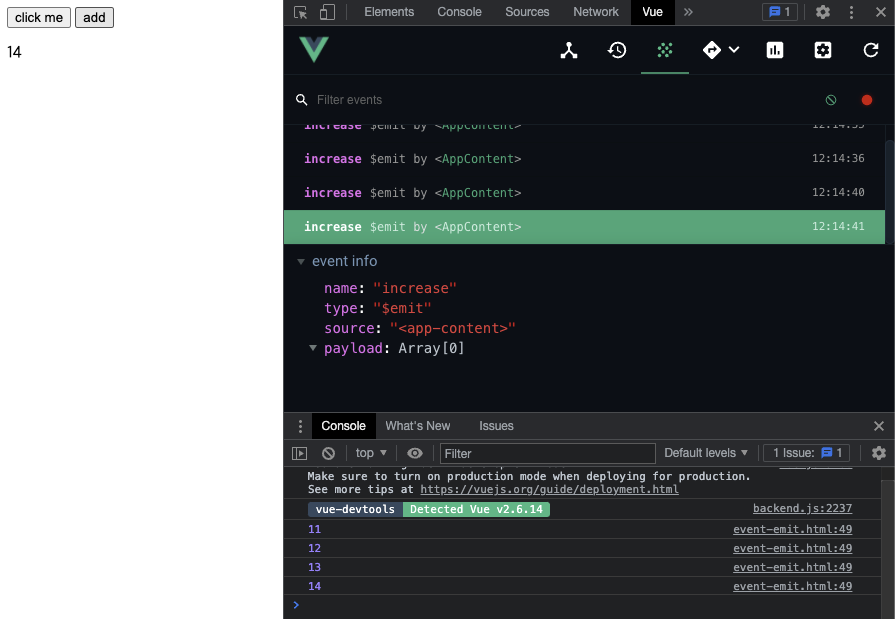
5. DOM에 p태그를 추가하여 화면에 num을 출력하자.
{{ }} 를 이용하여 루트컴포넌트의 num값을 출력하자.
add 버튼을 클릭할 때 마다 화면에 num값이 즉시 출력된다.
        <app-header v-on:pass="logText"></app-header>
        <app-content v-on:increase="increaseNumber"></app-content>
        <p>{{ this.num }} </p>
6. 전체 코드
<!DOCTYPE html>
<html lang="en">
<head>
    <meta charset="UTF-8">
    <meta http-equiv="X-UA-Compatible" content="IE=edge">
    <meta name="viewport" content="width=device-width, initial-scale=1.0">
    <title>Document</title>
</head>
<body>
    <div id="app">
        <!-- <app-header v-on:하위 컴포넌트에서 발생한 이벤트 이름="상위 컴포넌트의 메서드 이름"></app-header> -->
        <app-header v-on:pass="logText"></app-header>
        <app-content v-on:increase="increaseNumber"></app-content>
        <p>{{ this.num }} </p>
    </div>
    <script src="https://cdn.jsdelivr.net/npm/vue/dist/vue.js"></script>
    <script>

        var appHeader = {
            template: '<button v-on:click="passEvent">click me</button>',
            methods: {
                passEvent: function(){
                    this.$emit('pass');
                }
            }
        }

        var appContent = {
            template: '<button v-on:click="addNumber">add</button>',
            methods: {
                addNumber: function(){
                    this.$emit('increase');
                }
            }
        }

        new Vue({
            el: '#app',
            components: {
                'app-header': appHeader,
                'app-content': appContent
            },
            methods: {
                logText: function(){
                    console.log('hi');
                },
                increaseNumber: function(){
                    this.num += 1;
                    console.log(this.num);
                }
            },
            data:{
                num: 10
            }
        });
    </script>
</body>
</html>