
📖 주제 : 쿠버네티스에서 제공하는 롤링 업데이트와 다양한 배포 전략
-
디플로이먼트(Deployment)에서 기본으로 제공하는 롤링 업데이트(Rolling Update) 방식에 대해 설명해보세요.
-
블루-그린 배포(Blue-Green Deployment), 카나리 배포(Canary Deployment)는 무엇이며, 쿠버네티스에서 어떻게 구현할 수 있는지 조사해보세요.
-
무중단 배포를 위해 어떻게 설정해야 하는지, readinessProbe와 livenessProbe의 활용 방안을 설명해보세요.
-
(옵션) 실제 사례(예: nginx+node.js+DB 환경)에서 Rolling Update와 Blue-Green을 비교하고, 장단점을 분석해보세요.
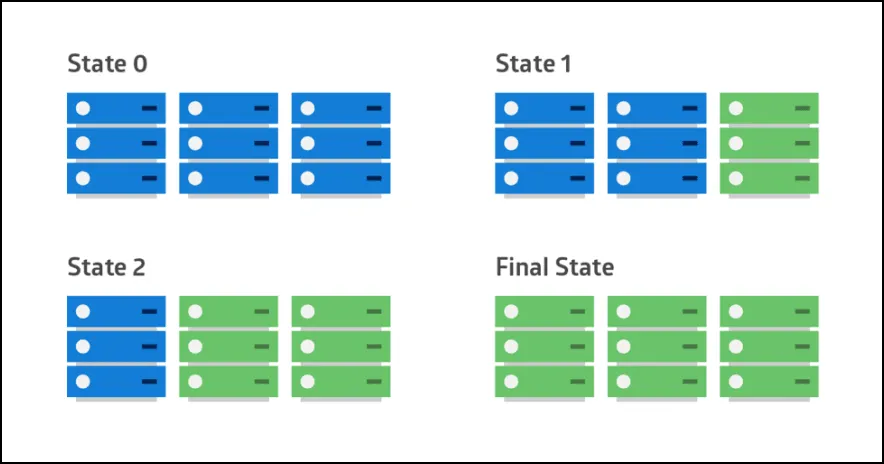
1. 디플로이먼트에서 기본으로 제공하는 롤링 업데이트 방식
⚙️ 롤링 업데이트
- 롤링 업데이트란? : 기존 파드를 점진적으로 교체하여 새로운 애플리케이션 버전을 배포합니다.
- 쿠버네티스는 롤링 업데이트를 디폴트 배포 전략으로 설정
롤링 업데이트 옵션
maxSurge- 맥스 서지 : 롤링 업데이트를 위해 최대로 생성할 수 있는 파드 갯수
- maxSurge를 높게 설정하면 롤링 배포를 빠르게 적용 가능
- % 단위 또는 갯수 단위로 지정 가능
- 설정하지 않을 경우 기본 값은 25%
maxUnavailable
- 롤링 업데이트 중 최대로 삭제할 파드 갯수
- maxUnavailable를 높게 설정하면 롤링 배포를 빠르게 적용 가능
- 다만 한번에 많은 파드를 삭제할 경우 트래픽이 남아있는 소수의 파드로 집중될 수 있어 값을 적절히 설정 필요
- % 단위 또는 갯수 단위로 지정 가능
- 설정하지 않을 경우 기본 값은 25%
Deployment 예제 YAML
apiVersion: apps/v1
kind: Deployment
metadata:
  labels:
    app: deploy-test
  name: deploy-test
spec:
  replicas: 6 # 파드 수
  selector:
    matchLabels:
      app: deploy-test
  strategy:
    type: RollingUpdate
    rollingUpdate:
      maxSurge: 2 # 기본 pod개수보다 여분의 pod가 몇개가 더 추가될 수 있는지를 설정
      maxUnavailable: 1 # 업데이트하는 동안 몇 개의 pod가 이용 불가능하게 되어도 되는지를 설정
  template:
    metadata:
      labels:
        app: deploy-test
    spec:
      containers:
      - image: nginx:1.9.0
        name: nginx
쿠버네티스에서 롤링 업데이트 구현하는 방법
롤링 업데이트 실습을 위해 Deployment 이미지를 1.9.0 에서 1.9.2로 업데이트해 보자.
- 이미지 업데이트
kubectl set image deployment/[디플로이먼트_이름] [컨테이너_이름]=[이미지]:[버전]
# ex) kubectl set image deployment/deploy-test nginx=nginx:1.9.2
쿠버네티스가 자동으로 롤링 업데이트를 진행하게 된다. (Deployment는 기본적으로 롤링 업데이트 전략을 사용하도록 설정되어 있기 때문)
- 롤링 업데이트 상태 확인
kubectl rollout status deployment/deploy-test- 업데이트 적용 확인 (Deployment 확인)
kubectl describe deployment deploy-test이미지 버전이 1.9.2로 업데이트 된 것을 확인할 수 있다.
- 문제가 발생하면 롤백
kubectl rollout undo deployment deploy-test쿠버네티스 배포 전략(RollingUpdate, Blue/Green, Canary) 및 롤백(Rollback) 개념과 설정
2. 블루-그린 배포와 카나리 배포
⚙️ 블루-그린 배포
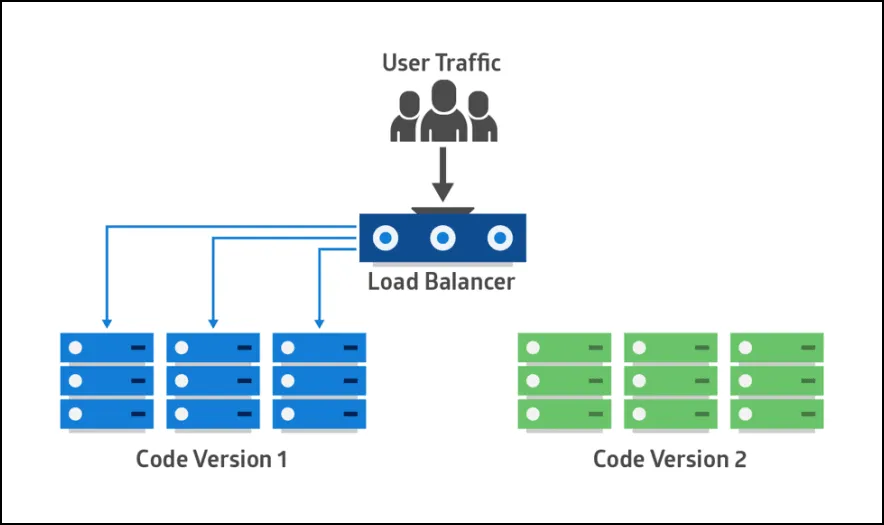
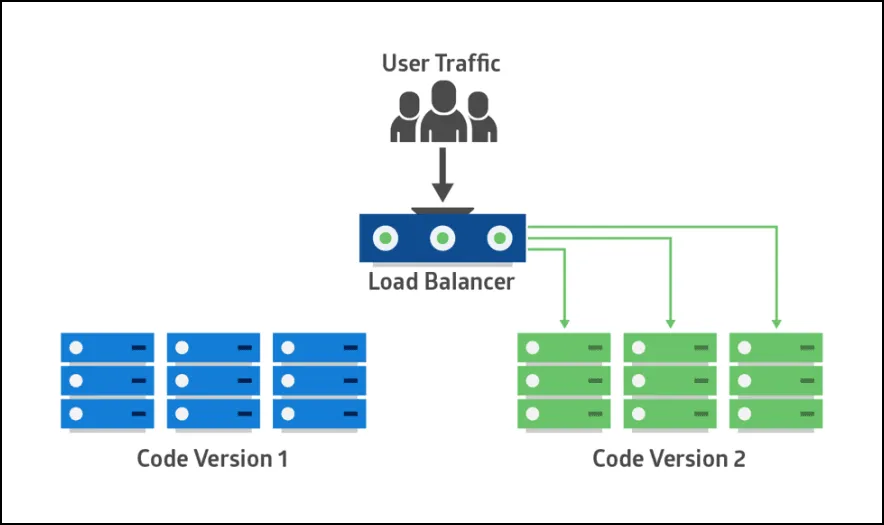
두 개의 환경(ver 1.0, ver2.0)(Blue와 Green)을 유지하며, 새로운 버전(Green)이 준비된 후에 트래픽을 ver1.0 에서 ver2.0으로 전환한다
쿠버네티스에서 블루-그린 배포 구현하는 방법
1. 블루, 그린 두 가지 버전의 Deployment를 생성
- 블루 : nginx 1.14.2 버전
apiVersion: apps/v1
kind: Deployment
metadata:
  name: version-blue
  labels:
    app: version
    color: blue
spec:
  replicas: 1
  selector:
    matchLabels:
      app: version
      color: blue
  template:
    metadata:
      labels:
        app: version
        color: blue
    spec:
      containers:
      - name: version
        image: nginx:1.14.2
        ports:
        - containerPort: 8080
- 그린 : nginx 1.16.1 버전
apiVersion: apps/v1
kind: Deployment
metadata:
  name: version-green
  labels:
    app: version
    color: green
spec:
  replicas: 1
  selector:
    matchLabels:
      app: version
      color: green
  template:
    metadata:
      labels:
        app: version
        color: green
    spec:
      containers:
      - name: version
        image: nginx:1.16.1
        ports:
        - containerPort: 8080
2. Deployment 배포
kubectl apply -f version-bule.yaml
kubectl apply -f version-green.yaml
3. Service에서 selector를 통해 블루 버전을 먼저 선택하여 실행
    apiVersion: v1
    kind: Service
    metadata:
      name: version
      labels:
        app: version
    spec:
      ports:
      - port: 80
        targetPort: 8080
      selector:
        app: version
        color: blue # 블루 버전 선택
kubectl apply -f version-service.yaml4. Service patch로 그린버전으로 배포되도록 변경
kubectl patch service version -p '{"spec":{"selector":{"color":"green"}}}'5. 결과 확인
kubectl describe svc version Name: version
Namespace: default
Labels: app=version
Annotations: <none>
Selector: app=version,color=green # 그린 버전
Type: ClusterIP
IP Family Policy: SingleStack
IP Families: IPv4
IP: 10.99.207.157
IPs: 10.99.207.157
Port: <unset> 80/TCP
TargetPort: 8080/TCP
Endpoints: 10.244.0.23:8080
Session Affinity: None
Events: <none>⚙️ 카나리 배포
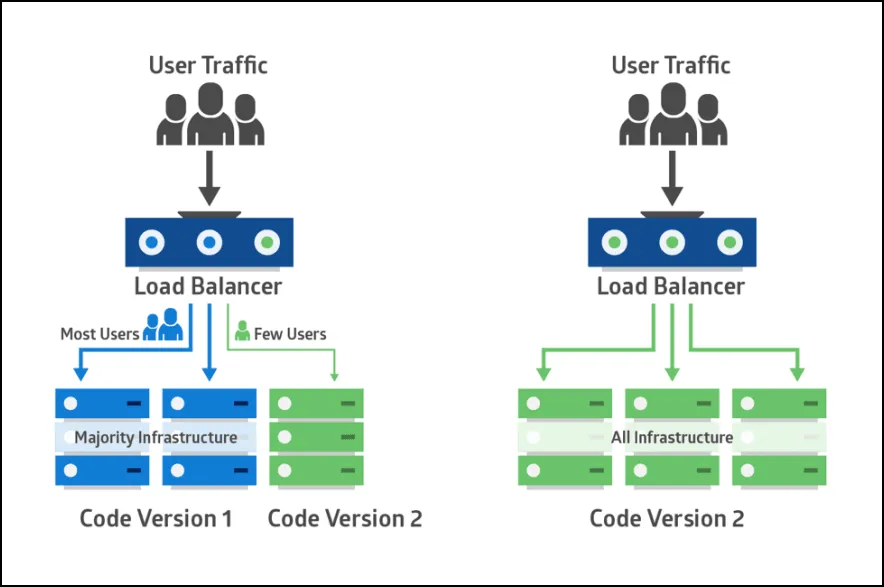
전체 트래픽 중 일부만 새로운 버전(ver2.0)으로 라우팅하여 테스트한다. 배포에 문제가 없다고 판단되면, ver2.0을 점진적으로 배포한다.
쿠버네티스에서 카나리 배포 구현하는 방법
1. ver 1.0(stabler 버전)과 ver 2.0(카나리 버전)의 Deployment 생성
- 레플리카 수가 4개인 ver1.0
apiVersion: apps/v1
kind: Deployment
metadata:
  name: application-deployment
  labels:
    app: application # 동일
    version: stable # stable버전
spec:
  replicas: 4
  selector:
    matchLabels:
      app: application
      version: stable
  template:
    metadata:
      labels:
        app: application
        version: stable
    spec:
      containers:
      - name: application
        image: nginx:1.14.2
        ports:
        - containerPort: 8080
- 레플리카 수가 1개인 ver2.0
    apiVersion: apps/v1
    kind: Deployment
    metadata:
      name: application-deployment-canary
      labels:
        app: application # 동일
        version: canary # 카나리버전
    spec:
      replicas: 1
      selector:
        matchLabels:
          app: application
          version: canary
      template:
        metadata:
          labels:
            app: application
            version: canary
        spec:
          containers:
          - name: application
            image: nginx:1.16.1
            ports:
            - containerPort: 8080
2. Deployment 배포
kubectl apply -f canary-stable.yaml
kubectl apply -f canary-canary.yaml
3. Service 생성
apiVersion: v1
kind: Service
metadata:
  labels:
    app: application # stable버전과 카나리버전 모두 실행
  name: app-service
  namespace: default
spec:
  ports:
  - nodePort: 30880
    port: 8080
    protocol: TCP
    targetPort: 8080
  selector:
    app: application
type: NodePort3. 무중단 배포와 readinessProbe, livenessProbe의 활용
무중단 배포를 위해서는 아래 두가지 쿠버네티스 옵션을 바르게 설정해주어야 한다.
livenessProbe
- 컨테이너가 살아 있는지(정상 작동하는지)확인하는 역할
- 이 헬스체크가 실패하면 kubelet이 컨테이너를 죽이고 재시작하여 상태를 복구
livenessProbe:
  httpGet:
    path: /healthcheck  # 생존 상태를 확인할 엔드포인트
    port: 8080
  initialDelaySeconds: 10  # 파드 시작 후 첫 확인까지 대기 시간
  periodSeconds: 15       # 확인 간격
readinessProbe
- 무중단 배포의 핵심
- readinessProbe는 파드가 트래픽 받을 준비가 되었는지 확인
- 파드가 실행되었다고 해서 바로 요청을 받을 수 있는 상태가 되는게 아님. 자바 프로세스같은 경우, 실행되더라도 초기화 과정이 오래 걸리기 때문에 이런 순간에 요청이 가면 응답을 하지 못하게 됨. 그런 경우를 방지하기 위해 실제 서비스가 준비된 상태인지를 확인하는 readinessProbe를 잘 설정해주어야 한다.
- readinessProbe가 ok상태이어야 요청을 처리할 수 있게 된다. 트래픽 처리가 가능하다.
readinessProbe:
  httpGet:
    path: /healthz  # 준비 상태를 확인할 엔드포인트
    port: 8080      # 확인할 포트
  initialDelaySeconds: 5  # 파드 시작 후 첫 확인까지 대기 시간
periodSeconds: 10 # 확인 간격apiVersion: apps/v1
kind: Deployment
metadata:
name: my-app
labels:
app: my-app
spec:
replicas: 3 # 파드 수
strategy:
type: RollingUpdate
rollingUpdate:
maxUnavailable: 1 # 배포 중 사용할 수 없는 최대 파드 수 (1개)
maxSurge: 1 # 배포 중 추가 생성할 수 있는 파드 수 (1개)
selector:
matchLabels:
app: my-app
template:
metadata:
labels:
app: my-app
spec:
containers:
- name: my-app-container
image: nginx:1.21 # 업데이트할 이미지
ports:
- containerPort: 80
readinessProbe: # 준비 상태 확인
httpGet:
path: /
port: 80
initialDelaySeconds: 5 # 파드가 뜬 후 준비 확인 전 대기 시간
periodSeconds: 10 # 확인 간격
livenessProbe: # 생존 상태 확인
httpGet:
path: /
port: 80
initialDelaySeconds: 10 # 파드가 뜬 후 생존 확인 전 대기 시간
periodSeconds: 15 # 확인 간격
4. 실제 사례에서 Rolling Update와 Blue-Green 비교
장단점 비교
| 배포 전략 | 장점 | 단점 |
|---|---|---|
| Rolling Update | 가용성 유지, 리소스 효율적 사용 | 배포 중 버전 혼합으로 오류 가능성 |
| Blue-Green | 빠른 롤백 가능, 배포 전 철저한 검증 | 리소스 사용량 증가, 운영 비용 증가 |
실제 사례 적용
- Rolling Update:
- 리소스를 효율적으로 사용하고, 일반적이고 단순한 업데이트에 적합
- Blue-Green:
- 안전성과 즉각적인 롤백이 필요한 상황에 적합
- 큰 변화(예: Node.js 및 DB 스키마 동시 업데이트)가 포함된 배포에 적합.