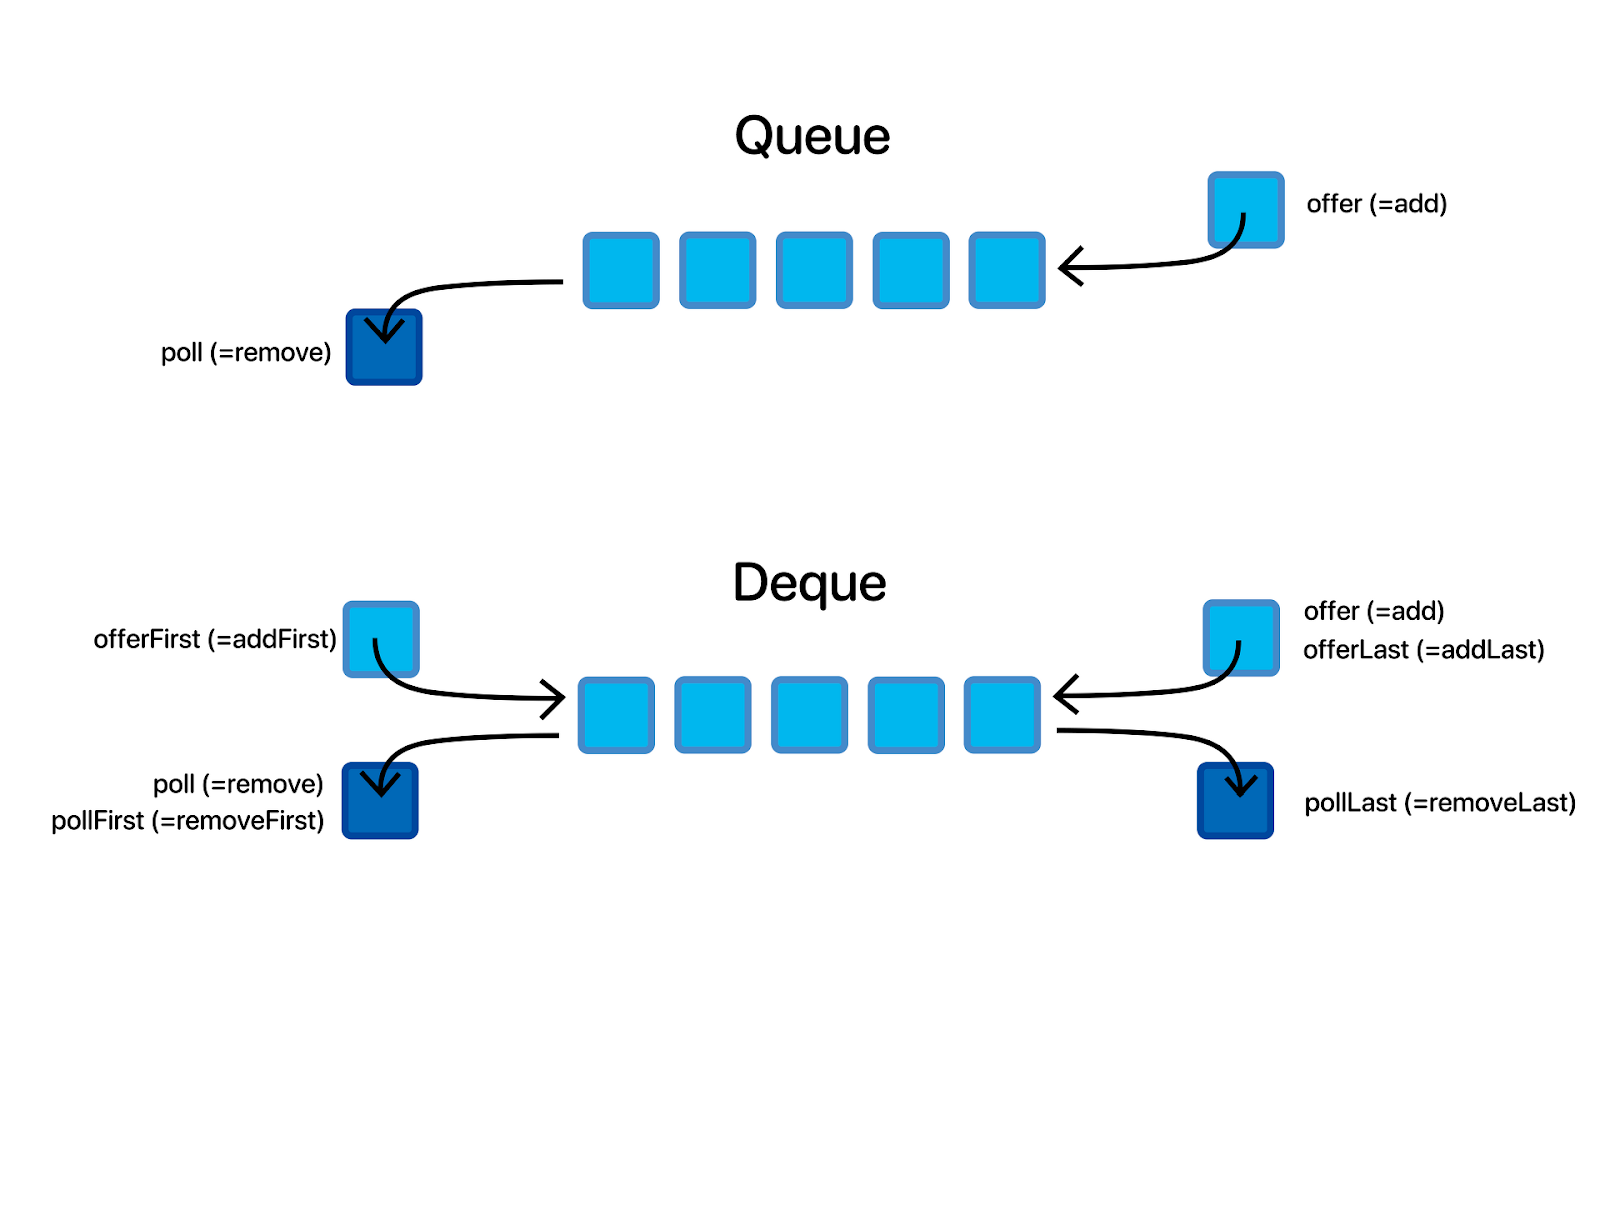
정의
덱(Deque, Double Ended Queue)은 양쪽 끝에서 삽입과 삭제가 모두 가능한 선형 자료구조다. 스택과 큐의 기능을 모두 포함하는 더 일반적인 자료구조로, 앞쪽(front)과 뒤쪽(rear) 모두에서 요소를 추가하거나 제거할 수 있다.
기본 개념
← removeFront    addFront →     ← addRear    removeRear →
┌─────┬─────┬─────┬─────┬─────┐
│  1  │  3  │  5  │  7  │ 9 │
└─────┴─────┴─────┴─────┴─────┘
↑                           ↑
front                      rear
주요 연산
- addFront(item): 덱의 앞쪽에 요소 삽입
- addRear(item): 덱의 뒤쪽에 요소 삽입
- removeFront(): 덱의 앞쪽에서 요소 제거 및 반환
- removeRear(): 덱의 뒤쪽에서 요소 제거 및 반환
- peekFront(): 앞쪽 요소 조회 (제거하지 않음)
- peekRear(): 뒤쪽 요소 조회 (제거하지 않음)
- isEmpty(): 덱이 비어있는지 확인
- size(): 덱의 크기 반환
시간 복잡도
| 연산 | 시간 복잡도 | 설명 |
|---|---|---|
| addFront | O(1) | 앞쪽에 삽입 |
| addRear | O(1) | 뒤쪽에 삽입 |
| removeFront | O(1) | 앞쪽에서 제거 |
| removeRear | O(1) | 뒤쪽에서 제거 |
| peekFront/Rear | O(1) | 양쪽 끝 요소 조회 |
| search | O(n) | 특정 요소 찾기 |
공간 복잡도
- O(n): n개의 요소를 저장하는 공간 필요
JavaScript/TypeScript 구현
배열 기반 덱 (비효율적)
class ArrayDeque<T> {
  private items: T[] = [];

  addFront(item: T): void {
    this.items.unshift(item); // O(n) - 비효율적!
  }

  addRear(item: T): void {
    this.items.push(item); // O(1)
  }

  removeFront(): T | undefined {
    return this.items.shift(); // O(n) - 비효율적!
  }

  removeRear(): T | undefined {
    return this.items.pop(); // O(1)
  }

  peekFront(): T | undefined {
    return this.items[0];
  }

  peekRear(): T | undefined {
    return this.items[this.items.length - 1];
  }

  isEmpty(): boolean {
    return this.items.length === 0;
  }

  size(): number {
    return this.items.length;
  }

  toArray(): T[] {
    return [...this.items];
  }
}
배열 기반 덱의 문제점
unshift()와shift()는 모든 요소를 이동시켜야 하므로 O(n) 시간- 앞쪽 연산이 빈번하면 성능이 크게 저하됨
원형 배열 기반 덱 (효율적)
class CircularArrayDeque<T> {
  private items: (T | undefined)[];
  private frontIndex: number;
  private rearIndex: number;
  private count: number;
  private capacity: number;

  constructor(capacity: number = 16) {
    this.capacity = capacity;
    this.items = new Array(capacity);
    this.frontIndex = 0;
    this.rearIndex = capacity - 1; // rear는 front 바로 앞에서 시작
    this.count = 0;
  }

  private resize(): void {
    const oldCapacity = this.capacity;
    this.capacity = oldCapacity * 2;
    const newItems = new Array(this.capacity);

    // 기존 요소들을 새 배열에 순서대로 복사
    for (let i = 0; i < this.count; i++) {
      const index = (this.frontIndex + i) % oldCapacity;
      newItems[i] = this.items[index];
    }

    this.items = newItems;
    this.frontIndex = 0;
    this.rearIndex = this.count - 1;
  }

  addFront(item: T): void {
    if (this.count === this.capacity) {
      this.resize();
    }

    this.frontIndex = (this.frontIndex - 1 + this.capacity) % this.capacity;
    this.items[this.frontIndex] = item;
    this.count++;
  }

  addRear(item: T): void {
    if (this.count === this.capacity) {
      this.resize();
    }

    this.rearIndex = (this.rearIndex + 1) % this.capacity;
    this.items[this.rearIndex] = item;
    this.count++;
  }

  removeFront(): T | undefined {
    if (this.isEmpty()) {
      return undefined;
    }

    const item = this.items[this.frontIndex];
    this.items[this.frontIndex] = undefined;
    this.frontIndex = (this.frontIndex + 1) % this.capacity;
    this.count--;
    return item;
  }

  removeRear(): T | undefined {
    if (this.isEmpty()) {
      return undefined;
    }

    const item = this.items[this.rearIndex];
    this.items[this.rearIndex] = undefined;
    this.rearIndex = (this.rearIndex - 1 + this.capacity) % this.capacity;
    this.count--;
    return item;
  }

  peekFront(): T | undefined {
    return this.isEmpty() ? undefined : this.items[this.frontIndex];
  }

  peekRear(): T | undefined {
    return this.isEmpty() ? undefined : this.items[this.rearIndex];
  }

  isEmpty(): boolean {
    return this.count === 0;
  }

  isFull(): boolean {
    return this.count === this.capacity;
  }

  size(): number {
    return this.count;
  }

  toArray(): T[] {
    const result: T[] = [];
    for (let i = 0; i < this.count; i++) {
      const index = (this.frontIndex + i) % this.capacity;
      result.push(this.items[index]!);
    }
    return result;
  }
}
이중 연결 리스트 기반 덱
class DequeNode<T> {
  data: T;
  prev: DequeNode<T> | null;
  next: DequeNode<T> | null;

  constructor(data: T) {
    this.data = data;
    this.prev = null;
    this.next = null;
  }
}

class LinkedDeque<T> {
  private head: DequeNode<T> | null = null;
  private tail: DequeNode<T> | null = null;
  private count: number = 0;

  addFront(data: T): void {
    const newNode = new DequeNode(data);

    if (!this.head) {
      this.head = this.tail = newNode;
    } else {
      newNode.next = this.head;
      this.head.prev = newNode;
      this.head = newNode;
    }
    this.count++;
  }

  addRear(data: T): void {
    const newNode = new DequeNode(data);

    if (!this.tail) {
      this.head = this.tail = newNode;
    } else {
      this.tail.next = newNode;
      newNode.prev = this.tail;
      this.tail = newNode;
    }
    this.count++;
  }

  removeFront(): T | undefined {
    if (!this.head) {
      return undefined;
    }

    const data = this.head.data;
    this.head = this.head.next;

    if (this.head) {
      this.head.prev = null;
    } else {
      this.tail = null; // 마지막 노드였음
    }

    this.count--;
    return data;
  }

  removeRear(): T | undefined {
    if (!this.tail) {
      return undefined;
    }

    const data = this.tail.data;
    this.tail = this.tail.prev;

    if (this.tail) {
      this.tail.next = null;
    } else {
      this.head = null; // 마지막 노드였음
    }

    this.count--;
    return data;
  }

  peekFront(): T | undefined {
    return this.head?.data;
  }

  peekRear(): T | undefined {
    return this.tail?.data;
  }

  isEmpty(): boolean {
    return this.head === null;
  }

  size(): number {
    return this.count;
  }

  toArray(): T[] {
    const result: T[] = [];
    let current = this.head;
    while (current) {
      result.push(current.data);
      current = current.next;
    }
    return result;
  }

  // 역순으로 순회
  toReverseArray(): T[] {
    const result: T[] = [];
    let current = this.tail;
    while (current) {
      result.push(current.data);
      current = current.prev;
    }
    return result;
  }
}
실생활 비유
양방향 터널
- 사람들이 터널 양쪽 끝에서 들어오고 나갈 수 있다
- 앞쪽으로도 뒤쪽으로도 이동 가능
- 터널의 양 끝에서 모든 작업이 이루어진다
편집기의 텍스트 커서
- 커서 앞에 문자 삽입 (addFront)
- 커서 뒤에 문자 삽입 (addRear)
- 백스페이스로 앞 문자 삭제 (removeFront)
- Delete 키로 뒤 문자 삭제 (removeRear)
음악 플레이어의 재생 목록
- 현재 곡 앞에 곡 추가 (addFront)
- 현재 곡 뒤에 곡 추가 (addRear)
- 이전 곡으로 이동 (removeFront)
- 다음 곡으로 이동 (removeRear)
프론트엔드에서의 활용
슬라이딩 윈도우 구현
class SlidingWindow<T> {
  private window = new LinkedDeque<T>();
  private maxSize: number;

  constructor(maxSize: number) {
    this.maxSize = maxSize;
  }

  add(item: T): T[] {
    if (this.window.size() >= this.maxSize) {
      this.window.removeFront(); // 오래된 요소 제거
    }
    this.window.addRear(item); // 새 요소 추가
    return this.window.toArray();
  }

  getAverage(): number {
    const items = this.window.toArray() as number[];
    return items.reduce((sum, val) => sum + val, 0) / items.length;
  }

  getMin(): number {
    const items = this.window.toArray() as number[];
    return Math.min(...items);
  }

  getMax(): number {
    const items = this.window.toArray() as number[];
    return Math.max(...items);
  }
}

// 실시간 데이터 분석 예시
const RealtimeChart: React.FC = () => {
  const [dataWindow] = useState(() => new SlidingWindow<number>(10));
  const [chartData, setChartData] = useState<number[]>([]);
  const [average, setAverage] = useState<number>(0);

  useEffect(() => {
    const interval = setInterval(() => {
      const newValue = Math.random() * 100;
      const newData = dataWindow.add(newValue);
      setChartData(newData);
      setAverage(dataWindow.getAverage());
    }, 1000);

    return () => clearInterval(interval);
  }, [dataWindow]);

  return (
    <div>
      <div>평균: {average.toFixed(2)}</div>
      <div>데이터: {chartData.join(', ')}</div>
    </div>
  );
};
덱 자체는 양쪽 끝에서 자유롭게 삽입/삭제가 가능한 유연한 자료구조이지만, 슬라이딩 윈도우로 활용할 때는 특정한 패턴으로 사용하게 된다:
슬라이딩 윈도우에서의 덱 사용 패턴:
- 새 데이터 추가: addRear() (뒤쪽에 삽입)
- 오래된 데이터 제거: removeFront() (앞쪽에서 제거)
이렇게 되면 결과적으로 FIFO(First In, First Out) 동작을 하게 된다. 즉, 가장 먼저 들어온 데이터가 가장 먼저 나가는 큐와 동일한 동작 패턴이다.
그런데 왜 큐 대신 덱을 사용할까?
- 양방향 접근의 유연성: 필요에 따라 뒤쪽 데이터도 제거할 수 있음
- 다양한 윈도우 전략: 조건에 따라 앞쪽/뒤쪽 모두에서 제거 가능
- 복합적인 로직: 단순 FIFO가 아닌 더 복잡한 윈도우 관리가 필요할 때
예를 들어, 아래의 MinMaxSlidingWindow에서는:
- 기본적으로는 FIFO로 동작하지만
- 최대/최소값 추적을 위해 중간에서도 값을 제거하는 복잡한 로직을 사용한다
결론적으로, 덱의 능력은 양방향이지만, 슬라이딩 윈도우에서는 주로 FIFO 패턴으로 사용하되, 필요시 양방향 접근의 유연성을 활용할 수 있다는 장점이 있다.
최대/최소값을 유지하는 슬라이딩 윈도우
class MinMaxSlidingWindow {
  private window = new LinkedDeque<number>();
  private minDeque = new LinkedDeque<number>(); // 최소값 후보들
  private maxDeque = new LinkedDeque<number>(); // 최대값 후보들
  private maxSize: number;

  constructor(maxSize: number) {
    this.maxSize = maxSize;
  }

  add(value: number): { min: number; max: number } {
    // 윈도우 크기 제한
    if (this.window.size() >= this.maxSize) {
      const removed = this.window.removeFront()!;

      // 제거된 값이 최소/최대 후보에 있다면 제거
      if (this.minDeque.peekFront() === removed) {
        this.minDeque.removeFront();
      }
      if (this.maxDeque.peekFront() === removed) {
        this.maxDeque.removeFront();
      }
    }

    this.window.addRear(value);

    // 새 값보다 큰 최소값 후보들 제거
    while (!this.minDeque.isEmpty() && this.minDeque.peekRear()! > value) {
      this.minDeque.removeRear();
    }
    this.minDeque.addRear(value);

    // 새 값보다 작은 최대값 후보들 제거
    while (!this.maxDeque.isEmpty() && this.maxDeque.peekRear()! < value) {
      this.maxDeque.removeRear();
    }
    this.maxDeque.addRear(value);

    return {
      min: this.minDeque.peekFront()!,
      max: this.maxDeque.peekFront()!
    };
  }
}

// 주식 가격 분석 예시
const StockAnalyzer: React.FC = () => {
  const [window] = useState(() => new MinMaxSlidingWindow(5));
  const [prices, setPrices] = useState<number[]>([]);
  const [minMax, setMinMax] = useState<{ min: number; max: number }>({ min: 0, max: 0 });

  const addPrice = (price: number) => {
    const result = window.add(price);
    setPrices(prev => [...prev.slice(-4), price]); // 최근 5개만 표시
    setMinMax(result);
  };

  return (
    <div>
      <input
        type="number"
        placeholder="주식 가격 입력"
        onKeyPress={(e) => {
          if (e.key === 'Enter') {
            const price = parseFloat(e.currentTarget.value);
            if (!isNaN(price)) {
              addPrice(price);
              e.currentTarget.value = '';
            }
          }
        }}
      />
      <div>최근 가격: {prices.join(', ')}</div>
      <div>최소값: {minMax.min}</div>
      <div>최대값: {minMax.max}</div>
    </div>
  );
};
문자열 팰린드롬 검사
function isPalindrome(str: string): boolean {
  const deque = new LinkedDeque<string>();

  // 알파벳만 추출하여 덱에 추가
  const cleanStr = str.toLowerCase().replace(/[^a-z]/g, '');
  for (const char of cleanStr) {
    deque.addRear(char);
  }

  // 양쪽 끝에서 비교
  while (deque.size() > 1) {
    const front = deque.removeFront();
    const rear = deque.removeRear();

    if (front !== rear) {
      return false;
    }
  }

  return true;
}

// 사용 예시
console.log(isPalindrome("A man a plan a canal Panama")); // true
console.log(isPalindrome("race a car")); // false
덱 vs 스택 vs 큐 비교
| 특성 | 스택 | 큐 | 덱 |
|---|---|---|---|
| 삽입 위치 | top만 | rear만 | front, rear 둘 다 |
| 삭제 위치 | top만 | front만 | front, rear 둘 다 |
| 원칙 | LIFO | FIFO | 제한 없음 |
| 유연성 | 낮음 | 낮음 | 높음 |
| 메모리 오버헤드 | 낮음 | 낮음 | 약간 높음 |
| 구현 복잡도 | 낮음 | 중간 | 높음 |
장점
- 높은 유연성: 스택과 큐의 모든 기능을 포함
- 효율적 양방향 접근: 양쪽 끝에서 O(1) 연산
- 다양한 알고리즘 지원: 슬라이딩 윈도우, 팰린드롬 검사 등
- 범용성: 여러 자료구조를 하나로 대체 가능
단점
- 메모리 오버헤드: 양방향 포인터로 인한 추가 메모리 사용
- 구현 복잡도: 스택이나 큐보다 구현이 복잡
- 중간 접근 불가: 여전히 양 끝에서만 접근 가능
- 캐시 성능: 연결 리스트 기반 시 캐시 미스 가능성
활용 사례 정리
- 브라우저: 히스토리 관리 (앞으로/뒤로 가기)
- 텍스트 에디터: 커서 기반 편집, Undo/Redo
- 슬라이딩 윈도우: 실시간 데이터 분석, 이동 평균
- 알고리즘: 팰린드롬 검사, BFS 변형
- 게임: 플레이어 행동 히스토리, 리플레이 시스템
구현 방식 선택 가이드
원형 배열 기반 선택 시기
- 고정된 최대 크기가 있을 때
- 메모리 사용량을 예측할 수 있을 때
- 캐시 성능이 중요할 때
연결 리스트 기반 선택 시기
- 동적 크기 변경이 필요할 때
- 메모리 사용량을 최소화하려 할 때
- 크기 제한이 없어야 할 때
최적화 팁
- 크기 예측 가능: 원형 배열 기반 덱 사용
- 자주 리사이징: 초기 용량을 충분히 크게 설정
- 메모리 풀링: 노드 재사용으로 할당/해제 비용 절약
- 타입 안전성: TypeScript 제네릭으로 컴파일 타임 체크
