
1. Terraform 설치
1.1. Windows OS 환경에서 설치 방법
1.2. 강의 내용 git clone 내려받기
1.3. Terraform AWS Key 생성 및 등록
-
Access key, Secret key 생성
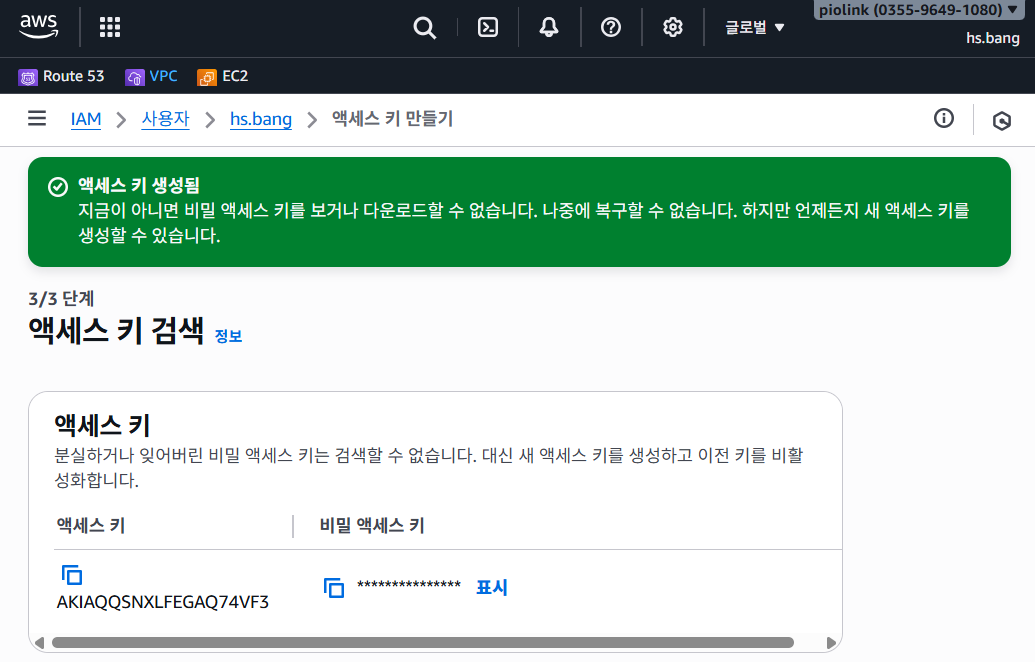
- AWS인스턴스를 Terraform으로 관리하기위한 Access, Secret Key 확인
-
aws profile 생성
- profile은 default 설정되어 있어서 별도 옵션없는 경우 default profile 자동선택 됨
- profile 다른 경우
-- profile옵션으로 별도 지정 필요하며 defaut profile 설정도 변경aws configure --profile dev
-
provider aws provider 및 resource 작성
-
Ubuntu AMI 조회 사이트 에서 적절한 Region 검색 후
resource.ami작성 -
instance.tf파일내용provider "aws" { profile = "dev" region = "us-east-1" } resource "aws_instance" "example" { ami = "ami-0d729a60" //작성 부분 instance_type = "t2.micro" }
-
-
terraform init명령어 실행- Terraform Project를 초기화하고 실행할 준비를 하는 첫 번째 필수 명령어
- Terraform 인프라를 배포할 수 있도록 Directoriy를 설정하는 단계
-*.tf구성파일에 정의된required_providers블락을 읽고, 필요한 모든 Provider를 외부에서 찾아 다운로드 하는 등 필요한 tool 등을 다운로드하고 준비하는 과정
- .terraform.locl.hcl파일 생성 후 버전잠금 수행PS C:\Users\USER\PycharmProjects\terraform-course\first-steps> terraform.exe init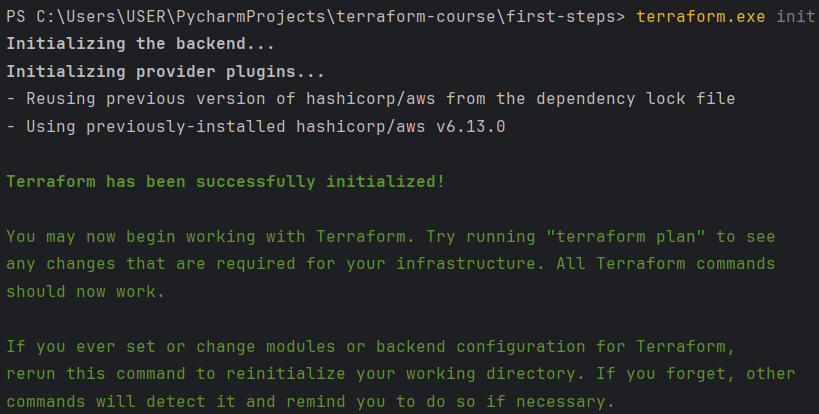
-
instance.tf 파일 내용 작성 후
terraform apply명령어 입력- 놀랍게도 us-east-1 리전에 인스턴스가 자동 생성됐다..
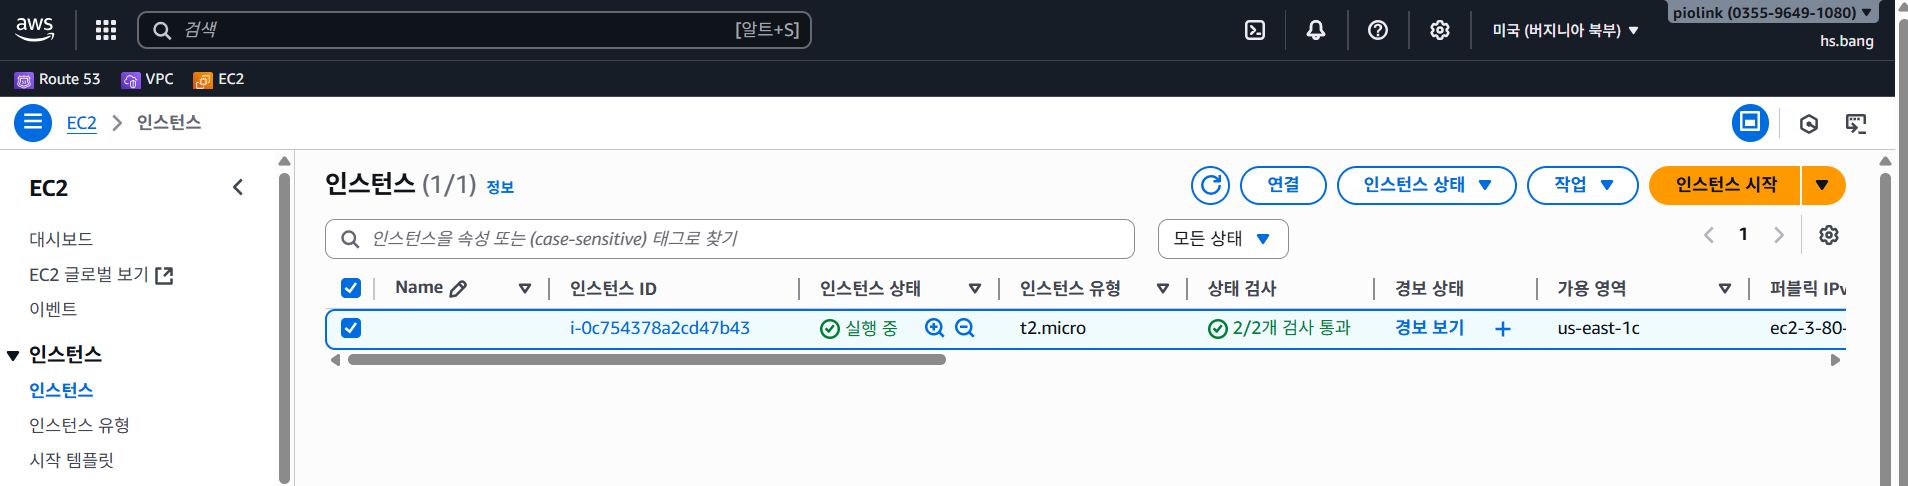
- 생성된 인스턴스 정보 조회
   PS C:\Users\USER\PycharmProjects\terraform-course\first-steps> aws ec2 describe-instances  --instance-
   ids i-01a0d116cbcdb5aae   --region us-east-1  --query 'Reservations[].Instances[].{State:State.Name,Ty
   pe:InstanceType,AZ:Placement.AvailabilityZone,PublicIp:PublicIpAddress,PrivateIp:PrivateIpAddress,SG:SecurityGroups[*].GroupName,Name:Tags[?Key==`Name`]|[0].Value}' --profile dev --output table
     -------------------------------------------------------------------------------
     |                              DescribeInstances                              |
     +------------+-------+---------------+---------------+-----------+------------+
     |     AZ     | Name  |   PrivateIp   |   PublicIp    |   State   |   Type     |
     +------------+-------+---------------+---------------+-----------+------------+
     |  us-east-1c|  None |  172.31.0.142 |  54.221.25.36 |  running  |  t2.micro  |
     +------------+-------+---------------+---------------+-----------+------------+
     ||                                    SG                                     ||
     |+---------------------------------------------------------------------------+|
     ||  default                                                                  ||
     |+---------------------------------------------------------------------------+|
- 놀랍게도 us-east-1 리전에 인스턴스가 자동 생성됐다..
-
resource 전체속성보기
PS C:\Users\USER\PycharmProjects\terraform-course\first-steps> terraform state show aws_instance.example # aws_instance.example: resource "aws_instance" "example" { ami = "ami-0d729a60" arn = "arn:aws:ec2:us-east-1:035596491080:instance/i-01a0d116cbcdb5aae" associate_public_ip_address = true availability_zone = "us-east-1c" disable_api_stop = false disable_api_termination = false ebs_optimized = false force_destroy = false get_password_data = false hibernation = false host_id = null iam_instance_profile = null id = "i-01a0d116cbcdb5aae" instance_initiated_shutdown_behavior = "stop" instance_lifecycle = null instance_state = "running" instance_type = "t2.micro" ipv6_address_count = 0 ipv6_addresses = [] key_name = null monitoring = false outpost_arn = null password_data = null placement_group = null placement_group_id = null placement_partition_number = 0 primary_network_interface_id = "eni-0f8891c26d364b63e" private_dns = "ip-172-31-0-142.ec2.internal" private_ip = "172.31.0.142" public_dns = "ec2-54-221-25-36.compute-1.amazonaws.com" public_ip = "54.221.25.36" region = "us-east-1" secondary_private_ips = [] security_groups = [ "default", ] source_dest_check = true spot_instance_request_id = null subnet_id = "subnet-c956f3bf" tags_all = {} tenancy = "default" user_data_replace_on_change = false vpc_security_group_ids = [ "sg-1e810d67", ] capacity_reservation_specification { capacity_reservation_preference = "open" } cpu_options { amd_sev_snp = null core_count = 1 threads_per_core = 1 } credit_specification { cpu_credits = "standard" } enclave_options { enabled = false } maintenance_options { auto_recovery = "default" } metadata_options { http_endpoint = "enabled" http_protocol_ipv6 = "disabled" http_put_response_hop_limit = 1 http_tokens = "optional" instance_metadata_tags = "disabled" } primary_network_interface { delete_on_termination = true network_interface_id = "eni-0f8891c26d364b63e" } private_dns_name_options { enable_resource_name_dns_a_record = false enable_resource_name_dns_aaaa_record = false hostname_type = "ip-name" } root_block_device { delete_on_termination = true device_name = "/dev/sda1" encrypted = false iops = 0 kms_key_id = null tags = {} tags_all = {} throughput = 0 volume_id = "vol-0f0762fe771e33353" volume_size = 8 volume_type = "standard" } } -
생성된 인스턴스 삭제도 명령어 입력으로 삭제진행
terraform destroy -
.terraform.lock.hcl : Provider 버전 잠금 파일(Lock 파일)
- Terraform이 Project에서 사용되는 Provider의 정확한 버전을 기록하고 고정하는 파일이며 다른 사람이 동일한 코드를 실행하거나 시간이 지난 후 다시 실행할 때 항상 동일한 Provider 버전을 사용해서 예기치 않은 동작이나 오류를 방지할 수 있다.
- 각 프로바이더 이름(ex.g. registry.terrafor.io/hashicorp/aws)
- 사용하는 Provider의 이름과 src를 나타내고 Terraform은 이 이름을 이용해 공식 Repogitory에 해당 Provider를 찾는다.
- 잠금버전
terraform init실행할 때required_providers블락에서 설정된 버전 제약 조건을 확인하고 가장 적합하고 실제 사용된 특정 버전을 선택 후 그 버전을 파일에 기록하여 고정
- 체크섬 목록
- 보안 및 무결성 요소, terraform init 실행될 때 정확히 동일한 파일을 다운로드했는지 검증
- 선택적으로 플랫폼(OS/ARCH) 별 항목
- 각 프로바이더 이름(ex.g. registry.terrafor.io/hashicorp/aws)
- Terraform이 Project에서 사용되는 Provider의 정확한 버전을 기록하고 고정하는 파일이며 다른 사람이 동일한 코드를 실행하거나 시간이 지난 후 다시 실행할 때 항상 동일한 Provider 버전을 사용해서 예기치 않은 동작이나 오류를 방지할 수 있다.
-
Terraform AWS 인스턴스 설정
-
-
resource 블락안에 하드코딩된 AMI 대신 다른 이미지 사용이 필요한 경우 data resource 블락 선언
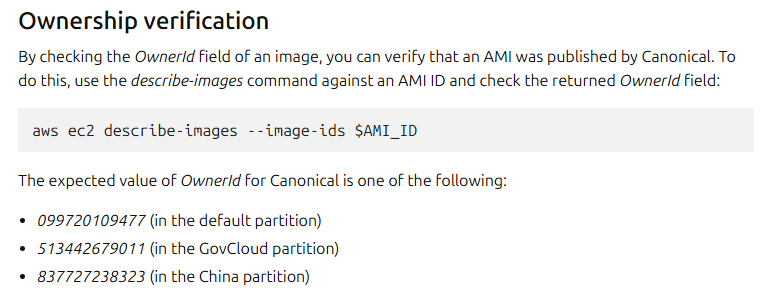
data.aws_ami.ubuntu블록 전체는 AWS에서 특정 조건을 만족하는 AMI를 검색을 위한 것이며data.aws_ami.ubuntu.id를 설정 시 최신 Ubuntu 이미지를 사용
-
AMI Ownership verification으로 어떤 계정이 소유한 AMI를 찾을지 owners 부분에 ID를 지정
provider "aws" { profile = "dev" region = "us-east-1" } data "aws_ami" "ubuntu" { most_recent = true filter { name = "name" values = ["ubuntu/images/hvm-ssd/ubuntu-jammy-22.04-amd64-server-*"] } filter { name = "virtualization-type" values = ["hvm"] } owners = ["099720109477"] # Canonical, ubuntu.com 의 ubuntu소유자 # AWS 계정 ID default parition 설정 } resource "aws_instance" "example" { ami = data.aws_ami.ubuntu.id instance_type = "t2.micro" tags = { Name = "example" } }- filter 블록들의 조건과 oweners 조건을 만족하는 ami-id가 자동으로 선택됨
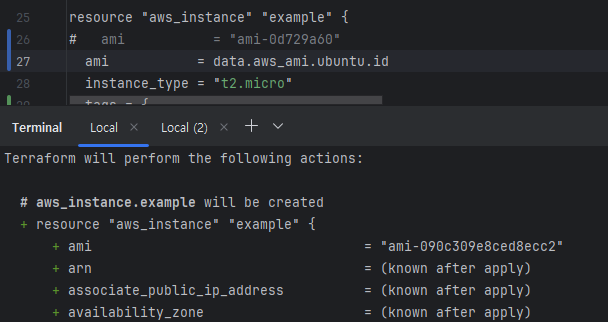
- filter 블록들의 조건과 oweners 조건을 만족하는 ami-id가 자동으로 선택됨
-
-
-
1.4. Terraform 사용해보기
1) Variable
-
기존 instance.tf파일에 data {} 내용을 별도 datasource.tf 파일생성 후 작성
-
instance.tf
- ami 이미지를 data.aws_ami.ubuntu.id 변경
- instnace_type 변수의 값을 var.instance_type 변경
provider "aws" { profile = "dev" region = "us-east-1" } resource "aws_instance" "example" { ami = data.aws_ami.ubuntu.id instance_type = var.instance_type tags = { Name = "example" } } -
datasource.tf
data "aws_ami" "ubuntu" { most_recent = true filter { name = "name" values = ["ubuntu/images/hvm-ssd/ubuntu-jammy-22.04-amd64-server-*"] } filter { name = "virtualization-type" values = ["hvm"] } owners = ["099720109477"] // Canonical, ubuntu.com 의 ubuntu소유자 // https://documentation.ubuntu.com/aws/aws-how-to/instances/find-ubuntu-images/ 링크에 나와 있는 Ownership verification AWS 계정 ID }- variables.tf
- 이곳에 변수의 default 값을 정의
variable "instance_type" { type = string default = "t2.micro" } - dev-file.tfvars
- terraform.tfvars 파일명이 아닌 경우 terraform apply 명령어 옵션으로 -var-file dev-file 파일명 정의
instance_type="t3.micro"
-
-
동작확인
terraform plan -var-file dev.tfvars명령어 실행
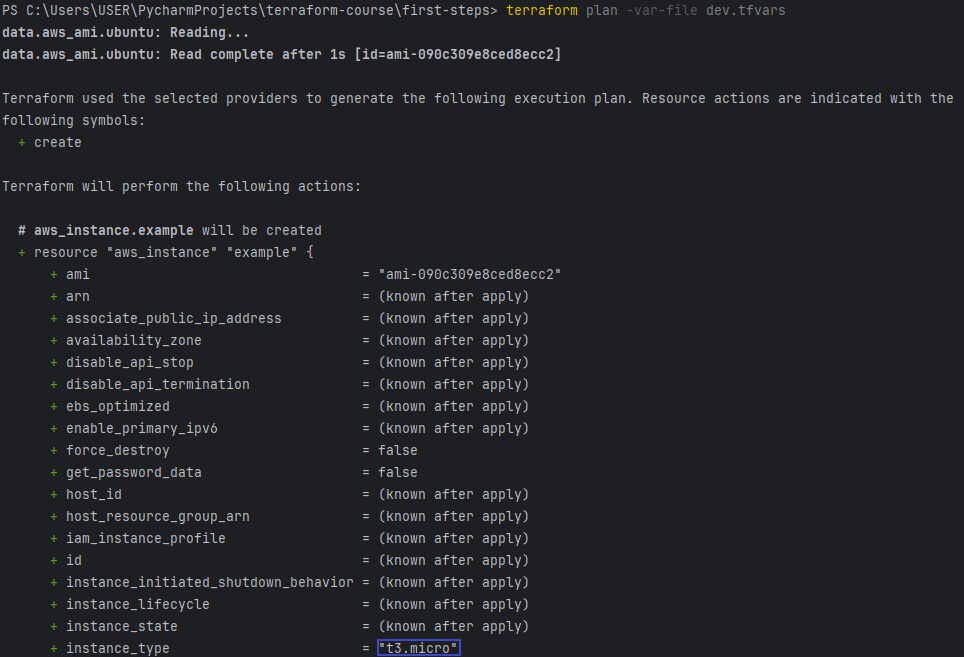
- Terraform console

- terraform.tfvars 파일명이 아닌 경우 -var-file 옵션으로 지정 필요
-
type map 포맷 설명
variable.tf파일 내용
variable "instance_type" { type = map default = { "example" = "t2.micro" "other_instance" = "t4g.micro" } }instance.tf파일 내용
resource "aws_instance" "example" {
  ami           = data.aws_ami.ubuntu.id
  instance_type = var.instance_type["example"] // 또는 var.instance_type.example
  tags = {
      Name = "example"
  }
}
terraform plan명령어 입력 후 실행 전 debug
PS C:\Users\USER\PycharmProjects\terraform-course\first-steps> terraform plan data.aws_ami.ubuntu: Reading... data.aws_ami.ubuntu: Read complete after 1s [id=ami-0a03ce9a6035af491] Terraform used the selected providers to generate the following execution plan. Resource actions are indicated with the following symbols: + create Terraform will perform the following actions: ... instance_initiated_shutdown_behavior = (known after apply) + instance_lifecycle = (known after apply) + instance_state = (known after apply) + instance_type = "t2.micro"- terraform conole
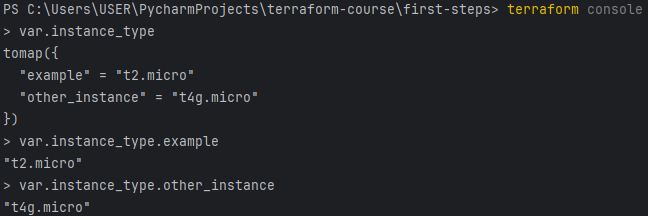
- 이외 다양한 변수 Type 내용 링크
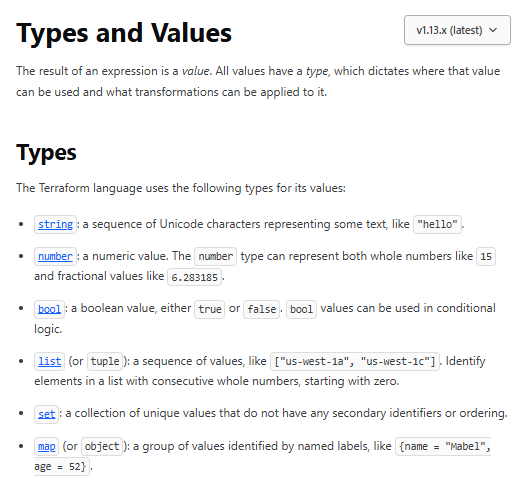
- 동일한 테라폼코드로 다른 환경의 인스턴스를 배포할 때마다 별도 정의해놓은 변수를 활용해서 복잡한 인프라를 쉽게 괸라가 가능하다.
2) Outputs
- AWS 인스턴스 실행 시 생성되는 AWS 인스턴스의 Public IP주소 등 관련 정보들을 print하여 확인
- aws_instance 출력 가능 attribute 확인
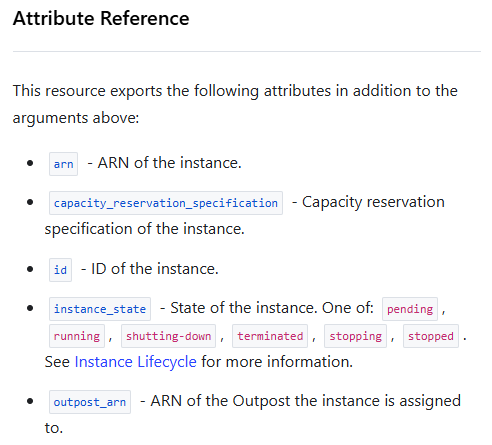
- output.tf파일 만들기
output "public_ip" { value = aws_instance.example.public_ip }- output은 별도 파일에 정의해서 값들을 관리
- terraform apply 출력 결과
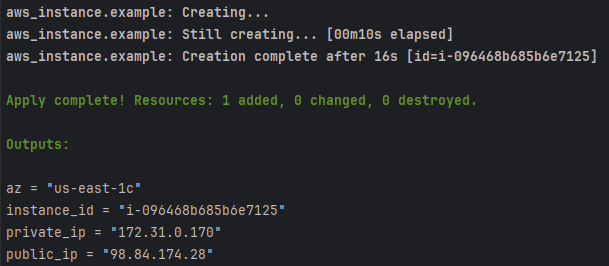
- output 설정 변수대로 public_ip 출력 확인
terraform output명령어로 관련 내용 확인
- aws_instance 출력 가능 attribute 확인
3) State
- 상태는 terraform.tfstate 로컬파일에 저장되나 다른 곳에 저장하는 것을 권장하고있다.
- Terraform 옵션 종류
Usage: terraform [global options] state <subcommand> [options] [args] Subcommands: identities List the identities of resources in the state list List resources in the state mv Move an item in the state pull Pull current state and output to stdout push Update remote state from a local state file replace-provider Replace provider in the state rm Remove instances from the state show Show a resource in the state - AWS 인스턴스 이름 변경
resource "aws_instance" "web" { ami = data.aws_ami.ubuntu.id instance_type = var.instance_type["example"] tags = { Name = "example" } }aws_instance.example에서aws_instance.web이름 변경을 위해 resource 블락을 수정 후terraform apply명령어 입력하는 경우aws_instance.web이라는 새롭게 인스턴스가 생성되면서 Override된다.- 인스턴스 이름만 변경하고 싶은 경우
terraform state mv명령어로 변경할 수 있다.

- 위와 같은 변경사항 있는경우 .tfstate 파일 내용에서 serial 부분이 업데이트된다.
1.5. VPC 사용하기
- 인기있는 Terraform 모듈은 AWS VPC가 있다. 테라폼 내 리소스만으로 구축하는 것은 상당히 복잡하기 때문이다. 많은 리소스들이 필요하기 때문에 모듈을 통해 구성하는게 편하다. VPC모듈
1) AWS VPC 생성
-
VPC 생성을위한 tf 파일작성
- vpc.tf
module "vpc" { source = "terraform-aws-modules/vpc/aws" name = "my-vpc" cidr = "10.0.0.0/16" azs = ["${var.aws_region}a", "${var.aws_region}b", "${var.aws_region}c"] private_subnets = ["10.0.1.0/24", "10.0.2.0/24", "10.0.3.0/24"] public_subnets = ["10.0.101.0/24", "10.0.102.0/24", "10.0.103.0/24"] enable_nat_gateway = false enable_vpn_gateway = false tags = { Terraform = "true" Environment = "dev" } }- outputs.tf
output "public_subnets" { value = module.vpc.public_subnets } -
public_subnet 조회 후 인스턴스 생성
-
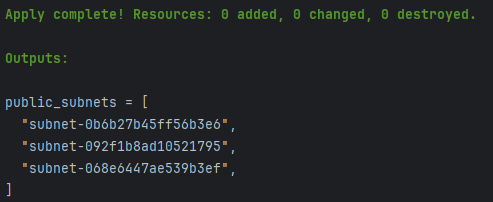
public_subnet Outputs 결과
terraform apply -target module.vpc명령어 입력
-
instance.tf 파일 수정
resource "aws_instance" "web" { ami = data.aws_ami.ubuntu.id instance_type = var.instance_type["example"] subnet_id = module.vpc.public_subnets[0] tags = { Name = "example" } }- Outputs 결과 리스트형이므로 위와 같이
subnet_id할당시 Subnet에 지정한 리소스가 없는 경우 자동으로 다음 Subnet 값을 확인해서 인스턴스를 생성한다.
- Outputs 결과 리스트형이므로 위와 같이
-
terraform apply입력 후 출력내용
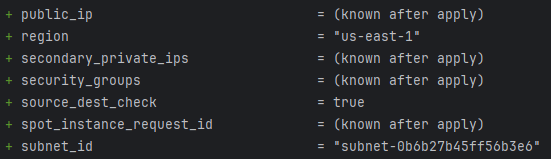
- vpc.tf 파일에 public_subnets 정의되어있지만,
+ public_ip = (known after apply)으로 출력되는 이유는 아래 AWS VPC모듈 default input 설정이 false이므로 public_ip 자동할당하려면 true 설정 값 추가 필요

vpc.tf: + map_public_ip_on_launch = trueinstance.tf: + associate_public_ip_address = true
-> EC2 private ip <-> public ip 자동 매핑 됨
- 위 파일 수정 이후 다시
terraform apply명령어 입력- Outputs 출력화면
- public_ip 부여 확인
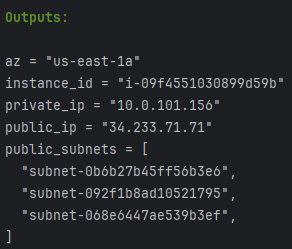
- public_ip 부여 확인
- AWS VPC/Instance 생성 확인

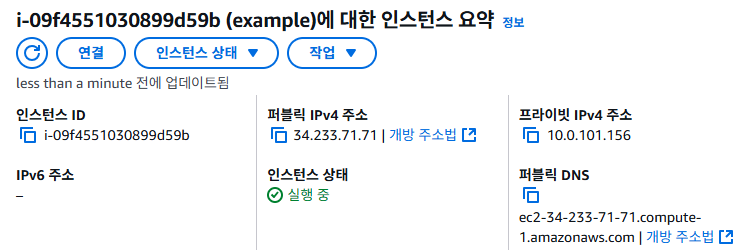
- Outputs 출력화면
- vpc.tf 파일에 public_subnets 정의되어있지만,
-
2) Security Group 설정
-
VPC 접속 허용하기 위한 여러 Security Group 중 하나를 선택 적용
-
instance.tf파일
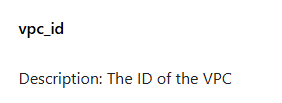
terraform { required_providers { ad = { source = "hashicorp/ad" version = "0.5.0" } } } provider "aws" { profile = "dev" region = "us-east-1" } resource "aws_instance" "web" { ami = data.aws_ami.ubuntu.id instance_type = var.instance_type["example"] subnet_id = module.vpc.public_subnets[0] associate_public_ip_address = true vpc_security_group_ids = [aws_security_group.allow_ssh.id] // ex) security_group_id : sg-12345 key_name = aws_key_pair.mykey.key_name // ssh-key 값 tags = { Name = "example" } } resource "aws_security_group" "allow_ssh" { name = "allow_ssh" description = "Allow SSH inbound traffic and all outbound traffic" vpc_id = module.vpc.vpc_id ingress { description = "SSH from VPC" from_port = 22 to_port = 22 protocol = "tcp" cidr_blocks = ["0.0.0.0/0"] ipv6_cidr_blocks = ["::/0"] } egress { description = "All outbound traffic" from_port = 0 to_port = 0 protocol = "-1" cidr_blocks = ["0.0.0.0/0"] ipv6_cidr_blocks = ["::/0"] } tags = { Name = "allow_ssh" } } resource "aws_key_pair" "mykey" { key_name = "mykey-demo" public_key = "ssh-ed25519 <KEY VALUE>" }- vpc_id는
vpc.tf모듈에 aws vpc를 정의했기 때문에 aws terraform registry outputs 내용을 참고해서 vpc_id 를 입력한다.
- ssh-key 명령어를 통해 key 생성 및 aws_key_pair.mykey.key_name 정의 후 aws_instance.web 블락 안에 key_name 을 정의
- 이후
terraform apply명령어 입력 뒤 생성된 인스턴스 ssh key를 통해서 터미널 접속 확인
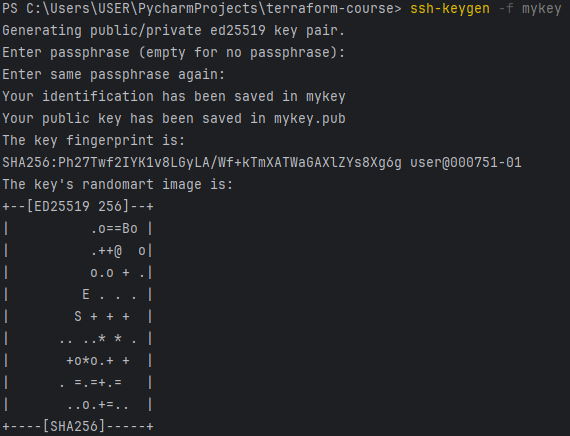
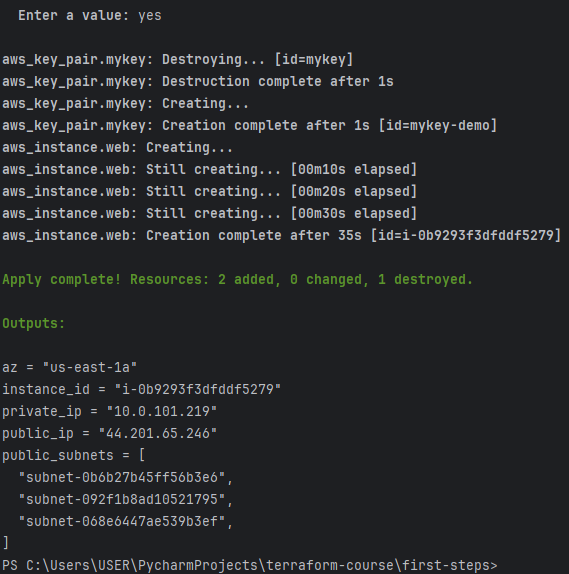
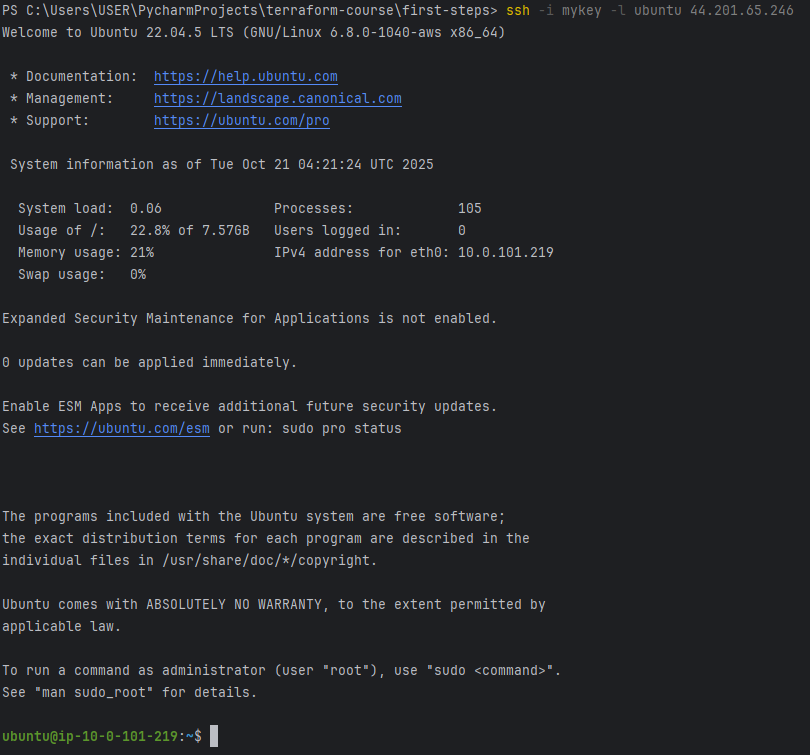
- vpc_id는
-
3) Function
- Terraform에서 지원하는 built-in language functions
- Filesystem, Date and Time 등 기본적인 함수들을 지원
- File functions 사용법
- ssh.pub key 값을 코드에 박아서 사용하는게 아닌 별도 파일형태로 관리할 수 있도록 File function을 사용한다.
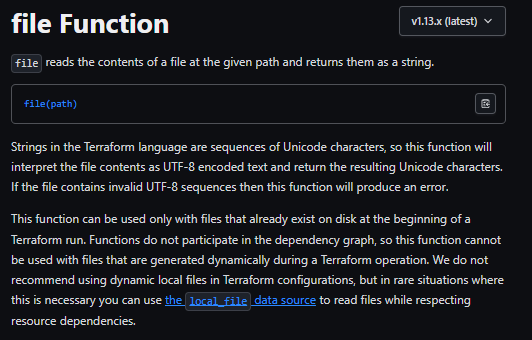
- 원격모듈이 있을 수 있기 때문에 path.module을 쓰기작업에서는 사용하지 않고 읽기작업에서만 사용을 권장한다고 한다
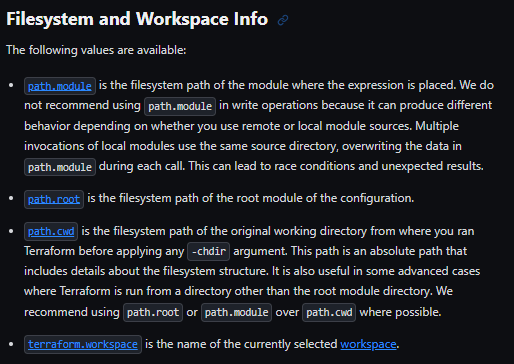
- path.module 사용법
resource "aws_key_pair" "mykey" { key_name = "mykey-demo" public_key = file("${path.module}/mykey.pub") } ${path.module}: 현재 작업 중인 .tf 파일이 있는 절대경로 변수
- ssh.pub key 값을 코드에 박아서 사용하는게 아닌 별도 파일형태로 관리할 수 있도록 File function을 사용한다.
4) Local Provisioning
-
AWS인스턴스가 생성되고 그 위에 소프트웨어 설치하는 방법은 여러가지있는데 한가지는 Ansible이용하거나 SSH접속해서 직접 설치하거나 등등
-
테라폼에서는 2가지 방법이 있는데 하나는 인스턴스 생성 후 관련 스크립트를 실행하는 것 관령 링크
user_data는 인스턴스가 생성될 때 제공하는것이며 해당 코드는 인스턴스가 시작될 때 실행됩니다. 재부팅할 때는 동작하지 않고 인스턴스가 생성될 때만 동작해서user_data를 변경해서 적용하고 싶은 경우 인스턴스를 삭제 후 재생성해야 한다.
-
templates 디렉터리 생성 후
web.tpl파일 생성-
web.tpl#!/bin/bash apt-get update apt-get install -y nginx rm /var/www/html/index.nginx-debian.html aws s3 sync s3://${S3_BUCKET_NAME} /var/www/html/- NGINX 설치 후 기본 HTML삭제 뒤 S3버킷의 내용을 웹서버디렉터리로 동기화하는 스크립트
- EC2인스턴스 생성 시 Aut-Scaling 그룹에 조인하도록 aws 명령어를 초기 스크립트에 설정
-
instance.tfresource "aws_instance" "web" { ... user_data = templatefile("${path.module}/templates/web.tpl", { "region" = var.aws_region "bucketname" = aws_s3_bucket_name.mybucket.bucket ... }) ... }user_data: AWS EC2 인스턴스 생성 시 최초 부팅단계에서 실행할 스크립트를 지정하는 속성templatefile(path, vars): TemplateFile을 읽어와서 제공된 변수들로 파일 내용의 일부를 대체한 후, 최종 결과 문자열을 반환.
-
4) Remote State
-
설명
- default로 terraform.tfstate 파일에 상태를 저장한다. 모든사람들이 terraform state를 접근해야하기도하고 최신상태를 유지할 수 있는 remote 저장공간에 tfstate파일을 관리한다.
- CSP에서 제공하는 많은 Storage 솔루션들이 있다.(Amazon S3, Google Cloud Storage 등)
- 또한 terraform.tfstate 에는 Secret 이 포함될 수 있으므로 git Reposgitory 에 이런 Secret 을 보관하고 싶지 않을 것이다. 또한 동일한 상태에 대해 동시 실행을 방지하기 위한 상태 잠금 메커니즘이 있다.
- Lock메커니즘은 예를들어 내가 terraform apply 했는데 다른사람이 거의 동시에 terraform apply을 눌렀을 경우 상태값 변경의 일관성을 위해서 Lock을 제공하며 Remote state 저장소를 AWS S3 이용하는 경우 DynamoDB를 통해 Lock 을 사용할 수 있다.
- 위 환경을 사용하면 terraform apply 사용할때 마다 No SQL인 DynamoDB에 상태 값을 기록해서 다른 사람이 Terraform apply를 적용할 때 상태 값을 확인하여 인지 할 수 있도록 동작한다.
- 단점은 상황에 따라 Lock 상태를 빠져나오지 못하는 경우가 있는데 Lock 상태가 지속되면 Lock 을 강제로 푸는 방법도 제공하고 있다.
- Remote State는 Remote Backend에 의해 구현되기 때문에 Backend block 을 구현해야 한다.
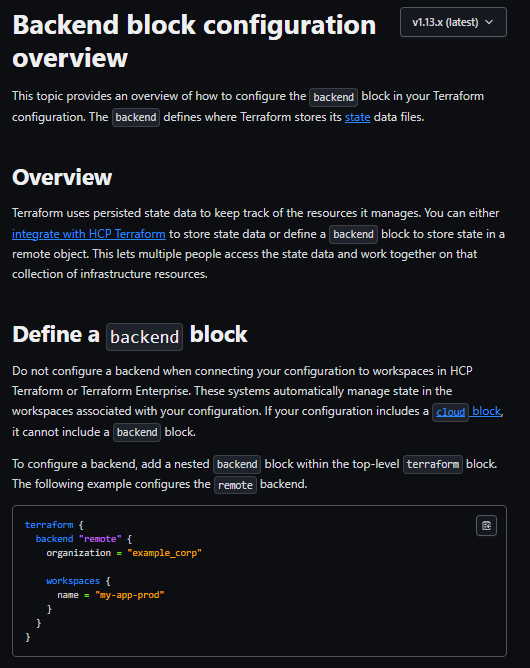
- 먼저 S3 설정이 필요하므로 Remote 저장을 위한 backend s3 생성해서 버킷을 만든다
- 이전 상태를 복구할 수 있또록 버킷 버전 관리를 활성화하는 것이 강력히 권장된다.
- 관리자 권한이 있다면 목록을 나열하고 입력 받을 수 있고 없다면 관리자 권한을 구현해야 한다 또한 state Lock을 위해 DynamoDB를 이용하는 경우 잠금을 위해 AWS IAM 권한이 필요하다.
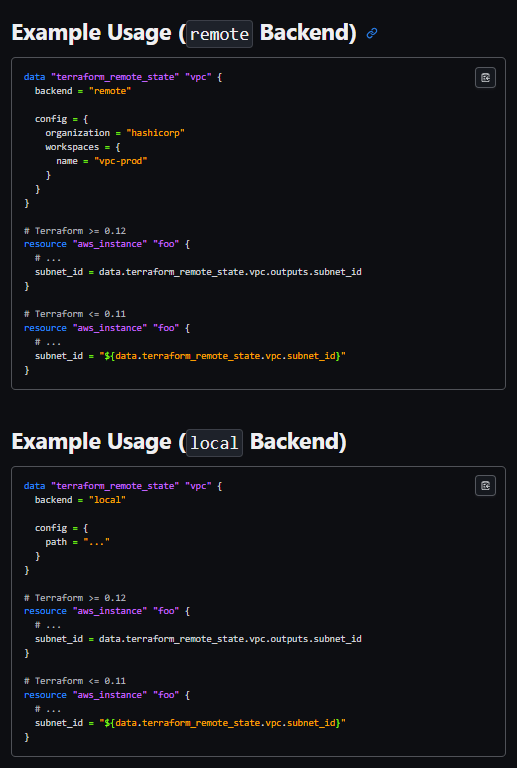
- Remote State를 가지게되면 Terraform을 여러 Project 로 나눌 수 있고 Data Source 라는 것은 Remote State를 활용하도록 도와주는 역할을한다. 테라폼에서 terraform_remote_state data source는 다른 워크스페이스나 다른 구성에서 관리되는 Remote State파일에 저장된 Outputs을 읽기 전용으로 가져와서 현재 워크스페이스의 Input 값으로 사용할 수 있도록하며 Terraform 운영 관리를 위해 여러 프로젝트의 각 팀들이 관련 프로젝트를 진행할 수 있게 활용된다.
예를들어 네트워크에 대한 Remote State파일이 있을 것이고 다른 팀 애플리케이션 팀은 네트워크의 Remote State를 읽는 Data Source를 사용 할 수 있다.
그래서 애플리케이션팀은 Terraform에서 네트워크 변경을 구성할 필요가 없다.
결과적으로 DataSource를 사용하면 애플리케이션팀이 VPC를 만들지않고도 Remote State를 통해 VPC 범위에 엑세스가 가능해진다.
-
Local State -> Remote State 스토리지 변경
-
AWS S3 버킷생성
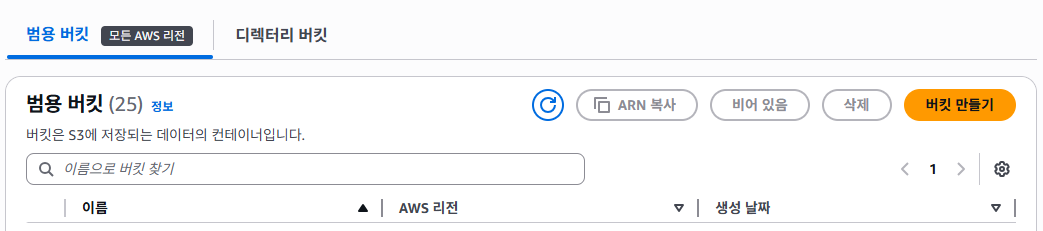

-
terraform.tf파일terraform { backend "s3" { bucket = "ganplank-s3" key = "first-steps" region = "us-east-1" } } provider "aws" { region = "us-east-1" }- backend S3 재구성 시 trafform init 을 한번 해줘야 한다.
- 명령어가 실행되면 tfstate 파일이 바로 여기에 생성된다.
-
instance.tf파일 내용 추가resource "aws_instance" "web" { ... key_name = aws_key_pair.mykey.key_name // ssh-key 값 user_data = templatefile("${path.module}/templates/web.tpl", { "region" = var.aws_region "S3_BUCKET_NAME" = aws_s3_bucket.mybucket.bucket }) ... resource "aws_s3_bucket" "mybucket" { bucket = "ganplank-s3" } -
생성결과
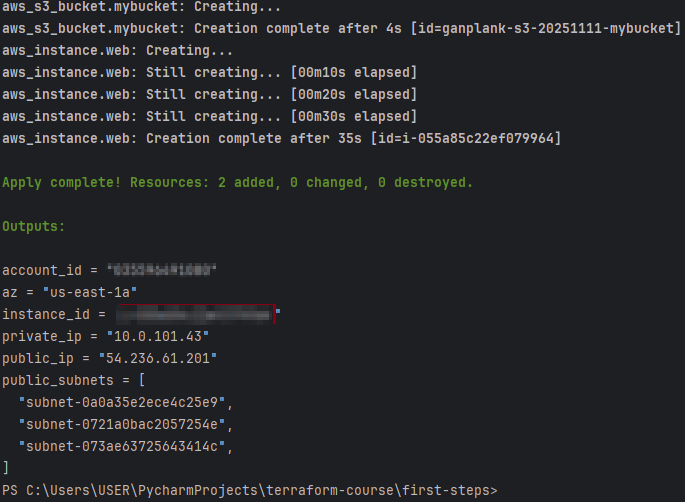
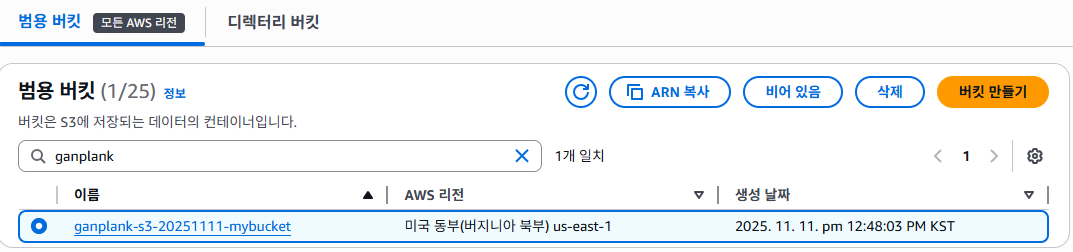

- 위 형태에서
terraform apply적용되면 기존 local storage에서 관리되었던 terraform.tfstate 파일은 빈값이되면서 AWS S3버킷에 terraform.tfstate 파일이 새롭게 생성되어짐을 확인할 수 있다. - terraform backend 설정값이 변경되는 경우 terraform.tfstate 상태기록 내용이 변경되어
terraform init -migrate-state옵션을 추가해 명령어 입력을 수행해야한다. 기존 state는 그대로 두고 현재 설정을 기준으로 다시 초기화하고 싶다면-reconfigure옵션을 사용한다. - terraform.tfstate 상태 기록 파일을 Local에서 backend.s3.key 값 입력을 통해 원하는 위치에 Remote storage에 옮겨서 보관 관리 가능하다.
- 위 형태에서
-
DynamoDB State Locking
- DynamoDB를 통해 terraform.tfstate lock 정보를 저장 및 관리
- Terraform 에서는 더이상 사용되지 않는다고 함
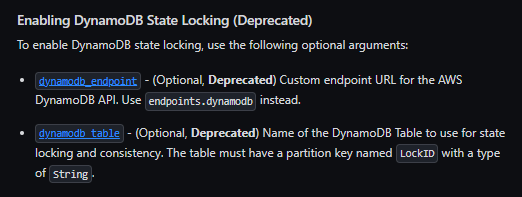
- 하지만 진행해보자면 테이블에서는 LockID 라는 파티션 키가 있어야 하여 테이블 파티션 키 생성
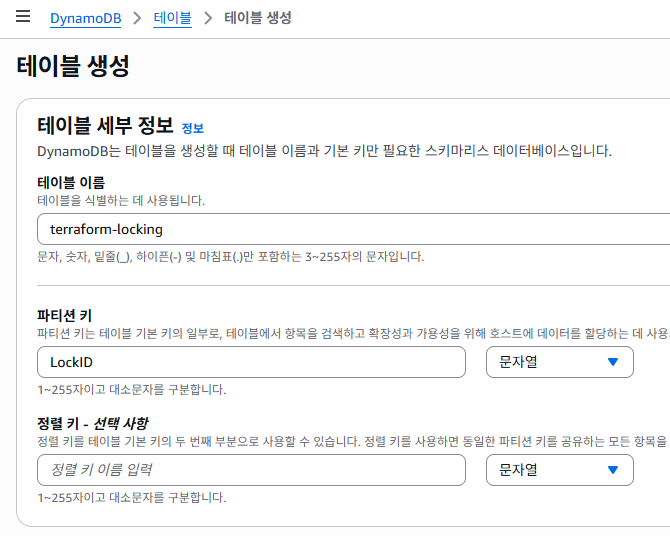
terraform apply -target aws_key_pair.mykey명령어 실행
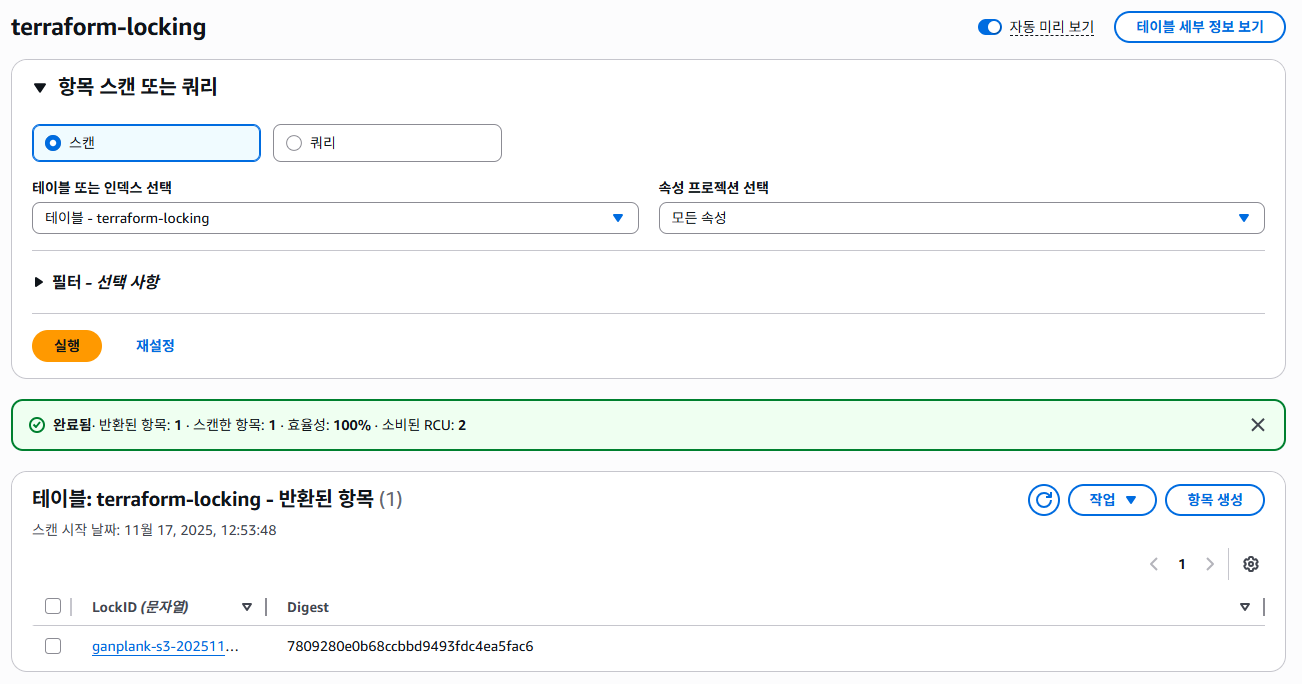
-
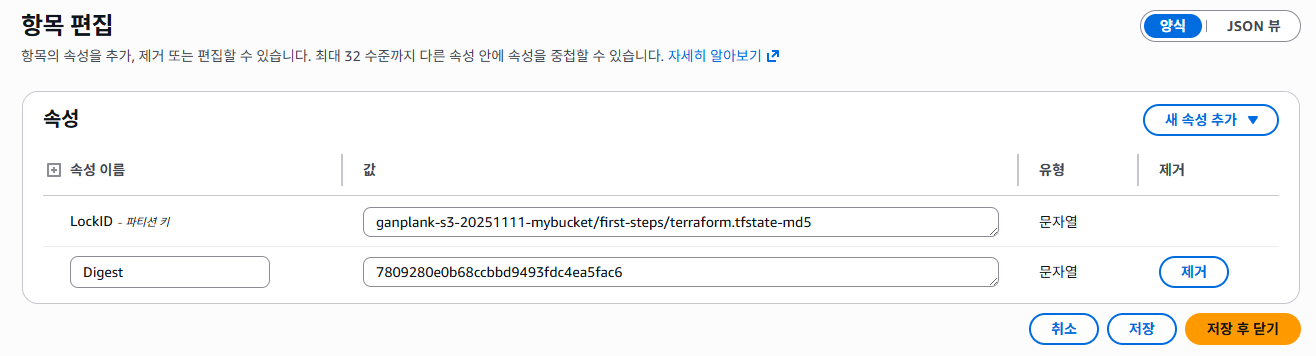
DynamoDB 해당 항목 편집을 눌러보면 속성에 AWS S3 버킷 이름으로 Lock ID 가 작성되어있는 것을 볼 수 있다.
- Lock이 동작을 확인하기위해
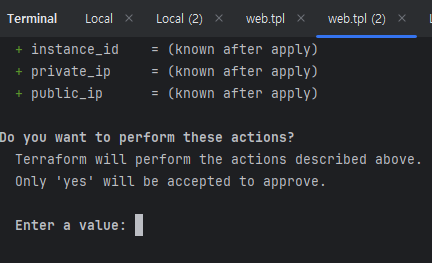
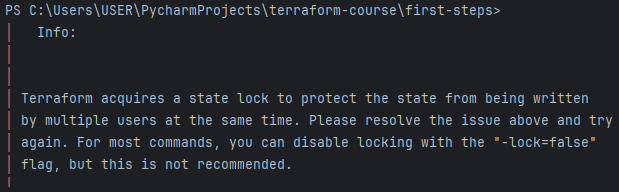
terraform apply후 yes 입력 받는 대기화면에서 새로운 다른 터미널을 열어서terraform apply입력 시 lock 이 걸려있다는 메시지와 함께 강제 해제 방법도 알려주고있다.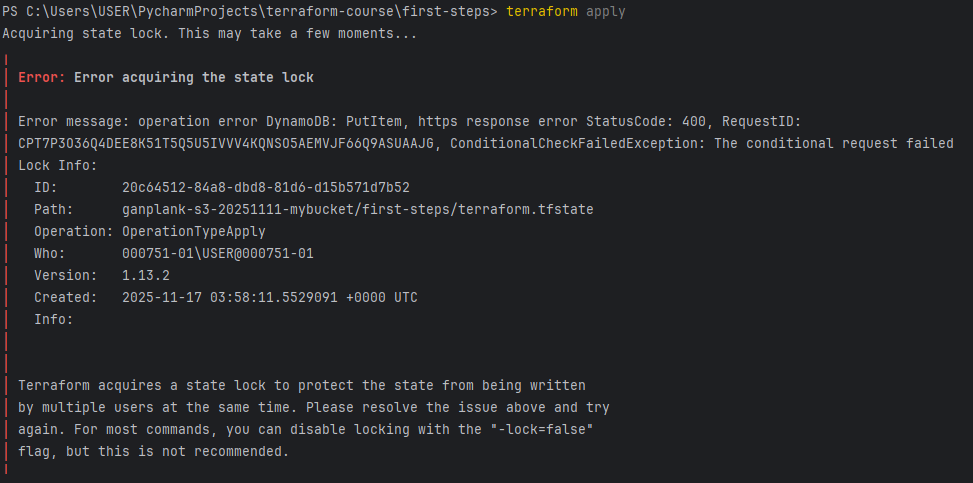
terraform apply -lock=flase옵션으로 lock 을 무시하고 실행하는 방법과terraform force-unlock <Lock ID>위 화면 Lock info 출력되는 ID 값으로 lock 을 강제 해제시킬 수 있다.- lock 동작을 확인한 이후 다시 돌아가기 위해
terraofrm init -migrate-state입력 후terraoform destory한다.
- Lock이 동작을 확인하기위해
-
5) Data Sources
5.1) aws_caller_identity
계정 ID를 얻기 쉬워서 별도 계정 ID를 하드코딩하지 않아도된다. 계정 ID를 불러오기위해 aws_caller 사용하고자 한다면 하드코딩할 수 있는데 하드코딩하는 데이터소스가 많아지면 모든 AWS호출을 해야하기 때문에 terraform apply 속도가 느려질 수 있다.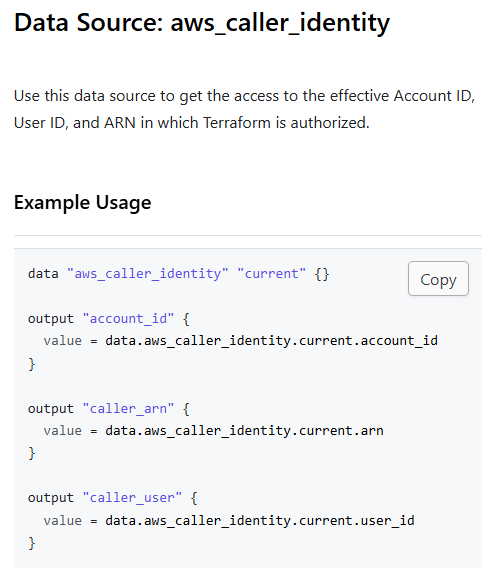
datasource.tf파일data "aws_caller_identity" "current" {} data "aws_region" "current" {}- 계정 ID를 불러오기 위해 data source 선언
outputs.tfoutput "account_id" { value = data.aws_caller_identity.current.account_id }- 콘솔 및 터미널에 account_id 출력하기 위해 data source 선언 내용을 value 로 잡음
terraform apply명령어 입력 후 Outputs 확인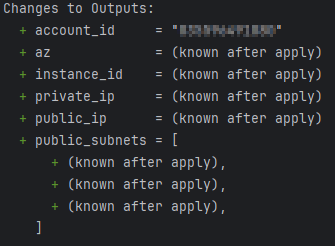
5.2) terraform_remote_state_Data Source
-
terraform apply명령어로 ec2 생성해서 vpc_id 확인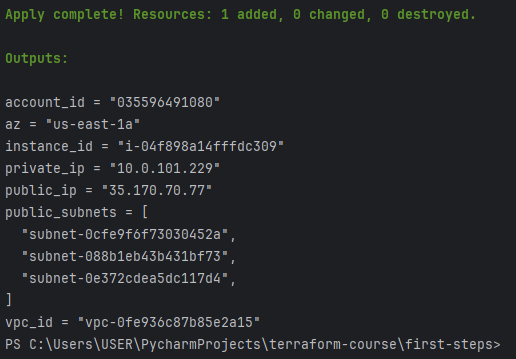
- AWS S3 bucket이름은 세계적으로 유일해야 하는데 AWS S3 bucket이 이미 만들어져있는 경우 해당 bucket을 사용이 필요하면
terraform import aws_s3_bucket.mybucket <bucket name>명령어로 backend 로 import 시킨다.
- AWS S3 bucket이름은 세계적으로 유일해야 하는데 AWS S3 bucket이 이미 만들어져있는 경우 해당 bucket을 사용이 필요하면
-
datasource.tf파일을 통해 ec2 생성 후 다른 프로젝트에서 해당 remote state를 읽어서 정보를 활용하는 방법이 있다. -
datasource로 remote state를 읽으면 구성 간에 데이터를 공유할 것이기 때문에 주의가 필요하다.
-
Output을 읽기위해 전체 state 파일에 접근할 필요가 있고 수동으로 사용자가 디렉터리 들어가서 전체 파일을 읽을 수 있으면 Outputs 이상의 많은 정보를 확인할 수 있다.
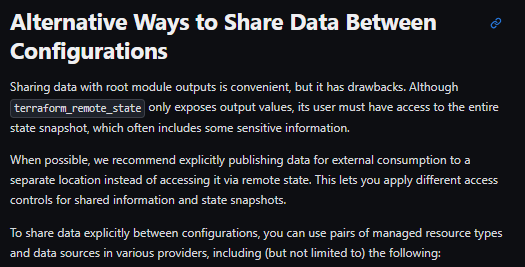
-
remote state에서 outputs값만
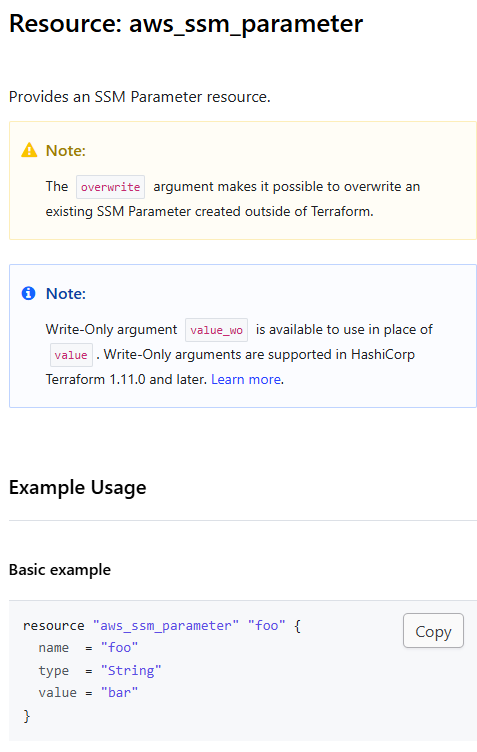
SSM Parameter에 따로 publish해서, 그걸 aws_ssm_parameter data source로 읽게 만들고 IAM으로 접근제어를 할 수 있다.
-
위 Basic example에 Key:Value를 작성할 수 있다. vpc_id를 parameter store 어딘가에 작성하고
aws_ssm_parameter로 읽을 수 있다. -
remote state파일을 읽으면 노출되지 말아야하는 정보들도 제공되어 공유하고 싶은값만AWS SSM Parameter Store에 저장하고 다른 프로젝트에서는data "aws_ssm_prameter"를 통해 값을 읽게 할 수 있다.- 팀/계정 분리나 다른 언어/툴에서도 쓰고ㅜ 싶은 값이있거나 권한 분리가 필요한 경우 사용된다.
-
주의할 점은 값이 parameter store에 암호화되어 저장되더라도 remote state에서는 항상 암호화되어 저장되지 않기 때문에 상태파일에 아무도 접근하지 못하도록 제어하고 AWS S3 암호화를 사용하여 전체파일이 암호화되도록 해야한다.
-
위 설정 예시를 참고해서
datasource-demo디렉터리(다른 프로젝트)를 생성 후datasource.tf파일에 아래 내용 작성
-
기존
terraform.tf에backend "s3"{}블락 안에bucket,key,region내용을 가져와서 remote state를 읽을 수 있는 위치를 정의하고 읽은 내용 중 vpc_id 를 출력할 수 있도록output "vpc_id" {}작성data "terraform_remote_state" "first-steps" { backend = "s3" config = { bucket = "ganplank-s3-20251111-mybucket" key = "first-steps/terraform.tfstate" region = "us-east-1" } } output "vpc_id" { value = data.terraform_remote_state.first-steps.outputs.vpc_id } -
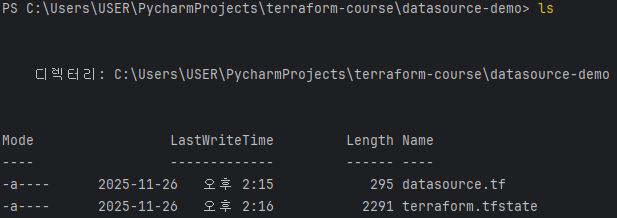
terraform apply입력 시 이미 remote state 파일을 읽고 그대로 remote state 파일을 해당 디렉터리 안에 파일을 생성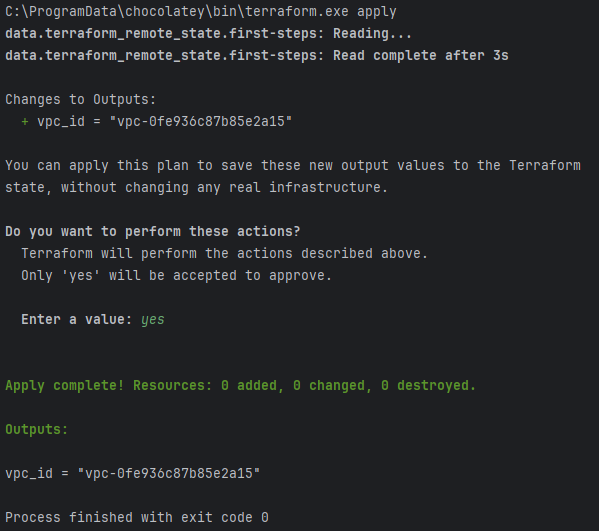
-
data.terraform_remote_state.first-steps: Reading...로그에서 첫 번째 프로젝트의 remote backend(AWS S3)에서 Terraform state 파일을 읽는것을 확인할 수 있따. -
Changes to Outputs: + vpc_id = "..."새 프로젝트 입장에서보면 원래는output "vpc_id"가 state에 없었고, 이번에는 처음 생기는 거라서 + 표시 됨, 서비스 영향없이output만 추가 -
결론적으로 첫 번째 프로젝트에서
output으로 내보낸 vpc_id를 두번째 프로젝트가 읽어서 자기 output으로 다시 노출시킴
-
기존 프로젝트에서 만들어둔 VPC의
vpc_id값을 읽어와서 이 새 프로젝트의 state에output으로 저장했다."resources": [ { "mode": "data", "type": "terraform_remote_state", "name": "first-steps", "provider": "provider[\"terraform.io/builtin/terraform\"]", "instances": [ { "schema_version": 0, "attributes": { "backend": "s3", "config": { "value": { "bucket": "ganplank-s3-20251111-mybucket", "key": "first-steps/terraform.tfstate", "region": "us-east-1" },
6) Local Variable
-
remote state 읽고 output 하는 과정에서 value 변수에 들어가는
remote_state.first-steps.outputs.vpc_id값이 길어서 사용하기 어려운데 Alias같은 개념으로local Variable을 사용할 수 있다.locals { vpc_id = data.terraform_remote_state.first-steps.outputs.vpc_id } output "vpc_id" { value = local.vpc_id }
7) Terraform Other Provider
- AWS 에서는 아마도 K8S를 가장 많이 보게될건데 Azure, GCP 등 다양한 프로바이더가 존재하며 Consul과 DNS에서도 Terraform 을 사용할 수 있다. 모두 REST API 를 제공하고 있으며 Provider 별 Documents 에 사용방법이 나와있다.
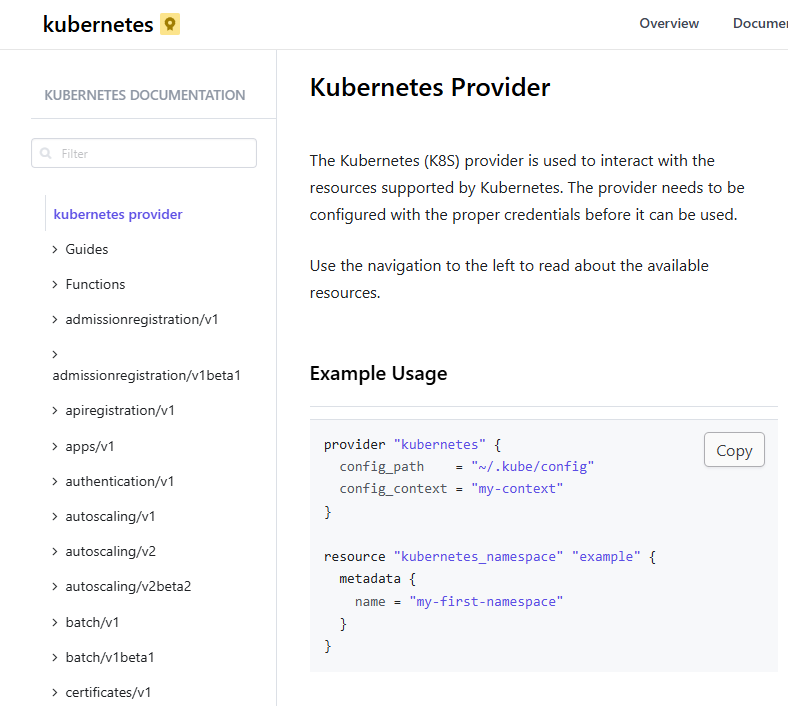
- 표준 AWS Provider에서
특정 리소스를 사용할수 없는 문제가 발생하면 awscc(AWS Cloud COntrol API)를 살펴보면 된다. awscc 는 사용 가능한 CloudFormation 리소스를 통해 생성한다. - AWSCC Provider
- AWSCC Provider는 AWS의 새로운 서비스와 기능에 대한 Terraform 자원을 최대한 신속하게 제공하기 위한 있는 보완 성격이 강한 도구이다.
- 표준 AWS Provider는 HashiCrop와 커뮤니티 개발자들이 AWS SDK를 기반으로 각 리소스의 로직을 수동으로 코딩하여 구축해야 하지만 AWSCC는 수동 코딩 과정을 건너뛰고 AWS가 표준화된 인터페이스로 제공하는 Cloud Control API를 자동으로 사용하도록 만들어져 새 기능 지원에 걸리는 시간을 획기적으로 단축시켰다.
awscc는 Terraform을 사용하여 AWS 인프라를 프로비저닝할 떄 사용하는 도구, 기존의 표준 AWS Provider와는 보완적인 관계
1. Auto-Generated- awscc Provider는 AWS의 Cloud Control API를 기반으로 자동생성된다.
- 이는 AWS가 새로운 서비스나 기능을 출시할 때, 표준 aws Provider가 수동으로 코드를 업데이트할 때까지 기다릴 필요 없이, awscc를 통해 더 빠르게 해당 리소스에 대한 Terraform 지원을 제공할 수 있게 해준다.
2. 신속한 리소스 지원 - AWS Cloud Control API가 지원하는 모든 리소스(현재 거의 모든 리소스)는 awscc PRovider를 통해 즉시 사용할 수 있다.
- 새로운 AWS기능이 출시되더라도 표준 aws provider의 지원이 지연될 수 있는 간극을 awscc가 메꿔주는 역할을 한다.
8) Terraform Command
-
terraform validate: 구문 오류 확인 -
terraform plan: plan을 먼저 실행하고 저장한 후 나중에 실행하는 방식으로 CI/CD 환경에서 많이 사용한다고 한다. -
terraform fmt: 구성 파일을 표준 스타일로 재포맷 -
terraform get: 구성 모듈을 불러오기 -
terraform init -upgrade:terraform.lock.hcl파일에 명시되어있는 최신 버전으로 업그레이드 -
terraform graph: 의존성 보기, 예를들어 아래 resource 처럼 보안 그룹은 모듈 VPC의 vpc_id를 가지고 있으니까 보안그룹 생성하기전에 먼저 vpc를 생성해야 한다.resource "aws_security_group" "allow_ssh" { name = "allow_ssh" description = "Allow SSH inbound traffic and all outbound traffic" vpc_id = module.vpc.vpc_id- 의존성을 가지고있는 내용을 확인할 수 있고 텍스트가 아닌 GraphViz를 이용해 시각화도 할 수 있따.
-
terraform import: AS3 스토리지 생성할 때 이미 만들어진 AS3 스토리지를 사용할 경우 사용한다. -
terraform login: terraform cloud에 로긍니하기 위한 것,logout마찬가지이다 -
terraform output: applt 했을 때 관련 output 출력 -
terraform provider: 어떤 provider 사용하는지 확인 -
terraform refresh: 원격에서 상태가 변경되었는지 확인 예를들어 AWS 변경이 있을 시refresh를 통해 terraform state를 갱신하여 remote state와 일치시킨다. -
terraform show: 현재 저장된 plan 을 본다. -
terraform tainit: 리소스 인스턴스를 오나전ㅇ히 기능하지 않는 것으로 표시