
Section 5: AWS를 활용한 테라폼
5.1. AWS 섹션소개
- AWS에 배포할 수 있는 리소스에 대한 내용 인프라 구축을 위한 필요한 구성요소들을 설명하는데 AWS 요소에 대한 설명이라 지나쳐도된다.
5.2. VPCs 소개
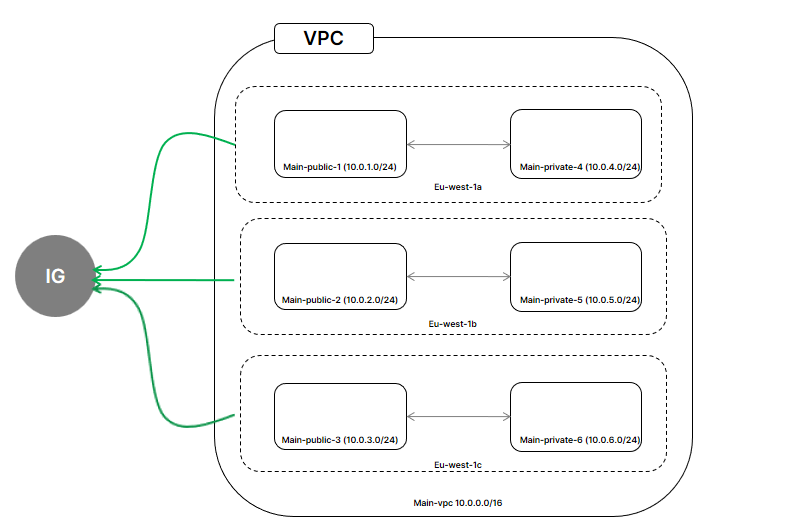
Section 1.
- VPC(Virtual Private Network)는 네트워크 레벨 상의 인스턴스들을 격리한다.
- 인스턴스를 시작할 수 있는 하나의 큰 네트워크EC2-Classic
- 한 VPC 에서 시작된 인스턴스는 Private IP주소를 사용해서 다른 VPC의 인스턴스와 통신할 수 없도록 네트워크 래벨에서 격리되어있다.
- 서로 간 통신하려면 Public IP를 통해서만 가능하다.
- 또 다른 방법은 두 개의 VPC가 서로 통신하기 위해서 VPC Peering 기능을 사용해볼 수 있다.
Section 2.
- VPC
- AWS에서는 인스턴스 또는 DB를 생성하기 위해 Self Private Subnet을 만들고 시작해야한다.
- VPC 는 하나의 큰 네트워크 (main-vpc 10.0.0.0/16) 에 논리적으로 여러 public <-> private subnet들이 할당되어서 Internet gateway를 통해서 외부와 통신을 한다.
- 하나의 DC(Data Center)를 AZ(Available Zone)이라고 부르고 모든 AZ에는 자체 Public과 Private Subnet이 존재하며 항상 /24 prefix 를 갖는다.
- 따라서 eu-west-1 에는 3개의 AZ과 DC가 있고 main-public-3에서 인스턴스를 시작하면 항상 해당 subnet 대역인 10.0.3.x 네트워크 IP주소를 할당받는다.
- 모든 public-subnet은 IG(InternetGateway)와 연결되고 pirvate subnet에서 생성되는 인스턴스는 Public-IP주소를 얻지못해 인터넷과 연결되지 않는다.
- main-public의 인스턴스는 모두 같은 VPC에 있기에 main private의 인스턴스와 연결할 수 있고 동일한 VPC 안에서 각 서브넷 별 인스턴스는 방화벽정책만 허용되면 통신이 가능하기 때문에 LB를해주는 VIP는 public subnet에다가 생성하고 부하분산대상 WEB인스턴스는 private subnet에 배치한다.
5.3. VPC 데모
-
VPC 데모에서는
vpc.tf,nat.tf파일을 활용할거다
vpc.tf// Internet VPC resource "aws_vpc" "main" { cidr_block = "10.0.0.0/16" instance_tenancy = "default" //이 VPC에서 시작된 모든 인스턴스는 다른 AWS 계정의 인스턴스와 하드웨어를 공유할 수도 있는 공유(Shared) 테넌시로 실행, default 외에 dedicated 옵션도 있음 enable_dns_support = "true" //VPC에서 DNS 해석을 사용할 수 있도록 설정 enable_dns_hostnames = "true" //VPC에서 시작된 인스턴스 enable_classiclink = false //EC2-Classic 인스턴스가 이 VPC의 리소스에 연결할 수 있도록 허용 tags = { Name = "main" } } // Subnets resource "aws_subnet" "main-public-1" { vpc_id = aws_vpc.main.id cidr_block = "10.0.1.0/24" map_public_ip_on_launch = "true" availability_zone = "eu-west-1a" tags = { Name = "main-public-1" } } resource "aws_subnet" "main-public-2" { vpc_id = aws_vpc.main.id cidr_block = "10.0.2.0/24" map_customer_owned_ip_on_launch = "true" availability_zone = "eu-west-1b" tags = { Name = "main-public-2" } } resource "aws_subnet" "main-public-3" { vpc_id = aws_vpc.main.id cidr_block = "10.0.3.0/24" map_public_ip_on_launch = "true" availability_zone = "eu-west-1c" tags = { Name = "main-public-3" } } resource "aws_subnet" "main-private-1" { vpc_id = aws_vpc.main.id cidr_block = "10.0.4.0/24" map_public_ip_on_launch = "false" availability_zone = "eu-west-1a" tags = { Name = "main-private-1" } } resource "aws_subnet" "main-private-2" { vpc_id = aws_vpc.main.id cidr_block = "10.0.5.0/24" map_public_ip_on_launch = "false" availability_zone = "eu-west-1b" tags = { Name = "main-private-2" } } resource "aws_subnet" "main-private-3" { vpc_id = aws_vpc.main.id cidr_block = "10.0.6.0/24" map_public_ip_on_launch = "false" availability_zone = "eu-west-1c" tags = { Name = "main-private-3" } } // Internet Gateway resource "aws_internet_gateway" "main-gw" { vpc_id = aws_vpc.main.id tags = { Name = "main-gw" } } // route tables : Internet GW 생성하고 인스턴스에 라우팅 테이블 PUSH하기위한 정의 resource "aws_route_table" "main-public" { vpc_id = aws_vpc.main.id route { cidr_block = "0.0.0.0/0" gateway_id = "${aws_internet_gateway.main-gw.id}" } tags = { Name = "main-public-1" } } // route associations public 모든 단일 public subnet에 생성되는 이 routing 테이블을 연결하는 경우 // Static Routing Table 개념인가..? resource "aws_route_table_association" "main-public-1-a" { subnet_id = aws_subnet.main-public-1.id route_table_id = aws_route_table.main-public.id } resource "aws_route_table_association" "main-public-2-a" { subnet_id = aws_subnet.main-public-2.id route_table_id = aws_route_table.main-public.id } resource "aws_route_table_association" "main-public-3-a" { subnet_id = aws_subnet.main-public-3.id route_table_id = aws_route_table.main-public.id }- cird_block블락으로 VPC의 subnet 네트워크대역 정의
{Instance_tenancy = 'default'}: VPC에서 시작된 모든 인스턴스는 다른 AWS 계정의 인스턴스와 하드웨어를 공유할 수도 있는 Shared 테넌시로 실행, default 외에 dedicated 옵션도 있음{enable_dns_supprt},{enalbe_dns_hostnames}: 인스턴스에서 사용할 DNS와 Hostname 설정map_public_ip_on_launch: 해당 Subnet에 Public IP주소 매핑 사용 여부 false 인 경우 해당 서브넷을 부여받은 인스턴스는 Private IP주소만 할당받을 수 있다.- 내부 Pirvate IP 주소와 Internet Gateway 연결하여 외부 통신하기 위해
"aws_route_table" "main-public"리소스에 라우팅 경로를 지정
-
nat.tf
인스턴스를 생성하면 기본적으로 private IP 주소만 할당되서 인스턴스가 외부통신은 가능하지만 외부에서 인스턴스로 통신은 허용되지않는다. 인터넷이 개인 인스턴스에서 시작할 인스턴스에 접근할 수 없도록 하려면 NET Gateway 설정하면 된다. 이를위해서는 AWS에서 지원하는 Static IP주소 또는 ElasticIP IP주소가 필요하다.# nat gw resource "aws_eip" "nat" { domain = "vpc" } resource "aws_nat_gateway" "nat-gw" { allocation_id = aws_eip.nat.id subnet_id = aws_subnet.main-public-1.id depends_on = [aws_internet_gateway.main-gw] } # VPC setup for NAT resource "aws_route_table" "main-private" { vpc_id = aws_vpc.main.id route { cidr_block = "0.0.0.0/0" nat_gateway_id = aws_nat_gateway.nat-gw.id } tags = { Name = "main-private-1" } } # route associations private resource "aws_route_table_association" "main-private-1-a" { subnet_id = aws_subnet.main-private-1.id route_table_id = aws_route_table.main-private.id }- #VPC setup for nat 에 NET Gateway로 전송하는 Route 경로를 푸시합니다.
- #route assciation private 은 선택사항인데 인터넷에서 연결할 수 없는 개인 서브넷을 원할 경우엔 적용하면 안된다.
5.4. Spinning up instances (EC2, EBS)
VPC를 설정했으니 해당 VPC 에서 새 인스턴스를 Spin up 할 수 있다.
-
EC2 인스턴스 Spinning up 방법
-
이전에 AWS Provider 및 자격 증명과 함께 provider.tf를 사용하거나 aws_configure 명령어로 자격증명을 설정한다.
provider.tfprovider "aws" { access_key = "${var.AWS_ACCESS_KEY}" secret_key = "${var.AWS_SECRET_KEY}" region = "${var.AWS_REGION}" } -
AMI 인스턴스 유형이 있는 instance.tf 파일
instance.tfresource "aws_instance" "example" { ami = "${lookup(var.AMIS, var.AWS_REGION)}" instance_type = "t2.micro" # the VPC Subnet subnet_id = "${aws_subnet.main-public-1.id}" # the securty group vpc_security_group_ids = ["${aws_security_group.allow-ssh.id}"] # the public SSH key key_name = "${aws_key_pair.mykeypair.key_name}" } -
region 정보와 AMI-ids가 있는 vars.tf가 있다.
vars.tf``` variable "AWS_ACCESS_KEY" {} variable "AWS_SECRET_KEY" {} variable "AWS_REGION" { default = "eu-west-1" } variable "AMIS" { type = "map" default = { us-east-1 = "ami-13be557e" us-west-2 = "ami-06b94666" eu-west-1 = "ami-844e0bf7" } } ```4) EC2 Instance
-
-
이제 보안 그룹과 테라폼에서 업로드할 KEY 쌍을 사용해서 인스턴스에 접속한다.
-
securitygroup.tf파일으로 security 그룹 생성resource "aws_security" "allow-ssh" { vpc_id ="${aws_vpc.main.id}" name = "allow-ssh" description = "security group that allows ssh and all egress traffic" egress { from_port = 0 to_port = 0 protocol = "-1" cidr_blocks = ["0.0.0.0/0"] } ingress { from_port = 22 to_port = 22 protocol = "-1" cidr_blocks = ["0.0.0.0/0"] } tags { Name = "allow-ssh" } }- security group은
vpc_id = "${aws_vpc.main.id}"항목에서 연결할 VPC를 지정한다. protocol = "-1"모든 프로토콜이라는 의미ingress블락에to_port = 22에 대한cidr_blocks = ["0.0.0.0/0"]에서 ANY가 아닌 허용할 네트워크를 특정지어 설정한다.
- security group은
-
keypairs.tf쉘 로그인을 위한 SSH.pub KEY 정의resource "aws_key_pair" "mkykeypair" { key_name = "mykeypair" public_key = "${file("keys/mykeypair.pub")}" }- keys/mykeypair.pub이 AWS에 업로드되고 이 public_key가 설치된 인스턴스를 시작할 수 있다.
-
5.5. AWS Instance demo
- SSH KEY 생성
ssh-keygen -f mykey명령어로 pub, private key 쌍을 생성
demo-8 디렉터리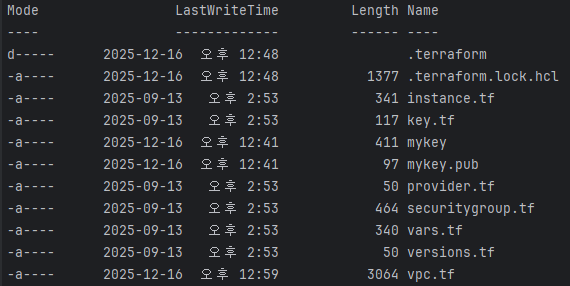
-
instance.tfresource "aws_instance" "example" { ami = var.AMIS[var.AWS_REGION] instance_type = "t2.micro" # the VPC subnet subnet_id = aws_subnet.main-public-1.id # the security group vpc_security_group_ids = [aws_security_group.allow-ssh.id] # the public SSH key key_name = aws_key_pair.mykeypair.key_name }- 인스턴스는 main-public-key에서 IP주소를 할당받고 해당 정보는
vpc.tf파일에main-public-1범위에서 IP주소를 얻는다는 것을 의미하고 eu-west-1a AZ에서 시작됨
- 인스턴스는 main-public-key에서 IP주소를 할당받고 해당 정보는
-
vpc.tf# Internet VPC resource "aws_vpc" "main" { cidr_block = "10.0.0.0/16" instance_tenancy = "default" enable_dns_support = "true" enable_dns_hostnames = "true" tags = { Name = "main" } } # Subnets resource "aws_subnet" "main-public-1" { vpc_id = aws_vpc.main.id cidr_block = "10.0.1.0/24" map_public_ip_on_launch = "true" availability_zone = "eu-west-1a" tags = { Name = "main-public-1" } } -
demo-8 디렉터리 현재위치에서
terraform init후terraform plan명령어 실행- 설정된 값아 맞게 출력 확인
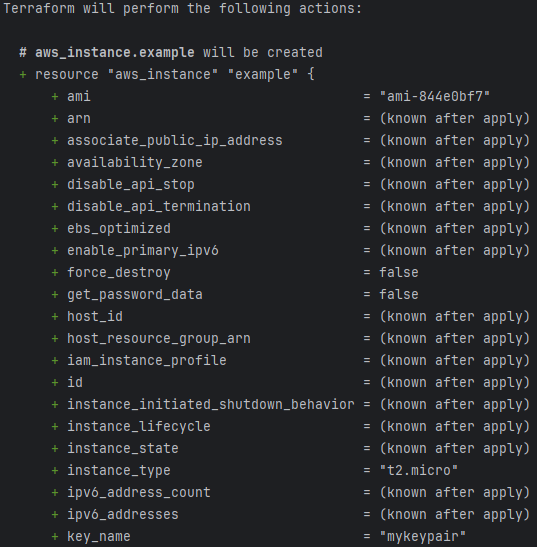
- 설정된 값아 맞게 출력 확인
-
terraform apply후 ec2 인스턴스 접속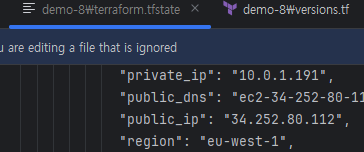
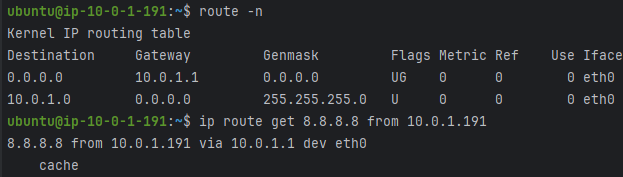
tfstate상태파일 public IP주소로 인스턴스 접속 후 IP주소 확인 시 private subnet(10.0.1.0/24)대역으로 DHCP받은 것을 확인 할 수 있음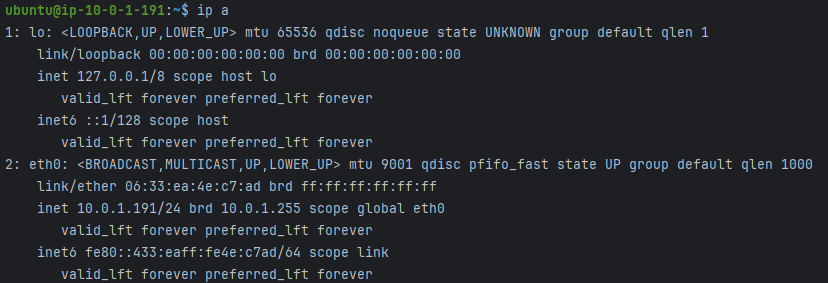
5.6. Block Storage (EBS volume)
- 특정 AMI가 있는 t2.micro 인스턴스는 8GB EBS(Elastic Block Storage) 스토리지를 자동으로 추가한다.
- 일부 인스턴스 유형에는 인스턴스 자체에 로컬 저장도 있는데 이를 임시 저장소라고 부르고 인스턴스가 종료되면 데이터도 같이 삭제된다.
- EBS 8GB 루트볼륨 저장소도 인스턴스가 종료될 때 자동으로 제거되도록 설정되어있다.
instance.tfresource "aws_instance" "example" { ... } // 볼륨을 정의 gp2로 프로비저닝없이 범용적인 SSD 선택 resource "aws_ebs_volume" "ebs-volume-1" { availability_zone = "eu-west-1a" size = 20 type = "gp2" # General Purpose storage, can also be standard or io1 or st1 tags { Name = "extra volume data" } } // 위 볼륨을 ec2 인스턴스에 부착 resource "aws_volume_attachment" "ebs-volume-1-attachment" { device_name = "/dev/xvdh" volume_id = "${aws_ebs_volume.ebs-volume-1.id}" instance_id = "${aws_instance.example.id}" }- root volume이나 storage를 증가시키고 싶으면
root_block_device를 이용할 수 있다.resource "aws_instance" "example" { root_block_device { volume_size = 16 volume_type = "gp2" delete_on_termination = true # wheter to delete the root block device when the instance gets terminated or not } }
- root volume이나 storage를 증가시키고 싶으면
5.7. EBS Volume DEMO
Demo-9 디렉터리에서 terraform init 후 ssh-keygen mykey 명령어로 ssh key 쌍 생성 뒤 ec2 인스턴스 생성
-
instance.tfresource "aws_instance" "example" { ami = var.AMIS[var.AWS_REGION] instance_type = "t2.micro" # the VPC subnet subnet_id = aws_subnet.main-public-1.id # the security group vpc_security_group_ids = [aws_security_group.allow-ssh.id] # the public SSH key key_name = aws_key_pair.mykeypair.key_name } resource "aws_ebs_volume" "ebs-volume-1" { availability_zone = "eu-west-1a" size = 20 type = "gp2" tags = { Name = "extra volume data" } } resource "aws_volume_attachment" "ebs-volume-1-attachment" { device_name = "/dev/xvdh" volume_id = aws_ebs_volume.ebs-volume-1.id instance_id = aws_instance.example.id stop_instance_before_detaching = true } -
terraform apply명령어 실행- ec2인스턴스 생성 후 접속해서 EBS Volume 할당 여부 확인
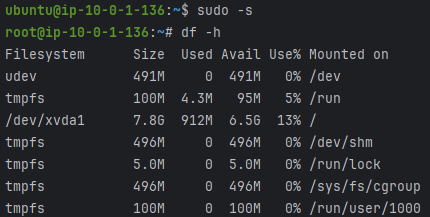
- root 디렉터리에 마운트된 8GB(/dev/xvda1)은 인스턴스 종류 시 자동으로 삭제된다. 보관이 필요하면 별도 설정이 필요하다.
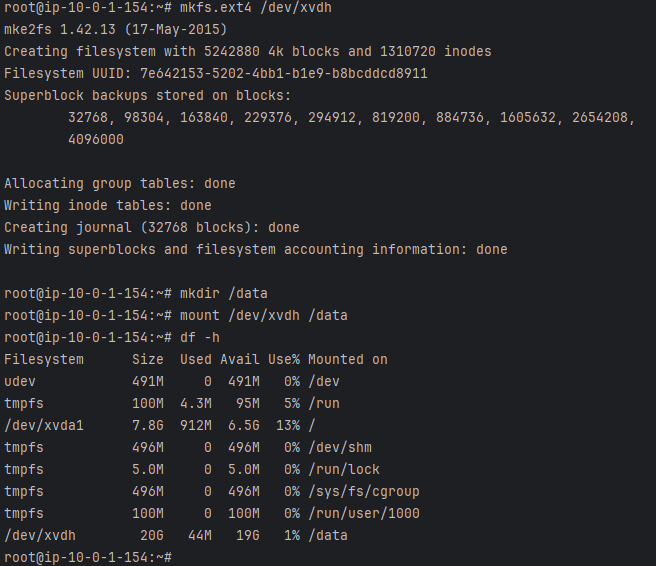

- 테라폼 resource로 선언한
ebs-volume-120Gbyte 볼륨은 리눅스 ext4파일시스템으로 변환 후 마운트해서 사용 가능하며 리부팅 시에도 마운트상태를 유지하기위해 fstab 파일에 마운트 내용을 추가한다.
- ec2인스턴스 생성 후 접속해서 EBS Volume 할당 여부 확인
-
테스트 중 기존 버킷 데이터가 있어서 인스턴스 삭제 안되는 경우, aws 명령어로 버킷을 먼저 삭제하거나 인스턴스 삭제 시 버킷 데이터를 먼저 삭제하도록 설정 필요
5.8. Userdata
-
Userdata 사용목적
- 클러스터 조인할 수 있도록 준비
ex) consul cluster, ECS cluster (Docker orchestration) - 명령어 또는 스크립트 실행
- 볼륨 마운트
- 인스턴스 시작할 때 볼륨을 마운트하는데 유용하고 인스턴스의 재부팅이 아니라 생성 시에만 실행되며 간단한 명령어를 위한 문자열로 aws_instance 리소스에 사용자 데이터를 추가하거나 템플릿을 사용할 수 있다. 이전 강의에서 다뤘던 Templates 도 Userdata에 사용할 수 있다.
- 클러스터 조인할 수 있도록 준비
-
부팅 시 OpenVPN APP 설치하는 userdata 작성예시
-
instance.tfresource "aws_instance" "example" { ami = "${lookup+(var.AMIS, var.AWS_REGION)}" # the VPC subnet subnet_id = "${aws_subnet.main-public-1.id}" # the security group vpc_security_group_ids = ["${aws_security_group.allow-ssh.id}"] # the public SSH key key_name = "${aws_key_pair.mykeypair.key_name}" # userdata user_data = "#!/bin/bash\nwget http://swupdate.openvpn.org/as/openvpn-as-2.1.2-Ubuntu14.amd_64.deb\ndpkg -i openvpn-as-2.1.2-Ubuntu14.amd_64.deb" }-
user_data 변수에 wget 명령어를 통해 APP 설치하는 bash 명령어 등록
resource "aws_instance" "example" { ami = "${lookup+(var.AMIS, var.AWS_REGION)}" # the VPC subnet subnet_id = "${aws_subnet.main-public-1.id}" # the security group vpc_security_group_ids = ["${aws_security_group.allow-ssh.id}"] # the public SSH key key_name = "${aws_key_pair.mykeypair.key_name}" # userdata user_data = "${data.template_coludinit_config.cloudinit-example.rendered}" } -
더 좋은 예로 Terraform의 Template을 사용해서 변수를
user_data사용하고 해당 변수는 렌더링되는cloudinit.tf에서 구성한다.
-
-
cloutinit.tfprovider "cloudinit" {} data "template_file" "init-script" { template = "${file("scripts/init.cfg")}" vars { region = "${var.AWS_REGION}" } } data "template_cloudinit_config" "cloudinit-example" { gzip =false base64_endcode = false part { filename = "init.cfg" content_type = "text/cloud-config" content = "${data.template_file.init-script.rendered}" } }- provider "cloudinit"을 사용하고 template = "${file("script/init.cfg")}" 으로 또 다른 스크립트를 참조하도록 한다.
-
scripts/init.cfg#cloud-config repo_update: true repo_upgrade: all packages: - docker output: all: '| tee -a /var/log/cloud-init-output.log'- cloutinit 스크립트 내용이며 repo 업데이트 여부와 설치할 패키지 그리고 출력로그도 지정되어있다.
-
cloudinit.tf여러 part를 갖는 예씨data "template_cloudinit_config" "cloudinit-example" { gzip = false base64_encode = false part { filename = "init.cfg" content_type = "text/cloud-config" content = "${template_file.init-script.rendered}" } # just a shell script instead of part { content_type = "text/x-shellscript" content = "#!/bin/bash\necho 'hello'" } # an upstart script (basically an init script to start/stop/restart/reload services) part { content_type = "text/upstart-job" content = "${file("scripts/start_docker_container.cfg")}" } }- template_cloudinit_config를 사용하지만 여러 part로 구성되어있고 upstart script는 서비스 상태를 담당하고 스크립트를 시작하거나 중지할 수 있다.
-
5.9. Userdata Demo
-
instance.tfresource "aws_instance" "example" { ami = var.AMIS[var.AWS_REGION] instance_type = "t2.micro" # the VPC subnet subnet_id = aws_subnet.main-public-1.id # the security group vpc_security_group_ids = [aws_security_group.allow-ssh.id] # the public SSH key key_name = aws_key_pair.mykeypair.key_name # user data user_data = data.cloudinit_config.cloudinit-example.rendered } resource "aws_ebs_volume" "ebs-volume-1" { availability_zone = "eu-west-1a" size = 20 type = "gp2" tags = { Name = "extra volume data" } } resource "aws_volume_attachment" "ebs-volume-1-attachment" { device_name = var.INSTANCE_DEVICE_NAME volume_id = aws_ebs_volume.ebs-volume-1.id instance_id = aws_instance.example.id skip_destroy = true # skip destroy to avoid issues with terraform destroy }- user_data변수에 값을 추가하고 20Gbyte의 EBS볼륨을 설정한다.
-
cloudinit.tf# note: previous templatefile datasources have been replaced by the template_file() function data "cloudinit_config" "cloudinit-example" { gzip = false base64_encode = false part { filename = "init.cfg" content_type = "text/cloud-config" content = templatefile("scripts/init.cfg", { REGION = var.AWS_REGION }) } part { content_type = "text/x-shellscript" content = templatefile("scripts/volumes.sh", { DEVICE = var.INSTANCE_DEVICE_NAME }) } }cloudinit_config은 Terraform의cloudinitProvider에서 정의한Data Source이다.- 여러 개의 shell script를 하나의
cloud-config파일로 결합하고 인코딩할 수 있도록 지원한다.
- 여러 개의 shell script를 하나의
DEVICE = "${var.INSTANCE_DEVICE_NAME}": DEVICE를 shell 스크립트에 변수로 전달할거기 때문에cloudinit.tf파일에서도instance.tf에서 사용한 변수를 동일하게 사용- 여러 part로 나눠서 init-script와 shellscript을 실행하도록 한다.
volumes.sh,init.cfg내용은 docker, lvm 패키지 설치와 20Gbyte Volume을 마운트하는 내용의 스크립트다.
-
terraform apply명령어 실행 후 인스턴스 접속하여 스크립트대로 명령어 실행되었는지 확인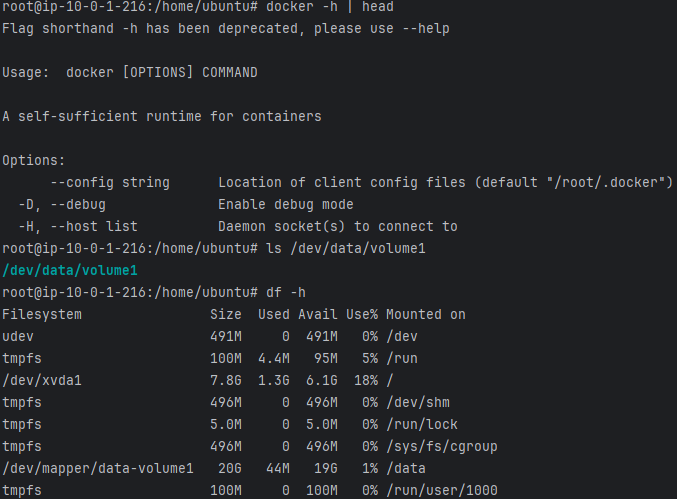
- docker 패키지가 정상적으로 설치되어있고 20Gib Volume 마운트 확인
cloud-init-output.log파일에서 스크립트 실행 시 관련 output-log를 확인 할 수 있음
5.10. Static IPs and DNS (private IP or public EIP, Route53)
1) Private IP주소
VPC 내 서브넷 범위에서 EC2 인스턴스에 자동 할당되지만 static IP주소를 사용하여 인스턴스가 항상 동일한 IP주소를 갖도록 할 수 있다.
resource "aws_instance" "example" {
    ami	= "${lookup(var.AMIS, var.AWS_REGION)}"
    instance_type = "t2.micro"
    subnet_id = "${aws_subnet.main-public-1.id}"
    private_ip = "10.0.1.4" # within the range of subnet main-public-1
}- instance.tf파일에 private_ip를 정의해두면되는데 해당 내용이 없으면 main-public-1 서브넷범위 내 임의 IP주소를 할당받는다.
2) Elastic IP주소
EIP는 EC2인스턴스에 연결할 수 있는 Static Public IP주소이다.
```
resource "aws_eip" "exmaple-eip" {
  instance = "${aws_instance.example.id}"
  vpc = true
}
```
EIP 설정은 위와 같이 정의하면되는데 인스턴스와 VPC가 있어야 하는 위치를 지정한다.
3) Route53
AWS는 도메인 발급 대행자여서 AWS에게 도메인을 구매하고 ZONE을 관리하여 DNS를 사용할 수 있다.
ELB도메인을 Route53 도메인의 root domain(APEX)에 Alias하여 LB으로 사용한다.
RFC규정 상 CNAME처리된 도메인은 다른 레코드를 가질 수 없다. 그래서 Root domain(APEX)에 CNAME위임이 불가하나 AWS처럼 Alias와 같은 자체 레코드를 사용하여 교묘하게 RFC규정을 우회하고 Root domain(APEX) 위임하는 경우들이 있다.(다른 벤더들도 Alias와 같은 자체 레코드 존재하는걸로 알고있음)
DNS레코드 Type64/65(SVCB/HTTPS)가 RFC 공식 규정되었고 SVCB 레코드로 Root domain(APEX)를 Alias할 수 있게되었다.
resource "aws_route53_zone" "example-com" {
	name = "example.com"
}
resource "aws_route53_record" "server1-record" {
	zone_id = "${aws_route53_zone.example-com.zone_id}"
    name = "server1.example.com"
    type = "A"
    ttl = "300"
    records = ["${aws_eip.example-eip.publuc_ip}"]
}aws_route53_zone,aws)route53_record를 통해서 route53 설정을 할 수 있다.
5.11. Demo - Route53
route53.tf
resource "aws_route53_zone" "newtech-academy" {
  name = "newtech.academy"
}

resource "aws_route53_record" "server1-record" {
  zone_id = aws_route53_zone.newtech-academy.zone_id
  name    = "server1.newtech.academy"
  type    = "A"
  ttl     = "300"
  records = ["104.236.247.8"]
}

resource "aws_route53_record" "www-record" {
  zone_id = aws_route53_zone.newtech-academy.zone_id
  name    = "www.newtech.academy"
  type    = "A"
  ttl     = "300"
  records = ["104.236.247.8"]
}

resource "aws_route53_record" "mail1-record" {
  zone_id = aws_route53_zone.newtech-academy.zone_id
  name    = "newtech.academy"
  type    = "MX"
  ttl     = "300"
  records = [
    "1 aspmx.l.google.com.",
    "5 alt1.aspmx.l.google.com.",
    "5 alt2.aspmx.l.google.com.",
    "10 aspmx2.googlemail.com.",
    "10 aspmx3.googlemail.com.",
  ]
}

output "ns-servers" {
  value = aws_route53_zone.newtech-academy.name_servers
}www-record의www.newtech.academy는 ERP Public IP주소를 가리키는 변수로 설정해도된다.mail1-record의 records 리스트 항목에 숫자는 우선순위이다.terraform apply후 도메인 생성확인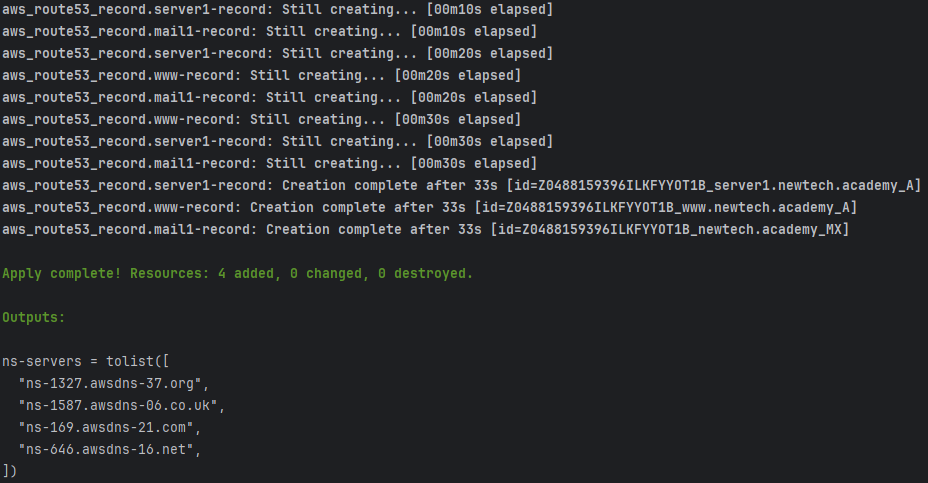
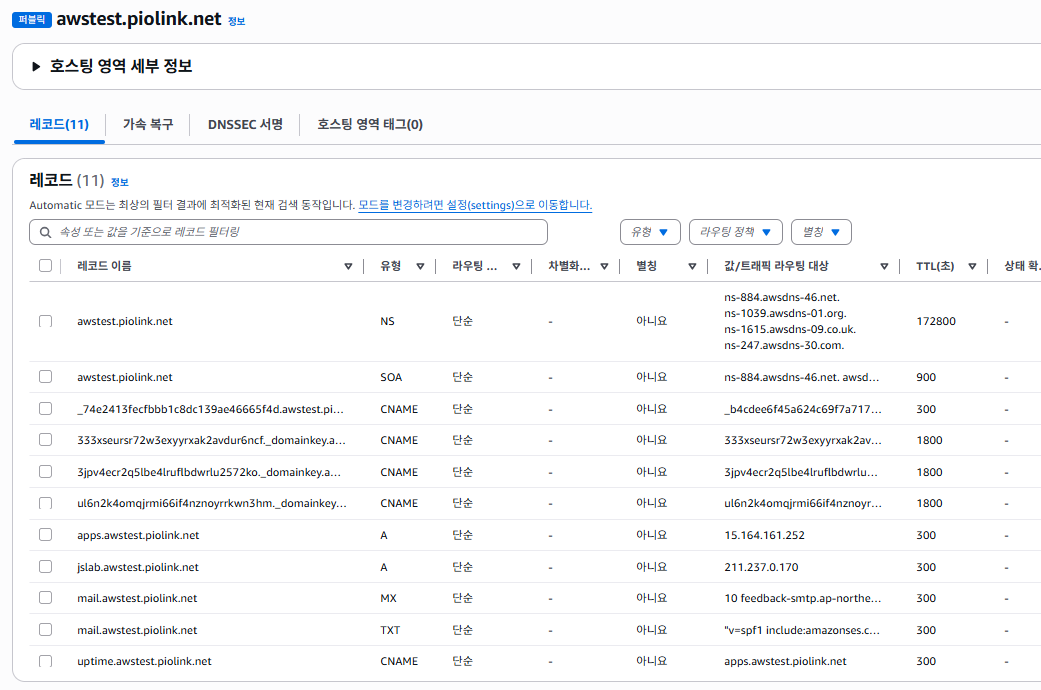
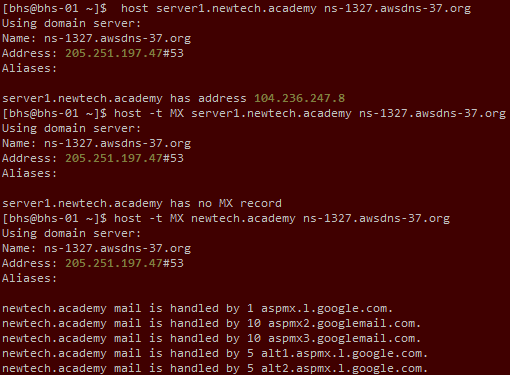
- AWS NS에게 DNS 질의 시 정상응답 확인
5.12. RDS (Relational databases)
- 특징
AWS 관계형 DB이며 고가용성을 위한 두 개 인스턴스의 ACTIVE/STANDBY형태에서 데이터 정합성을 위해 DB Replica 해서 동기화한다.
자동 스냅샷은 DB의 Backup 스냅샷을 찍는건데 자동 보안 업데이트도 사용할 수 있다.
지원하는 DB는 MySQL, MariaDB, PostgreSQL 등 웬만한건 다 지원한다. - 생성방법
subnet group생성
어떤VPC subnet이 DB에 속할지 정정할 수 있다. 예를들어eu-west-1a와eu-west-1b를 RDS인스턴스가 배치될 subnet으로 지정한다.parameter group생성
DB설정을 변경하기 위해parameter를 지정할 수 있다.security group생성
RDS인스턴스로 들어오는 Traffic을 허용할 수 있도록 설정한다.RDS instace생성
-
Paramete Group 생성 예시
resource "aws_db_parameter_grouo" "mariadb-parameters" { name = "mariadb-parameters" family = "mariadb 10.1" description = "MariaDB parameter group" parameter { name = "max_allowed_packet" value = "16777216" } } -
Subnet Group 생성 예시
resource "aws_db_subnet_group" "mariadb-subnet" { name = "mariadb-subnet" description = "RDS subnet group" subnet_ids = ["${aws_subnet.main-private-1.id}","${aws_subnet.main-private-2.id}"] }mariadb-subnetgroup명으로main-private-1.id와main-priavate-2.id여러 서브넷을 지정- RDS가 개인 서브넷에 배치되도록 지정해서 RDS가 시작할 때 선호하는 서브넷을 선택할 수 있다.
- HA를 활성화하게되면 두 서브넷 모두에 인스턴스가 생성된다.
-
Security Group 생성 예시
resource "aws_security_group" "allow-mariadb" {
	vpc_id = "${aws_vpc.main.id}"
    name = "allow-mariadb"
    description = "allow-mariadb"
    ingress {
    	form_port =3306
        to_port = 3306
        protocol = "tcp"
        security_groups = ["${aws_security_group.example.id}"]
    }
    egress {
    	form_port = 0
        to_port = 0
        protocol = "-1"
        cidr_blocks = ["0.0.0.0/0"]
        self = true
    }
    tags {
    	Name = "allow-mariadb"
    }
}- ingress 규칙에 다른 security_groups 지정도 가능하며 IP주소로 관리가 어렵기 때문에 선호되는 관리방식이다.
- Auto-scaling 등으로 인스턴스 IP주소가 쉽게 달라질 수 있는데 IP주소 상관없이 해당 보안 그룹을 할당받은 인스턴스의 통신을 자동으로 허용
- APP 간 API 통신 시에도 관련 security_group 이 할당되어 있는 인스턴스는 허용되도록 신뢰구조를 만들 수 있다.
- RDS Resource
resource "aws_db_instance" "mariadb" {
	allocated_storage = 100
    engine	= "mariadb"
    engine_version	= "10.1.14"
    instance_class	= "db.t2.small"
    identifier	= "mariadb"
    name	= "mariadb"
    username	= "root"
    password	= "password"
    db_subnet_group_name	= "${aws_db_Subnet_group.mariadb-subnet.name}"
    parameter_group_name	= "mariadb-parameters"
    multi_az	= "false"
    vpc_security_group_ids	= ["${aws_security_group.allow-mariadb.id}"]
    storage_type	= "gp2"
    backup_rentention_period	= 30
    availablility_zone	= "${aws_subnet.main-private-1.availiability_zone}"
    tags {
    	Name = "mariadb-instance"
    }
}allowcated_storage: 용량이 성능과 연관되어있어서 100 이상할당하는데 aws 에서 제공하는 storage typegp3또는io1,io2에서 용량과 성능을 구분해서 설정하라 수 있다.- GiB당 3 IOPS
backup_retention_period: 백업을 언제까지 할지 정의
Demo : RDS
rds.tf
resource "aws_db_subnet_group" "mariadb-subnet" {
  name        = "mariadb-subnet"
  description = "RDS subnet group"
  subnet_ids  = [aws_subnet.main-private-1.id, aws_subnet.main-private-2.id]
}

resource "aws_db_parameter_group" "mariadb-parameters" {
  name        = "mariadb-parameters"
  family      = "mariadb10.4"
  description = "MariaDB parameter group"

  parameter {
    name  = "max_allowed_packet"
    value = "16777216"
  }
}

resource "aws_db_instance" "mariadb" {
  allocated_storage       = 100 # 100 GB of storage, gives us more IOPS than a lower number
  engine                  = "mariadb"
  engine_version          = "10.4"
  instance_class          = "db.t2.small" # use micro if you want to use the free tier
  identifier              = "mariadb"
  db_name                 = "mariadb"
  username                = "root"           # username
  password                = var.RDS_PASSWORD # password
  db_subnet_group_name    = aws_db_subnet_group.mariadb-subnet.name
  parameter_group_name    = aws_db_parameter_group.mariadb-parameters.name
  multi_az                = "false" # set to true to have high availability: 2 instances synchronized with each other
  vpc_security_group_ids  = [aws_security_group.allow-mariadb.id]
  storage_type            = "gp2"
  backup_retention_period = 30                                          # how long you’re going to keep your backups
  availability_zone       = aws_subnet.main-private-1.availability_zone # prefered AZ
  skip_final_snapshot     = true                                        # skip final snapshot when doing terraform destroy
  tags = {
    Name = "mariadb-instance"
  }
}aws_db_instance에서aws_db_subnet_group,aws_db_parameter_group두개의 리소스를 참조하고 있다.- password 변수에
var.RDS_PASSWORD값을 지정해놓으면 terraform apply -var 옵션으로 인스턴스 생성할 때 패스워드 값을 같이 전달할 수 있다.
나에게는 aws rds생성 권한이 없어서 추후 IAM 추가 후 재진행하도록한다.
5.13. IAM (Identity & Access Management)
IAM은 AWS리소스 접근제어를 위해 권한설정 서비스이고 Groups, Users, Roles을 생성할 수 있다.
사용자는 groups을 가질수있고 MFA를 이용해 계정 로그인을 할 수 있으며 access key 또는 secret key를 사용할 수 있다.
- roles : 임시 access 권한 할당용도로 인스턴스에서 사용자나 서비스는 접근 자격 증명을 얻을 수 있다.
5.14. Autoscaling
워크로드가 가변적인경우에서 트래픽 피크치 도달 시 자동으로 VM 개수를 확장시켜주는 기능, 스케일 업은 비싸기도하고 효율성을 봤을 때 아웃이 좋음, 사용방법은 특정 인스턴스를 launch configuration하고(AMI ID, Security group, etc) Autoscaling group(최소, 최대 인스턴스, 헬스체크)을 지정한다. 그러면 Autoscaling 정책을 설정할 수 있는데 트리거가될 수 있는 thresghold를 설정할 수 있고(CloudWatch Alarm) 예를들어 평균 CPU 사용량이 20%이상이면 CloudWatch Alarm 트리거가되서 인스턴스 +1 증가시키거나 CPU 5%미만으로되면 -1 원복시킬 수 있다.
launch configuration, autoscaling_group
resource "aws_launch_configuration" "example-launchconfig" {
	name_prefix	=	"example-launchconfig"
    image_id	=	"${lookup(var.AMIS, var.AWS_REGION)}"
    instance_type	=	"t2.micro"
    key_name	=	"${aws_key_pair.mykeypair.key_name}"
    security_groups	=	["${aws_security_group.allow-ssh.id}"]
}

resource "aws_autoscaling_group" "example-autoscaling" {
	name	=	"example-auotoscaling"
    vpc_zone_identifier	=	["${aws_subnet.main-public-1.id}", "${aws_subnet.main-public-2.id}"]
    launch_configuration	=	"${aws_launch_configuration.example-launchconfig.name}"
    min_size	=	1
    max_size	=	2
    health_check_grace_period	=	300
    health_check_type	=	"EC2"
    force_delete	=	true

    tag {
    	key	=	"Name"
        value	=	"ec2 instance"
        propagate_at_launch	=	true
    }
}force_delete: 오토스케일링그룹에서 빠지면 인스턴스 자동삭제
autoscaling_policy, CloudWatch
정책이 트리거되면 autoscaling 시작되며 CloudWatch 알람으로 정책이 실행된다.
resource "aws_autoscaling_policy" "example-cpu-policy" {
	name	=	"example-cpu-policy"
    autoscaling_group_name	=	"${aws_autoscaling_group.example-autoscaling.name}"
    adjustment_type	=	"ChangeinCapacity"
    scaling_adjustment	=	"1"
    cooldown	=	"300"
    policy_type	=	"SimpleScaling"
}cooldown: 재동작 대기시간으로 스케일링 후 5분 동안은 추가 스케일링하지않음policy_type: SimepleScaling은 알람이 발생하면 정해진 수치만큼 즉시 조정한다는 의미
resource "aws_cloudwatch_metric_alarm" "example-cpu-alarm" {
	alarm_name	=	"example-cpu-alarm"
    alarm_description	=	"example-cpu-alarm"
    comparison_operator	=	"GreaterThanOrEqualToThreshold"
    evaluation_periods	=	"2"
    metric_name	=	"CPUUtilization"
    namespace	=	"AWS/EC2"
    period	=	"120"
    statistic	=	"Average"
    threshold	=	"30"

    dimensions = {
    	"AutoScalingGroupName" = "${aws_autoscaling_group.example-autoscaling.name}"
    }

    actions_enabled = true
    alarm_actions = ["${aws_autoscaling_policy.example-cpu-policy.arn}"]
}evaluation_periods: 위 조건이 연속된 2번의 주기동안 조건이 맞으면 autoscaling- 서버들의 평균 CPU가 2분 동안 30%를 넘으면 서버를 늘리기위한 알람정책
5.14. Load Balancer
AWS Elastic Load Blanacer(ELB)는 트래픽을 multiple EC2인스턴스 대상으로 자동 분배하며 autoscaling이 발생하면 해당 인스턴스는 ELB 대상으로 자동 추가되고 인스턴스 H/C로 항상 가용상태를 확인한다.
ELB는 SSL terminator로 사용할 수 있어서 EC2인스턴스에게 SSL Offload해줄수있다.
AWS는 무료 SSL인증서를 제공해주기 때문에 설치해서 사용할 수 있다.
하나의 Region 안에서 Multiple AZ에 걸쳐 있는 EC2에게 트래픽 분산할 수 있다.
resource "aws_elb" "my-elb" {
	name = "my-elb"
    subnetes = ["${aws_dubnet.main-public-1.id}", "${aws_subnet.main-public-2.id}"]
	security_groups	=	["${aws_security_group.elb-securitygroup.id}"]
    listner {
    	instance_port	=	80
        ...
    }
    health_check {
    	healthy_threshold = 2
        unhealthy_threshold = 2
        ...
    }
    instances = ["${aws_instance.example-instance.id}"]
    cross_zone_load_balancing = true
}- ELB autoscaling group에 넣으려면 instances를 지정
cross_zone_load_balancing: AZ간 EC2 LB할지 여부connection_draining_timeout: 오토스케일링된 EC2를 수동삭제할때 이미 연결된 커넥션 처리를 위해 Graceful하게 삭제하기위한 지정값
resource "aws_launch_configuration" "example-launchconfig" {
	...
}
resource "aws_autoscaling_group" "example-autoscaling" {
	name	=	"example-autoscaling"
    ...
    health_check_type	=	"ELB"
    load_balancers	=	["${aws_elb.my-elb.name}"]
}- ELB에 autoscalinggroup에 포함시키려면
load_balancers와health_check_type을 변경해주면 된다. - 그러면 오토스케일링이 자체적으로 H/C를 수행하지 않고 ELB H/C기반으로 오토스케일링한다.
5.16. Elastic Beanstalk
- AWS PaaS 솔루션이며 infra를 유지할필요없이 APP을 실행할 수 있는 플랫폼이다. 즉 APP src코드만 올리면 서버인프라 구축부터 배포까지 다 알아서 해주는 서비스이다.
- 또한 LB와 Autocaling Group을 이용해 Application scaling을 다룰수있다. 또 다른 PaaS솔루션 중 Heroku와 유사하다.
- PHP,Java,Node.js,Python,Docker, Go 등 다양하게 언어를 지원한다.
- Elastic Beanstalk환경을 배포하면 Endpoint로 사용할 수 있는 CNAME(Hostname)을 얻게되며 Route53을 사용해서 도메인을 지정해줄 수 있다.
- 이후 EB 명령어를 통해 App을 배포할 수 있다.
- Elastic beanstalk은 정말 개발자가 꾸는 꿈만같은 기능이지만, EC2가 아무리빨라도 컨테이너 배포속도를 따라잡지는 못하고 커스터마이징의 한계 등.. 그리고 이를 대안 가능한 더 좋은 서비스들이 많기 때문. 요즘은 AWS App Runner, Lambda 많이 사용한다고 함