프레임워크로 전반적이 웹 개발을 한다
JavaScript는 무겁고 느리기 때문에 프론트단에서만 사용했는데 이를 해결하고자 구글에서V8엔진을 개발을 하여JavaScript의 속도 향상을 크게 늘렸다.Chrome에서 빠르게 쓰기위해 개발 됐지만 너무 좋은 나머지 백엔드쪽에서도 사용 할 수 있게 한 것이Node.js이다.JavaScript를 백엔드 쪽에서 쓰면 좋은 이유
JavaScript와Java는 언어 종류가 다르다. 하지만 동일한 언어로 가면 호환이 좋다.- 언어를 하나만 배워도 풀스택이 가능하다
- 🤦♀️프론트 개발자들을 풀스택으로 만들 수 있다.
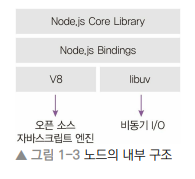
📖노드 시작하기
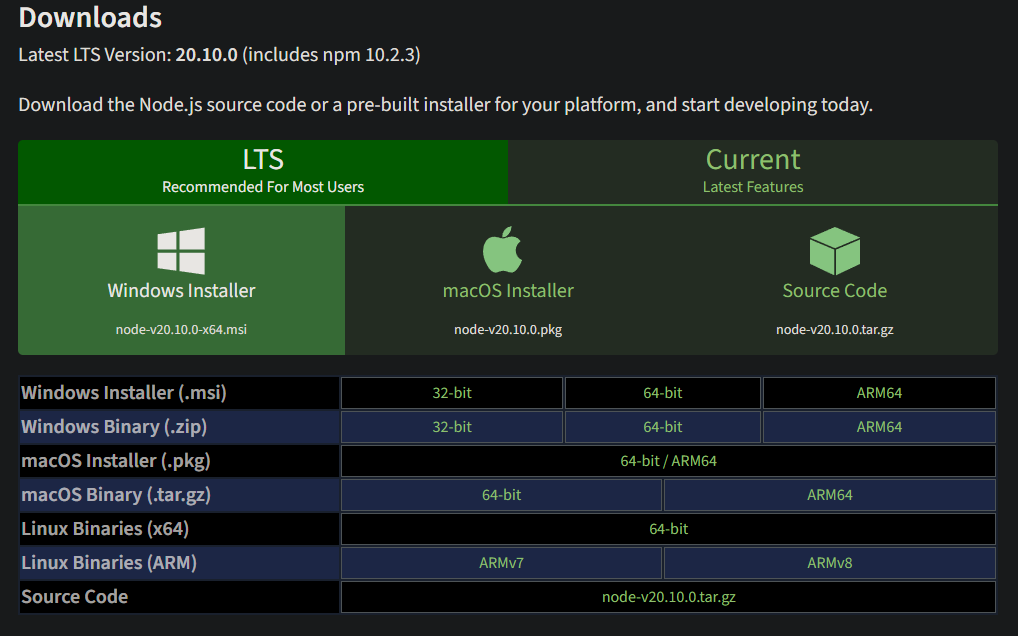
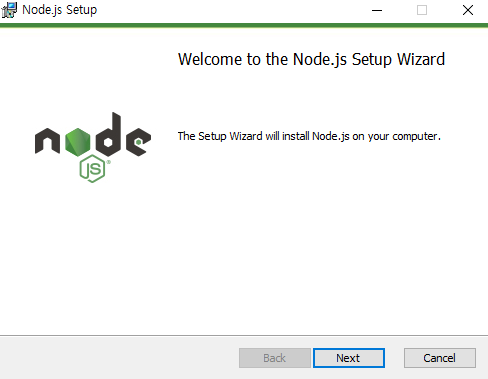
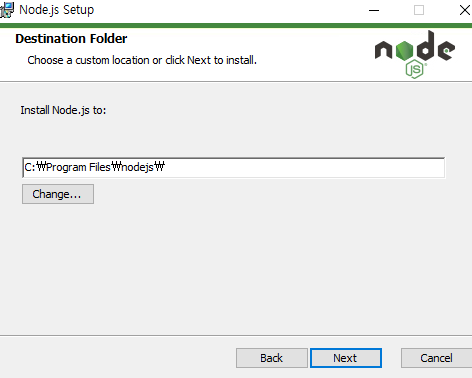
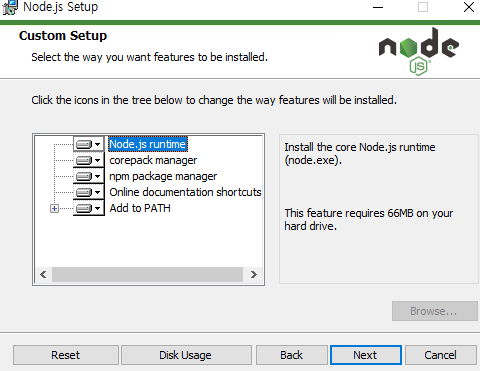
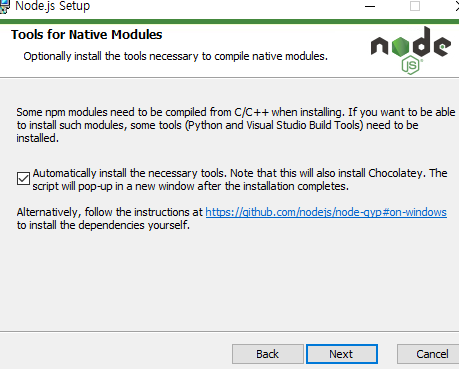
👉 이거 체크 말곤 따로 건드릴 건 없다
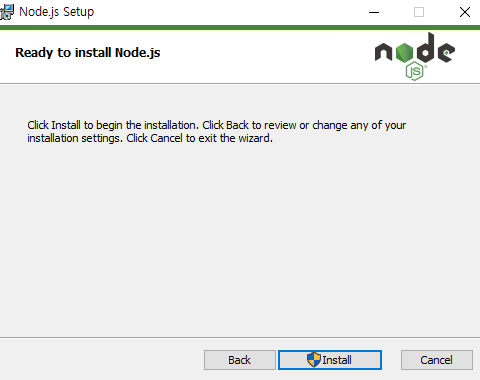
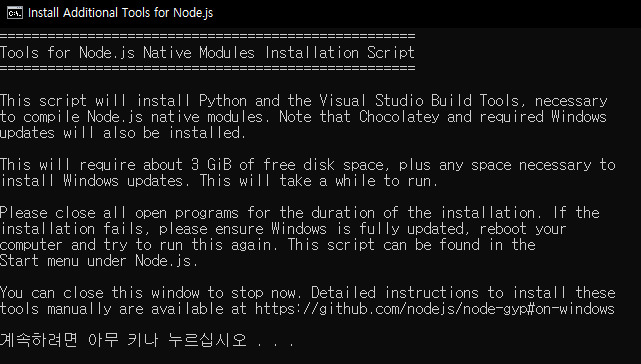
👉 Power Shell 나오면 "예" 누르고 설치.
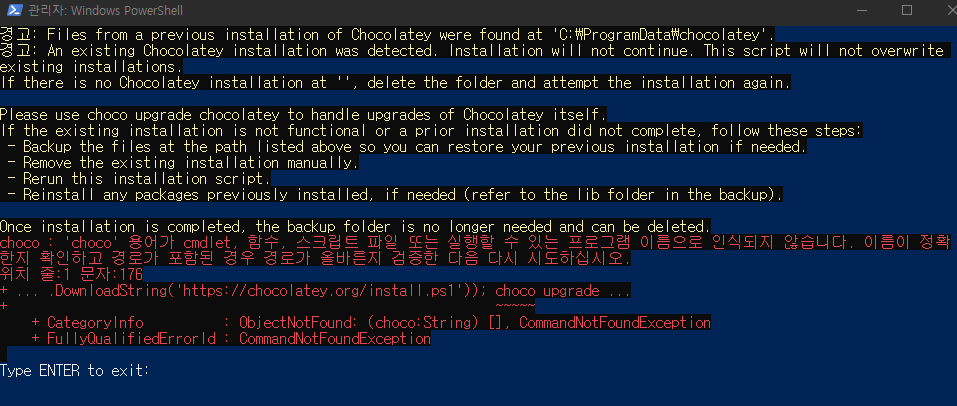
👉 에러는 신경쓰지 말 것 이미 깔려있어서 뜨는 에러. 처음 설치하면 에러 없이 설치된다. 시간이 좀 걸림

cmd

Git Bash
👉 node 입력, 버전나오고 >으로 변경 되면 성공
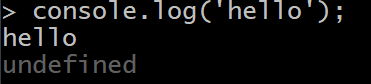
👉 잘 되나 테스트 하고 종료(Crtl + C * 2)
📌이벤트 기반
이벤트 기반(event-driven)이란 이벤트가 발생할 때 미리 지정해둔 작업을 수 행하는 방식을 의미
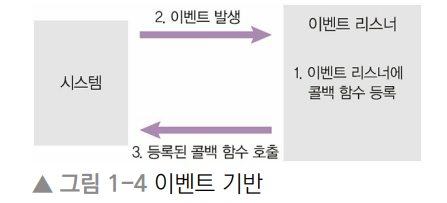
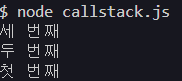
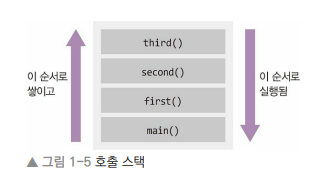
📍이벤트 기반 예제 1
👉 폴더 만들고
visual Studio Code실행하여 폴더 열기

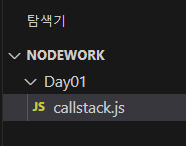
function first() {
    second();
    console.log('첫 번째');
}
function second() {
    third();
    console.log('두 번째');
}
    function third() {
    console.log('세 번째');
}
first();
Crtl + ` 혹은
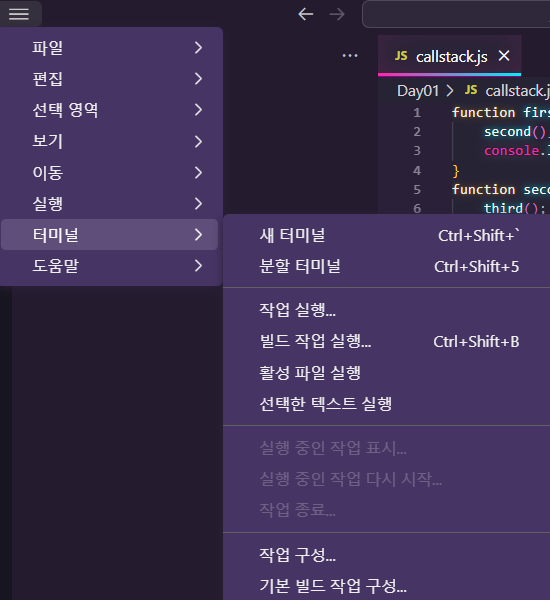
로 터미널 창 실행 👉 dir 입력 후 폴더 확인하고 cd [폴더명] 으로 이동 후 node [js파일]로 실행



 `
`
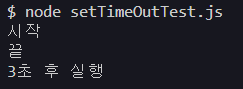
📍이벤트 기반 예제 2
function run(){
    console.log('3초 후 실행');
}

console.log('시작');

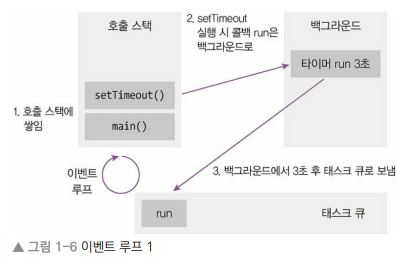
setTimeout(run, 3000);

console.log('끝');
👉 시작, 끝은 바로 나오고 3초 후 실행은 3초 후에 실행 된다.
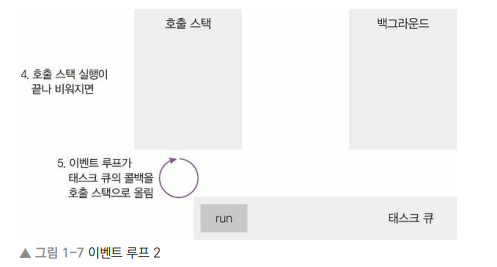
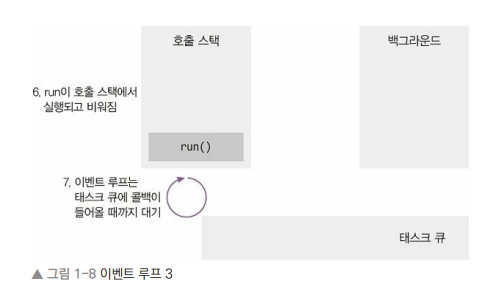
📌블로킹, ⚡논 블로킹 I/O⚡
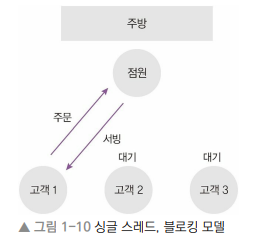
블로킹은 전 작업이 끝나야 다음 작업을 실행해 처리 속도가 오래 걸리지만 정확하다는 장점이 있다.
논 블로킹은 정확하지 않을 수 있지만 처리속도가 빠른 장점이 있다.
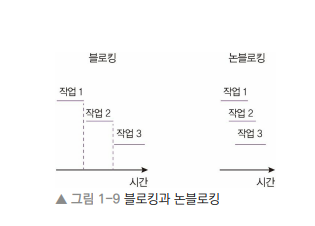
📍블로킹 예제
function longRunningTask(){
    console.log('작업 끝');
}

console.log('시작');

longRunningTask();

console.log('다음 작업');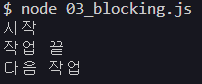
📍논 블로킹 예제
function longRunningTask(){
    console.log('작업 끝');
}

console.log('시작');

setTimeout(longRunningTask, 0);

console.log('다음 작업');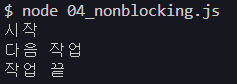
👉 setTimeout은 태스크 큐로 가기 때문에 그 사이에 '다음 작업'이 먼저 동작
📌싱글 스레드
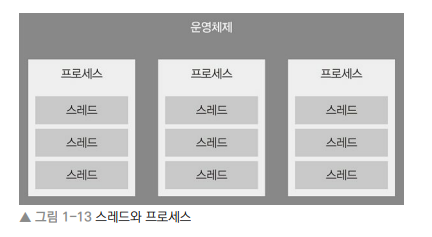
프로세스: 운영체제에서 할당하는 작업의 단위로 노드나 인터넷 브라우저 같은 프로그램은 개별적인 프로세스이다. 프로세스 간에 메모리 등의 자원을 공유하지 않는다스레드: 프로세스 내에서 실행되는 흐름의 단위로 하나의 프로세스는 스레드를 여러 개 가질 수 있다. 스레드들은 부모 프로세스의 자원을 공유한다. 즉, 같은 메모리에 접근할 수 있다.
📍싱글 스레드 블로킹
📍⚡싱글 스레드 논 블로킹⚡
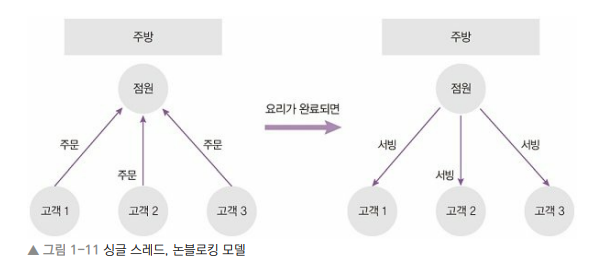
👉 Node.js 의 기본적인 방식
📍멀티 스레드 블로킹
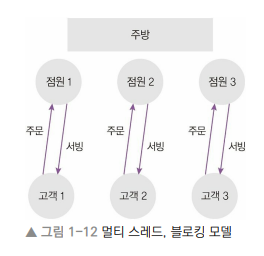
📍멀티 스레딩과 멀티 프로세싱 비교
| 멀티 스레딩 | 멀티 프로세싱 | |
|---|---|---|
| 사용 환경 | 하나의 프로세스 안에서 여러 개의 스레드 사용 | 여러 개의 프로세스 사용 |
| 적합한 시나리오 | CPU 작업이 많을 때 사용 | I/O 요청이 많을 때 사용 |
| 프로그래밍 난이도 | 프로그래밍이 어려움 | 비교적 쉬움 |
📌서버로서의 노드
노드 서버I/O가 많은 작업에 적합하다. 노드는libuv(비동기 I/O)라이브러리를 사용하여I/O작업을 논블로킹 방식으로 처리해준다. 따라서 스레드 하나가 많은 수의I/O를 혼자서도 감당할 수 있지만 CPU 부하가 큰 작업에는 적합하지 않다싱글 스레드여서 멀티 스레드 방식보다는 컴퓨터 자원을 적게 사용하는 장점이 있지만, CPU 코어를 하나밖에 사용하지 못하는 단점도 있다
결제시스템 같은 경우 노드로 개발하면 좋다
장점 단점 멀티 스레드 방식에 비해 컴퓨터 자원을 적게 사용함 싱글 스레드로 CPU 코어를 하나만 사용함 I/O 작업이 많은 서버로 적합 CPU 작업이 많은 서버로는 부적합 멀티 스레드 방식보다 쉬움 하나뿐인 스레드가 멈추지 않도록 관리해야 함 웹 서버가 내장되어 있음 서버 규모가 커졌을 때 서버를 관리하기 어려움 자바스크립트를 사용함 어중간한 성능 JSON 형식과 호환하기 쉬움
📌서버 외의 노드
사용 범위가 점점 늘어나 웹, 모바일, 데스크톱 애플리케이션 개발에도 사용
노드 기반으로 돌아가는 대표적인 웹 프레임워크로는
Angular과React,Vue등이 있다.
📖알아둬야 할 자바스크립트
📌ES2015+
JavaScript문법. 대충 막 써도 되는 경우도 있다. 근데 에러는 안알려줌 ㅋ
📍const, let
const: 상수, 변경 불가let: 함수, 조건문, 반목문 안에서 사용var: 전부
📍템플릿 문자열
큰따옴표나 작은따옴표로 감싸는 기존 문자열과는 다르게 백틱( ` )으로 감쌈.
특이한 점은 문자열 안에 변수를 넣을 수 있다`
const num3 = 1;
const num4 = 2;
const result2 = 3;

var string1 = num3 + ' 더하기 ' + num4 + '는 \'' + result2 + '\'';
⚡const string2 = `${num3} 더하기 ${num4}는 '${result2}'`;⚡

console.log(string1);
console.log(string2);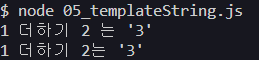
📍객체 리터럴
바로 객체화 해서 사용
예전 객체 리터럴
var sayNode = function(){ // var가 함수도 받을 수 있다. 익명 함수
    console.log('Node');
}

var es = 'ES';

// 통째로 객체 리터럴
var oldObject = {
    // sayJs 함수, 객체 안에 함수가 있다
    sayJs: function(){
        console.log('JS');
    },
    // 객체안의 sayNode(변수명): var sayNode
    sayNode: sayNode
};

sayNode(); // Node
// ES6 에 값이 Fantastic으로 들어감
oldObject[es + 6] = 'Fantastic'; // ES6: 'Fantastic'
oldObject.sayNode(); // Node
oldObject.sayJs(); // JS
console.log(oldObject.ES6); // Fantastic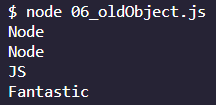
최근 객체 리터럴
var sayNode = function(){
    console.log('Node');
};

var es = 'ES';

const newObject = {
    sayJS(){
        console.log('JS');
    },

    sayNode,

    [es + 6]: 'Fantastic'
};

newObject.sayNode(); // Node
newObject.sayJS(); // JS
console.log(newObject.ES6); // Fantastic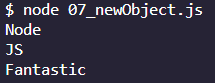
📌화살표 함수
function선언 대신=>기호로
함수를 선언하고 변수에 대입하면 나중에 재사용 가능.
📍예제 1
function add1(x, y){
    return x + y;
}

const add2 = (x, y) => {
    return x + y;
}
const add3 = (x, y) => x + y;
const add4 = (x, y) => (x + y);

function not1(x){
    return !x;
}
const not2 = x => !x;

console.log(add1(5, 7));
console.log('--------');
console.log(add2(5, 7));
console.log('--------');
console.log(add3(5, 7));
console.log('--------');
console.log(add4(5, 7));
console.log('--------');
console.log(not1(false));
console.log('--------');
console.log(not2(false));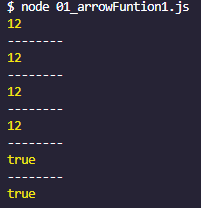
📍예제 2
var relationship1 = {
    name: 'zero',
    friends: ['nero', 'hero', 'xero'],
    logFriends: function(){
        var that = this; // realtionship1을 가리키는 this를 that에 저장
        this.friends.forEach(function(friend) {
            console.log(that.name, friend);
        });
    },
};
relationship1.logFriends();

console.log('----------------');

const relationship2 = {
    name: 'zero',
    friends: ['nero', 'hero', 'xero', 'hello'],
    logFriends(){
        this.friends.forEach(friend => {
            console.log(this.name, friend);
        });
    },
};
relationship2.logFriends();
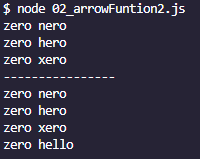
👉 화살표 함수는 무조건 부모의 this를 물려받는다
❌📌⚡구조 분해 할당⚡
객체와 배열로부터 속성이나 요소를 쉽게 꺼낼 수 있다.
코드를 입력하세요👉 candyMachine2는 솔직히 왜 이렇게 쓰는지 모르겠지만 자바와 유사한 candyMachine만 알고 있자. 한 줄 바꿈으로 많이 쓰는 유형
📌클래스
📍이전 타입
// 부모 클래스 Human
var Human = function(type) { // 생성자
    this.type = type || 'human';
};

Human.isHuman = function(human){ // static 메소드
    // 부모와 자식 참조 자료형 변환
    return human instanceof Human;
};

Human.prototype.breath = function(){ // 메소드
    console.log('h-a-a-a-m');
};

// class Zero extends Human
var Zero = function(type, firstName, lastName){ // 생성자
    Human.apply(this, arguments); // Human 상속
    this.firstName = firstName;
    this.lastName = lastName;
};

Zero.prototype = Object.create(Human.prototype); // 상속
Zero.prototype.constructor = Zero;

Zero.prototype.sayName = function() { // 메소드
    console.log(this.firstName + ' ' +  this.lastName);
};

var oldZero = new Zero('human', 'Zero', 'Cho');

console.log(Human.isHuman(oldZero));
oldZero.sayName();
oldZero.breath();
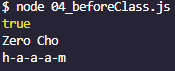
📍현재
class Human{
    constructor(type = 'human'){
        this.type = type;
    }

    static isHuman(human){
        return human instanceof Human;
    }

    breathe(){
        console.log('h-a-a-a-m');
    }
}

class Zero extends Human {
    constructor(type, firstName, lastName) {
        super(type); // 부모 생성자
        this.firstName = firstName;
        this.lastName = lastName;
    }

    sayName(){
        super.breathe();
        console.log(`${this.firstName} ${this.lastName}`);
    }
}

const newZero = new Zero('human', 'Zero', 'Cho');
console.log(Human.isHuman(newZero));
newZero.sayName();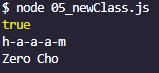
👉 우리가 잘 알고 있는 자바의 형태
📌프로미스
Javascript,Node
👉 비동기 프로그래밍, 이벤트 주도 방식 👉콜백 함수자주 사용
👉ES2015부터는Javascript와Node의API들이콜백대신프로미스(Promise)기반으로 재구성
👉콜백 헬(callback hell)을 극복자바의 try catch와 유사하다
📍예제 1, 기본 형태
const condition = true; // true면 resolve, false면 reject
const promise = new Promise((resolve, reject) => {
    if(condition){
        resolve('성공');
    }
    else{
        reject('실패');
    }
});

// 다른 코드가 들어갈 수 있음
promise
    .then((message) => {
        console.log(message); // 성공(resolve)한 경우 실행
    })
    .catch((error) => {
        console.error(error); // 실패(reject)한 경우 실행
    })
    .finally(() => {
        console.log('무조건 실행')
    });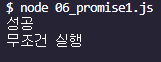
👉 condition = true;
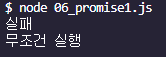
👉 condition = false;
📍예제 2, 콜백 헬 극복
콜백 헬
function findAndSaveUser(Users) {
    Users.findOne({}, (err, user) => { // 첫 번째 콜백
        if (err) {
            return console.error(err);
        }
        user.name = 'zero';
        user.save((err) => { // 두 번째 콜백
            if (err) {
                return console.error(err);
            }
            Users.findOne({ gender: 'm' }, (err, user) => { // 세 번째 콜백
                // 생략
            });
        });
    });
}
👉 더 길어진다면 콜백 헬에 빠질 수 있다
예제 2, 콜백 헬 극복
function findAndSaveUser(Users) {
    Users.findOne({})
        .then((user) => { // 첫 번째 콜백
            user.name = 'zero';
            return user.save();
        })
        .then((user) => { // 두 번째 콜백
            return Users.findOne({ gender: 'm' });
        })
        .then((user) => { // 세 번째 콜백
            // 생략
        })
        .catch(err => {
            console.error(err);
        });
}
👉 try catch와는 다르게 then을 여러 번 쓸 수 있다. then을 순차대로 실행하다가 문제가 생기면 catch로 빠짐
📍예제 3, 프로미스 여러 개 받기
const promise1 = Promise.resolve('성공1');
const promise2 = Promise.resolve('성공2');

// Promise 중 하나라도 실패하면 무조건 catch로 넘어감
Promise.all([promise1, promise2]) // 여러개의 Promise 받기
    .then((result) => {
        console.log('성공');
        console.log(result); // ['성공1','성공2']
    })
    .catch((error) => {
        console.log('실패')
        console.error(error);
    });
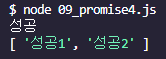
👉 resolve

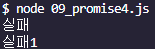
👉 reject
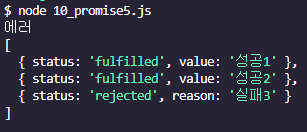
📍예제 4, 프로미스 상세 출력
const promise1 = Promise.resolve('성공1');
const promise2 = Promise.resolve('성공2');
const promise3 = Promise.reject('실패3');

Promise.allSettled([promise1, promise2, promise3])
.then((result) => {
    console.log(result);
})
.catch((error) => {
    console.error(error);
});

// reject는 무조건 catch를 달아야 한다
Promise.reject('에러').catch(() => {
    console.log('에러');
});
📌async/await
Promise는then catch를 사용하여 소스가 길어지는 경우도 있는데 그래서 사용하는게async/await결국 async/await 사용한다는 소리
📍예제 1
function findAndSaveUser(Users) {
    Users.findOne({})
        .then((user) => { // 첫 번째 콜백
            user.name = 'zero';
            return user.save();
        })
        .then((user) => { // 두 번째 콜백
            return Users.findOne({ gender: 'm' });
        })
        .then((user) => { // 세 번째 콜백
            // 생략
        })
        .catch(err => {
            console.error(err);
        });
}
를 async/await 사용하여 바꿔보자
async function findAndSaveUser(Users) { // async
    // try catch가 있긴하다.
    try {
        let user = await Users.findOne({}); // await
        user.name = 'zero';
        user = await user.save(); // await
        user = await Users.findOne({ gender: 'Man' }); // await
        // 생략
    } catch (error) {
        console.error(error);
    }
}

// 화살표 함수 사용
const findAndSaveUser = async (Users) => {
    try {
        let user = await Users.findOne({});
        user.name = 'zero';
        user = await user.save();
        user = await Users.findOne({ gender: 'm' });
        // 생략
    } catch (error) {
        console.error(error);
    }
};
이번에는 출력되는 것 까지 확인해보자
const promise1 = Promise.resolve('성공1');
const promise2 = Promise.resolve('성공2');
(async () => {
    for await (promise of [promise1, promise2]) {
        console.log(promise);
    }
})();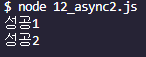
👉 resolve

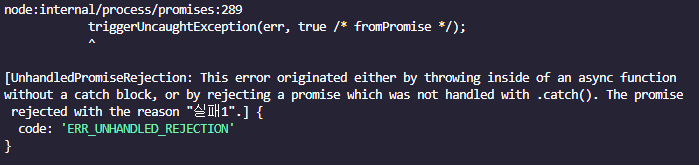
👉 catch 만들라는 소리
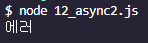
const promise1 = Promise.reject('실패1');
const promise2 = Promise.resolve('성공2');
(async () => {
    for await (promise of [promise1, promise2]) {
        console.log(promise);
    }
})()
.catch(() => {
    console.log('에러');
});
📌Map/Set
ES2015에 추가된 새로운 자료구조.
Map은 객체,Set은 배열과 유사
📍Map 예제
const m = new Map(); // Map 객체 생성

// Map에 값 넣기
m.set('a', 'b'); // set(키, 값)으로 Map에 속성 추가
m.set(3, 'c'); // 문자열이 아닌 값을 키로 사용 가능
const d = {};
m.set(d, 'e'); // 객체도 가능

// Map에서 Key를 이용해 값 출력
console.log(m.get(d)); // e
console.log(m.size); // 3

// Map에서 Key, Value 값 추출 후 출력
for(const[k, v] of m){ // 반복문 사용 가능
    console.log(k, v); // 'a', 'b', 3, 'c', {}, 'e'
} // 속성 간의 순서 보장

// Map에서 Key, Value 값 추출 후 출력
m.forEach((v, k) => { // forEach 사용 가능
    console.log(k, v); // 결과는 동일
});

// Map에서 d키를 가진 데이터가 있는지 확인
console.log(m.has(d)); // true

// Map에서 d키를 가진 데이터 삭제
m.delete(d); // delete(KEY)로 속성 삭제
m.clear(); // clear()로 전부 삭제

console.log(m.size);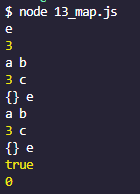
📍Set 예제
const s = new Set();

// add 요소로 Set객체에 추가
s.add(false);
s.add(1);
s.add('1'); // 문자열
s.add(1); // 중복은 무시됨
s.add(2);

console.log(s.size); // 중복이 제거되어 4
console.log(s.has(1)); // has 요소로 요소 존재 여부 확인, true

console.log('------');

for(const a of s){
    console.log(a); // false 1 '1' 2
}

console.log('------');

s.forEach((a) => {
    console.log(a); // false 1 '1' 2
})

s.delete(2); // delete 요소로 데이터 2인 요소 제거
s.clear(); // clear()로 전부 제거

console.log('**************');

// 중복 제거
const arr = [1, 3, 2, 7, 2, 6, 3, 5];

const s1 = new Set(arr);
const result = Array.from(s1);
console.log(result);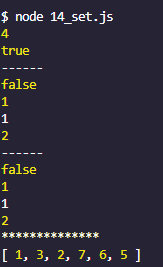
📌널 병합/옵셔널 체이닝
ES2020에서 추가된
??(널 병합) 연산자,?.(옵셔널 체이닝) 연산자널 병합 연산자는 이전에
||였으며 그 대용으로 사욯한다.falsy 값(0, '', false, NaN, null, undefined)중null과undefined만 따로 구분한다.
👉 자바의||와는 다르다옵셔널 체이닝 연산자는
null이나undefined의 속성을 조회하는 경우 에러가 발생하는 것을 막는다.
👉 자바의Optional<T>와 비슷하다
📍널 병합 예제
const a = 0;
const b = a || 3; // a가 0이면 falsy 값 그 뒤에 값이 3이 된다. b = 3
console.log(b);

console.log('-----');

const c = 0;
const d = c ?? 3; // c가 falsy값 이지만 ?? 👉 null or undefined만 적용 됨. d = 0
console.log(d);

console.log('-----');

const e = null;
const f = e ?? 3; // e가 null. f = 3
console.log(f);

console.log('-----');

const g = undefined;
const h = g ?? 3; // g가 undefined. h = 3
console.log(h);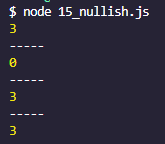
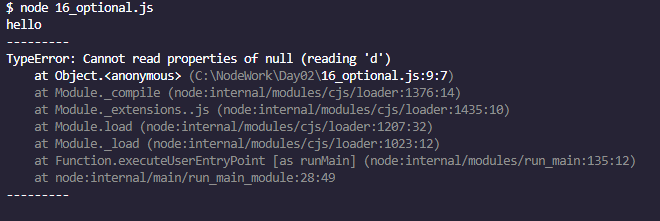
📍옵셔널 체이닝 예제
const a = {}; // {} 객체 리터럴
a.b = 'hello'; // a가 객체이므로 문제 없음
console.log(a.b);

console.log('---------');

const c = null;
try{
    c.d;
}catch (e){
    console.error(e); // NullPoint 에러 발생
}

console.log('---------');

c?.d // 옵셔널 체이닝 연산자 사용. 문제 없음. Optional<T>와 비슷하다
📌AJAX
비동기적 웹 서비스를 개발하기 위한 기법.
Node도 비동기라며? 👉 둘이 잘 맞는다
JSON을 많이 사용하며 페이지 이동 없이 서버에 요청을 보내고 응답을 받는 기술이다.보통
AJAX요청은jQuery나axios같은 라이브러리를 이용해서 보낸다. 이 책은axios위주
<!DOCTYPE html>
<html lang="en">
<head>
    <meta charset="UTF-8">
    <meta name="viewport" content="width=device-width, initial-scale=1.0">
    <title>Document</title>
    <script src = "https://unpkg.com/axios/dist/axios.min.js"></script>
<script>
    axios.get('https://www.zerocho.com/api/get')
    .then((result) => {
        console.log(result);
        console.log(result.data);
    })
    .catch((error) => {
        console.log(error);
    });

    // (async () => {
    //     try{
    //         const result = await axios.post('https://www.zerocho.com/api/post/json', {
    //             name: 'zerocho',
    //             birth: 1994
    //         });
    //         console.log(result);
    //         console.log(result.data);
    //     }catch(error){
    //         console.log(error);
    //     }
    // })();
</script>
</head>
<body>

</body>
</html>
👉 POST 요청은 막혀있어 주석. 책에선 나중에 해결한다고 함
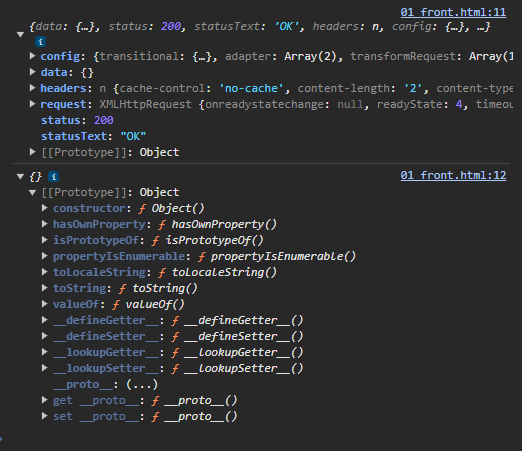
👉 잘 받아온 GET 요청
📌FormData
HTML form태그의 데이터를 동적으로 제어할 수 있는 기능. 주로AJAX와 함께 사용
📍예제 1
    <script>
        var formData = new FormData();
        formData.append('name', 'zerocho'); // 추가
        formData.append('item', 'orange');
        formData.append('item', 'melon');
        formData.has('item'); // true
        formData.has('money'); // false
        formData.get('item'); // orange
        formData.getAll('item'); // ['orange','melon']
        formData.append('test', ['hi', 'zero']);
        formData.get('test'); // hi, zero
        formData.delete('test');
        formData.get('test'); // null
        formData.set('item', 'apple');
        formData.getAll('item'); // ['apple']
    </script>
📍예제 2
<!DOCTYPE html>
<html lang="en">
<head>
    <meta charset="UTF-8">
    <meta name="viewport" content="width=device-width, initial-scale=1.0">
    <title>Document</title>
    <script src = "https://unpkg.com/axios/dist/axios.min.js"></script>
<script>
    (async () => {
        try{
            const formData = new FormData();
            formData.append('name', 'zerocho');
            formData.append('birth', 1994);
            const result = await axios.post('https://www.zerocho.com/api/post/formdata', formData);
            console.log(result);
            console.log(result.data.message);
            document.write(result.data.message);
        }catch(error){
            console.log(error);
        }
    })();
</script>
</head>
<body>

</body>
</html>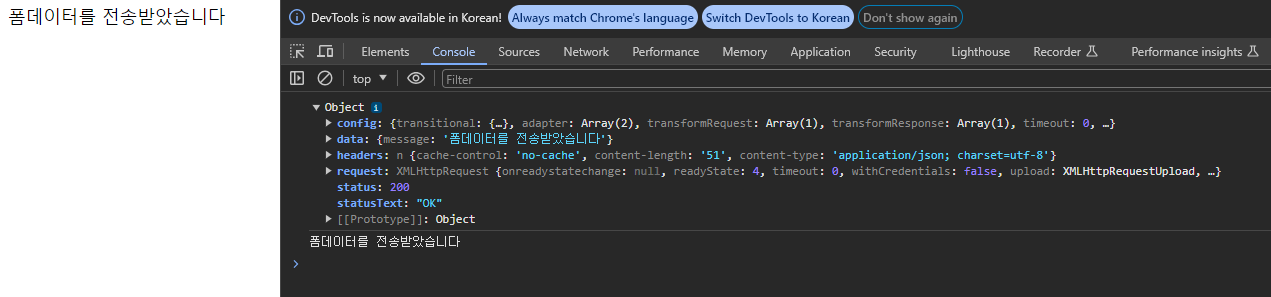
📌encodeURLComponent, decodeURLComponent
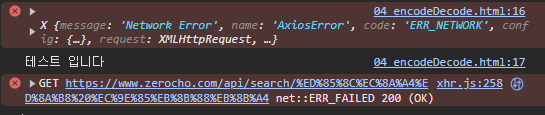
AJAX요청을 보낼 때‘http://localhost:8003/search/노드’처럼 주소에 한글이 들어가는 경우가 있다. 서버 종류에 따라 다르지만, 서버가 한글 주소를 이해하지 못하는 경우가 있는데, 이럴 때window객체의 메소드인encodeURIComponent메서드를 사용. 노드에서도 사용할 수 있다.
노드👉%EB%85%B8%EB%93%9C로 변환받는 쪽은
decodeURLComponent를 사용하면 된다.
%EB%85%B8%EB%93%9C👉노드로 변환
<!DOCTYPE html>
<html lang="en">
<head>
    <meta charset="UTF-8">
    <meta name="viewport" content="width=device-width, initial-scale=1.0">
    <title>Document</title>
    <script src = "https://unpkg.com/axios/dist/axios.min.js"></script>
    <script>
        (async () => {
            try{
                const result = await axios
                .get(`https://www.zerocho.com/api/search/${encodeURIComponent('테스트 입니다')}`);
                console.log(result);
                console.log(result.data); // {}
            }catch(error){
                console.error(error);
                console.log(decodeURIComponent('%ED%85%8C%EC%8A%A4%ED%8A%B8%20%EC%9E%85%EB%8B%88%EB%8B%A4'))
            }
        })();
    </script>
</head>
<body>

</body>
</html>
👉 %ED%85%8C%EC%8A%A4%ED%8A%B8%20%EC%9E%85%EB%8B%88%EB%8B%A4를 DECODE 하면
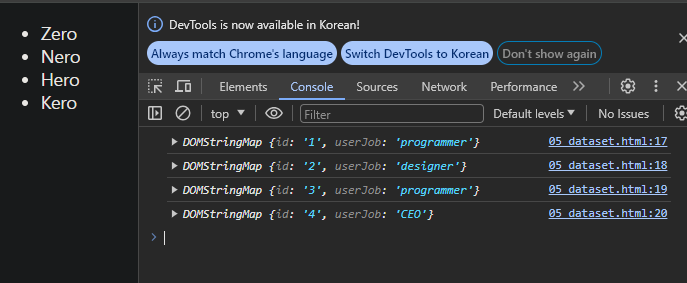
📌data attribute와 dataset
데이터를 저장하는 공식적인 방법
<!DOCTYPE html>
<html lang="en">
<head>
    <meta charset="UTF-8">
    <meta name="viewport" content="width=device-width, initial-scale=1.0">
    <title>Document</title>
</head>
<body>
    <ul>
        <!-- data- 로 시작하는 것이 data attribute-->
        <li data-id = "1" data-user-job = "programmer">Zero</li>
        <li data-id = "2" data-user-job = "designer">Nero</li>
        <li data-id = "3" data-user-job = "programmer">Hero</li>
        <li data-id = "4" data-user-job = "CEO">Kero</li>
    </ul>

    <script>
        console.log(document.querySelectorAll('li')[0].dataset);
        console.log(document.querySelectorAll('li')[1].dataset);
        console.log(document.querySelectorAll('li')[2].dataset);
        console.log(document.querySelectorAll('li')[3].dataset);
    </script>
</body>
</html>