
이거 숫자로 시작하면 거의 100개까지 갈텐데...
나중에 고치기로하고..일단 #1. 🤦🏻♀️
매 업로드 사진은 여행 때 찍었던 사진으로, 글과 무관합니다 :)
생각보다 블로깅할 시간이 없네요;;; 벌써 11:30pm...
빠르게 배운걸 정리해봅시다!!! 동료분들 화이팅!!!
🍎 jest
리액트 공부할 때 한 번 써봤던 거라 간단하게 해결하였습니다.
jest-test 폴더를 생성하고 jest설치 및 yarn을 실행합니다.
yarn global add --dev jest
yarn init -y
먼저 간단한 테스트용 함수를 만들고,,,
// main.js
const add = (a, b) => a + b;

module.exports = add;
__test__ 폴더를 생성하고, add.test.js파일을 작성합니다.
add를 받아와서 확인하는 것이죠!
const add = require('../main.js')

it("1 더하기 2 는 3이죠?", () => {
  expect(add(1, 2)).toEqual(3);
})package.json파일을 작성합니다. jest만 작성하셔도 됩니다 :)
{
"name": "jest-test",
"version": "1.0.0",
"main": "index.js",
"license": "MIT",
"scripts": {
"test": "jest --watchAll --verbose"
}
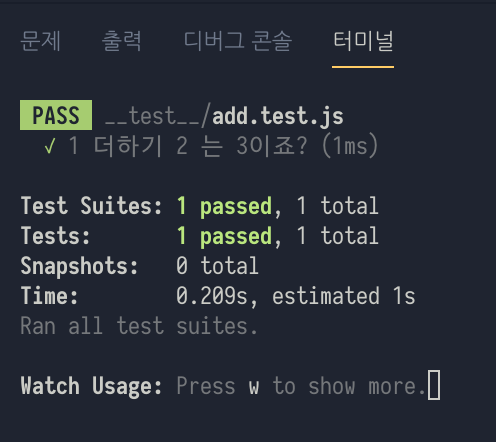
}자, 간단한 준비는 끝났습니다! yarn test!!!
저장할 때마다 새로 고침되기 때문에 매.우 간편하죠? 🥑🥑🥑
🍋 ESLint
많이들 들어봤을 ESLint이다. TS용으로 TSLint도 있습니다...!
jest와 마찬가지로 eslint-test폴더를 생성합니다.
yarn init -y
yarn global add eslint
eslint --initinit을 하면 몇가지 질문을 계속 던지는데요...?
그냥 읽어봐도 이해할 수 있으므로, 상황에 맞게 선택합니다.
airbnb 스타일이 인기가 많으므로, 선택하면 추가 라이브러리를 권장해줍니다.
{
  "name": "eslint-test",
  "version": "1.0.0",
  "main": "index.js",
  "license": "MIT",
  "devDependencies": {
    "eslint": "^5.16.0",
    "eslint-config-airbnb-base": "^13.2.0",
    "eslint-plugin-import": "^2.18.2"
  }
}
완료되면 .eslintrc파일이 생성되는데, 내용을 확인해봅시다!
{
    "env": {
        "browser": true,
        "es6": true,
    },
    "extends": [
        "airbnb-base"
    ],
    "globals": {
        "Atomics": "readonly",
        "SharedArrayBuffer": "readonly"
    },
    "parserOptions": {
        "ecmaVersion": 2018,
        "sourceType": "module"
    },
    "rules": {
    }
}main.js에 다음과 같이 이상한 코드를 작성합시다.
// main.js
function sub(a, b) {
  if (a  ) { a = 10; }
  return a - b;
}
딱봐도, 이상한 코드! 👈🏻
eslint app.js를 실행하면 다음과 같은 몇가지 에러가 표시됩니다.
1:10  error  'sub' is defined but never used              no-unused-vars
2:10  error  There should be no spaces inside this paren  space-in-parens
2:10  error  Multiple spaces found before ')'             no-multi-spaces
2:14  error  Assignment to function parameter 'a'         no-param-reassign
eslint app.js --fix 를 해주면 일정 부분은 수정해줍니다.
다음은 수정된 결과입니다!
function sub(a, b) {
  if (a) { a = 10; }
  return a - b;
}
🍑 ESLint - custom
이제 React에서 필요한 ESLint를 직접 설정해봅시다!
yarn init -y
yarn add -D eslint
먼저, yarn init으로 패키지를 생성하고, eslint를 추가합니다.
이후, .eslintrc를 생성하고, 작성합니다.
{
  "parserOptions": {
    "ecmaVersion": 2019,         // ECMA2019 적용
    "sourceType": "module",      // import ,export
    "ecmaFeatures": {
      "jsx": true,               // jsx 허용
    }
  },
  "env": {
    "browser": true,             // 웹을 다루므로
    "node": true,			    // 노드 사용
  },
  "extends": [
    "eslint:recommended",         // eslint 권장 적용
    "plugin:react/recommended"   // 추가 플러그인
  ],
  "plugins": [				   // 추가 플러그인
    "import",
    "react-hooks",
  ]
}
이제 추가로 적용한 플러그인을 따로 설치하면 됩니다.
한 줄에 안 보여서 3줄로 작성했지만, 한 줄에 주우욱 작성해도 됩니다!
yarn add -D eslint-plugin-import
yarn add -D eslint-plugin-react
yarn add -D eslint-plugin-react-hooks
첫 날은 간단하게 끝!!! 👏🏻👏🏻👏🏻