들어가며
후속편 요청이 들어왔다.
두근두근 어떻게 업데이트 되었을까
그래서 이 글에서는 새로운 LandscapistImage가 어떻게 달라졌는지를 살펴보고자 합니다.
무엇이 바뀌었나: CoilImage → LandscapistImage
라이브러리 구조의 변화
Landscapist 2.9.3에서 가장 큰 변화는 이미지 로딩 엔진 자체가 교체되었다는 점입니다.
이전 (2.8.2):
  landscapist-coil3 → CoilImage
  내부적으로 Coil3의 ImageLoader.execute()를 사용

현재 (2.9.3):
  landscapist-image → LandscapistImage
자체 이미지 로딩 엔진 (Ktor + 커스텀 디코더) 사용| 항목 | CoilImage (2.8.2) | LandscapistImage (2.9.3) |
|---|---|---|
| 이미지 로딩 | Coil3의 ImageLoader 위임 | 자체 Landscapist 엔진 |
| 네트워크 | OkHttp (Coil3 경유) | Ktor |
| 캐싱 | Coil3의 메모리/디스크 캐시 | 자체 2-tier 캐시 (LRU + WeakRef + DiskLruCache) |
| 디코딩 | Coil3 디코더 파이프라인 | 자체 ImageDecoder (프로그레시브 지원) |
단순한 래퍼에서 독립적인 이미지 로딩 라이브러리로 진화한 것입니다.
Constraints 획득 방식
이전 글에서 CoilImage가 BoxWithConstraints(내부적으로 SubcomposeLayout)를 사용으로 인해 이미지 로딩 성능에 부정적인 영향을 받았다고 했습니다.
이를 개선하여 변경된 LandscapistImage에서는 BoxWithConstraints 를 제거하고 Modifier.layout 을 이용해 Constraints를 획득하고 있습니다.
// CoilImage (2.8.2) - SubcomposeLayout 사용
BoxWithConstraints {
    val constraints = this.constraints
    // ...
}

// LandscapistImage (2.9.3) - Modifier.layout 사용
Box(
    modifier = modifier.layout { measurable, constraints ->
        if (incomingMaxWidth < 0) {
            incomingMaxWidth = if (constraints.hasBoundedWidth) constraints.maxWidth else 0
            incomingMaxHeight = if (constraints.hasBoundedHeight) constraints.maxHeight else 0
        }
        val placeable = measurable.measure(constraints)
        layout(placeable.width, placeable.height) { placeable.placeRelative(0, 0) }
    }
)LandscapistImage는 Modifier.layout을 사용하여 Layout 단계에서 직접 Constraints를 획득합니다. 이로써 SubcomposeLayout의 추가 Composition 비용이 제거되었습니다.
이전 CoilImage:
  Composition → Layout → SubComposition → Layout → Draw

현재 LandscapistImage:
  Composition → Layout (constraints 획득) → Draw
이는 AsyncImage의 Modifier.Node 기반 접근과 유사한 수준의 개선입니다.
벤치마크 결과
그렇다면 이러한 변경사항들이 성능에 어떤 영향을 주었을까요? 벤치마크를 통해 수치로 살펴보도록 하겠습니다.
사전 설정: 메모리 캐시
저번 결과 분석에서는 라이브러리의 default 설정을 그대로 사용했지만, 이번에는 설정을 추가했습니다.
왜냐하면… 설정을 안 하면 Landscapist가 메모리 캐시를 안 쓰더라구요….
| Landscaspit | AsyncImage |
|---|---|
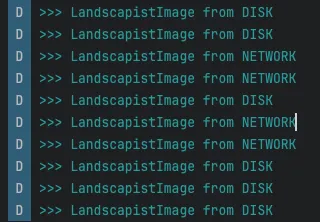 | 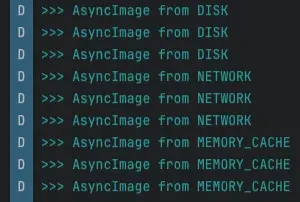 |
로그를 찍어보면 분명 MemoryCache를 거치는데,,, 왜 최종 결과는 DISK 일까요? 🤔
추후에 원인을 파악하면 업데이트 하겠습니다
똑같은 환경에서 테스트하기 위해 Coil의 메모리 캐시 설정을 가져왔습니다.
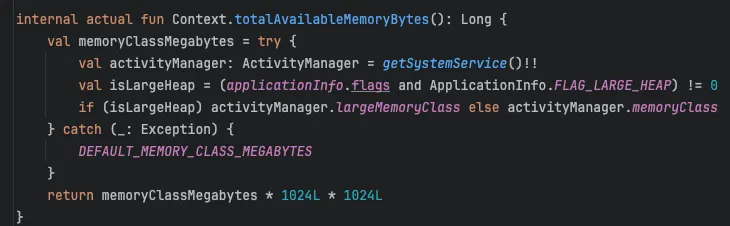
우선 Context를 이용해 메모리 크기를 가져옵니다.
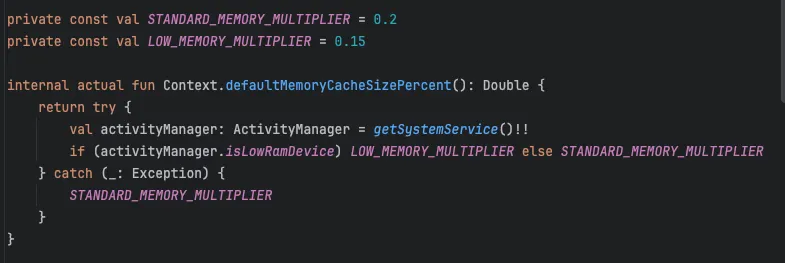
Coil3는 디바이스의 메모리 크기에서 0.2퍼센트를 사용하고 있습니다.
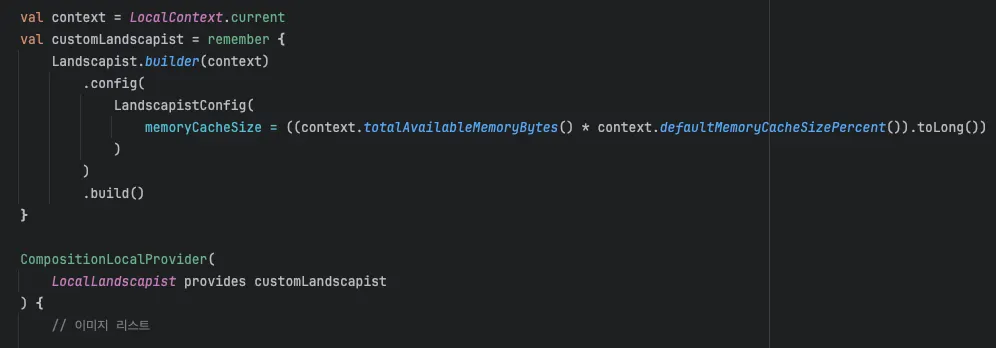
이 설정을 Landscapist에 그대로 적용합니다.
그럼 이제 벤치마크 결과를 분석해보겠습니다.
Galaxy S22+ 에서 동일한 지난 블로그 글과 동일한 Macrobenchmark 환경으로 측정했습니다.
1. 이미지 로딩 성능 (ImageLoadingSumMs)
| CompilationMode | CoilImage 2.8.2 | LandscapistImage 2.9.3 | 변화 |
|---|---|---|---|
| None | 46.7ms | 83.2ms | 78% 느려짐 |
| Partial | 30.4ms | 72.2ms | 138% 느려짐 |
| Full | 30.4ms | 64.9ms | 114% 느려짐 |
전반적으로 엄청난 수치로 로딩 성능이 느려졌습니다.
아마 새로운 자체 엔진(Ktor 기반)으로 교체한 영향으로 보입니다. 교체한지 얼마 안 되었으니 최적화의 여지가 많이 남을 것으로 예상됩니다.
2. 프레임 렌더링 성능 (frameDurationCpuMs)
CoilImage 대비 프레임 변화
| CompilationMode | CoilImage 2.8.2 P50 | LandscapistImage 2.9.3 P50 | 변화 |
|---|---|---|---|
| None | 7.9ms | 5.0ms | 37% 개선 |
| Partial | 6.4ms | 4.7ms | 27% 개선 |
| Full | 5.0ms | 4.8ms | 4% 개선 |
이미지 로딩 성능은 전반적으로 느려졌지만, 프레임 렌더링 성능이 눈에 띄게 개선되었습니다.
BoxWithConstraints 제거의 효과가 명확합니다. 특히 JIT만 사용하는 None 모드에서 37% 개선은 SubcomposeLayout 제거의 직접적인 영향입니다.
프레임 성능 비교: LandscapistImage & AsyncImage
| CompilationMode | LandscapistImage P50 | AsyncImage P50 | LandscapistImage P99 | AsyncImage P99 |
|---|---|---|---|---|
| None | 5.0ms | 4.7ms | 15.2ms | 14.8ms |
| Partial | 4.7ms | 4.6ms | 13.8ms | 11.6ms |
| Full | 4.8ms | 4.8ms | 15.0ms | 13.1ms |
frameDurationCpuMs P50 (낮을수록 좋음)

None 모드:
  LandscapistImage: █████ 5.0ms
  AsyncImage:       █████ 4.7ms

Full 모드:
  LandscapistImage: █████ 4.8ms
  AsyncImage:       █████ 4.8ms
P50 기준으로 두 라이브러리가 완전히 동등합니다. Full 모드에서 둘 다 4.8ms로 동일하며, None 모드에서도 6% 차이에 불과합니다. BoxWithConstraints 제거의 효과가 확실히 보입니다!
다만 P99에서 주목할 차이가 있습니다. Full 모드에서 LandscapistImage의 P99(15.0ms)가 AsyncImage(13.1ms)보다 14% 높습니다. 이는 자체 엔진의 메모리 캐시 관리(LRU eviction, GC 등)에 의한 간헐적 스파이크로 추정됩니다.
3. 프레임 오버런 (frameOverrunMs)
양수일수록 프레임 데드라인을 초과한 것이고, 음수일수록 여유가 있는 것입니다.
| CompilationMode | LandscapistImage | AsyncImage | 차이 |
|---|---|---|---|
| None | -0.5ms | -0.1ms | LandscapistImage 0.4ms 더 여유 |
| Partial | -0.6ms | -0.5ms | 동등 (0.1ms 차이) |
| Full | -0.5ms | -0.4ms | 동등 (0.1ms 차이) |
P50에서는 두 라이브러리 모두 음수(데드라인 내)로, 프레임 드롭 없이 잘 처리합니다. 차이는 0.1~0.4ms 수준으로 사실상 동등합니다.
| CompilationMode | LandscapistImage | AsyncImage | 차이 |
|---|---|---|---|
| None | 16.0ms | 8.8ms | AsyncImage 45% 적은 오버런 |
| Partial | 8.1ms | 8.2ms | 동등 (1% 차이) |
| Full | 13.9ms | 8.4ms | AsyncImage 40% 적은 오버런 |
P99에서는 의미 있는 차이가 나타납니다. Full 모드 기준 AsyncImage가 40% 더 적은 오버런(13.9ms vs 8.4ms)을 보여주며, None 모드에서는 그 차이가 45%(16.0ms vs 8.8ms)로 더 벌어집니다. 반면 Partial 모드에서는 두 라이브러리가 거의 동등합니다 (8.1ms vs 8.2ms, 1% 차이).
4. 느린 스크롤 성능
앞에서 빠른 스크롤에서는 모든 면에서 AsyncImage가 더 좋은 성능을 보여줬습니다.
하지만 느린 스크롤에서는 격차의 성격이 달라졌습니다.
| 메트릭 | LandscapistImage | AsyncImage | 차이 |
|---|---|---|---|
| ImageLoadingSumMs median | 4.0ms | 0.8ms | AsyncImage 80% 빠름 |
| frameDurationCpuMs P50 | 5.1ms | 5.2ms | 동등 |
| frameDurationCpuMs P99 | 8.7ms | 9.7ms | LandscapistImage 10% 우위 |
| frameOverrunMs P50 | -1.3ms | -0.6ms | LandscapistImage 우위 |
| frameOverrunMs P99 | 2.1ms | 4.0ms | LandscapistImage 47% 우위 |
느린 스크롤에서도 이미지 로딩은 AsyncImage가 압도적으로 빠릅니다. 그러나 프레임 안정성에서는 LandscapistImage가 우수한 결과를 보입니다. P99 프레임 렌더링 8.7ms vs 9.7ms (10% 우위), 프레임 오버런 P99 2.1ms vs 4.0ms (47% 우위)로 차이가 있습니다.
느린 스크롤에서는 이미지가 점진적으로 화면에 진입하므로 로딩 부담이 적고 캐시 히트율이 높아지는데, 이 환경에서 LandscapistImage의 단순한 캐시 히트 경로가 프레임 안정성에 긍정적으로 작용하는 것으로 보입니다.
5. BaselineProfile 효과 분석
None 모드(JIT만) 대비 Full 모드(전체 AOT)의 성능 향상률입니다.
| 메트릭 | LandscapistImage 향상률 | AsyncImage 향상률 |
|---|---|---|
| ImageLoadingSumMs | 83.2→64.9ms (22% 개선) | 34.3→15.2ms (56% 개선) |
| frameDurationCpuMs P50 | 5.0→4.8ms (4%) | 4.7→4.8ms (거의 동일) |
| frameDurationCpuMs P99 | 15.2→15.0ms (1%) | 14.8→13.1ms (11%) |
BaselineProfile 효과: ImageLoadingSumMs (None → Full)

LandscapistImage: ████████████████████ 22% 개선 (83.2ms → 64.9ms)
AsyncImage:       ████████████████████████████████████████████████████████ 56% 개선 (34.3ms → 15.2ms)
LandscapistImage의 BaselineProfile 효과는 22%로, 이전 CoilImage(35%)보다 낮지만 의미 있는 수준입니다. AsyncImage(56%)에 비하면 여전히 차이가 있으며, 이는 자체 엔진의 I/O 바운드 작업이 AOT 컴파일의 혜택을 적게 받기 때문으로 보입니다.
종합 비교: 세 시점의 변화
이미지 로딩 시간 (Full 모드, median)
AsyncImage:              ████████ 15.2ms
CoilImage 2.8.2:         ████████████████ 30.4ms
LandscapistImage 2.9.3:  ████████████████████████████████ 64.9ms
프레임 렌더링 (Full 모드, P50)
AsyncImage:              █████████ 4.8ms
LandscapistImage 2.9.3:  █████████ 4.8ms
CoilImage 2.8.2:         ██████████ 5.0ms
종합 성능 비교표
| 항목 | CoilImage 2.8.2 | LandscapistImage 2.9.3 | AsyncImage | 최고 |
|---|---|---|---|---|
| 이미지 로딩 (Full) | 30.4ms | 64.9ms | 15.2ms | AsyncImage |
| 프레임 렌더링 P50 (Full) | 5.0ms | 4.8ms | 4.8ms | 동등 |
| 프레임 렌더링 P99 (Full) | 17.8ms | 15.0ms | 13.1ms | AsyncImage |
| 느린 스크롤 로딩 | - | 4.0ms | 0.8ms | AsyncImage |
| 느린 스크롤 P99 | - | 8.7ms | 9.7ms | LandscapistImage |
| 느린 스크롤 오버런 P99 | - | 2.1ms | 4.0ms | LandscapistImage |
| BaselineProfile 로딩 효과 | 35% | 22% | 56% | AsyncImage |
벤치마크 결과 요약
요약
- 프레임 렌더링은 크게 개선되었다
BoxWithConstraints제거로 None 모드에서 37% 개선 (7.9ms → 5.0ms)- AsyncImage와 완전히 동등한 프레임 성능 달성 (Full P50: 4.8ms vs 4.8ms)
- 이미지 로딩은 느려졌지만, 치명적 수준은 아니다
- Coil3 엔진에서 자체 엔진으로 교체하면서 로딩 시간 114% 증가 (30.4ms → 64.9ms)
- AsyncImage가 77% 빠름 (15.2ms vs 64.9ms)
- 새로운 엔진의 최적화 여지가 남아 있으며, 향후 개선 가능성 있음
- 느린 스크롤에서는 프레임 안정성 우위 (로딩은 여전히 느림)
- 이미지 로딩: AsyncImage가 80% 빠름 (0.8ms vs 4.0ms)
- 하지만 P99 프레임 렌더링: 8.7ms vs 9.7ms (LandscapistImage 10% 우위)
- 프레임 오버런 P99: 2.1ms vs 4.0ms (47% 우위)
- 이전 측정보다 격차는 줄었지만 프레임 안정성에서 여전히 우위
- P99에서 새로운 트레이드오프 발견
- Full 모드 frameDurationCpuMs P99: LandscapistImage 15.0ms vs AsyncImage 13.1ms (14% 차이)
- 메모리 캐시 관리(LRU eviction, GC)에 의한 간헐적 스파이크로 추정
- 빠른 스크롤 시 P99 안정성은 AsyncImage가 우위
라이브러리 선택 기준 (업데이트)
| 기준 | 추천 |
|---|---|
| 이미지가 많은 빠른 스크롤 | AsyncImage (로딩 77% 빠름) |
| 느린 스크롤 프레임 안정성 | LandscapistImage (P99 오버런 47% 우위) |
| 느린 스크롤 로딩 속도 | AsyncImage (80% 빠름) |
| 프레임 렌더링 P50 | 완전 동등 (Full 모드 4.8ms vs 4.8ms) |
| P99 안정성 (빠른 스크롤) | AsyncImage (15.0ms vs 13.1ms) |
| 프로그레시브 로딩 | LandscapistImage (내장 지원) |
| 안정성/성숙도 | AsyncImage (Coil3 프로덕션 검증) |
| BaselineProfile 효과 | AsyncImage (56% vs 22%) |
LandscapistImage vs AsyncImage: 내부 구현 분석으로 본 성능 차이의 원인
위의 벤치마크 결과를 보고 왜 이러한 현상이 발생했는지 궁금해졌습니다.
왜 AsyncImage 로딩이 더 빠를까요? 왜 Landscapist의 프레임 성능이 더 안정적일까요?
지금부터 두 라이브러리 내부 구현을 분석해서 그 원인을 추측해보도록 하겠습니다.
AsyncImage의 로딩 속도가 더 빠른 이유
Full 모드 기준 AsyncImage(15.2ms)가 LandscapistImage(64.9ms)보다 4.3배 빠릅니다. 이 차이는 아래의 세 가지 구조적 원인이라 생각합니다.
1. Size 획득 방식의 차이: 1프레임 vs 2프레임
- AsyncImage: 1프레임에 완료
AsyncImage는 Modifier.Node 기반의 ConstraintsSizeResolver를 사용합니다.
// ConstraintsSizeResolver.kt (Coil)
@Stable
class ConstraintsSizeResolver : SizeResolver, LayoutModifier {
    private var latestConstraints = ZeroConstraints
    private var continuations = mutableListOf<Continuation<Unit>>()

    override suspend fun size(): Size {
        if (latestConstraints.isZero) {
            var continuation: Continuation<Unit>? = null
            try {
                suspendCancellableCoroutine<Unit> {
                    continuation = it
                    continuations.add(it)
                }
            } finally {
                continuations.remove(continuation)
            }
        }
        return latestConstraints.toSize()
    }

    fun setConstraints(constraints: Constraints) {
        latestConstraints = constraints
        if (!constraints.isZero) {
            // 대기 중인 coroutine들을 직접 resume
            continuations.forEach { it.resume(Unit) }
            continuations.clear()
        }
    }
}
핵심은 suspendCancellableCoroutine입니다. 이미지 로딩 코루틴이 size()를 호출하면 일시 중단되고, Layout 단계에서 Constraints가 결정되는 즉시 continuation.resume()으로 코루틴이 재개됩니다. 추가 Composition 없이 같은 프레임 안에서 로딩이 시작됩니다.
AsyncImage 로딩 과정 정리
Frame 1:
Composition → Layout (constraints 획득 + continuation resume) → 로딩 시작- LandscapistImage: 2프레임 필요
LandscapistImage는 Modifier.layout과 mutableIntStateOf를 사용합니다.
// LandscapistImage 내부
var incomingMaxWidth by mutableIntStateOf(-1)
var incomingMaxHeight by mutableIntStateOf(-1)

Box(
    modifier = modifier.layout { measurable, constraints ->
        // Frame 1: Layout 단계에서 Constraints 획득
        if (incomingMaxWidth < 0) {
            incomingMaxWidth = if (constraints.hasBoundedWidth) constraints.maxWidth else 0
            incomingMaxHeight = if (constraints.hasBoundedHeight) constraints.maxHeight else 0
        }
        val placeable = measurable.measure(constraints)
        layout(placeable.width, placeable.height) { placeable.placeRelative(0, 0) }
    },
    propagateMinConstraints = true,
) {
    // Frame 2: incomingMaxWidth 변경으로 Recomposition 발생
    if (incomingMaxWidth >= 0 && incomingMaxHeight >= 0) {
        LaunchedEffect(recomposeKey, loadingKey) {
            // 이제서야 이미지 로딩 시작
        }
    }
}Modifier.layout은 Layout 단계에서 실행되지만, mutableIntStateOf에 값을 쓰면 Compose의 Snapshot 시스템이 다음 프레임에서 Recomposition을 예약합니다. 두 번째 프레임에서 LaunchedEffect가 실행되어야 비로소 로딩이 시작됩니다.
LandscapistImage 로딩 과정 정리
Frame 1:
  Composition → Layout (constraints 획득, mutableIntStateOf 업데이트) → Draw

Frame 2:
  Recomposition (state 변경 감지) → LaunchedEffect 실행 → 로딩 시작
LandscapistImage는 AsyncImage 대비 1프레임(~16ms)의 추가 지연이 있습니다. 이러한 차이점이 로딩 속도에 영향을 주는 것 같습니다.
2. 이미지 디코딩 엔진의 차이
- Coil3의 파이프라인 (AsyncImage)
ImageLoader.execute(request)
  → Interceptor 체인 (확장 가능한 파이프라인)
    → EngineInterceptor
      → 메모리 캐시 확인 (LruCache)
      → [miss] 디스크 캐시 확인
      → [miss] OkHttp로 네트워크 요청
      → BitmapFactory 디코딩
      → 캐시 저장
→ ImageResult 반환- Landscapist의 파이프라인
Landscapist.load(request)
  → 메모리 캐시 확인 (TwoTierMemoryCache)
  → [miss] 디스크 캐시 확인 (DiskLruCache)
  → [miss] Ktor로 네트워크 요청
  → DecodeScheduler를 통한 디코딩
    → Semaphore(4)로 동시 디코딩 수 제한
    → Mutex + busy-wait으로 우선순위 기반 스케줄링
  → 캐시 저장
Landscapist는 KMP 지원을 위해 Ktor(플랫폼 독립적 HTTP 클라이언트)와 자체 디코딩 파이프라인을 사용합니다. 여기서 주목할 부분은 DecodeScheduler입니다.
- DecodeScheduler의 구조
internal class DecodeScheduler(maxConcurrency: Int = 4) {
    private val semaphore = Semaphore(maxConcurrency)
    private val mutex = Mutex()
    private val activeRequests = mutableSetOf<PrioritizedRequest>()

    suspend fun <T> schedule(priority: DecodePriority, block: suspend () -> T): T {
        val request = PrioritizedRequest(priority)
        try {
            // 1단계: 세마포어로 동시 실행 수 제한
            semaphore.acquire()
            mutex.withLock { activeRequests.add(request) }

            // 2단계: 자신의 우선순위가 가장 높을 때까지 대기 (busy-wait)
            request.waitForTurn(activeRequests, mutex)

            // 3단계: 실제 디코딩 실행
            return block()
        } finally {
            mutex.withLock { activeRequests.remove(request) }
            semaphore.release()
        }
    }
}waitForTurn의 구현이 특히 주목할 만합니다.
suspend fun waitForTurn(activeRequests: Set<PrioritizedRequest>, mutex: Mutex) {
    while (true) {
        val isHighest = mutex.withLock {
            activeRequests.all { it.priority <= this.priority }
        }
        if (isHighest) break
        delay(1)  // 1ms 간격으로 폴링
    }
}
busy-wait 패턴(1ms delay 루프)을 사용합니다. 이 방식에는 두 가지 문제가 있습니다.
- 불필요한 대기 시간: 우선순위가 낮은 디코딩 작업은 매 1ms마다 확인 → 대기하기를 반복합니다. 4개의 슬롯이 모두 차있고 우선순위가 낮으면, 실제 실행까지 수 ms~수십 ms의 지연이 추가됩니다.
- Mutex 경합:
waitForTurn내에서 1ms마다mutex.withLock을 호출합니다. 동시에 여러 디코딩 요청이 대기 중이면 Mutex 경합이 발생하여 추가 지연을 유발합니다.
Coil3에는 이러한 중앙집중식 스케줄러가 없습니다. 코루틴 디스패처(Dispatchers.IO)가 자연스럽게 동시성을 관리합니다.
internal class DecodeScheduler(maxConcurrency: Int = 4) {
    private val semaphore = Semaphore(maxConcurrency)
    private val mutex = Mutex()
    private val activeRequests = mutableSetOf<PrioritizedRequest>()

    suspend fun <T> schedule(priority: DecodePriority, block: suspend () -> T): T {
        val request = PrioritizedRequest(priority)
        try {
            // 1단계: 세마포어로 동시 실행 수 제한
            semaphore.acquire()
            mutex.withLock { activeRequests.add(request) }

            // 2단계: 자신의 우선순위가 가장 높을 때까지 대기 (busy-wait)
            request.waitForTurn(activeRequests, mutex)

            // 3단계: 실제 디코딩 실행
            return block()
        } finally {
            mutex.withLock { activeRequests.remove(request) }
            semaphore.release()
        }
    }
}
이 설계에는 명확한 장점이 있습니다.
- 우선순위 기반 스케줄링:
DecodePriority(IMMEDIATE, HIGH, NORMAL, LOW, BACKGROUND)를 통해 화면에 보이는 이미지를 먼저 디코딩할 수 있습니다. 빠른 스크롤 중 이미 지나간 이미지보다 현재 보이는 이미지를 우선 처리하는 데 유리합니다. - 명시적 동시성 제어:
Semaphore(4)로 동시 디코딩 수를 CPU 코어 수에 맞춰 제한합니다. 이미지 디코딩은 CPU 바운드 작업이므로, 무제한 동시 실행보다 적절한 제한이 전체 처리량을 높일 수 있습니다. - 프로그레시브 디코딩과의 연계: 우선순위 시스템을 통해 프로그레시브 디코딩 시 부분 이미지와 최종 이미지의 디코딩 순서를 제어할 수 있습니다.
다만 waitForTurn의 구현 방식에는 성능상 비용이 따릅니다.
suspend fun waitForTurn(activeRequests: Set<PrioritizedRequest>, mutex: Mutex) {
    while (true) {
        val isHighest = mutex.withLock {
            activeRequests.all { it.priority <= this.priority }
        }
        if (isHighest) break
        delay(1)  // 1ms 간격으로 폴링
    }
}
busy-wait 패턴(1ms delay 루프)을 사용합니다. 우선순위 스케줄링이라는 목표는 좋지만, 구현 방식에 두 가지 비용이 있습니다.
- 폴링 지연: 우선순위가 낮은 디코딩 작업은 매 1ms마다 확인 → 대기를 반복합니다. 4개의 슬롯이 모두 차있고 우선순위가 낮으면, 실제 실행까지 수 ms~수십 ms의 지연이 추가됩니다.
- Mutex 경합:
waitForTurn내에서 1ms마다mutex.withLock을 호출합니다. 동시에 여러 디코딩 요청이 대기 중이면 Mutex 경합이 발생하여 추가 지연을 유발합니다.
Coil3에는 이러한 중앙집중식 스케줄러가 없습니다. 코루틴 디스패처(Dispatchers.IO)가 자연스럽게 동시성을 관리하므로 우선순위 제어는 불가능하지만, busy-wait과 Mutex 경합도 없습니다.
느린 스크롤에서 LandscapistImage의 프레임 안정성이 높은 이유
앞에서 AsyncImage가 더 로딩 속도가 빠른 이유를 살펴보았습니다.
그렇다면 프레임 안정성 면에서는 LandscapistImage가 왜 더 안정적일까요?
프레임 안정성에 영향을 주는 요인들
이를 살펴보기 앞서, 프레임 안정성에 영향을 주는 요인들은 무엇이 있을까요?
- Compose Phase (Composition → Layout → Draw)
- Jetpack Compose 성능을 위해 아래 링크의 권장사항에 유의하면 좋습니다.
- https://developer.android.com/develop/ui/compose/performance?hl=ko
- https://developer.android.com/develop/ui/compose/performance/bestpractices?utm_source=android-studio-app&utm_medium=app
- https://developer.android.com/develop/ui/compose/performance/bestpractices?hl=ko#defer-reads
- GC와 프레임 드롭
- https://developer.android.com/topic/performance/vitals/render?utm_source=android-studio-app&utm_medium=app&hl=ko
- https://developer.android.com/topic/performance/vitals/render?utm_source=android-studio-app&utm_medium=app
- https://developer.android.com/codelabs/jetpack-compose-performance?utm_source=android-studio-app&utm_medium=app&hl=ko#6
- GPU 렌더링 / RenderThread / 오버드로
- https://developer.android.com/topic/performance/rendering/inspect-gpu-rendering - GPU 렌더링 프로파일링, RenderThread 동작
- https://developer.android.com/topic/performance/rendering/overdraw - 오버드로 원인과
줄이는 방법 - https://developer.android.com/topic/performance/rendering/profile-gpu - Sync &
Upload(텍스처 업로드) 메트릭, 프레임별 GPU 작업 분석
제가 나중에 읽을려고 링크 달았습니다. 저도 전부 이해하지 못했어요.. 엉엉
느린 스크롤에서 프레임 안정성에 영향을 주는 요인: GC
벤치마크 결과를 보면, P50은 양쪽 다 여유롭습니다(5.1ms vs 5.2ms). 차이는 P99에서만 나타나는데, P99
스파이크의 주요 원인은 GC pause가 프레임 렌더링과 겹치는 순간입니다. 다른 요소들은 AsyncImage와 Landscapist 둘 다 비슷한 환경이기에 중요성이 낮다고 생각했습니다.
그렇다면 메모리캐시 히트마다 생성되는 객체는 각각 얼마나 있는지 살펴보도록 하겠습니다.
AsyncImage 캐시 히트 시 생성되는 객체 (~6개):
Options(요청 옵션)MemoryCache.Key(캐시 키)MemoryCache.Value래퍼 (매 조회마다 새로 생성)SuccessResult(결과 래퍼, 7개 필드)Painter(image.asPainter())State.Success(상태 래퍼)
LandscapistImage 캐시 히트 시 생성되는 객체 (~3개):
CacheKey(캐시 키)String(memoryKey)ImageResult.Success(결과 래퍼)
양쪽 모두 결과 래퍼 객체를 생성하지만, 두 가지 차이가 있습니다.
첫째, Coil3의 StrongMemoryCache.get()은 매 조회마다 새로운 MemoryCache.Value 인스턴스를 생성합니다.
// Coil3 - StrongMemoryCache.get()
override fun get(key: Key): Value? {
    return cache[key]?.let { Value(it.image, it.extras) }  // 매번 새 Value 할당
}
반면 Landscapist의 TwoTierMemoryCache.get()은 기존 CachedImage 참조를 그대로 반환합니다.
// Landscapist - TwoTierMemoryCache.get()
strongCache.remove(memoryKey)?.let { image ->
    strongCache[memoryKey] = image
    return@synchronized image  // 기존 객체 참조 반환, 새 할당 없음
}둘째, AsyncImage는 Interceptor 체인 순회 과정에서 추가적인 중간 객체(체인 컨텍스트, 매핑 결과 등)가 생성됩니다. Landscapist는 캐시에 직접 접근하므로 이 오버헤드가 없습니다.
- AsyncImage: 캐시 히트마다 ~6개 객체 → Minor GC 빈번 → 겹칠 확률 ↑
- Landscapist: 캐시 히트마다 ~3개 객체 → Minor GC 덜 빈번 → 겹칠 확률 ↓
절대적인 개수 차이(~6개 vs ~3개)만으로는 GC에 큰 영향을 주지 않지만, 느린 스크롤에서 매 프레임 캐시 조회가 반복되면 이 차이가 누적됩니다. 특히 MemoryCache.Value의 매번 재할당은 Eden 영역의 GC 압력을 높이고, 이것이 간헐적으로 프레임 렌더링과 겹치면 P99 스파이크로 나타날 수 있습니다.
빠른 스크롤에서 AsyncImage의 프레임 안정성이 높은 이유
근데 빠른 스크롤에서는 왜 AsyncImage의 안정성이 더 우위일까요…..
이건 더 찾아본 뒤에 블로그 내용을 업데이트 하겠습니다……