안녕하세요!
Derek 입니다 😁
시간이.. 아주 빨리 흘러갔군요..! 조만간 이 javascript 30 시리즈를 마무리해야겠어요.
.gif) 얼른해서 후다닥 마무리지어보려 노력해볼게요 :)
얼른해서 후다닥 마무리지어보려 노력해볼게요 :)
오늘은 Day 22 project를 정리해보려합니다.
나름 귀엽지만 언젠간 꼭 쓰일 기능인것 같습니다.
22. Follow along Link Highlighter
목표
문단 내의
a태그에 마우스가 올라가면 해당 태그를 강조시킨다.
글 속에 존재하는 a 태그를 마우스가 해당 태그 위를 지나갈때 강조시켜주는 기능입니다.
Derek 과 Wes Bos의 구현코드
const triggers = document.querySelectorAll("a");

const highlight = document.createElement("span");
highlight.classList.add("highlight");
document.body.append(highlight);

function highlightLink() {
  const linkCoords = this.getBoundingClientRect();
  const coords = {
    width: linkCoords.width,
    height: linkCoords.height,
    top: linkCoords.top + window.scrollY,
    left: linkCoords.left + window.scrollX
  };
  highlight.style.width = `${coords.width}px`;
  highlight.style.height = `${coords.height}px`;
  highlight.style.transform = `translate(${coords.left}px, ${coords.top}px)`;
};

triggers.forEach(link => link.addEventListener("mouseenter", highlightLink));
먼저 triggers 변수는 문단에 존재하는 모든 a 태그 배열을 지닙니다.
또한 highlight 변수를 만들어 일단은 document.body 에 append 를 하죠.
이제 이 두가지를 활용해서 a 태그를 따라다니도록 합니다.
1. highlightLink 함수
이 함수는 mouseenter event 에 등록되는 함수입니다.
triggers.forEach(link => link.addEventListener("mouseenter", highlightLink));이렇게a 태그 배열인 triggers 에 mouseenter 이벤트를 highlightLink 함수를 등록했습니다.
function highlightLink() {
  const linkCoords = this.getBoundingClientRect();
  const coords = {
    width: linkCoords.width,
    height: linkCoords.height,
    top: linkCoords.top + window.scrollY,
    left: linkCoords.left + window.scrollX
  };
  highlight.style.width = `${coords.width}px`;
  highlight.style.height = `${coords.height}px`;
  highlight.style.transform = `translate(${coords.left}px, ${coords.top}px)`;
}
처음보는 getBoundingClientRect() 함수가 보이네요! MDN 에 따르면,
The
Element.getBoundingClientRect()method returns a DOMRect object providing information about the size of an element and its position relative to the viewport.
즉, 어떤 객체에 대해서 사이즈와 위치를 알려주는 함수라고보면 될것 같아요.
이는 객체의 top, bottom, left, right, width, height, x, y 이렇게 값을 준다고 합니다.
이곳에서 확인할 수 있네요.
triggers 에 걸린 이벤트니, this 의 getBoundingClientRect() 는 각각 a 태그의 위치 및 속성을 반환 할겁니다. 그 값을 linkCoords 가 가지고 있구요.
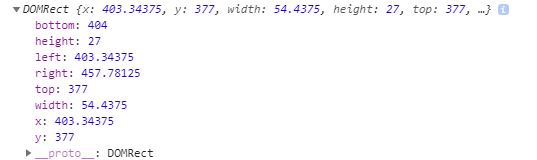
이렇게, 값을 확인할 수 있네요!
이를 활용해서 앞서 선언한 span 태그인 highlight 를 조정합니다.
const coords = {
  width: linkCoords.width,
  height: linkCoords.height,
  top: linkCoords.top + window.scrollY,
  left: linkCoords.left + window.scrollX
};
각각 속성 값을 coods 라는 객체를 만들어 저장한 후,
highlight.style.width = `${coords.width}px`;
highlight.style.height = `${coords.height}px`;
highlight.style.transform = `translate(${coords.left}px, ${coords.top}px)`;
이렇게, highlight 의 style 속성을 바로 수정하여 위치를 옮겨줍니다!
비교적 간단한 주제였습니다!
.gif)
처음 다루어보는 getBoundingClientRect() 함수를 적극적으로 활용해서 쉽게 만들어보았습니다.
틀린내용이나 수정할 내용이 있다면 언제든지 피드백 부탁드립니다!
감사합니다!🤗