6번 노드에서 xgb를 많이 사용하셨을 것 같은데요. ray를 사용하면 간편하게 좋은 성적을 낼 가능성이 낮은 시도를 빠르게 멈추고 서치를 할 수 있습니다. 사용을 시작하면 간편한데, 세팅이 헛갈려서 ray공식 홈페이지에 있는 xgb 튜토리얼을 Ex6에 맞게 바꾼 코드와 설명을 공유드립니다.
1. import ray tune
!pip install ray[tune]

import sklearn.datasets
import sklearn.metrics
import os
from ray.tune.schedulers import ASHAScheduler
from sklearn.model_selection import train_test_split
import xgboost as xgb
import ray
from ray import tune
from ray.tune.integration.xgboost import TuneReportCheckpointCallback
2. ray 초기화
ray.shutdown()  # Restart Ray defensively in case the ray connection is lost.
ray.init(log_to_driver=False)
3. train_price
xgb로 훈련을 어떻게 할지 설정하는 함수입니다. categorical 타입이 들어있으면 DMatrix에 enable_categorical=True를 인자로 주어야 한다고 합니다. evals는 평가를 할 dataset을 설정하는 인자입니다. evals=[(test_set, "eval")] 는 test_set을 'eval'이라는 이름으로 로깅하겠다는 의미입니다.
def train_price(config: dict):
    # This is a simple training function to be passed into Tune
    # Split into train and test set
    train_x, test_x, train_y, test_y = train_test_split(
        data_onehot, y, test_size=0.25)
    # Build input matrices for XGBoost
    train_set = xgb.DMatrix(train_x, label=train_y, enable_categorical=True)
    test_set = xgb.DMatrix(test_x, label=test_y, enable_categorical=True)
    # Train the classifier, using the Tune callback
    xgb.train(
        config,
        train_set,
        evals=[(test_set, "eval")],
        verbose_eval=False,
        callbacks=[TuneReportCheckpointCallback(filename="model.xgb")])
4. tune_xgboost()
하이퍼파라미터 튜닝을 설정하는 함수입니다. 사용할 수 있는 하이퍼파라미터의 범위와, 어떤 방식으로 early-stopping을 할 지, 사용할 리소스를 정합니다.
현재 regression이고, 원래'price' 에 log1p를 적용한 값(y)을 입력으로 넣어주고 있으므로, 로스펑션을 정해주는 "objective"를 "reg:squarederror"로 하고, 그 이름은 "eval_metric"에서 "rmsle"로 정해줍니다.
원하는 하이퍼파라미터 범위를 여기서 정해주세요
ASHAScheduler는 빠르게 underperforming trial을 중단시킵니다.
grace_period는 중단시키기까지 최소한의 iteration을 정합니다. (grad_period=4 -> 모델의 성능이 나빠도 4 iteration 까지는 참습니다)
내부에 tune.run이 가장 핵심으로, 하이퍼파라미터 튜닝을 시작합니다. metric의 "eval-rmsle"는 "eval" ( test_set) 에서 "rsmle" ( "reg:squarederror)를 기준으로 평가하겠다는 의미입니다.
num_samples로 몇 번 서치를 진행할지 설정합니다.
def tune_xgboost():
    search_space = {
        # You can mix constants with search space objects.
        "objective": "reg:squarederror",
        "eval_metric": ["rmsle"],
        "max_depth": tune.randint(3,9),
        "min_child_weight": tune.choice([1, 2, 3]),
        "subsample": tune.uniform(0.5, 1.0),
        "eta": tune.loguniform(1e-4, 2e-2),
        "booster": 'gbtree'
    }
    # This will enable aggressive early stopping of bad trials.
    scheduler = ASHAScheduler(
        max_t=100,  # 100 training iterations
        grace_period=4,
        reduction_factor=2)

    analysis = tune.run(
        train_price,
        metric="eval-rmsle",
        mode="min",
        # You can add "gpu": 0.1 to allocate GPUs
        resources_per_trial={"cpu": 2, "gpu": 0.3},
        config=search_space,
        num_samples=80,
        scheduler=scheduler)

    return analysis
5. 나머지
tutorial을 그대로 사용했습니다.
def get_best_model_checkpoint(analysis):
    best_price_model = xgb.Booster()
    best_price_model.load_model(os.path.join(analysis.best_checkpoint, "model.xgb"))
    error =analysis.best_result["eval-rmsle"]
    print(f"Best model parameters: {analysis.best_config}")
    print(f"Best model rmsle: {error:.4f}")
    return best_price_model

if __name__ == "__main__":
    import argparse
    parser = argparse.ArgumentParser()
    parser.add_argument(
        "--server-address",
        type=str,
        default=None,
        required=False,
        help="The address of server to connect to if using "
        "Ray Client.")
    args, _ = parser.parse_known_args()

    if args.server_address:
        import ray
        ray.init(f"ray://{args.server_address}")

    analysis = tune_xgboost()

    # Load the best model checkpoint.
    if args.server_address:
        # If connecting to a remote server with Ray Client, checkpoint loading
        # should be wrapped in a task so it will execute on the server.
        # We have to make sure it gets executed on the same node that
        # ``tune.run`` is called on.
        from ray.tune.utils import force_on_current_node
        remote_fn = force_on_current_node(
            ray.remote(get_best_model_checkpoint))
        best_bst = ray.get(remote_fn.remote(analysis))
    else:
        best_bst = get_best_model_checkpoint(analysis)
6. 결과
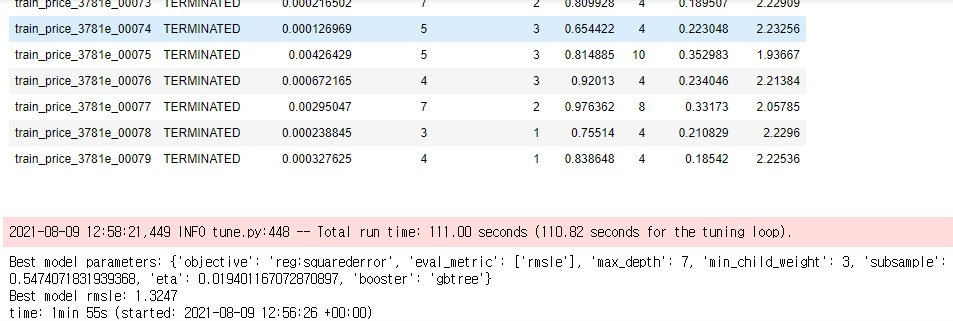
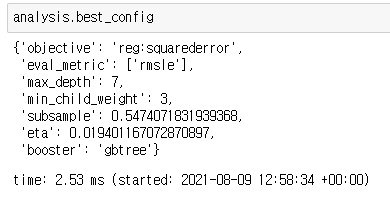
7. 얻어진 하이퍼파라미터로 모델 훈련하기
서치가 끝나면 params = analysis.best_config로 최적설정을 저장합니다.
아래의 셀로 cross-validation을 진행합니다. best_rounds가 저장됩니다
dtrain = xgb.DMatrix(data_onehot, label=y, enable_categorical=True)
dtest = xgb.DMatrix(sub_onehot, enable_categorical=True)

def rmse_exp(predictions, dmat):
    labels = dmat.get_label()
    diffs = np.exp(predictions) - np.exp(labels)
    squared_diffs = np.square(diffs)
    avg = np.mean(squared_diffs)
    return ('rmse_exp', np.sqrt(avg))

cv_output = xgb.cv(params,
                   dtrain,
                   num_boost_round=5000,         # 학습 횟수
                   early_stopping_rounds=10,    # overfitting 방지
                   nfold=5,                      # 높을 수록 실제 검증값에 가까워지고 낮을 수록 빠름
                   verbose_eval=100,             # 몇 번째마다 메세지를 출력할 것인지
                   feval=rmse_exp,               # price 속성을 log scaling 했기 때문에, 다시 exponential
                   maximize=False,
                   show_stdv=False,              # 학습 동안 std(표준편차) 출력할지 말지
                   )
# scoring
best_rounds = cv_output.index.size
score = round(cv_output.iloc[-1]['test-rmse_exp-mean'], 2)

print(f'\nBest Rounds: {best_rounds}')
print(f'Best Score: {score}')
마지막으로, 아래의 셀을 실행하면 예측값을 얻을 수 있습니다
model = xgb.train(params, dtrain, num_boost_round=best_rounds)
y_pred = model.predict(dtest)
y_pred = np.expm1(y_pred)
y_pred