🙆♂️ import 🙇♂️
[Spring Boot / STS] 스프링부트에 swagger 연동 및 사용법[haddoddo]
[Spring Boot] Swagger 연동 및 설정 방법[Bamdule]
Swagger
Swagger란 서버로 요청되는 URL 리스트를 HTML화면으로 문서화 및 테스트 할 수 있는 라이브러리이다.
간단하게 설명하면 Swagger는 API Spec 문서이다.
API를 엑셀이나 가이드 문서를 통해 관리하는 방법은 주기적인 업데이트가 필요하기 때문에 관리가 쉽지 않고 시간이 오래 걸린다.
그래서 Swagger를 사용해 API Spec 문서를 자동화해주어 간편하게 API문서를 관리하면서 테스트할 수 있다.
Swagger 설정하기
먼저 Swagger 사용을 위해 pom.xml에 dependency를 추가한다.
<dependency>
	<groupId>io.springfox</groupId>
	<artifactId>springfox-swagger-ui</artifactId>
	<version>2.9.2</version>
</dependency>
<dependency>
	<groupId>io.springfox</groupId>
	<artifactId>springfox-swagger2</artifactId>
	<version>2.9.2</version>
</dependency>
그 후 환경 설정을 위해 SwaagerConfig Class를 만들어준다.
package com.ddaja.config;

import java.util.HashSet;
import java.util.Set;

import org.springframework.context.annotation.Bean;
import org.springframework.context.annotation.Configuration;

import springfox.documentation.builders.ApiInfoBuilder;
import springfox.documentation.builders.PathSelectors;
import springfox.documentation.builders.RequestHandlerSelectors;
import springfox.documentation.service.ApiInfo;
import springfox.documentation.service.Contact;
import springfox.documentation.spi.DocumentationType;
import springfox.documentation.spring.web.plugins.Docket;
import springfox.documentation.swagger2.annotations.EnableSwagger2;

@Configuration
@EnableSwagger2
public class SwaggerConfig {
    @Bean
    public Docket api() {
        return new Docket(DocumentationType.SWAGGER_2)
                .consumes(getConsumeContentTypes())
                .produces(getProduceContentTypes())
                .apiInfo(getApiInfo())
                .select()
                .apis(RequestHandlerSelectors.basePackage("com.ddaja.ddaja.controller"))
                .paths(PathSelectors.ant("/**"))
                .build();
    }

    private Set<String> getConsumeContentTypes() {
        Set<String> consumes = new HashSet<>();
        consumes.add("application/json;charset=UTF-8");
        consumes.add("application/x-www-form-urlencoded");
        return consumes;
    }

    private Set<String> getProduceContentTypes() {
        Set<String> produces = new HashSet<>();
        produces.add("application/json;charset=UTF-8");
        return produces;
    }

    private ApiInfo getApiInfo() {
        return new ApiInfoBuilder()
                .title("API")
                .description("[DDaJa] REST API")
                .contact(new Contact("[DDaja Swagger]", "https://github.com/swgil007/DDaJa", "BNG"))
                .version("1.0")
                .build();
    }
}
Swagger Config 설명
.consume()과 .produces()는 각각 Request Content-Type, Response Content-Type에 대한 설정. (선택)
.apiInfo()는 Swagger API 문서에 대한 설명을 표기하는 메소드. (선택)
.apis()는 Swagger API 문서로 만들기 원하는 BasePackage 경로. (필수)
.path()는 URL 경로를 지정하여 해당 URL에 해당하는 요청만 Swagger API 문서로 만든다. (필수)
Swagger 사용하기
이제 Swaager를 사용할 수 있는데, 아래 Annotations들을 통해서 간단하게 설명 문구들이나 설정을 마치고,
localhost/swagger-ui.html url 경로를 통해서 Swaager API 문서 페이지를 볼 수 있다.
@ApiOperation
@ApiOperation Annotation은 value, notes 를 통해서 해당 API에 대한 설명이나 설정을 진행할 수 있다.
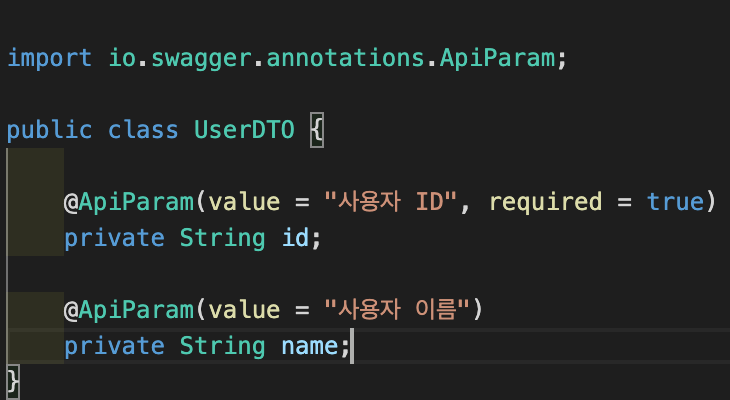
@ApiParam
@ApiParam Annotation 으로 DTO 변수에 대한 설명 및 다양한 설정을 사용할 수 있다.