Human Pose Estimation (인간 자세 예측)
영상(2D)만 가지고 딥러닝 기술과 CV 기술을 접목해 사람의 관절에 대한 특징점을 학습시켜서 정교한 자세 측정을 하는 것
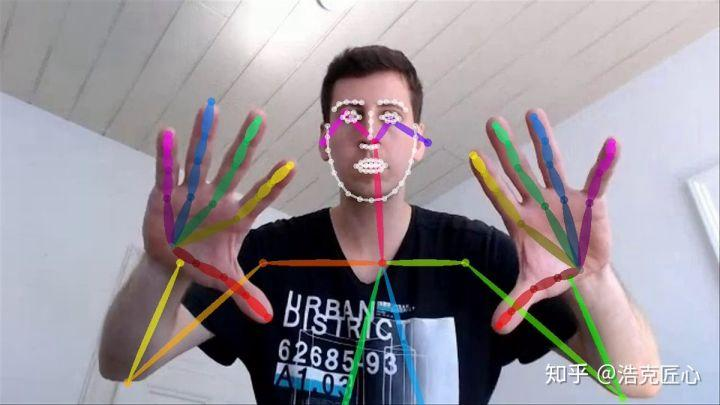
OpenPose란?
- 오직 카메라 한 대로 사람의 몸, 얼굴, 손가락 마디를 정확하게 예측
- 인간의 스켈레톤을 찾자!
- 기존(이전) 방법: 사람 검출 → 검출된 사람에 대한 자세 찾기 반복 (Top-Down)
- OpenPose: 모든 사람의 관절 추정 → 관절 위치를 이어 스켈레톤 형성 (Bottom-Up)
- body, hand, face 유추 가능
OpenPose의 모델들
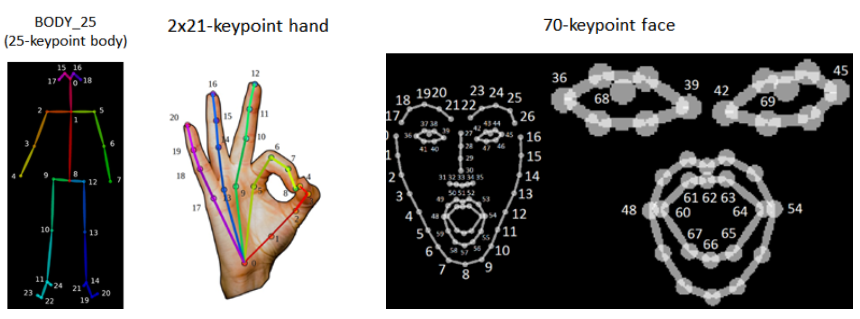
COCO
- 출력 관절 수: 18개
BODY-25
- 출력 관절 수: 25개
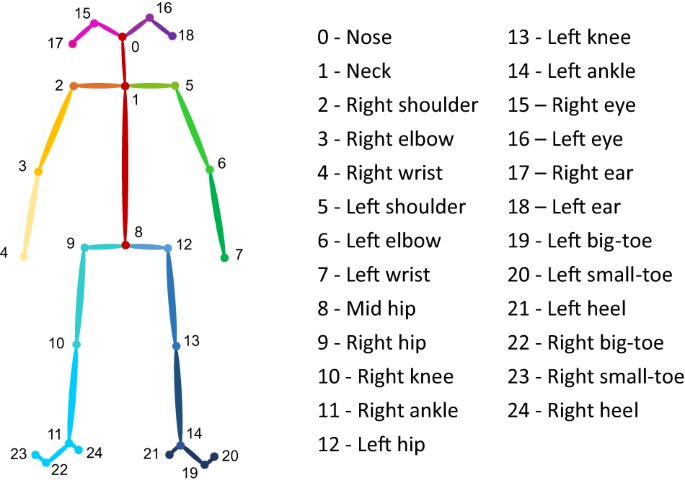
- 골반, 발 추가
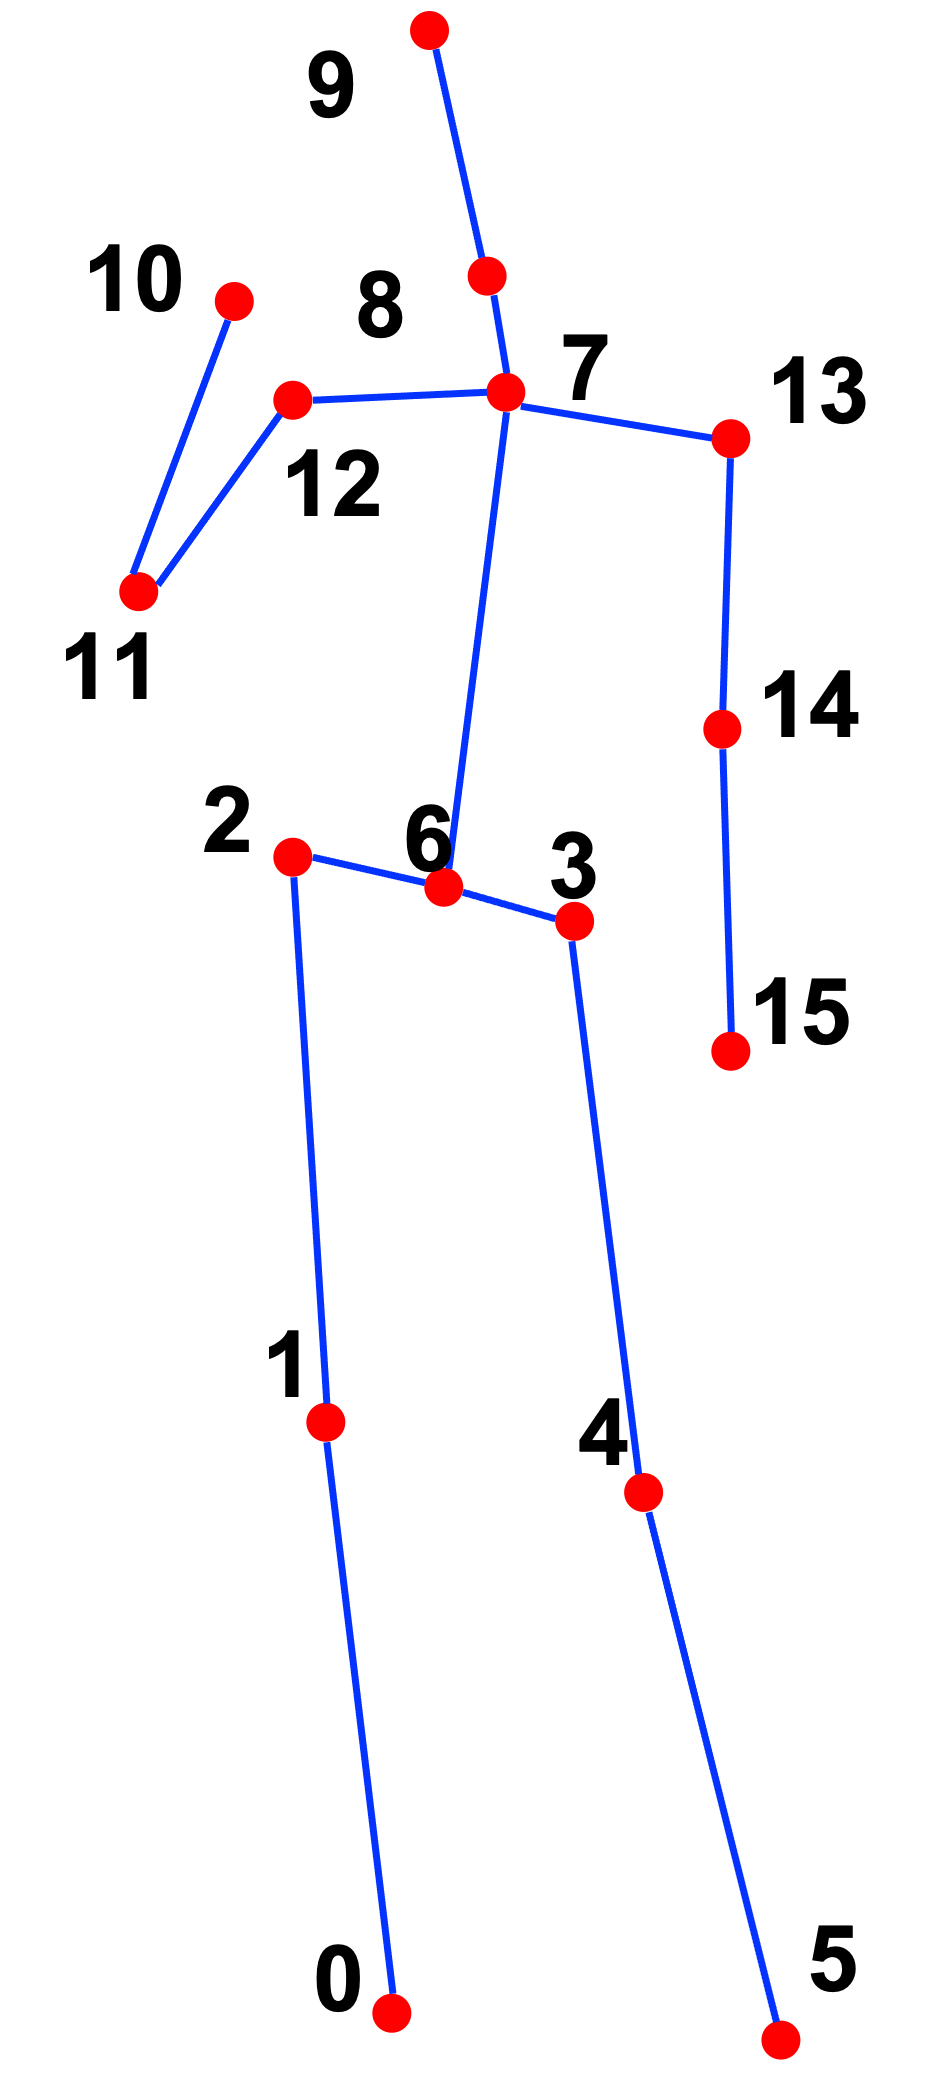
MPII
- 출력 관절 수: 15개
CNN 아키텍쳐
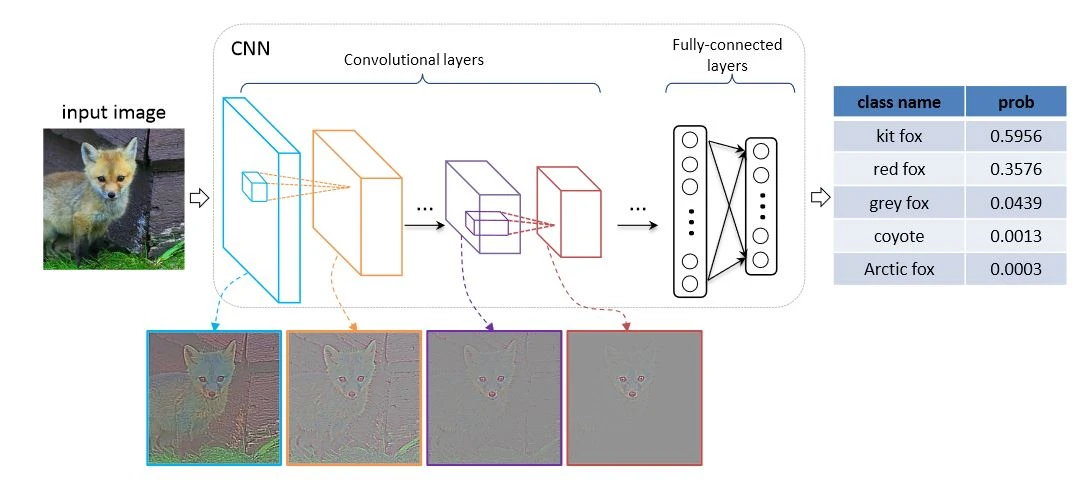
input: 이미지 데이터
output: 입력 이미지에 대한 예측 범주를 제공
VGG-19
- OpenPose의 딥러닝 네트워크
- 구조 간단, 쉽게 변형 가능 → 테스트에 적합
- 다중 레이어가 있는 표준 심층 CNN 아키텍처
- VGG 이후로 CNN이 깊어졌다는 점에서 의의 가짐- 주로 쓰던 5x5 대신 3x3 필터를 여러번, 그리고 zero-padding을 사용하여 convolution layer를 더 깊게 쌓음
- layer가 깊어지면 여러번 비선형 활성 함수(ReLU 등의)를 거쳐 feature에 많은 비선형성을 줄 수 있음
- VGG: Visual Geometry Group
- 컨볼루션 레이어의 가중치 레이어가 19개

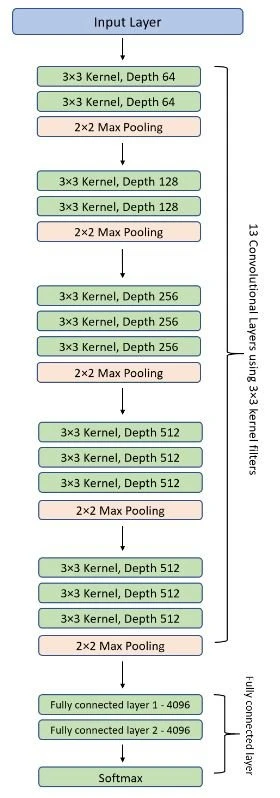
(VGG16의 아키텍처)
OpenPose에서의 VGG-19
이미지 → VGG → Stage1 → Stage2 → Stage N → Result
- 이미지가 VGG-19로 들어감
- Convolutional Layer(C)와 Pooling Layer(P)를 거쳐 특징맵(Feature Map, F)을 생성
※ 특징맵: 처음에는 큰 의미가 없지만, 학습 데이터와 비교하며 차이점을 줄여나가면서 최적화를 하면 나중에는 학습 데이터에 맞는 특징을 갖게 됨.
- Stage 1
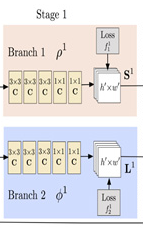
- Input: F(특징맵)
- Output: Confidence Map(S, Branch 1: 관절 예측)와 Part Affinity Field(L, Branch 2: 사람 예측)
- Confidence Map

관절 위치!!
- Part Affinity Fields
관절의 연결 정보!! (인체 부위 사이의 연관 정도)
한 관절 → 다른 관절로 이어지는 방향을 인코딩한 2D 벡터
- Part Affinity Fields
- Stage 2
Stage 1에서 결과로 얻은 S와 L을 조합하여 새로운 특징점을 만들고, 같은 원리로 Stage N까지 진행
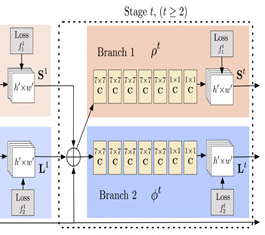
왜 Stage를 N개 써야할까?
네트워크가 깊어질수록 앞쪽의 Layer는 학습 영향이 줄어들기 때문에, Stage 중간 중간에 결과값을 특징맵(F)로 만들어 입력하여 여러 Stage를 거칠수록 예측 정확도를 향상시킨다. 각 Stage에서는 예측값과 실제 train data의 정답 사이의 차이가 최소화되도록 네트워크를 학습시킨다.
관련 튜토리얼은 아래 링크를 참고해볼 수 있다.
https://learnopencv.com/deep-learning-based-human-pose-estimation-using-opencv-cpp-python/
관련 프로젝트 참고 링크
https://gyong0117.tistory.com/149
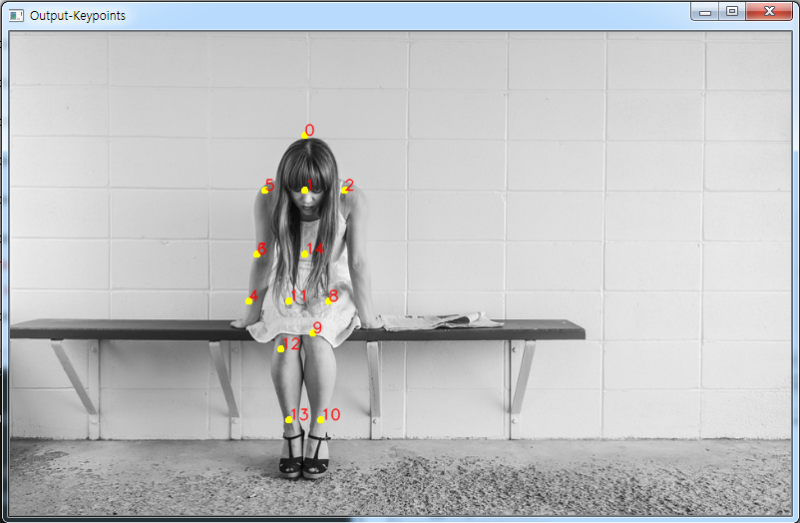
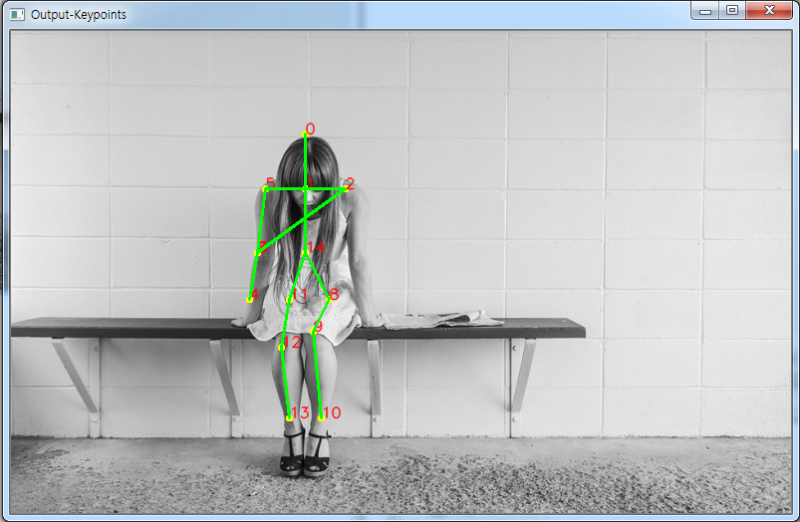
코드 (MPII 예시)
pip install opencv-python# fashion_pose.py : MPII를 사용한 신체부위 검출
import cv2
# MPII에서 각 파트 번호, 선으로 연결될 POSE_PAIRS
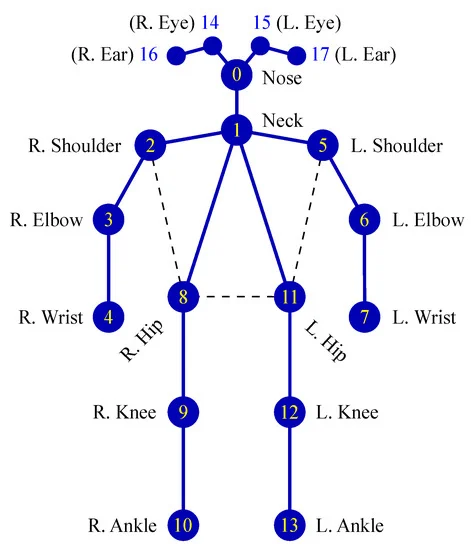
BODY_PARTS = { "Head": 0, "Neck": 1, "RShoulder": 2, "RElbow": 3, "RWrist": 4,
"LShoulder": 5, "LElbow": 6, "LWrist": 7, "RHip": 8, "RKnee": 9,
"RAnkle": 10, "LHip": 11, "LKnee": 12, "LAnkle": 13, "Chest": 14,
"Background": 15 }
POSE_PAIRS = [ ["Head", "Neck"], ["Neck", "RShoulder"], ["RShoulder", "RElbow"],
["RElbow", "RWrist"], ["Neck", "LShoulder"], ["LShoulder", "LElbow"],
["LElbow", "LWrist"], ["Neck", "Chest"], ["Chest", "RHip"], ["RHip", "RKnee"],
["RKnee", "RAnkle"], ["Chest", "LHip"], ["LHip", "LKnee"], ["LKnee", "LAnkle"] ]
# 각 파일 path
protoFile = "D:\\python_D\\fashion_data\\pose_deploy_linevec_faster_4_stages.prototxt"
weightsFile = "D:\\python_D\\fashion_data\\pose_iter_160000.caffemodel"
# 위의 path에 있는 network 불러오기
net = cv2.dnn.readNetFromCaffe(protoFile, weightsFile)
# 이미지 읽어오기
image = cv2.imread("D:\\python_D\\fashion_data\\full_body7.png")
# frame.shape = 불러온 이미지에서 height, width, color 받아옴
imageHeight, imageWidth, _ = image.shape
# network에 넣기위해 전처리
inpBlob = cv2.dnn.blobFromImage(image, 1.0 / 255, (imageWidth, imageHeight), (0, 0, 0), swapRB=False, crop=False)
# network에 넣어주기
net.setInput(inpBlob)
# 결과 받아오기
output = net.forward()
# output.shape[0] = 이미지 ID, [1] = 출력 맵의 높이, [2] = 너비
H = output.shape[2]
W = output.shape[3]
print("이미지 ID : ", len(output[0]), ", H : ", output.shape[2], ", W : ",output.shape[3]) # 이미지 ID
# 키포인트 검출시 이미지에 그려줌
points = []
for i in range(0,15):
# 해당 신체부위 신뢰도 얻음.
probMap = output[0, i, :, :]
# global 최대값 찾기
minVal, prob, minLoc, point = cv2.minMaxLoc(probMap)
# 원래 이미지에 맞게 점 위치 변경
x = (imageWidth * point[0]) / W
y = (imageHeight * point[1]) / H
# 키포인트 검출한 결과가 0.1보다 크면(검출한곳이 위 BODY_PARTS랑 맞는 부위면) points에 추가, 검출했는데 부위가 없으면 None으로
if prob > 0.1 :
cv2.circle(image, (int(x), int(y)), 3, (0, 255, 255), thickness=-1, lineType=cv2.FILLED) # circle(그릴곳, 원의 중심, 반지름, 색)
cv2.putText(image, "{}".format(i), (int(x), int(y)), cv2.FONT_HERSHEY_SIMPLEX, 0.5, (0, 0, 255), 1, lineType=cv2.LINE_AA)
points.append((int(x), int(y)))
else :
points.append(None)
cv2.imshow("Output-Keypoints",image)
cv2.waitKey(0)
# 이미지 복사
imageCopy = image
# 각 POSE_PAIRS별로 선 그어줌 (머리 - 목, 목 - 왼쪽어깨, ...)
for pair in POSE_PAIRS:
partA = pair[0] # Head
partA = BODY_PARTS[partA] # 0
partB = pair[1] # Neck
partB = BODY_PARTS[partB] # 1
#print(partA," 와 ", partB, " 연결\n")
if points[partA] and points[partB]:
cv2.line(imageCopy, points[partA], points[partB], (0, 255, 0), 2)
cv2.imshow("Output-Keypoints",imageCopy)
cv2.waitKey(0)
cv2.destroyAllWindows()

이성과 낭만 사이 그 어딘가