K8S Scheduler
K8S Scheduler ??
노드가 할당되지 않은 새로 생성된 Pod를 감지하고, 스케줄러가 발견한 모든 Pod에 대해 스케줄러는 해당 Pod가 실행시 최상의 노드를 찾는 책임을 가짐
노드에 Pod 할당
Pod를 생성할때 특정 노드에서만 실행 하거나, 특정 조건에 맞춰 Node에서 실행하도록 설정 할수 있다.
접근 방식은 모두 Node labels를 사용하여 선택을 용이하게 한다.
kubernetes가 특정 Pod를 예약할 위치를 선택하는 방법에는 여러가지가 존재한다.
- nodeSelector
- Affinity and anti-affinity
- nodeName
- Pod topology spread constraints
Node Labels
노드에도 파드와 마찬가지로 키-값 쌍의 레이블이 붙는다.
운영자는 수동으로 레이블을 추가 할수 있으며, 기본적으로 클러스터 내 노드들이 가진 레이블을 통하여 노드를 분류 할 수 있다.
이 레이블은 나중에 파드 스케줄링 제약 조건 (nodeSelector, affinity 등)에서 참조 한다.
예시
kubectl label nodes sample disktype=ssd environment=productionapiVersion: v1
kind: Node
metadata:
name: sample
labels:
disktype: ssd
environment: production
...방법 1. nodeSelector
파드 스펙 내에 nodeSelector 필드를 사용하여 특정 레이블을 가진 노드로만 스케줄 되도록 제한한다.
여러 키-값 쌍으로 지정할 수 있으며, 파드가 모든 조건을 만족하는 노드에만 배포된다.
예시
apiVersion: v1
kind: Pod
metadata:
  name: nginx
spec:
  containers:
  - name: nginx-container
    image: nginx
  nodeSelector:
    disktype: ssd
방법 2. Affinity and Anti-Affinity
nodeSelector보다 정의할수 있는 제약 유형을 확장 시키며, 강제(hard), 선호(soft) 규칙을 구분 할수 있다.
- Node Affinity : 노드의 레이블을 기반으로 파드가 스케줄될 노드를 선택한다.
- Pod 간 Affinity / Anti-Affinity : 클러스터 내에 이미 실행 중인 다른 파드 레이블을 기준으로, 같이 배치하거나 분리하여 배치하도록 제어할수 있다.
예시 - Node Affinity
apiVersion: v1
kind: Pod
metadata:
  name: node-affinity
spec:
  affinity:
    nodeAffinity:
      requiredDuringSchedulingIgnoredDuringExecution:
        # 반드시 만족해야 하는 조건 (hard)
        nodeSelectorTerms:
        - matchExpressions:
          - key: kubernetes.io/hostname
            operator: In
            values:
            - node1
      preferredDuringSchedulingIgnoredDuringExecution:
        # 선호하는 조건 (soft)
      - weight: 1
        preference:
          matchExpressions:
          - key: disktype
            operator: In
            values:
            - ssd
  containers:
  - name: nginx-container
    image: nginx
예시 - Pod 간 Affinity
apiVersion: v1
kind: Pod
metadata:
  name: pod-affinity
spec:
  affinity:
    podAffinity:
      requiredDuringSchedulingIgnoredDuringExecution:
      - labelSelector:
          matchExpressions:
          - key: app
            operator: In
            values:
            - redis
        topologyKey: "kubernetes.io/hostname"
  containers:
  - name: nginx-container
    image: nginx
방법 3. nodeName
pod 스펙의 nodeName 필드를 사용하면 스케줄러를 거치지 않고 지정된 노드에서 파드를 바로 실행한다.
단 노드가 존재하지 않거나, 리소스가 부족할 경우 파드 실행에 실패한다.
예시
apiVersion: v1
kind: Pod
metadata:
  name: nginx
spec:
  containers:
  - name: nginx-container
    image: nginx
  nodeName: node1
방법 4. Pod Topology Spread Constraints
파드를 클러스터의 장애 도메인 (노드,. 가용영역 등) 전반에 균등하게 분산 하여 배포 할수 있도록 제어가 가능하다.
이를 통해 특정 영역에 파드가 몰리지 않아 고가용성과 균형 잡힌 리소스 사용이 가능해진다.
- maxSkew: 노드 간 파드 수의 허용 최대 차이를 지정
- topologyKey: 분배 기준이 되는 노드 레이블 키 (예: kubernetes.io/hostname, topology.kubernetes.io/zone 등)
- whenUnsatisfiable: 제약조건을 만족하지 못할 경우 스케줄링을 중단할지(DoNotSchedule) 아니면 우선순위 점수를 부여할지(ScheduleAnyway) 결정
예시
apiVersion: apps/v1
kind: Deployment
metadata:
  name: myapp
spec:
  replicas: 3
  selector:
    matchLabels:
      app: nginx
  template:
    metadata:
      labels:
        app: nginx
    spec:
      topologySpreadConstraints:
      - maxSkew: 1
        topologyKey: kubernetes.io/hostname
        whenUnsatisfiable: DoNotSchedule
        labelSelector:
          matchLabels:
            app: nginx
      containers:
      - name: nginx
        image: nginx
정리
각 방식은 제어하려는 목적과 요구사항에 맞게 사용된다.
- nodeSelector : 가장 기본적이면서 간단한 방법
- Affinity / Anti-Affinity 는 보다 정교한 스케줄링 제어가 필요할 때 사용
- nodeName : 명시적으로 특정 노드를 지정할 때
- Pod topology spread constraints : 파드 분산 및 고가용성을 보장 할때
Pod 오버헤드
k8s에서 Pod 오버헤드는 컨테이너 실행에 필요한 리소스 이외에, Pod 인프라 자체가 소비하는 추가적인 시스템 리소스를 나타낸다. 이러한 오버헤드는 주로 Pod의 RuntimeClass에 정의된 오버 헤드에 따라 결정 된다.
주요 특징
- 스케줄링 시 고려 : k8s Scheduler는 Pod를 스케줄링 할 때, 각 컨테이너의 리소스 요청 합계에 Pod 오버헤드를 추가로 고려하여 노드를 선택
- cgroup 크기 조정 : 노드의 kubelet은 Pod의 cgroup을 설정할 때, 컨테이너 리소스 제한과 함께 Pod 오버헤드를 포함하여 메모리 및 CPU 제한을 설정
Pod 오버헤드 구성 방법
- RuntimeClass 정의
- 먼저 overhead 필드를 포함하는 RuntimeClass를 정의한다.
- 예시 kata Container를 사용하는 경우 약 120MiB의 오버헤드를 설정할 수 있다.
apiVersion: node.k8s.io/v1
kind: RuntimeClass
metadata:
  name: kata-fc
handler: kata-fc
overhead:
  podFixed:
    memory: "120Mi"
    cpu: "250m"
- 예시 kata Container를 사용하는 경우 약 120MiB의 오버헤드를 설정할 수 있다.
- 이렇게 정의된 RuntimeClass는 해당 오버헤드를 리소스 할당량 계산, 노드 스케줄링, Pod cgroup 크기 조정 시 고려한다.
- 먼저 overhead 필드를 포함하는 RuntimeClass를 정의한다.
- Pod에서 RuntimeClass를 사용
- 위에서 정의한 RuntimeClass를 사용하여 Pod를 생성할 때, runtimeClassName 필드를 설정한다.
apiVersion: v1
kind: Pod
metadata:
  name: test-pod
spec:
  runtimeClassName: kata-fc
  containers:
  - name: busybox-ctr
    image: busybox:1.28
    resources:
      limits:
        cpu: 500m
        memory: 100Mi
  - name: nginx-ctr
    image: nginx
    resources:
      limits:
        cpu: 1500m
        memory: 100Mi
- 위에서 정의한 RuntimeClass를 사용하여 Pod를 생성할 때, runtimeClassName 필드를 설정한다.
오버헤드 적용 예시
위의 코드를 기반으로 구성시
- 컨테이너 리소스 합계 : 두 컨테이너의 리소스 제한 합계는 2000m CPU과 200Mi 메모리 이다.
- 오버헤드 포함시 : 정의된 오버헤드 포함시 2250m CPU와 320Mi 메모리를 요청
- 노드 스케줄링 : 스케줄러는 이러한 총합을 고려하여 충분한 리소스를 가진 노드에 Pod를 스케줄링한다.
해당 방식으로 k8s는 Pod 오버헤드를 고려하여 리소스 할당과 스케줄링 정확성을 보장한다.
Pod Scheduling Readiness
Pod 스케줄링 준비 상태를 제어하며, 필수 리소스 부족으로 인하여 스케줄러와 클러 오토 스케일러에 불 필요한 부하가 발생하는 것을 방지한다.
이를 위해 Pod의 .spec.schedulingGates 필드를 사용하여 스케줄링 준비 상태를 관리할 수 있다.
Pod의 스케줄링 게이트 구성
- schedulingGate 필드 : 문자열 목록으로, 각 문자열은 Pod는 스케줄링 되기 전에 만족해야 하는 조건을 나타낸다.
- 해당 필드는 Pod 생성 시에만 초기화할 수 있으며, 생성 후에는 스케줄링 게이트를 제거할 수 있지만 새로운 게이트를 추가하는 것은 허용되지 않는다.

출처 : https://kubernetes.io/docs/concepts/scheduling-eviction/pod-scheduling-readiness/
사용 예시
-
스케줄링되지 않도록 설정된 Pod 생성
apiVersion: v1 kind: Pod metadata: name: test-pod spec: schedulingGates: - name: example.com/foo - name: example.com/bar containers: - name: pause image: registry.k8s.io/pause:3.6 -
파드 생성후 아래 명령어를 이용하여 SchedulingGated 상태를 확인한다.
kubectl get pods test-pod kubectl get pod test-pod -o jsonpath='{.spec.schedulingGates}' -
스케줄링 게이트 제거를 통항 스케줄링 준비 완료
Pod의 스케줄링 게이트를 제거하여 스케줄러가 해당 Pod를 스케줄링 하도록 한다.
apiVersion: v1
kind: Pod
metadata:
  name: test-pod
spec:
  containers:
  - name: pause
    image: registry.k8s.io/pause:3.6
-
스케줄링 게이트가 제거되면, 스케줄러는 Pod를 스케줄링하며, 리소스 요청이 없는 경우 Running 상태로 전환한다.
kubectl get pod test-pod -o wide
관찰 가능성
scheduler_pending_pods 메트릭에는 새로운 “gated” 라벨이 추가되어, 스케줄링이 시도 되었지만 스케줄링 되지 않는 Pod와 명시적으로 스케줄링 준비가 되어 있지 않는 Pod를 구분할 수 있다.
Pod 스케줄링 지시문의 변경
- Pod가 스케줄링 게이트를 가지고 있는 동안, 특정 제약 조건 하에서 스케줄링 지시문을 변경할 수 있다.
- 예를 들어,
.spec.nodeSelector에는 항목 추가만 허용되며,.spec.affinity.nodeAffinity가 비어 있는 경우에는 설정이 허용된다.
이러한 기능을 통해 Kubernetes에서 Pod의 스케줄링 준비 상태를 세밀하게 제어하고, 스케줄러의 효율성을 향상시킬 수 있다.
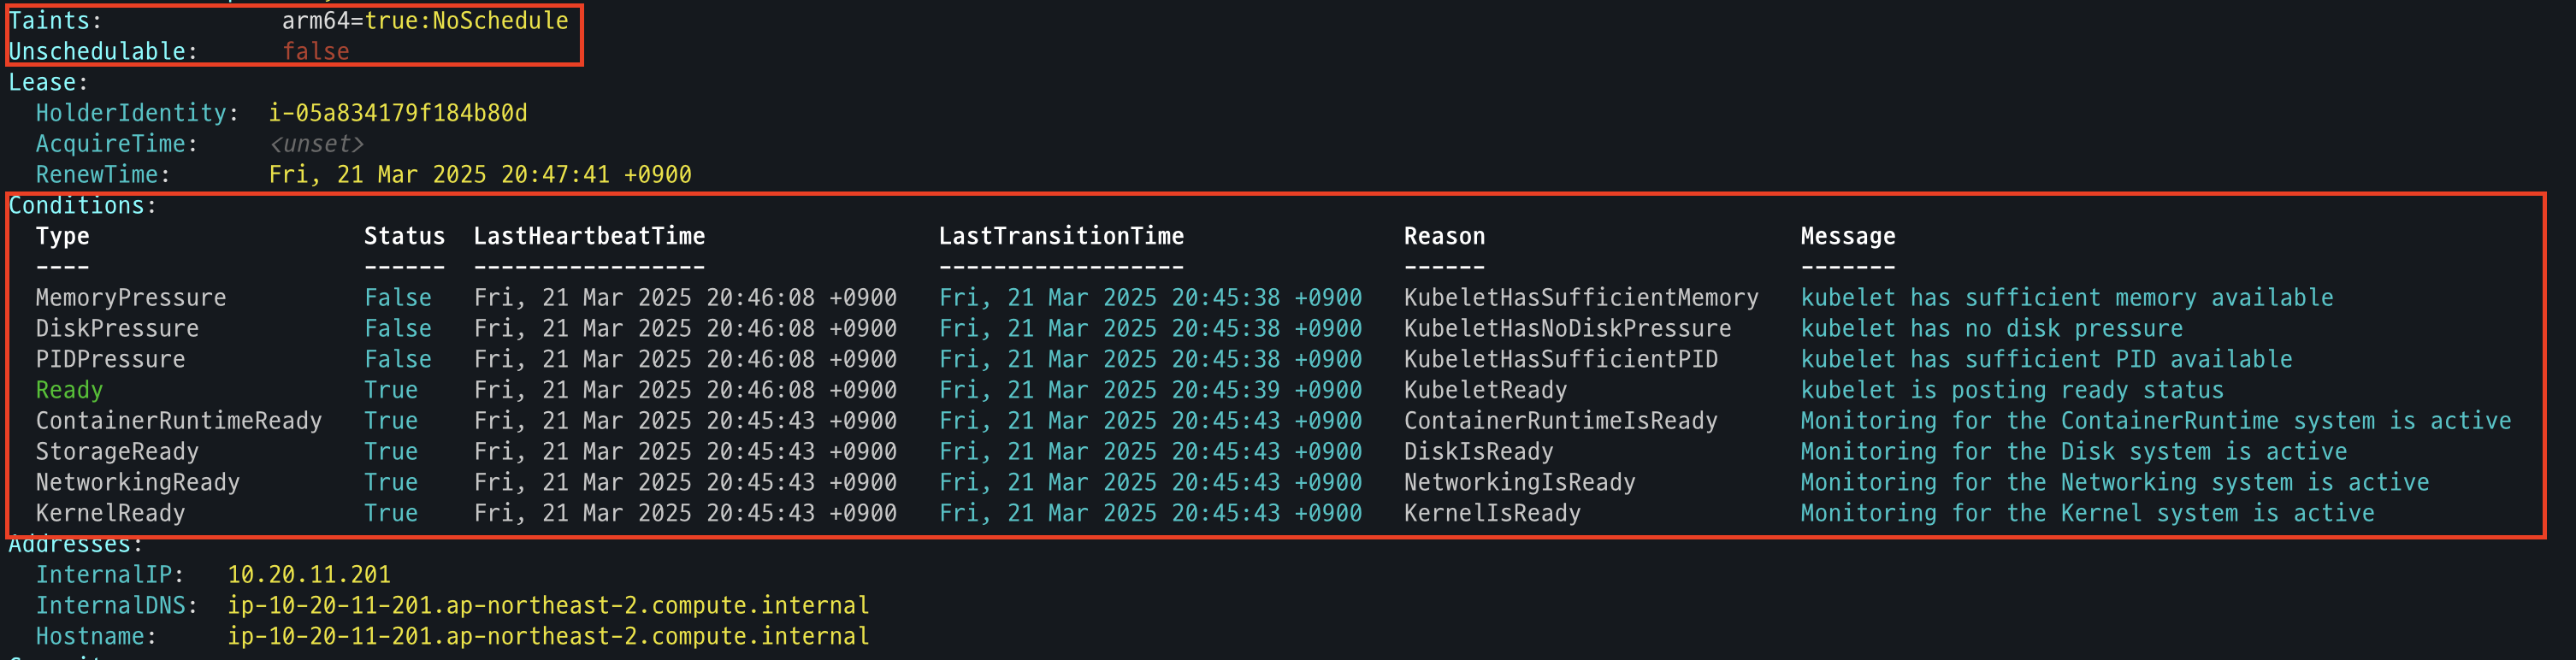
Taints and Tolerations
Taints and Tolerations ??
- Taint : 특정 노드가 특정 pod를 받지 않도록 설정
- Toleration : Pod에 설정하여 특정 Taint가 있는 노드에 스케줄링될 수 있도록 허용
- Node Affinity는 특정 노드로 Pod를 "끌어들이는" 반면, Taints는 Pod를 "배제"하는 역할.
Taint 추가 삭제 명령어
kubectl taint nodes <노드명> key=value:NoSchedule
kubectl taint nodes <노드명> key=value:NoSchedule-  # 제거
Toleration 설정
tolerations:
- key: "key1"
  operator: "Equal"
  value: "value1"
  effect: "NoSchedule"


tolerations:
- key: "key1"
  operator: "Exists"
effect: "NoSchedule"- Equal : key-value가 정확하게 일치해야 허용
- Exists : key만 존재하면 허용.
Taint Effect
| 효과 | 설명 |
|---|---|
| NoSchedule | Pod 스케줄링 불가 (기존 Pod는 유지). |
| PreferNoSchedule | 되도록 스케줄링하지 않음 (강제성 없음). |
| NoExecute | 매칭되지 않는 Pod는 즉시 퇴출 (tolerationSeconds 지정 가 |
예제 사용 케이스.
- 전용 노드 (Dedicated Nodes)
- 특정 그룹만 사용할 수 있도록 노드에 Taint 추가 (
dedicated=groupName:NoSchedule). - 해당 그룹 Pod에 Toleration 설정.
- 특정 그룹만 사용할 수 있도록 노드에 Taint 추가 (
- 특수 하드웨어 (GPU 등)
- GPU 노드에
special=true:NoScheduleTaint 추가. - GPU를 사용하는 Pod에 Toleration 추가.
- GPU 노드에
- 노드 장애 감지 및 퇴출
- Kubernetes는 특정 조건에서 자동으로 Taint를 추가:
node.kubernetes.io/not-ready: 노드 준비 안됨node.kubernetes.io/unreachable: 노드 통신 불가node.kubernetes.io/memory-pressure: 메모리 부족
- 기본적으로
not-ready,unreachableTaint는 300초 후 Pod를 퇴출. DaemonSet은not-ready,unreachable에 대한NoExecuteToleration을 기본적으로 포함.
- Kubernetes는 특정 조건에서 자동으로 Taint를 추가:
Taints와 Tolerations는 특정 Pod를 특정 노드에서 실행하거나 배제하는 데 유용하며, 노드 상태에 따른 자동 조정을 가능하게 한다.
Scheduling Framework
k8s 스케줄링 프레임워크는 플러그형 아키텍처로, 스케줄링 기능을 확장 하고 유지관리 쉽게 설계되었다.
해당 프레임워크는 다양한 스케줄링 플러그인을 통해 클러스터의 스케줄링 동작을 세밀하게 제어할수 있도록 도와준다.
정의
- 목적: 스케줄러 코어를 경량화하고 유지보수성을 높이며, 대부분의 기능을 플러그인으로 구현
- 작동 흐름:
- 스케줄링 주기(Scheduling Cycle): Pod에 적합한 노드 선택
- 바인딩 주기(Binding Cycle): 선택된 노드에 Pod 배치
- 두 주기를 합쳐 "스케줄링 컨텍스트"라 부름
주요 확장 포인트
스케줄링은 아래의 순차적 단계로 진행이 되며 Extension, Point로 노출되어 커스텀 할수 있다.
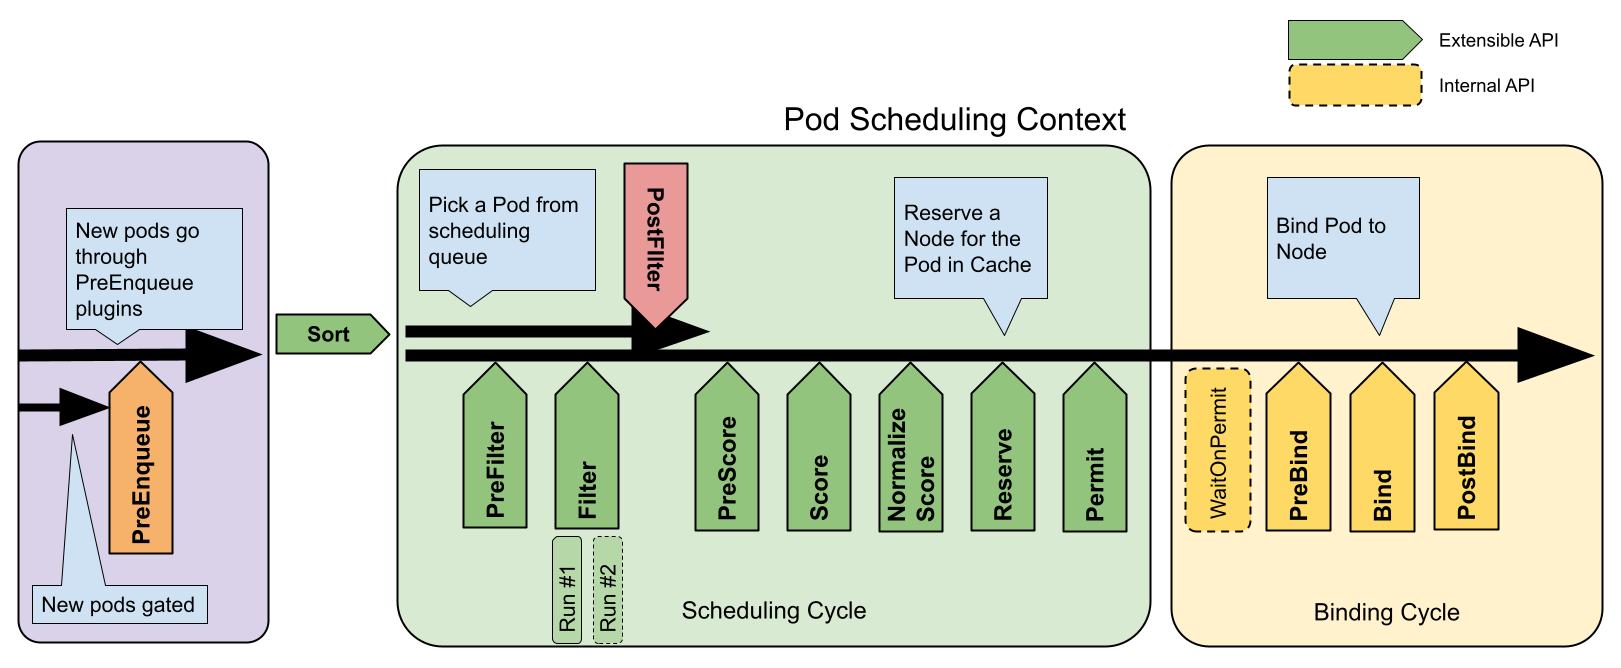
출처 : https://kubernetes.io/docs/concepts/scheduling-eviction/scheduling-framework/
| 확장 포인트 | 설명 | 주요 특징 | 실행 순서 | 예시 사용 사례 |
|---|---|---|---|---|
| PreEnqueue | Pod이 스케줄링 대기열에 추가되기 전 조건 검사 | 모든 플러그인이 성공해야 대기열 진입 가능 | 1 | Pod 우선순위 기반 대기열 제어 |
| QueueSort | 스케줄링 대기열의 Pod 정렬 규칙 정의 | 동시에 하나의 플러그인만 활성화 가능 | 2 | 우선순위/생성 시간 기준 정렬 |
| PreFilter | Pod 메타데이터 전처리 또는 클러스터 사전 검증 | 실패 시 즉시 스케줄링 중단 | 3 | 리소스 요구량 계산, 의존성 검사 |
| Filter | 실행 불가능한 노드 필터링 | 노드별 병렬 평가 가능, 하나라도 실패 시 중단 | 4 | 리소스 가용성/테인트 검사 |
| PostFilter | 실행 가능 노드 없을 때 호출 | 주로 선점(Preemption) 로직 구현 | 5 | 다른 Pod 종료를 통한 자원 확보 |
| PreScore | 점수 계산 전 공유 데이터 생성 | Score 단계를 위한 사전 작업 | 6 | 노드 그룹핑 정보 생성 |
| Score | 노드 점수 부여 (범위: 0-100) | 가중치 적용 가능한 점수 체계 | 7 | 리소스 밸런스/노드 친화성 계산 |
| NormalizeScore | 점수 표준화 | 모든 Score 플러그인 실행 후 호출 | 8 | 점수 범위 정규화 |
| Reserve | 자원 예약 | 성공 시 바인딩 진행, 실패 시 Unreserve 역순 실행 | 9 | 볼륨/네트워크 자원 예약 |
| Permit | 최종 승인 제어 | Approve/Deny/Wait(타임아웃) 3가지 액션 | 10 | 외부 승인 시스템 연동 |
| PreBind | 바인딩 전 작업 수행 | 실패 시 Pod을 대기열로 반환 | 11 | 네트워크 볼륨 마운트 준비 |
| Bind | 실제 노드 바인딩 | 하나의 플러그인이 처리하면 나머지 생략 | 12 | 기본 바인딩 또는 커스텀 바인딩 로직 |
| PostBind | 바인딩 후 리소스 정리 | 정보 제공용으로만 사용 (실행 실패 무시) | 13 | 로깅/모니터링, 임시 리소스 삭제 |
Plugin configuration
- QueueingHint (v1.32 베타): 클러스터 이벤트 발생 시 Pod 재스케줄링 여부 결정
- 다중 프로필 지원: 워크로드 유형별 별도 스케줄러 프로필 구성 가능
- 기본 플러그인: v1.18+부터 대부분 플러그인이 기본 활성화됨
- 커스텀 플러그인: 사용자 정의 플러그인 개발 및 통합 가능 (scheduler-plugins 참고)
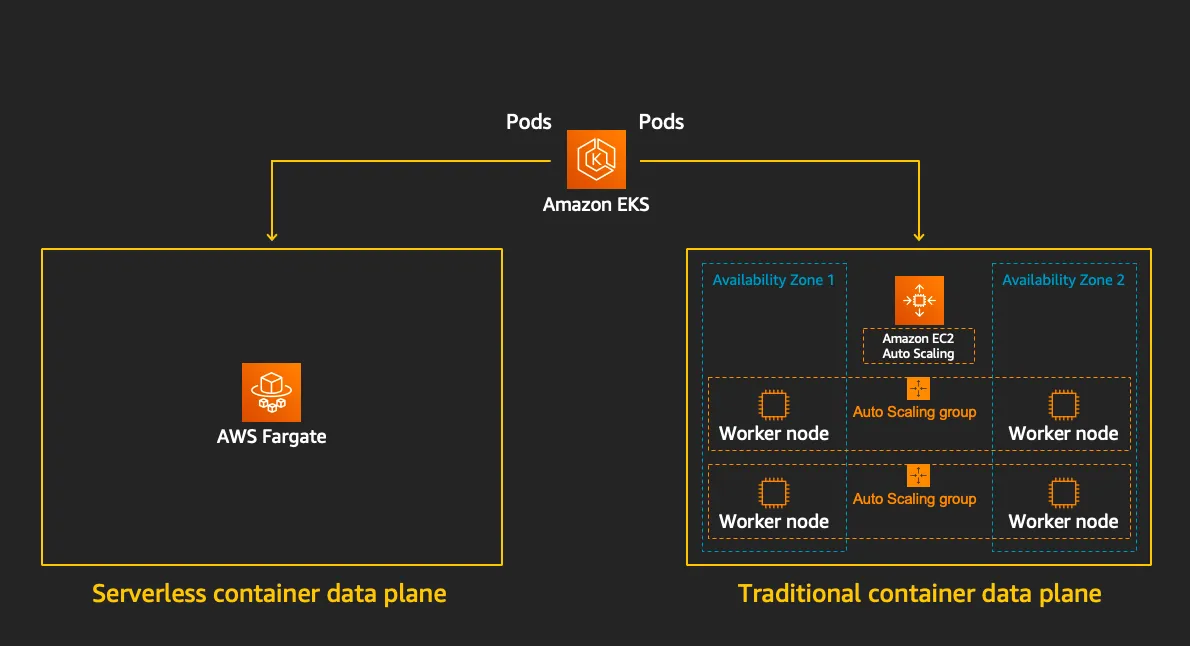
Fargate
AWS가 제공하는 서버리스 컨테이너 실행 서비스로, 인프라 관리 없이 컨테이너화된 애플리케이션을 배포하고 관리할수 있도록 설계 되어 있다.
또한 Amazon ECS, EKS와 통합되어 컨테이너의 실행을 단순화 한다.
출처 : https://www.eksworkshop.com/docs/fundamentals/fargate/
특징
- 서버리스 인프라 관리
- EC2 인스턴스, 가상 머신, 클러스터 등을 직접 관리할 필요가 없다.
- CPU, 메모리, 네트워킹 등의 리소스를 정의하면 AWS가 백엔드 인프라를 자동으로 프로비저닝한다.
- ECS/EKS와의 통합
- ECS Fargate: ECS 작업 정의(CPU/메모리 지정)를 사용해 컨테이너를 실행하며, EC2 기반 클러스터 대신 Fargate를 시작 유형으로 선택한다.
- EKS Fargate: Kubernetes Pod를 실행할 때 Fargate 프로파일을 활용해 노드 관리 없이 쿠버네티스 애플리케이션을 운영한다.
- 보안 및 격리
- 각 작업 또는 Pod는 자체 격리된 커널 리소스 공간에서 실행되며, 기본 인프라를 다른 사용자와 공유하지 않는다.
- 비용 모델
- 사용한 vCPU, 메모리, 스토리지 양에 따라 초 단위로 과금된다.
- 장기적인 예약 인스턴스 할인은 적용되지 않아, 변동성이 큰 워크로드에 적합하다.
- 자동 확장
- ECS 서비스 또는 Kubernetes Horizontal Pod Autoscaler와 연동해 트래픽 변화에 따라 자동으로 컨테이너 수를 조정한다.
Firecracker
KVM 기반의 경량 가상화 기술로, 마이크로 VM 을 통해 컨테이너의 효율성과 VM의 격리 보안을 결합한 오픈 소스 솔루션이다.

출처 : https://github.com/firecracker-microvm/firecracker/blob/main/docs/design.md
특징
- 보안 : 여러 수준의 격리와 보호를 통해 공격 노출 영역을 최소화 한다.
- 고성능 : 125ms 이내에 micro VM를 시작할 수 있어 단기 워커로드에 적합하다.
- 검증된 실적 : AWS Lambda와 Fargate 등에서 이미 상용화 되어 있음
- 낮은 오버헤드 : 각 microVM는 약 5MiB 메모리만 사용하여, 수천개의 VM를 안전하게 실행할 수 있다.
- 오픈 소스 : Firecracker는 오픈 소스로 제공되어 있음
- 미니멀리즘 기반 : 최소한의 디바이스 모델을 사용하고, Rust로 작성 되어 보안 취약점을 방지한다.
- 단순한 게스트 모델 : 공격 영역을 최소화 하며, 단순화, 가상화가 된 디바이스 모델을 제공한다.
- 잠금(Jail) 처리 : cgroups와, seccomp BPF를 통해 시스템 호출 목록을 제한하고, 안전한 환경을 제공
- 정적 연결 : firecracker 프로세스는 정적으로 연결되며, 잠금자(Jailer)에서 시작하여 가능한 안전하고 클린한 상태의 호스트 환경을 보장한다.
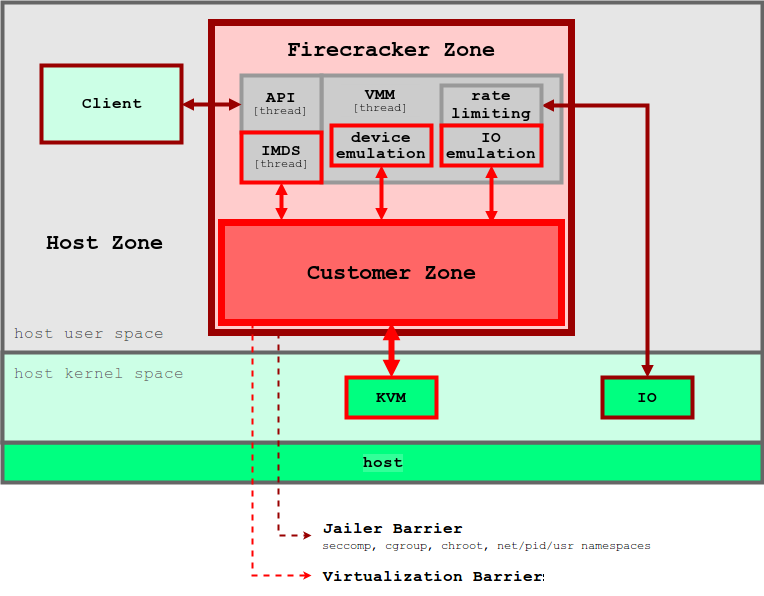
출처 : https://github.com/firecracker-microvm/firecracker/blob/main/docs/design.md
Fargate 아키텍처
공식적으로 작성된 Fargate Architecture 가 존재하지 않아 정확하게 확인 할 수는 없으나 몇가지 기능을 통하여 추측해 볼수 있다.
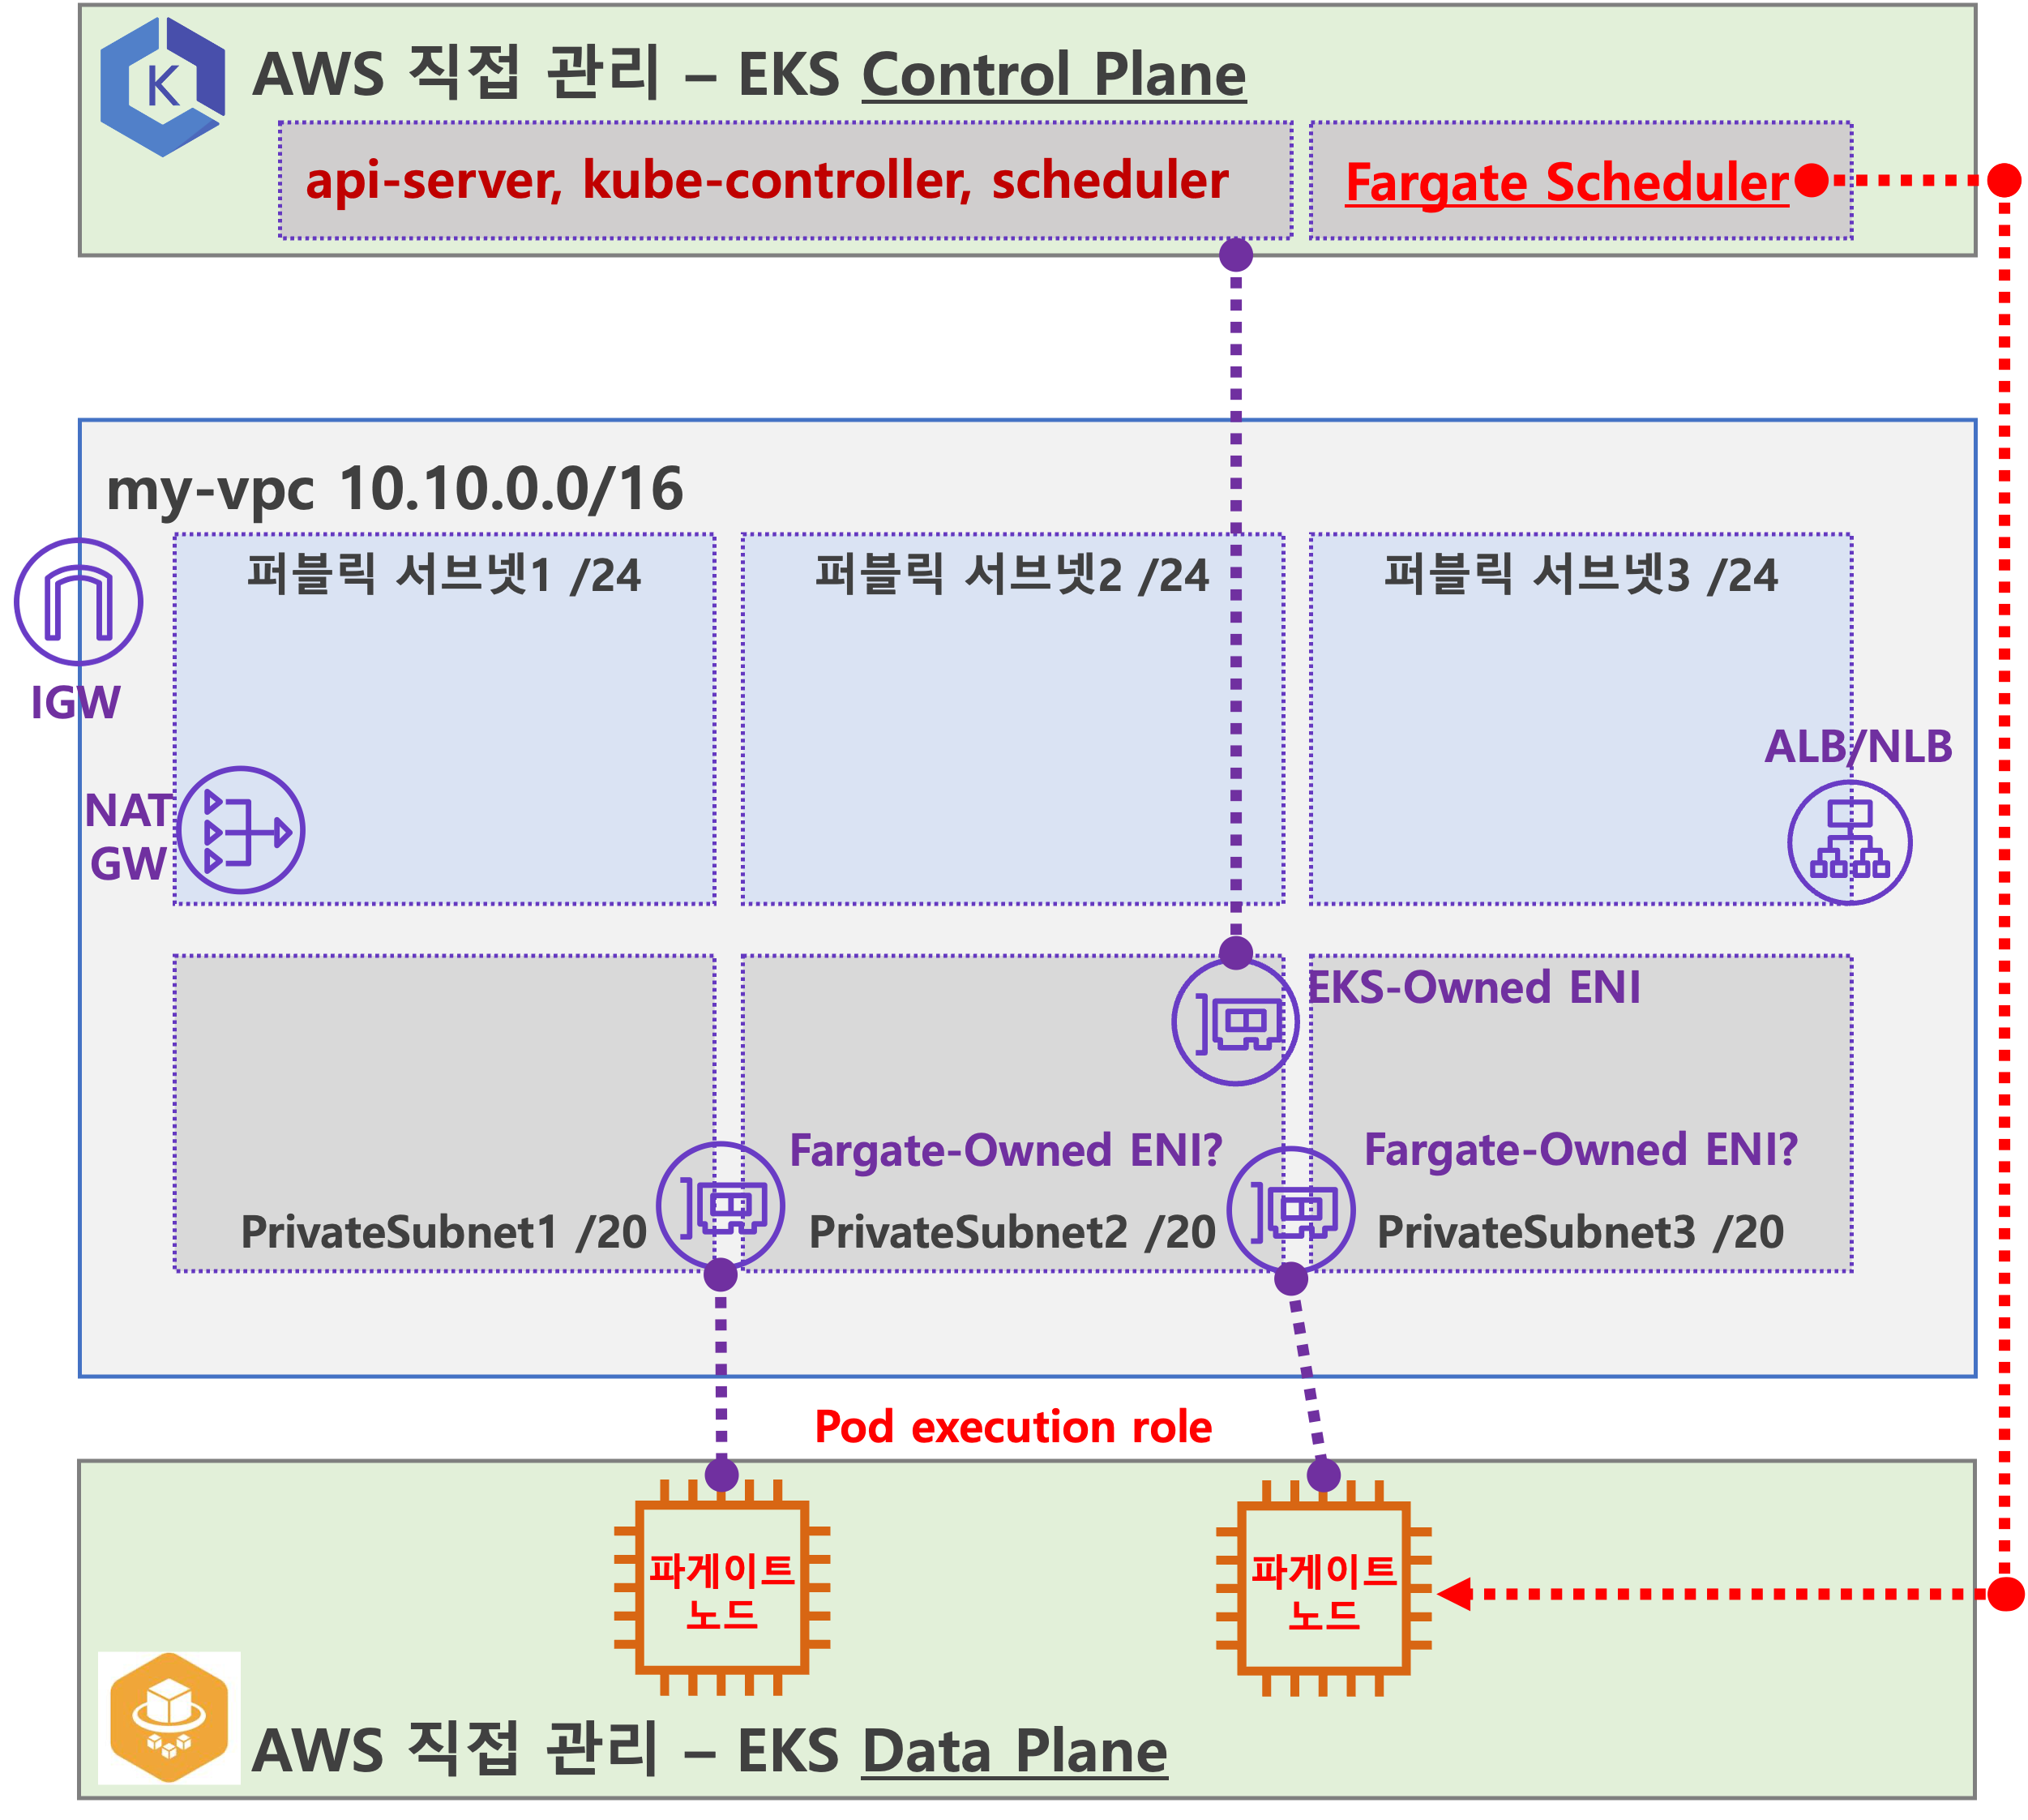
출처 : 기시다 AEWS 3기 스터디 - 7주차
- Fargate Scheduler (Controller):
- EKS Control Plane에서 동작.
- Fargate Scheduler에 필요한 IAM 역할(Policy)은 AWS에서 자동으로 관리하며, 별도의 설정 없이 설치 시 자동으로 설정됨.
- Fargate 배포 파드 (노드 당 1개 파드):
- 배포된 파드는 사용자 VPC 내의 ENI를 사용하며, 이 ENI는 Fargate가 관리하는 것으로 보임.
- 파드에 필요한 IAM 역할은 Fargate 설치 시 설정해야 하며, 필요 시 IRSA(Identity and Role-based Service Access) 추가 설정이 가능.
- 파드 외부 통신:
- 외부로 나가는 트래픽은 NAT Gateway를 통해 공인 IP로 SNAT 후 인터넷 게이트웨이(IGW)를 통해 외부로 나감.
- 퍼블릭 서브넷에서 실행 중인 파드는 공인 IP 비용이 발생하며, 외부 침입 시도가 있을 가능성이 있음.
- 외부에서 파드로 인입 요청:
- 외부에서 오는 트래픽은 ALB 또는 NLB를 통해 Fargate가 관리하는 ENI에 연결된 파드로 전달됨.
즉, Fargate는 EKS 클러스터에서 자동으로 파드를 배포하고 관리하며, 외부 통신 시 NAT Gateway와 IGW를 통해 연결하고, 인입 트래픽은 ALB/NLB를 통해 파드로 전달된다
Fargate 물리노드 아키텍처
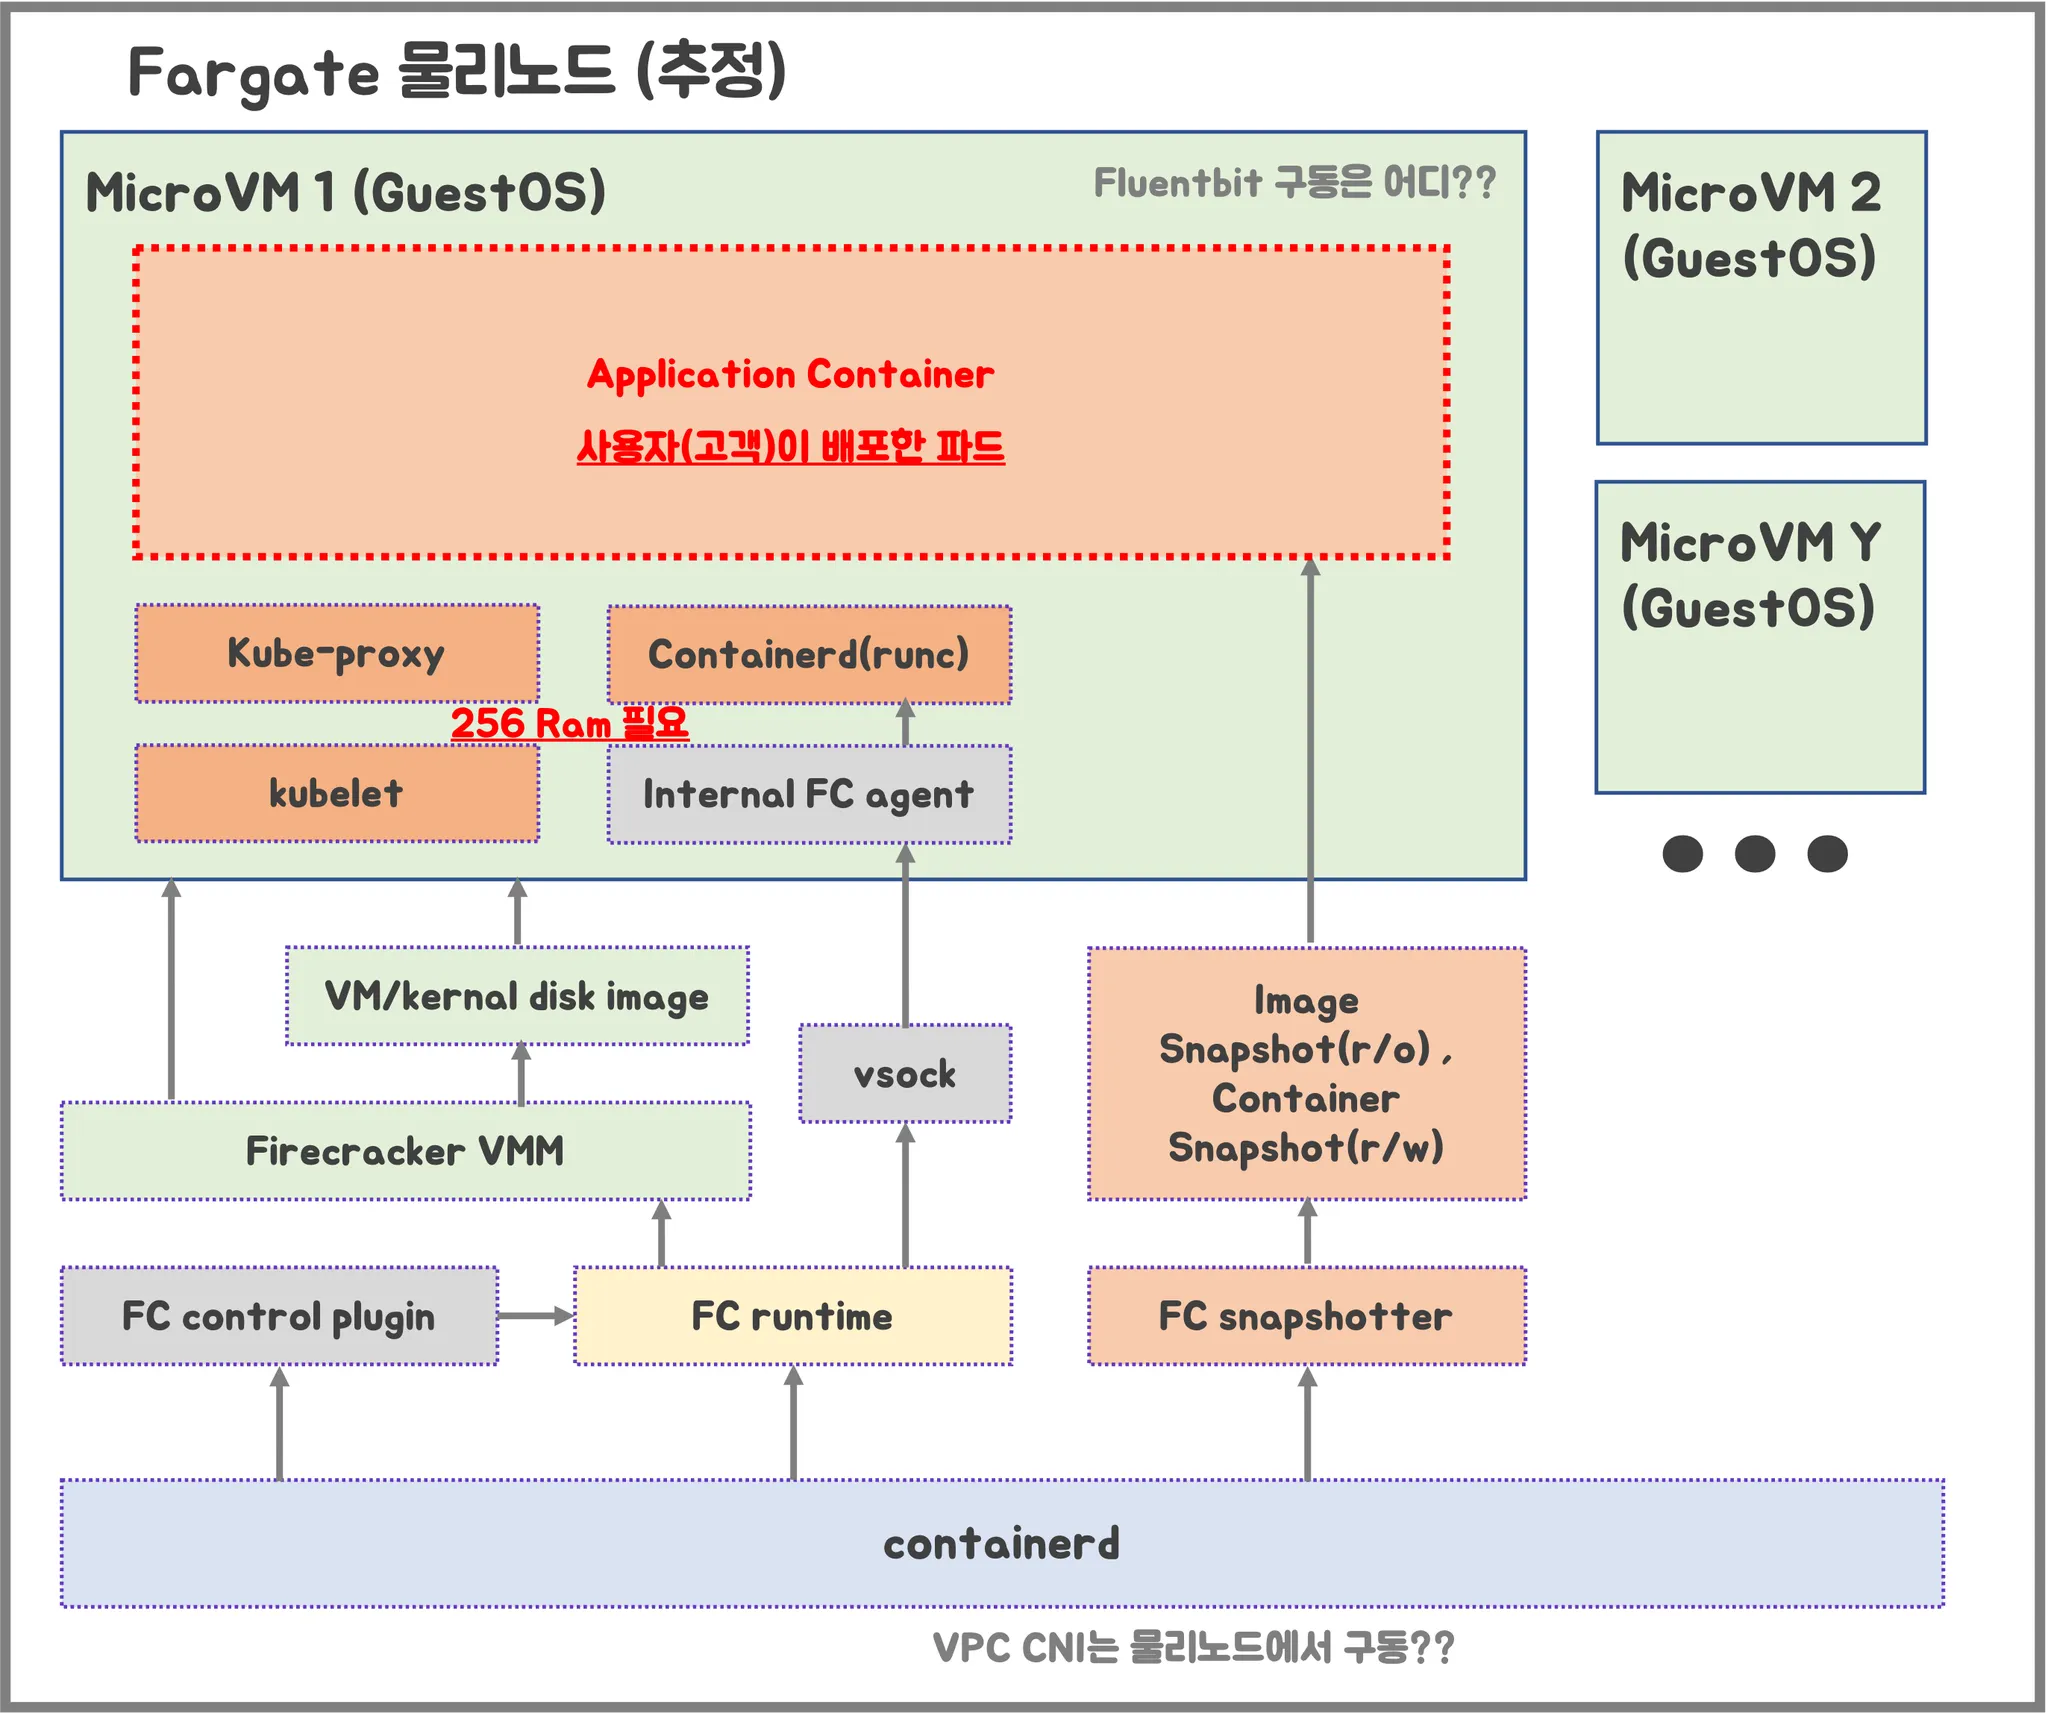
출처 : 기시다 AEWS 3기 스터디 - 7주차
- firecracker-containerd를 통하여 MicroVM (Application 컨테이너)를 배포
- VMM를 통하여 Micro VM를 배포하고, FC Snapshotter를 통하여 Application Container의 이미지를 구현
- MicroVM 마다 kubelet, kube-proxy, Containerd 가 동작하므로, 256 RAM이 반드시 필요
- 사용자에의 VPC에 보이는 ENI는 Application Container와 직접 매핑 되어 있는 것으로 추정
실습
테라폼으로 실습 환경 배포
코드 가져오기
#
git clone https://github.com/aws-ia/terraform-aws-eks-blueprints
tree terraform-aws-eks-blueprints/patterns
cd terraform-aws-eks-blueprints/patterns/fargate-serverless
main.tf 수정
리전 등 일부 실습 편리를 위해 수정, Sample App 배포 부분 삭제
provider "aws" {
  region = local.region
}

provider "kubernetes" {
  host                   = module.eks.cluster_endpoint
  cluster_ca_certificate = base64decode(module.eks.cluster_certificate_authority_data)

  exec {
    api_version = "client.authentication.k8s.io/v1beta1"
    command     = "aws"
    # This requires the awscli to be installed locally where Terraform is executed
    args = ["eks", "get-token", "--cluster-name", module.eks.cluster_name]
  }
}

provider "helm" {
  kubernetes {
    host                   = module.eks.cluster_endpoint
    cluster_ca_certificate = base64decode(module.eks.cluster_certificate_authority_data)

    exec {
      api_version = "client.authentication.k8s.io/v1beta1"
      command     = "aws"
      # This requires the awscli to be installed locally where Terraform is executed
      args = ["eks", "get-token", "--cluster-name", module.eks.cluster_name]
    }
  }
}

data "aws_availability_zones" "available" {
  # Do not include local zones
  filter {
    name   = "opt-in-status"
    values = ["opt-in-not-required"]
  }
}

locals {
  name     = basename(path.cwd)
  region   = "ap-northeast-2"

  vpc_cidr = "10.10.0.0/16"
  azs      = slice(data.aws_availability_zones.available.names, 0, 3)

  tags = {
    Blueprint  = local.name
    GithubRepo = "github.com/aws-ia/terraform-aws-eks-blueprints"
  }
}

################################################################################
# Cluster
################################################################################

module "eks" {
  source  = "terraform-aws-modules/eks/aws"
  version = "~> 20.11"

  cluster_name                   = local.name
  cluster_version                = "1.30"
  cluster_endpoint_public_access = true

  # Give the Terraform identity admin access to the cluster
  # which will allow resources to be deployed into the cluster
  enable_cluster_creator_admin_permissions = true

  vpc_id     = module.vpc.vpc_id
  subnet_ids = module.vpc.private_subnets

  # Fargate profiles use the cluster primary security group so these are not utilized
  create_cluster_security_group = false
  create_node_security_group    = false

  fargate_profiles = {
    study_wildcard = {
      selectors = [
        { namespace = "study-*" }
      ]
    }
    kube_system = {
      name = "kube-system"
      selectors = [
        { namespace = "kube-system" }
      ]
    }
  }

  fargate_profile_defaults = {
    iam_role_additional_policies = {
      additional = module.eks_blueprints_addons.fargate_fluentbit.iam_policy[0].arn
    }
  }

  tags = local.tags
}

################################################################################
# EKS Blueprints Addons
################################################################################

module "eks_blueprints_addons" {
  source  = "aws-ia/eks-blueprints-addons/aws"
  version = "~> 1.16"

  cluster_name      = module.eks.cluster_name
  cluster_endpoint  = module.eks.cluster_endpoint
  cluster_version   = module.eks.cluster_version
  oidc_provider_arn = module.eks.oidc_provider_arn

  # We want to wait for the Fargate profiles to be deployed first
  create_delay_dependencies = [for prof in module.eks.fargate_profiles : prof.fargate_profile_arn]

  # EKS Add-ons
  eks_addons = {
    coredns = {
      configuration_values = jsonencode({
        computeType = "Fargate"
        # Ensure that the we fully utilize the minimum amount of resources that are supplied by
        # Fargate https://docs.aws.amazon.com/eks/latest/userguide/fargate-pod-configuration.html
        # Fargate adds 256 MB to each pod's memory reservation for the required Kubernetes
        # components (kubelet, kube-proxy, and containerd). Fargate rounds up to the following
        # compute configuration that most closely matches the sum of vCPU and memory requests in
        # order to ensure pods always have the resources that they need to run.
        resources = {
          limits = {
            cpu = "0.25"
            # We are targeting the smallest Task size of 512Mb, so we subtract 256Mb from the
            # request/limit to ensure we can fit within that task
            memory = "256M"
          }
          requests = {
            cpu = "0.25"
            # We are targeting the smallest Task size of 512Mb, so we subtract 256Mb from the
            # request/limit to ensure we can fit within that task
            memory = "256M"
          }
        }
      })
    }
    vpc-cni    = {}
    kube-proxy = {}
  }

  # Enable Fargate logging this may generate a large ammount of logs, disable it if not explicitly required
  enable_fargate_fluentbit = true
  fargate_fluentbit = {
    flb_log_cw = true
  }

  enable_aws_load_balancer_controller = true
  aws_load_balancer_controller = {
    set = [
      {
        name  = "vpcId"
        value = module.vpc.vpc_id
      },
      {
        name  = "podDisruptionBudget.maxUnavailable"
        value = 1
      },
    ]
  }

  tags = local.tags
}

################################################################################
# Supporting Resources
################################################################################

module "vpc" {
  source  = "terraform-aws-modules/vpc/aws"
  version = "~> 5.0"

  name = local.name
  cidr = local.vpc_cidr

  azs             = local.azs
  private_subnets = [for k, v in local.azs : cidrsubnet(local.vpc_cidr, 4, k)]
  public_subnets  = [for k, v in local.azs : cidrsubnet(local.vpc_cidr, 8, k + 48)]

  enable_nat_gateway = true
  single_nat_gateway = true

  public_subnet_tags = {
    "kubernetes.io/role/elb" = 1
  }

  private_subnet_tags = {
    "kubernetes.io/role/internal-elb" = 1
  }

  tags = local.tags
}
테라폼 초기화
- code
terraform init
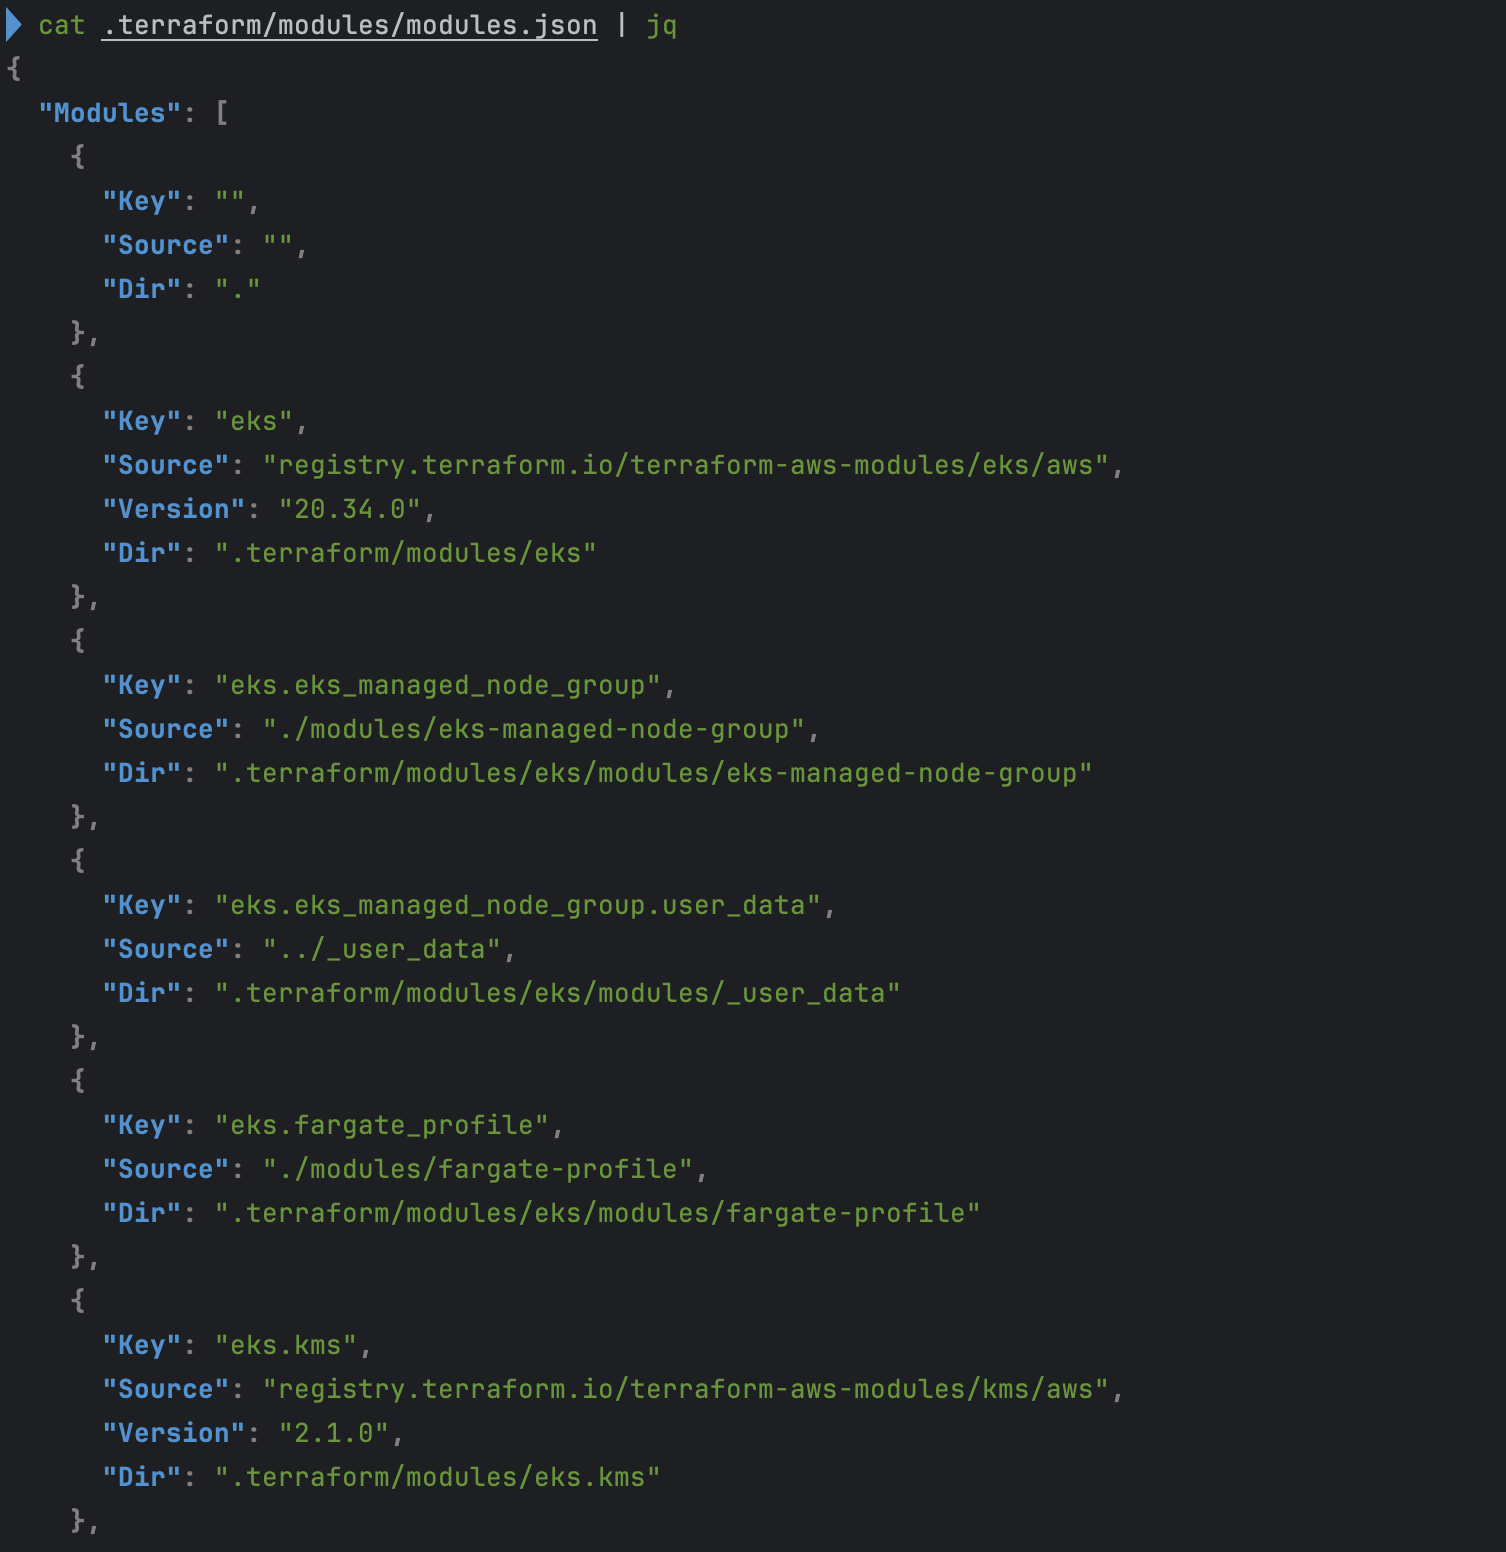
tree .terraform
cat .terraform/modules/modules.json | jq
tree .terraform/providers/registry.terraform.io/hashicorp -L 2
# plan
terraform plan- .terraform
- module.json
- hashicorp (각 module 별 version 확인)

- terraform plan
EKS 배포
- code
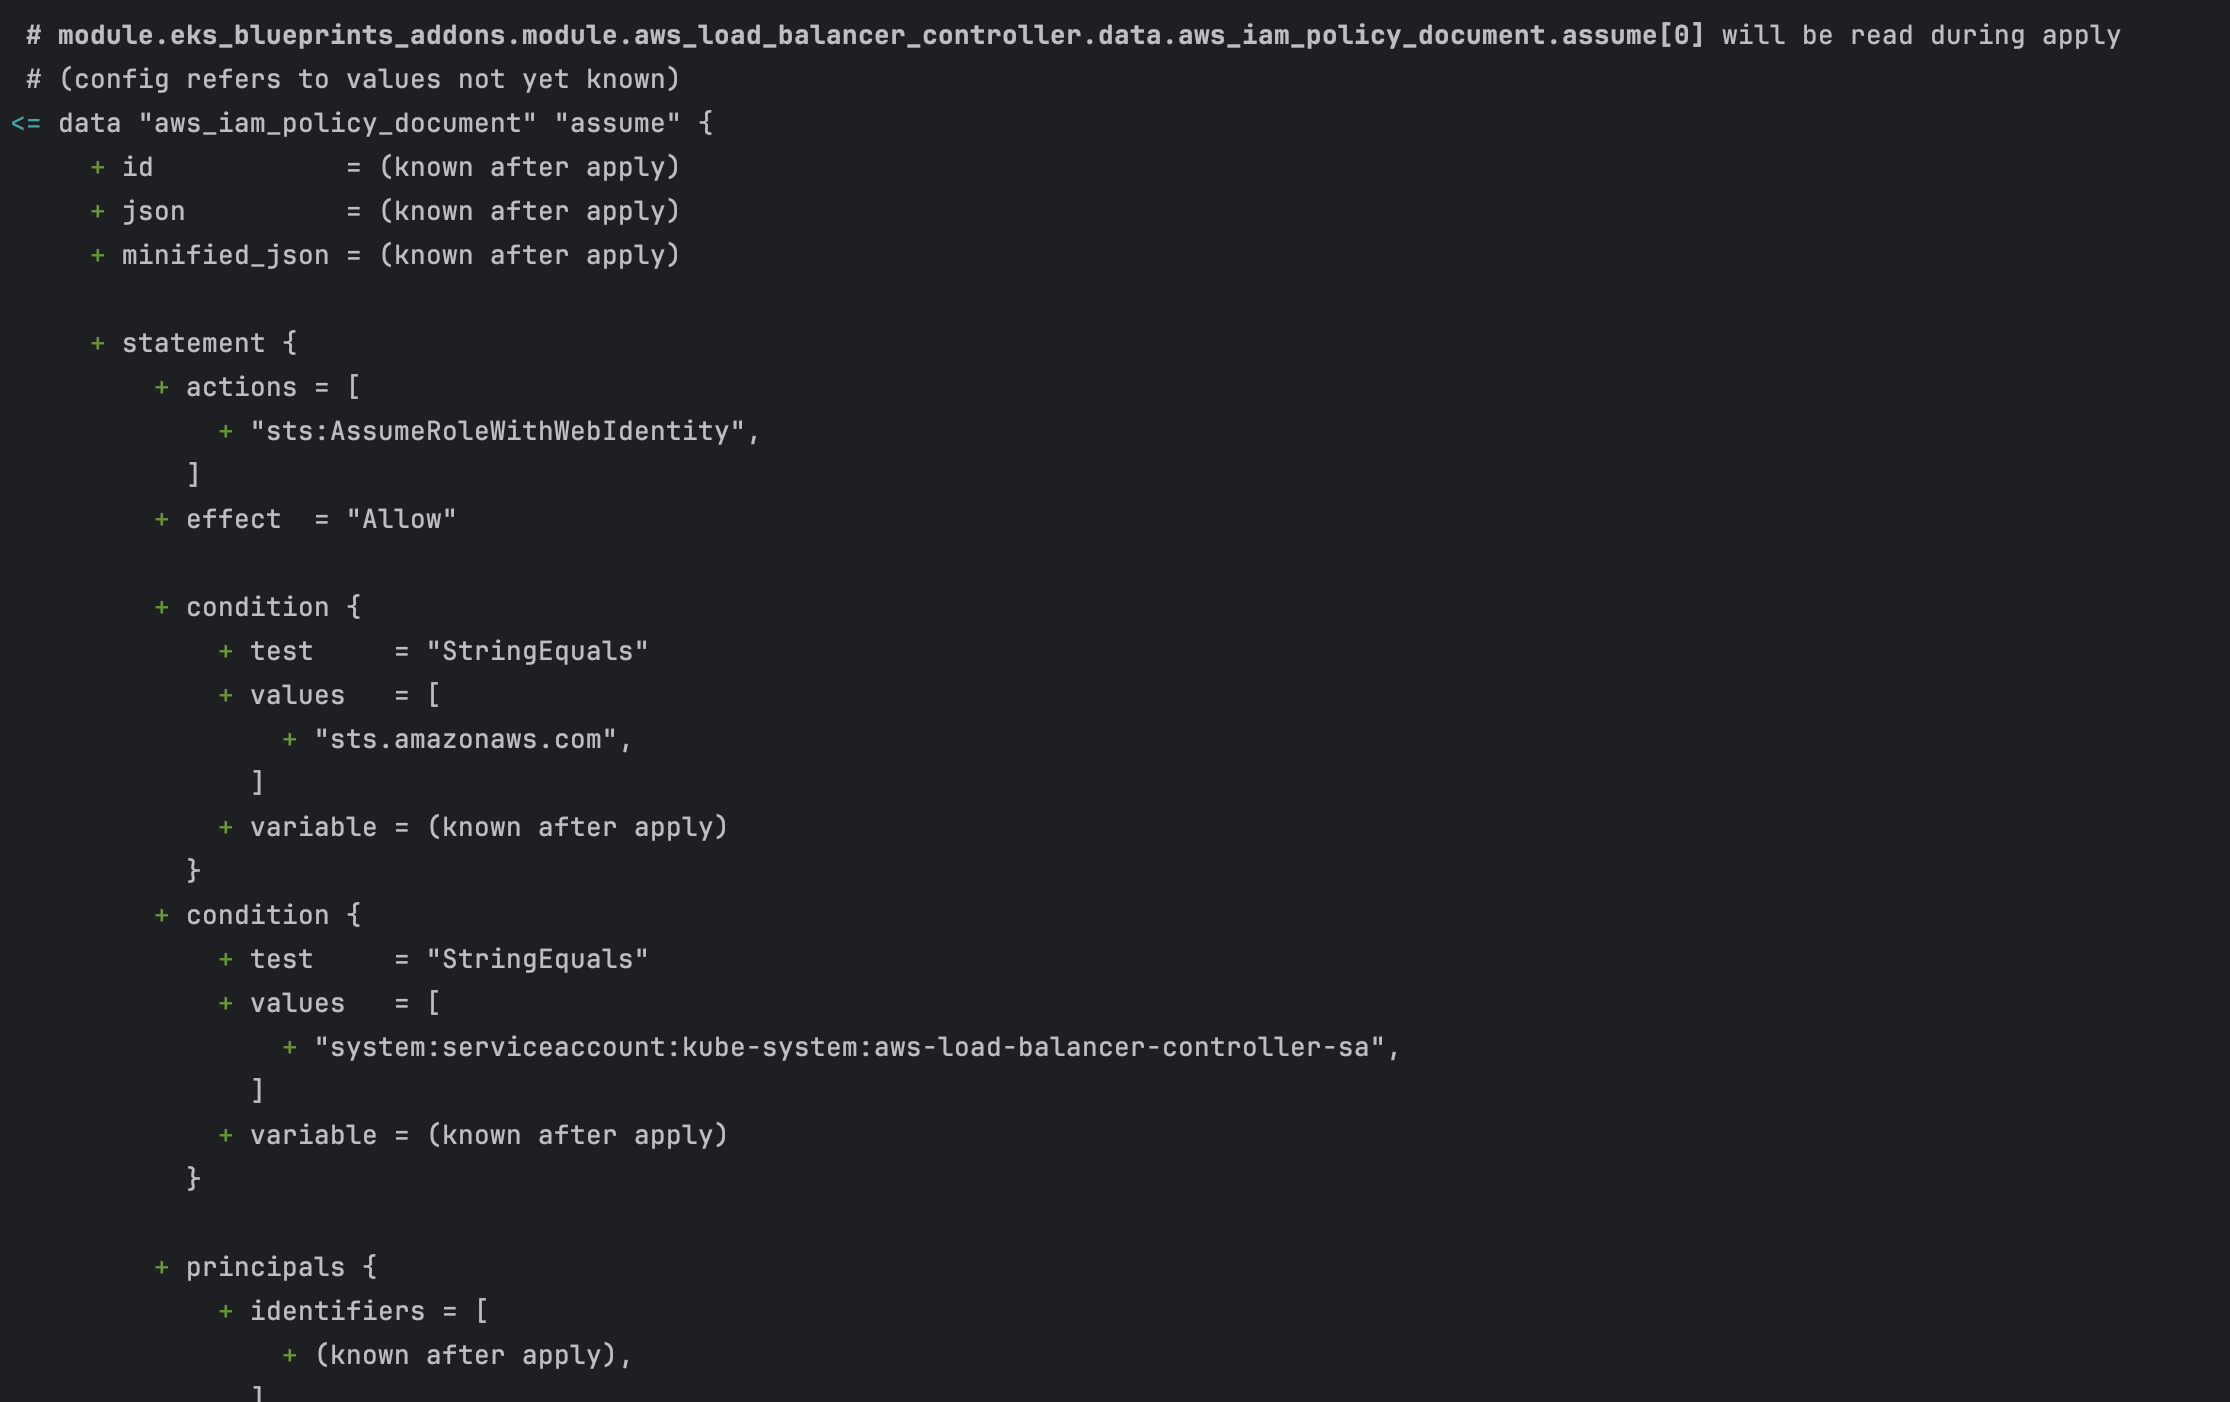
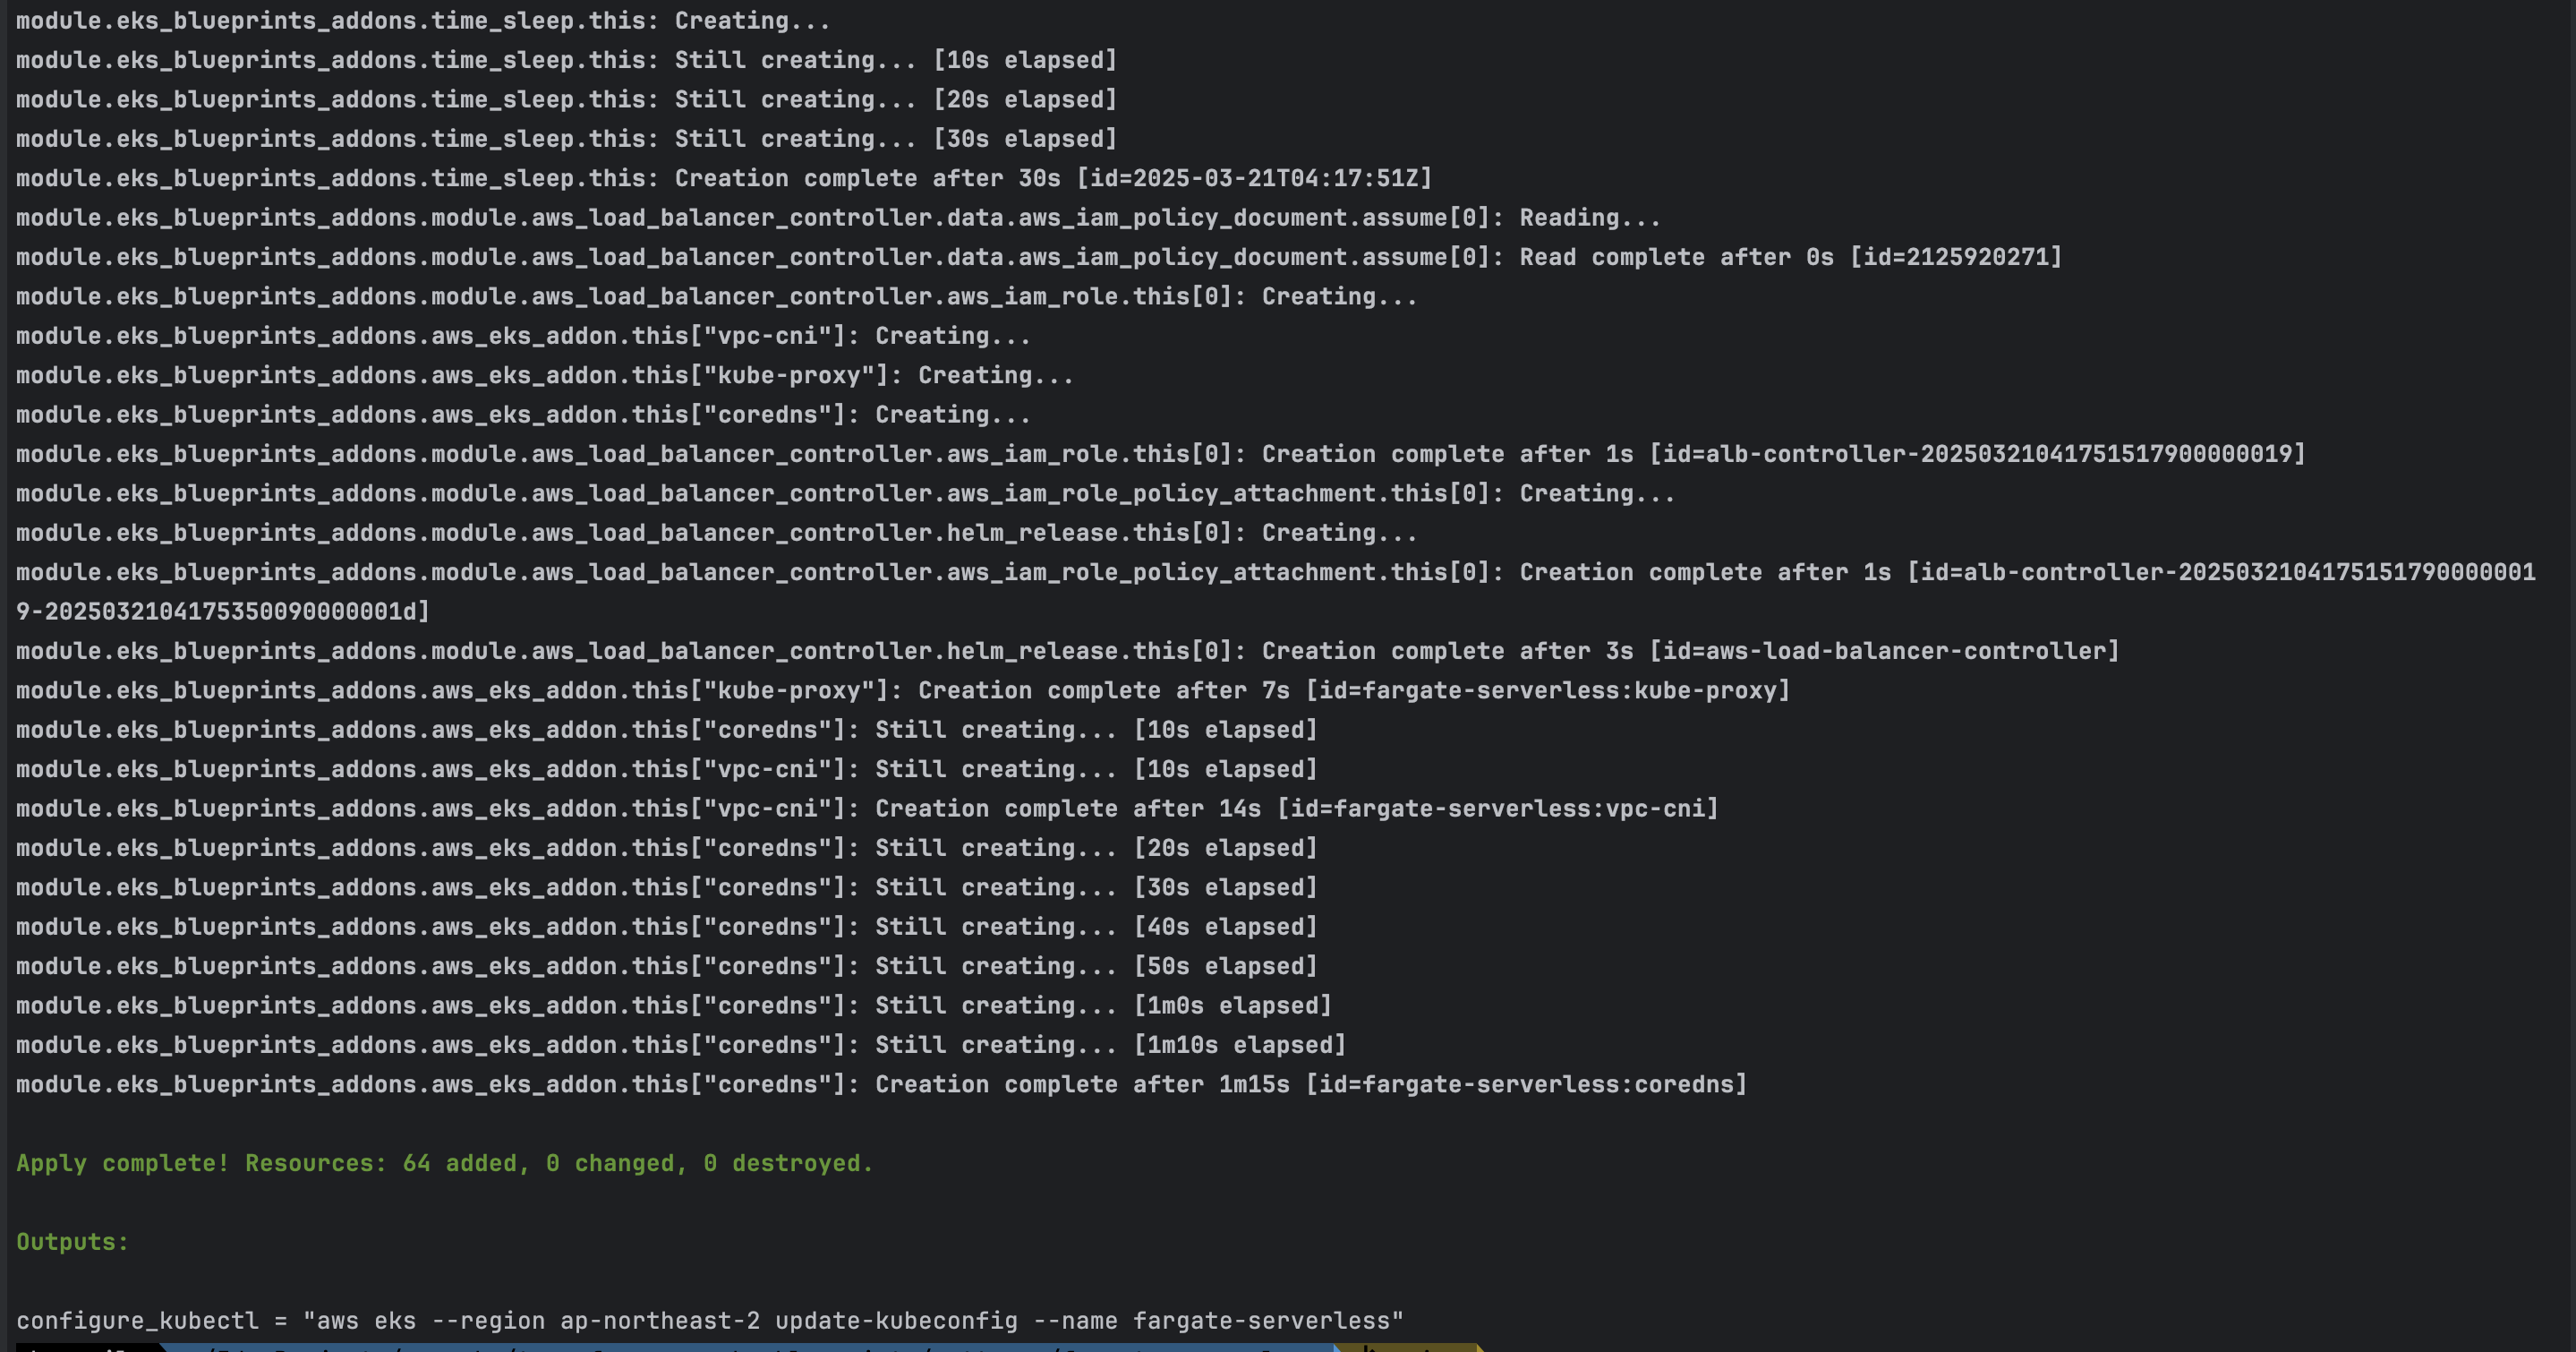
# 배포 : EKS, Add-ons, fargate profile - 13분 소요
terraform apply -auto-approve
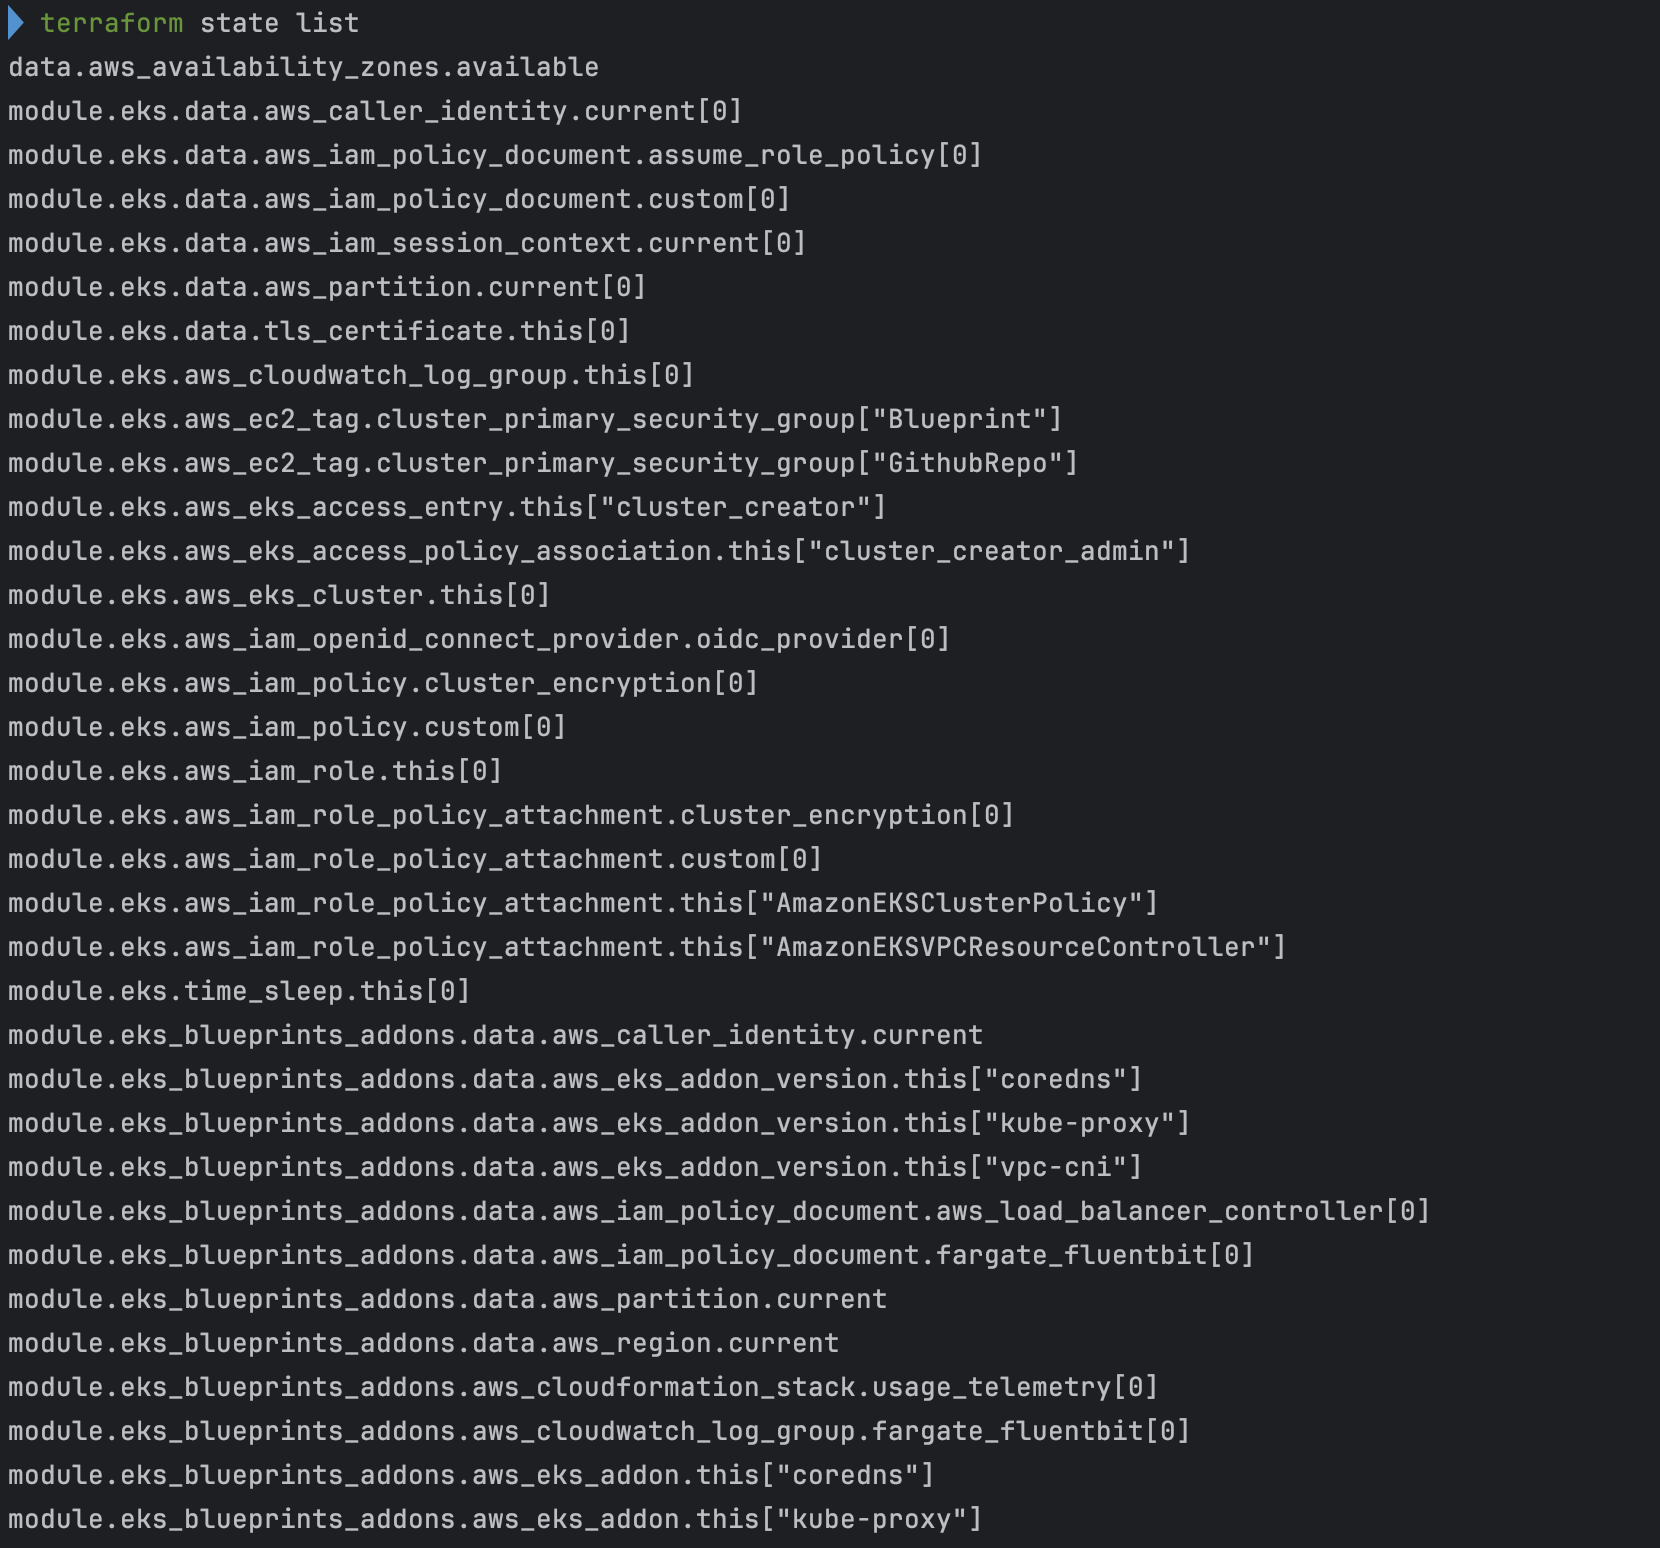
# 배포 완료 후 확인
terraform state list
terraform output
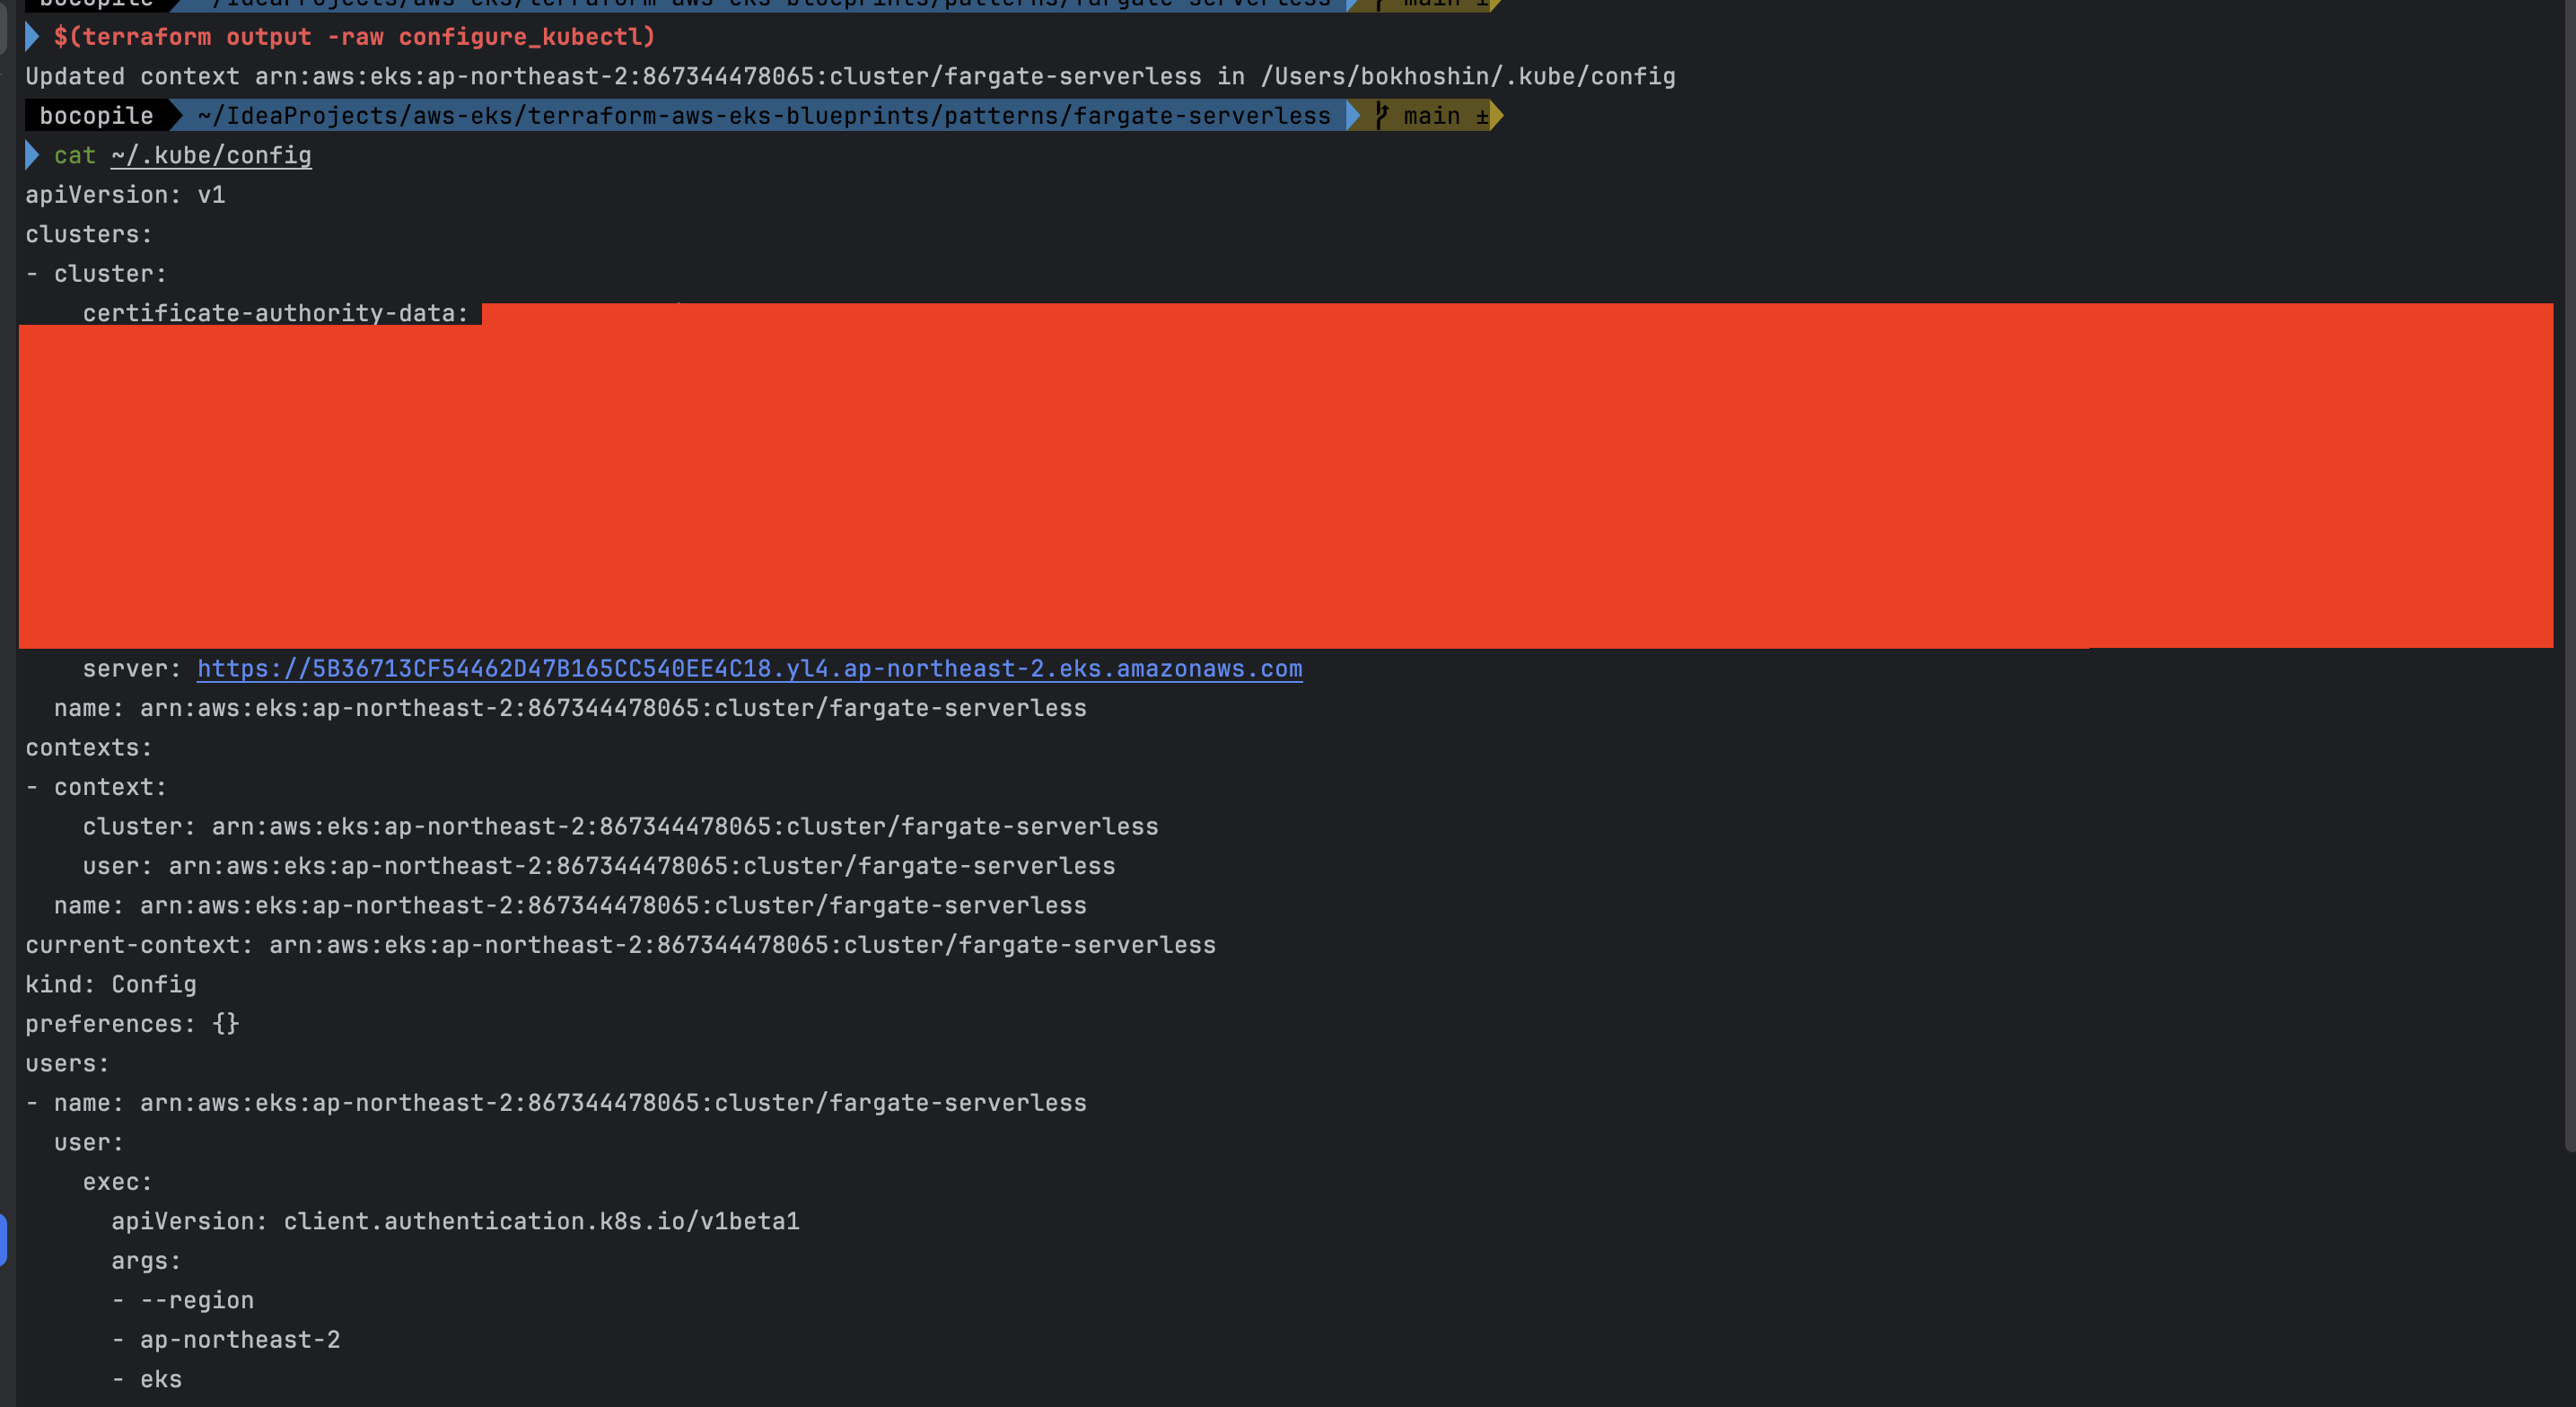
# EKS 자격증명
$(terraform output -raw configure_kubectl) # aws eks --region ap-northeast-2 update-kubeconfig --name fargate-serverless
cat ~/.kube/config
# kubectl context 변경
kubectl ctx
kubectl config rename-context "arn:aws:eks:ap-northeast-2:$(aws sts get-caller-identity --query 'Account' --output text):cluster/fargate-serverless" "fargate-lab"
# k8s 노드, 파드 정보 확인
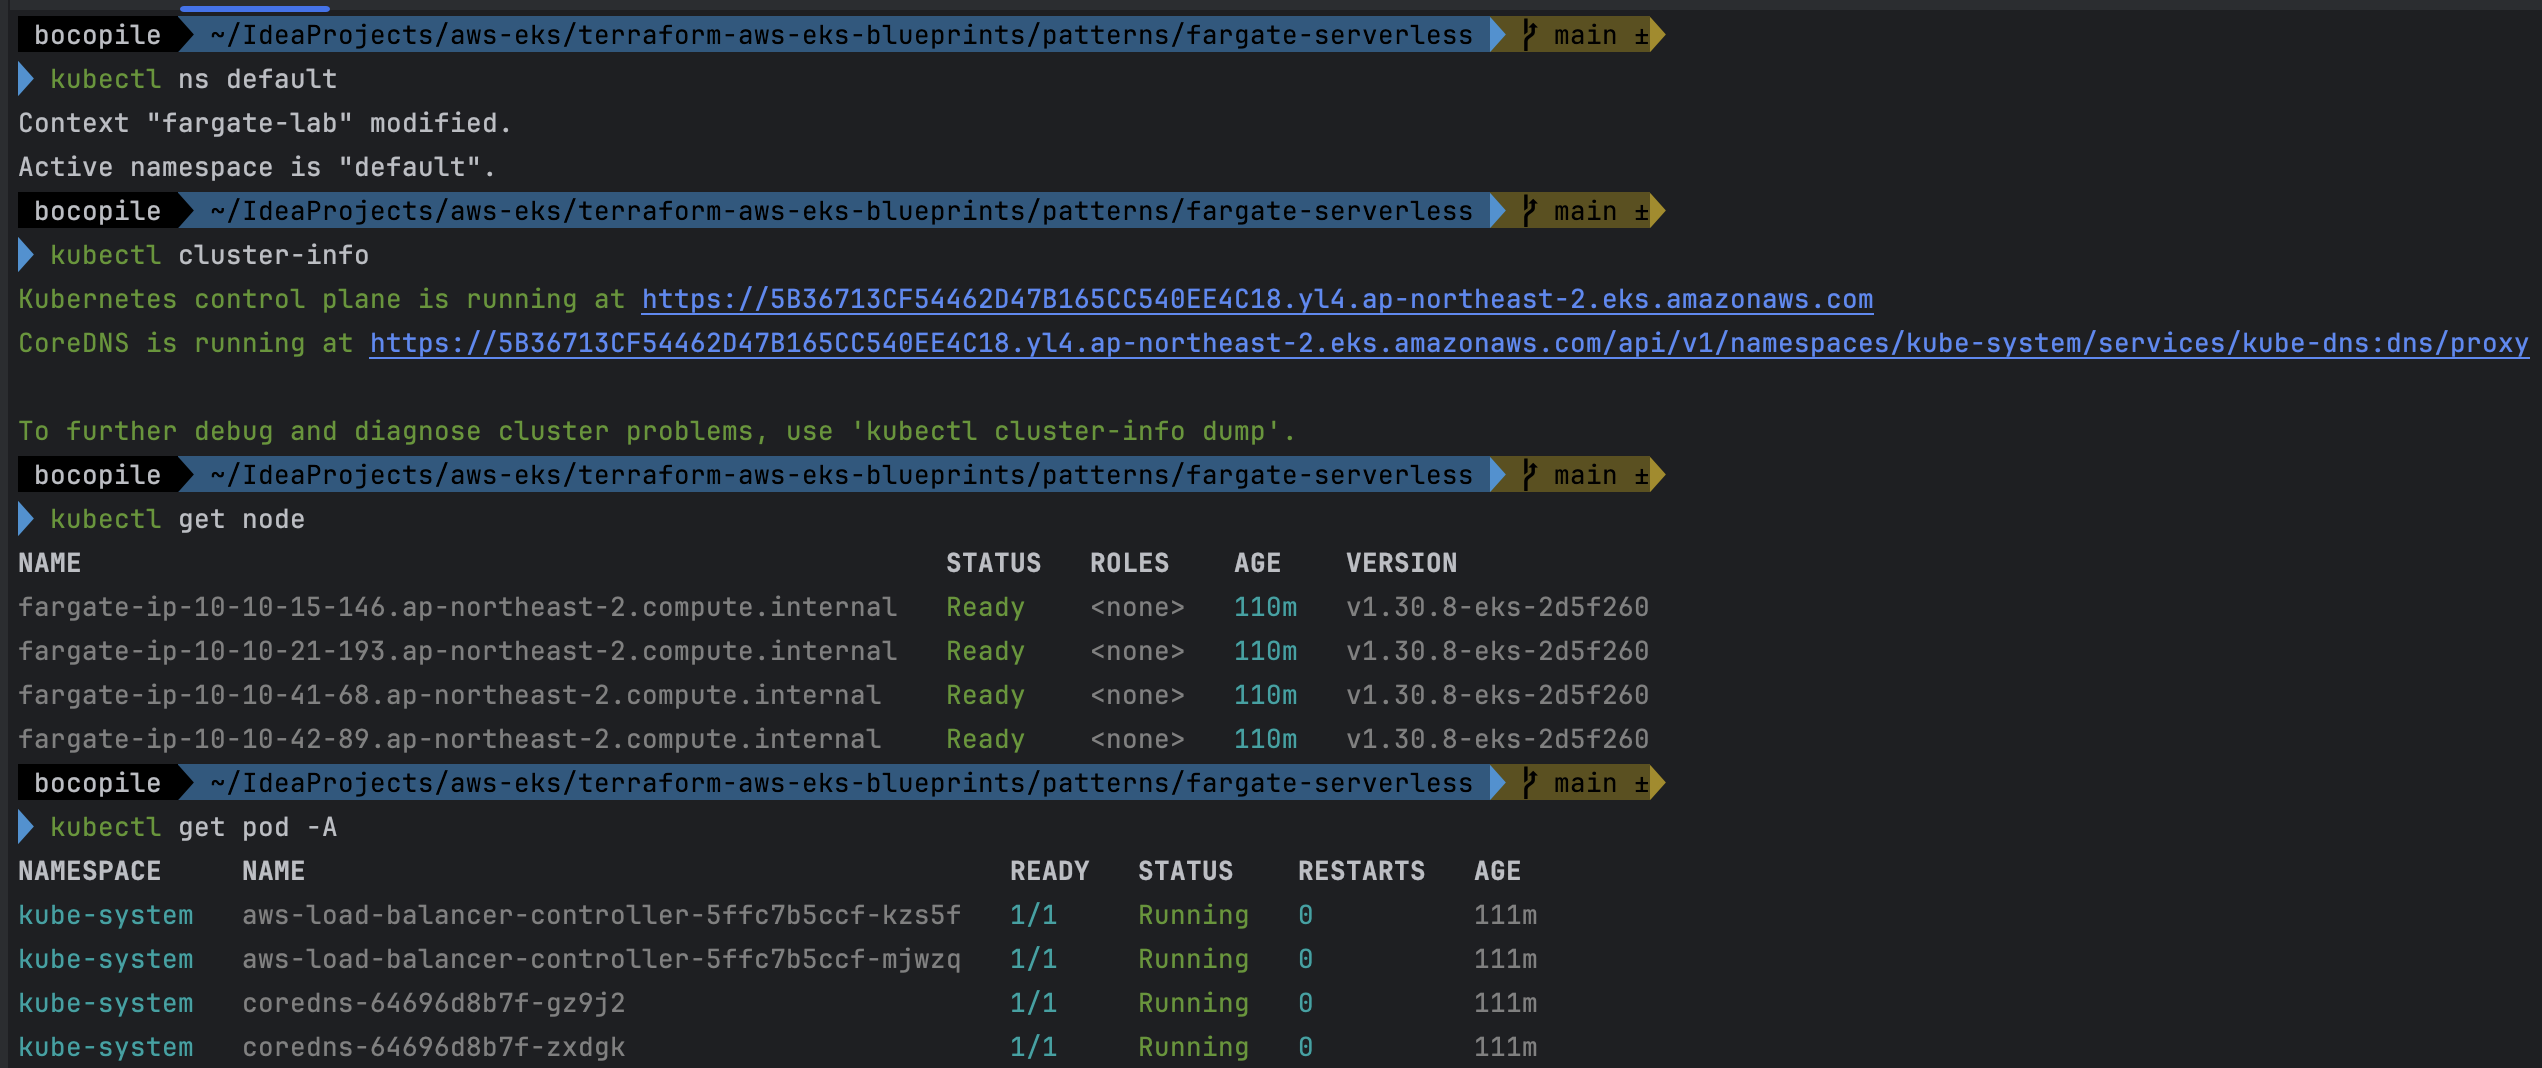
kubectl ns default
kubectl cluster-info
kubectl get node
kubectl get pod -A
# 상세 정보 확인
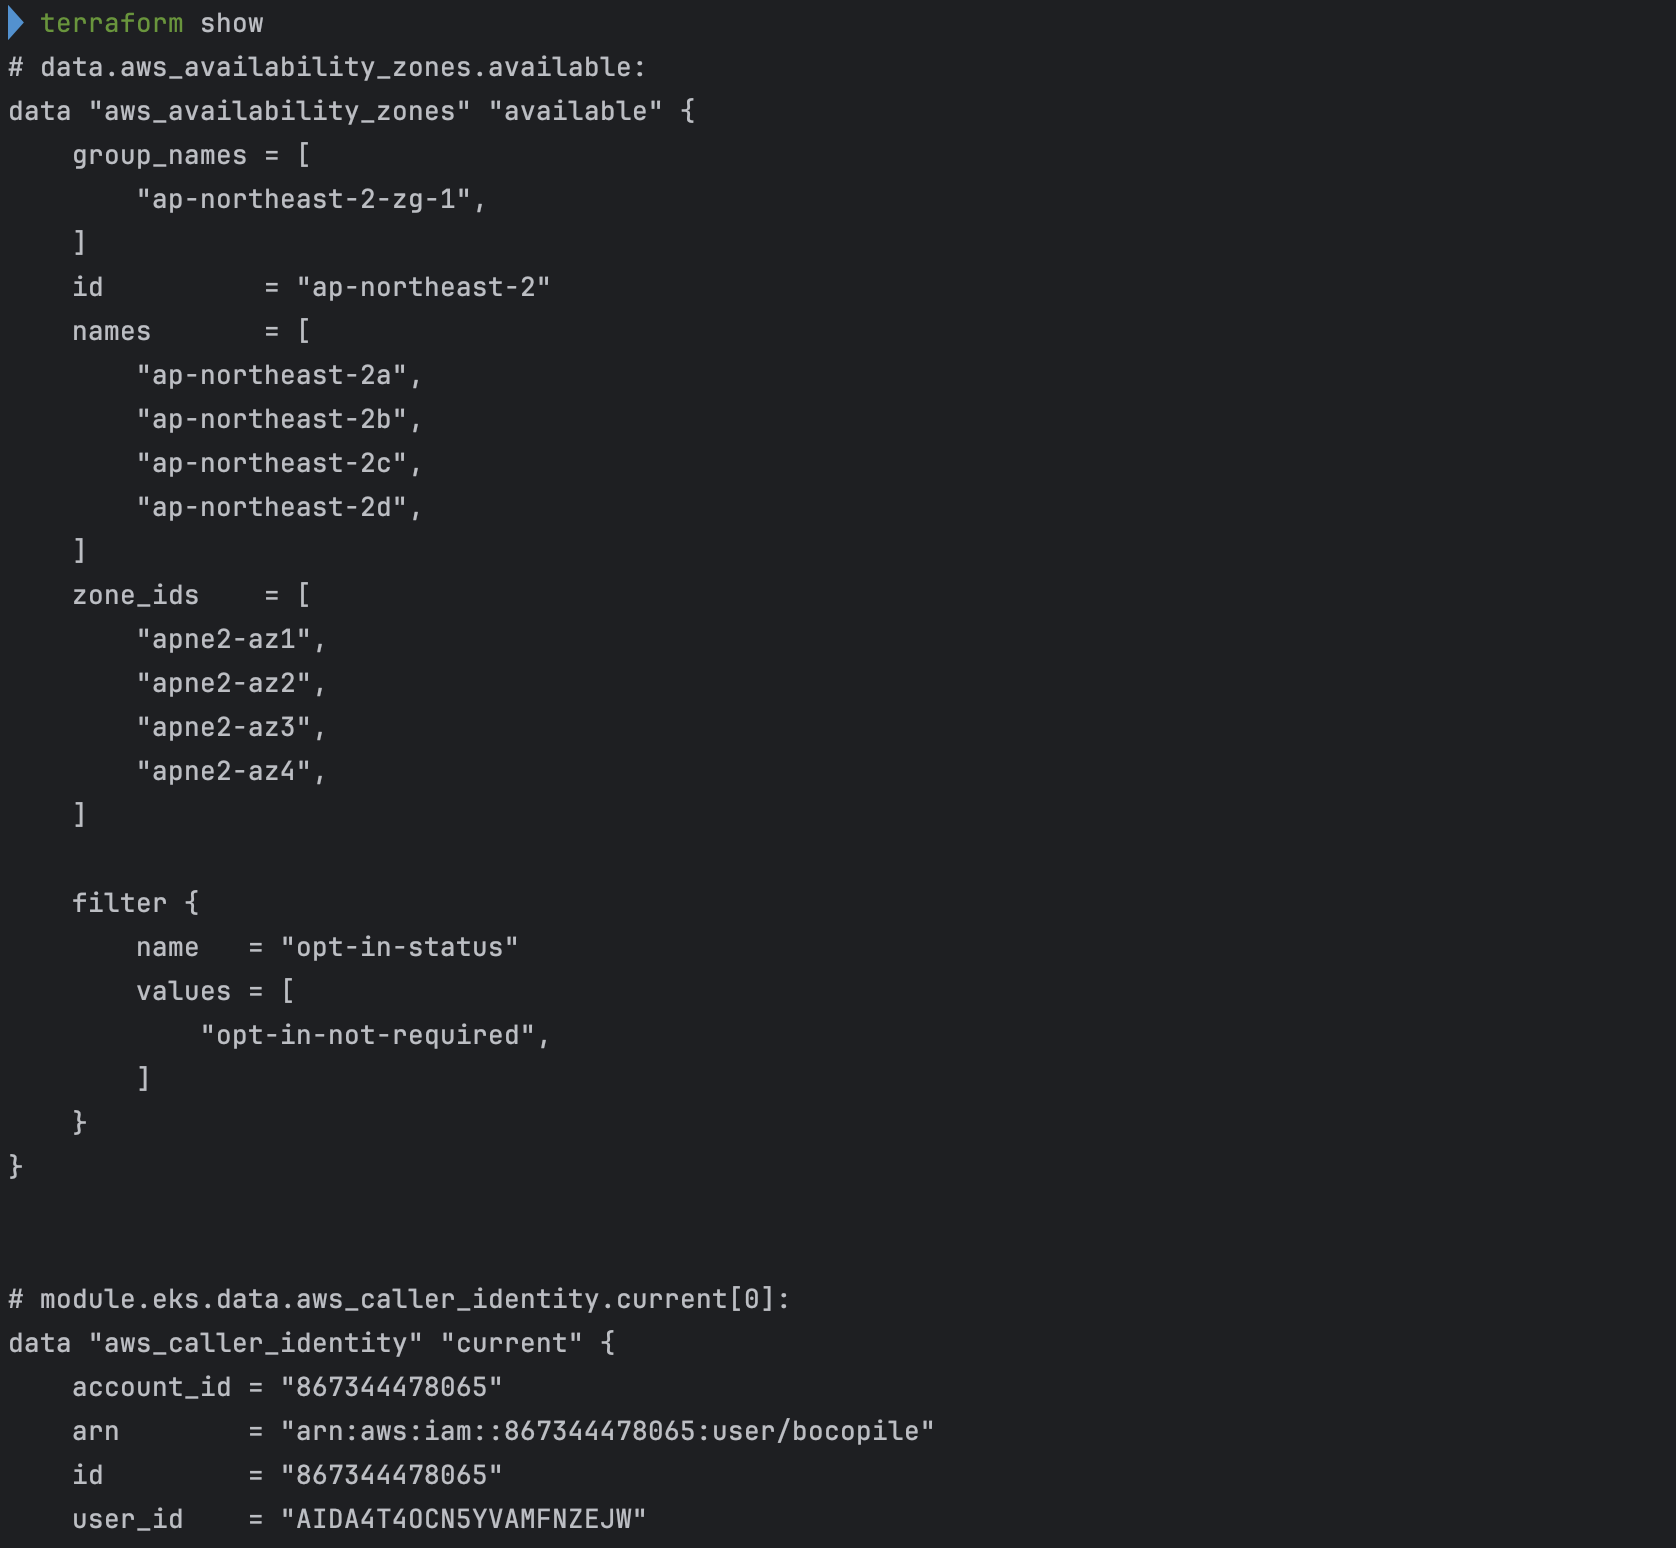
terraform show
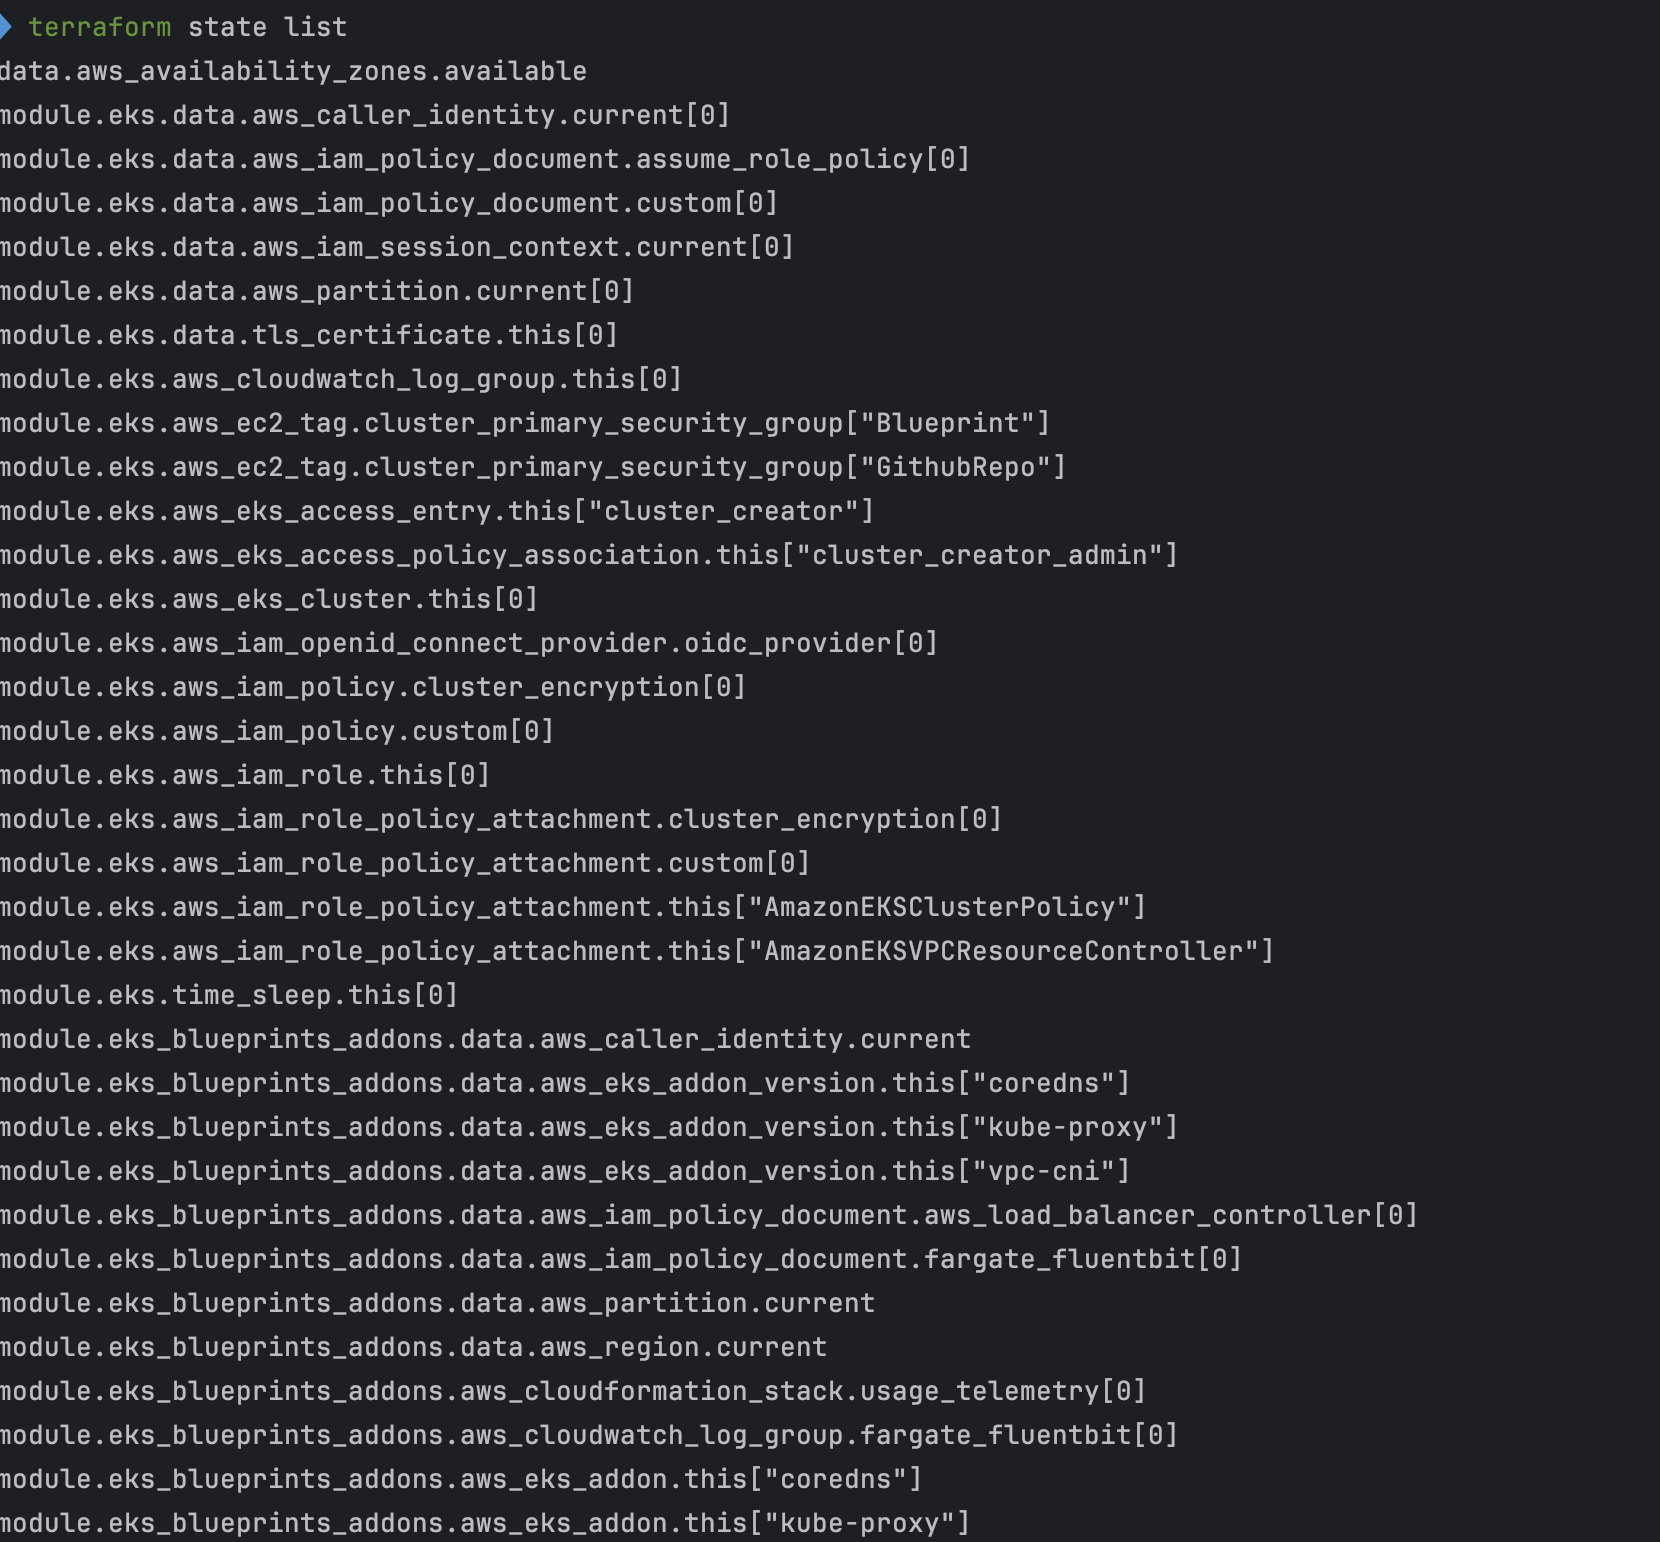
terraform state list- 배포
- 배포 후 확인

- EKS 자격 증명
- kubectl context 변경

- k8s 노드, 파드 정보 확인
- 상세 정보 확인
기본 정보 확인
- code
# k8s api service 확인 : ENDPOINTS 의 IP는 EKS Owned-ENI 2개
kubectl get svc,ep
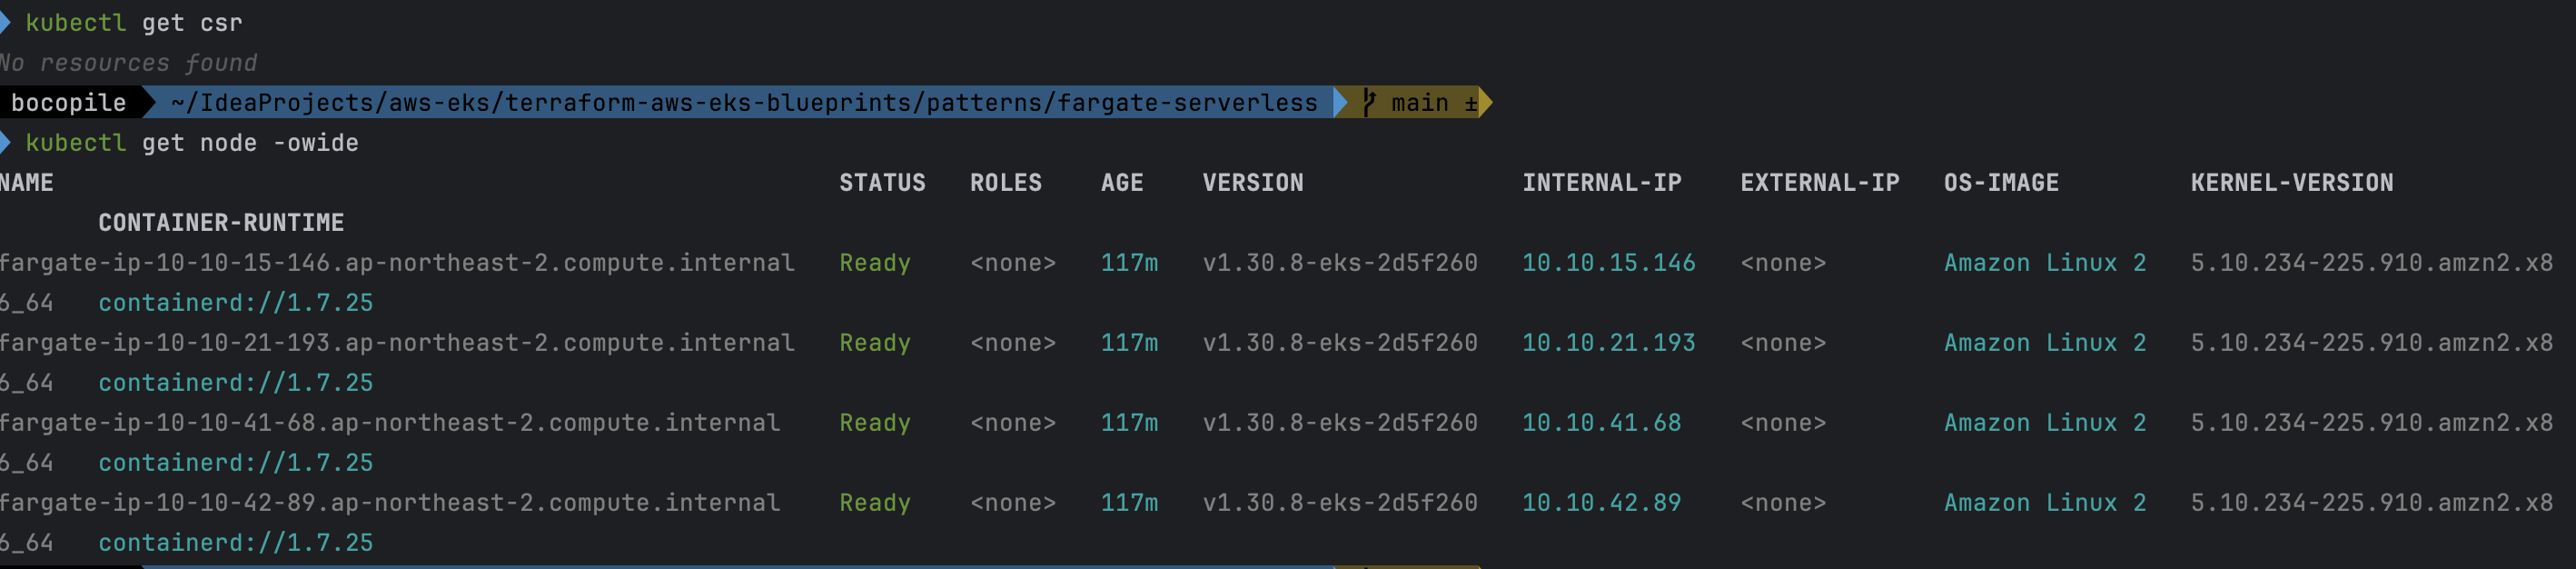
# node 확인 : 노드(Micro VM) 4대
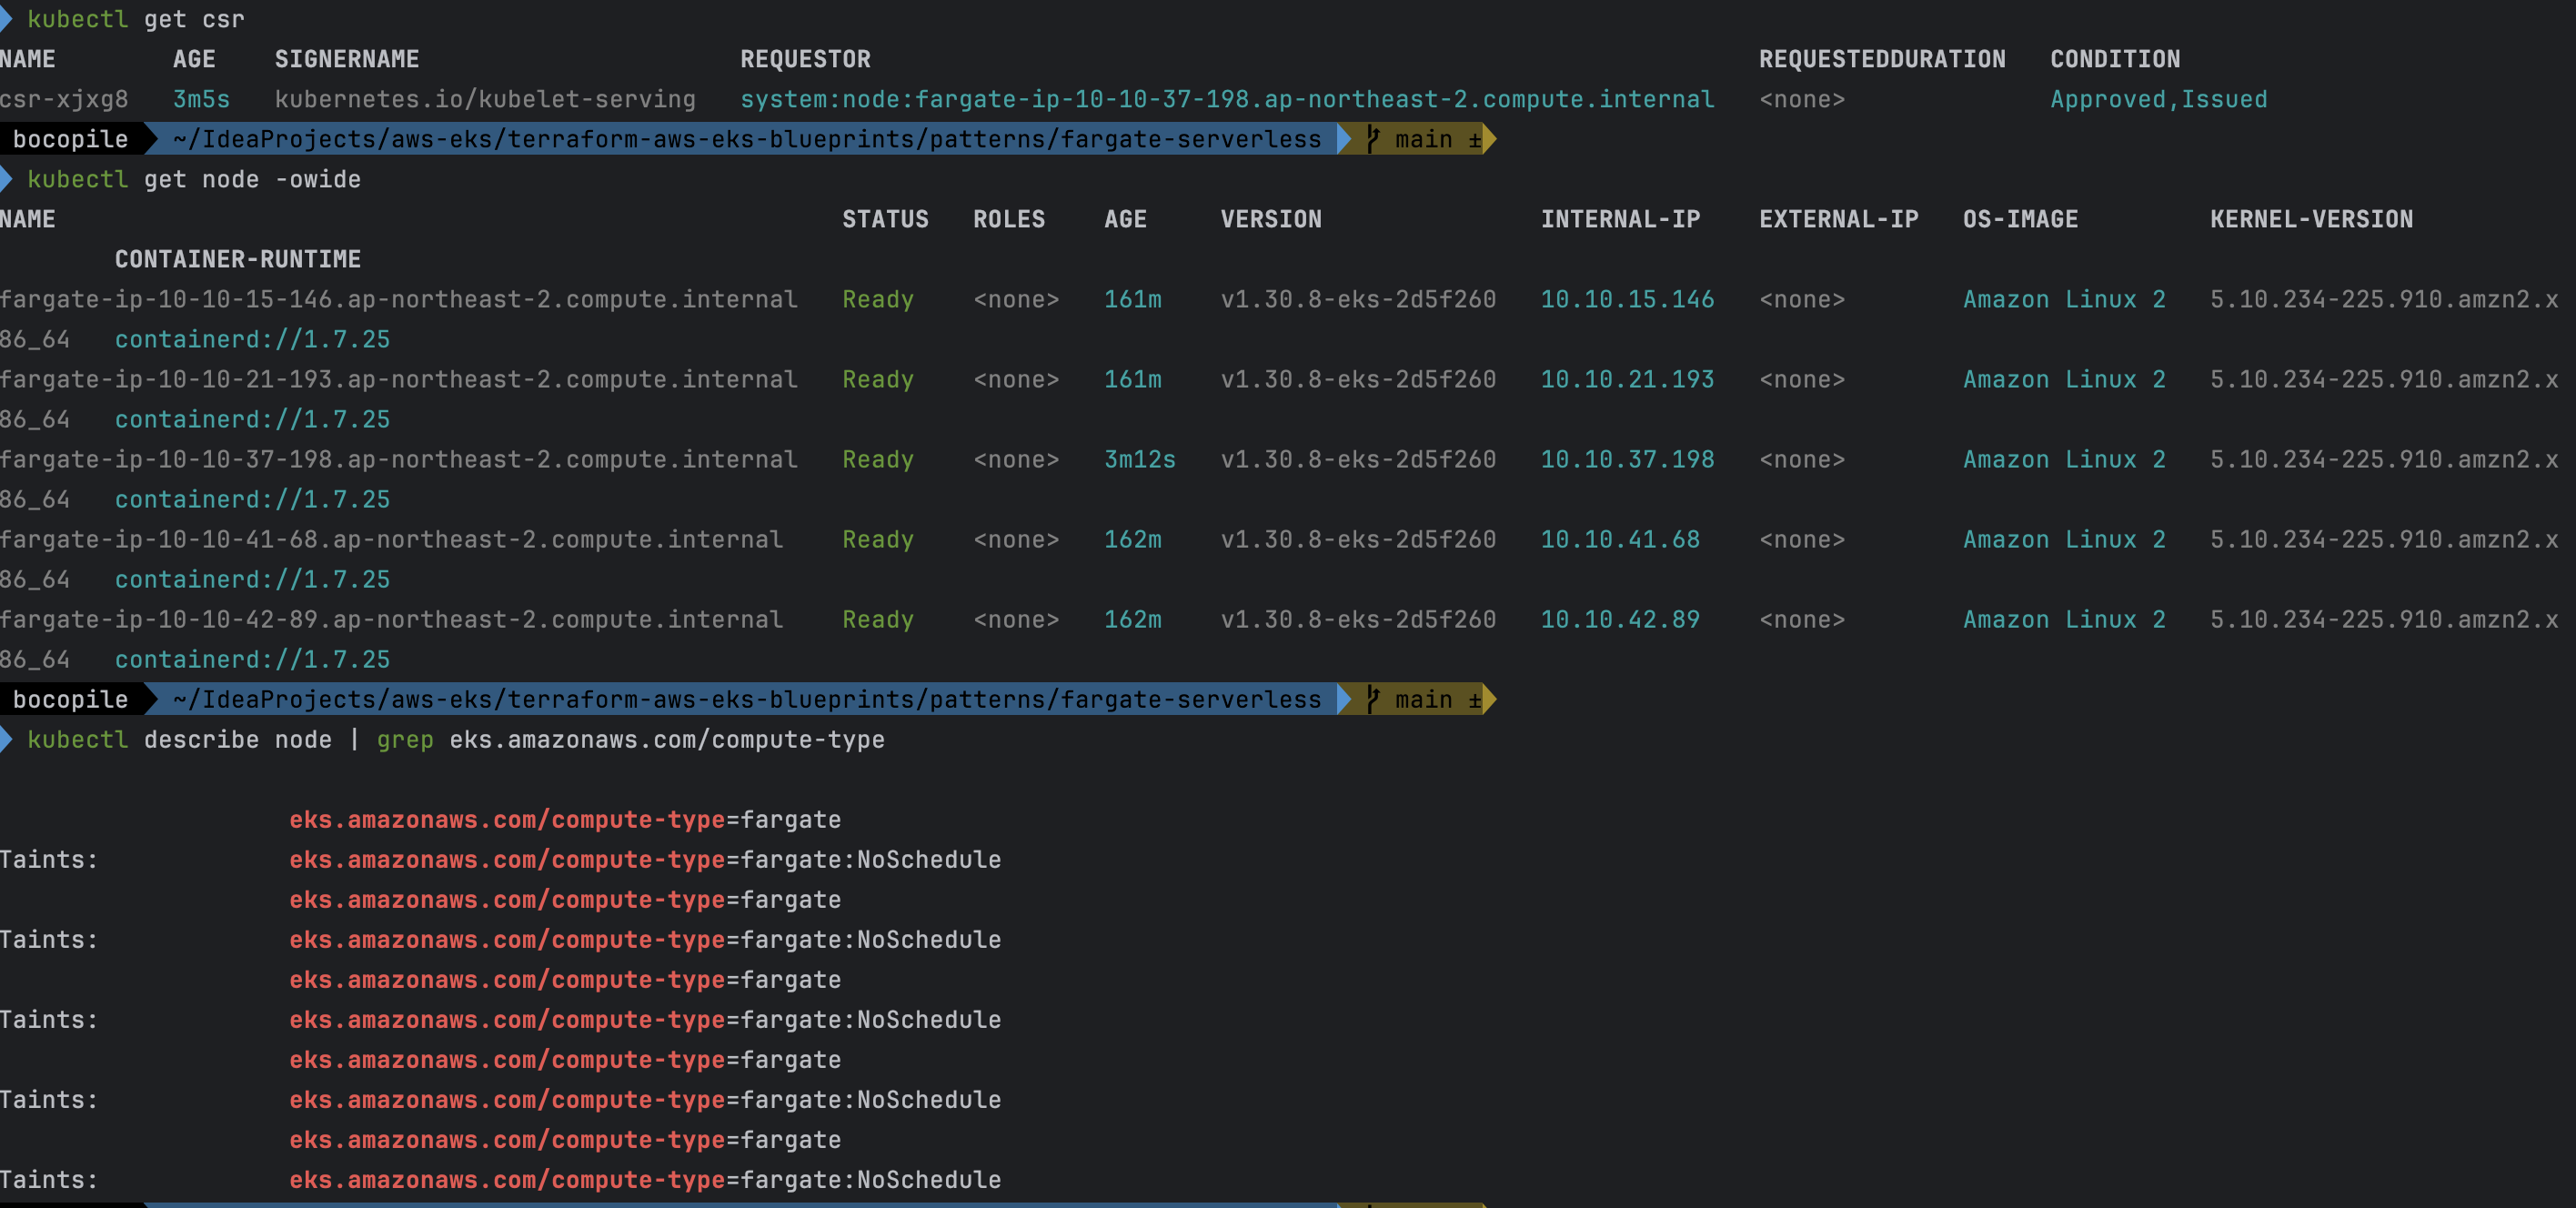
kubectl get csr
kubectl get node -owide
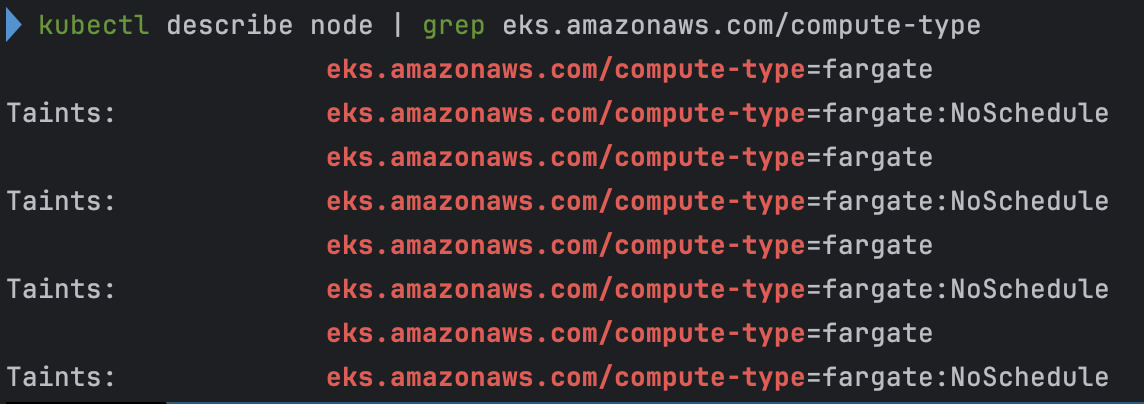
kubectl describe node | grep eks.amazonaws.com/compute-type
# 파드 확인 : 파드의 IP와 노드의 IP가 같다!
kubectl get pdb -n kube-system
kubectl get pod -A -owide
# aws-load-balancer-webhook-service , eks-extension-metrics-api?
kubectl get svc,ep -n kube-system
# eks-extension-metrics-api?
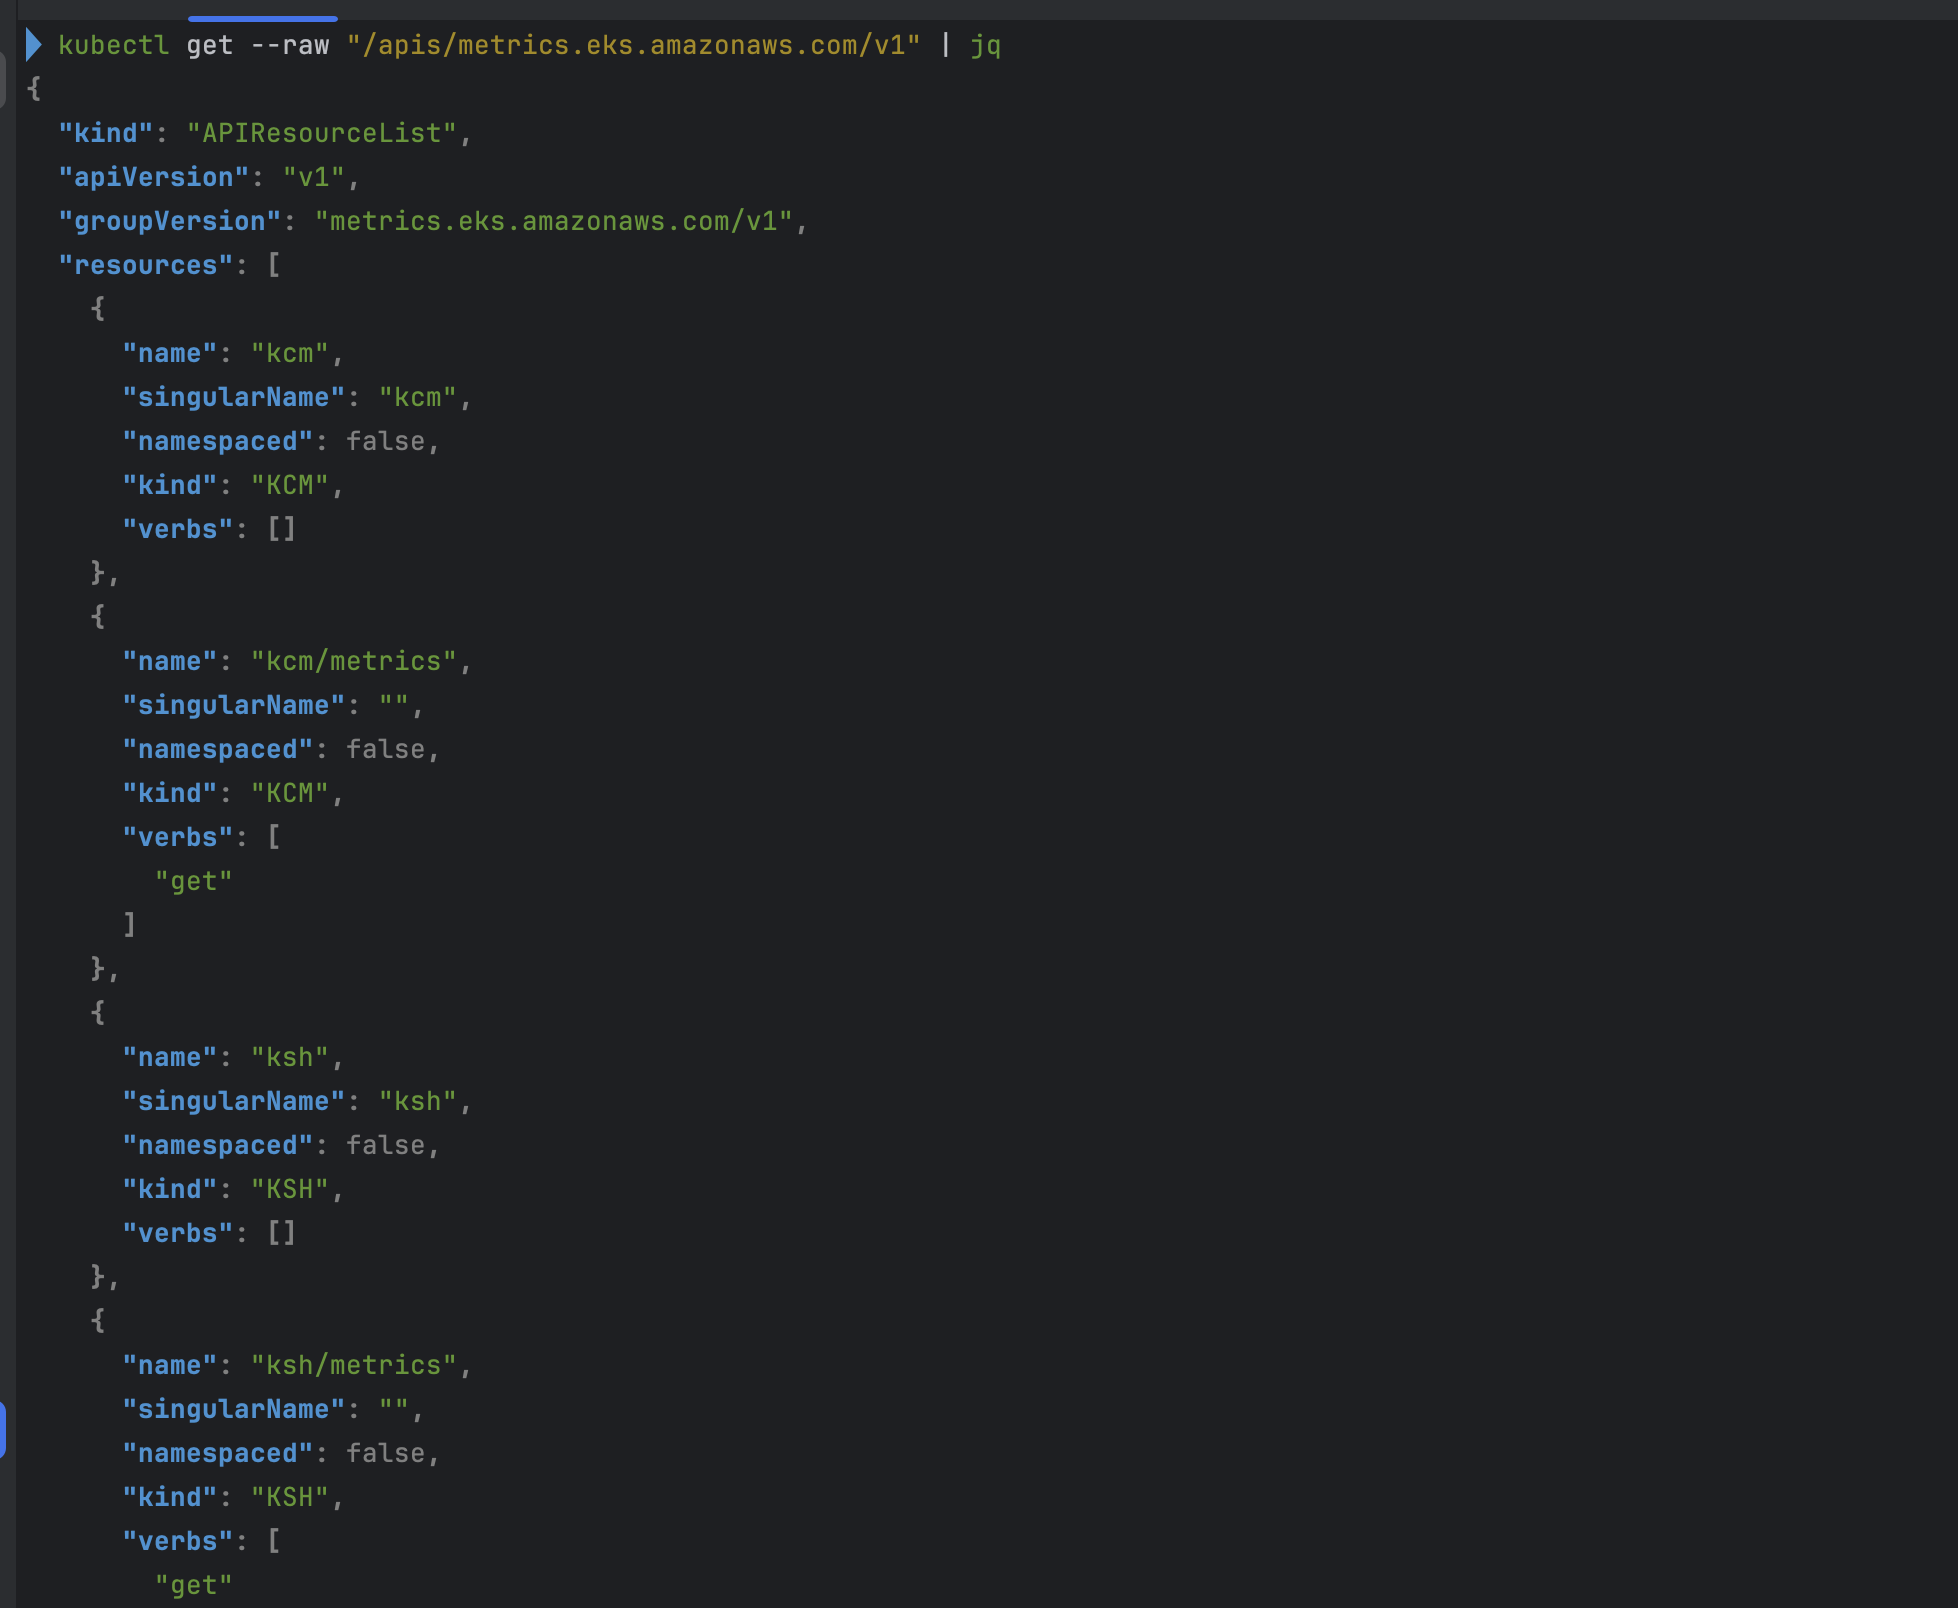
kubectl get apiservices.apiregistration.k8s.io | grep eks
kubectl get --raw "/apis/metrics.eks.amazonaws.com" | jq
kubectl get --raw "/apis/metrics.eks.amazonaws.com/v1" | jq
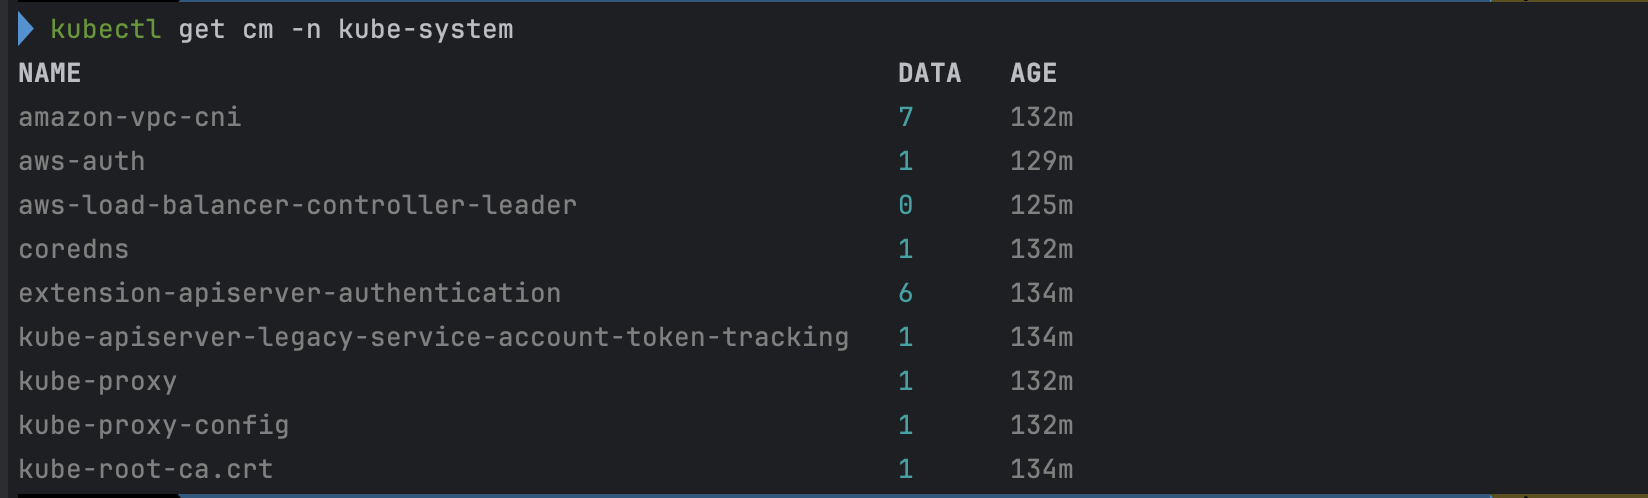
# configmap 확인
kubectl get cm -n kube-system
...
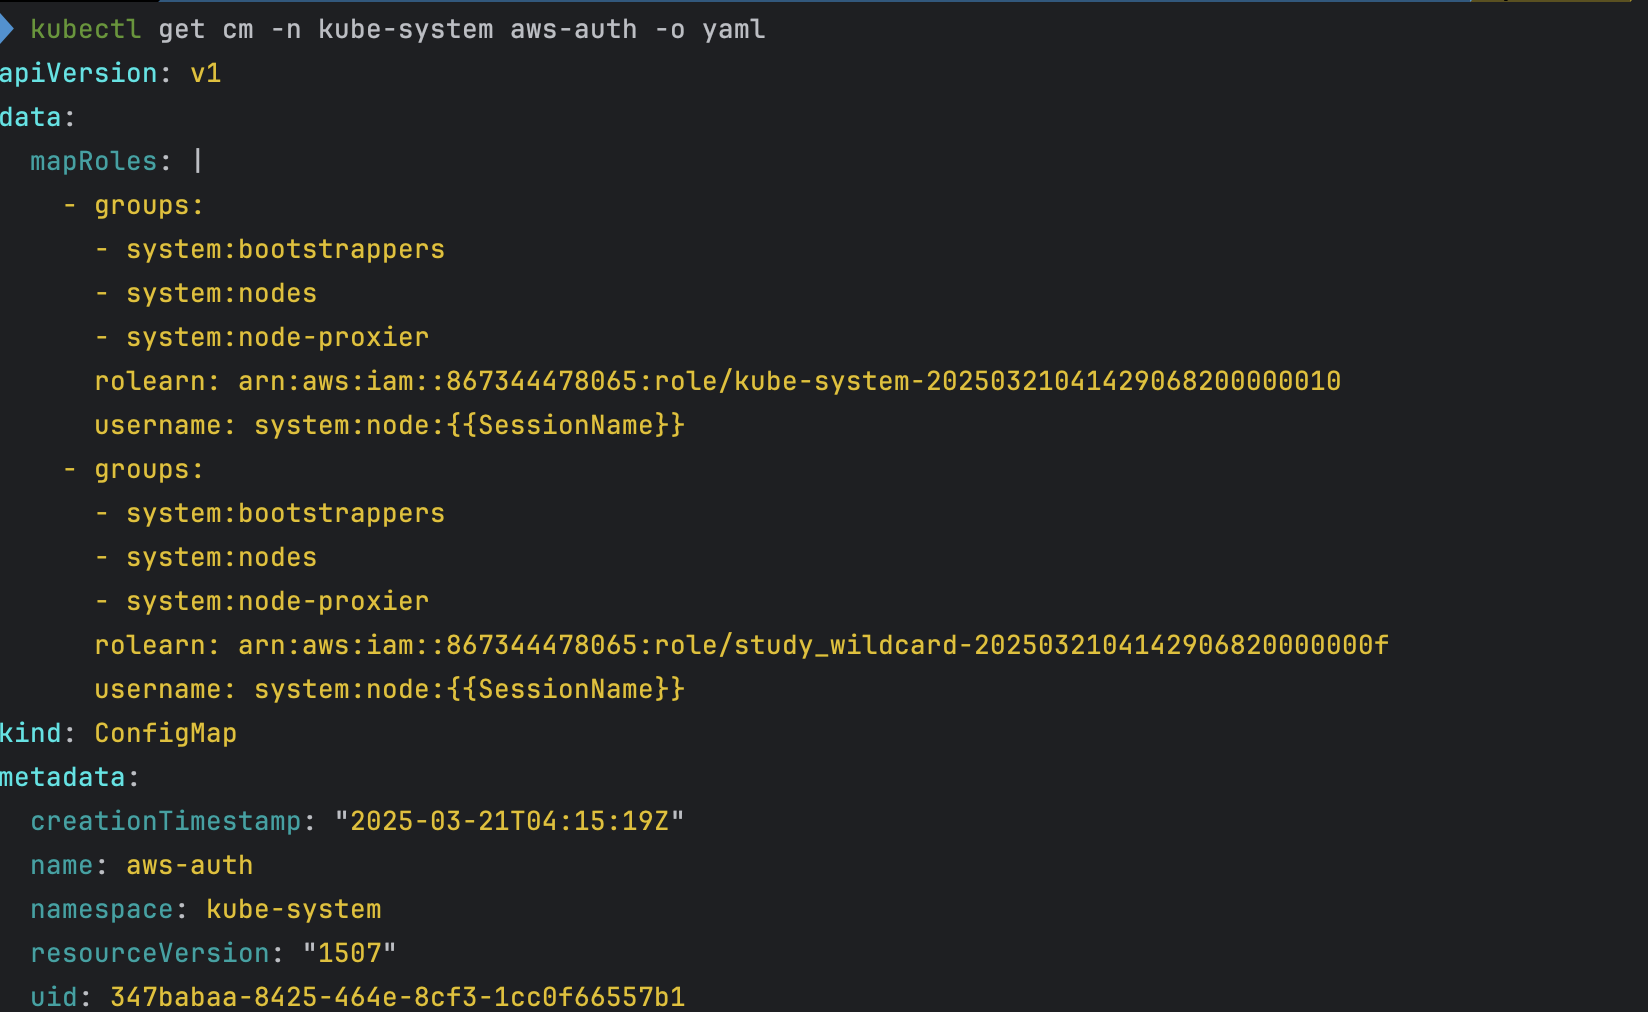
# aws-auth 보다 우선해서 IAM access entry 가 있음을 참고.
# 기본 관리노드 보다 system:node-proxier 그룹이 추가되어 있음.
# fargate profile 이 2개인데, 그 profile 갯수만큼 있음.
kubectl get cm -n kube-system aws-auth -o yaml
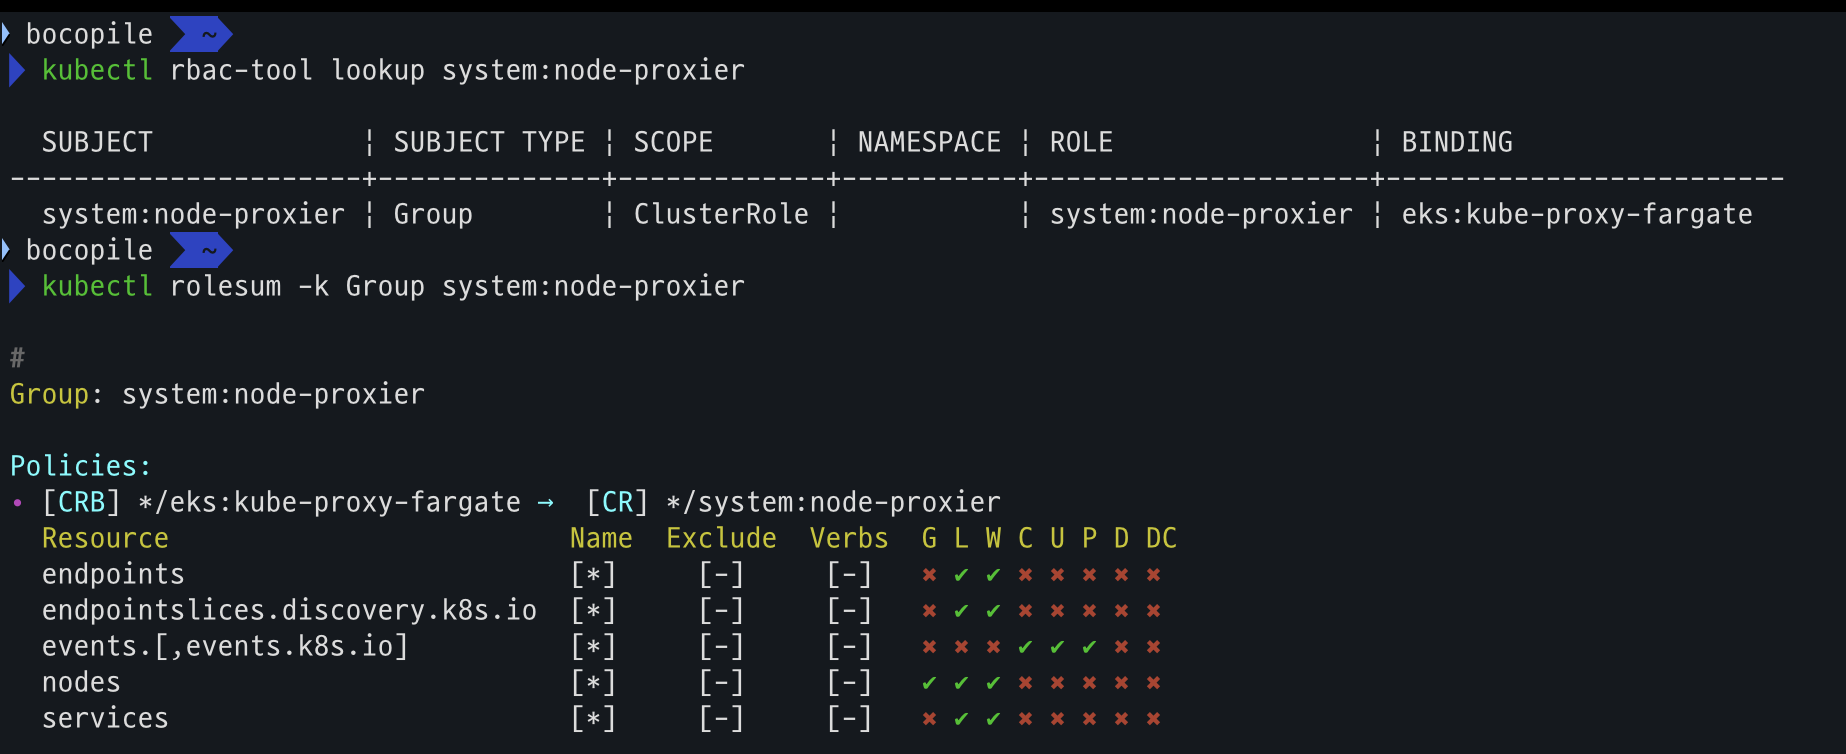
kubectl rbac-tool lookup system:node-proxier
kubectl rolesum -k Group system:node-proxier
#
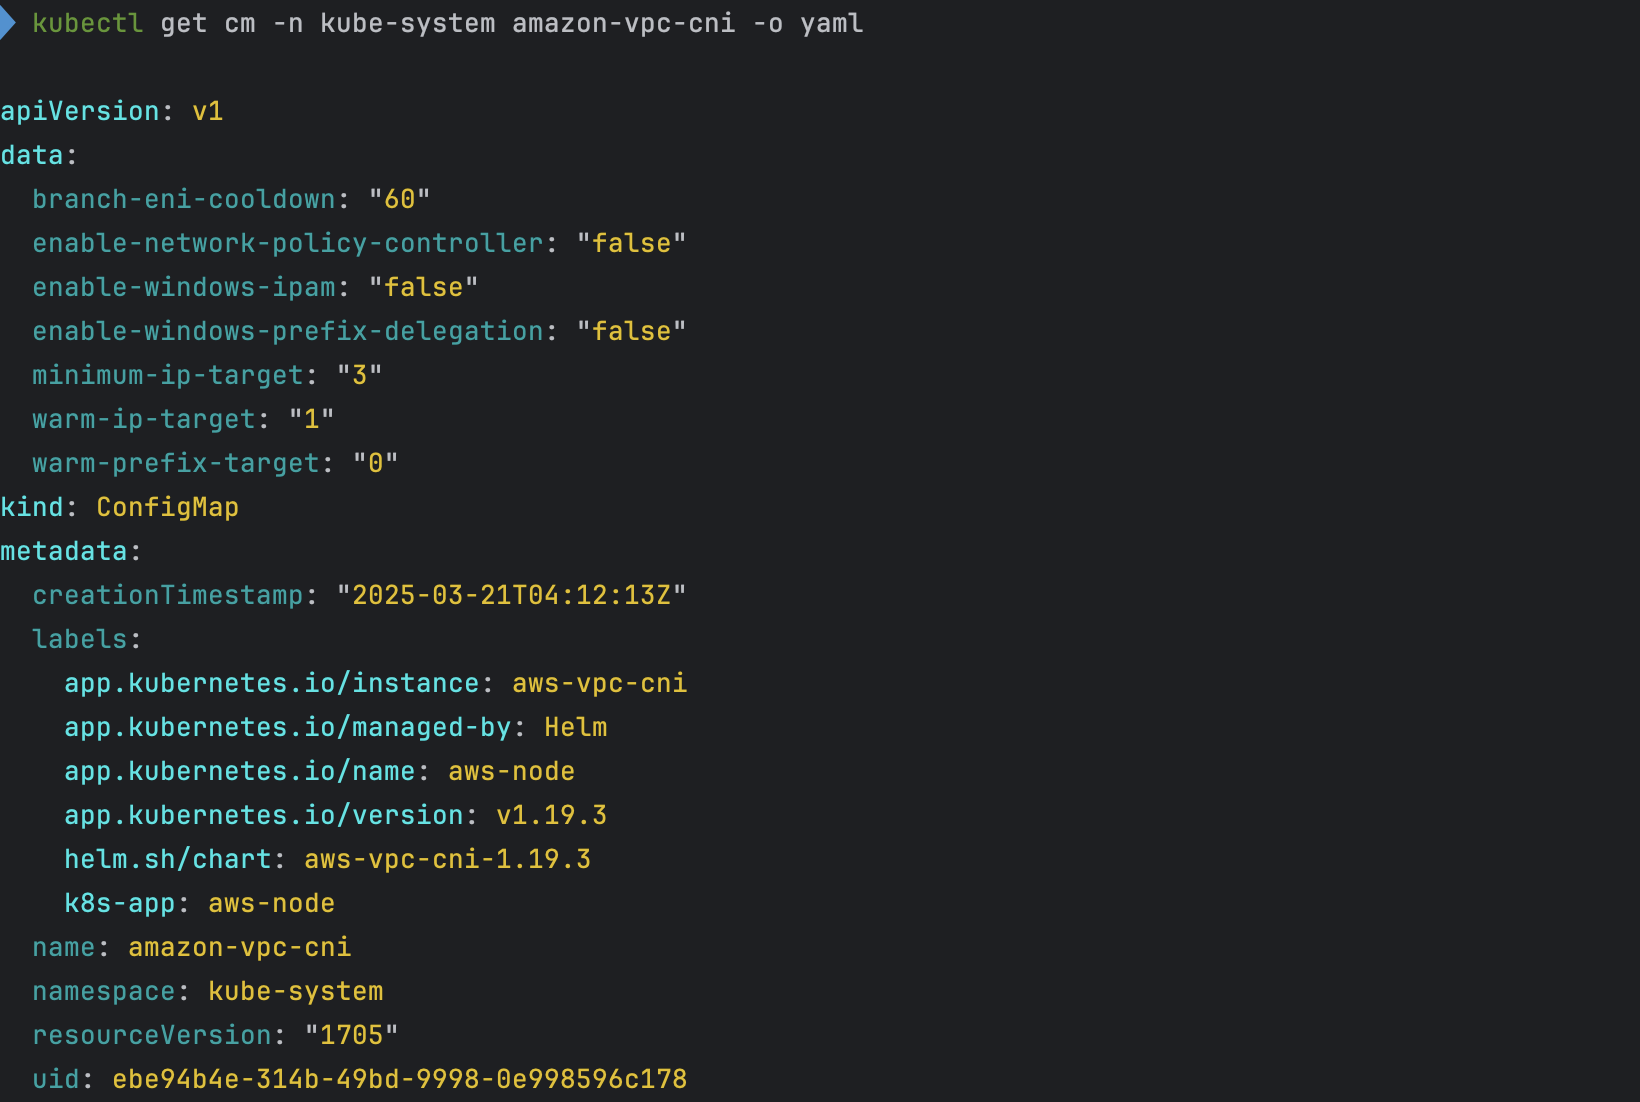
kubectl get cm -n kube-system amazon-vpc-cni -o yaml
# coredns 설정 내용
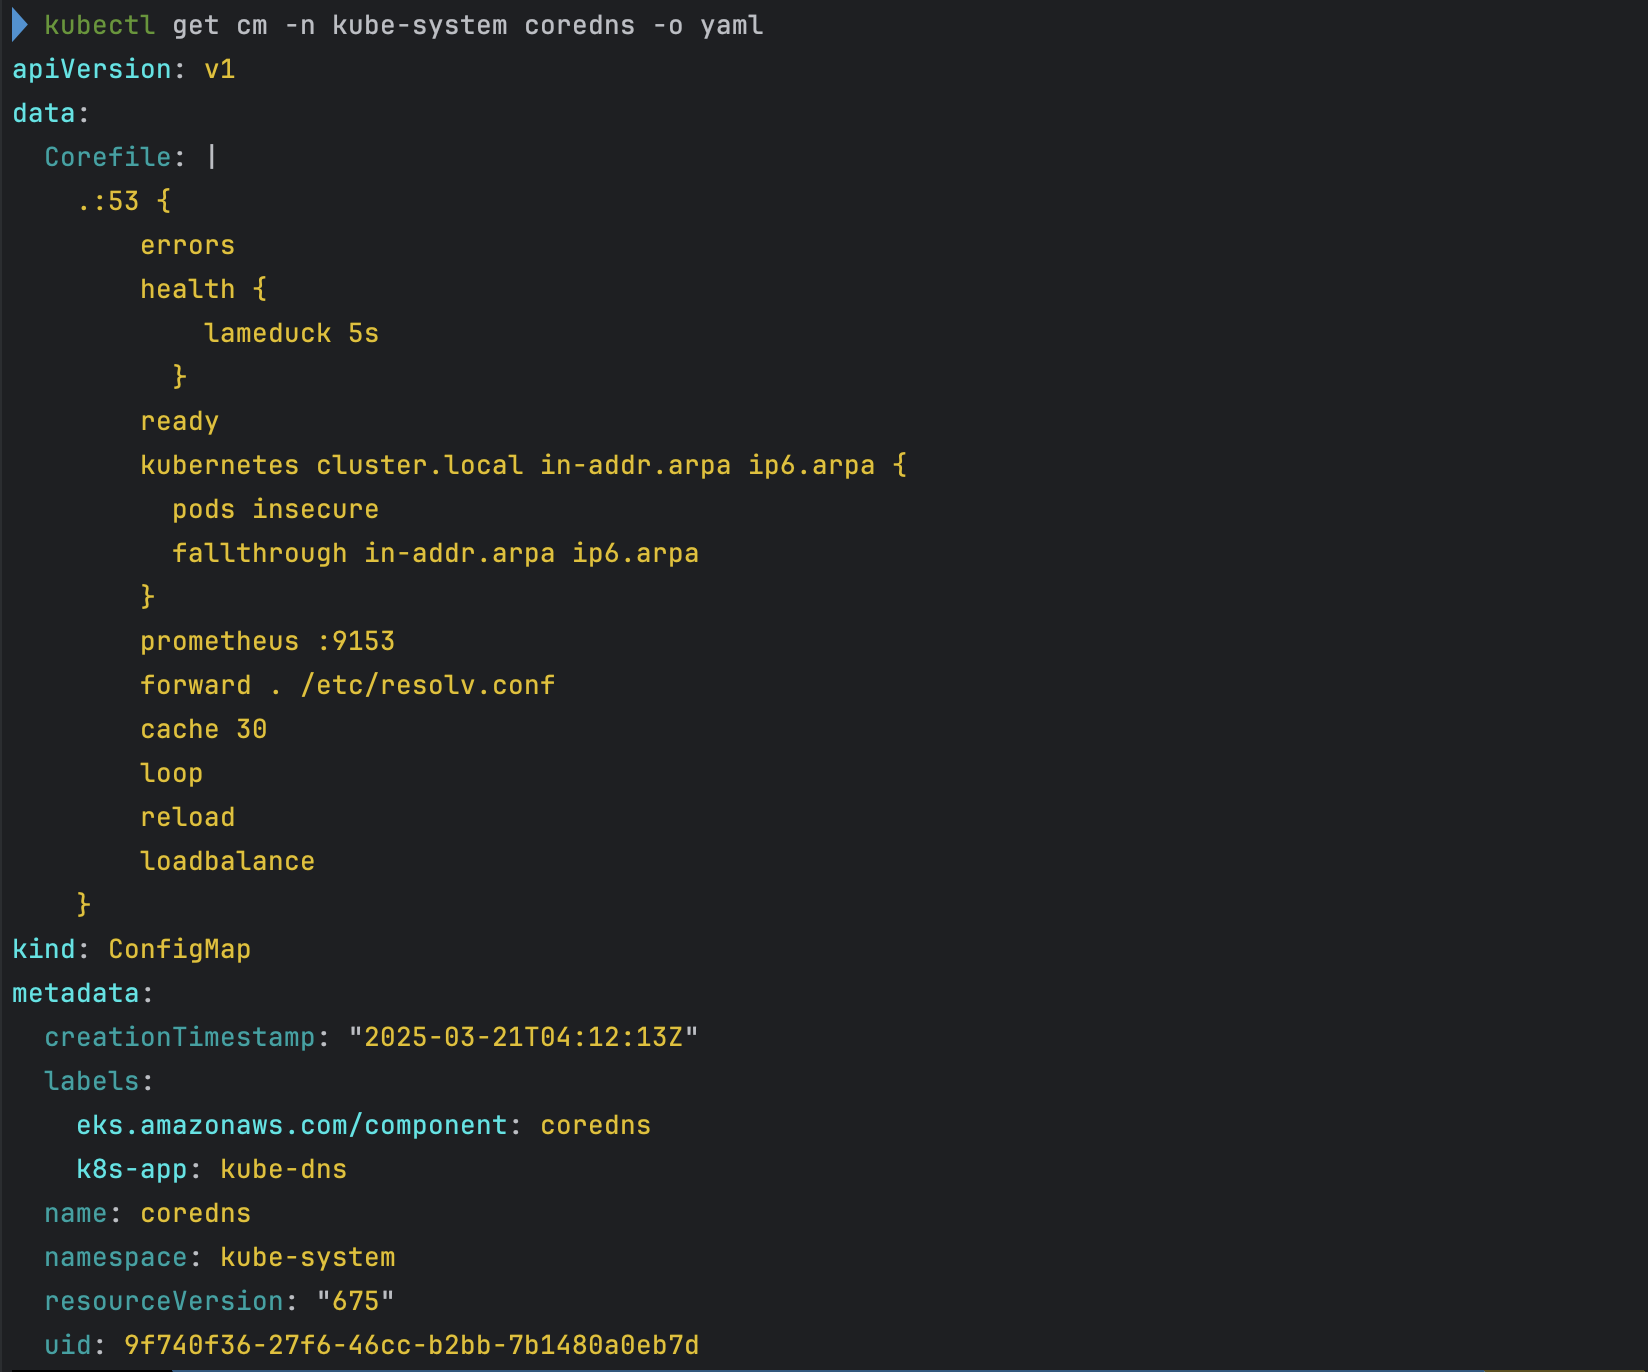
kubectl get cm -n kube-system coredns -o yaml
# 인증서 작성되어 있음 : client-ca-file , requestheader-client-ca-file
kubectl get cm -n kube-system extension-apiserver-authentication -o yaml
#
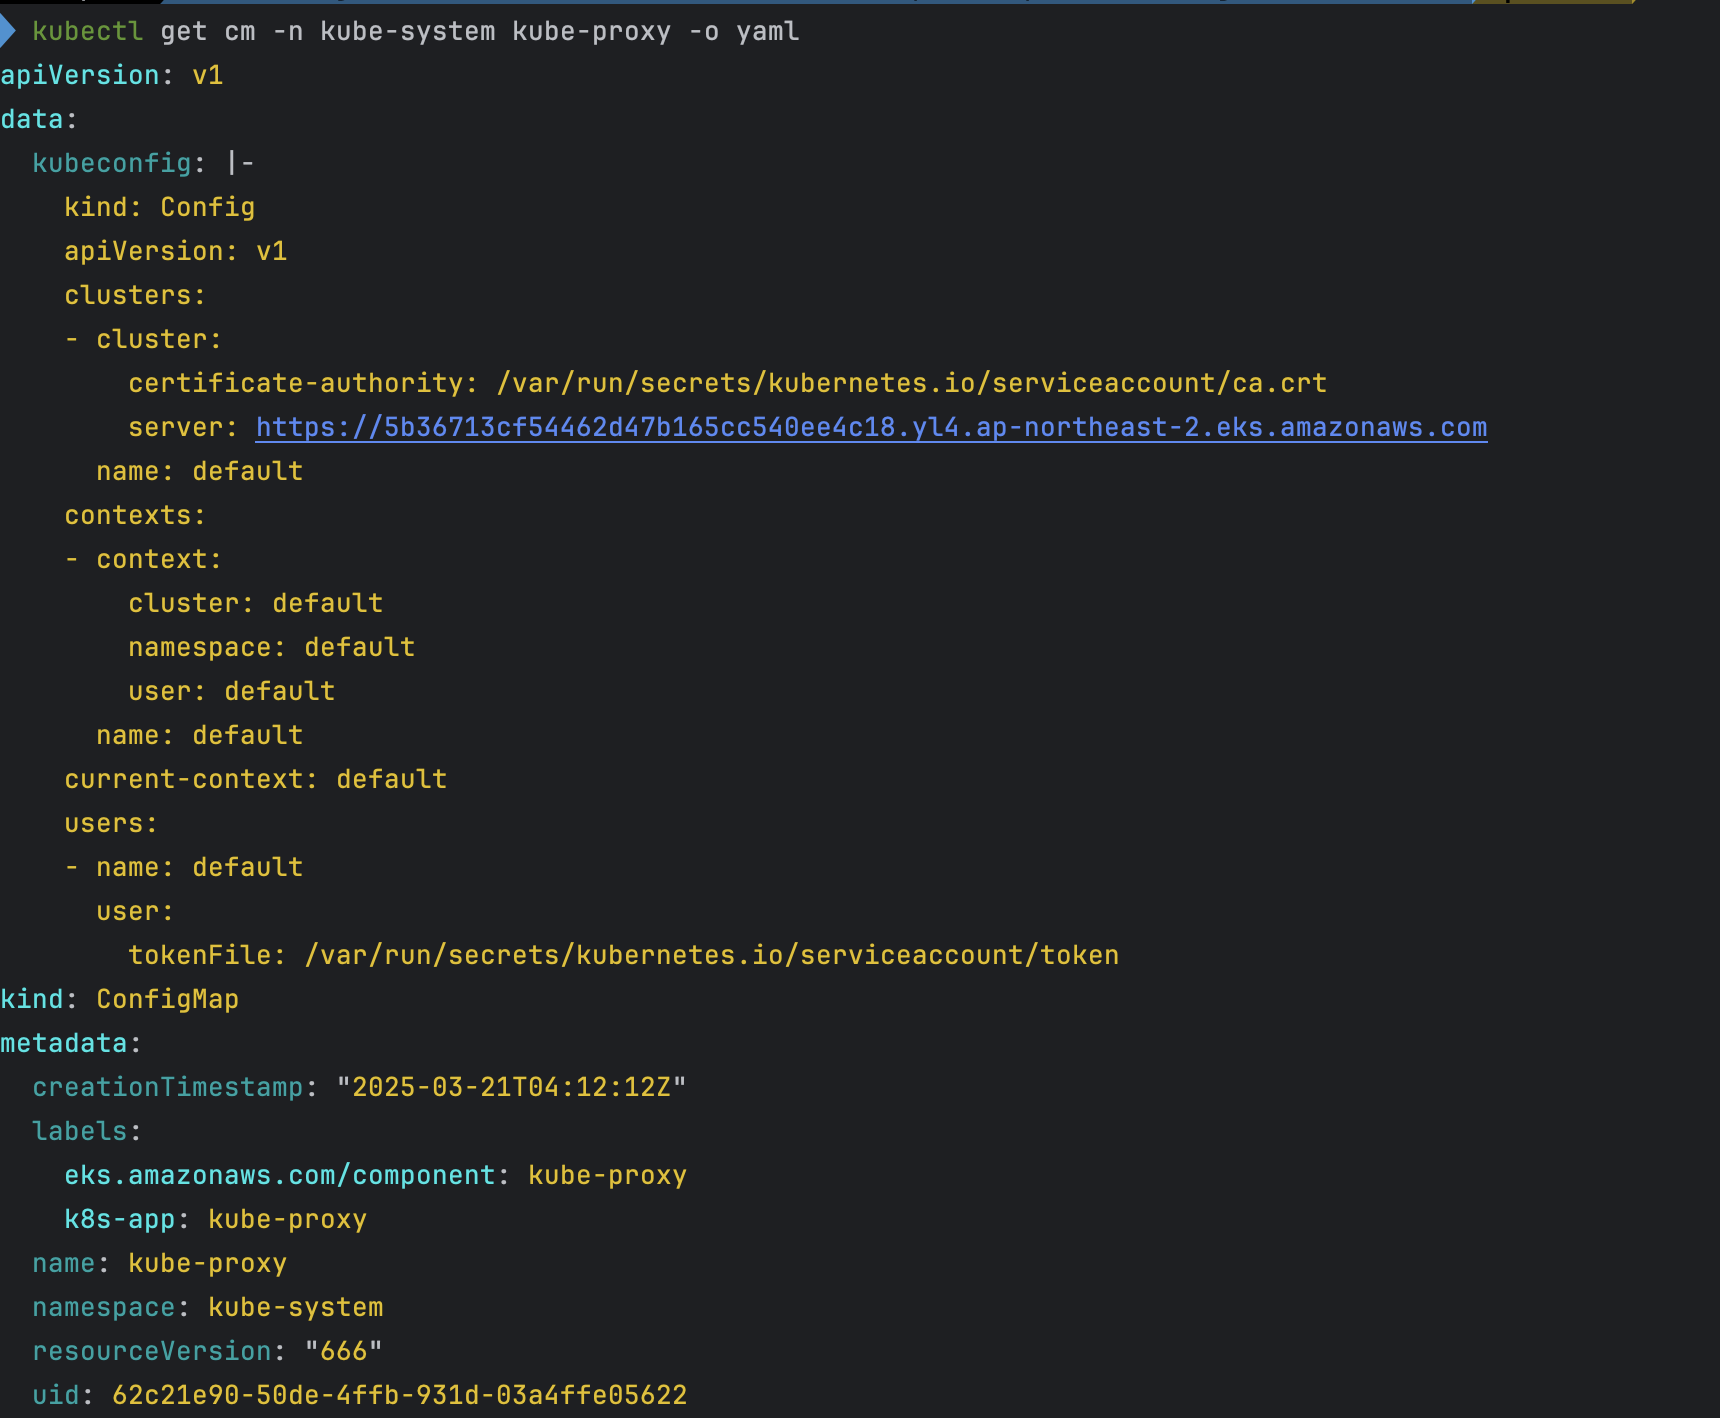
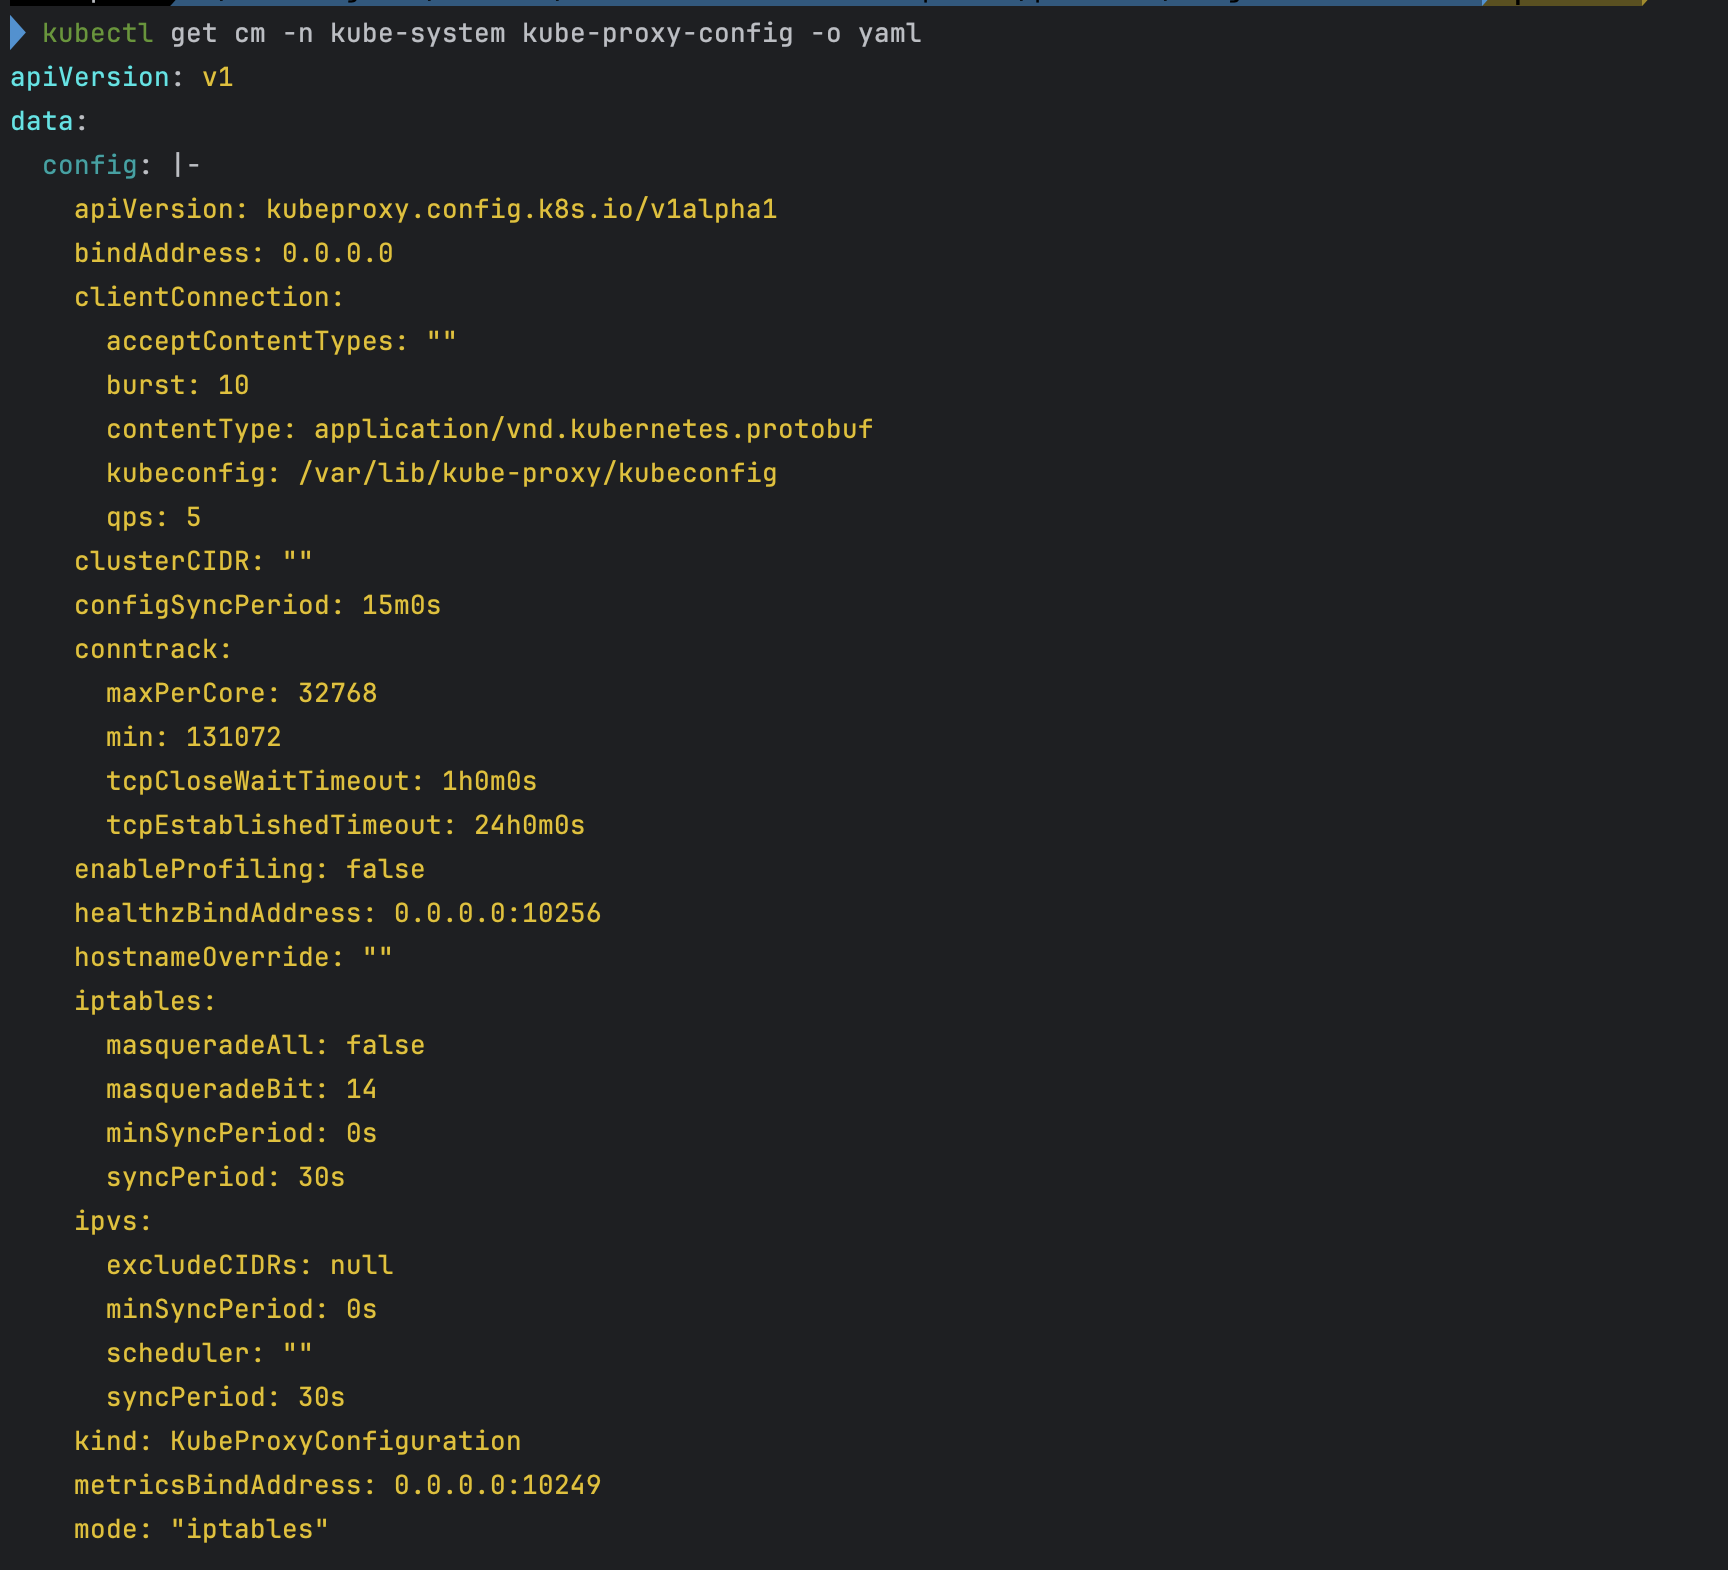
kubectl get cm -n kube-system kube-proxy -o yaml
kubectl get cm -n kube-system kube-proxy-config -o yaml
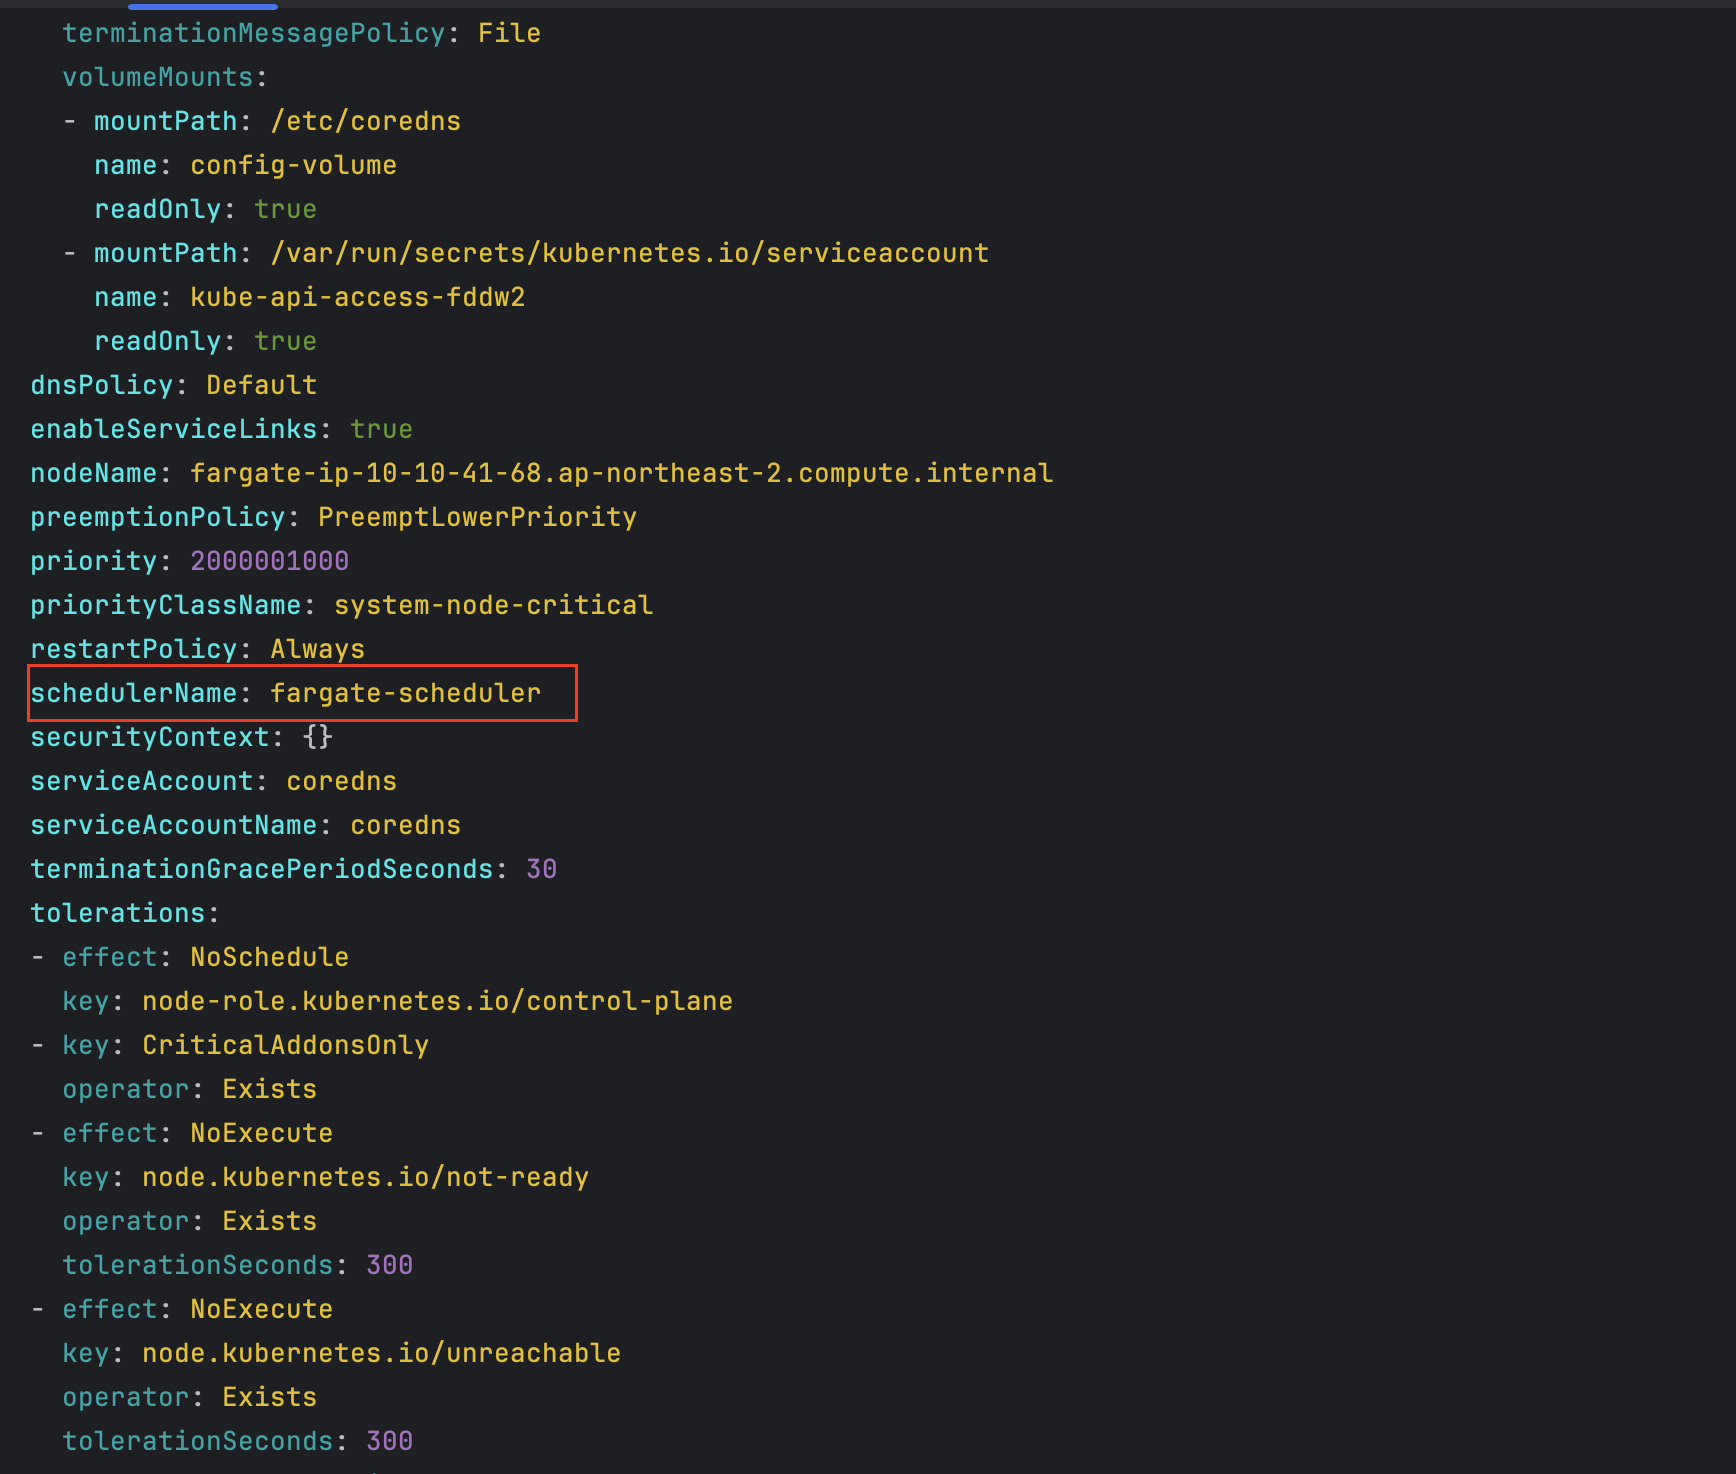
# coredns 파드 상세 정보 확인
kubectl get pod -n kube-system -l k8s-app=kube-dns -o yaml- service , endpoint 확인

- node 확인
- 파드 확인
-
파드의 IP와 노드의 IP가 같다.
-
- aws-load-balancer-webhook-service , eks-extension-metrics-api 확인
- eks-extension-metrics-api 확인

- configmap 확인
- aws-auth 확인
- amazon-vpc-cni 설정 확인
- coredns 설정 확인
- 인증서 확인
- kube-proxy 설정 확인
- coredns 파드 상세 확인 - schedulerName 확인
EKS 관리 콘솔 확인
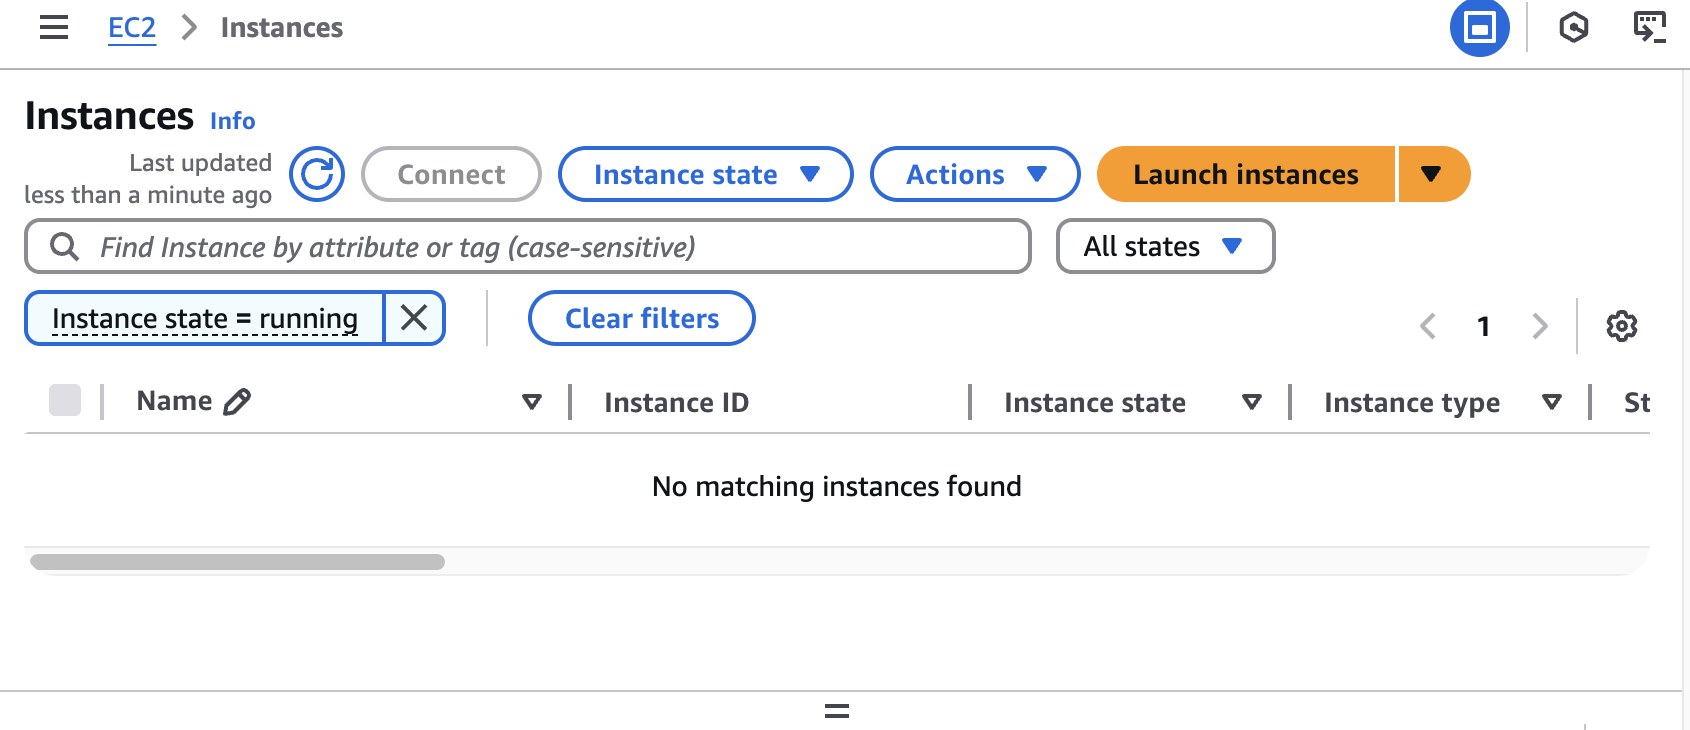
- EC2 : 별도로 생성된 EC2는 없다.
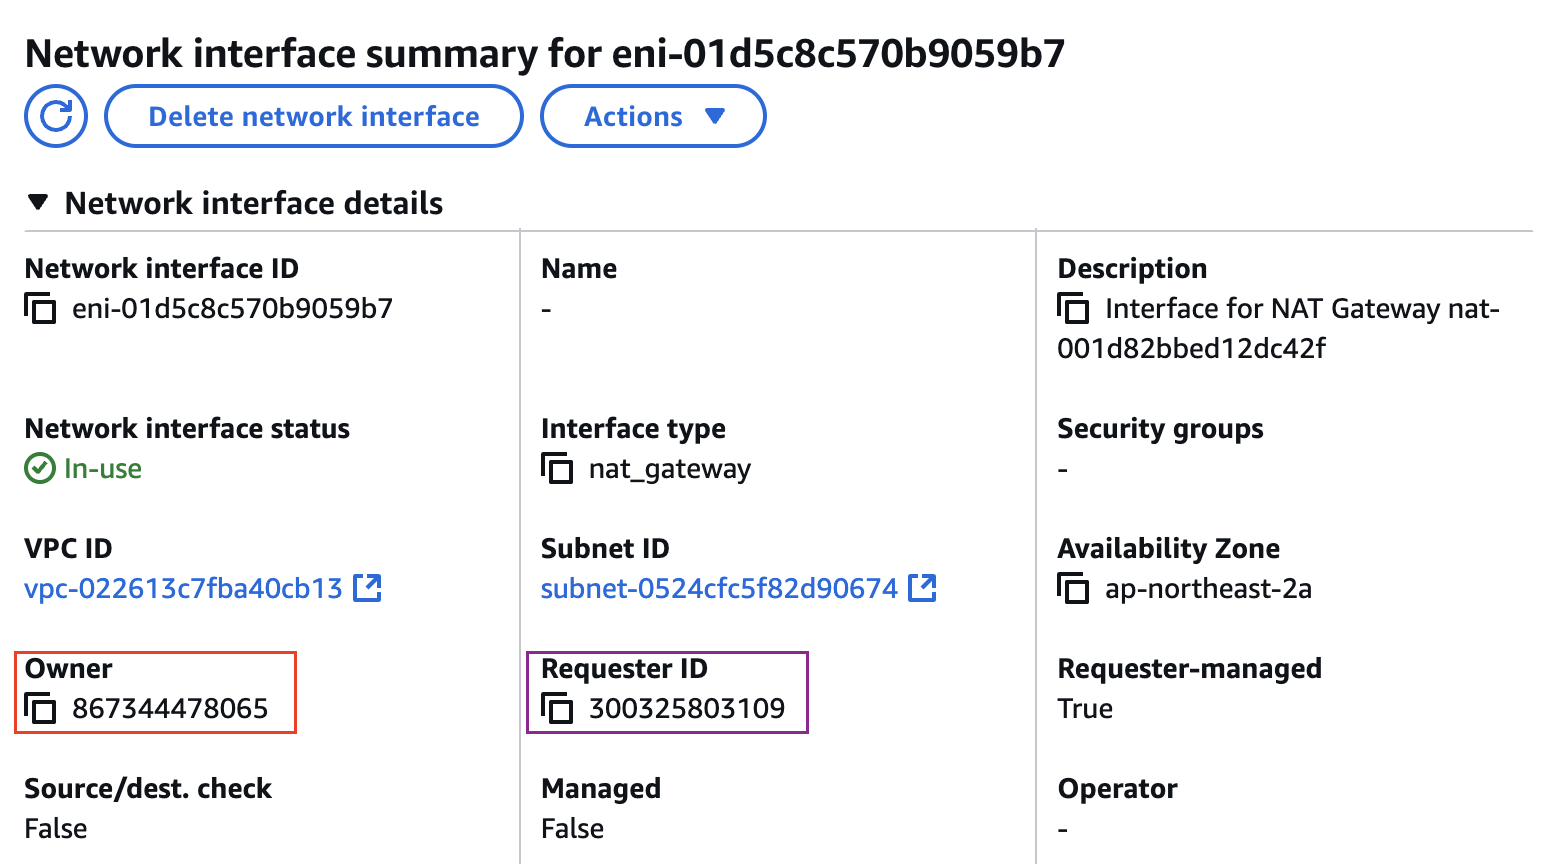
- ENI (eks owned, fargate owned) - fargate 통해 생성 되었으므로 일치 하지 않음
fargate에 kube-ops-view 설치
kube-ops-view 설치
- code
# helm 배포
helm repo add geek-cookbook https://geek-cookbook.github.io/charts/
helm install kube-ops-view geek-cookbook/kube-ops-view --version 1.2.2 --set env.TZ="Asia/Seoul" --namespace kube-system

# 포트 포워딩
kubectl port-forward deployment/kube-ops-view -n kube-system 8080:8080 &

# kube-ops-vieww 접근
open "http://127.0.0.1:8080/#scale=1.5" # macOS
- helm 배포

- 포트포워딩

- 사이트 접근
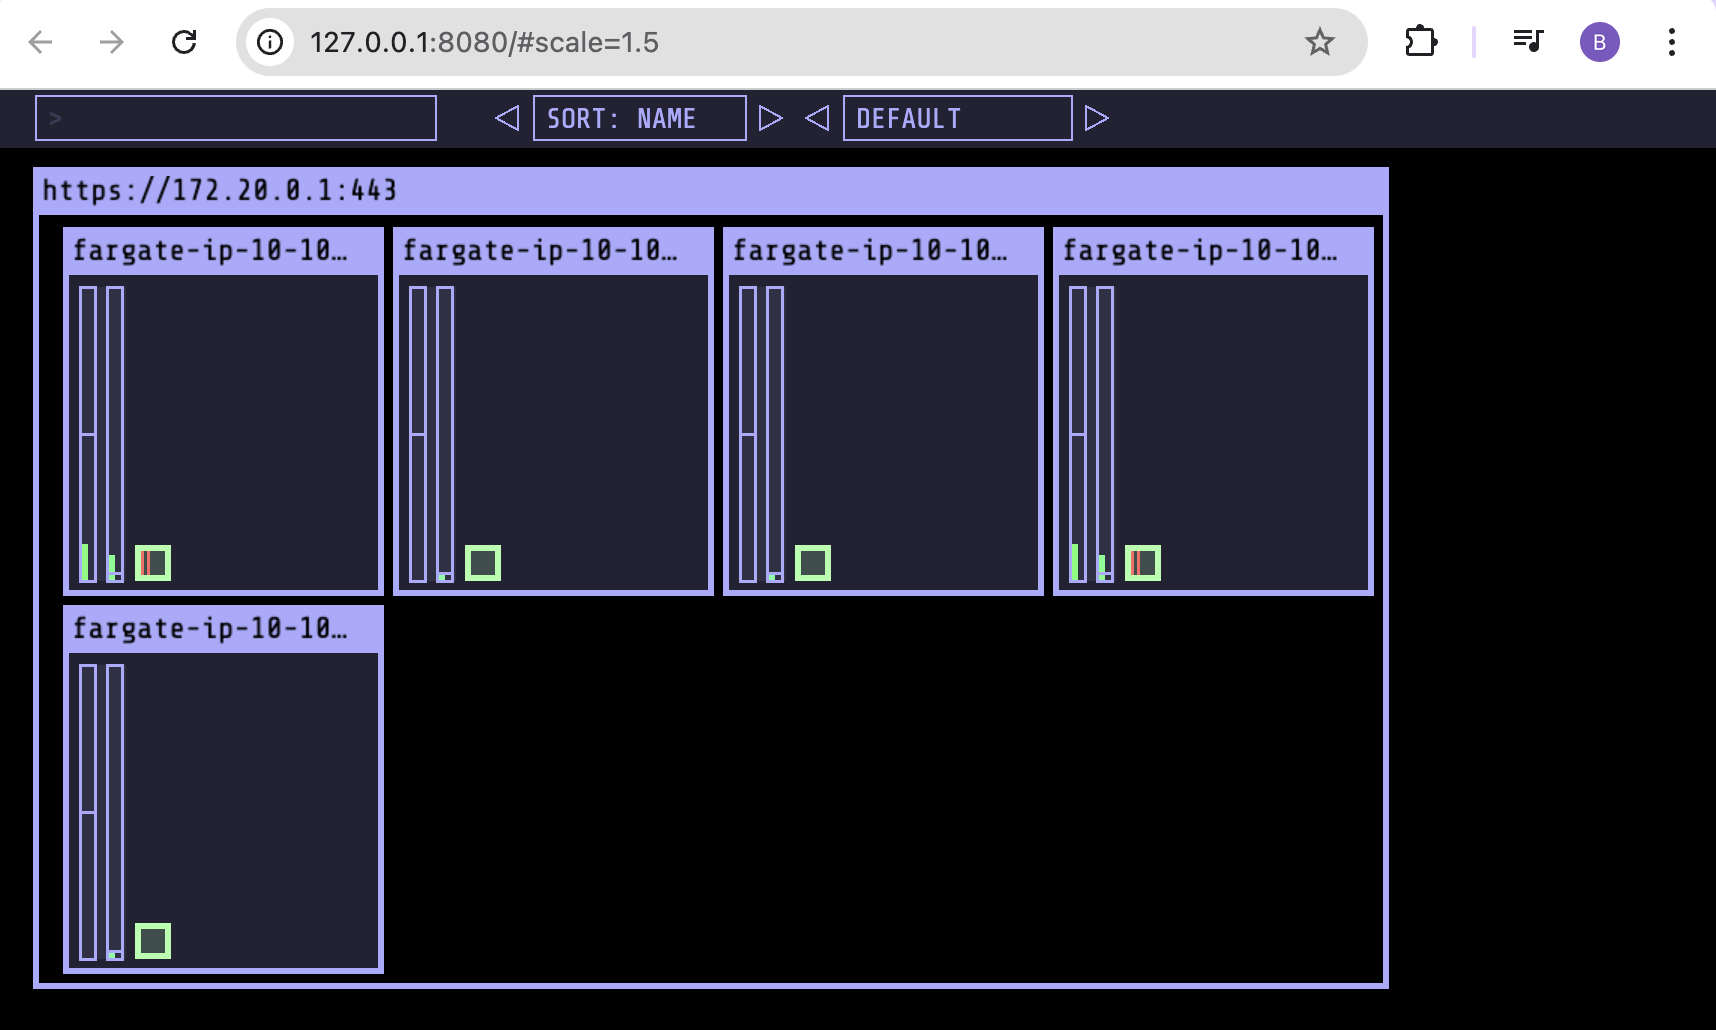
kube-ops-view 파드 확인
# node 확인 : 노드(Micro VM)
kubectl get csr
kubectl get node -owide
kubectl describe node | grep eks.amazonaws.com/compute-type

# 디플로이먼트 상세 정보
kubectl get deploy -n kube-system kube-ops-view -o yaml

# 파드 상세 정보 : admission control 이 동작했음을 알 수 있음
kubectl get pod -n kube-system -l app.kubernetes.io/instance=kube-ops-view -o yaml

#
kubectl describe pod -n kube-system -l app.kubernetes.io/instance=kube-ops-view | grep Events: -A10
- node 확인
- kube-ops-view 디플로이먼트/파드 상세 정보 확인 - admission control이 동작했음을 확인
- kube-ops-view pod 관련 이벤트 확인

fargate에 netshoot 디플로이먼트 배포
참고
- cpu value에 맞춰 근접한 memory value를 할당 한다.
- ex) cpu 500m, memory 500MiB 를 기준으로 파드를 생성하는 경우 256 MiB가 (MicroVM 마다 kubelet, kube-proxy, Containerd 가 동작하므로, 256 RAM이 반드시 필요) 추가 됨에 따라서 가장 근접한
cpu 500m, memory 1GiB로 생성된다.
- ex) cpu 500m, memory 500MiB 를 기준으로 파드를 생성하는 경우 256 MiB가 (MicroVM 마다 kubelet, kube-proxy, Containerd 가 동작하므로, 256 RAM이 반드시 필요) 추가 됨에 따라서 가장 근접한
파드 생성시 리소스 설정 규칙
| vCPU value | Memory value |
|---|---|
| .25 vCPU | 0.5 GB, 1 GB, 2 GB |
| .5 vCPU | 1 GB, 2 GB, 3 GB, 4 GB |
| 1 vCPU | 2 GB, 3 GB, 4 GB, 5 GB, 6 GB, 7 GB, 8 GB |
| 2 vCPU | Between 4 GB and 16 GB in 1-GB increments |
| 4 vCPU | Between 8 GB and 30 GB in 1-GB increments |
| 8 vCPU | Between 16 GB and 60 GB in 4-GB increments |
| 16 vCPU | Between 32 GB and 120 GB in 8-GB increments |
실습
- code
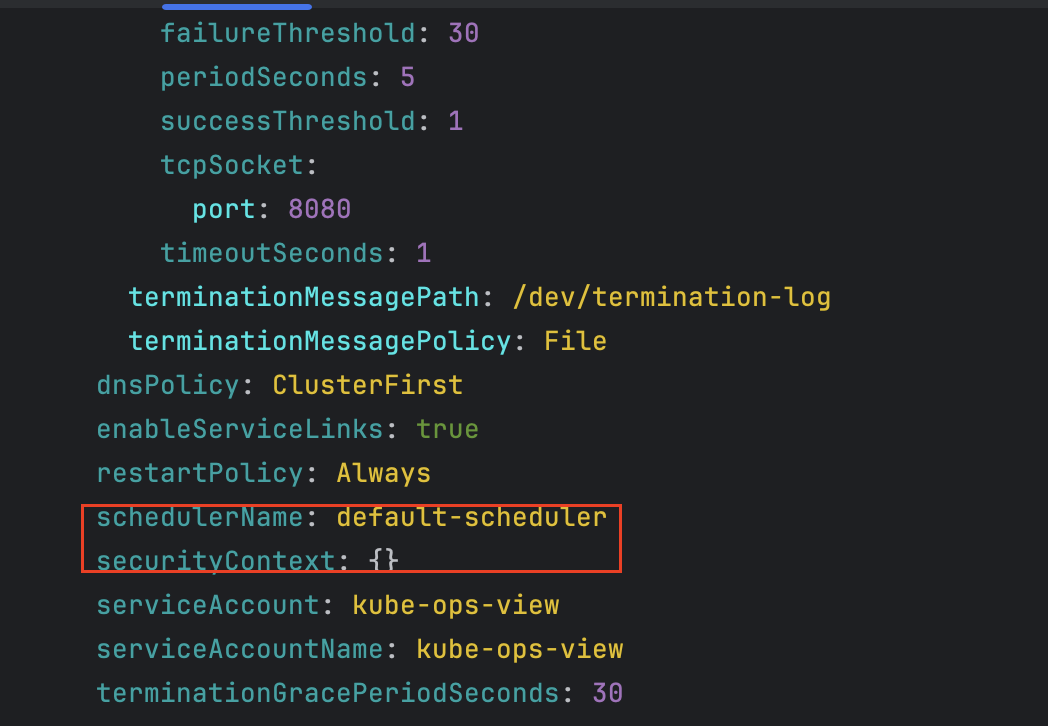
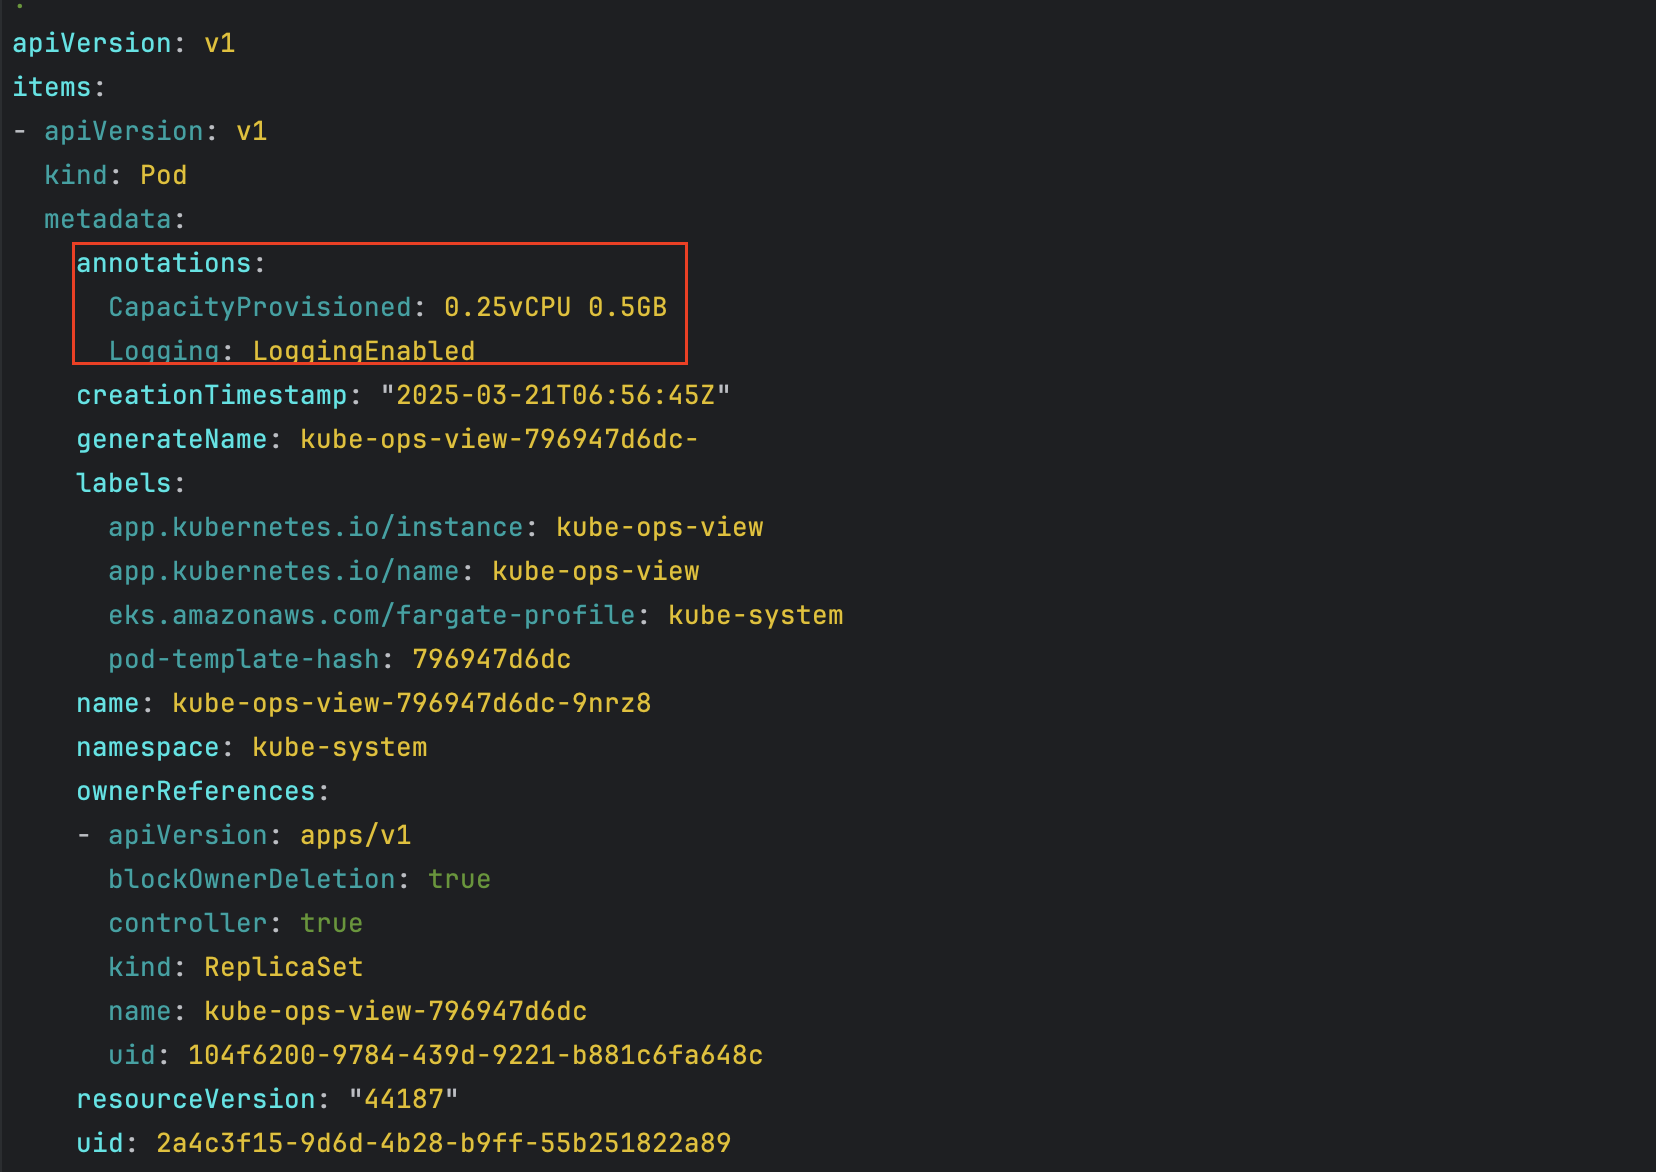
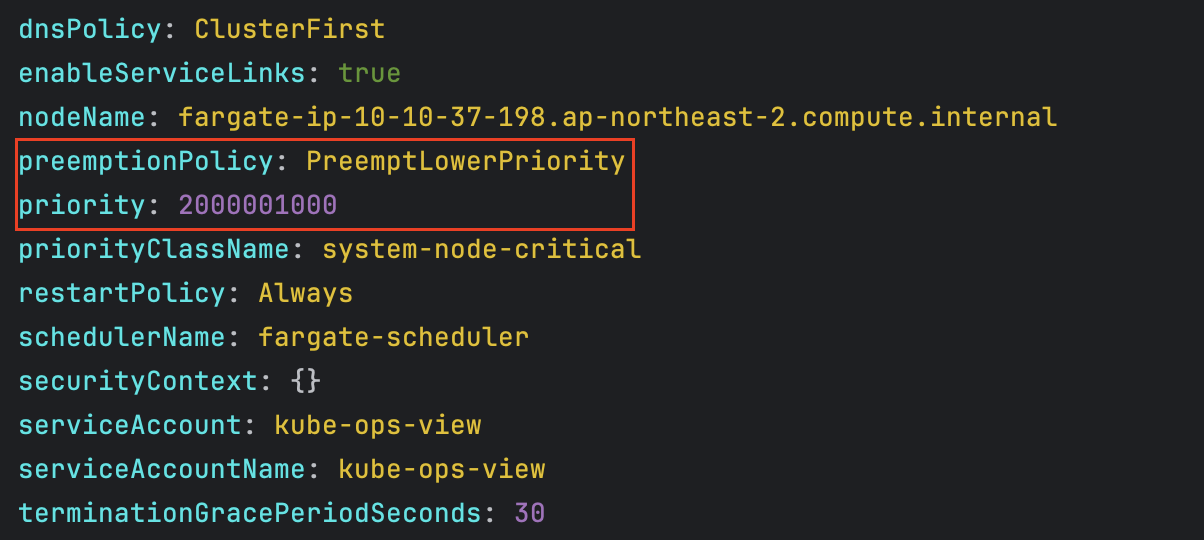
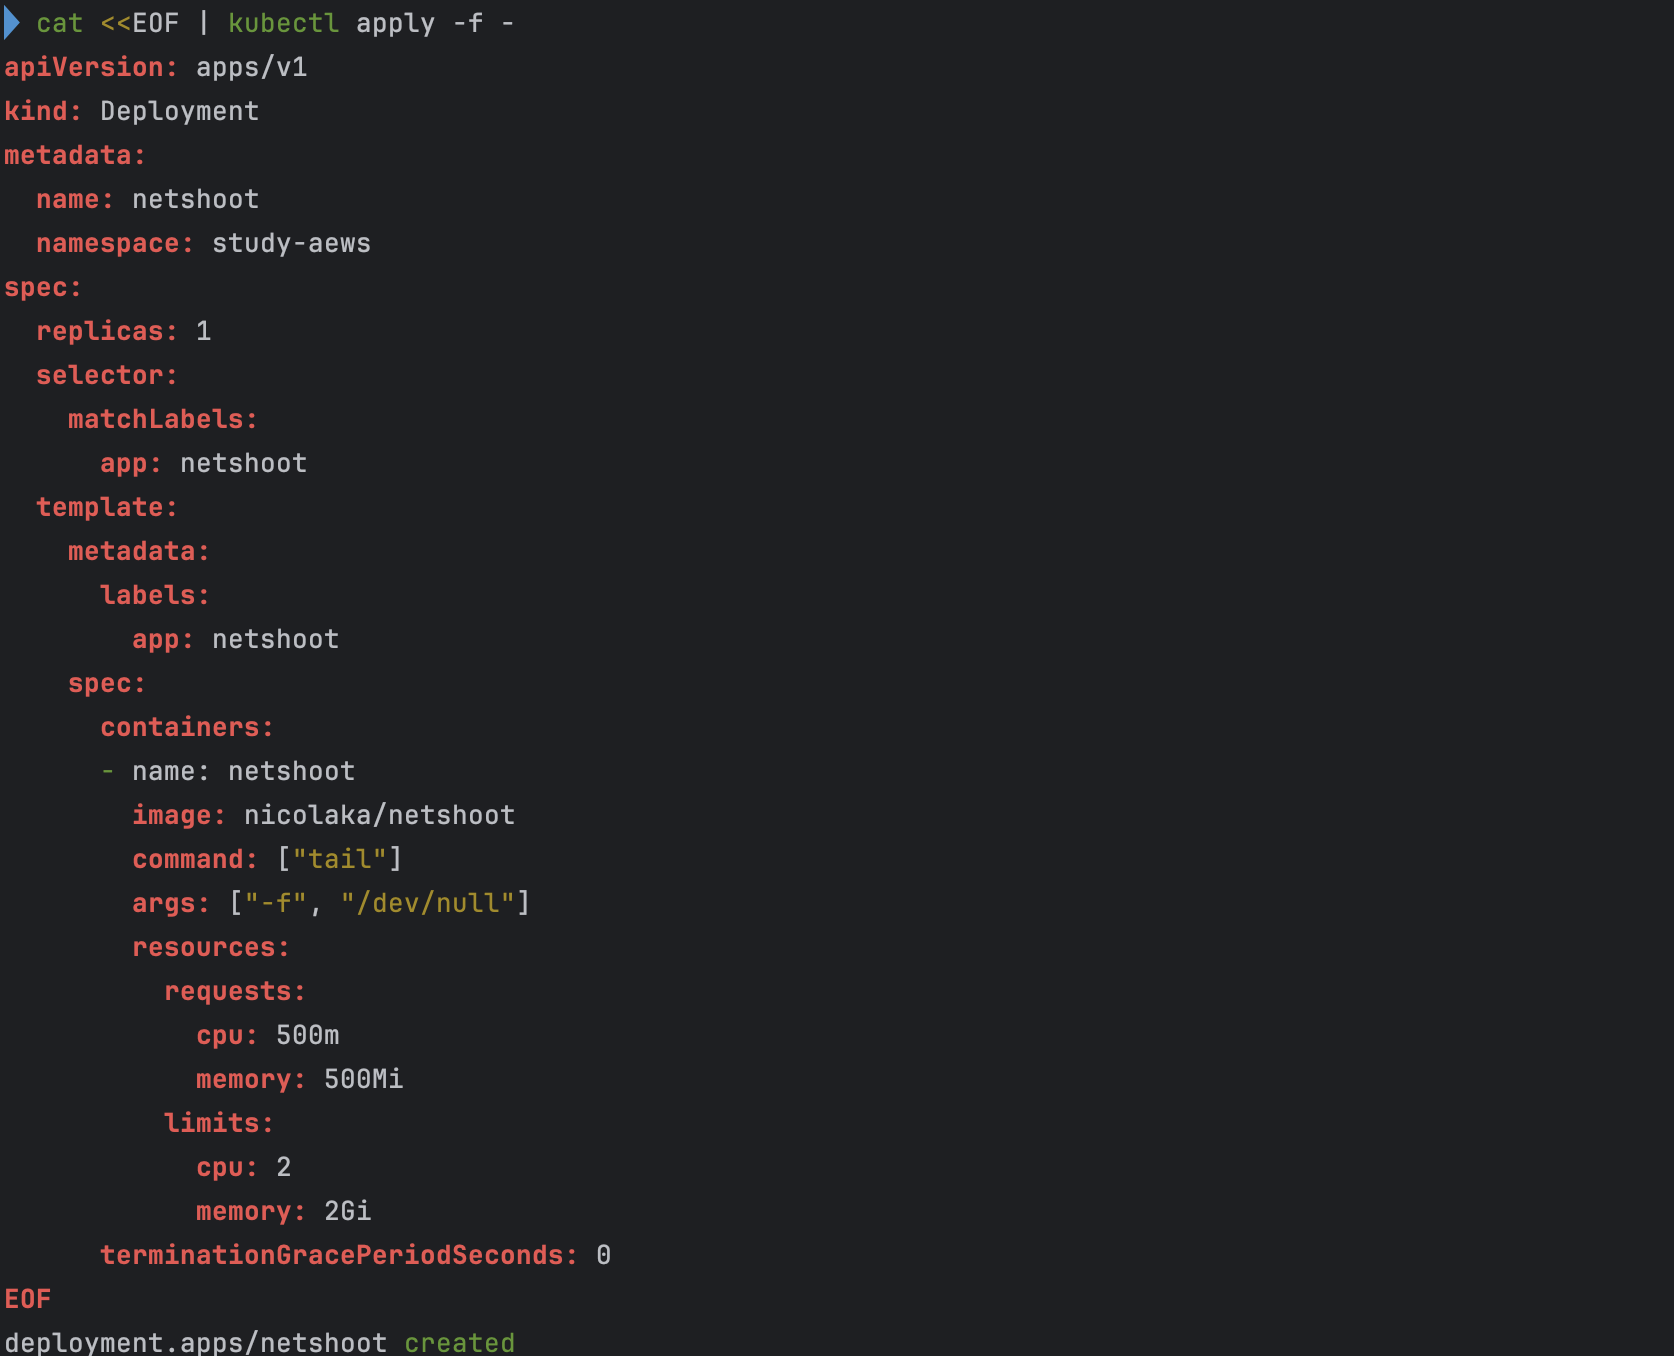
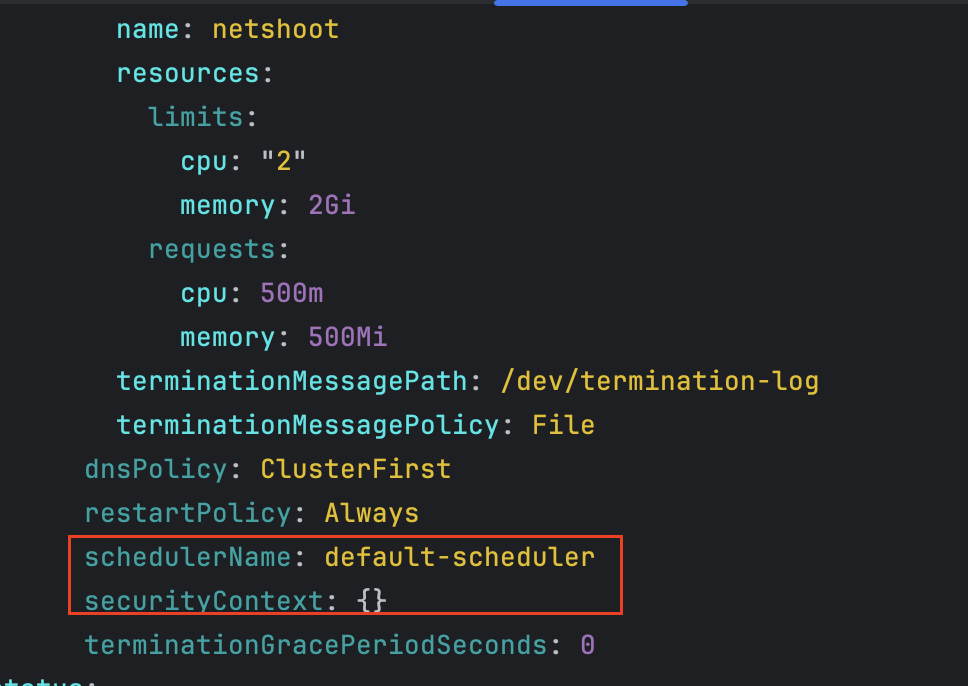
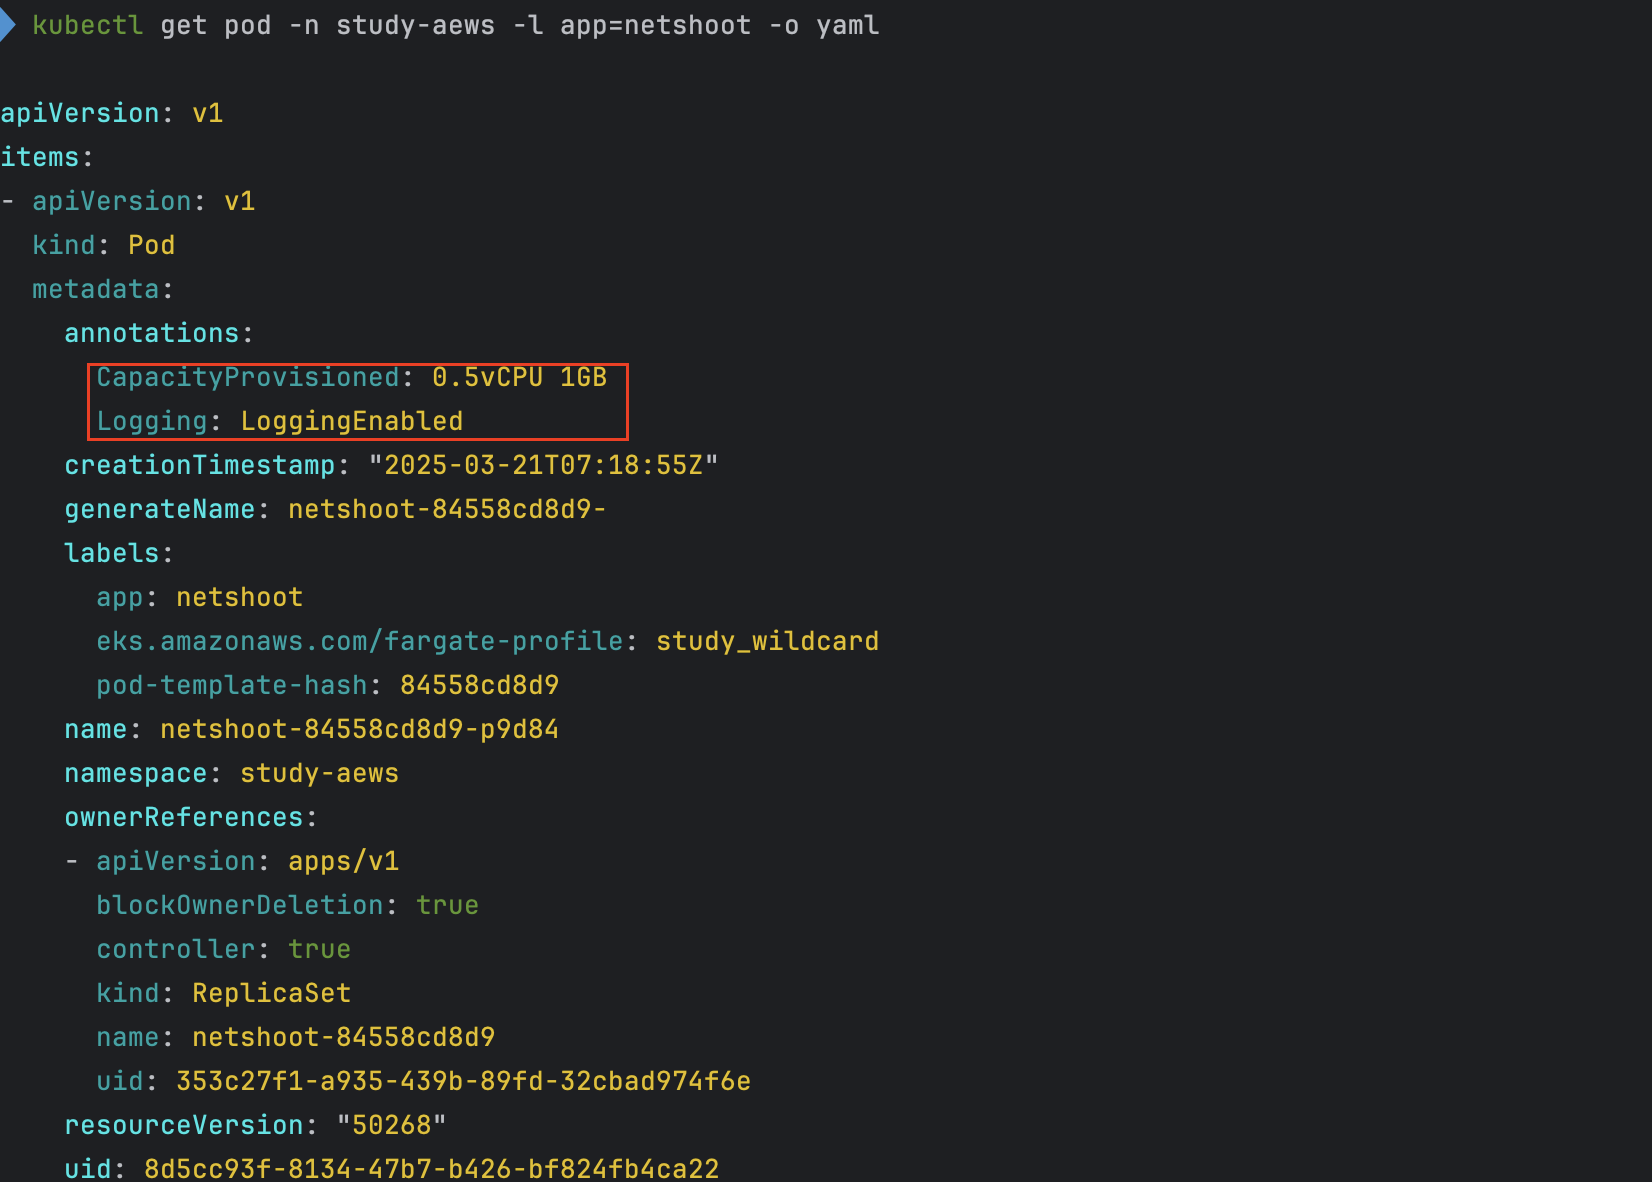
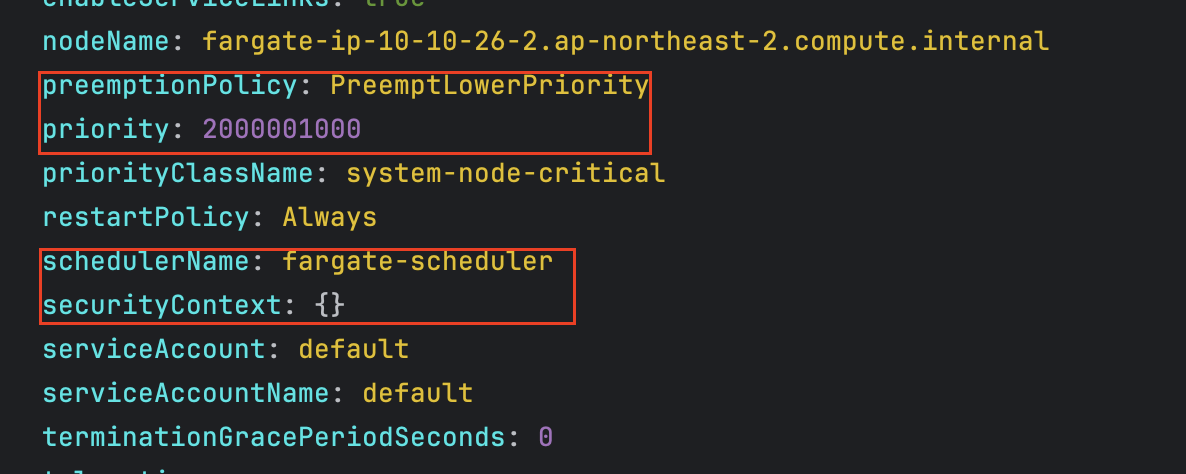
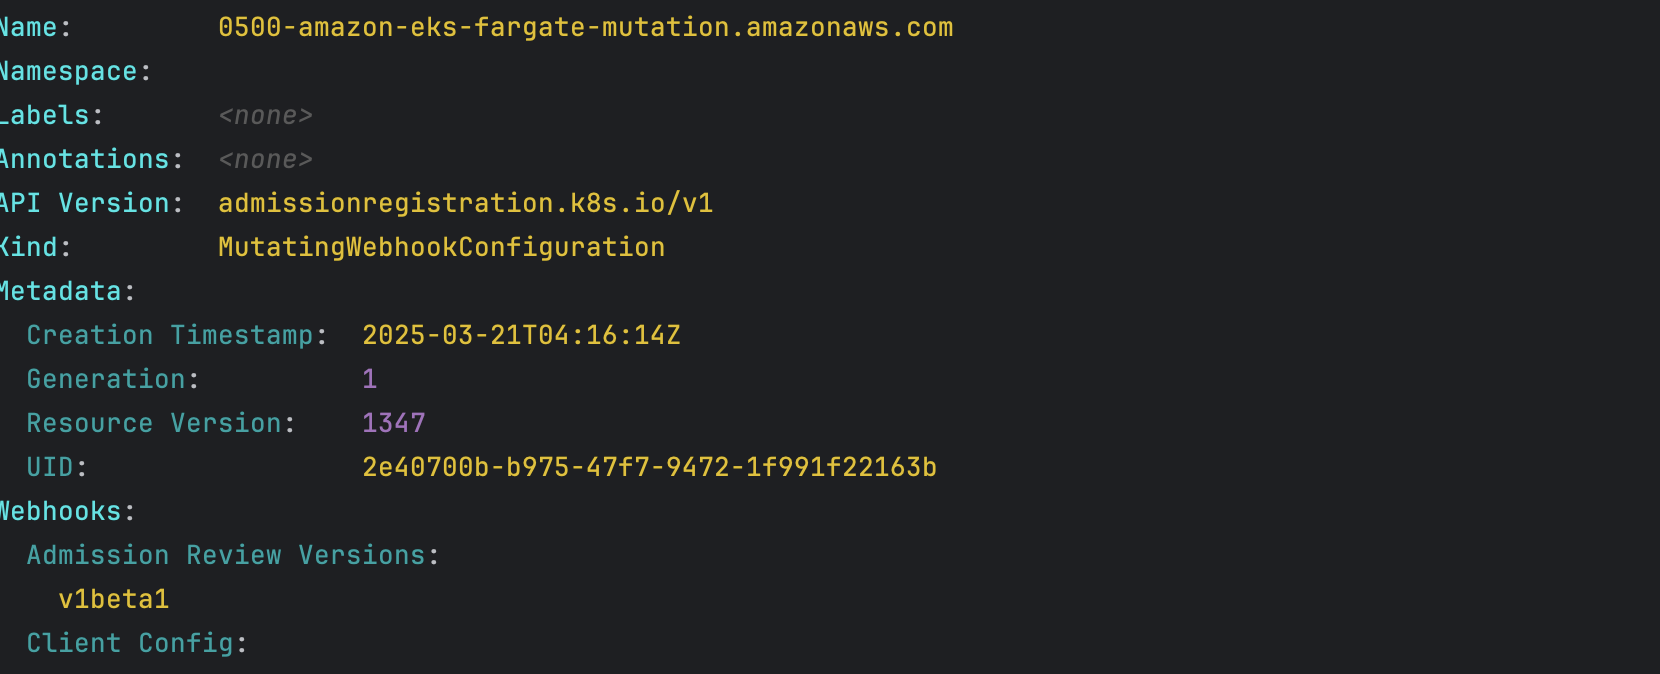
# 네임스페이스 생성
kubectl create ns study-aews

# 테스트용 파드 netshoot 디플로이먼트 생성 : 0.5vCPU 1GB 할당되어, 아래 Limit 값은 의미가 없음. 배포 시 대략 시간 측정해보자!
cat <<EOF | kubectl apply -f -
apiVersion: apps/v1
kind: Deployment
metadata:
  name: netshoot
  namespace: study-aews
spec:
  replicas: 1
  selector:
    matchLabels:
      app: netshoot
  template:
    metadata:
      labels:
        app: netshoot
    spec:
      containers:
      - name: netshoot
        image: nicolaka/netshoot
        command: ["tail"]
        args: ["-f", "/dev/null"]
        resources:
          requests:
            cpu: 500m
            memory: 500Mi
          limits:
            cpu: 2
            memory: 2Gi
      terminationGracePeriodSeconds: 0
EOF
kubectl get events -w --sort-by '.lastTimestamp'

# 확인 : 메모리 할당 측정은 어떻게 되었는지?
kubectl get pod -n study-aews -o wide
kubectl get pod -n study-aews -o jsonpath='{.items[0].metadata.annotations.CapacityProvisioned}'
0.5vCPU 1GB

# 디플로이먼트 상세 정보
kubectl get deploy -n study-aews netshoot -o yaml
...
  template:
    ...
    spec:
      ...
      schedulerName: default-scheduler
      securityContext: {}
      terminationGracePeriodSeconds: 0
...

# 파드 상세 정보 : admission control 이 동작했음을 알 수 있음
kubectl get pod -n study-aews -l app=netshoot -o yaml
...
  metadata:
    annotations:
      CapacityProvisioned: 0.5vCPU 1GB
      Logging: LoggingEnabled
    ...
    preemptionPolicy: PreemptLowerPriority
    priority: 2000001000
    priorityClassName: system-node-critical
    restartPolicy: Always
    schedulerName: fargate-scheduler
    ...
    qosClass: Burstable

#
kubectl describe pod -n study-aews -l app=netshoot | grep Events: -A10

# Mutating Webhook, Validating Webhook 확인
kubectl get mutatingwebhookconfigurations.admissionregistration.k8s.io
kubectl describe mutatingwebhookconfigurations 0500-amazon-eks-fargate-mutation.amazonaws.com
kubectl get validatingwebhookconfigurations.admissionregistration.k8s.io

-----------------------------------------------------
- 디플로이먼트 생성
- 메모리 할당 확인
-
cpu 500m, memory 500MiB으로 설정하였으나 memory는 1GiB로 세팅됨

-
- 디플로이먼트 상세 정보
- 파드 상세 정보 - Admission control이 동작했음을 확인
- 파드 생성시 발생했던 Event 확인

- Mutating Webhook, Validating Webhook 확인


파드 내부에 접속후 확인
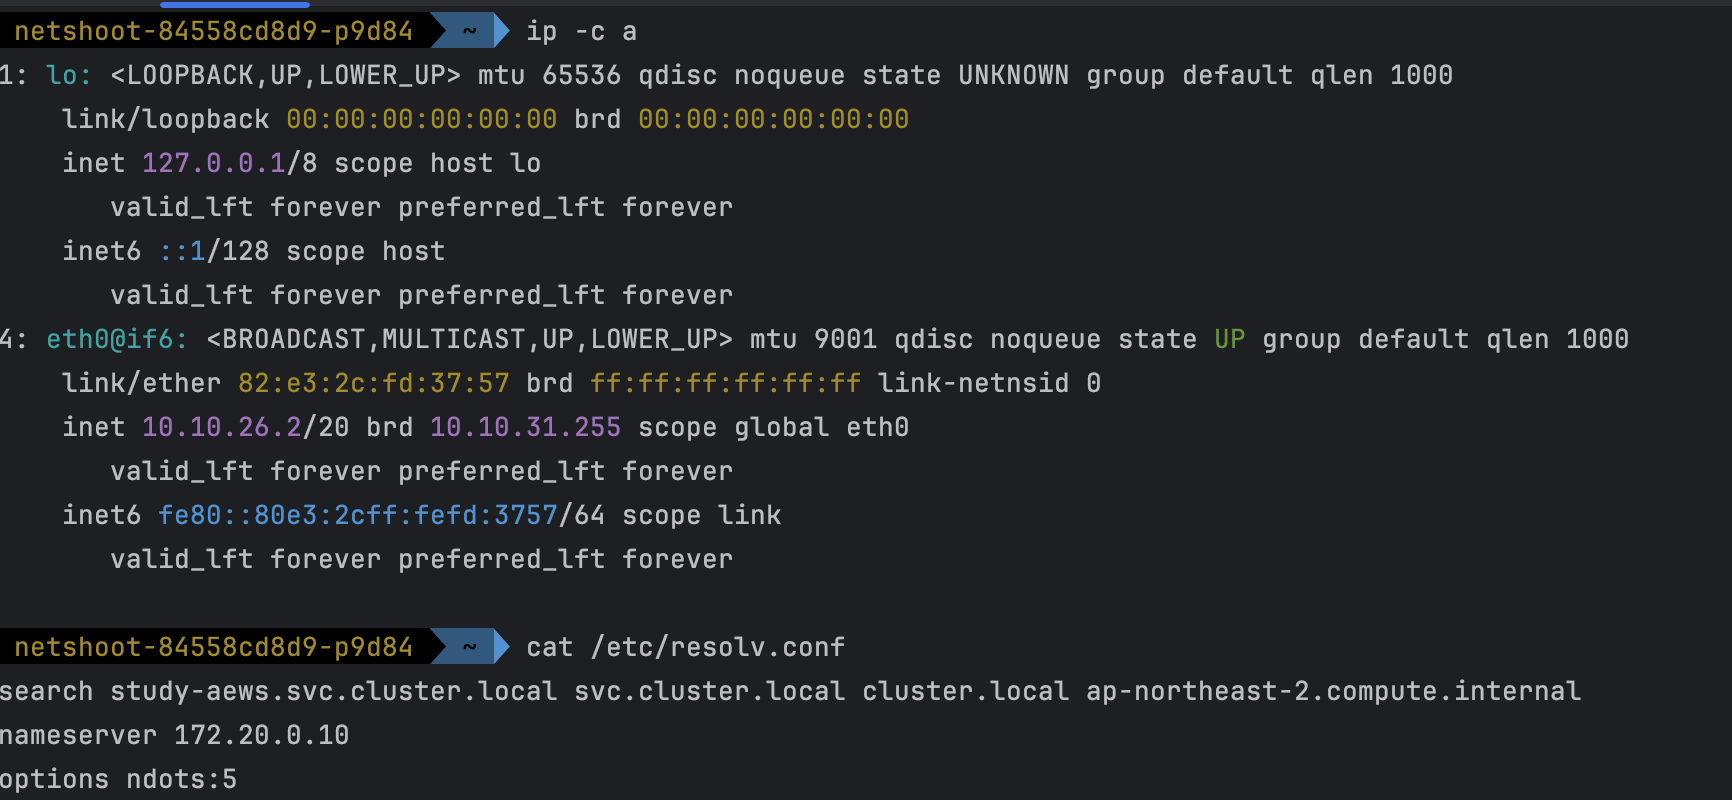
- code
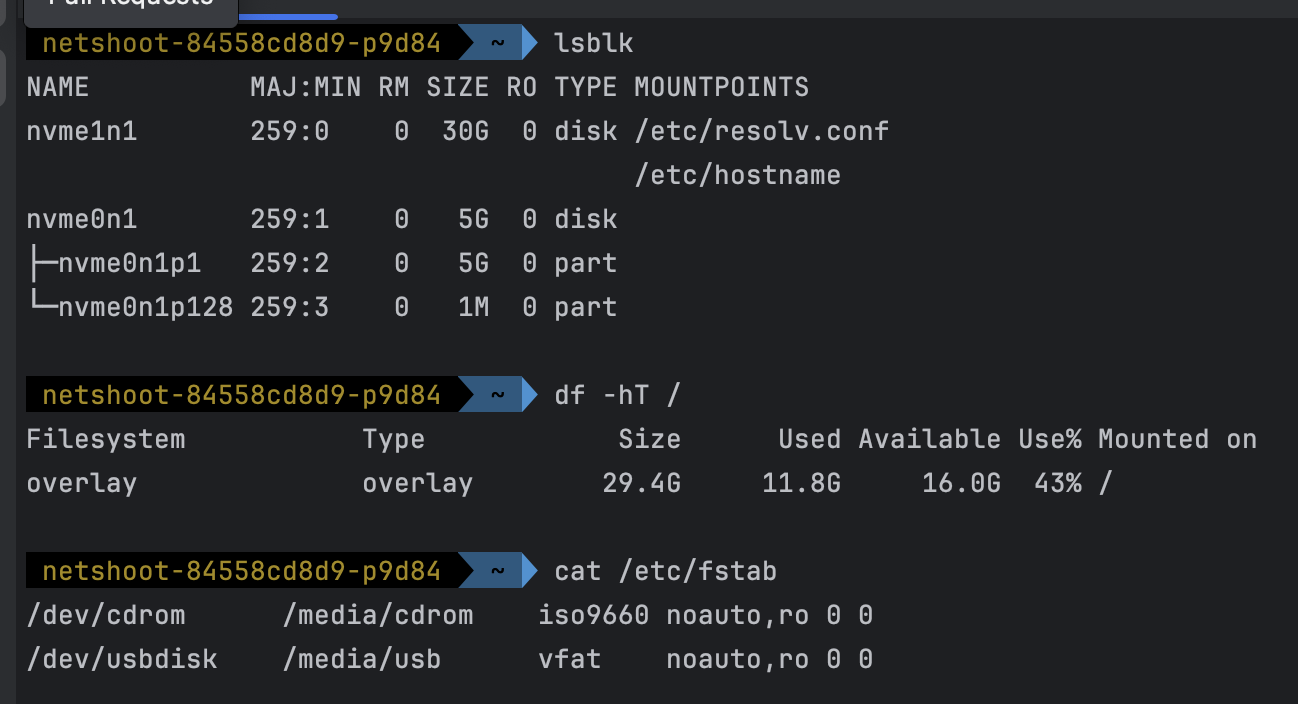
kubectl exec -it deploy/netshoot -n study-aews -- zsh ----------------------------------------------------- ip -c a cat /etc/resolv.conf curl ipinfo.io/ip # 출력되는 IP는 어떤것? , 어떤 경로를 통해서 인터넷이 되는 걸까? ping -c 1 <다른 파드 IP ex. coredns pod ip> lsblk df -hT / cat /etc/fstab exit - 확인
- 확인 중 특이사항
- pod 내에서 외부 통신할때 조회되는 ip는 NAT Gateway IP와 동일한 것을 확인할수 있다.


- pod 내에서 외부 통신할때 조회되는 ip는 NAT Gateway IP와 동일한 것을 확인할수 있다.
파드 권한과 호스트 네임스페이스 공유로 호스트 탈취 시도
fargate의 경우는 탈취 시도가 어려움, fargate 가 아닌 경우
- code
kubectl apply -f - <<EOF apiVersion: v1 kind: Pod metadata: name: root-shell namespace: study-aews spec: containers: - command: - /bin/cat image: alpine:3 name: root-shell securityContext: privileged: true tty: true stdin: true volumeMounts: - mountPath: /host name: hostroot hostNetwork: true hostPID: true hostIPC: true tolerations: - effect: NoSchedule operator: Exists - effect: NoExecute operator: Exists volumes: - hostPath: path: / name: hostroot EOF kubectl get pod -n study-aews root-shell kubectl describe pod -n study-aews root-shell | grep Events: -A 10 # 테스트 후 삭제 kubectl delete pod -n study-aews root-shell - 파드 생성
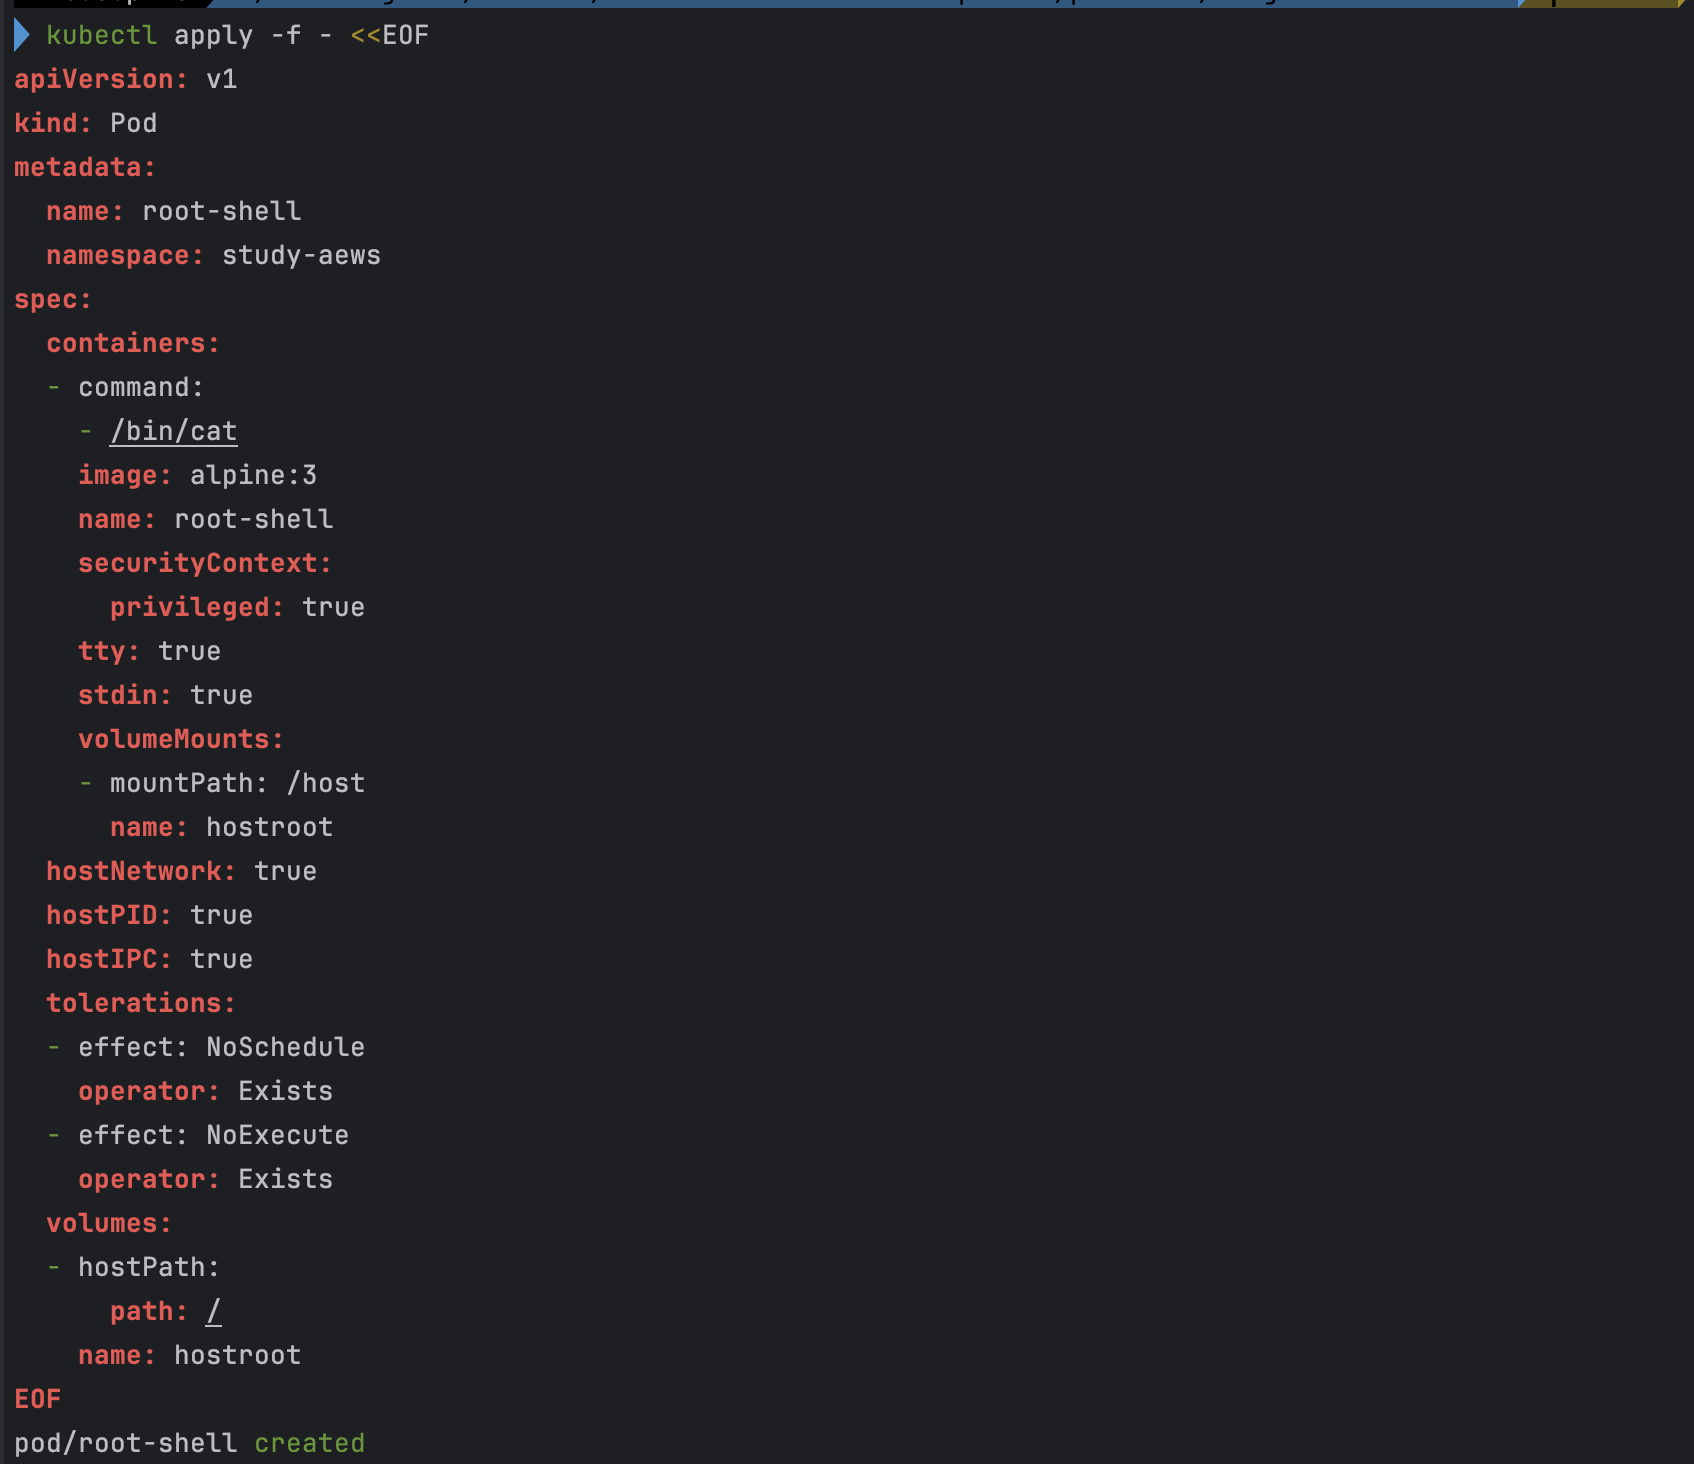
- 파드 확인
- Fargate에서 지원되지 않는 항목 및 권한이 포함되어 있어 아래와 같은 에러가 발생하면서 파드가 생성되지 않는다.

- Fargate에서 지원되지 않는 항목 및 권한이 포함되어 있어 아래와 같은 에러가 발생하면서 파드가 생성되지 않는다.
AWS ALB (Ingress) 실습
- code
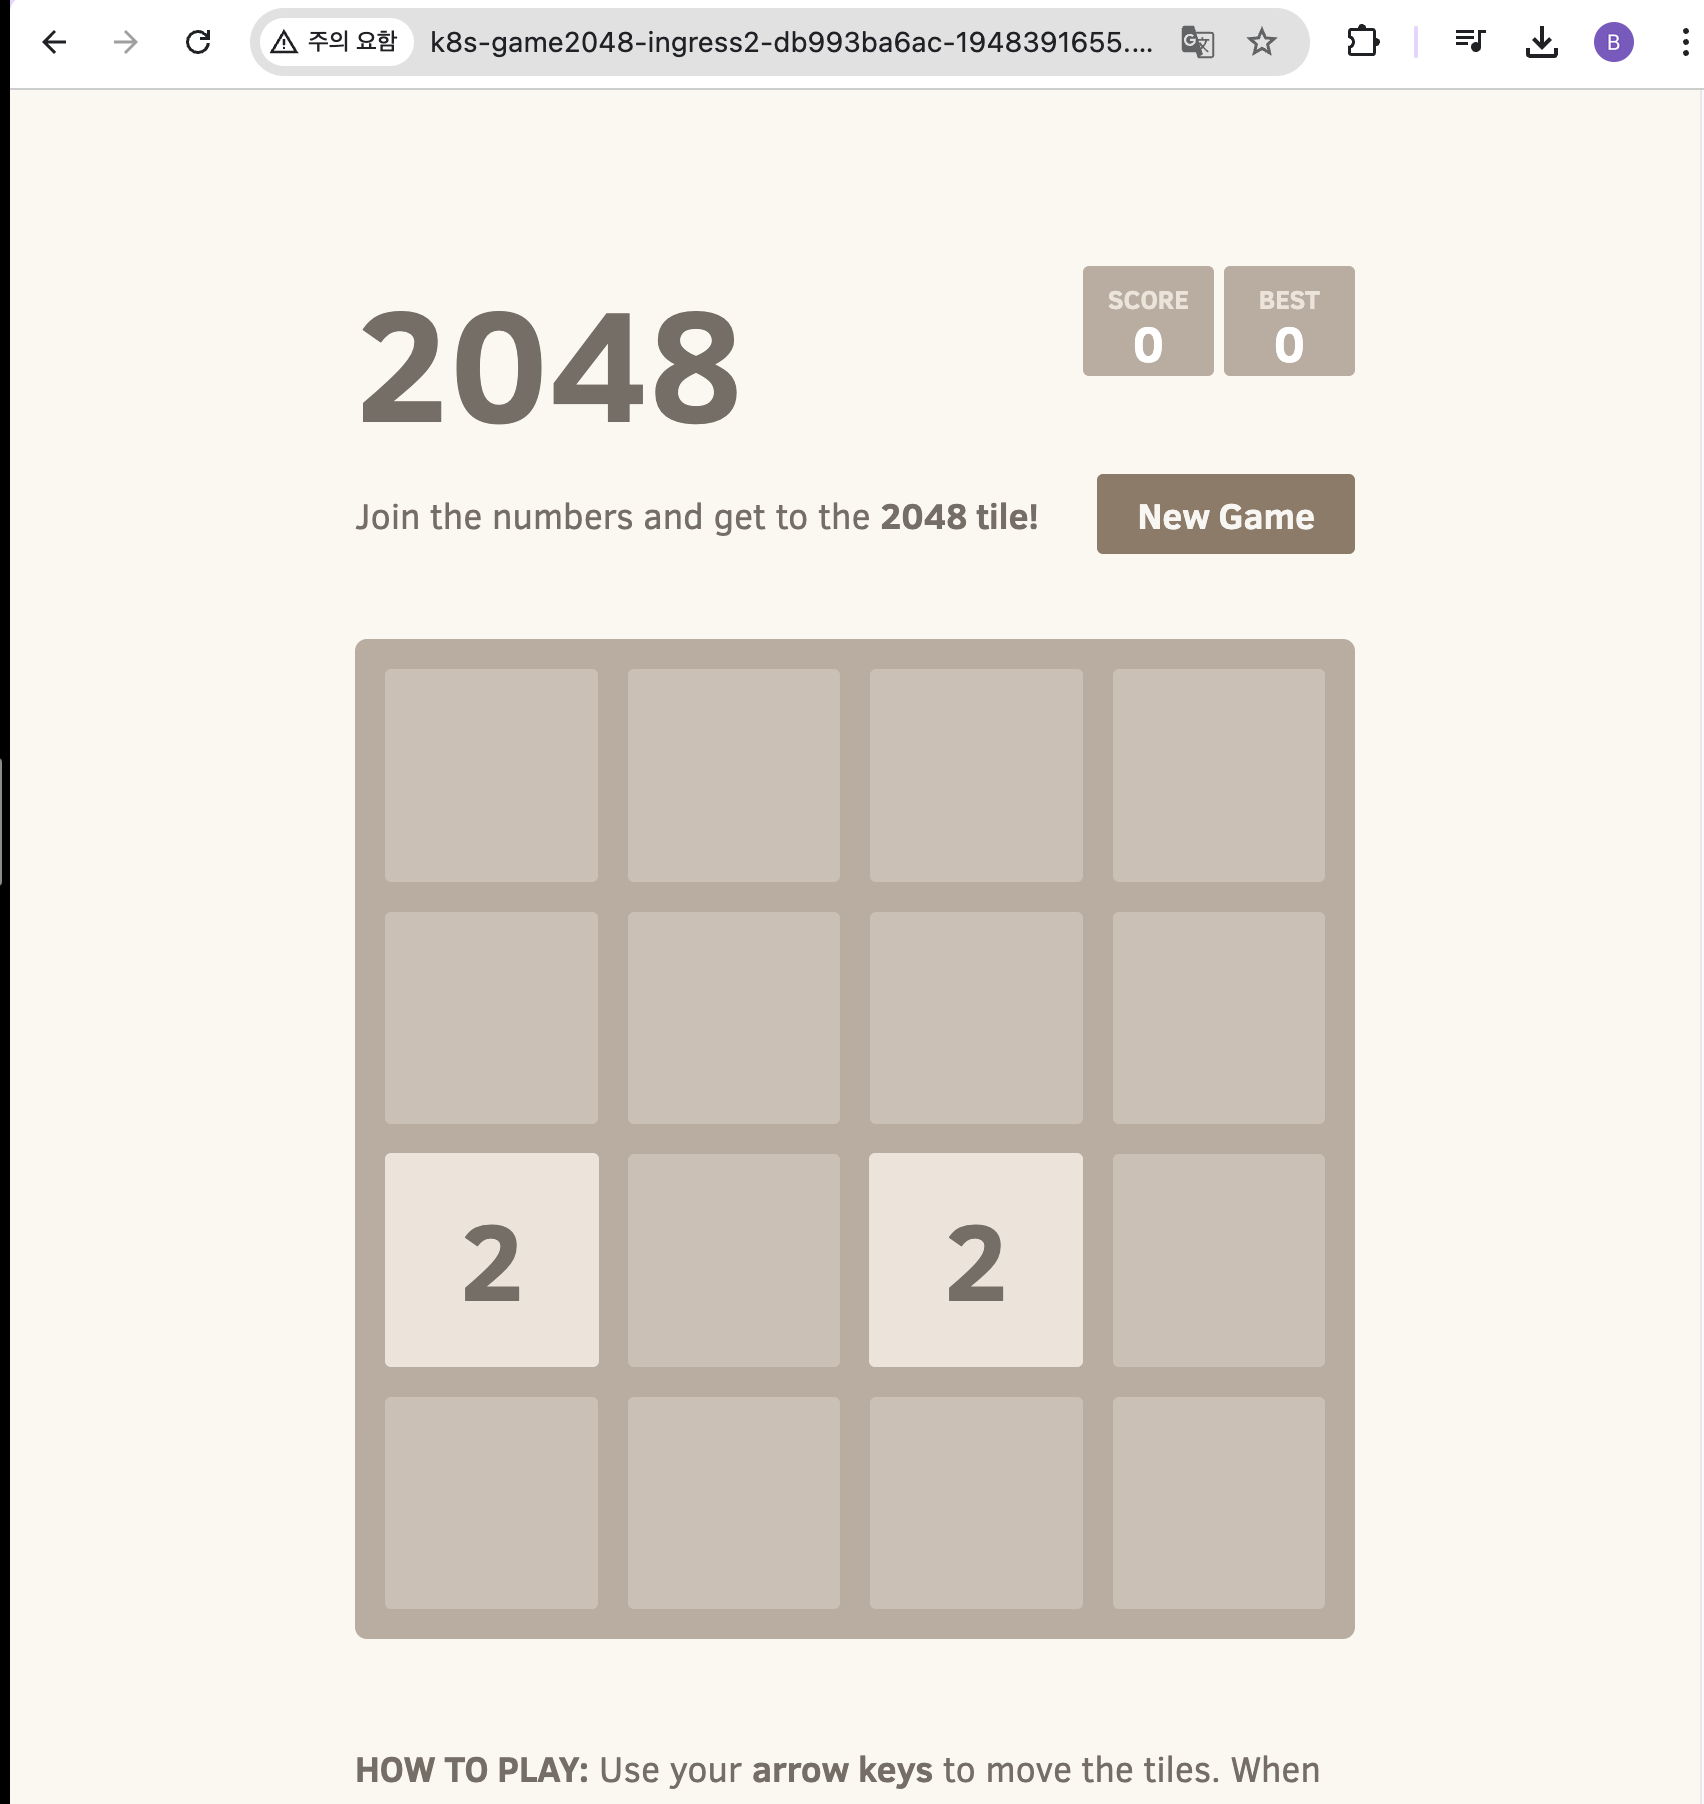
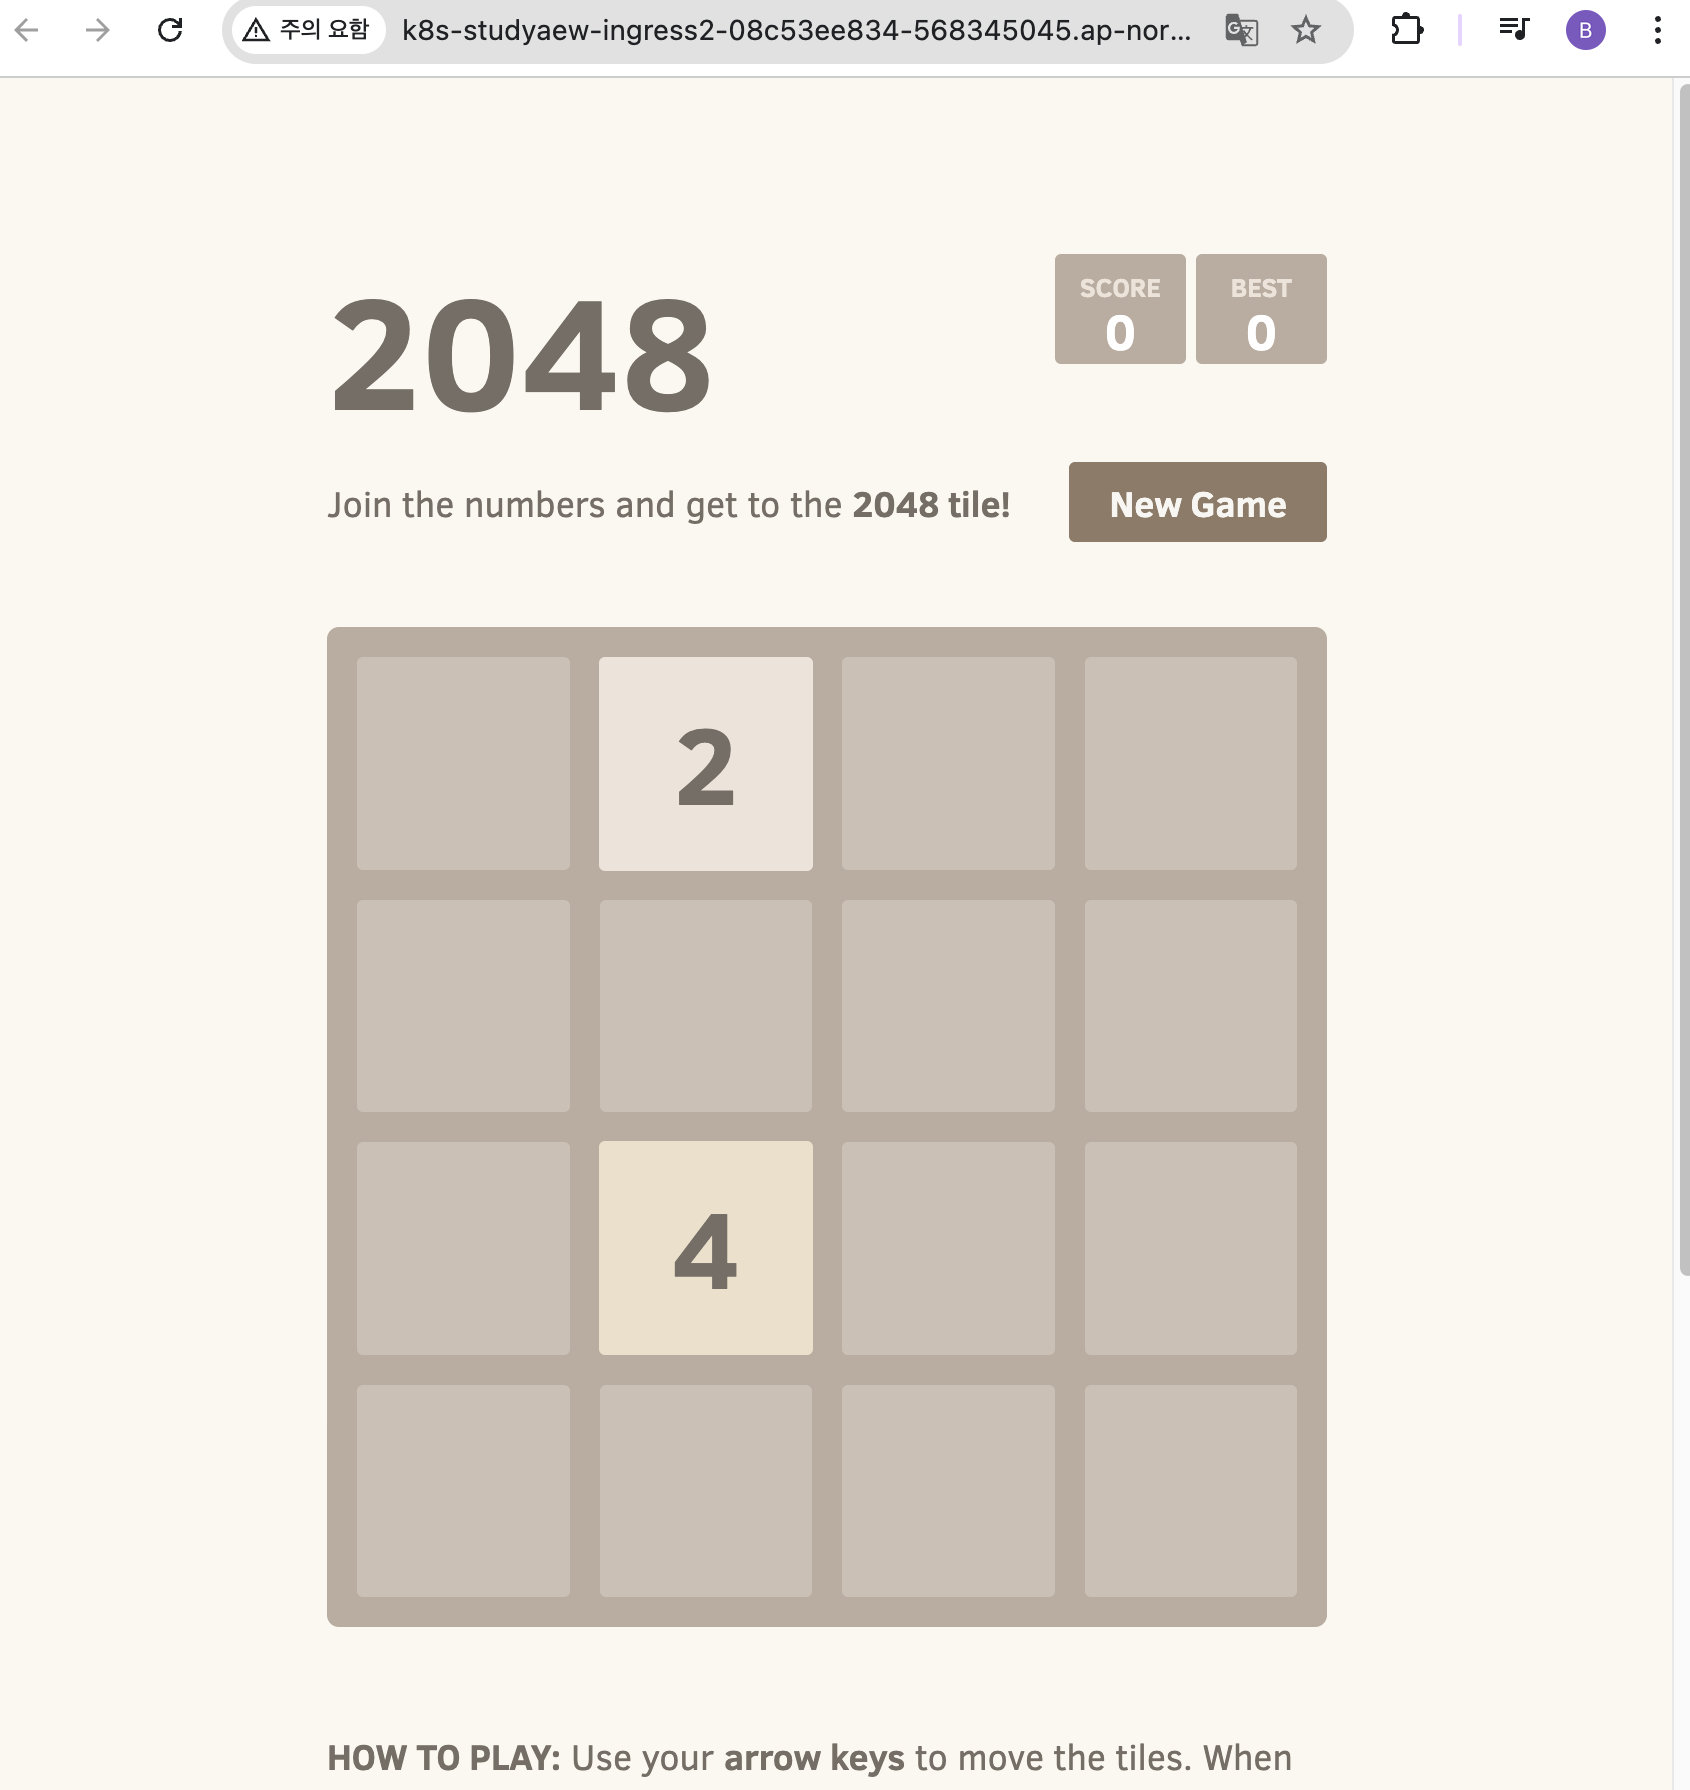
cat <<EOF | kubectl apply -f -
apiVersion: apps/v1
kind: Deployment
metadata:
  namespace: study-aews
  name: deployment-2048
spec:
  selector:
    matchLabels:
      app.kubernetes.io/name: app-2048
  replicas: 2
  template:
    metadata:
      labels:
        app.kubernetes.io/name: app-2048
    spec:
      containers:
      - image: public.ecr.aws/l6m2t8p7/docker-2048:latest
        imagePullPolicy: Always
        name: app-2048
        ports:
        - containerPort: 80
---
apiVersion: v1
kind: Service
metadata:
  namespace: study-aews
  name: service-2048
spec:
  ports:
    - port: 80
      targetPort: 80
      protocol: TCP
  type: ClusterIP
  selector:
    app.kubernetes.io/name: app-2048
---
apiVersion: networking.k8s.io/v1
kind: Ingress
metadata:
  namespace: study-aews
  name: ingress-2048
  annotations:
    alb.ingress.kubernetes.io/scheme: internet-facing
    alb.ingress.kubernetes.io/target-type: ip
spec:
  ingressClassName: alb
  rules:
    - http:
        paths:
        - path: /
          pathType: Prefix
          backend:
            service:
              name: service-2048
              port:
                number: 80
EOF

# 모니터링
watch -d kubectl get pod,ingress,svc,ep,endpointslices -n study-aews

# 생성 확인
kubectl get-all -n study-aews
kubectl get ingress,svc,ep,pod -n study-aews
kubectl get targetgroupbindings -n study-aews

# Ingress 확인
kubectl describe ingress -n study-aews ingress-2048
kubectl get ingress -n study-aews ingress-2048 -o jsonpath="{.status.loadBalancer.ingress[*].hostname}{'\n'}"

# 게임 접속 : ALB 주소로 웹 접속
kubectl get ingress -n study-aews ingress-2048 -o jsonpath='{.status.loadBalancer.ingress[0].hostname}' | awk '{ print "Game URL = http://"$1 }'

# 파드 IP 확인
kubectl get pod -n study-aews -owide

# 파드 증가
kubectl scale deployment -n study-aews  deployment-2048 --replicas 4

# 게임 실습 리소스  삭제
kubectl delete ingress ingress-2048 -n study-aews
kubectl delete svc service-2048 -n study-aews && kubectl delete deploy deployment-2048 -n study-aews
- 디플로이먼트와 Service, Ingress 배포
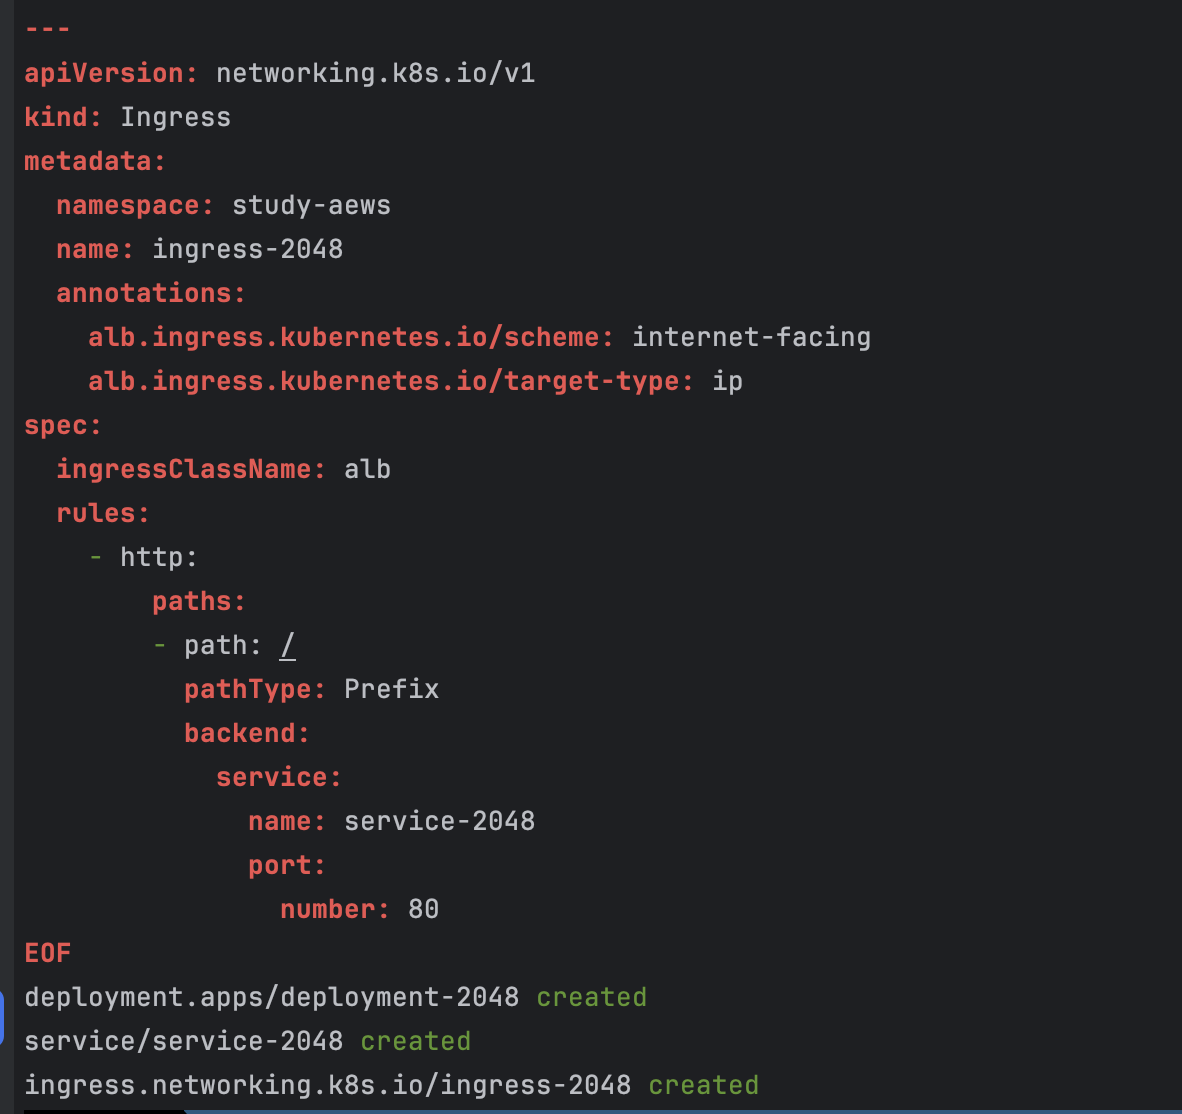
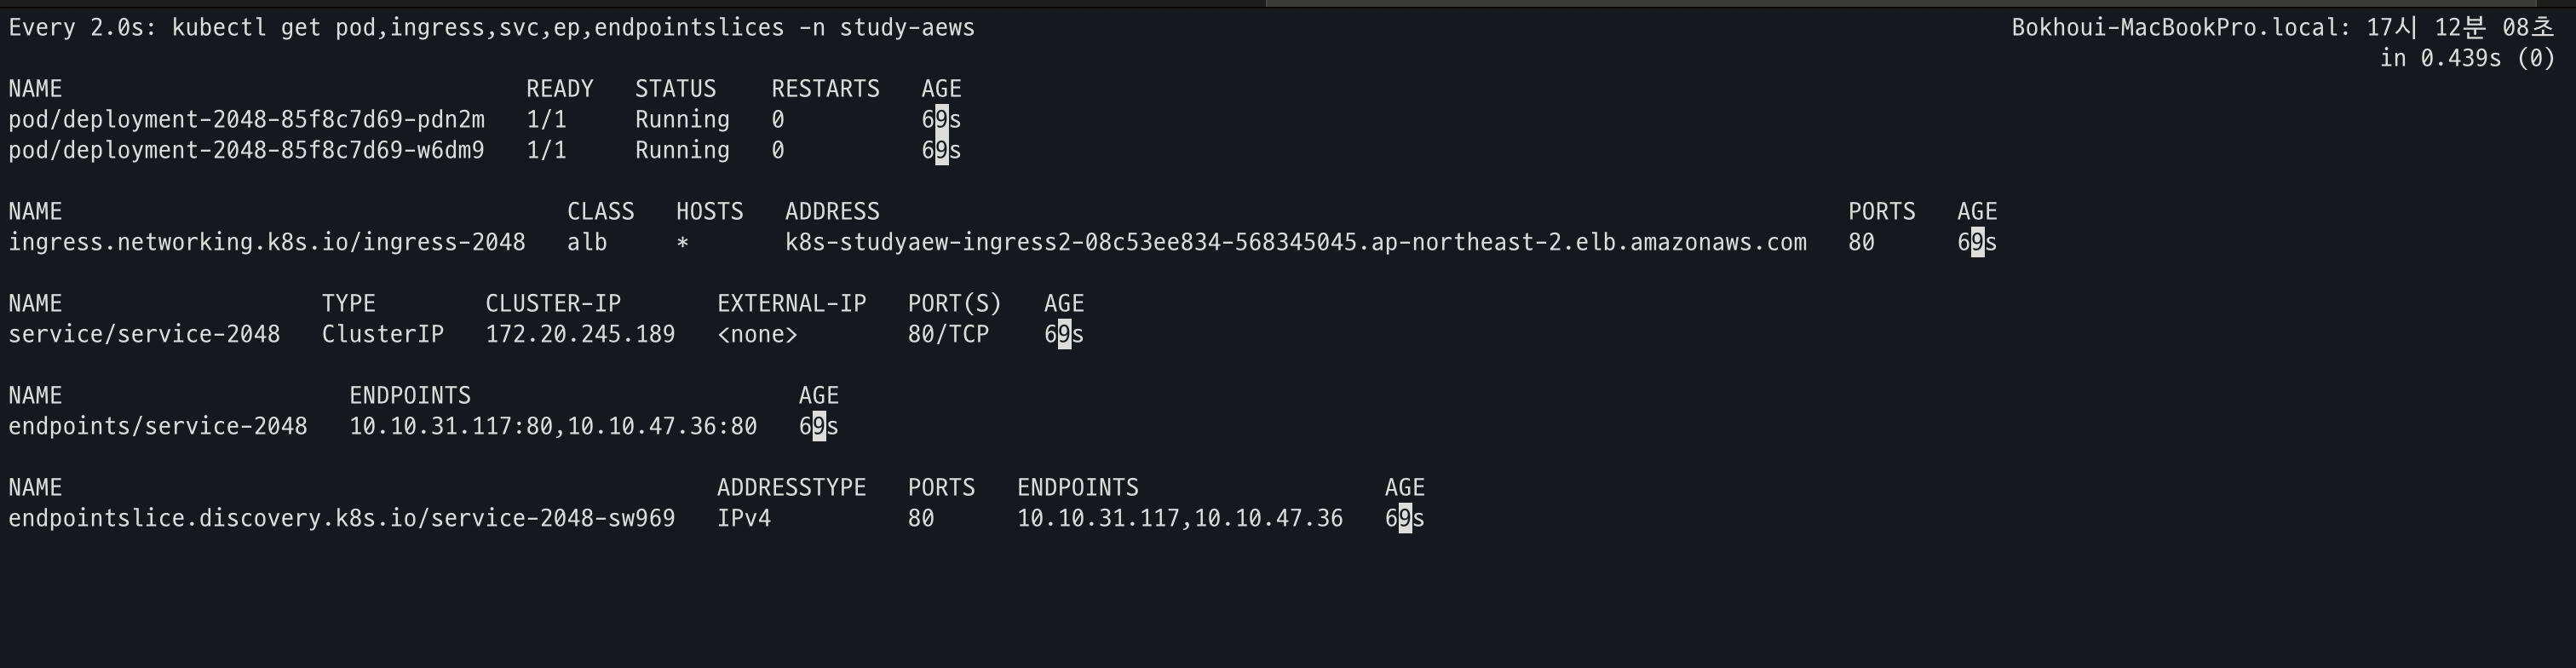
- 생성 확인
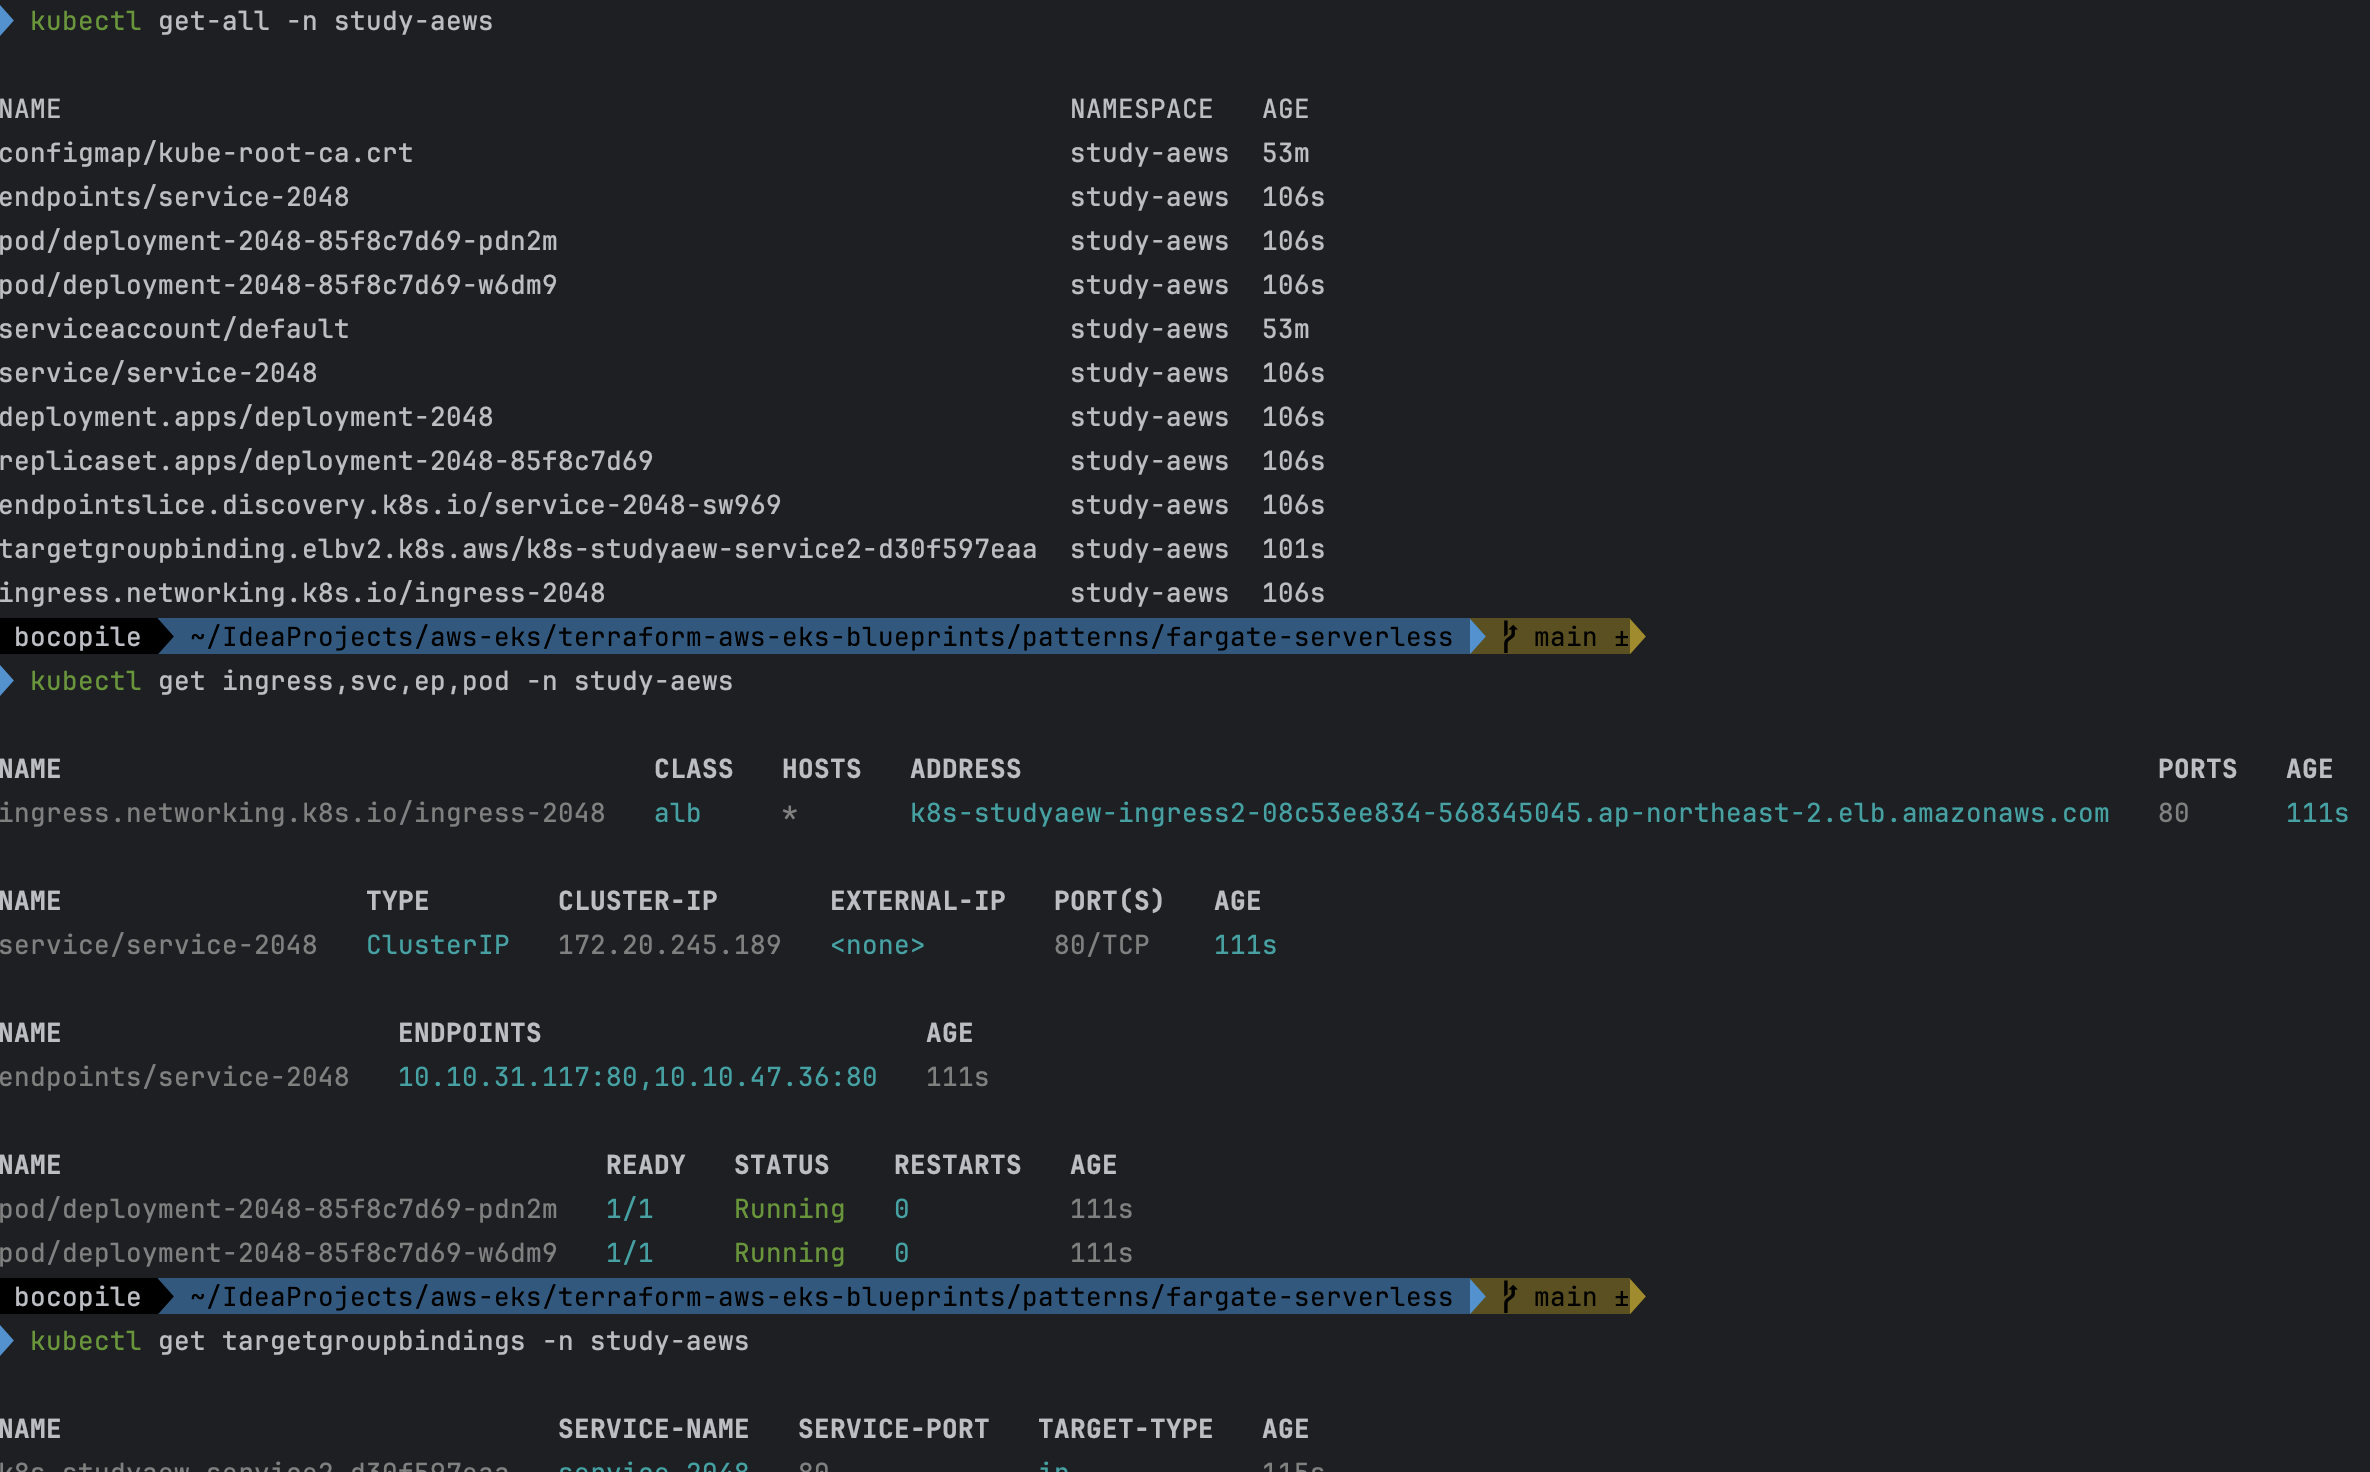
- Ingress 확인
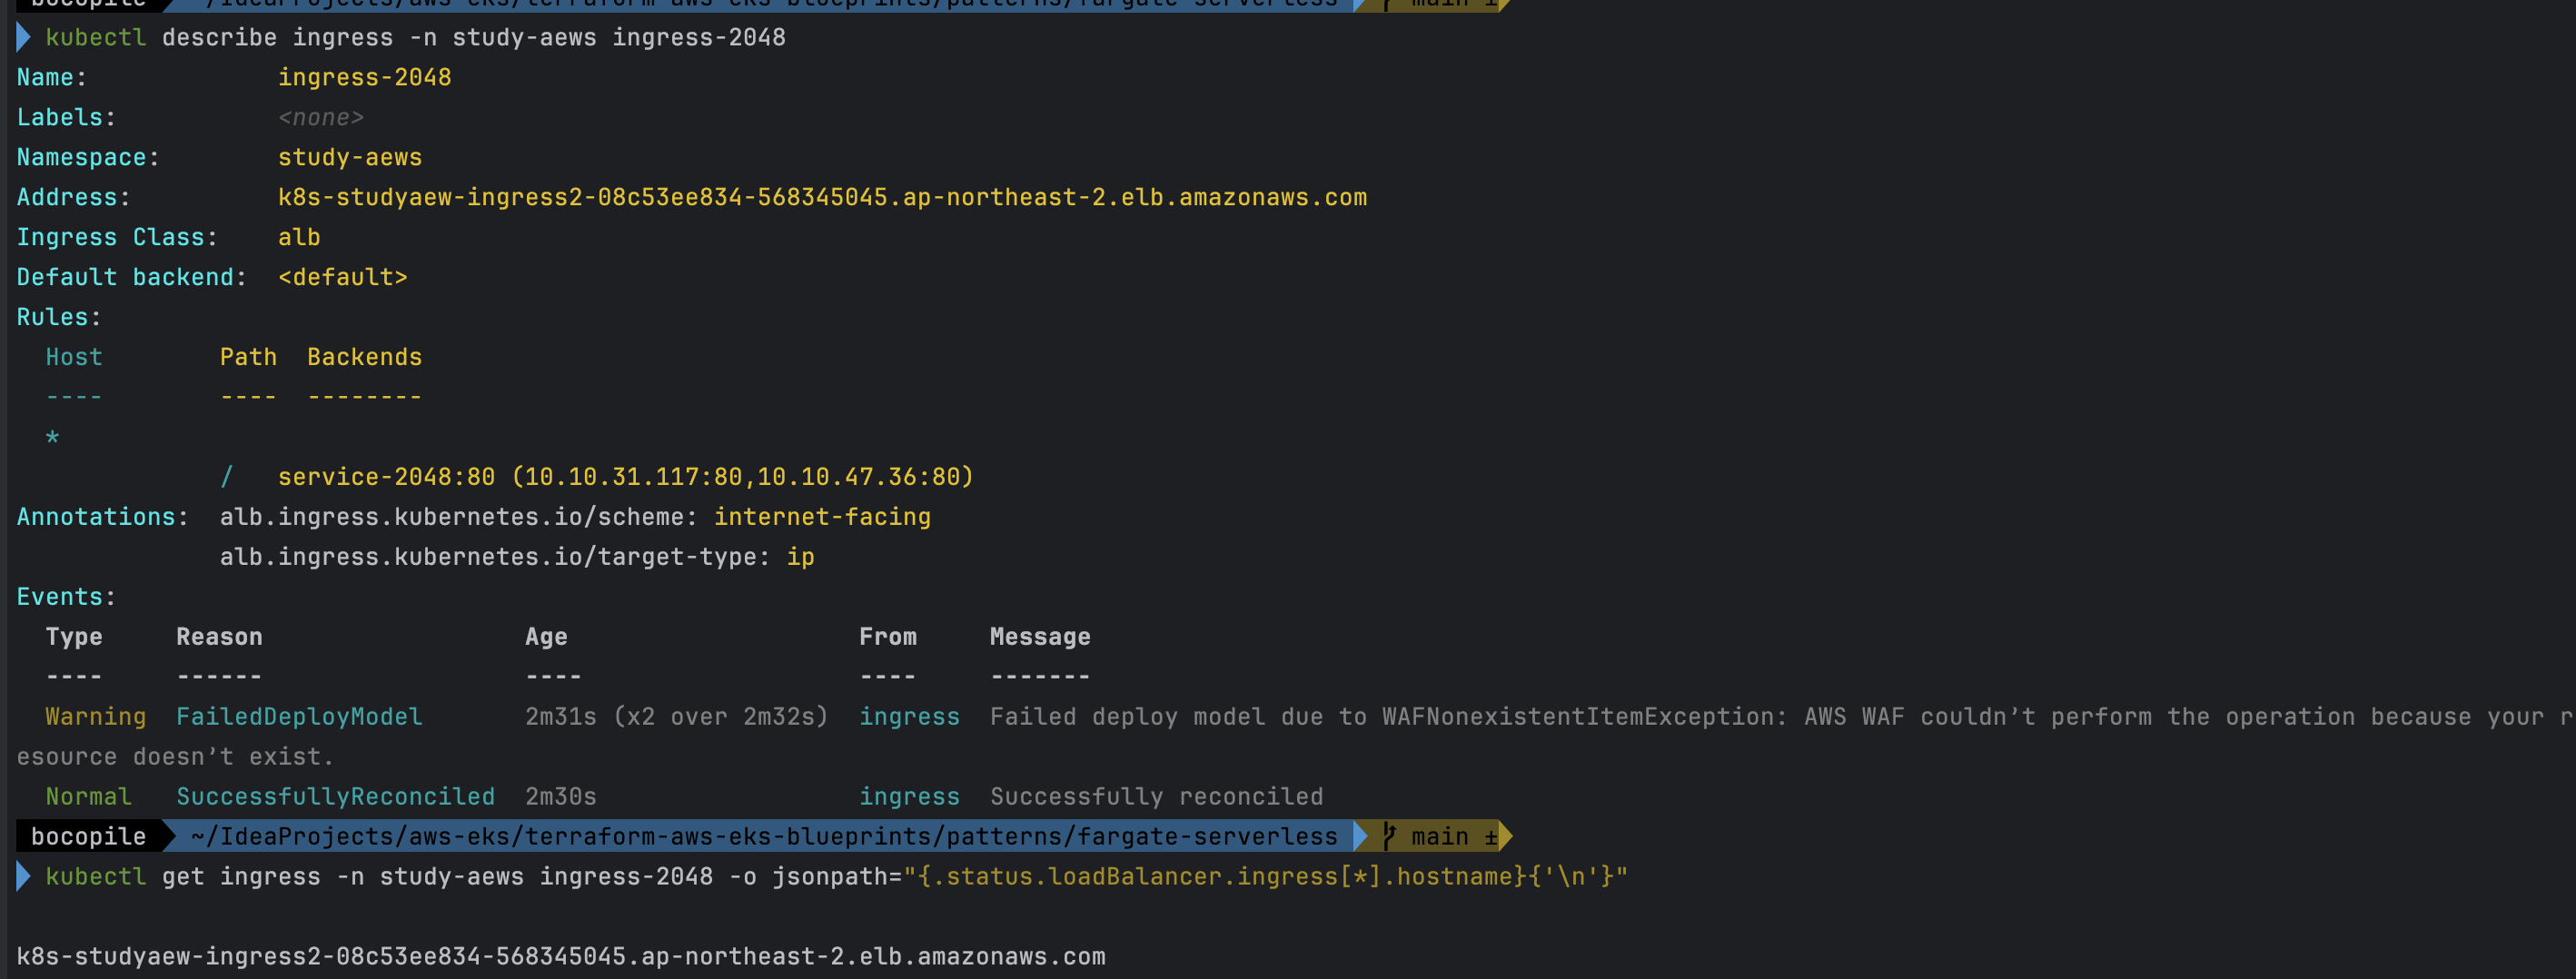
- 게임 접속
- 파드 IP 확인

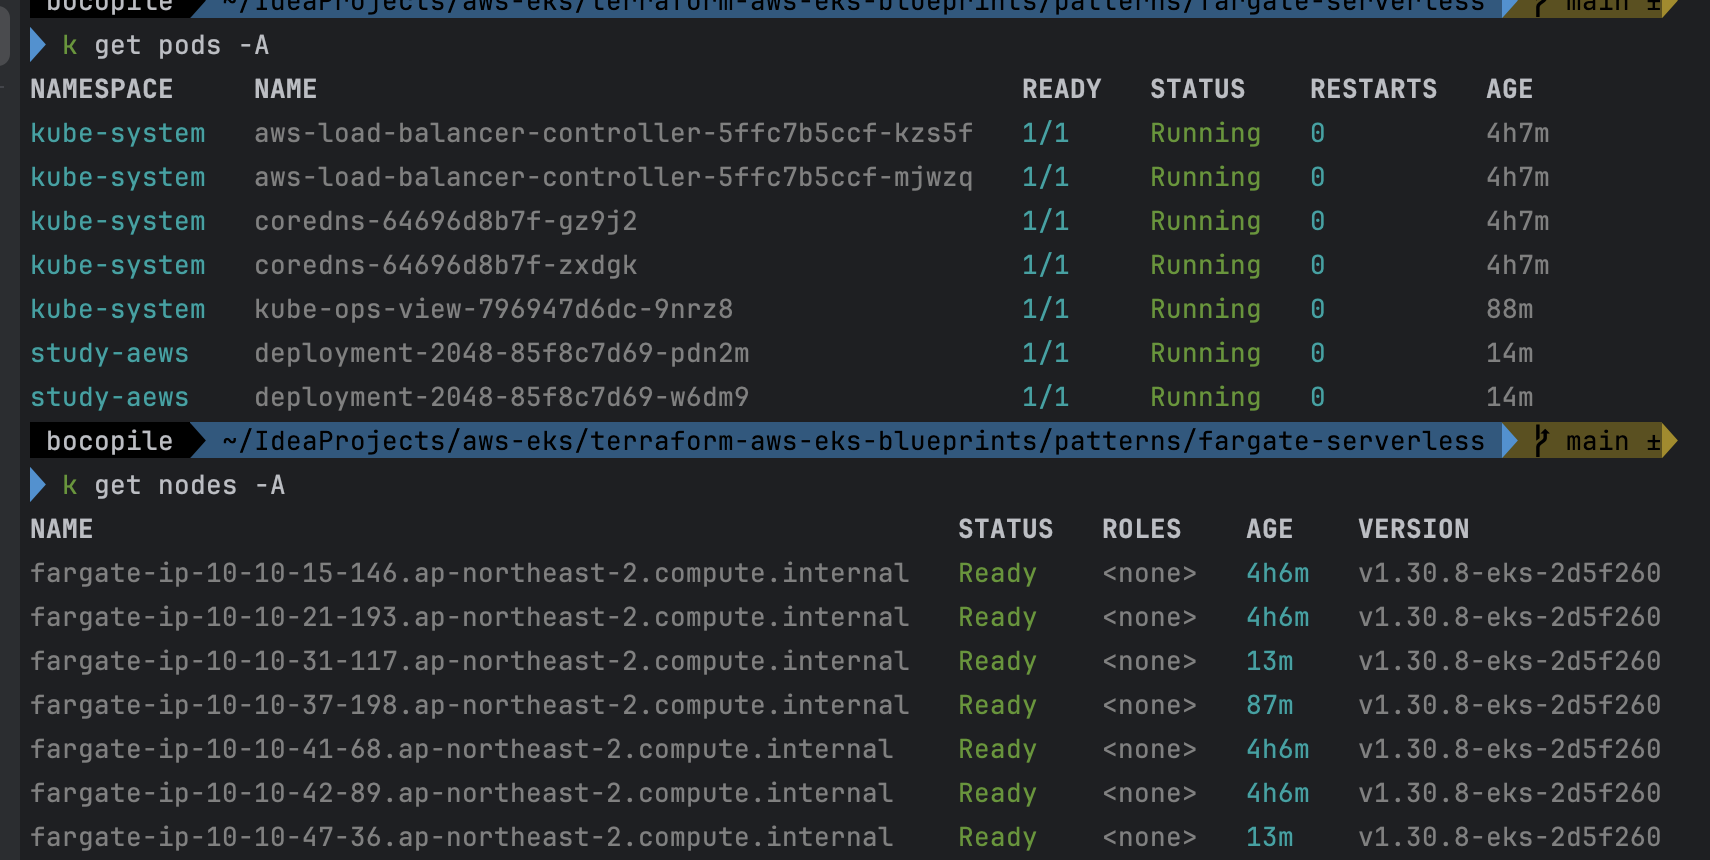
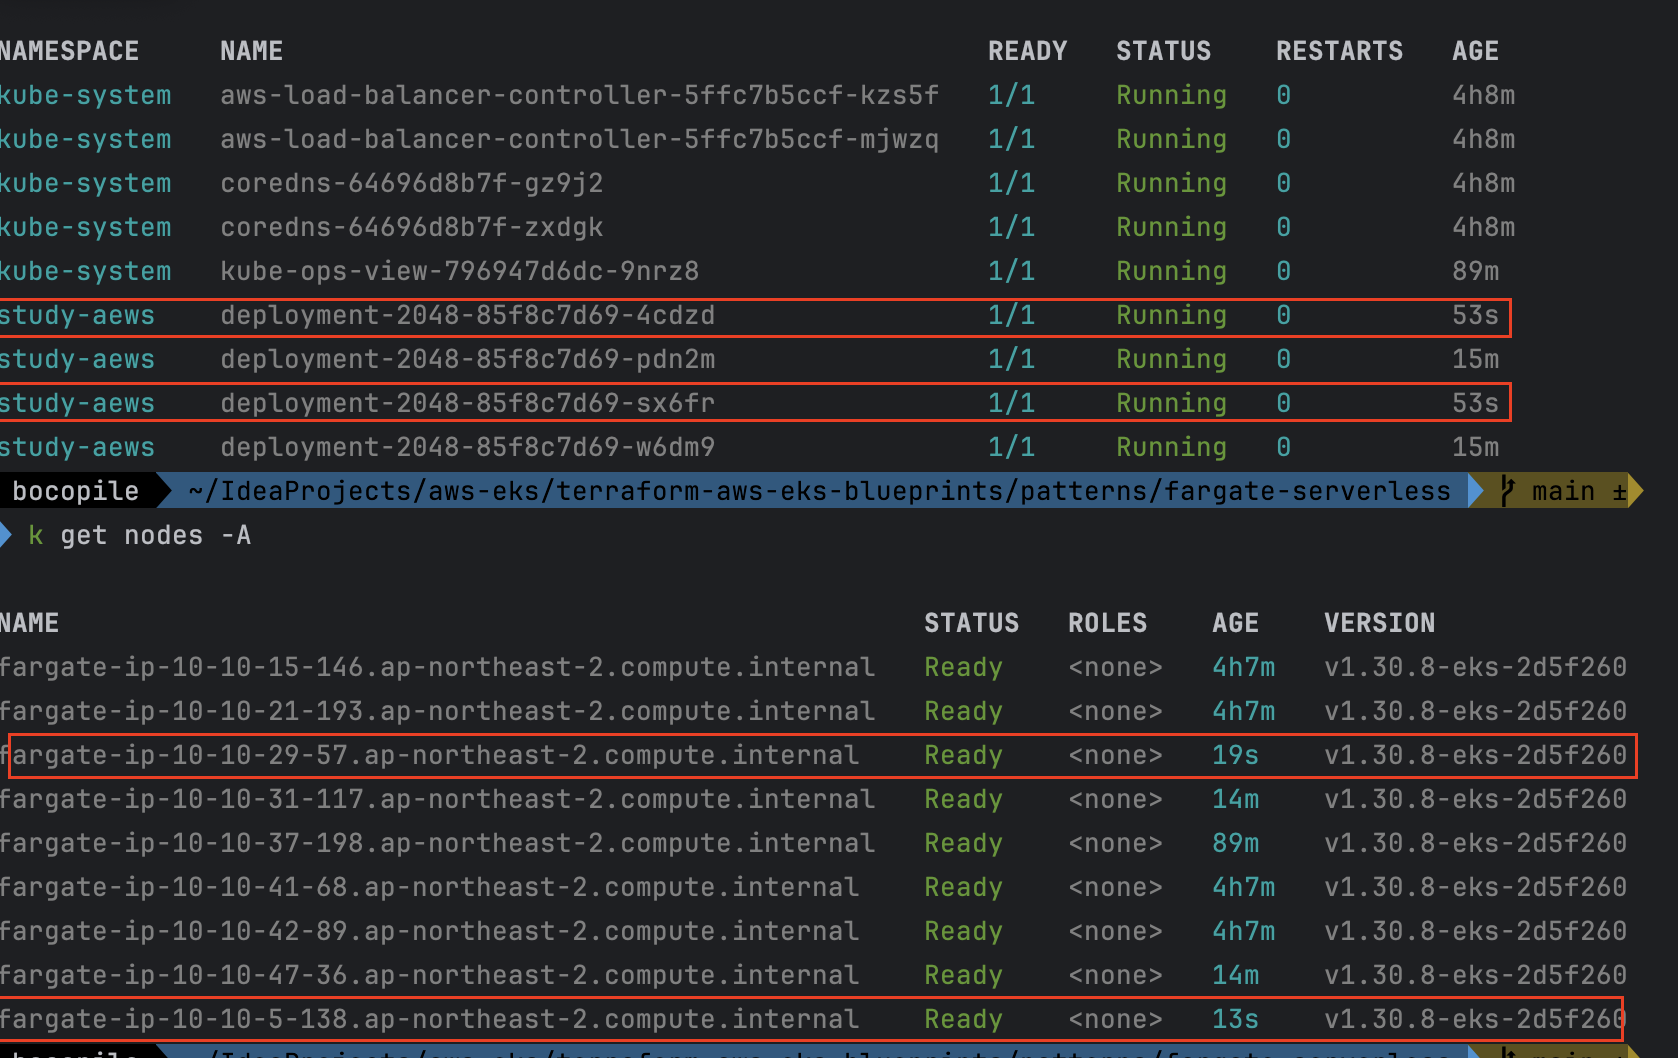
- Replicas 4로 변경
-
확인 : 노드 7개 → 9개로 증가 되는 것을 확인
- 기존

- 적용 후
- 기존
Fargate logging
정의
Fargate의 EKS는 별도의 Fluent Bit 사이드 카 없이 내장 로그 라우터를 제공한다.
- 구성 방법:
- ConfigMap 생성: 이름은
aws-logging, 네임스페이스는aws-observability, 5300자 이하
- ConfigMap 생성: 이름은
- 동작 원리:
- ConfigMap 생성 시 Fargate가 자동으로 로그 라우터를 구성함
- AWS 관리 Fluent Bit 배포판을 사용
- 활용:
- 로그를 Amazon CloudWatch, OpenSearch, Data Firehose(예: S3, Kinesis 데이터 스트림 등)로 스트리밍 가능
실습
- code
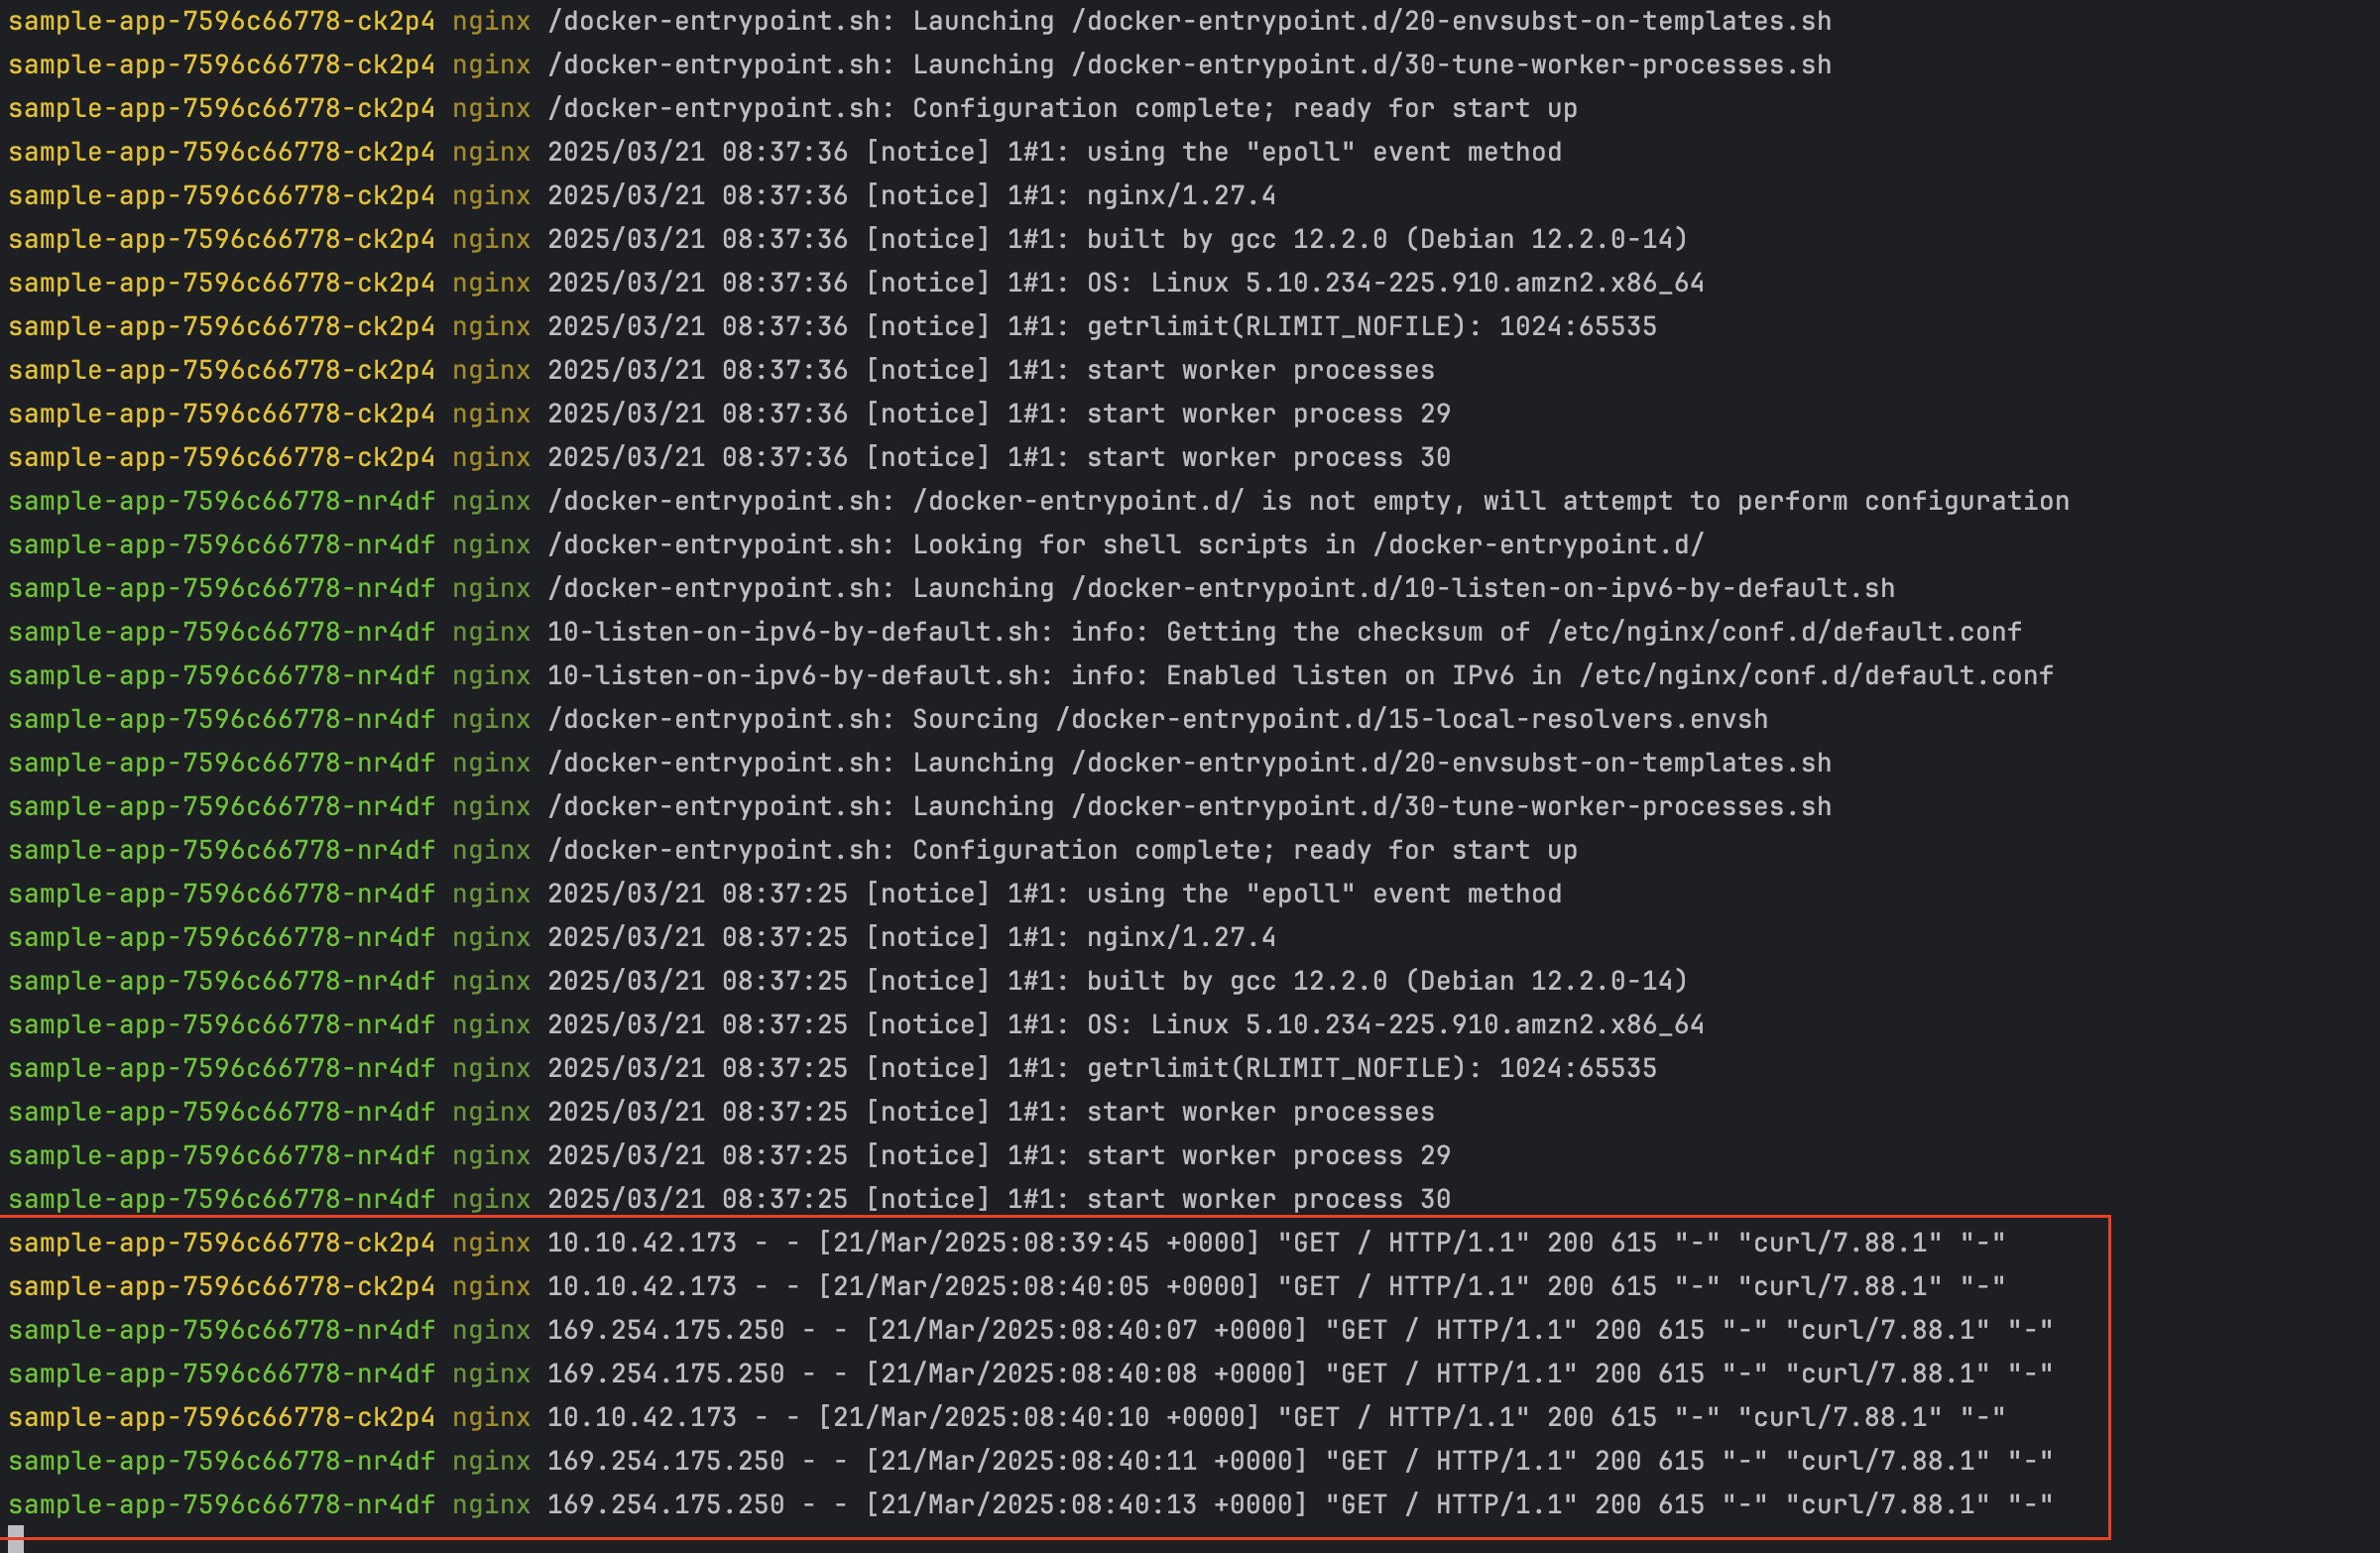
cat <<EOF | kubectl apply -f -
apiVersion: apps/v1
kind: Deployment
metadata:
  name: sample-app
  namespace: study-aews
spec:
  replicas: 2
  selector:
    matchLabels:
      app: nginx
  template:
    metadata:
      labels:
        app: nginx
    spec:
      containers:
      - image: nginx:latest
        name: nginx
        ports:
        - containerPort: 80
          name: http
        resources:
          requests:
            cpu: 500m
            memory: 500Mi
          limits:
            cpu: 2
            memory: 2Gi
---
apiVersion: v1
kind: Service
metadata:
  name: sample-app
  namespace: study-aews
spec:
  selector:
    app: nginx
  ports:
  - port: 80
    targetPort: 80
    protocol: TCP
  type: ClusterIP
EOF

# 확인
kubectl get pod -n study-aews -l app=nginx
kubectl describe pod -n study-aews -l app=nginx

# 반복 접속
kubectl exec -it deploy/sample-app -n study-aews -- curl sample-app | grep title
while true; do kubectl exec -it deploy/sample-app -n study-aews -- curl sample-app | grep title; sleep 1; echo ; date; done;

# 로그 확인
kubectl stern -n study-aews -l app=nginx
- Deployment, Service 배포

- 배포 확인

- 반복 접속 확인
로그 설정 정보 확인
- code
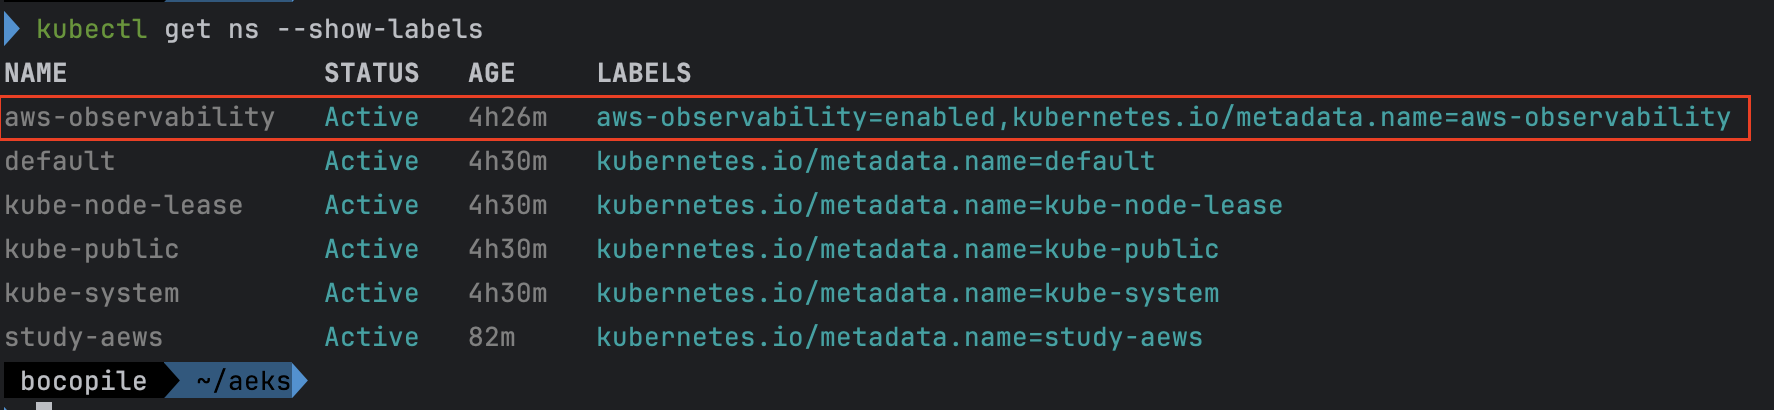
#aws-observability라는 이름의 전용 네임스페이스 확인
kubectl get ns --show-labels
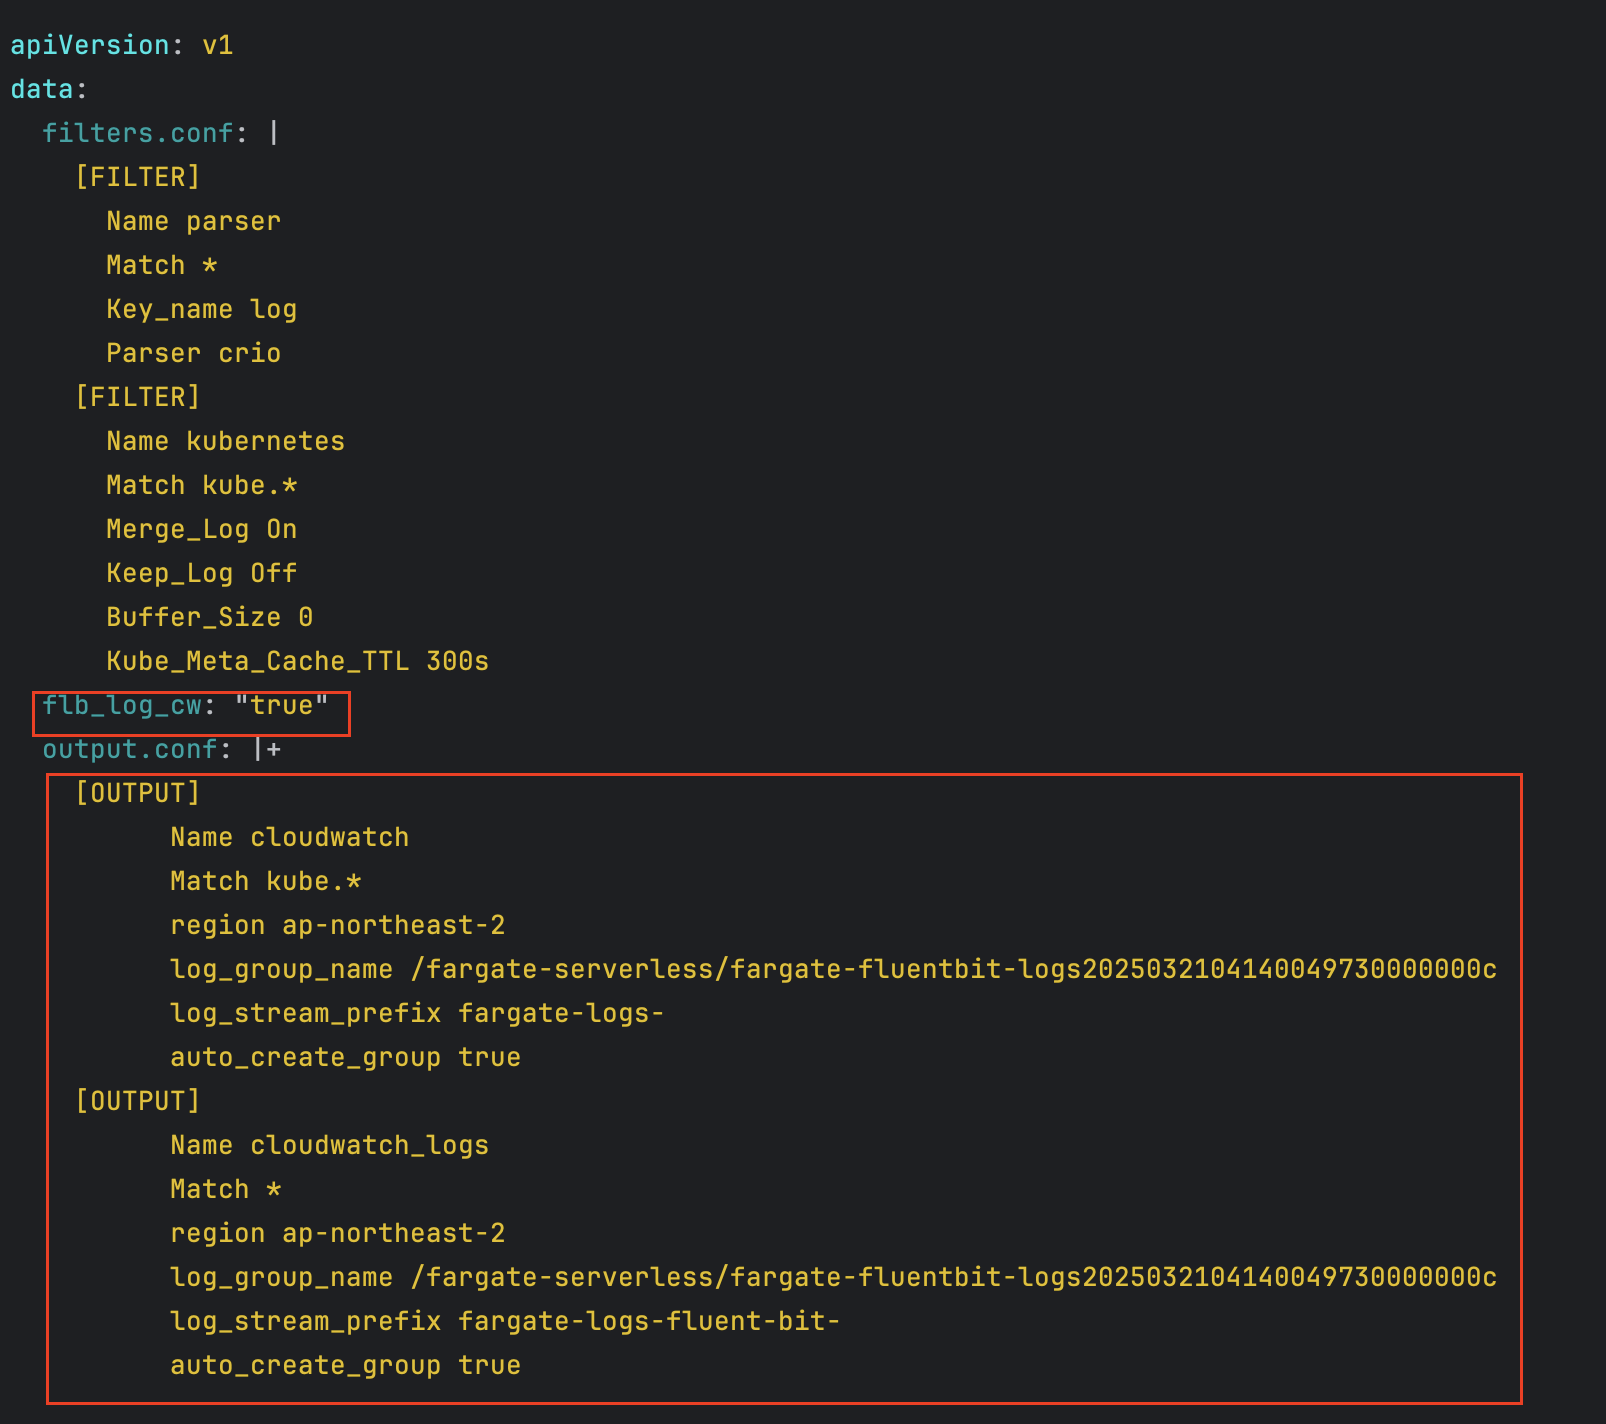
# Fluent Conf 데이터 값이 포함된 ConfigMap : 컨테이너 로그를 목적지로 배송 설정
## Amazon EKS Fargate 로깅은 ConfigMap의 동적 구성을 지원하지 않습니다.
## ConfigMap에 대한 모든 변경 사항은 새 포드에만 적용됩니다. 기존 포드에는 변경 사항이 적용되지 않습니다.
kubectl get cm -n aws-observability
kubectl get cm -n aws-observability aws-logging -o yaml- aws-observability라는 이름의 전용 네임스페이스 확인
- 설정 확인
수집된 로그 확인 - Amazon CloudWatch
- fargate-fluentbit-logs 선택
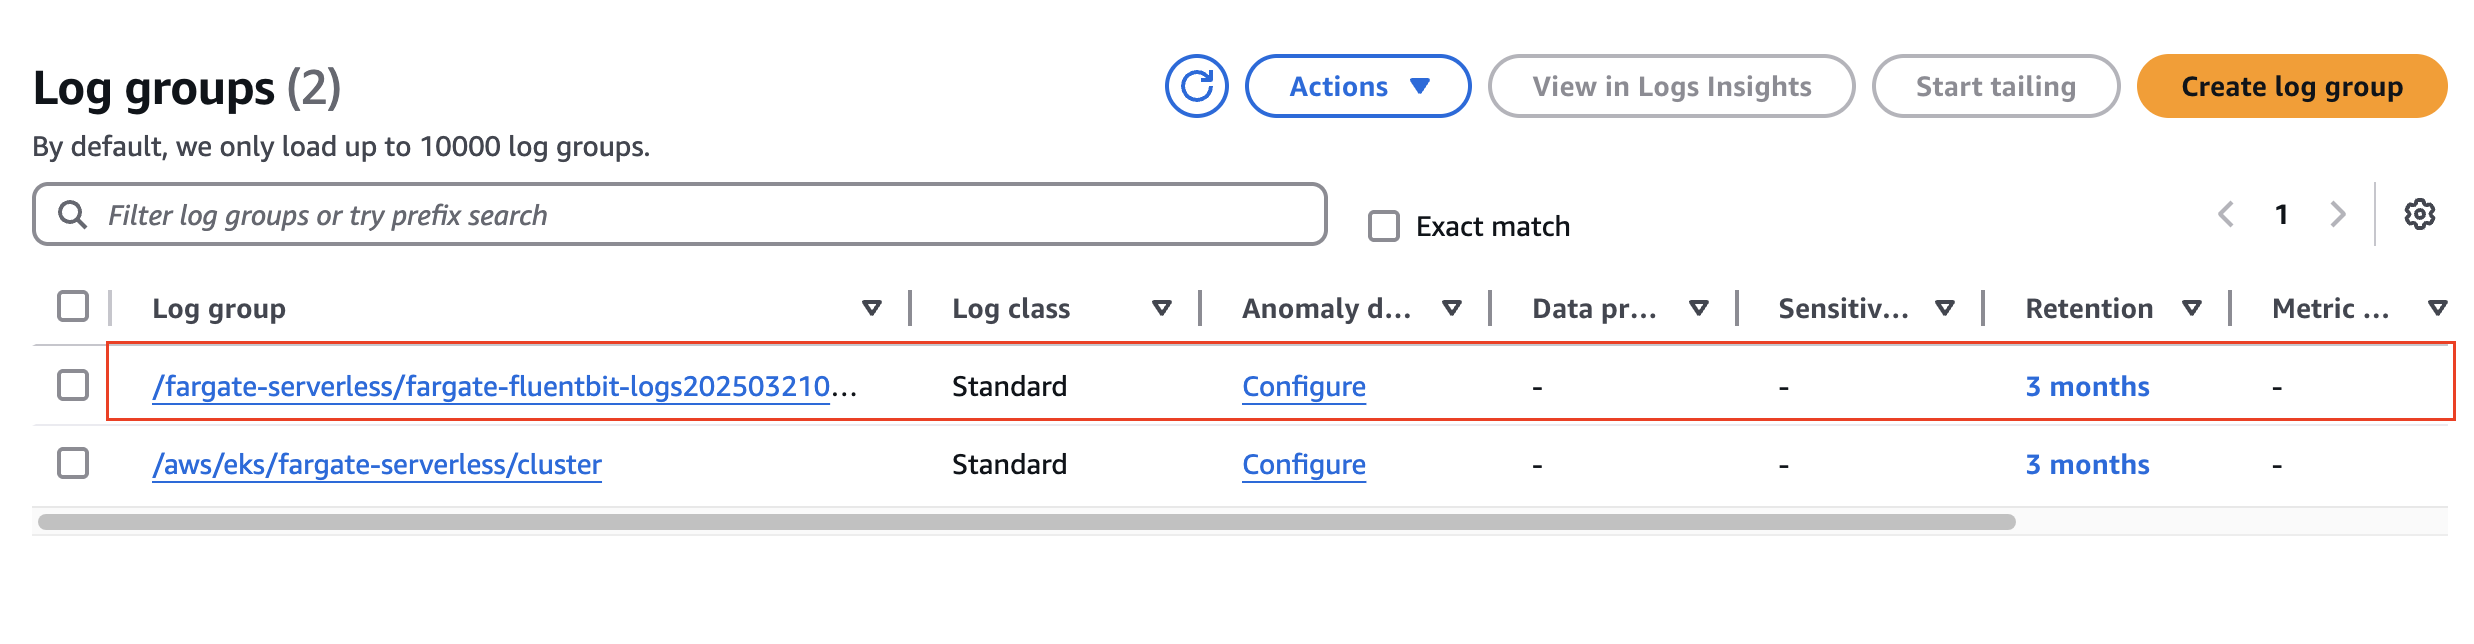
- 로그 확인

실습 코드 삭제
- 실습 배포 리소스들 먼저 삭제
# 게임 실습 리소스  삭제
kubectl delete ingress ingress-2048 -n study-aews
kubectl delete svc service-2048 -n study-aews && kubectl delete deploy deployment-2048 -n study-aews

# netshoot 삭제
kubectl delete deploy netshoot -n study-aews

# kube-ops-view 삭제
helm uninstall kube-ops-view -n kube-system
- 테라폼 삭제
# 테라폼 삭제 : vpc 삭제가 잘 안될 경우 aws 콘솔에서 vpc 수동 삭제 -> vnic 등 남아 있을 경우 해당 vnic 강제 삭제
terraform destroy -auto-approve

# VPC 삭제 확인
aws ec2 describe-vpcs --filter 'Name=isDefault,Values=false' --output yaml

# kubeconfig 삭제
rm -rf ~/.kube/config
EKS Auto Mode
참고
- 영어 링크 - https://aws.amazon.com/about-aws/whats-new/2024/12/amazon-eks-auto-mode/
- 한국어 링크 - https://aws.amazon.com/ko/about-aws/whats-new/2024/12/amazon-eks-auto-mode/
EKS Auto Mode??
EKS Auto Mode는 클러스터 관리 작업은 AWS으로 넘김으로서 k8s 실행을 간소화 하고, 애플리케이션의 성능 및 보안을 강화하며, 컴퓨팅 비용을 최적화하는데 초점을 맞췄다.
EKS Auto Mode 등장 배경
- 쿠버네티스 운영 복잡성 완화: 쿠버네티스는 노드, 네트워크, 스토리지 등을 직접 관리해야 하며, 초보자 진입 장벽이 높습니다.
- 신속한 클러스터 설정 요구: 개발자/기업이 인프라 구성보다 애플리케이션 개발에 집중할 수 있도록 자동화된 환경 필요.
- 운영 오버헤드 감소: 노드 패치, 용량 관리, 보안 업데이트 등을 AWS에 위임하여 DevOps 부담을 줄여줌
EKS Auto Mode 아키텍처
기존에 사용해오던 EKS는 기본적으로 다음과 같이 구성되었다.
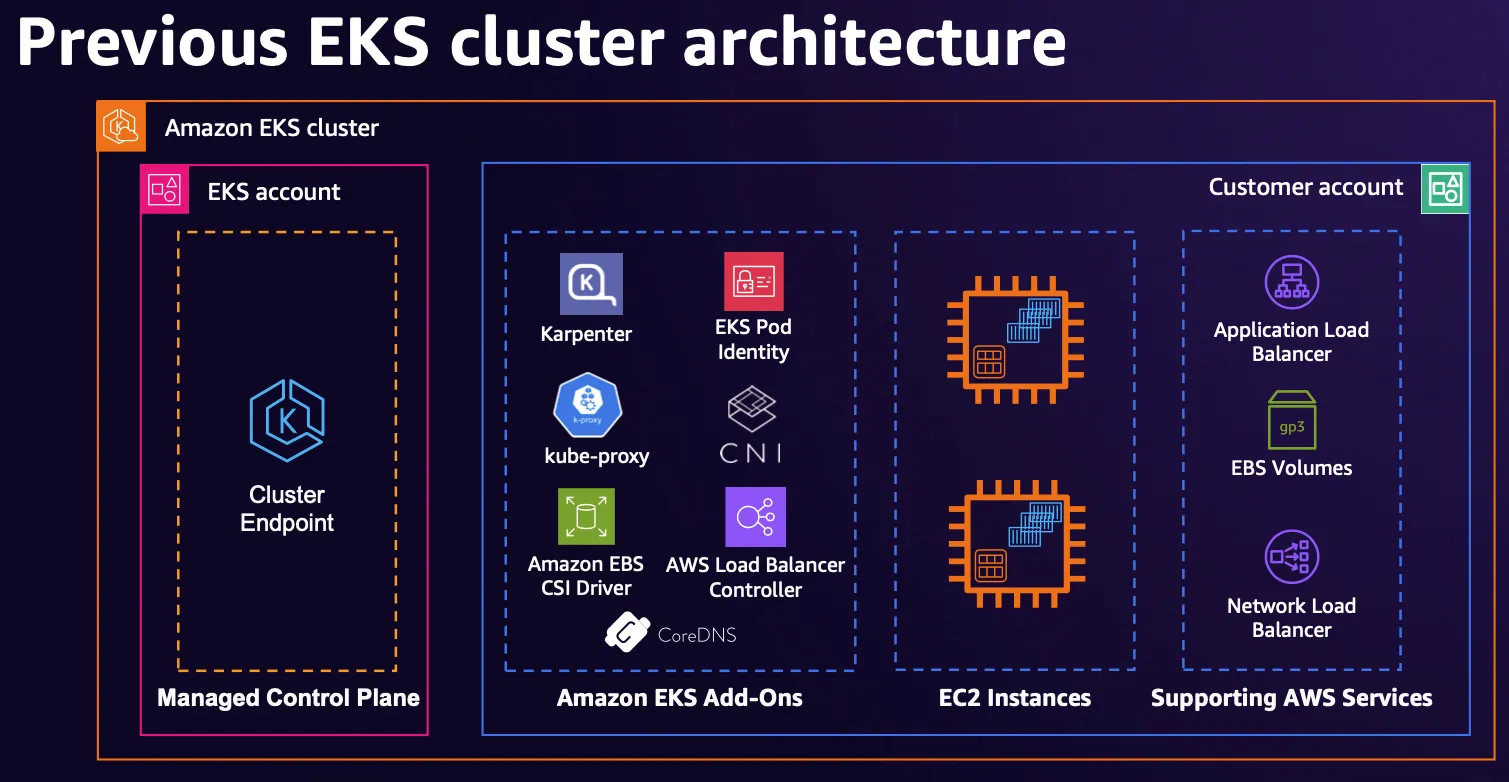
출처 : AWS re:Invent 2024 - The future of Kubernetes on AWS (KUB201)
EKS Auto Mode에서는 아래와 같이 AWS에 더 많은 부분을 관리하도록 하였다.
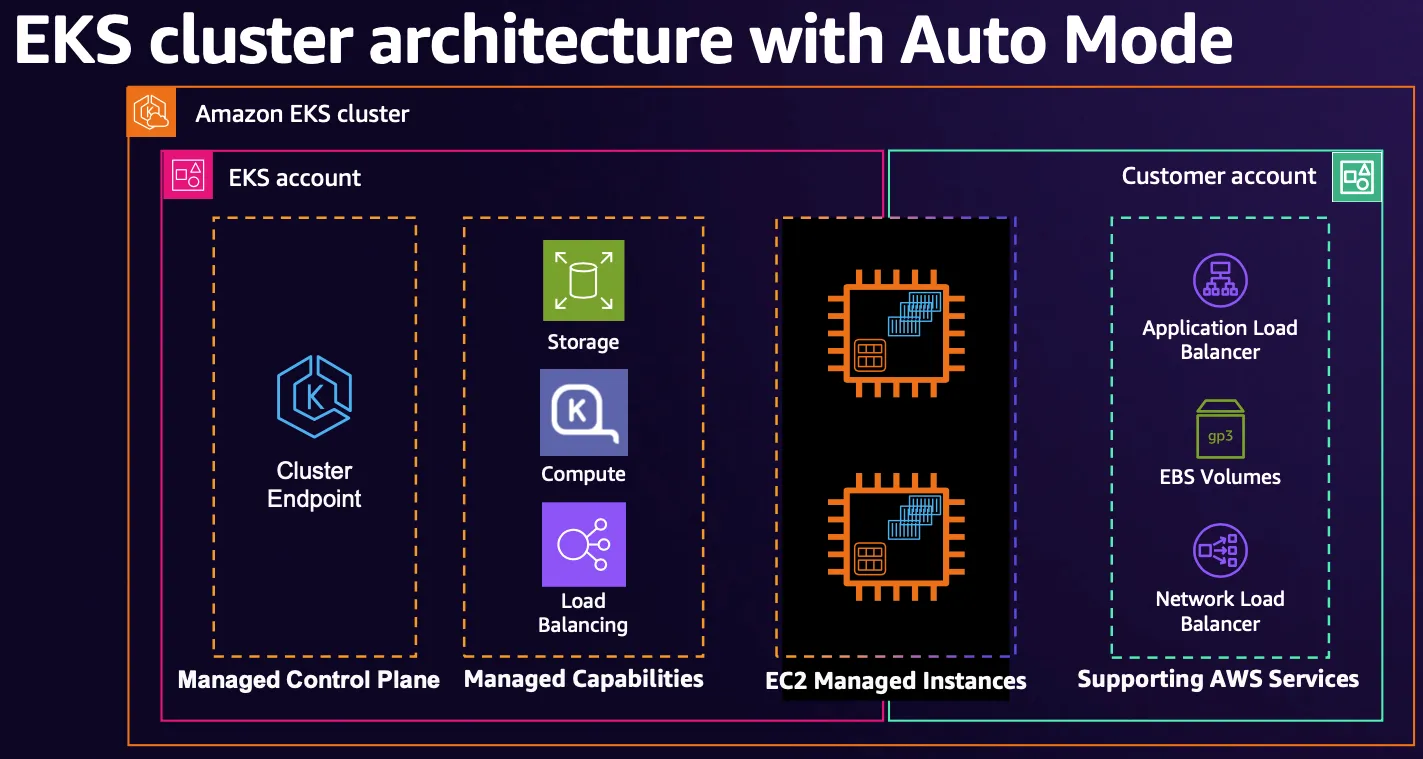
출처 : AWS re:Invent 2024 - The future of Kubernetes on AWS (KUB201)
- 변경 사항
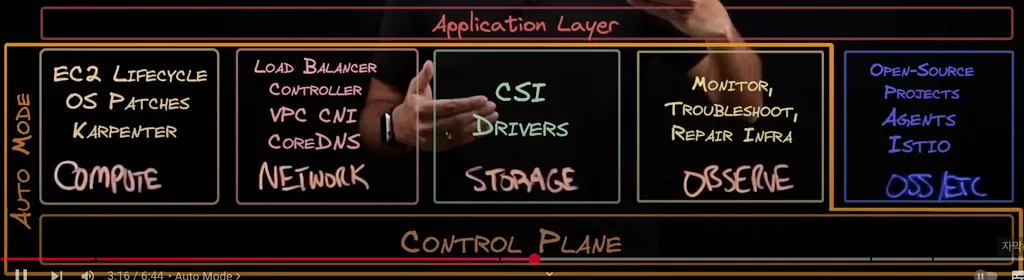
위와 같이 compute, network, storage, observe에 관한 driver들과 addon들은 모두 AWS에서 관리해준다.
고객 관리 영역에는 OSS/ETC들이 존재한다.
EKS Auto Mode 기능
- 클러스터 관리 간소화: 운영 오버헤드를 줄이고, EKS 전문 지식 없이도 동적 워크로드를 실행 가능하게 함.
- 애플리케이션 가용성: 필요에 따라 노드를 자동 추가/제거하여 수동 용량 계획 없이 안정적인 운영 보장.
- 비용 효율성: 유휴 인스턴스를 종료하고 워크로드를 통합하여 컴퓨팅 비용 최적화.
- 보안 강화: 불변 AMI, SELinux, 읽기 전용 루트 파일 시스템 적용. 노드는 최대 21일마다 자동 교체.
- 자동 업그레이드: PDB 및 NDB를 준수하면서 최신 패치 적용. 21일 이상 업데이트 차단 시 개입 필요.
- 관리되는 구성 요소: Pod 네트워크, 로컬 DNS, GPU 플러그인, EBS CSI 스토리지 등 기본 제공.
- 사용자 지정 가능: 스토리지·컴퓨팅·네트워크 설정이 필요한 경우 NodePool 및 NodeClasses 사용자 지정 가능.
EKS Auto Mode 장단점
장점
- 관리 용이성: 노드 프로비저닝, 패치, 업데이트를 AWS가 자동 처리.
- 빠른 시작: 복잡한 인프라 구성 없이 5~10분 내 클러스터 배포 가능.
- 자동 스케일링: CPU/메모리 사용량 기반으로 노드 수 조정.
- 보안 강화: 기본적인 IAM 정책, 암호화, 네트워크 격리 적용.
- 비용 효율성: 사용량에 따른 리소스 최적화로 불필요한 비용 감소.
단점
- 커스터마이징 제한: 특정 커널 설정, 사용자 정의 AMI 사용이 어려움.
- 비용 관리 필요: 과도한 스케일링으로 인한 예상치 못한 비용 발생 가능.
- 특수 워크로드 부적합: GPU/고성능 스토리지 등 특수 인스턴스 요구 시 제약.
- 의존성 증가: AWS 인프라에 종속되어 멀티클라우드 전략 구현 복잡.
실습
Terraform 배포
project clone
git clone https://github.com/aws-samples/sample-aws-eks-auto-mode.git
cd sample-aws-eks-auto-mode/terraform
eks.tf 확인
# eks.tf : "system" 은 '전용인스턴스'로 추가하지 않는다
...
  cluster_compute_config = {
    enabled    = true
    node_pools = ["general-purpose"]
  }
...
variables.tf 수정
- region 변경 : ap-northeast-2
- vpc_cid 변경 : 10.20.0.0/16
variable "name" {
  description = "Name of the VPC and EKS Cluster"
  default     = "automode-cluster"
  type        = string
}

variable "region" {
  description = "region"
  default     = "ap-northeast-2"
  type        = string
}

variable "eks_cluster_version" {
  description = "EKS Cluster version"
  default     = "1.31"
  type        = string
}

# VPC with 65536 IPs (10.0.0.0/16) for 3 AZs
variable "vpc_cidr" {
  description = "VPC CIDR. This should be a valid private (RFC 1918) CIDR range"
  default     = "10.20.0.0/16"
  type        = string
}
배포
- code
terraform init terraform plan terraform apply -auto-approve - 배포 결과
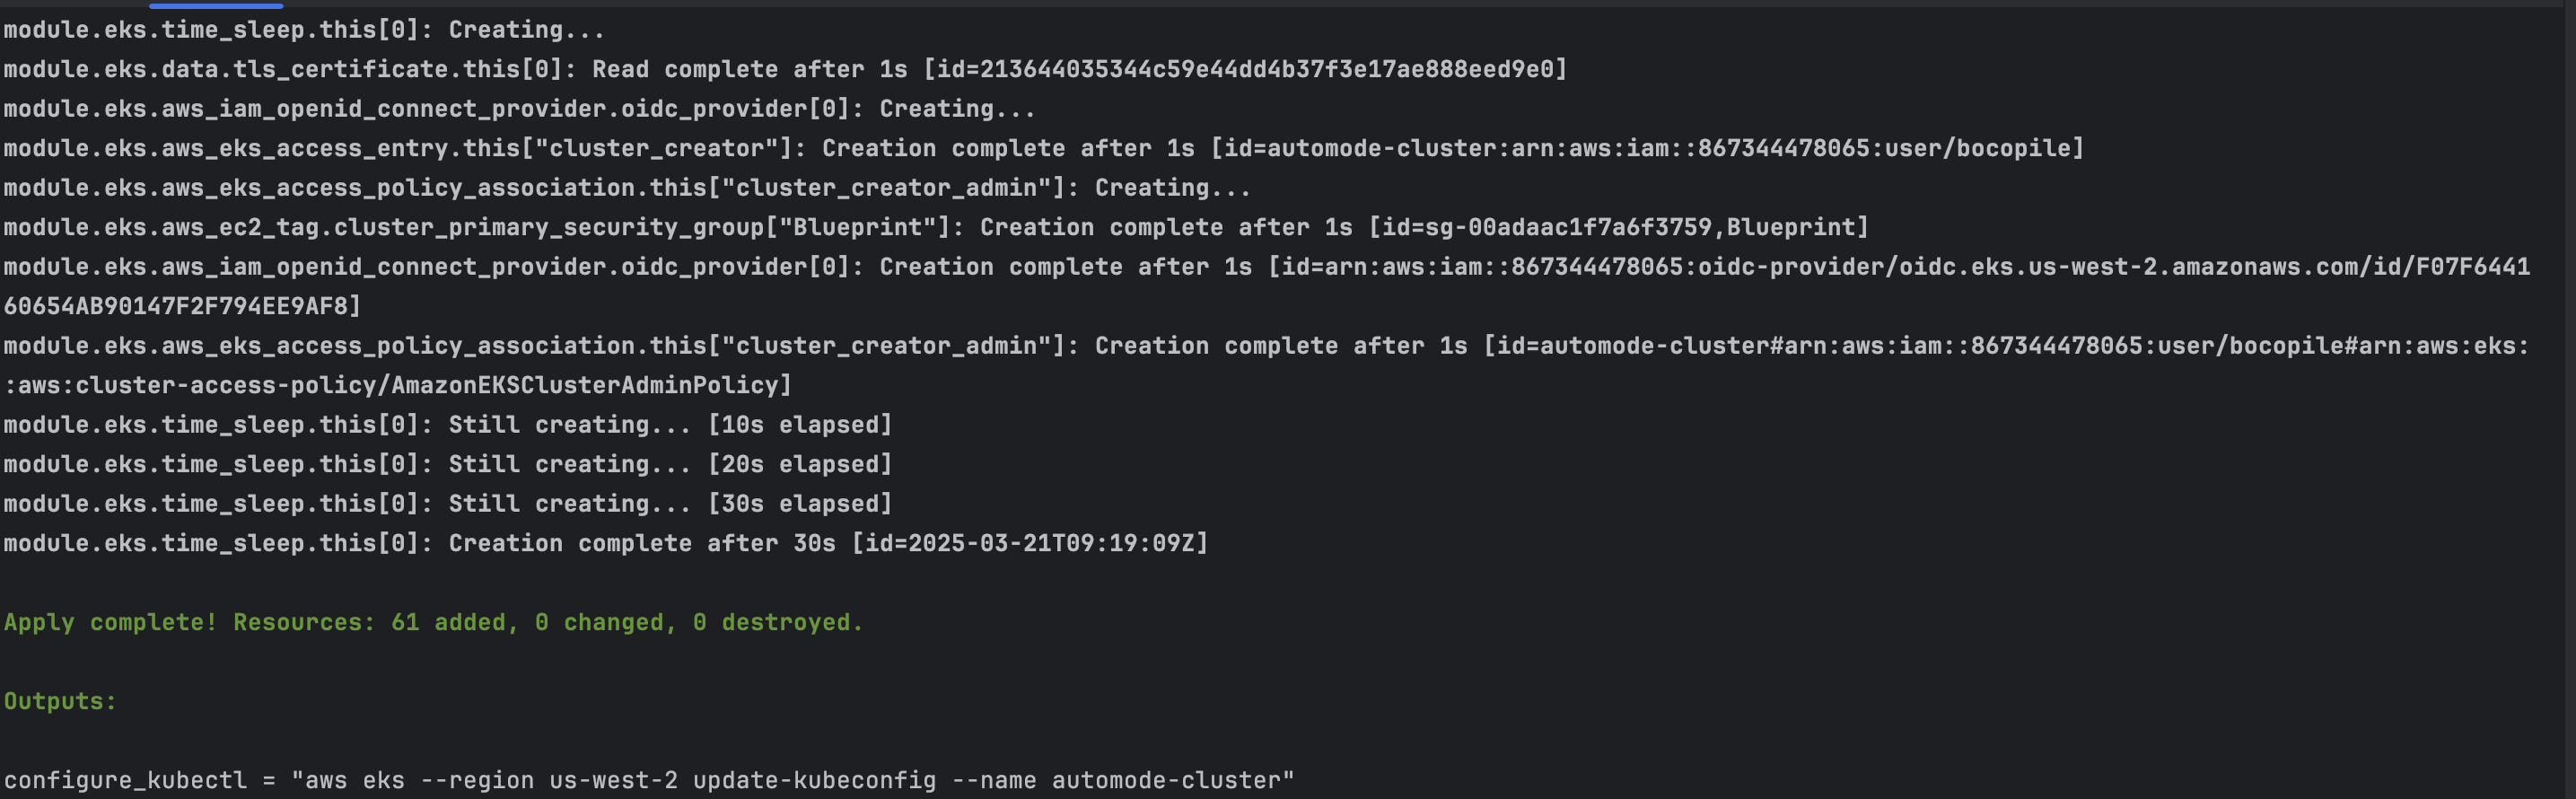
kubectl 설정
#kube config 설정
$(terraform output -raw configure_kubectl)

# kubectl context 변경
kubectl ctx
kubectl config rename-context "arn:aws:eks:ap-northeast-2:$(aws sts get-caller-identity --query 'Account' --output text):cluster/automode-cluster" "automode-lab"
kubectl ns default
기본 정보 확인
service, endpoint 확인
- code
kubectl get svc,ep - 확인 결과

Terraform 확인
- code
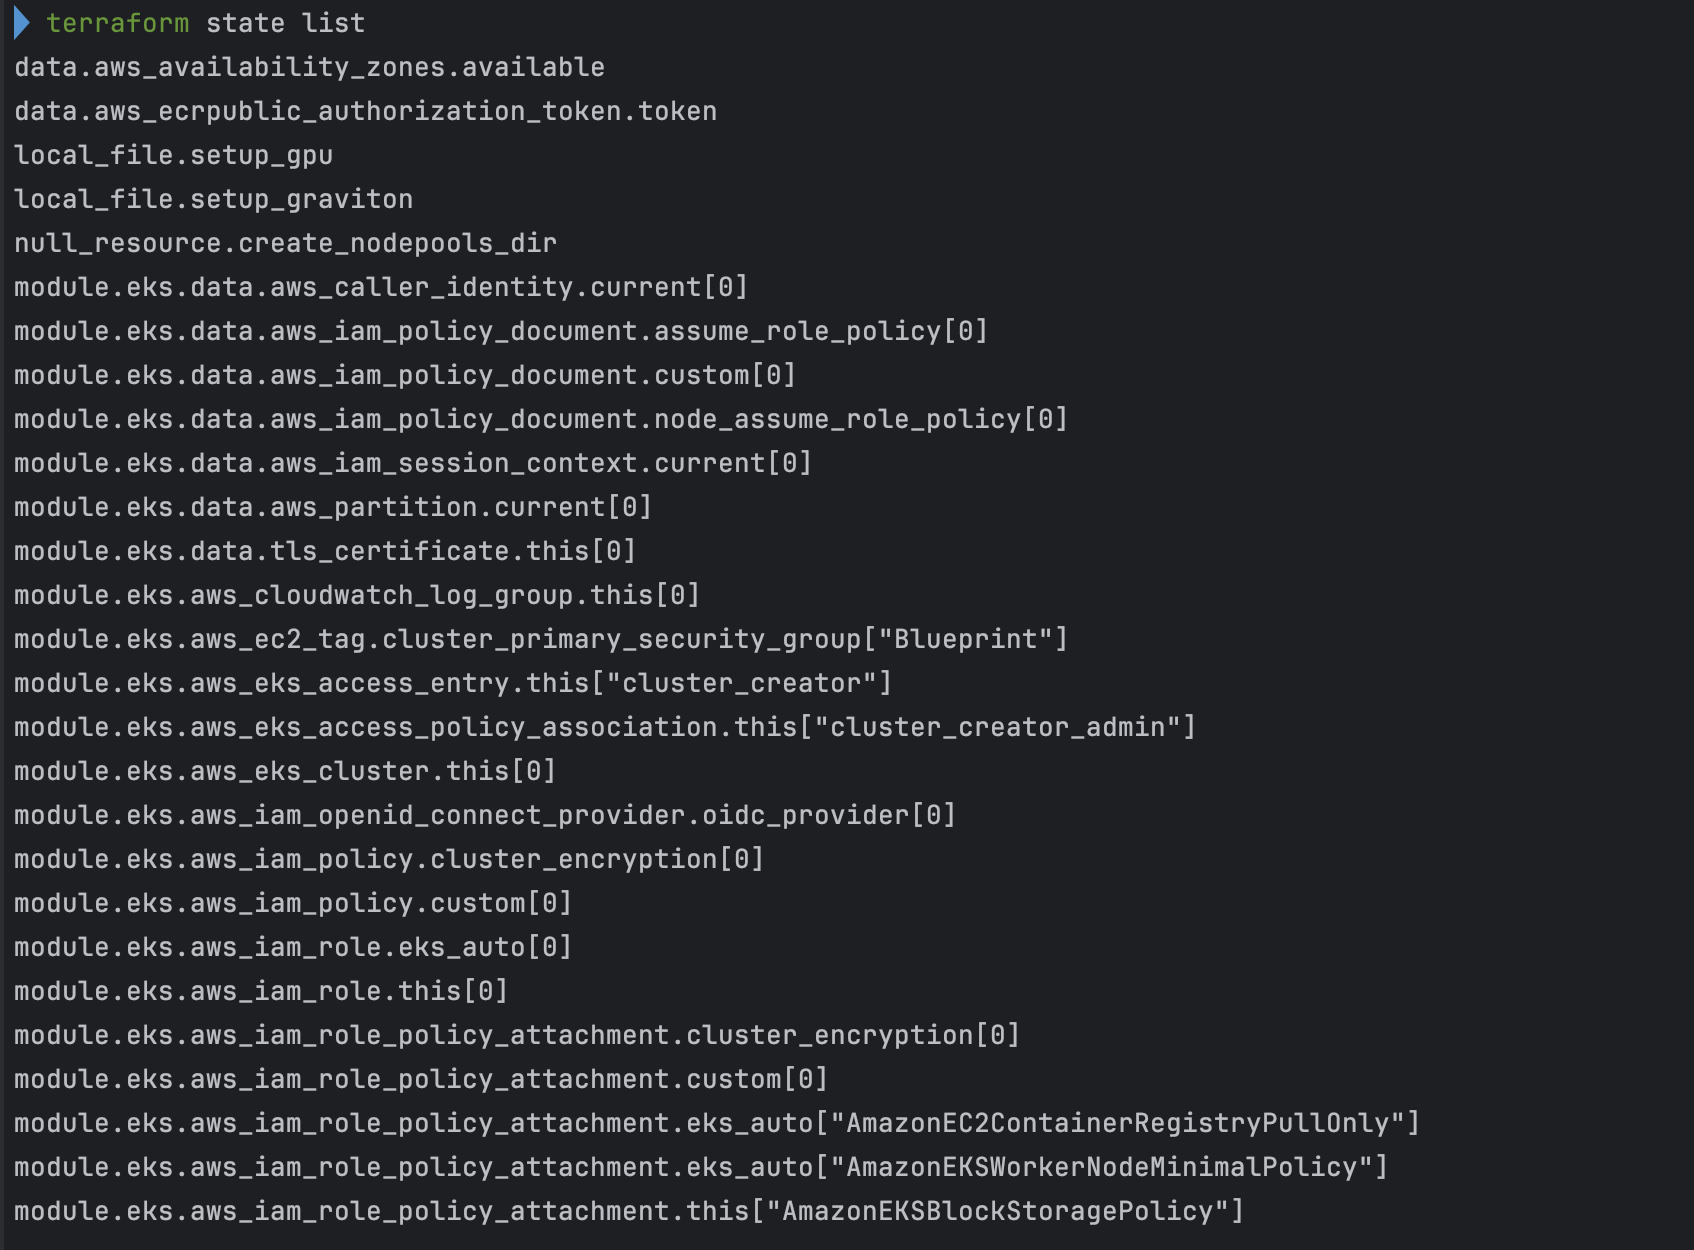
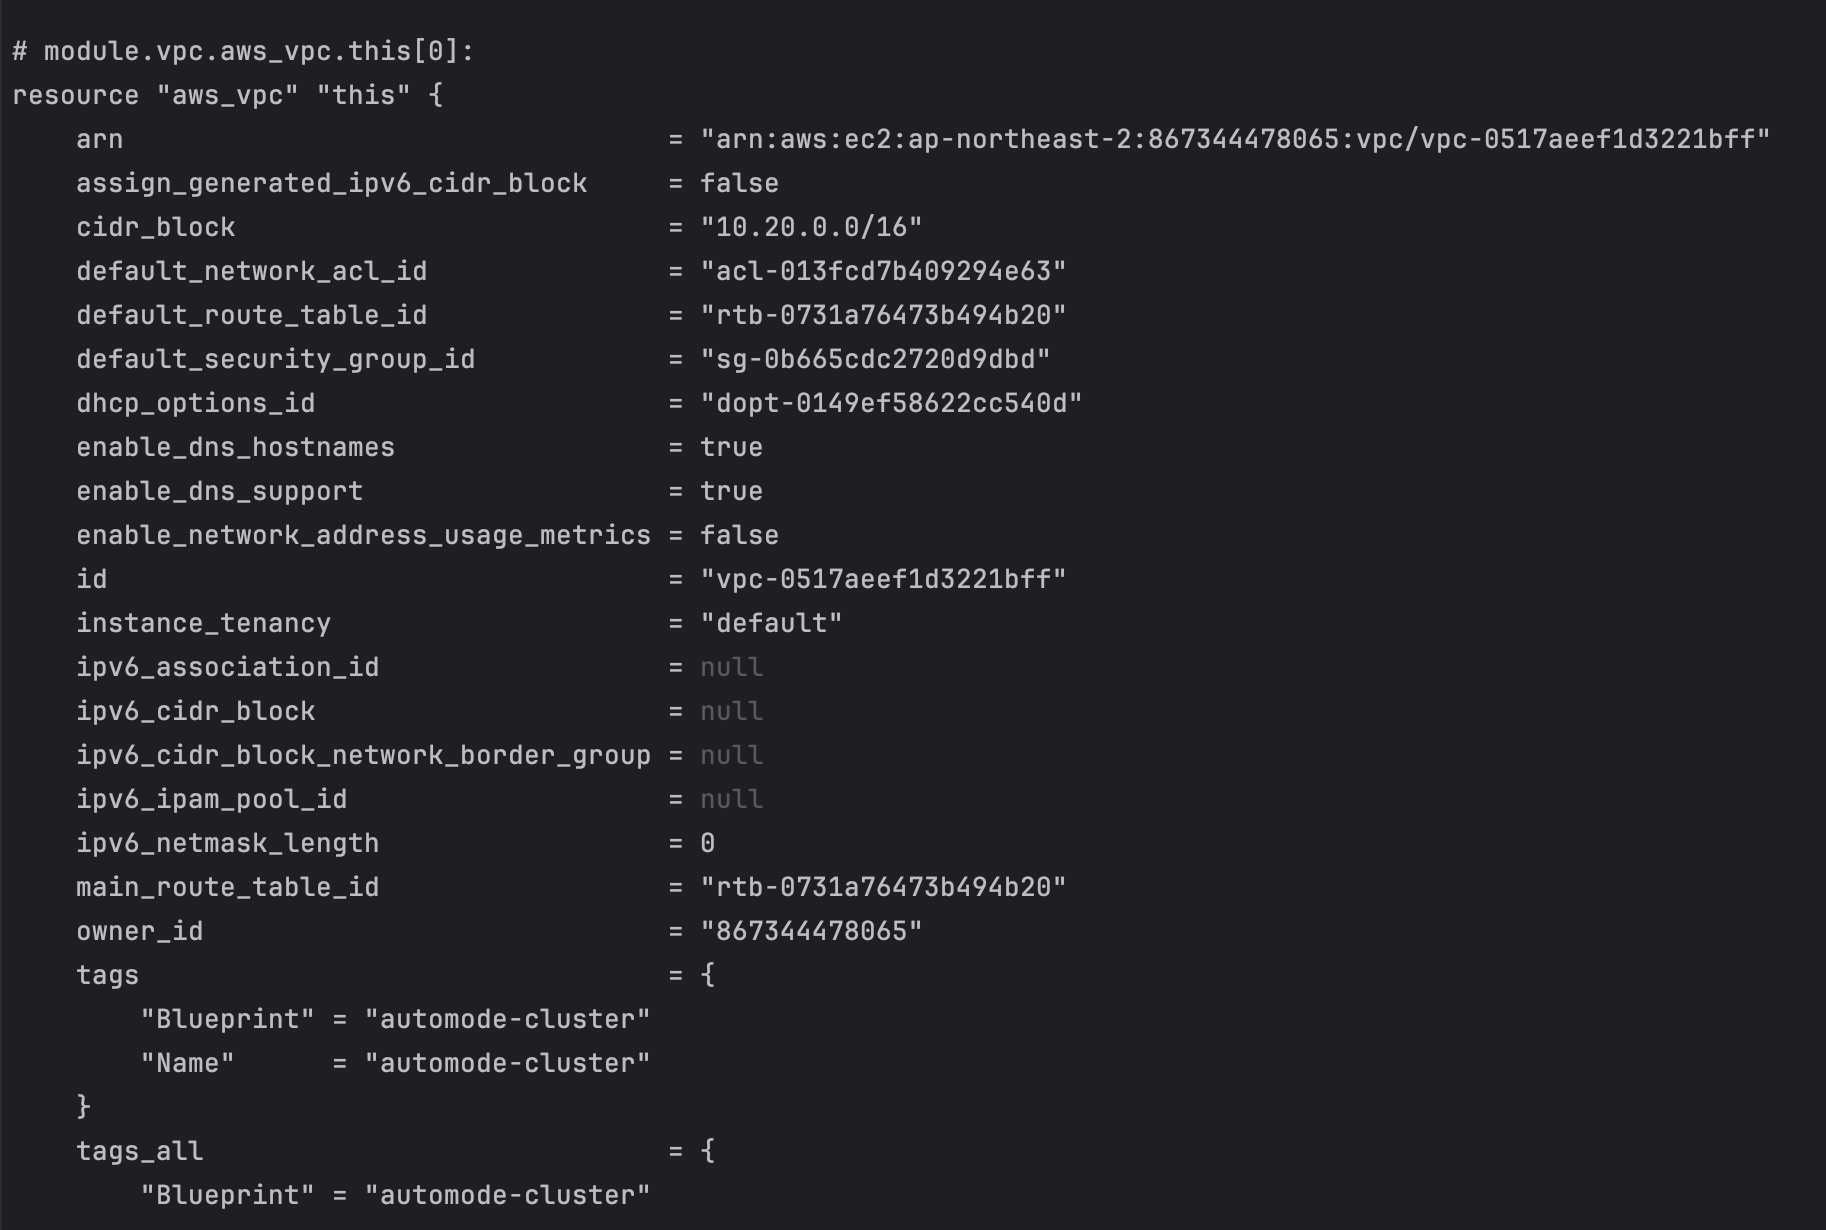
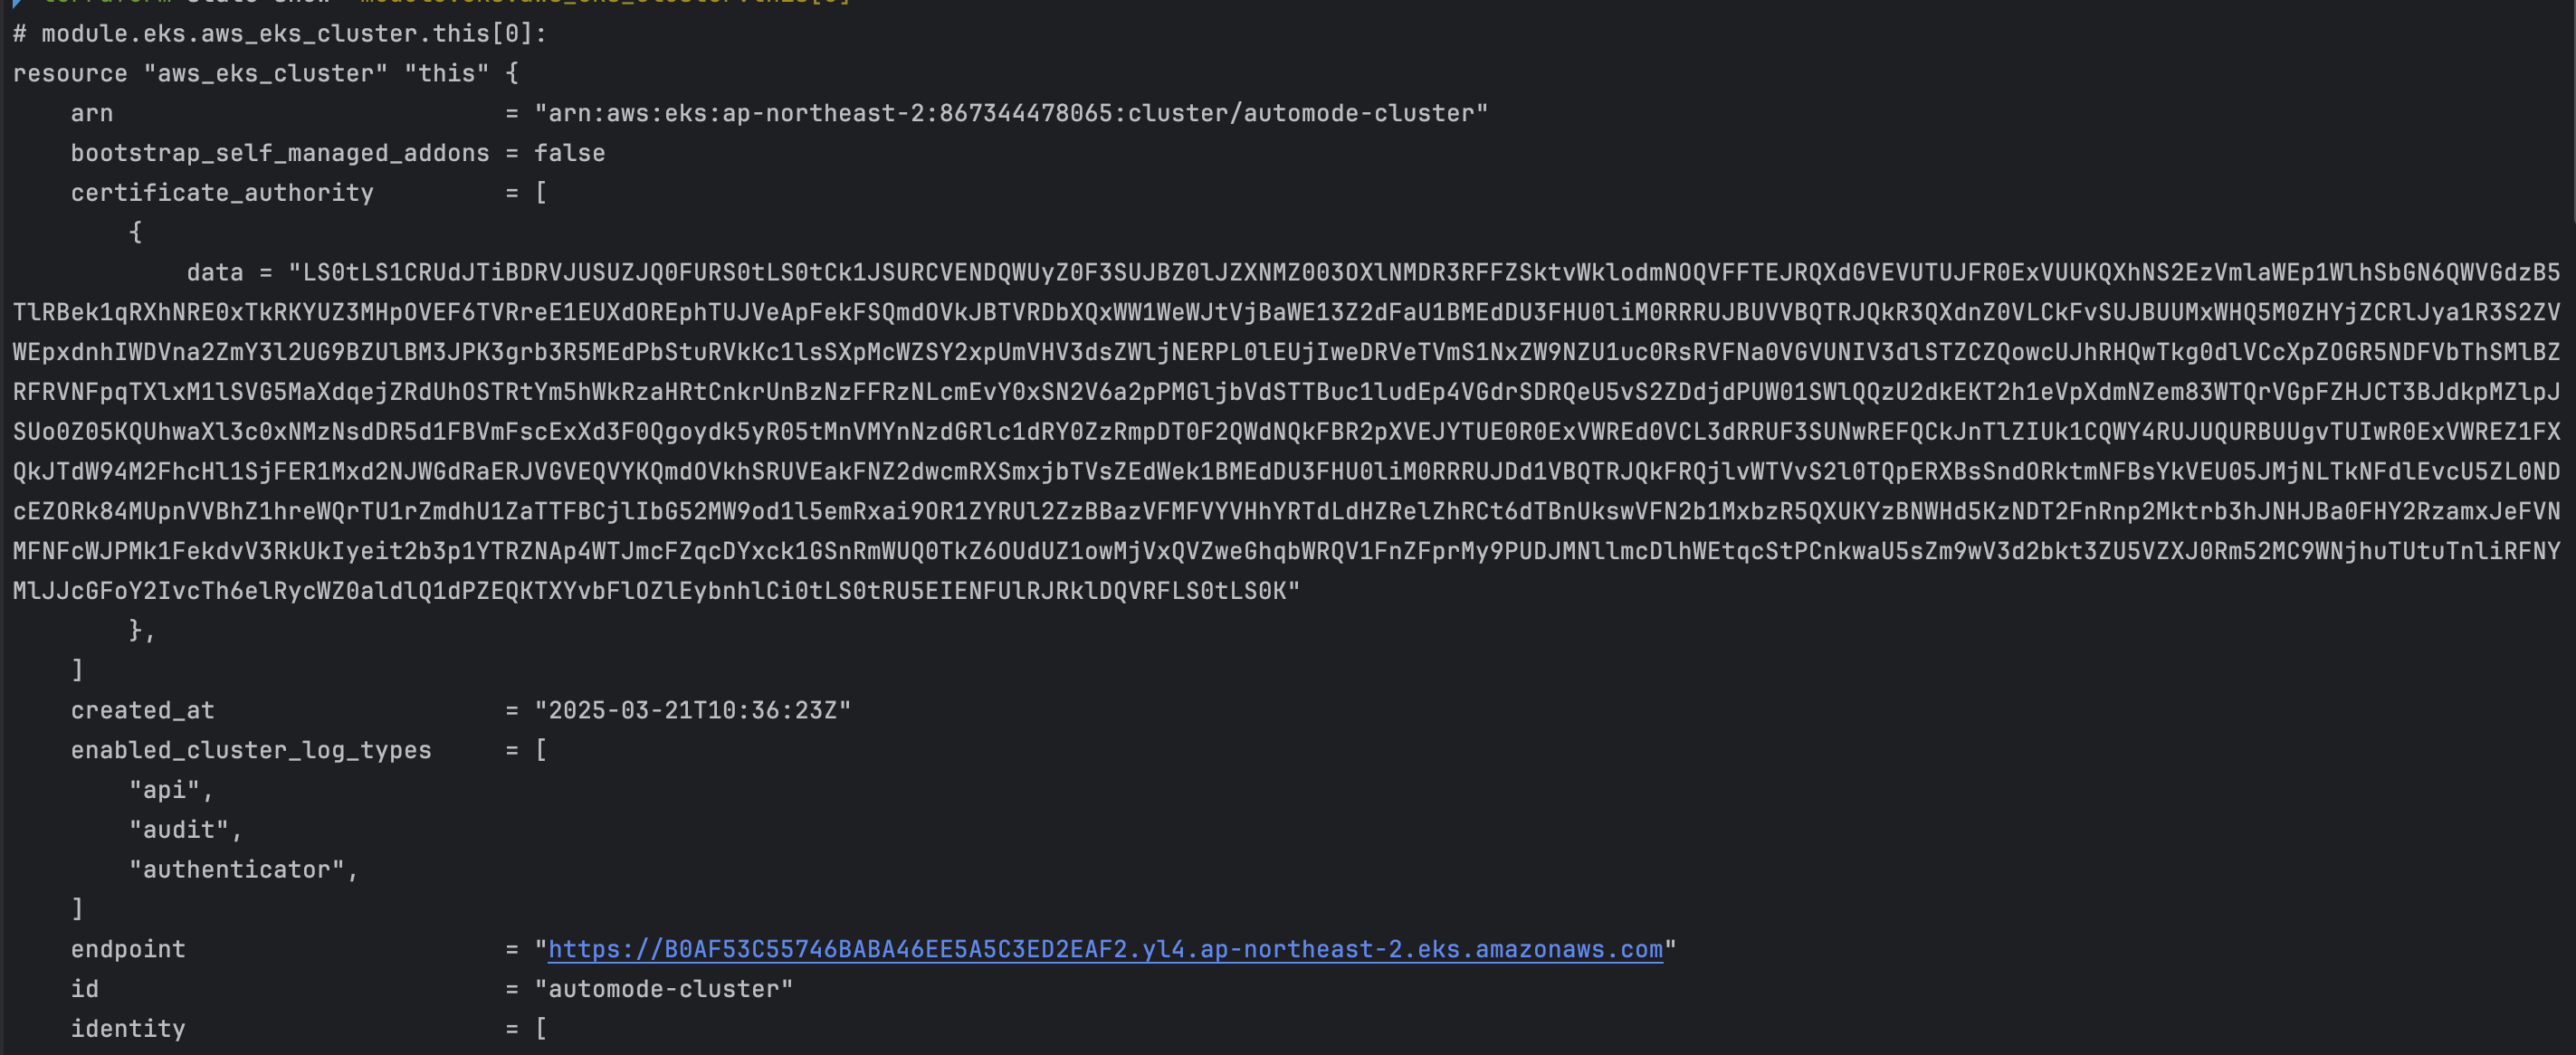
terraform state list
terraform show
terraform state show 'module.eks.aws_eks_cluster.this[0]'
- 확인 결과
kubectl 확인
- code
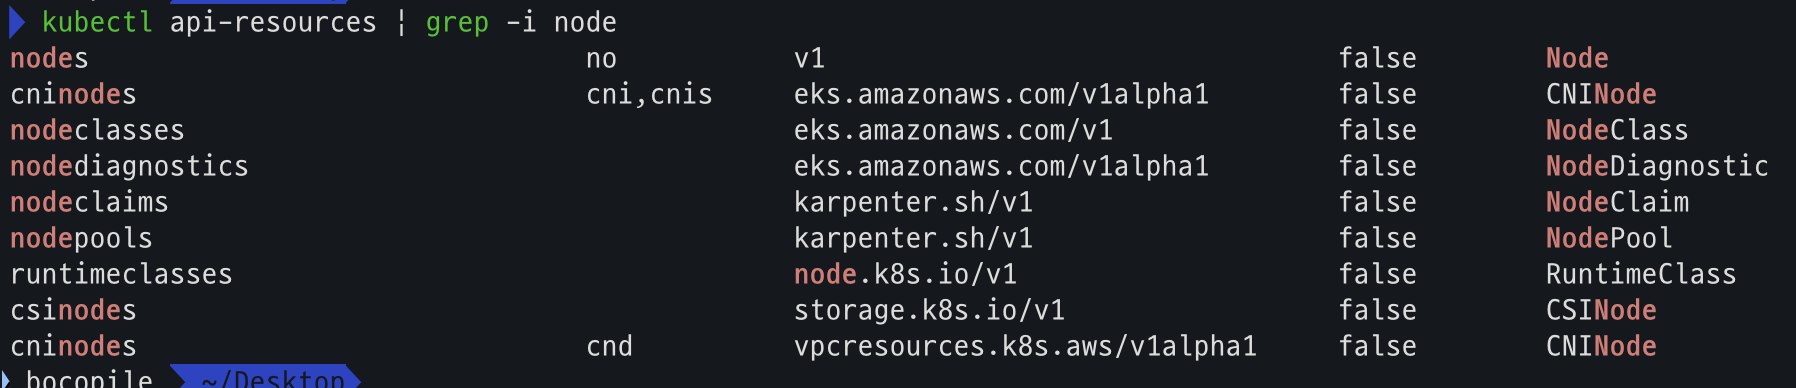
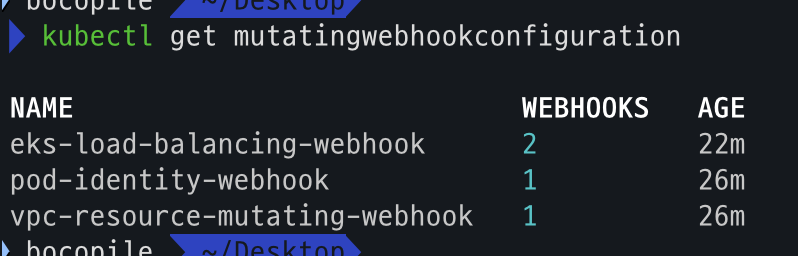
kubectl get crd kubectl api-resources | grep -i node kubectl get nodeclasses.eks.amazonaws.com kubectl get nodepools kubectl get mutatingwebhookconfiguration kubectl get validatingwebhookconfiguration - crd

- api resource 확인
- NodeClass 확인

- NodePool 확인

- mutatingwebhookconfiguration 확인
- validatingwebhookconfiguration 확인

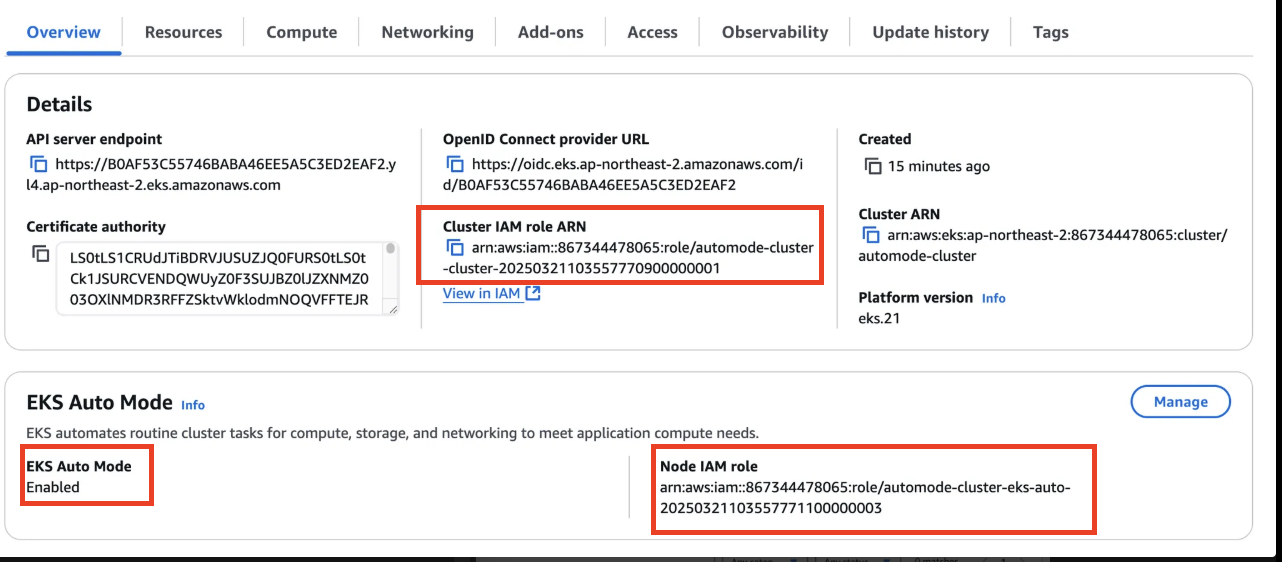
AWS Console 확인
- VPC : ENI 확인

- EKS : Cluster IAM Role, Node IAM Role, Auto Mode 확인
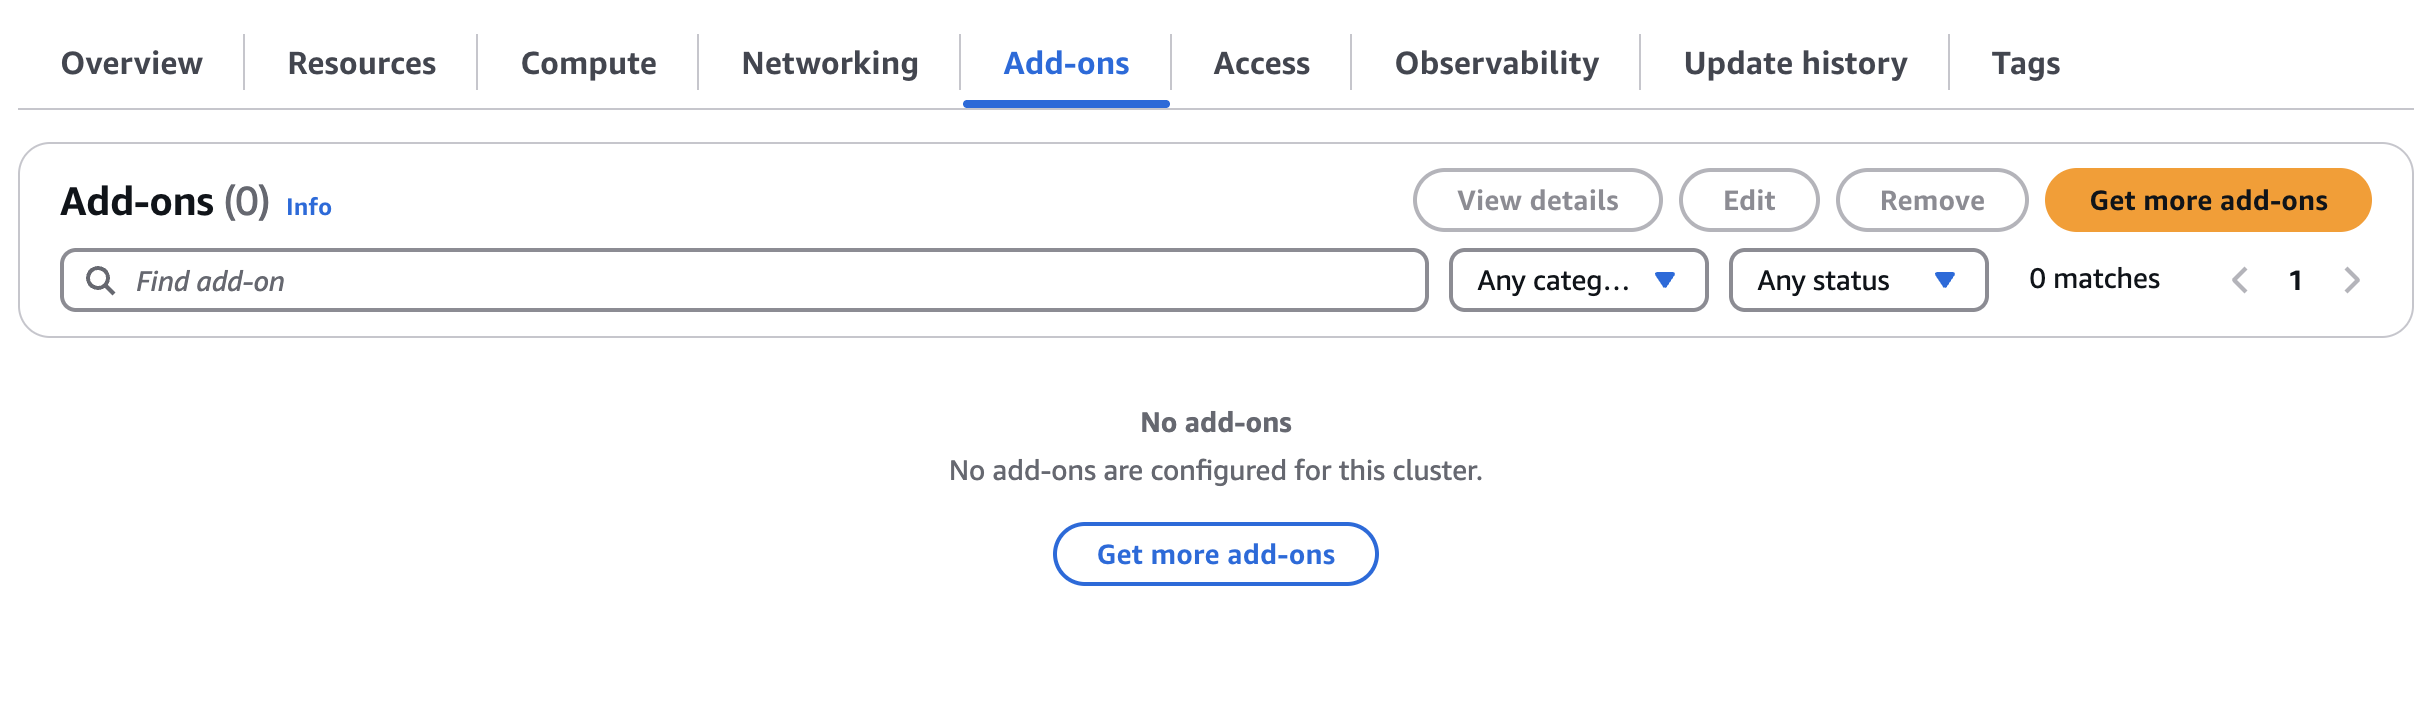
- Add-On 확인 : Auto Mode로 인하여 관리가 되어 별도로 설치 되지 않음
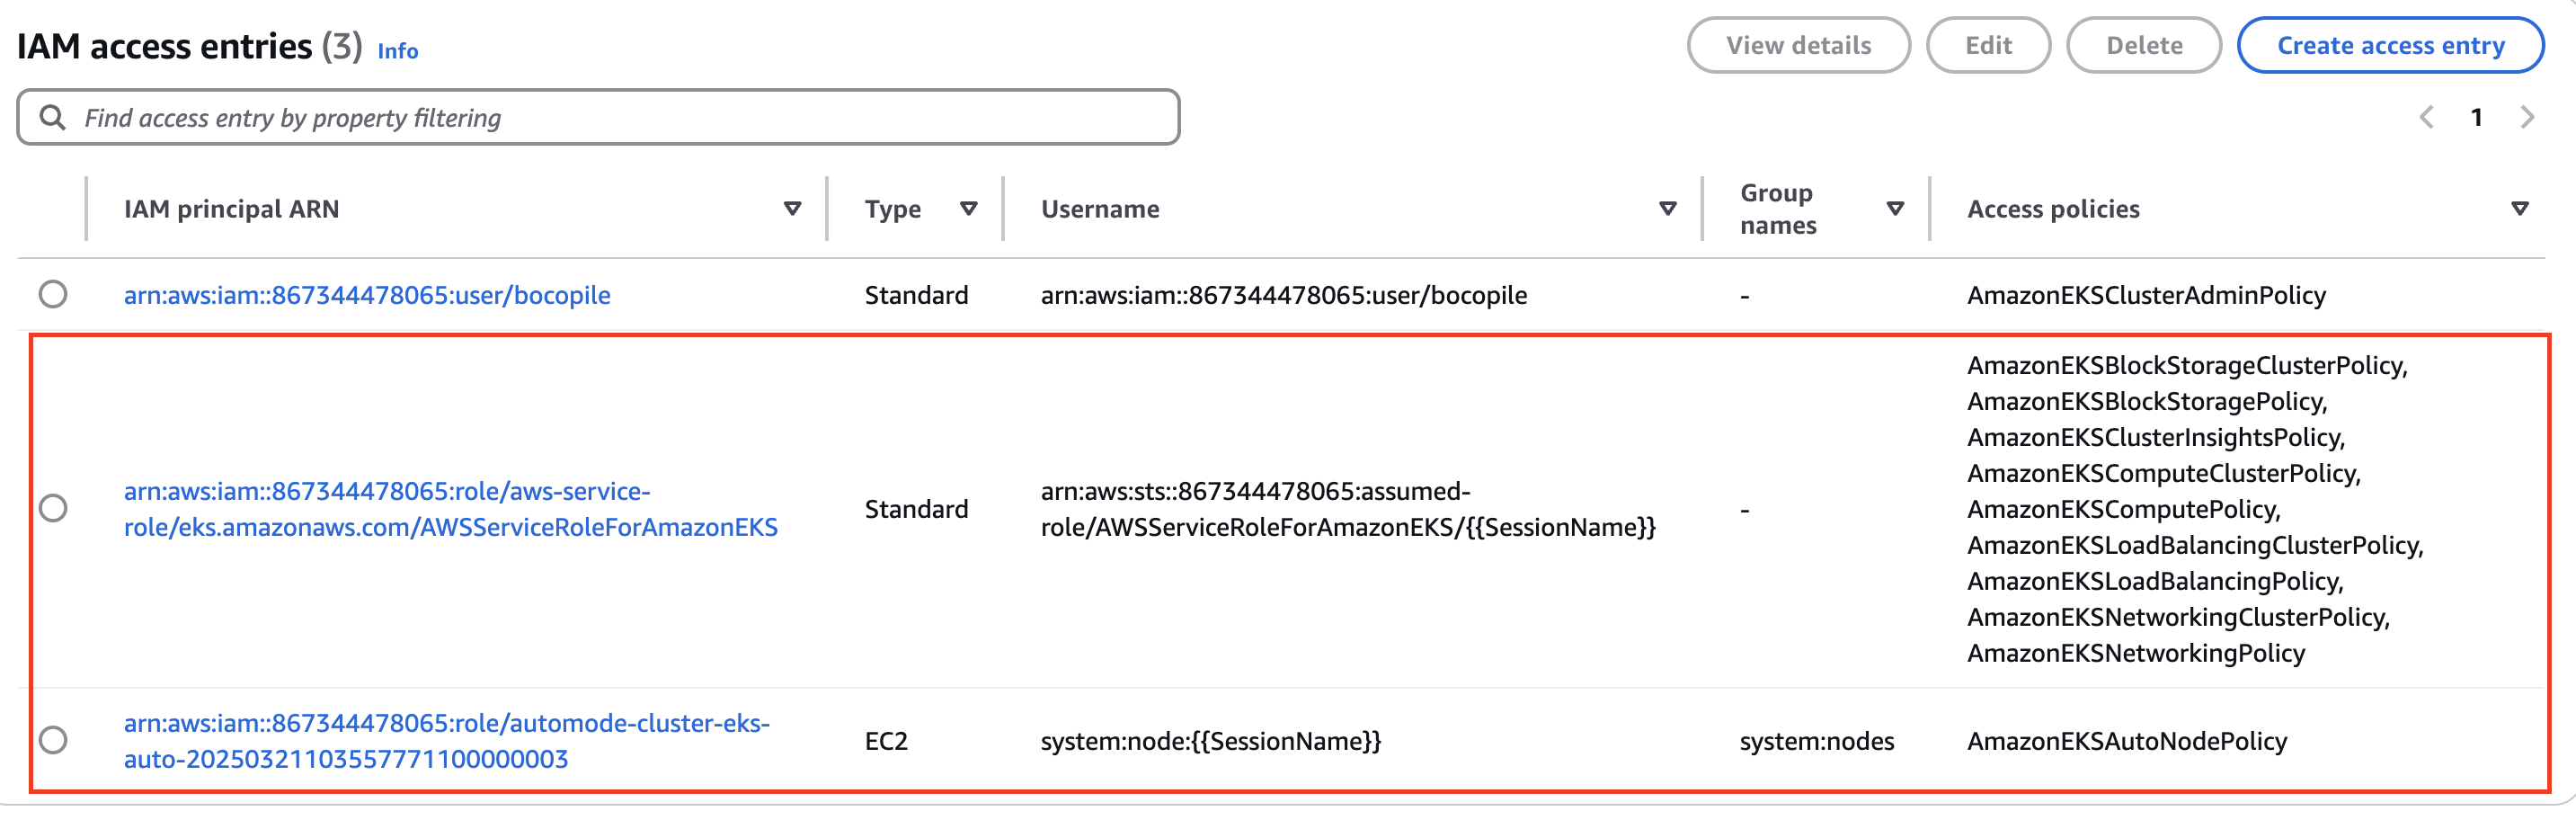
- Access : IAM access entries
[도전 과제 1]
- custom nodepools 에
disruption.budgets에 평일 오전 9시~17시에는 disruption 동작하지 않게 설정 및 검증 해보기
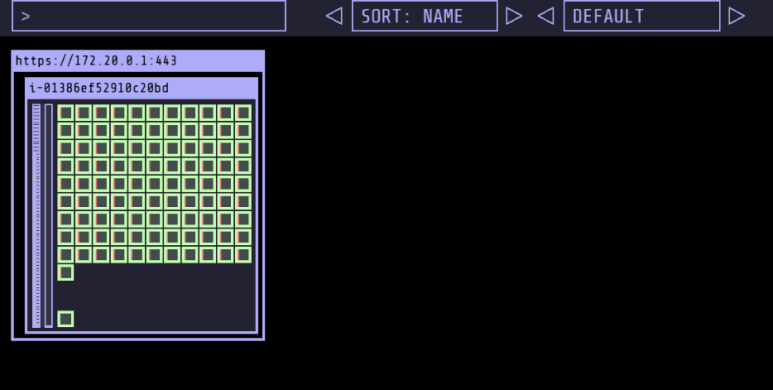
kube-ops-view 설치
- code
# 모니터링
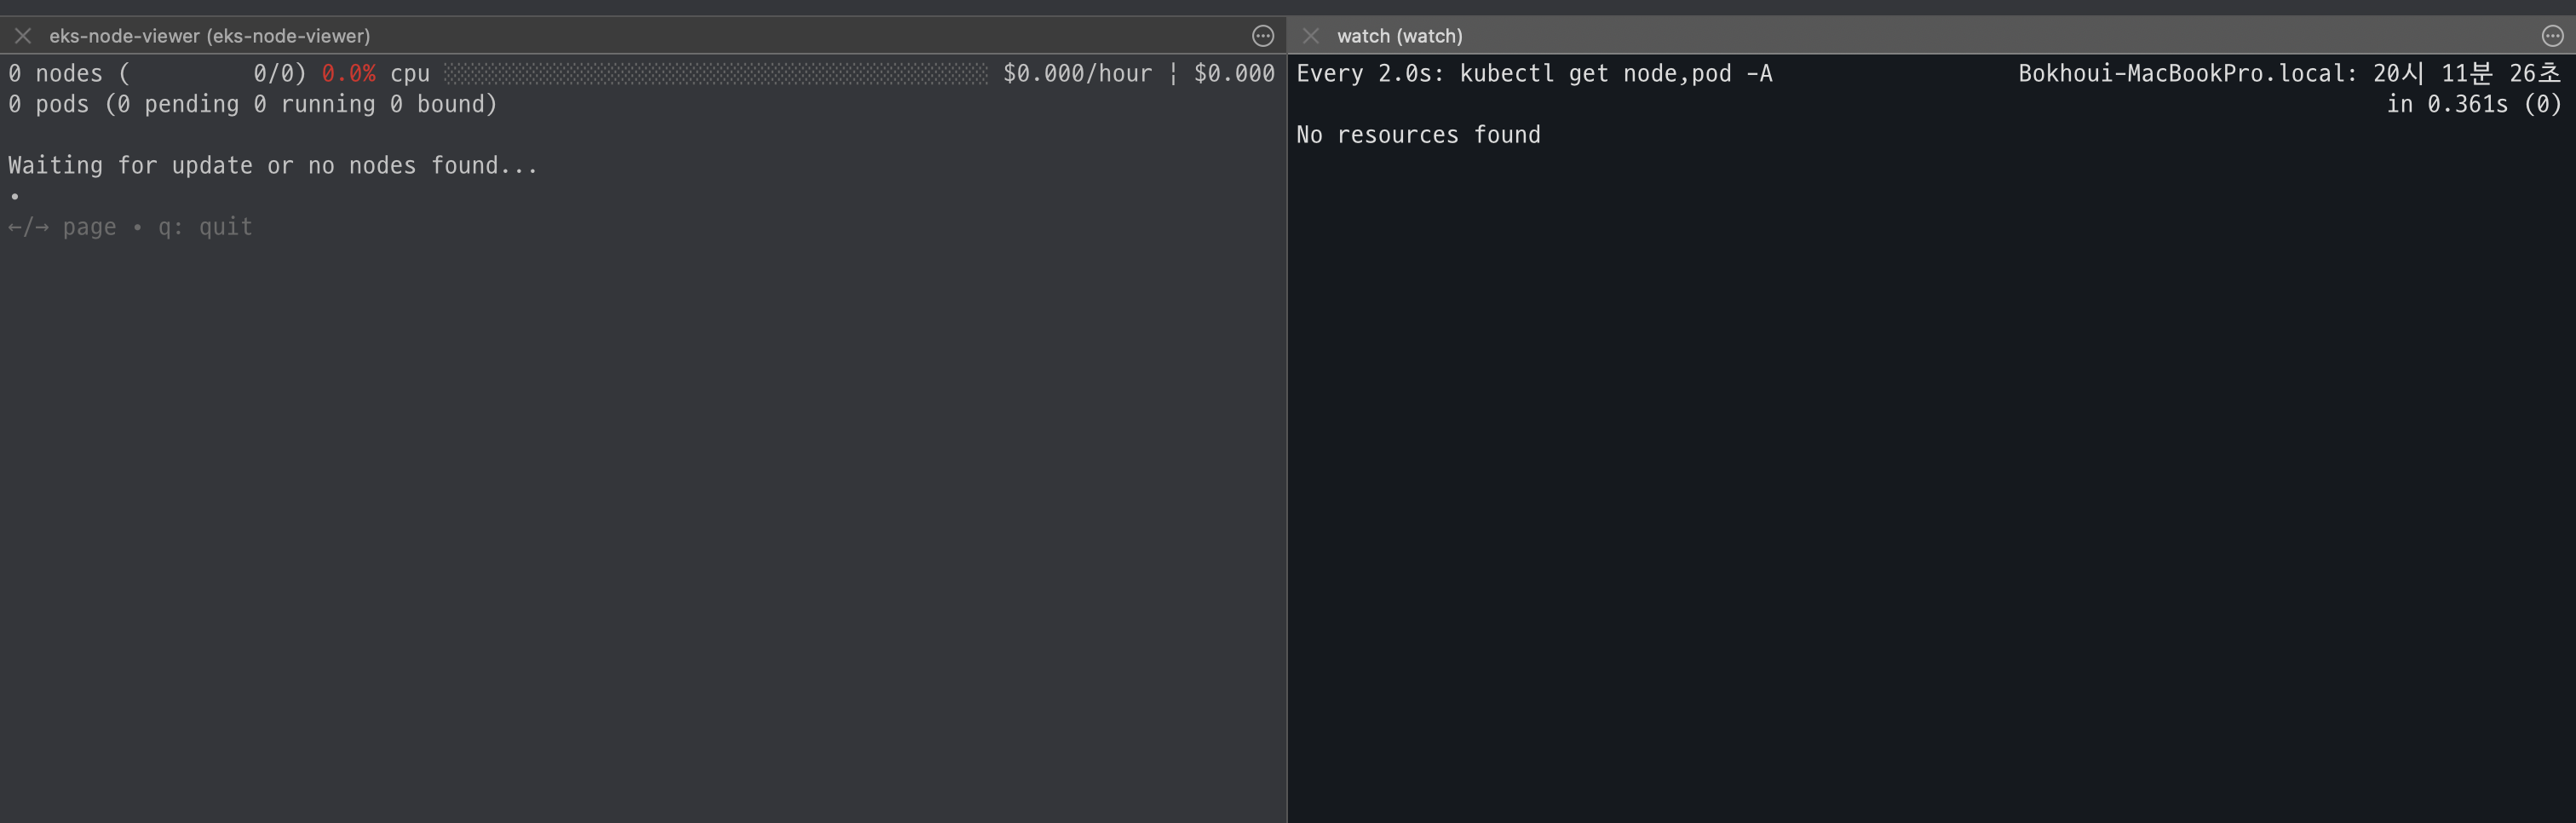
eks-node-viewer --node-sort=eks-node-viewer/node-cpu-usage=dsc --extra-labels eks-node-viewer/node-age
watch -d kubectl get node,pod -A
# helm 배포
helm repo add geek-cookbook https://geek-cookbook.github.io/charts/
helm install kube-ops-view geek-cookbook/kube-ops-view --version 1.2.2 --set env.TZ="Asia/Seoul" --namespace kube-system
kubectl get events -w --sort-by '.lastTimestamp' # 출력 이벤트 로그 분석해보자
# 확인
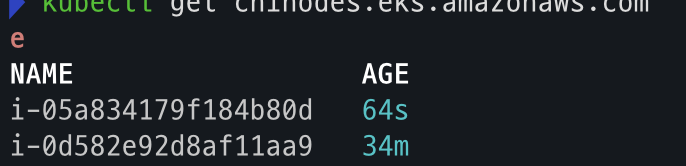
kubectl get nodeclaims
NAME TYPE CAPACITY ZONE NODE READY AGE
general-purpose-528mt c5a.large on-demand ap-northeast-2c i-09cf206aee76f0bee True 54s
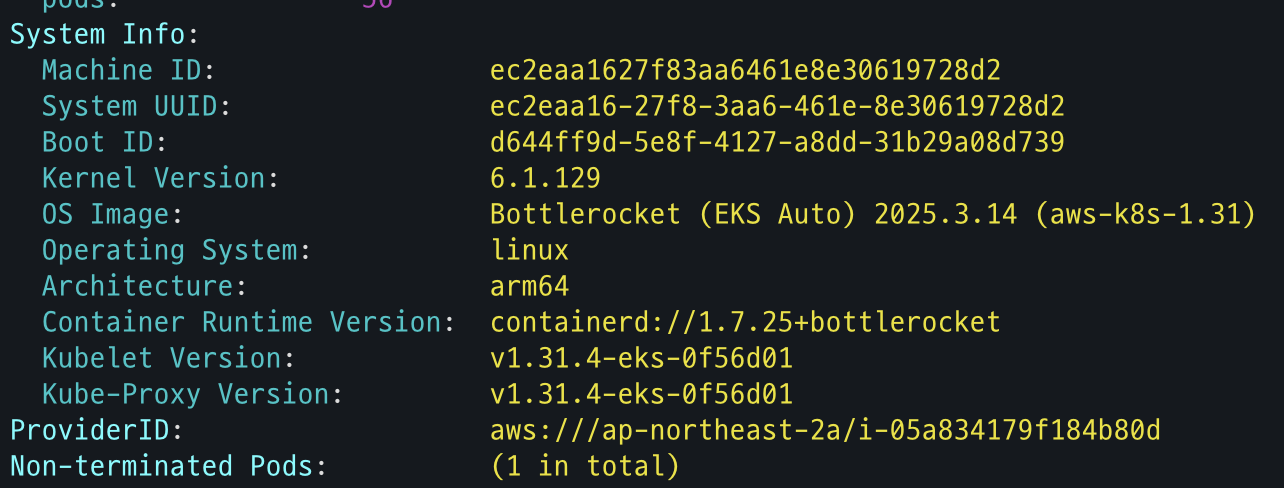
# OS, KERNEL, CRI 확인
kubectl get node -owide
NAME STATUS ROLES AGE VERSION INTERNAL-IP EXTERNAL-IP OS-IMAGE KERNEL-VERSION CONTAINER-RUNTIME
i-09cf206aee76f0bee Ready <none> 2m14s v1.31.4-eks-0f56d01 10.20.44.40 <none> Bottlerocket (EKS Auto) 2025.3.9 (aws-k8s-1.31) 6.1.129 containerd://1.7.25+bottlerocket
# CNI 노드 확인
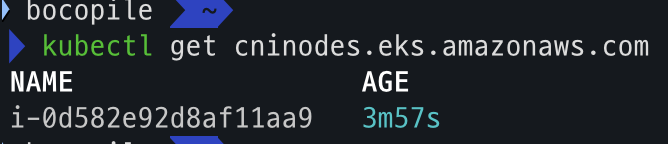
kubectl get cninodes.eks.amazonaws.com
NAME AGE
i-09cf206aee76f0bee 3m24s
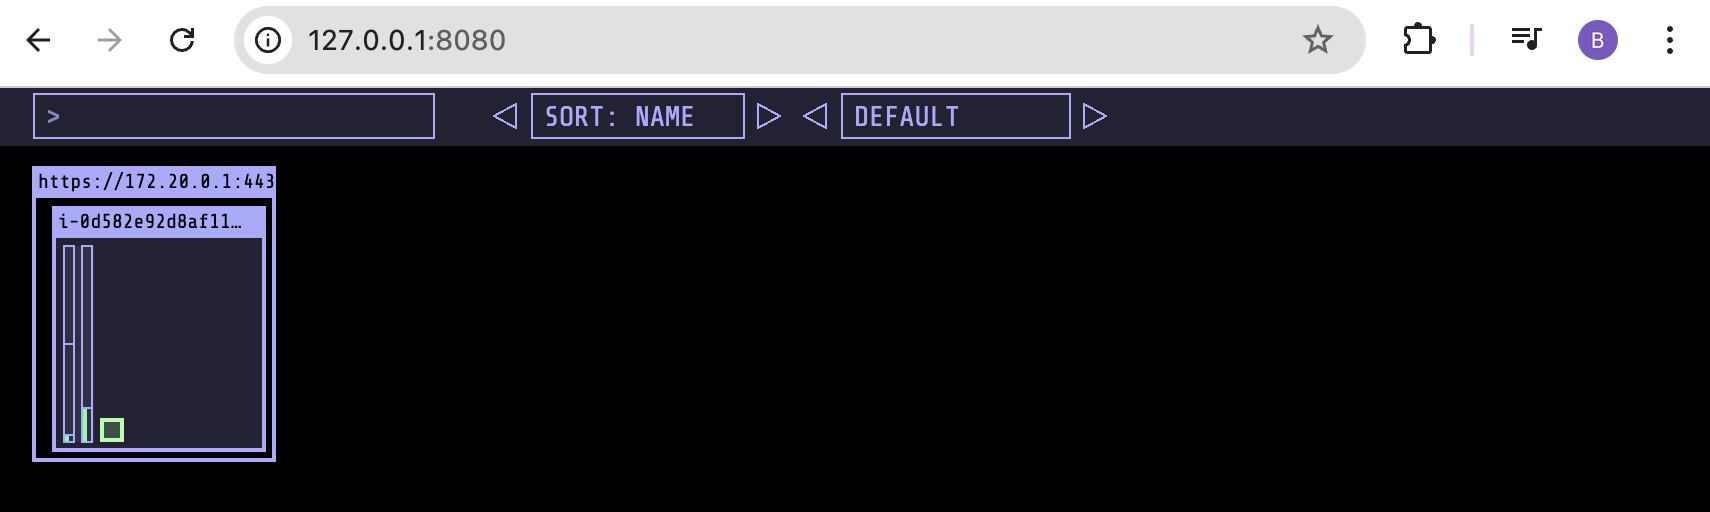
#[신규 터미널] 포트 포워딩
kubectl port-forward deployment/kube-ops-view -n kube-system 8080:8080 &
open "http://127.0.0.1:8080/#scale=1.5" # macO- 모니터링 세팅
- helm 배포

- 배포 확인

- OS, Kernel, CRI 확인
)
- CNI 노드 확인
- 사이트 접속
Karpenter 동작 확인
deployment 배포
cat <<EOF | kubectl apply -f -
apiVersion: apps/v1
kind: Deployment
metadata:
name: inflate
spec:
replicas: 1
selector:
matchLabels:
app: inflate
template:
metadata:
labels:
app: inflate
spec:
terminationGracePeriodSeconds: 0
nodeSelector:
eks.amazonaws.com/compute-type: auto
securityContext:
runAsUser: 1000
runAsGroup: 3000
fsGroup: 2000
containers:
- name: inflate
image: public.ecr.aws/eks-distro/kubernetes/pause:3.7
resources:
requests:
cpu: 1
securityContext:
allowPrivilegeEscalation: false
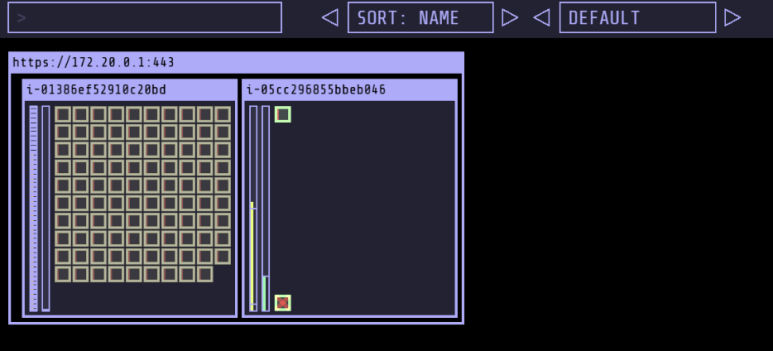
EOF배포 확인
- code
kubectl get nodes kubectl get pods - 확인 결과


karpenter 테스트
- code
#
kubectl scale deployment inflate --replicas 100 && kubectl get events -w --sort-by '.lastTimestamp'

#
kubectl scale deployment inflate --replicas 99 && kubectl get events -w --sort-by '.lastTimestamp'

# 실습 확인 후 삭제
kubectl delete deployment inflate && kubectl get events -w --sort-by '.lastTimestamp'
- 테스트 진행 - 파드 갯수에 따라서 Node 생성 및 제거 되는 것을 확인
Graviton Workloads (2048 game) 배포 with ingress(ALB)
custom nodeclass/pool, ment 배포
- code
# custom node pool 생성 : 고객 NodePool : Karpenter 와 키가 다르니 주의!
cat ../nodepools/graviton-nodepool.yaml
kubectl apply -f ../nodepools/graviton-nodepool.yaml

# Node Clsss 확인
kubectl get NodeClass

# Node Pool 확인
kubectl get NodePool

# game-2048 배포
kubectl apply -f ../examples/graviton/game-2048.yaml
- Node Class 확인

- Node Pool 확인

배포 확인
# nodeclaims 확인
kubectl get nodeclaims

kubectl get cninodes.eks.amazonaws.com
eks-node-viewer --resources cpu,memory
kubectl get node -owide
kubectl describe node- Node Claim 확인

- CNInodes 확인
- node 확인
AWS 관리 콘솔 확인
- EKS - Compute : 별도의 node pool 생성 확인
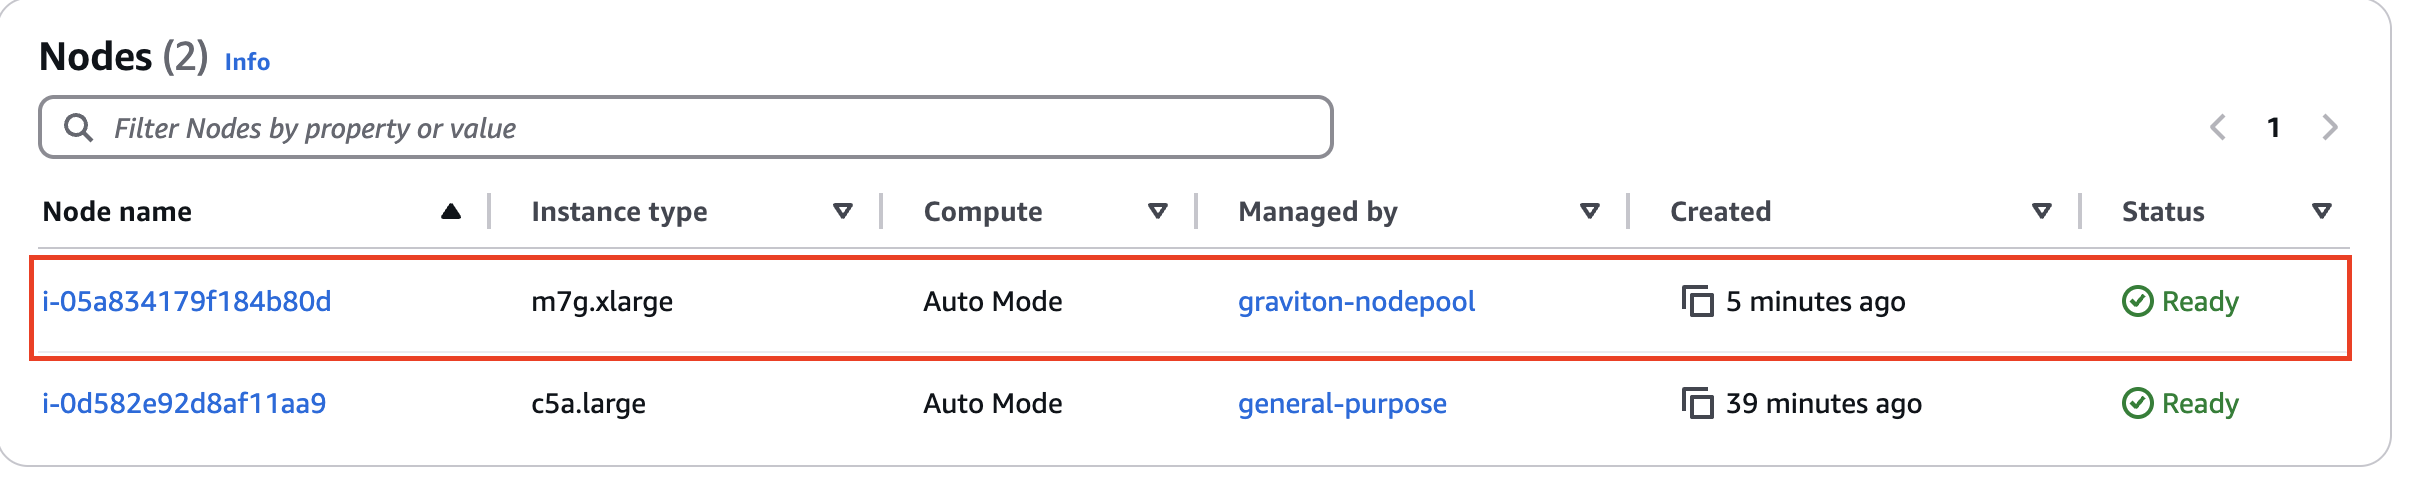
-
EC2 - 1대 생성 확인

- 참고로, 생성되는 EC2의 OS는 Bottlerocket 이며, 루트 볼륨은 읽기 전용임.
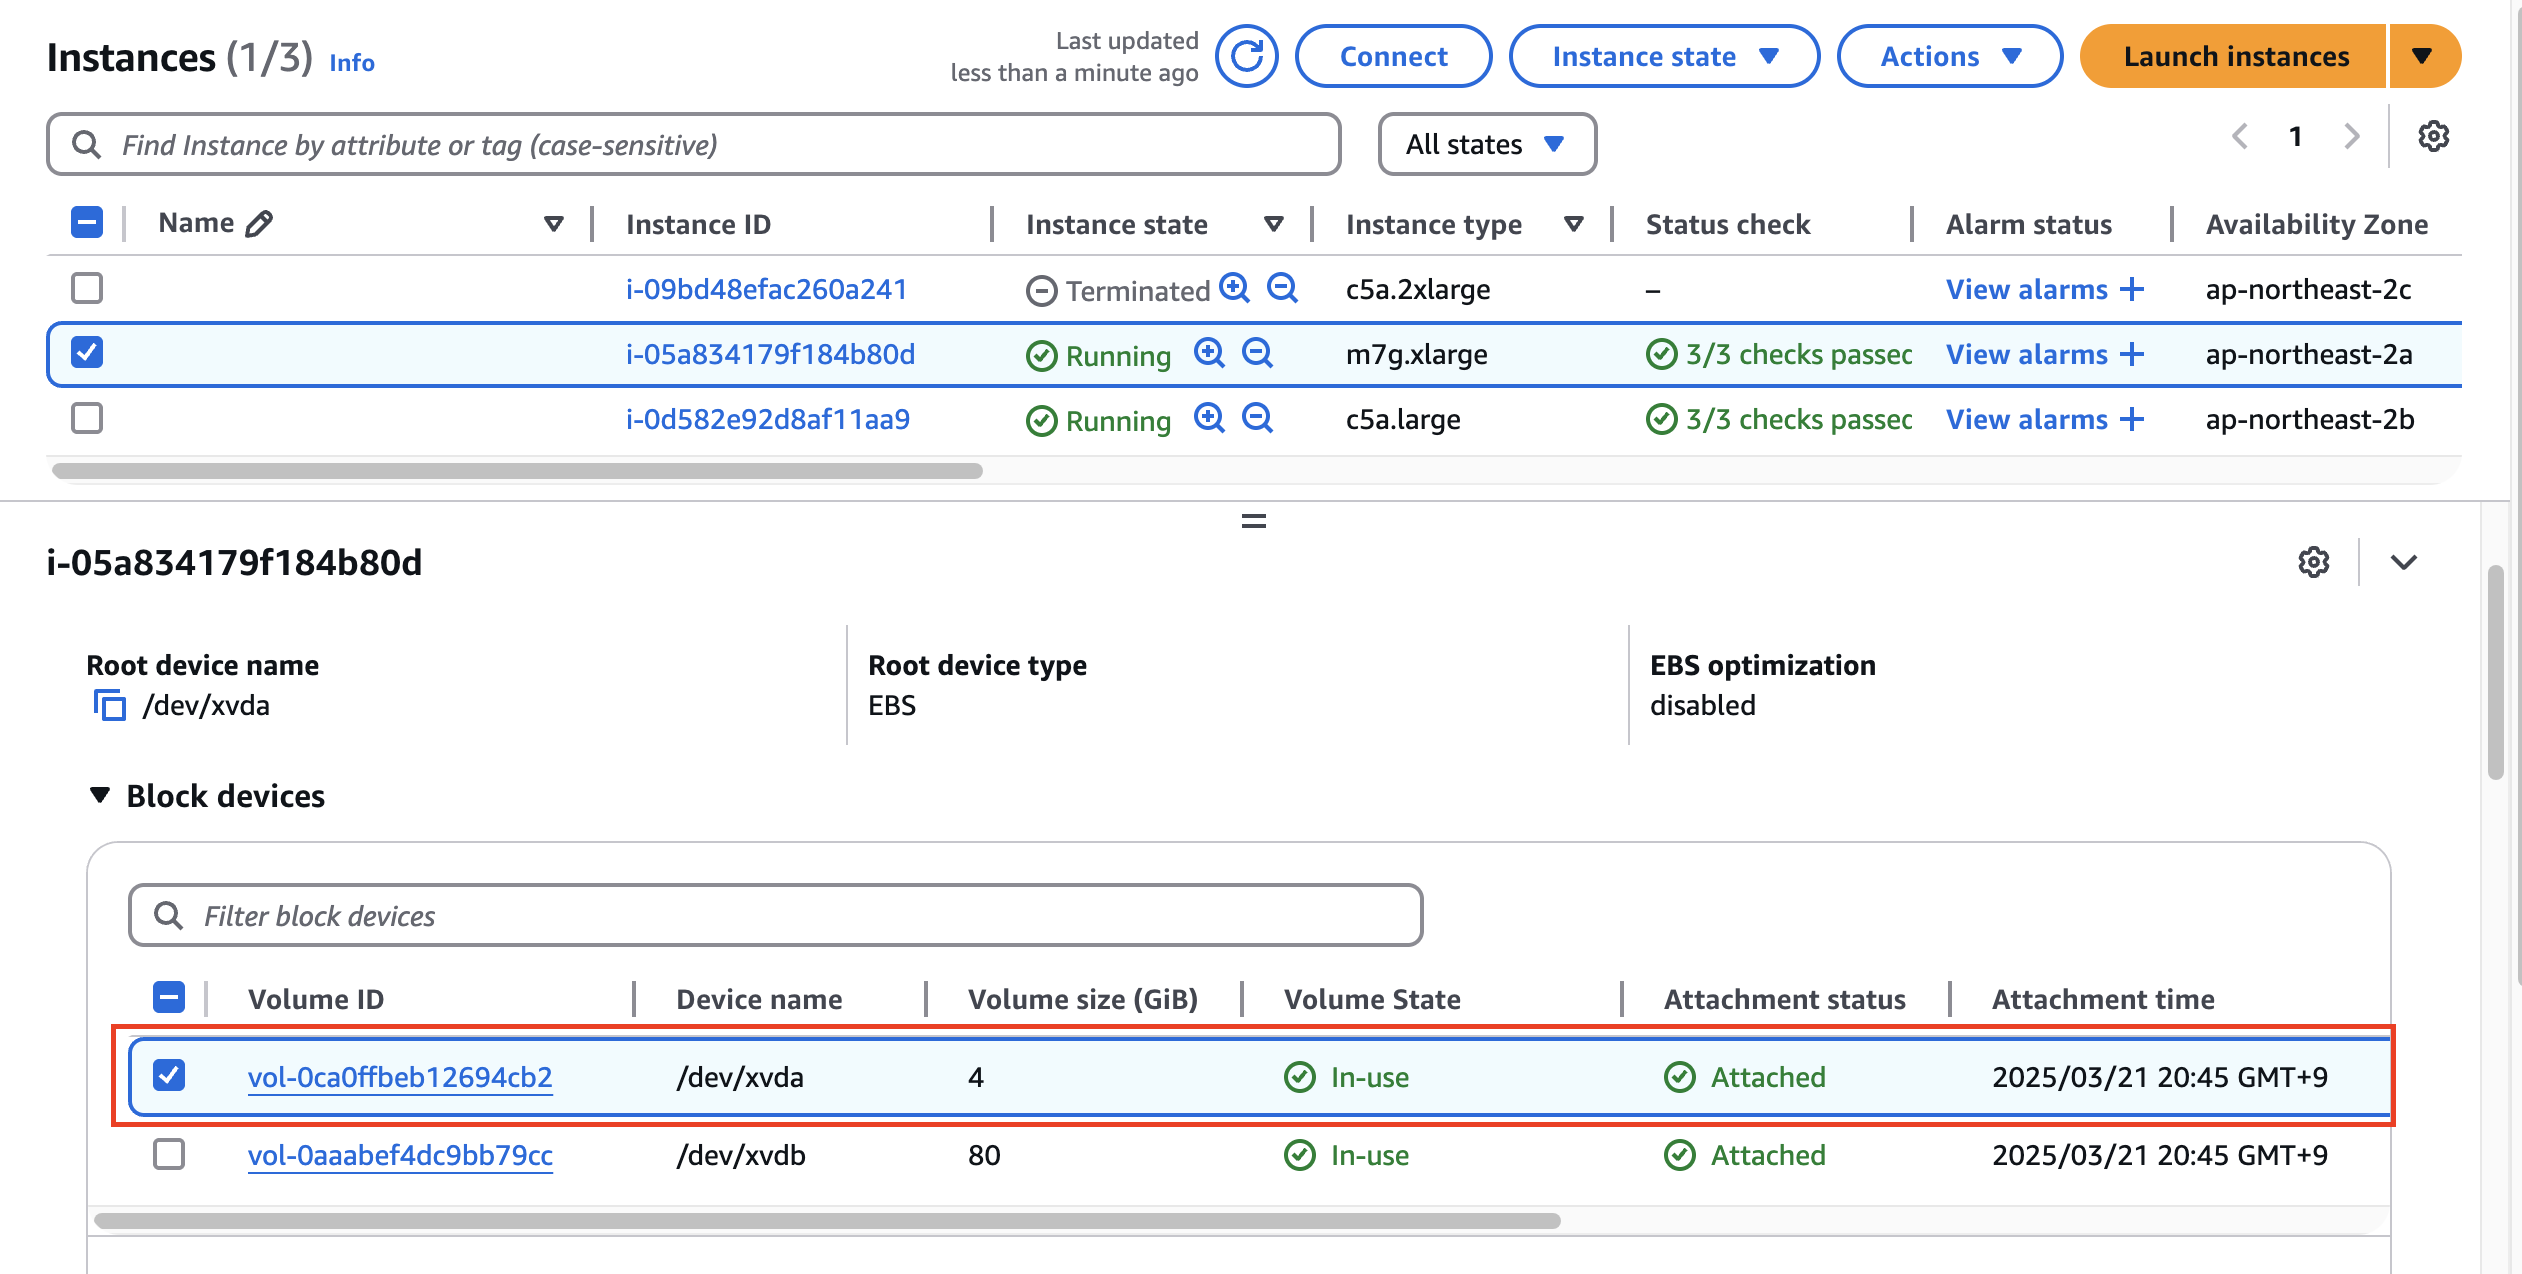
- 참고로, 생성되는 EC2의 OS는 Bottlerocket 이며, 루트 볼륨은 읽기 전용임.
ALB (Ingress) 설정
- code
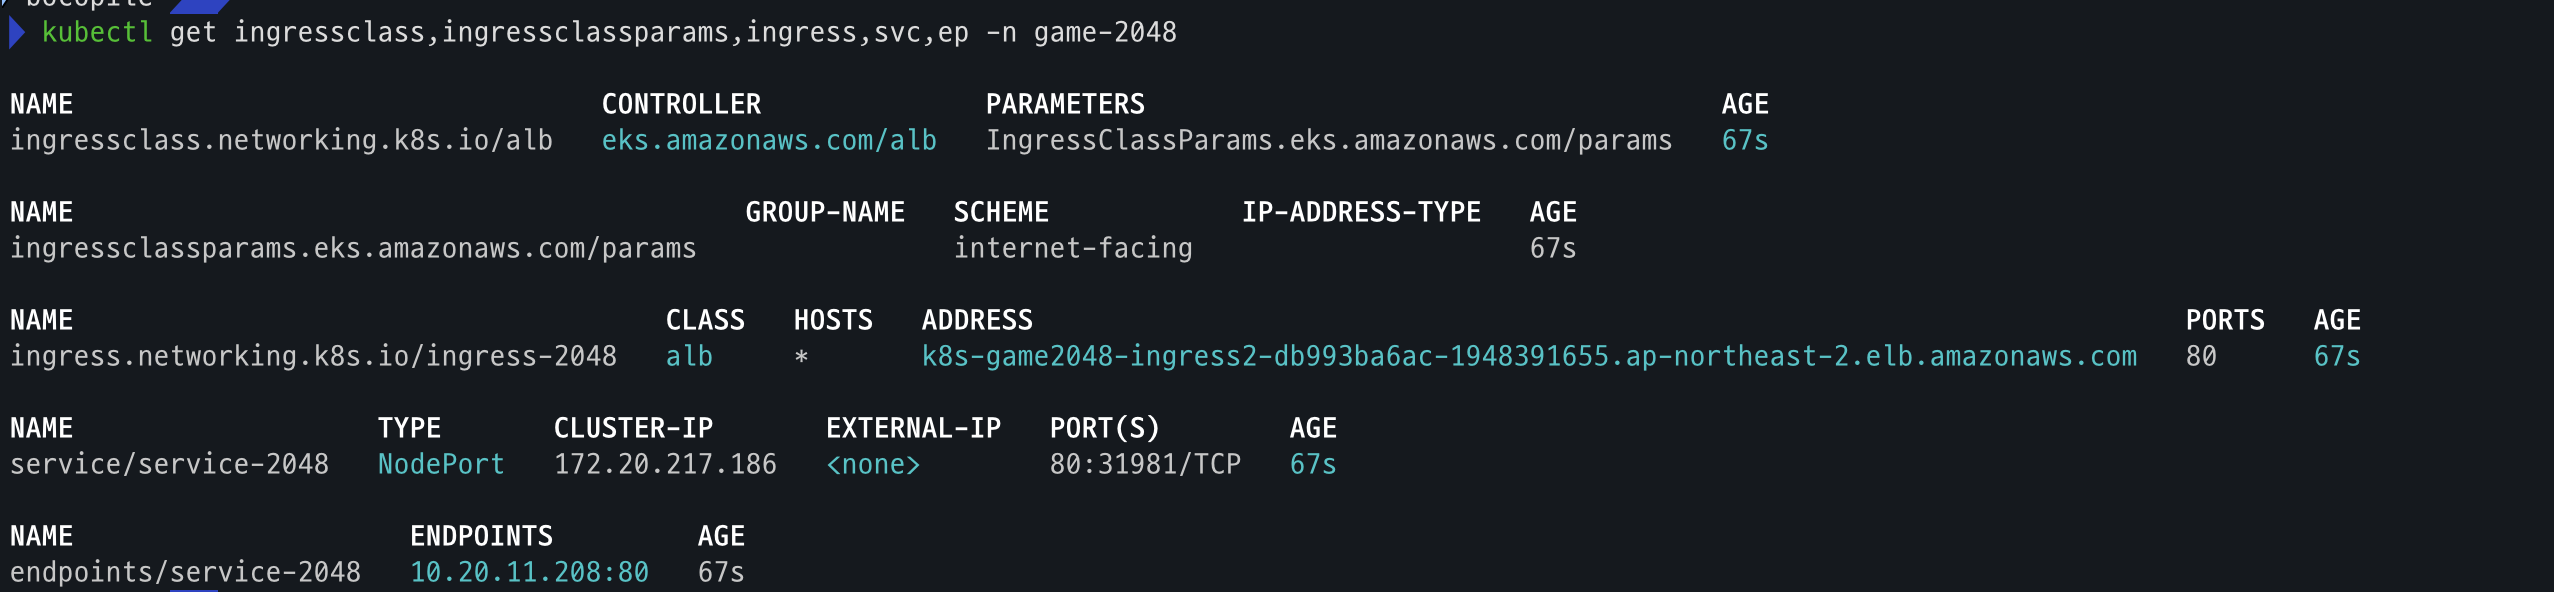
cat ../examples/graviton/2048-ingress.yaml
kubectl apply -f ../examples/graviton/2048-ingress.yaml

# 배포 확인
kubectl get ingressclass,ingressclassparams,ingress,svc,ep -n game-2048
- 배포

- 배포 확인
Security Groups 설정
- code
# Get security group IDs
ALB_SG=$(aws elbv2 describe-load-balancers \
--query 'LoadBalancers[?contains(DNSName, `game2048`)].SecurityGroups[0]' \
--output text)
EKS_SG=$(aws eks describe-cluster \
--name automode-cluster \
--query 'cluster.resourcesVpcConfig.clusterSecurityGroupId' \
--output text)
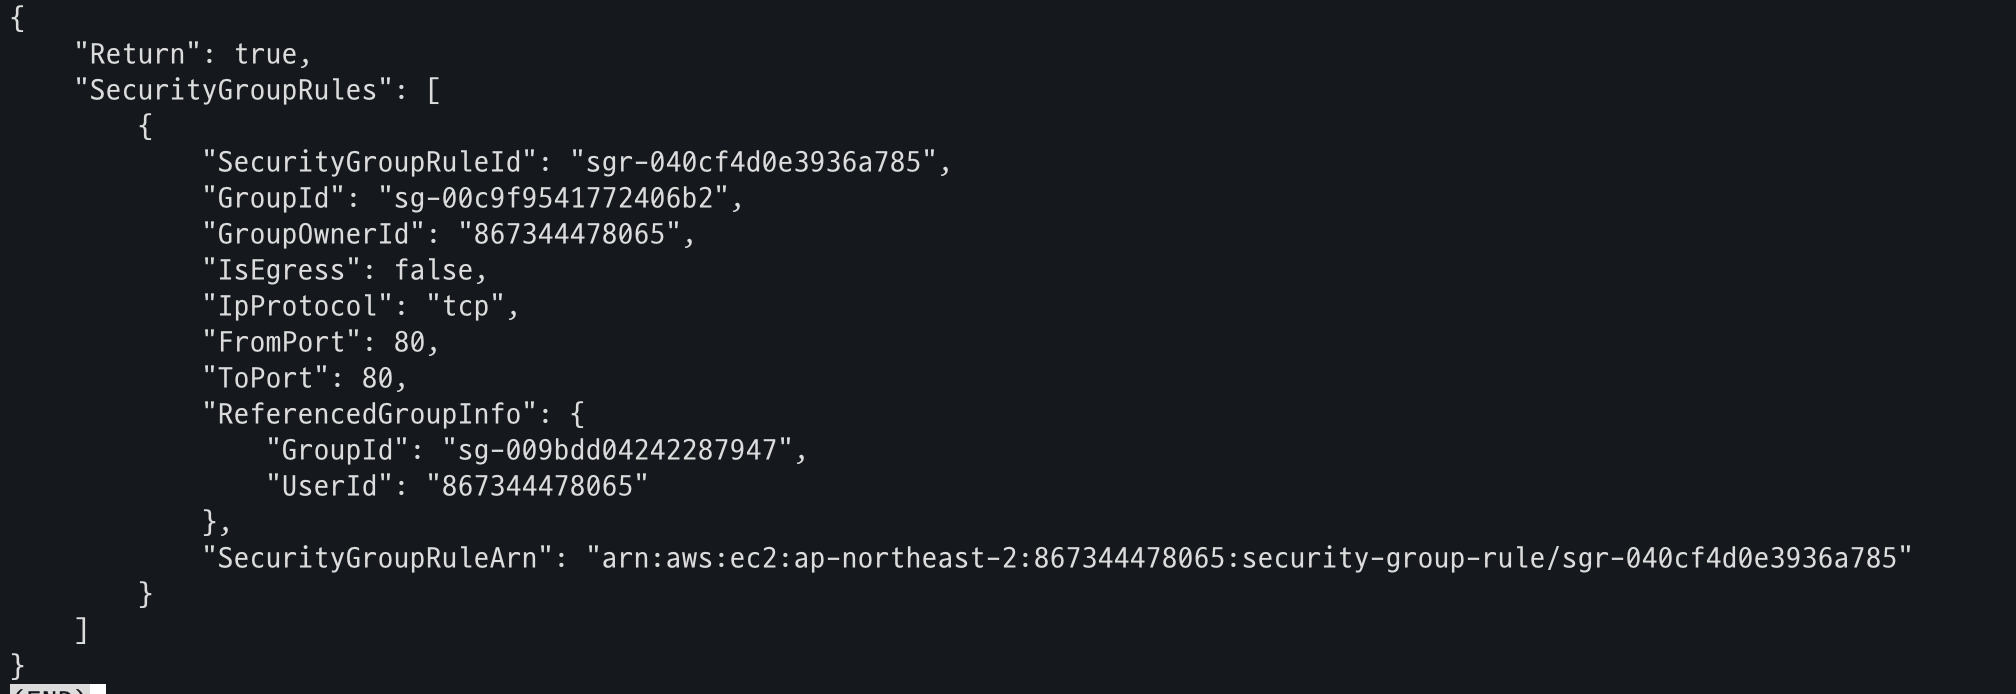
echo $ALB_SG $EKS_SG # 해당 보안그룹을 관리콘솔에서 정책 설정 먼저 확인해보자
# Allow ALB to communicate with EKS cluster : 실습 환경 삭제 때, 미리 $EKS_SG에 추가된 규칙만 제거해둘것.
aws ec2 authorize-security-group-ingress \
--group-id $EKS_SG \
--source-group $ALB_SG \
--protocol tcp \
--port 80
# 아래 웹 주소로 http 접속!
kubectl get ingress ingress-2048 \
-o jsonpath='{.status.loadBalancer.ingress[0].hostname}' \
-n game-2048
k8s-game2048-ingress2-db993ba6ac-782663732.ap-northeast-2.elb.amazonaws.com- ALB_SG, EKS_SG 변수 확인

- EKS Cluster ALB 허용
- 사이트 접속