실습 환경 구성
Quota 신청
- URL : https://us-west-2.console.aws.amazon.com/servicequotas/home/services/ec2/quotas
- on-demand G 로 검색하여 Running On-Demand G and VT instances 선택 → vCPU 24로 요청
도구 설치
- eksdemo - Amazon EKS 학습 목적 데모
brew tap aws/tap
brew install eksdemo
실습 준비 - GPU Time-slicing on Amazon EKS
- Link : https://aws.amazon.com/ko/blogs/containers/gpu-sharing-on-amazon-eks-with-nvidia-time-slicing-and-accelerated-ec2-instances/
- yaml 파일 생성 분석
eksdemo create cluster gpusharing -i t3.large -N 2 --region us-west-2 --dry-run - 실행 명령어
eksdemo create cluster gpusharing -i t3.large -N 2 --region us-west-2
AI 워크로드에 대한 컨테이너 사용
머신러닝과 딥러닝은 이제 기업 경쟁력의 핵심입니다. 이를 실현하기 위한 필수 조건은 고성능 GPU 인프라입니다. 하지만 전통적인 베어메탈 환경에서 GPU를 사용하는 데에는 여러 한계가 존재했고, 이를 해결하기 위해 컨테이너 기반 GPU 가상화 기술이 빠르게 진화해왔습니다.
전통적인 GPU 사용 방식의 한계
- 복잡한 환경 구성 CUDA/cuDNN 버전 호환성 문제로 프레임워크 업그레이드 때마다 수작업으로 드라이버·라이브러리 조정 필요
- 재현성 부족 “내 로컬에서는 잘 돌아가는데” 문제가 빈번하며, 동일 환경 복제에 어려움
- 리소스 비효율성 베어메탈 서버의 평균 GPU 활용률이 30% 이하에 머무르며 비용 낭비
- 확장성 제한 분산 학습을 위해 장비를 추가·연결하는 과정이 복잡하고 자동화하기 어려움
컨테이너 기반 GPU 가상화를 위한 핵심 기술
컨테이너는 Linux Cgroups·Namespaces로 CPU, 메모리, 네트워크를 격리하지만, GPU는 물리적 장치 파일·드라이버 의존성 등 고유 제약이 있습니다.
- 물리적 파티셔닝 어려움: 초기 GPU는 메모리·코어 단위 분할 지원 미비
- 높은 드라이버·라이브러리 의존성: 프로젝트별 CUDA 버전 불일치 이슈
- 장치 파일 접근 제어: 컨테이너 내부에서
/dev/nvidia*파일 직접 다루기 복잡
GPU 가상화 기술의 발전
MIG (Multi‑Instance GPU, 2020~)
- A100 이상 GPU에서 공식 지원
- 최대 7개 GPU 인스턴스로 분할 가능
- 메모리·캐시·코어 완전 격리, 하드웨어 수준 멀티테넌시
- 베어메탈·컨테이너 양쪽에서 활용도↑ (단, NVIDIA 종속성 존재)
vGPU (Virtual GPU)
- 하이퍼바이저 기반 가상머신 단위 GPU 자원 분할
- Time‑sharing 방식으로 복수 VM에 메모리 격리 제공
- 단점: 별도 하이퍼바이저 요구, 설정·운영 복잡
컨테이너 환경에서 GPU 활용의 진화
1단계: 수동 마운트 (2016~2018)
docker run --device=/dev/nvidia0:/dev/nvidia0 \
           --device=/dev/nvidiactl:/dev/nvidiactl \
           -v /usr/local/cuda:/usr/local/cuda \
tensorflow/tensorflow:latest-gpu- GPU 장치 파일을 일일이 지정
- 드라이버·라이브러리 버전 충돌, 자동화 불가
2단계: NVIDIA Container Runtime (2018~2020)
# Docker 19.03 이후
docker run --gpus '"device=0,1"' nvidia/cuda:11.0-base nvidia-smi-gpus옵션으로 장치 자동 감지- 호스트 드라이버 자동 주입, Docker·Kubernetes에 OCI 런타임 제공
3단계: Kubernetes Device Plugin (2020~현재)
resources:
  limits:
nvidia.com/gpu: 2- 선언적 GPU 리소스 요청
- 클러스터 차원 스케줄링·격리
- 멀티테넌트 환경에서도 안전한 자원 분배
결론 및 전망
컨테이너 기반 GPU 가상화는 이미 표준 인프라가 되었으며, 주요 효과는 다음과 같습니다:
- 리소스 활용률 극대화: MIG/vGPU로 다중 인스턴스 분할
- 자동화·재현성 확보: NVIDIA Container Runtime
- 확장성·멀티테넌시 지원: Kubernetes Device Plugin
실습
실습 준비 2 - GPU 노드 그룹 추가
- gpu Nodegroup 확인
eksdemo create nodegroup gpu -i g5.4xlarge -N 1 -c gpusharing --dry-run
- GPU 노드 그룹 생성
eksdemo create nodegroup gpu -i g5.4xlarge -N 1 -c gpusharing
GPU Time-slicing 미적용 테스트
- node 확인
kubectl get node --label-columns=node.kubernetes.io/instance-type,eks.amazonaws.com/capacityType,topology.kubernetes.io/zone
- GPU 노드에 label 지정
kubectl label node i-0af783eca345807e8.us-west-2.compute.internal eks-node=gpu
- nvdp-vaules.yaml 파일 다운로드
curl -O https://raw.githubusercontent.com/sanjeevrg89/eks-gpu-sharing-demo/refs/heads/main/nvdp-values.yaml
- nvidia-device-plugin 설치
helm repo add nvdp https://nvidia.github.io/k8s-device-plugin
helm repo update
helm upgrade -i nvdp nvdp/nvidia-device-plugin \
  --namespace kube-system \
  -f nvdp-values.yaml \
  --version 0.14.0
- 설치 확인
kubectl get daemonset -n kube-system | grep nvidia
- time-slicing 비활성화 확인
kubectl get nodes -o json | jq -r '.items[] | select(.status.capacity."nvidia.com/gpu" != null) | {name: .metadata.name, capacity: .status.capacity}'
- GPU 모델 배포
kubectl create namespace gpu-demo
cat << EOF > cifar10-train-deploy.yaml
apiVersion: apps/v1
kind: Deployment
metadata:
  name: tensorflow-cifar10-deployment
  namespace: gpu-demo
  labels:
    app: tensorflow-cifar10
spec:
  replicas: 5
  selector:
    matchLabels:
      app: tensorflow-cifar10
  template:
    metadata:
      labels:
        app: tensorflow-cifar10
    spec:
      containers:
      - name: tensorflow-cifar10
        image: public.ecr.aws/r5m2h0c9/cifar10_cnn:v2
        resources:
          limits:
            nvidia.com/gpu: 1
EOF
$ kubectl apply -f cifar10-train-deploy.yaml
- gpu-demo 모니터링
watch -d 'kubectl get pods -n gpu-demo'
- 파드 확인
kubectl get pods -n gpu-demo
- GPU 리소스 부족으로 생성 불가능한 상황 발생
kubectl describe pod tensorflow-cifar10-deployment-7c6f89c8d6-k7z77 -n gpu-demo
GPU Time-slicing 적용 테스트
- time-slicing 적용
cat << EOF > nvidia-device-plugin.yaml
apiVersion: v1
kind: ConfigMap
metadata:
  name: nvidia-device-plugin
  namespace: kube-system
data:
  any: |-
    version: v1
    flags:
      migStrategy: none
    *sharing:
      timeSlicing:
        resources:
        - name: nvidia.com/gpu
          replicas: 10*
EOF
$ kubectl apply -f nvidia-device-plugin.yaml
- 새로운 configMap으로 배포
helm upgrade -i nvdp nvdp/nvidia-device-plugin \
  --namespace kube-system \
  -f nvdp-values.yaml \
  --version 0.14.0 \
  --set config.name=nvidia-device-plugin \
  --force
- GPU 확인
kubectl get nodes -o json | jq -r '.items[] | select(.status.capacity."nvidia.com/gpu" != null) | {name: .metadata.name, capacity: .status.capacity}'
- 파드 확인 - 지속적으로 재시작 되는 현상 발생
kubectl get pods -n gpu-demo
- 메모리 부족 이슈 발생
kubectl logs tensorflow-cifar10-deployment-7c6f89c8d6-k7z77 -n gpu-demo | grep memory
멀티 GPU 활용을 위한 AI/ML 인프라 with EKS
대규모 모델과 GPU의 한계
최근 GPT‑3(1,750억 파라미터), Megatron‑Turing NLG(5,300억 파라미터), PaLM(5,400억 파라미터) 등 초거대 모델이 등장하면서, 더 이상 단일 GPU만으로는 학습이 불가능해졌습니다.
이제는 멀티 GPU + 멀티 노드 기반의 분산 학습이 필수이며, 이로 인해 네트워크 병목 문제가 본격적으로 대두되고 있습니다.
분산 학습에서 발생하는 네트워크 병목
주요 통신 패턴
분산 딥러닝 학습 중 대표적인 통신 연산은 다음과 같습니다.
-
AllReduce
모든 GPU가 각자의 그래디언트를 주고받으며 평균을 계산
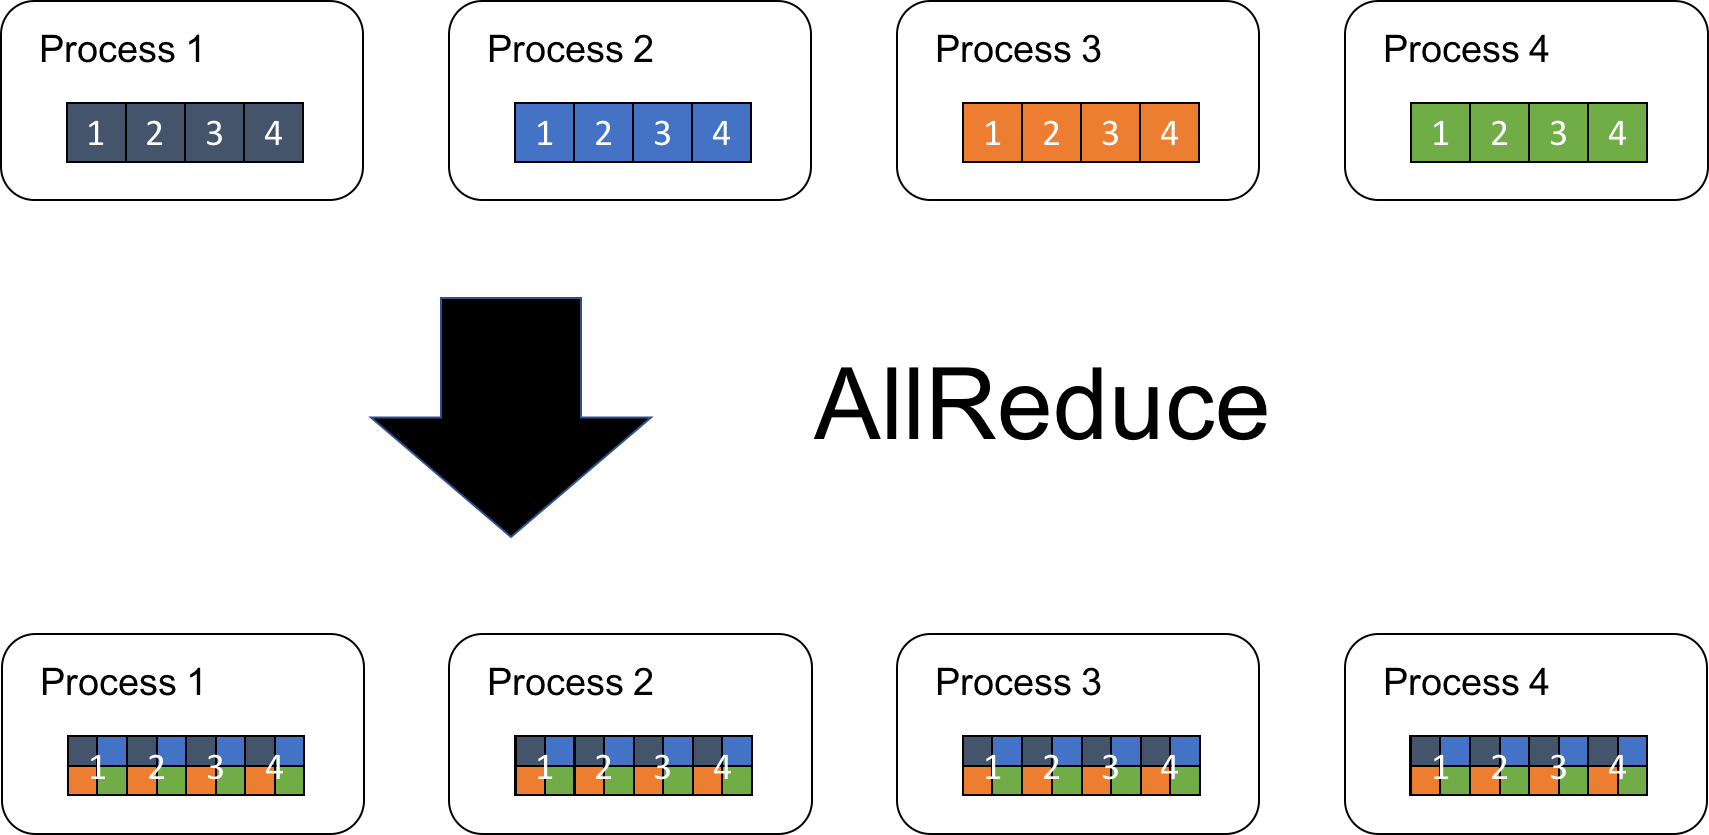
참조 : 기시다 AEWS 3기
-
AllGather, ReduceScatter, Broadcast 등
예시:
8개의 GPU 노드가 AllReduce를 수행할 때, 통신에 소요되는 시간이 학습 전체의 약 70%를 차지하고, 이로 인해 GPU 사용률이 60~70% 수준으로 떨어지는 사례가 보고되었습니다.
NVIDIA NCCL (NVIDIA Collective Communications Library)
분산 학습의 병목을 완화하기 위해 NVIDIA가 제공하는 통신 라이브러리입니다.
- 토폴로지 최적화 NVLink, PCIe, NVSwitch 등 다양한 토폴로지를 자동 감지하여 최적화
- 커뮤니케이션 오버랩 CUDA 스트림 통합으로 연산과 통신의 동시 진행 가능
- 멀티 노드 지원 IP 소켓, InfiniBand, RoCE 등을 통한 확장성 제공
- 프레임워크 통합 PyTorch, TensorFlow 등 주요 딥러닝 프레임워크에 기본 탑재
단점: 노드 간 네트워크 컨트롤러나 스위치 수준의 병목까지 완전히 해결하기에는 한계가 있습니다.
AWS의 해법: Elastic Fabric Adapter (EFA)
AWS는 GPU 간 고성능 네트워크를 위해 EFA(Elastic Fabric Adapter) 를 제공합니다.
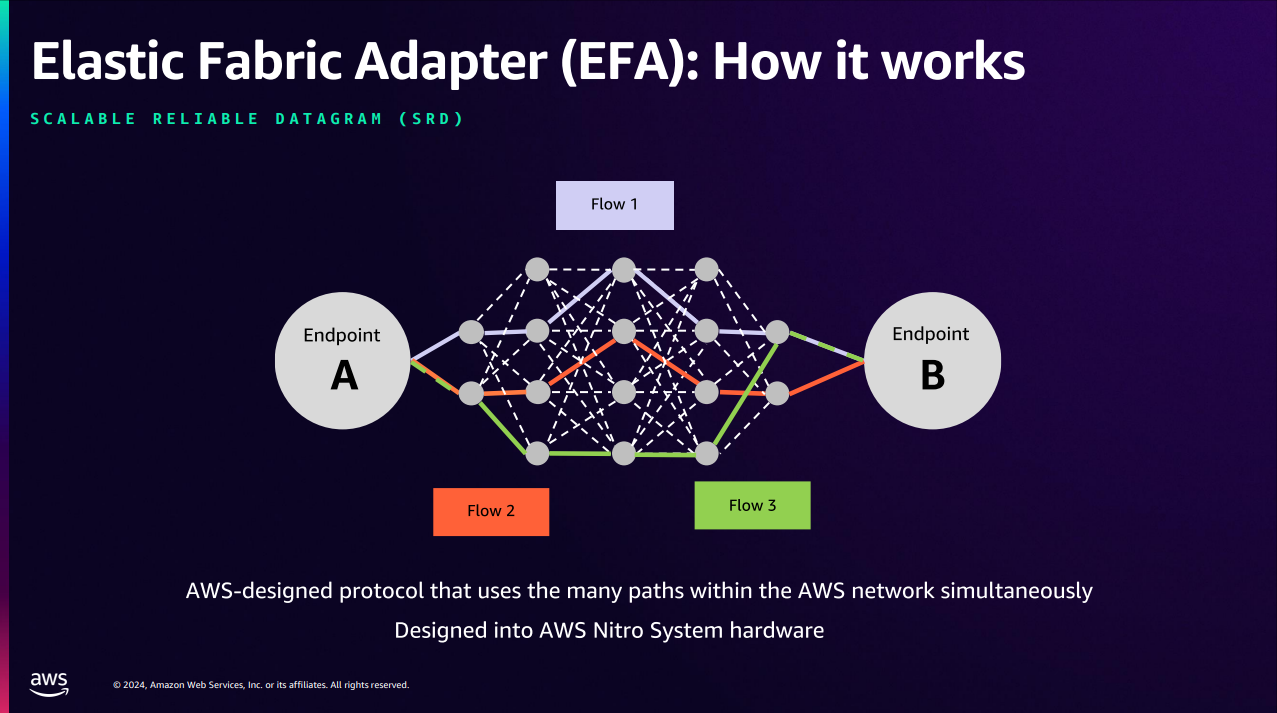
핵심 기술
- OS Bypass 커널을 우회하여 사용자 공간에서 직접 통신, 컨텍스트 스위칭 제거
- RDMA (Remote Direct Memory Access) CPU 개입 없이 메모리 간 직접 데이터 전송 (Zero‑copy)
- NCCL + EFA 통합 GPU 간 직접 통신 최적화 및 자동 튜닝 알고리즘 지원
EFA의 실질적 이점
AWS EKS와 결합했을 때 얻을 수 있는 장점을 정리하면 다음과 같습니다.
| 분류 | 주요 내용 |
|---|---|
| 인프라 관리 | Kubernetes를 통한 GPU 및 EFA 리소스 선언적 관리, 오토스케일링 |
| 비용 최적화 | GPU 활용률 90% 이상 달성, 학습 시간 단축, Spot 인스턴스와의 연동으로 비용 절감 |
| 성능 향상 | 초저지연 네트워크 통신 제공, 대규모 분산 학습 워크로드 가속 |
| 개발자 경험 | 일관된 실행 환경 제공, 실험 재현성 확보, CI/CD 파이프라인과의 통합 용이 |
지원 인스턴스 유형
EFA는 다음과 같은 고성능 인스턴스에서 사용할 수 있습니다.
자세한 내용은 AWS 공식 문서의 EFA 지원 인스턴스 항목을 참고하세요.
- P4dn, G4dn, C5n, etc. (AWS EFA 인스턴스 종류)
실습
[실습 준비] - EKS Blueprint with Terraform
- Git Clone
git clone https://github.com/aws-ia/terraform-aws-eks-blueprints.git
cd terraform-aws-eks-blueprints/patterns/nvidia-gpu-efa
- Code 변경
sed -i "s/p5.48xlarge/g5.8xlarge/g" eks.tf # spec 변경
sed -i "s/us-west-2/us-east-1/g" main.tf # region 변경
- terraform 적용
terraform init
terraform apply -target="module.vpc" -auto-approve
terraform apply -target="module.eks" -auto-approve
terraform apply -auto-approve
MPI Operator 사용 테스트
- kubeconfig update
aws eks --region us-east-1 update-kubeconfig --name nvidia-gpu-efa
- 인스턴스 유형 별 노드 조회
kubectl get nodes -L node.kubernetes.io/instance-type
- Kubeflow MPI Operator 배포
kubectl apply -f https://raw.githubusercontent.com/kubeflow/mpi-operator/v0.4.0/deploy/v2beta1/mpi-operator.yaml
- 패치를 적용하여 mpi-operator 서비스 계정이 apiGroup leases 리소스에 액세스할 수 있도록 설정
kubectl apply -f https://raw.githubusercontent.com/aws-samples/aws-do-eks/main/Container-Root/eks/deployment/kubeflow/mpi-operator/clusterrole-mpi-operator.yaml
- g5.8xlarge 인스턴스 스팩 변경 - GPU 1개 및 EFA 1개로 변경
sed -i "s/GPU_PER_WORKER=8/GPU_PER_WORKER=1/g" generate-efa-info-test.sh
sed -i "s/EFA_PER_WORKER=32/EFA_PER_WORKER=1/g" generate-efa-info-test.sh
- efa 테스트 진행
./generate-efa-info-test.sh
kubectl apply -f ./efa-info-test.yaml
- 모니터링 진행
watch 'kubectl get pods'
- 테스트 결과 확인
kubectl logs -f $(kubectl get pods | grep launcher | cut -d ' ' -f 1)
EFA NCCL 테스트
- 스팩 변경
sed -i "s/INSTANCE_TYPE=p5e\.48xlarge/INSTANCE_TYPE=g5\.8xlarge/g" generate-efa-nccl-test.sh
sed -i "s/GPU_PER_WORKER=8/GPU_PER_WORKER=1/g" generate-efa-nccl-test.sh
sed -i "s/EFA_PER_WORKER=32/EFA_PER_WORKER=1/g" generate-efa-nccl-test.sh
sed -i "s/FI_EFA_USE_DEVICE_RDMA=1/FI_EFA_USE_DEVICE_RDMA=0/g" generate-efa-nccl-test.sh
- efa 테스트 진행
./generate-efa-nccl-test.sh
kubectl apply -f ./efa-nccl-test.yaml
- 모니터링 진행
watch 'kubectl get pods'
- 테스트 결과 확인
kubectl logs -f $(kubectl get pods | grep launcher | cut -d ' ' -f 1)
리소스 제거
terraform destroy -target="module.eks_blueprints_addons" -auto-approve
terraform destroy -target="module.eks" -auto-approve
terraform destroy -auto-approve
3. Amazon FSx 및 AWS Inferentia 기반으로 GenAI 및 ML 구축
Workshop 실습 구성도
- Workshop 카탈로그 : https://catalog.workshops.aws/genaifsxeks
<figure>
<img src='https://velog.velcdn.com/images/gjrjr4545/post/0047d1c3-4bf5-4858-9104-ee19630136cd/image.png' alt='missing' />
<em>출처 : https://catalog.workshops.aws/genaifsxeks/en-US/010-introduction</em>
참조 솔루션/SDK
- AWS Neuron SDK AWS Inferentia 및 Trainium 하드웨어를 위한 SDK로, 컴파일러 + 런타임 + 프로파일링 도구를 포함 → 딥러닝 모델의 고성능 실행과 비용 효율성을 제공.
- Amazon FSx for Lustre 머신러닝, 분석, HPC를 위한 고성능 병렬 파일 시스템.
- 초저지연, TB/s 처리량, 수백만 IOPS 지원
- Amazon S3와 연동 - S3 버킷 데이터를 파일처럼 액세스 가능하며, 양방향 동기화 지원.
기본 세팅
- 기존 credentials 삭제
aws cloud9 update-environment --environment-id ${C9_PID} --managed-credentials-action DISABLE
rm -vf ${HOME}/.aws/credentials
- IAM 역할 확인
aws sts get-caller-identity
- 랩 지역 이름 설정
TOKEN=`curl -s -X PUT "http://169.254.169.254/latest/api/token" -H "X-aws-ec2-metadata-token-ttl-seconds: 21600"`
export AWS_REGION=$(curl -s -H "X-aws-ec2-metadata-token: $TOKEN" http://169.254.169.254/latest/meta-data/placement/region)
- eks 클러스터 변수 설정
export CLUSTER_NAME=eksworkshop
- 리전, 클러스터 이름 설정 확인
echo $AWS_REGION
echo $CLUSTER_NAME
- kube-config 파일 업데이트
aws eks update-kubeconfig --name $CLUSTER_NAME --region $AWS_REGION
- 클러스터 조회
kubectl get nodes
- karpenter pods 확인
kubectl get pods --namespace karpenter
Amazon FSx for Lustre에 모델 스토리지 구성
설명
전체 아키텍처 개요
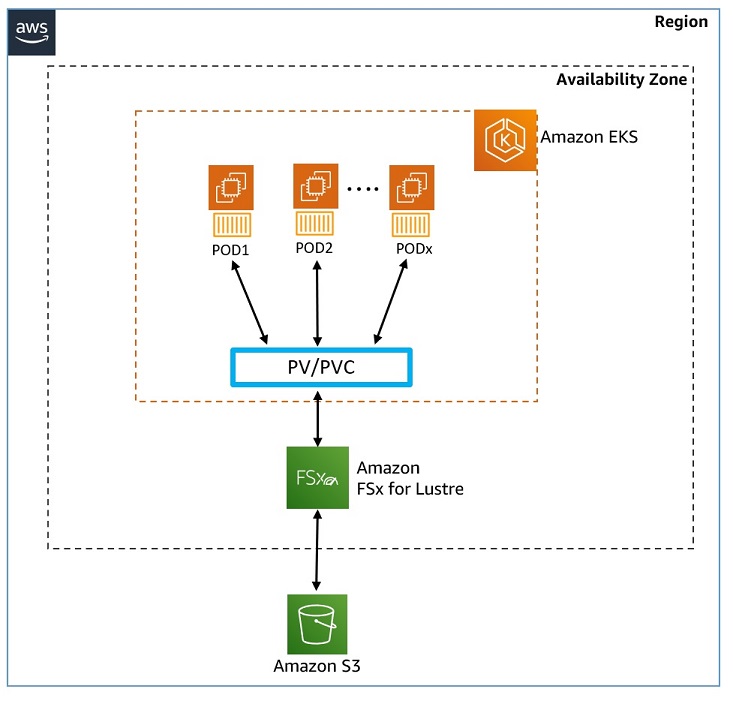
- 모델 저장 위치: Mistral-7B-Instruct 모델 → Amazon S3 버킷에 저장
- 스토리지 계층 구성
- S3와 연결된 Amazon FSx for Lustre 파일 시스템 사용
- Lustre는 고성능 병렬 파일 시스템 (저지연, 고처리량)
- 애플리케이션 구성
- Amazon EKS 클러스터에 vLLM 기반 Generative AI Chatbot 배포
- EKS 클러스터에는 2개의 EC2 워커 노드가 존재
- 통합 방식
- FSx for Lustre를 Kubernetes에 통합하여 모델 데이터를 사용
Kubernetes 스토리지 구성요소 설명
| 구성 요소 | 설명 |
|---|---|
| CSI 드라이버 | Kubernetes와 외부 스토리지 시스템(FSx 등)을 연결하는 인터페이스 |
| StorageClass | 스토리지의 속성(성능, 백업 정책 등)을 정의한 스토리지 "템플릿" |
| PV (Persistent Volume) | EKS 관리자가 프로비저닝한 실제 스토리지 리소스 |
| PVC (Persistent Volume Claim) | Pod가 요청하는 스토리지 요구사항 (크기, 접근 모드 등) |
스토리지 프로비저닝 방식 비교
| 방식 | 설명 | 사용 시점 |
|---|---|---|
| 정적 프로비저닝 | 관리자가 미리 FSx 인스턴스 + PV를 생성해두고, 사용자는 PVC로 연결 | 사전 준비된 스토리지가 필요한 경우 |
| 동적 프로비저닝 | 사용자가 PVC를 생성하면, Kubernetes가 자동으로 FSx 인스턴스 + PV를 생성 | 필요 시점에 스토리지 자동 생성 |
FSx for Lustre 특징
- 초고속 파일 시스템: 밀리초 미만 지연 + TB/s급 처리량 + 수백만 IOPS
- Amazon S3와의 연동: S3 객체를 파일처럼 사용 가능, 실시간 동기화
- Generative AI, ML, HPC에 최적화
실습
CSI 드라이버 배포
- (전제 조건) account-id 환경 변수 설정
ACCOUNT_ID=$(aws sts get-caller-identity --query "Account" --output text)
- CSI 드라이버 API 호출을 위한 IAM 정책 및 서비스 계정 생성 파일 작성
cat << EOF >  fsx-csi-driver.json
{
    "Version":"2012-10-17",
    "Statement":[
        {
            "Effect":"Allow",
            "Action":[
                "iam:CreateServiceLinkedRole",
                "iam:AttachRolePolicy",
                "iam:PutRolePolicy"
            ],
            "Resource":"arn:aws:iam::*:role/aws-service-role/s3.data-source.lustre.fsx.amazonaws.com/*"
        },
        {
            "Action":"iam:CreateServiceLinkedRole",
            "Effect":"Allow",
            "Resource":"*",
            "Condition":{
                "StringLike":{
                    "iam:AWSServiceName":[
                        "fsx.amazonaws.com"
                    ]
                }
            }
        },
        {
            "Effect":"Allow",
            "Action":[
                "s3:ListBucket",
                "fsx:CreateFileSystem",
                "fsx:DeleteFileSystem",
                "fsx:DescribeFileSystems",
                "fsx:TagResource"
            ],
            "Resource":[
                "*"
            ]
        }
    ]
}
EOF
- IAM 정책 생성
aws iam create-policy \
        --policy-name Amazon_FSx_Lustre_CSI_Driver \
        --policy-document file://fsx-csi-driver.json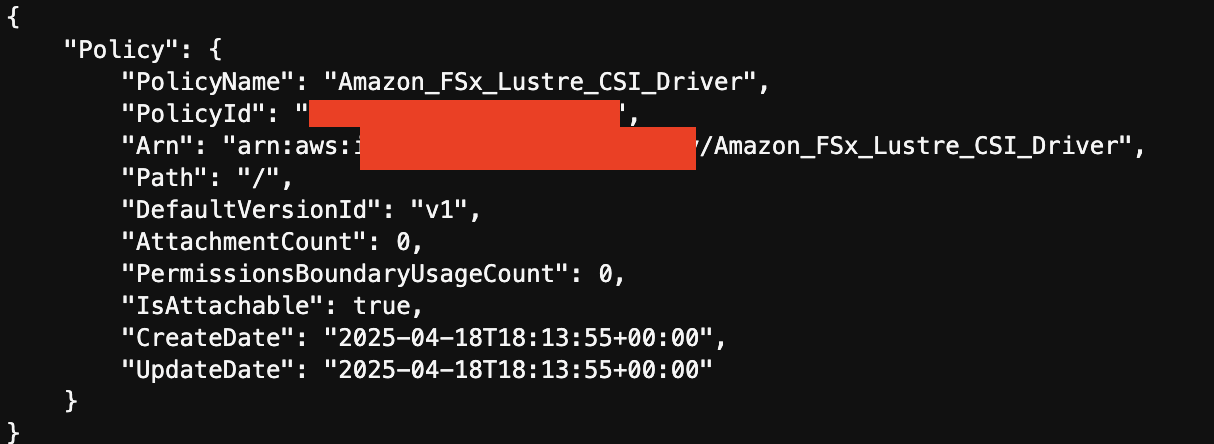
- 드라이버에 대한 k8s 서비스 계정 생성 및 정책을 서비스 계정에 연결
eksctl create iamserviceaccount \
    --region $AWS_REGION \
    --name fsx-csi-controller-sa \
    --namespace kube-system \
    --cluster $CLUSTER_NAME \
    --attach-policy-arn arn:aws:iam::$ACCOUNT_ID:policy/Amazon_FSx_Lustre_CSI_Driver \
    --approve
- 생성된 역할 ARN을 변수에 저장
export ROLE_ARN=$(aws cloudformation describe-stacks --stack-name "eksctl-${CLUSTER_NAME}-addon-iamserviceaccount-kube-system-fsx-csi-controller-sa" --query "Stacks[0].Outputs[0].OutputValue" --region $AWS_REGION --output text)
- ROLE_ARN 출력
echo $ROLE_ARN
- Lustre용 FSx의 CSI 드라이버 배포
kubectl apply -k "github.com/kubernetes-sigs/aws-fsx-csi-driver/deploy/kubernetes/overlays/stable/?ref=release-1.2"
- 배포 확인
kubectl get pods -n kube-system -l app.kubernetes.io/name=aws-fsx-csi-driver
- 생성한 서비스 계정에 어노테이션 추가
kubectl annotate serviceaccount -n kube-system fsx-csi-controller-sa \
 eks.amazonaws.com/role-arn=$ROLE_ARN --overwrite=true
- 적용 확인
kubectl get sa/fsx-csi-controller-sa -n kube-system -o yaml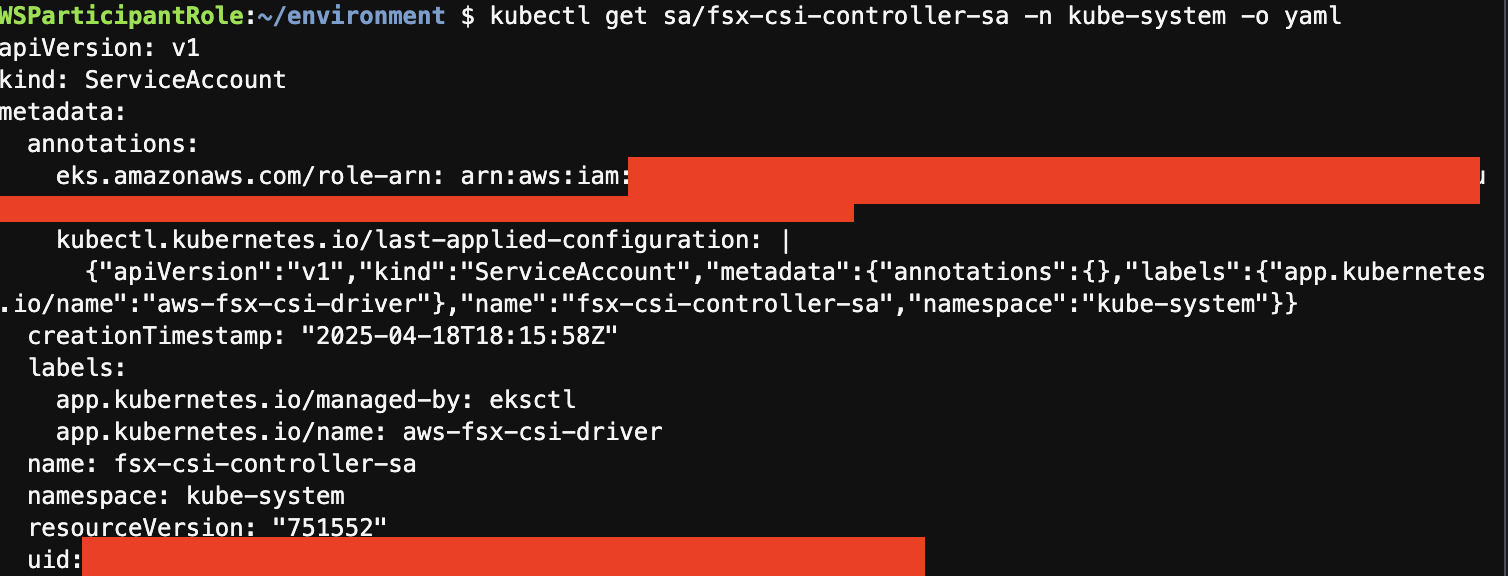
EKS 클러스터에 영구 볼륨 생성
PV 볼륨 생성 두가지 방법
- 정적 프로비저닝 - 관리자가 백엔드 스토리지 엔티티를 만들고 PV를 생성하며, 사용자는 이 PV가 자신의 Pod에서 사용되도록 클레임(PVC)을 만듭니다.
- 동적 프로비저닝 - 사용자가 PVC를 요청하면 CSI 드라이버가 사용자 요구 사항에 따라 PV(및 해당 백업 스토리지 엔티티)를 자동으로 생성합니다. 이 방법은 관리자가 미리 생성해야 하는 별도의 프로세스가 필요하지 않습니다.
실습
- 폴더 이동
cd /home/ec2-user/environment/eks/FSxL
- FSx Lustre 인스턴스 세부정보 변수 선언
FSXL_VOLUME_ID=$(aws fsx describe-file-systems --query 'FileSystems[].FileSystemId' --output text)
DNS_NAME=$(aws fsx describe-file-systems --query 'FileSystems[].DNSName' --output text)
MOUNT_NAME=$(aws fsx describe-file-systems --query 'FileSystems[].LustreConfiguration.MountName' --output text)
- PV 생성 yaml 파일 확인
cat fsxL-persistent-volume.yaml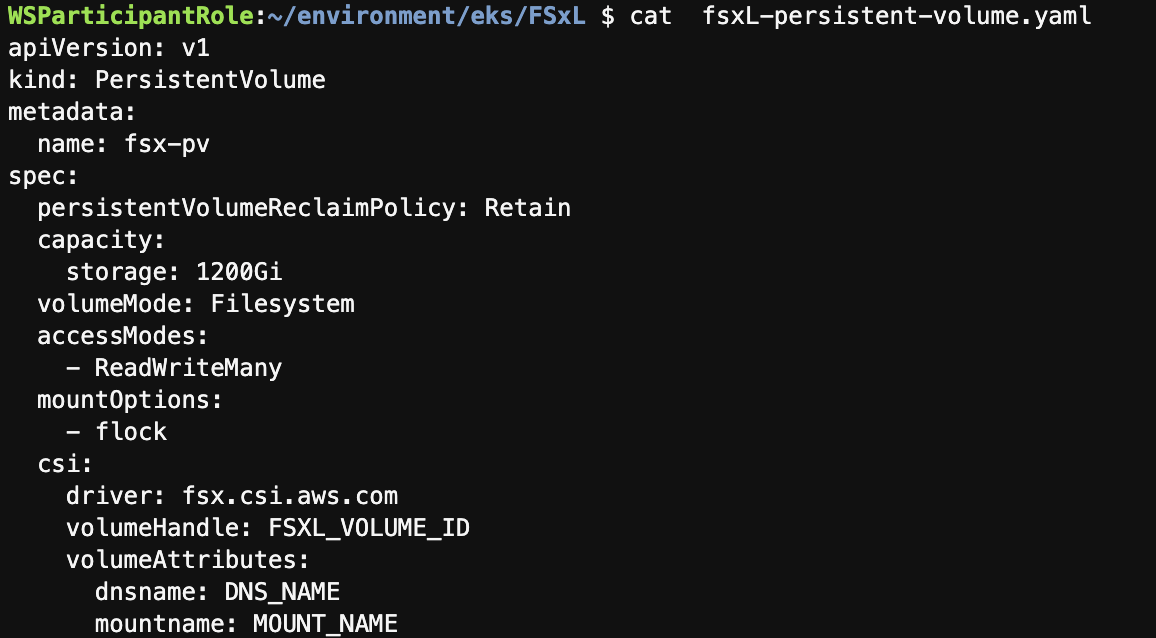
VOLUME_ID,DNS_NAME, 를MOUNT_NAMEFSx Lustre 인스턴스의 실제 값으로 변경sed -i'' -e "s/FSXL_VOLUME_ID/$FSXL_VOLUME_ID/g" fsxL-persistent-volume.yaml sed -i'' -e "s/DNS_NAME/$DNS_NAME/g" fsxL-persistent-volume.yaml sed -i'' -e "s/MOUNT_NAME/$MOUNT_NAME/g" fsxL-persistent-volume.yaml
- 변경 후 확인
cat fsxL-persistent-volume.yaml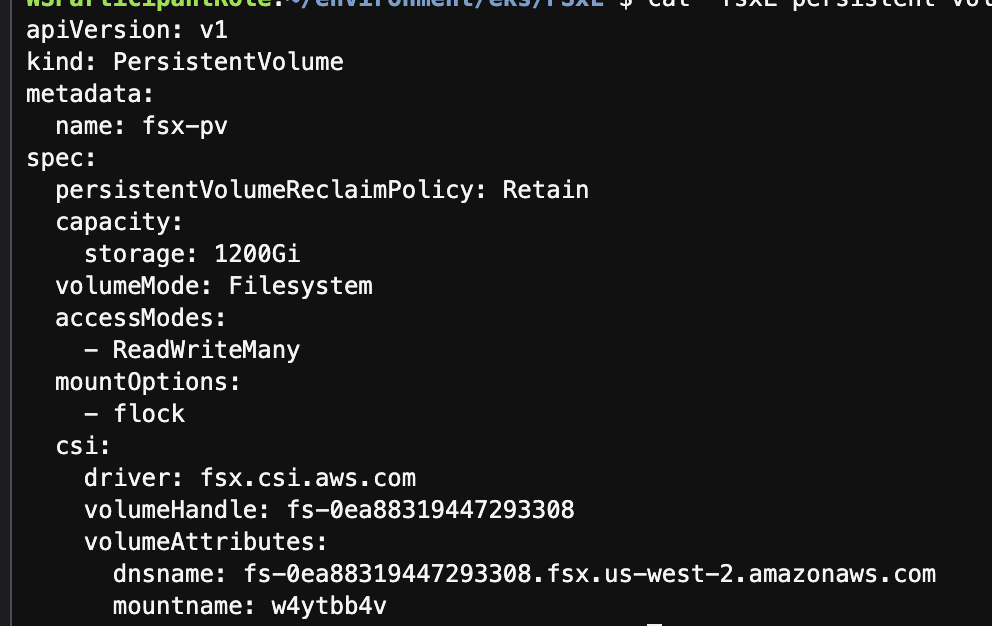
- PV 배포
kubectl apply -f fsxL-persistent-volume.yaml
- PV 확인
kubectl get pv
- PVC 생성
kubectl apply -f fsxL-claim.yaml
- PV, PVC 확인
kubectl get pv,pvc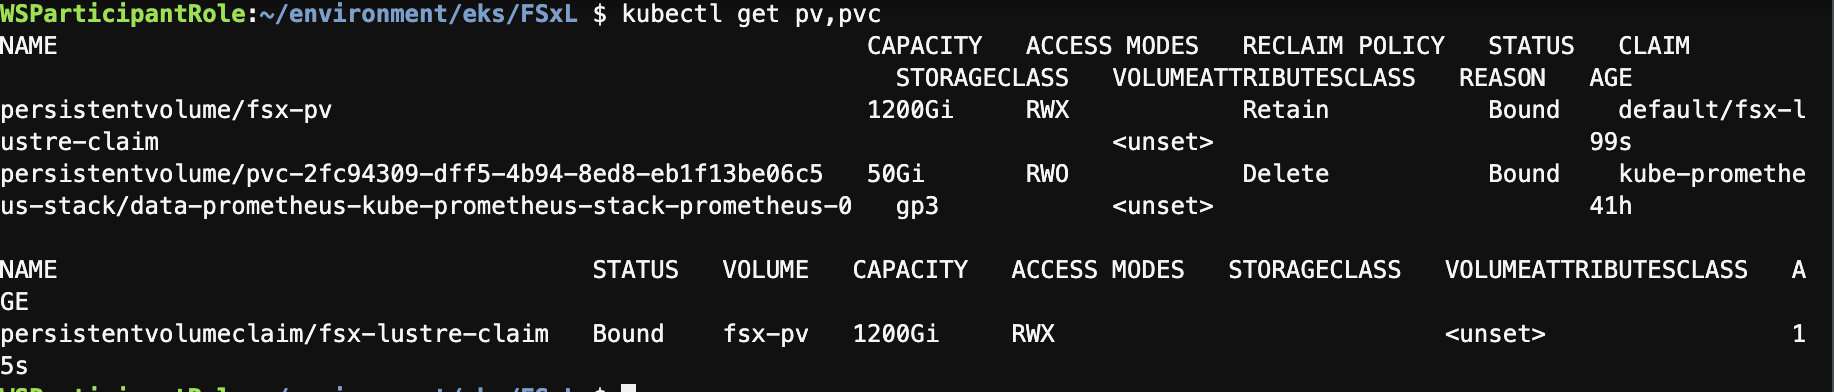
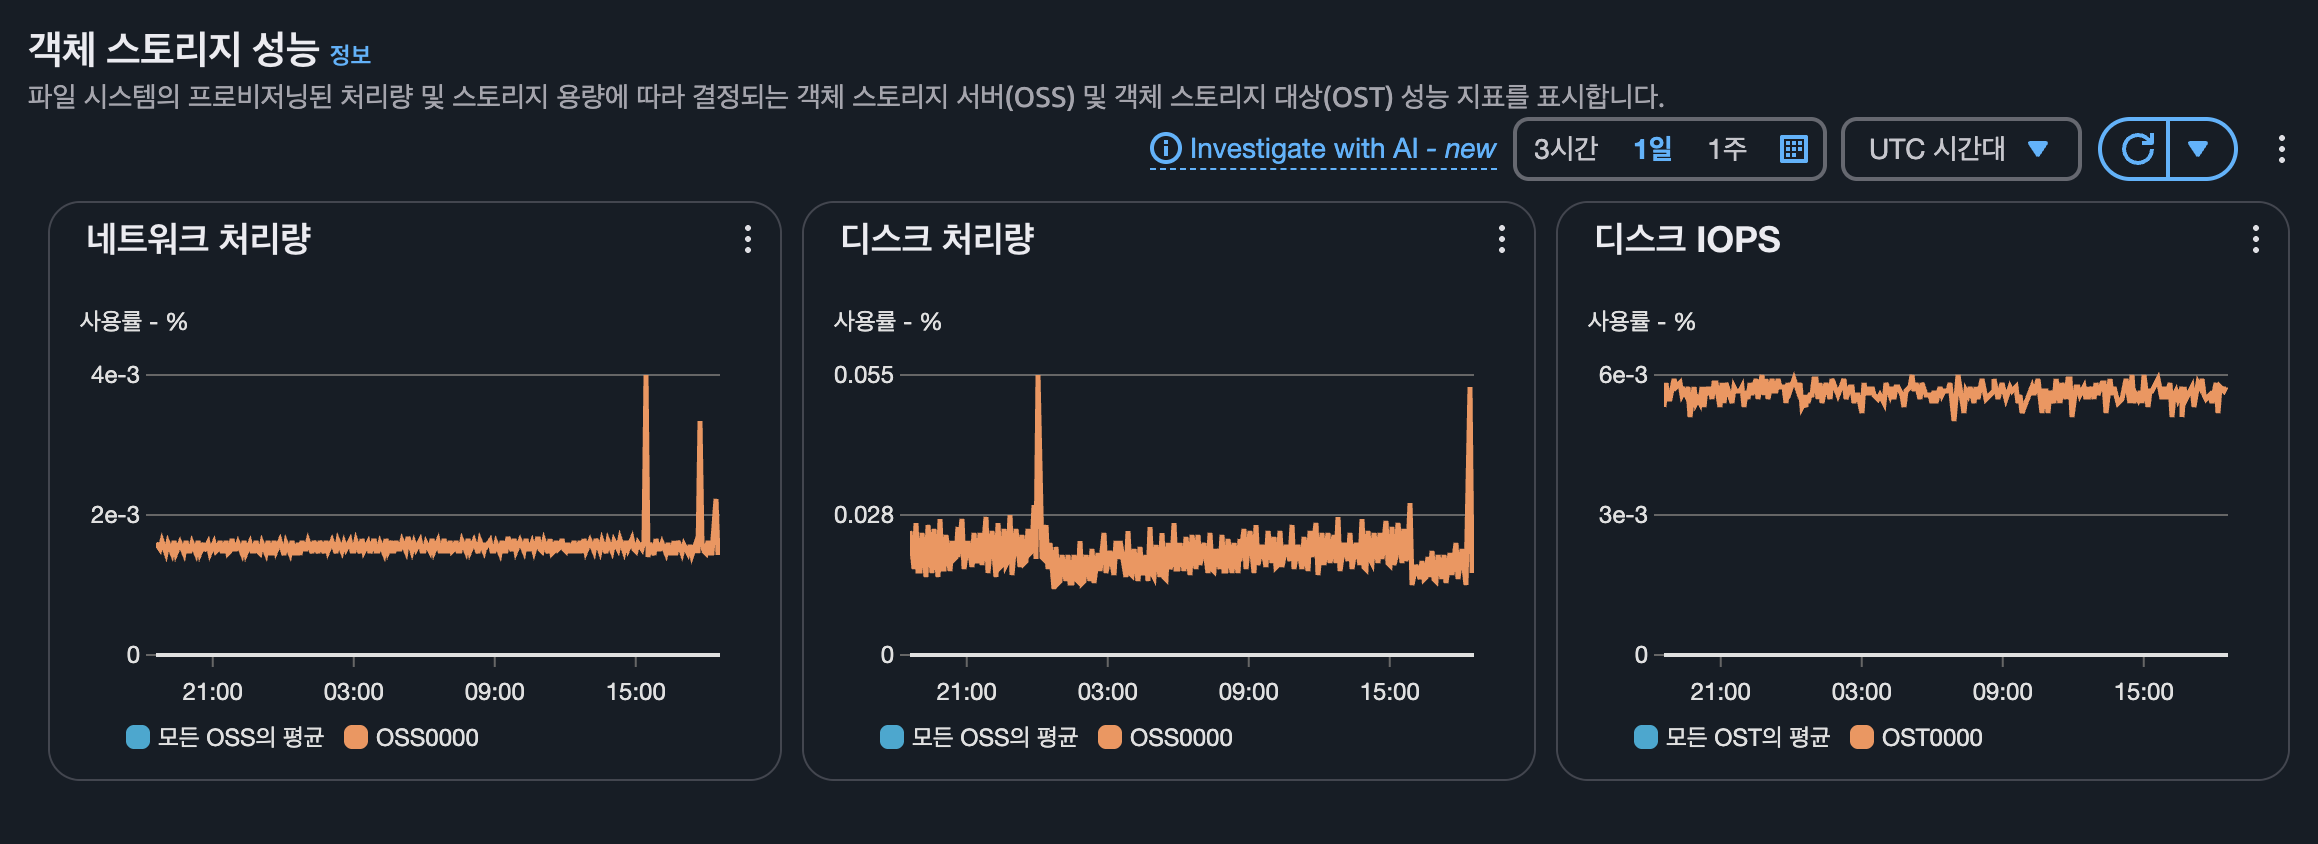
Amazon FSx 옵션, 성능 세부정보 확인
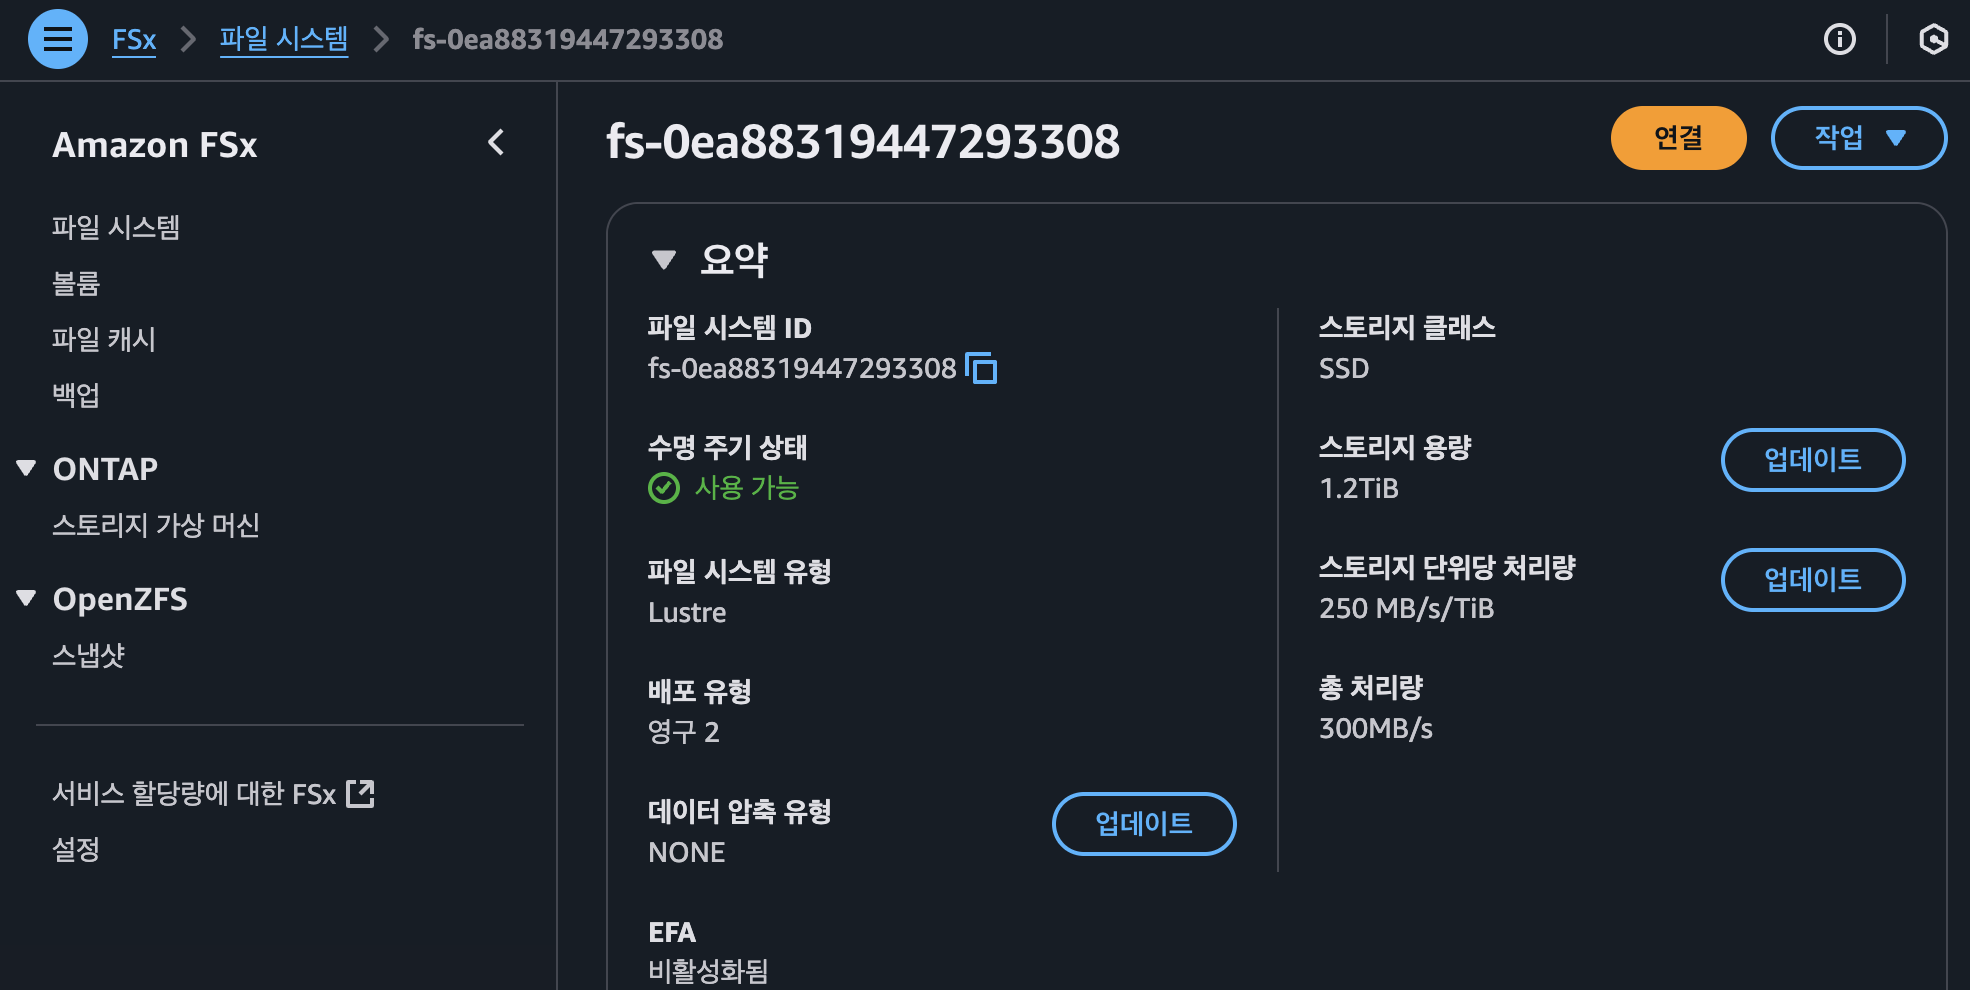
console에 접근하면 다음과 같이 FSx가 생성된것을 확인할수 있습니다.
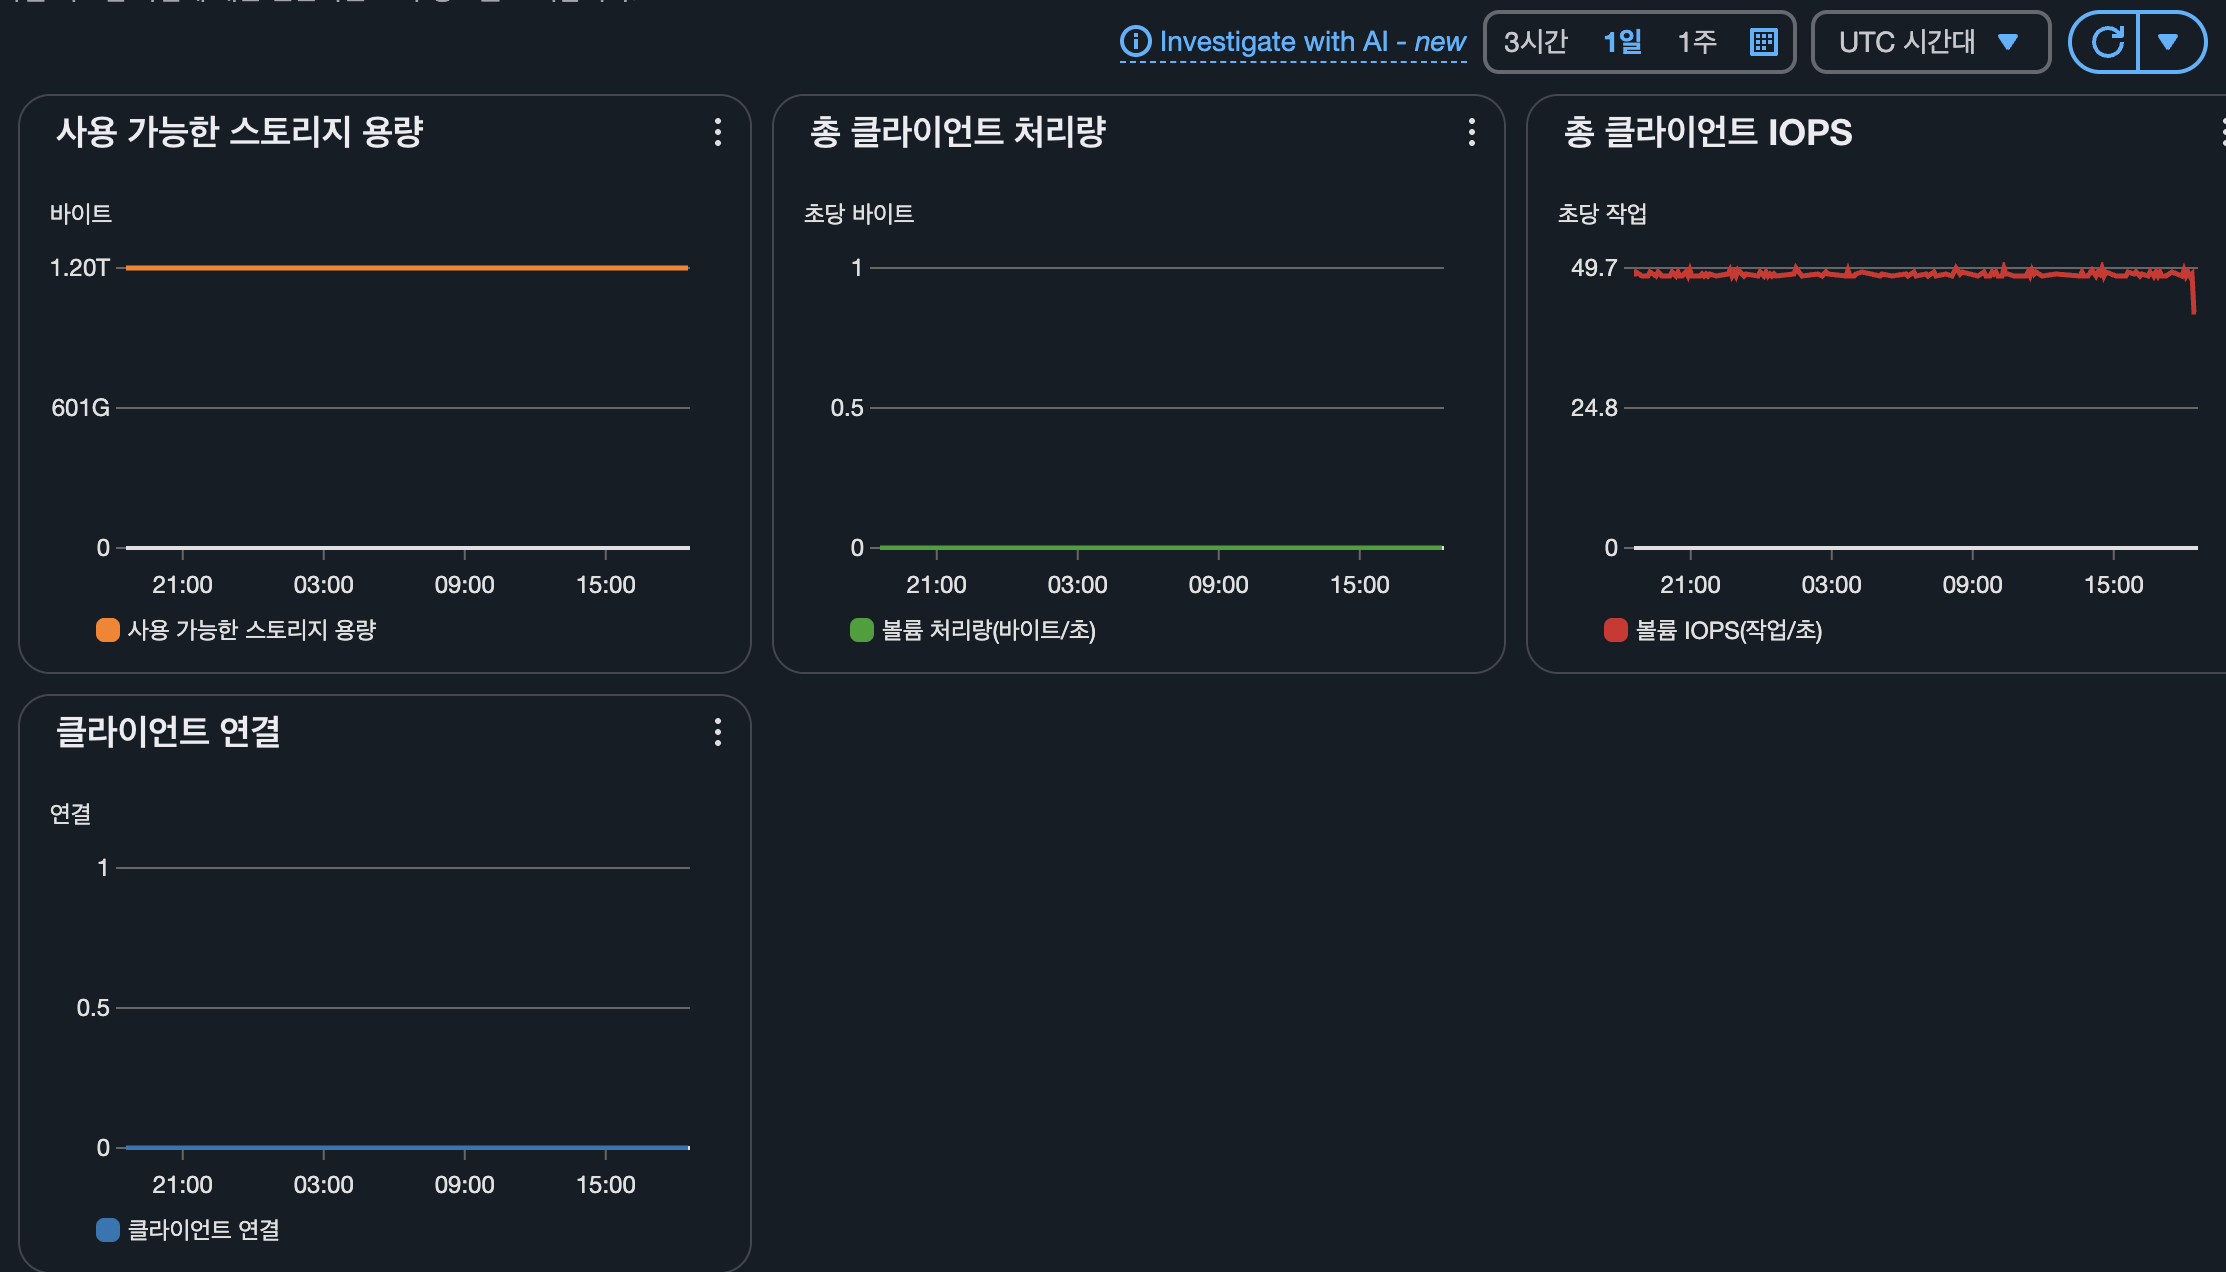
또한 모니터링 및 성능 텝에 접근하시면 다음과 같은 성능지표를 확인할수 있습니다.
생성형 AI 채팅 애플리케이션 배포
설명
목표
- Amazon EKS 클러스터에 vLLM + WebUI Pod를 배포하여 생성 AI 챗봇 애플리케이션 구성
- Mistral-7B-Instruct 모델을 Amazon S3 + FSx for Lustre에 저장하고 사용
- 추론 가속화를 위해 AWS Inferentia2 가속기 사용
구성요소
| 구성요소 | 설명 |
|---|---|
| Mistral-7B-Instruct | 70억 파라미터의 오픈소스 LLM. 지시문 기반 챗봇에 최적화 |
| vLLM | LLM 추론용 고성능 오픈소스 서버 라이브러리. OpenAI API 호환, HuggingFace 통합 |
| Amazon EKS | vLLM + WebUI Pod 실행 플랫폼. Karpenter로 Inferentia2 기반 노드 자동 확장 |
| Amazon FSx for Lustre | S3와 연동되는 고성능 파일 시스템. 모델 데이터를 빠르게 제공 |
| Amazon S3 | Mistral-7B 모델 저장소. Lustre와 연동 |
| AWS Inferentia2 (Inf2 인스턴스) | 저비용 고성능 딥러닝 추론 가속기. 최대 12개 가속기, HBM 32GB, 190TFLOPS 성능 |
| AWS Neuron SDK | PyTorch/TensorFlow와 통합되는 Inferentia용 컴파일러/런타임/프로파일러 툴킷 |
vLLM 기술
- 성능 특성
- PagedAttention 기반 메모리 최적화
- 지속적 배치 → 높은 처리량
- CUDA/HIP Graphs → 빠른 추론 속도
- 유연성
- HuggingFace 모델 연동
- OpenAI 호환 API 제공
- 다양한 가속기 지원 (GPU, Inferentia 등)
AWS Inferentia2 특징
| 항목 | 설명 |
|---|---|
| 용도 | 대규모 추론 전용 가속기 (LLM, 이미지/비디오 생성 등) |
| 성능 | 가속기당 32GB HBM / 190TFLOPS FP16 |
| 확장성 | EC2 인스턴스당 최대 12개 Inferentia2 탑재 |
| Neuron SDK | PyTorch/TensorFlow 통합, 코드 변경 최소화, 성능 최적화 제공 |
실습
AWS Inferentia 노드에 vLLM 배포
- Cloud9 터미널에서 작업 디렉터리 변경
cd /home/ec2-user/environment/eks/genai
- 배포할 Karpenter NodePool yaml 파일 확인
cat inferentia_nodepool.yaml# inferentia_nodepool.yaml apiVersion: karpenter.sh/v1 kind: NodePool metadata: name: inferentia labels: intent: genai-apps NodeGroupType: inf2-neuron-karpenter spec: template: spec: taints: - key: aws.amazon.com/neuron value: "true" effect: "NoSchedule" requirements: - key: "karpenter.k8s.aws/instance-family" operator: In values: ["inf2"] - key: "karpenter.k8s.aws/instance-size" operator: In values: [ "xlarge", "2xlarge", "8xlarge", "24xlarge", "48xlarge"] - key: "kubernetes.io/arch" operator: In values: ["amd64"] - key: "karpenter.sh/capacity-type" operator: In values: ["spot", "on-demand"] nodeClassRef: group: karpenter.k8s.aws kind: EC2NodeClass name: inferentia limits: cpu: 1000 memory: 1000Gi disruption: consolidationPolicy: WhenEmpty # expireAfter: 720h # 30 * 24h = 720h consolidateAfter: 180s weight: 100 --- apiVersion: karpenter.k8s.aws/v1 kind: EC2NodeClass metadata: name: inferentia spec: amiFamily: AL2 amiSelectorTerms: - alias: al2@v20240917 blockDeviceMappings: - deviceName: /dev/xvda ebs: deleteOnTermination: true volumeSize: 100Gi volumeType: gp3 role: "Karpenter-eksworkshop" subnetSelectorTerms: - tags: karpenter.sh/discovery: "eksworkshop" securityGroupSelectorTerms: - tags: karpenter.sh/discovery: "eksworkshop" tags: intent: apps managed-by: karpenter
- AWS Inferentia INF2 Accelerated Compute 노드에 Karpenter NodePool 정의를 배포
kubectl apply -f inferentia_nodepool.yaml
- nodepool, EC2NodeClass 확인
kubectl get nodepool,ec2nodeclass inferentia
- Neuron Device 플러그인 설치
kubectl apply -f https://raw.githubusercontent.com/aws-neuron/aws-neuron-sdk/master/src/k8/k8s-neuron-device-plugin-rbac.yml
kubectl apply -f https://raw.githubusercontent.com/aws-neuron/aws-neuron-sdk/master/src/k8/k8s-neuron-device-plugin.yml
- Neuron 스케줄러 플러그인 설치
kubectl apply -f https://raw.githubusercontent.com/aws-neuron/aws-neuron-sdk/master/src/k8/k8s-neuron-scheduler-eks.yml
kubectl apply -f https://raw.githubusercontent.com/aws-neuron/aws-neuron-sdk/master/src/k8/my-scheduler.yml
- vLLM 파드 배포 파일 확인
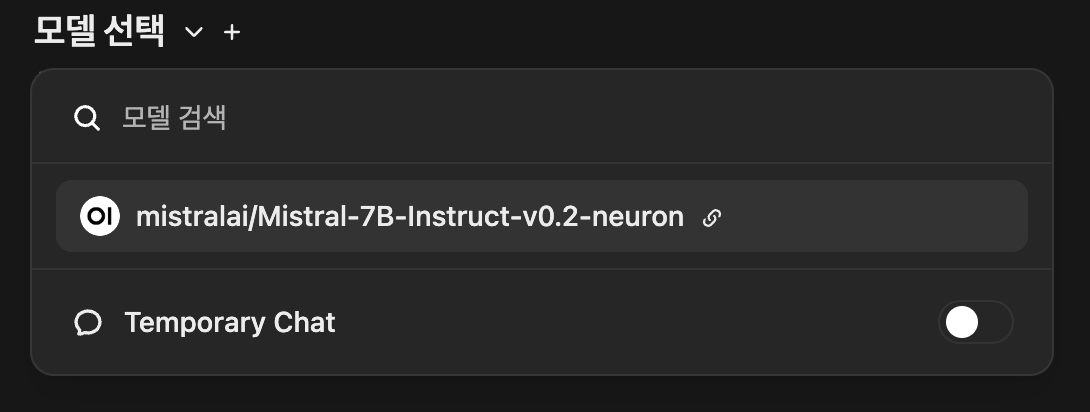
cat mistral-fsxl.yamlapiVersion: apps/v1 kind: Deployment metadata: name: vllm-mistral-inf2-deployment spec: replicas: 1 selector: matchLabels: app: vllm-mistral-inf2-server template: metadata: labels: app: vllm-mistral-inf2-server spec: tolerations: - key: "aws.amazon.com/neuron" operator: "Exists" effect: "NoSchedule" containers: - name: inference-server image: public.ecr.aws/u3r1l1j7/eks-genai:neuronrayvllm-100G-root resources: requests: aws.amazon.com/neuron: 1 limits: aws.amazon.com/neuron: 1 args: - --model=$(MODEL_ID) - --enforce-eager - --gpu-memory-utilization=0.96 - --device=neuron - --max-num-seqs=4 - --tensor-parallel-size=2 - --max-model-len=10240 - --served-model-name=mistralai/Mistral-7B-Instruct-v0.2-neuron env: - name: MODEL_ID value: /work-dir/Mistral-7B-Instruct-v0.2/ - name: NEURON_COMPILE_CACHE_URL value: /work-dir/Mistral-7B-Instruct-v0.2/neuron-cache/ - name: PORT value: "8000" volumeMounts: - name: persistent-storage mountPath: "/work-dir" volumes: - name: persistent-storage persistentVolumeClaim: claimName: fsx-lustre-claim --- apiVersion: v1 kind: Service metadata: name: vllm-mistral7b-service spec: selector: app: vllm-mistral-inf2-server ports: - protocol: TCP port: 80 targetPort: 8000
- vLLM 파드 배포
kubectl apply -f mistral-fsxl.yaml-
배포 확인
watch 'kubectl get pods'- 배포 중

- 배포 완료

- 배포 중
- node 확인 - inf2.xlarge 컴퓨팅 노드 생성 됨

WebUI 채팅 애플리케이션 배포
배포된 vLLM 사용을 위한 webUI 채팅 애플리케이션 배포
- WebUI 배포
kubectl apply -f open-webui.yaml
- WebUI 애플리케이션 URL 확인
kubectl get ing
- 사이트 접속

- 모델 확인
Mistral-7B 데이터 구조 확인 , 생성된 데이터 공유 및 복제
실습 목표
- vLLM Pod에 접속하여 FSx for Lustre 기반 영구 볼륨(PV) 확인
- 해당 볼륨이 연동된 Amazon S3 버킷의 모델 데이터를 확인
실습
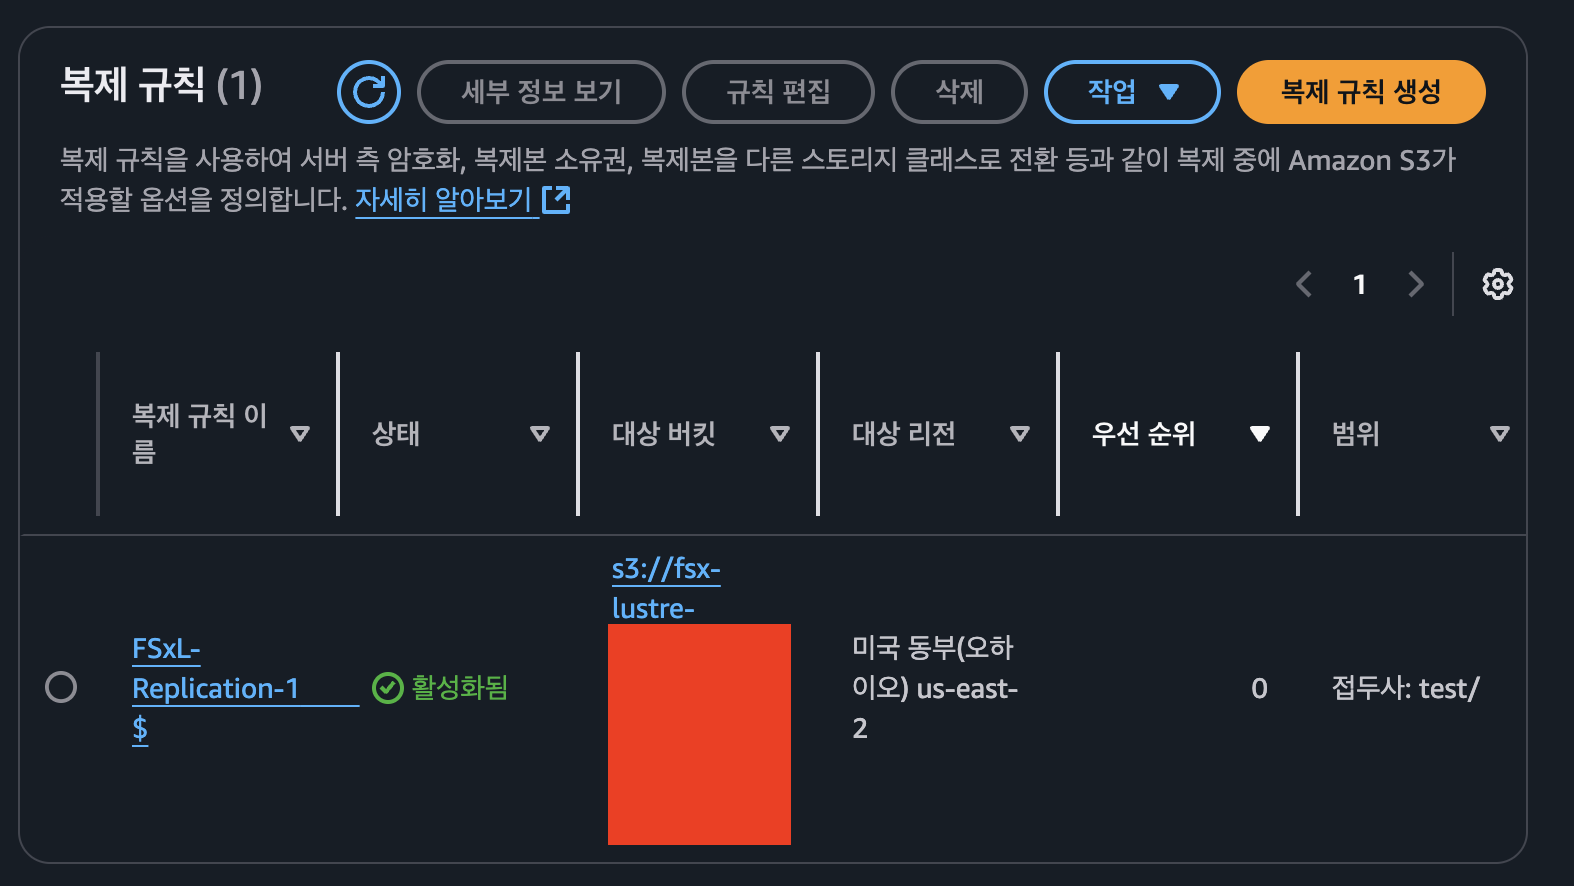
FSx 인스턴스에 대한 S3 크로스 리전 복제
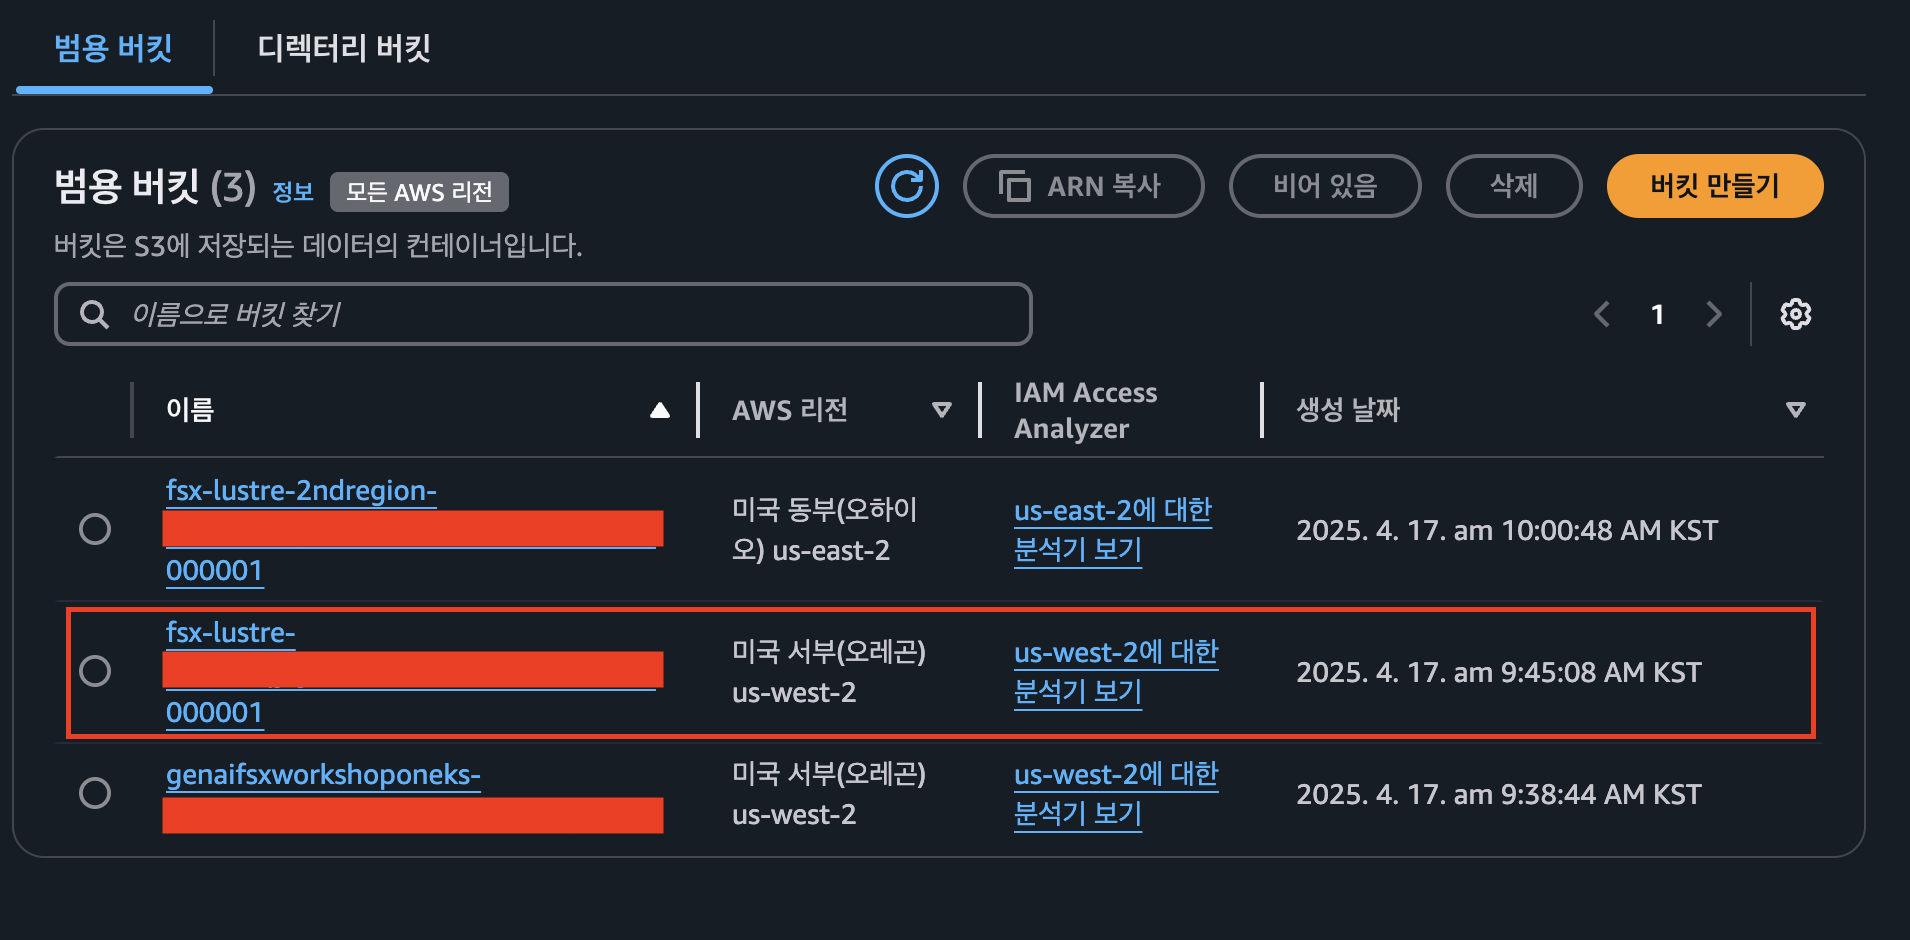
- Console → fsx-lustre-xxx 클릭 (fsx-lustre-2ndregion 절대 클릭 금지)
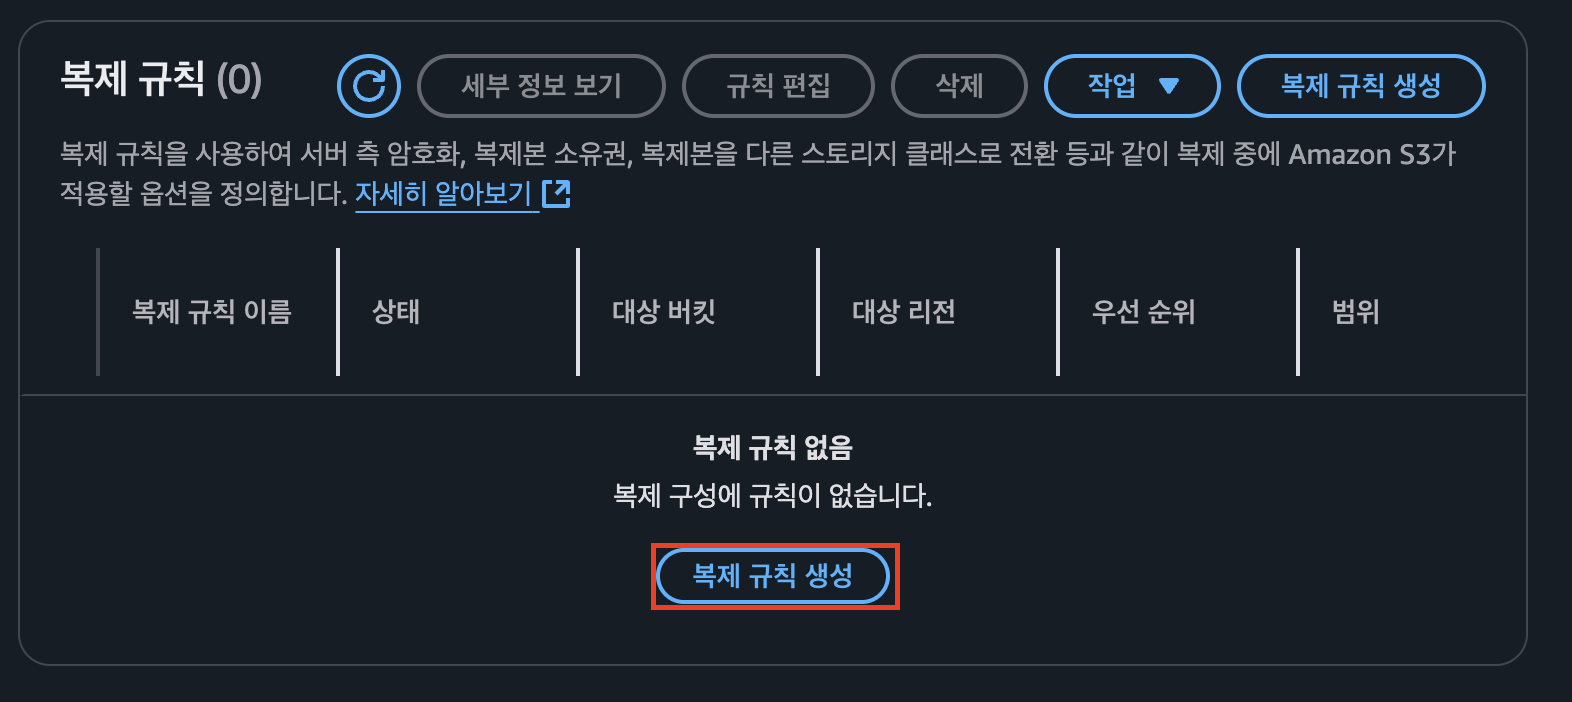
- 관리 탭 클릭 → 하단에 복제 규칙 접근 → 복제 규칙생성 클릭
- 버킷버전 관리 활성화 버튼 클릭

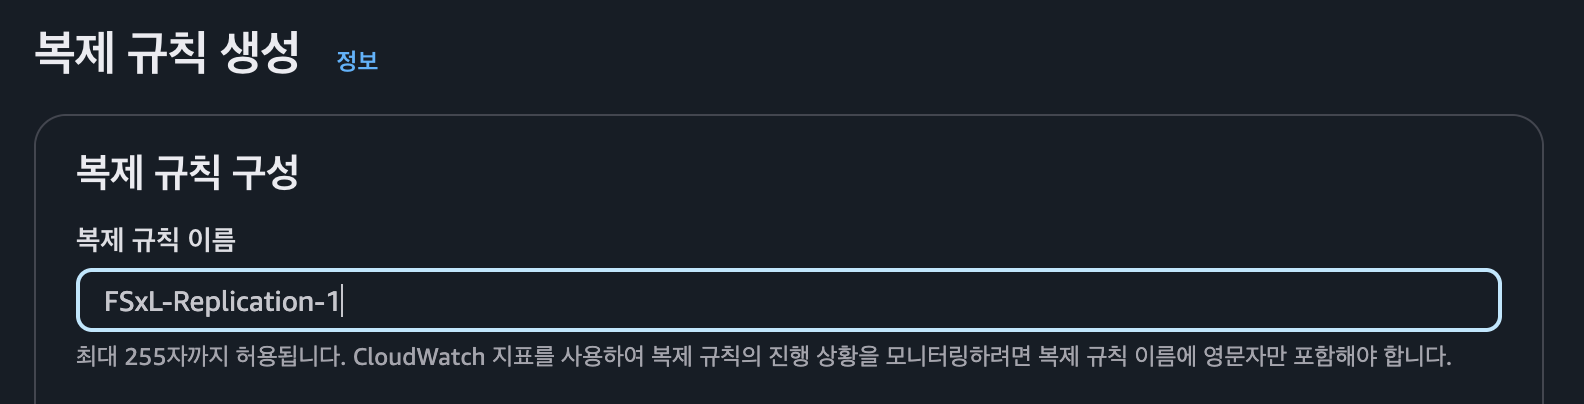
- 복제 규칙 구성 에서 이름 작성
- 하나 이상의 필터를 사용하여 이 규칙의 범위 제한 선택, 필터 유형 접두사에
test/추가 !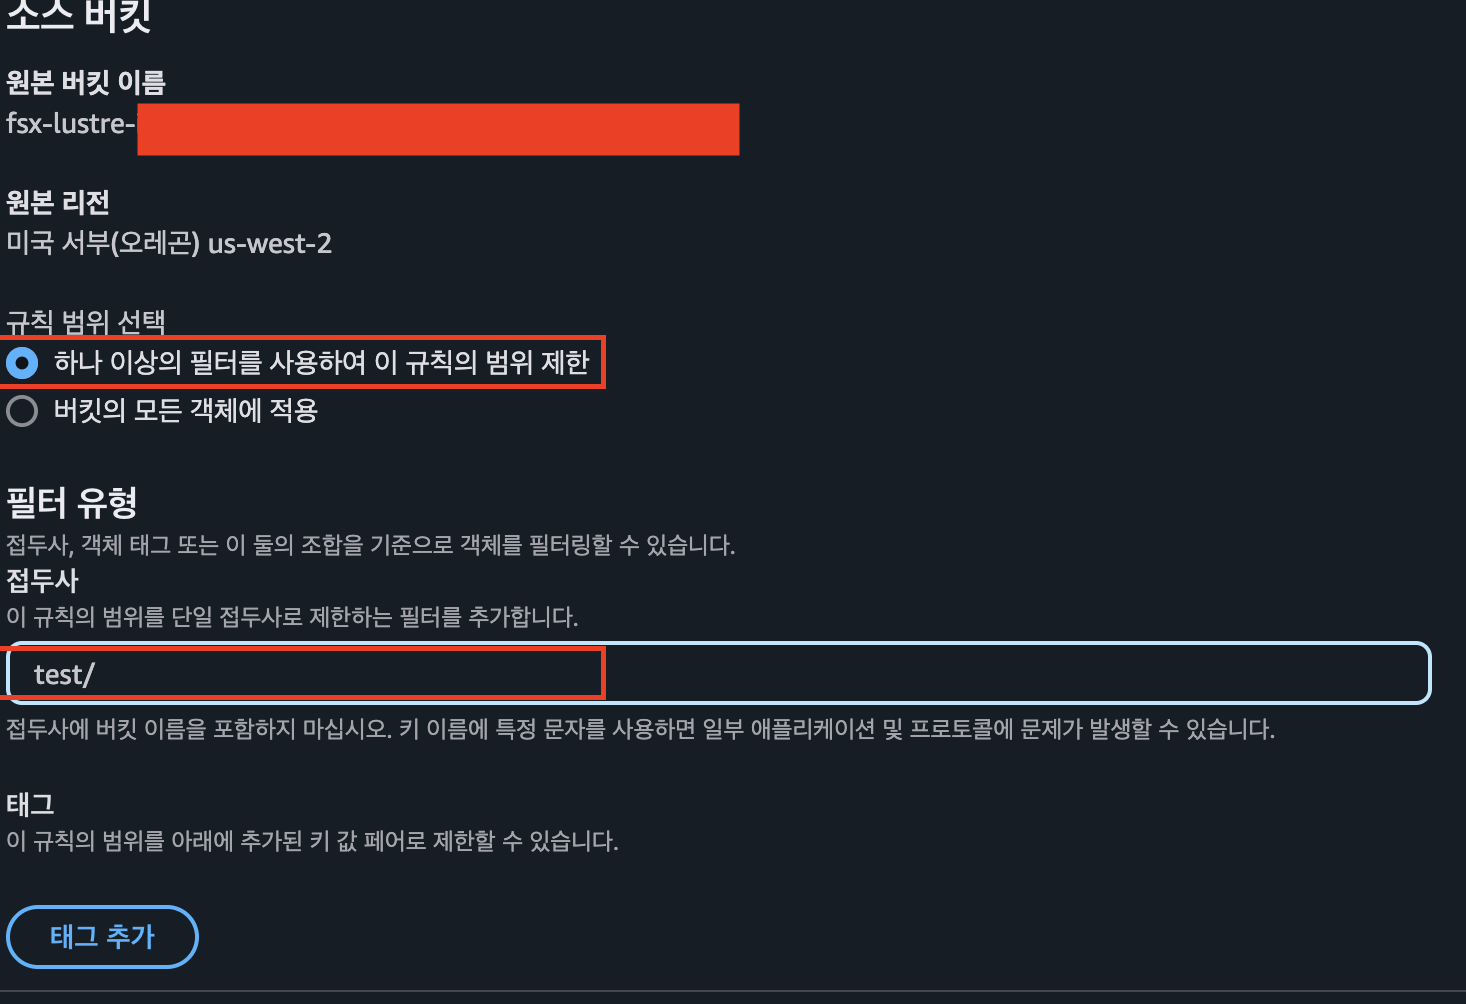
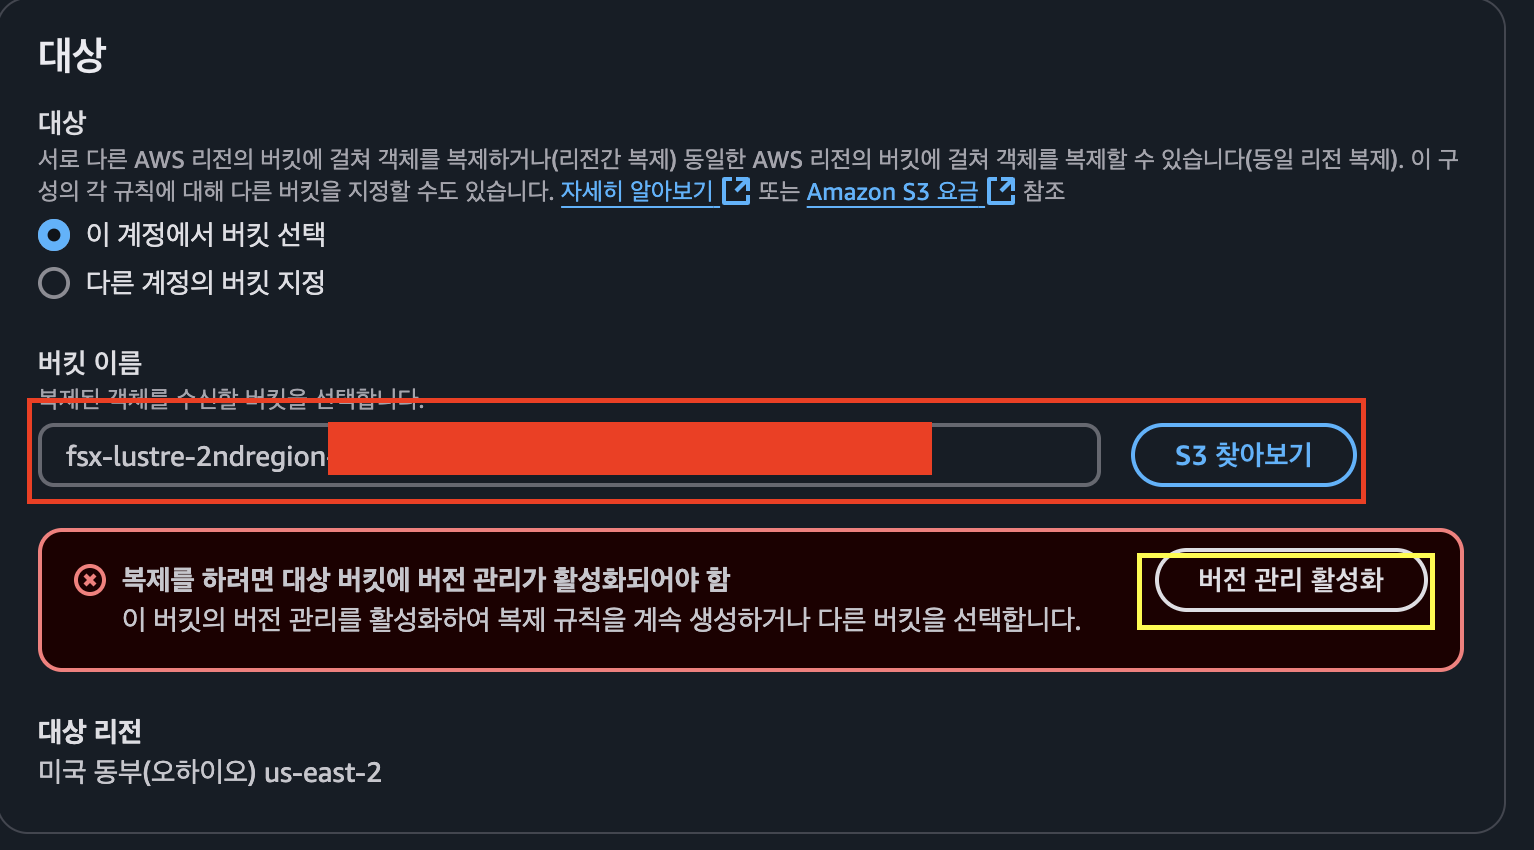
- 대상 접근 → s3 찾아보기 클릭 → fsx-lustre-2ndregion-xxx를 선택 → 버전 관리 활성화 클릭
- IAM role 접근 → sc-cross 검색 → s3-cross-region-replication-role-xxx 선택

- 암호화 활성화 및 kms 선택

-
저장을 눌러 구성 진행
-
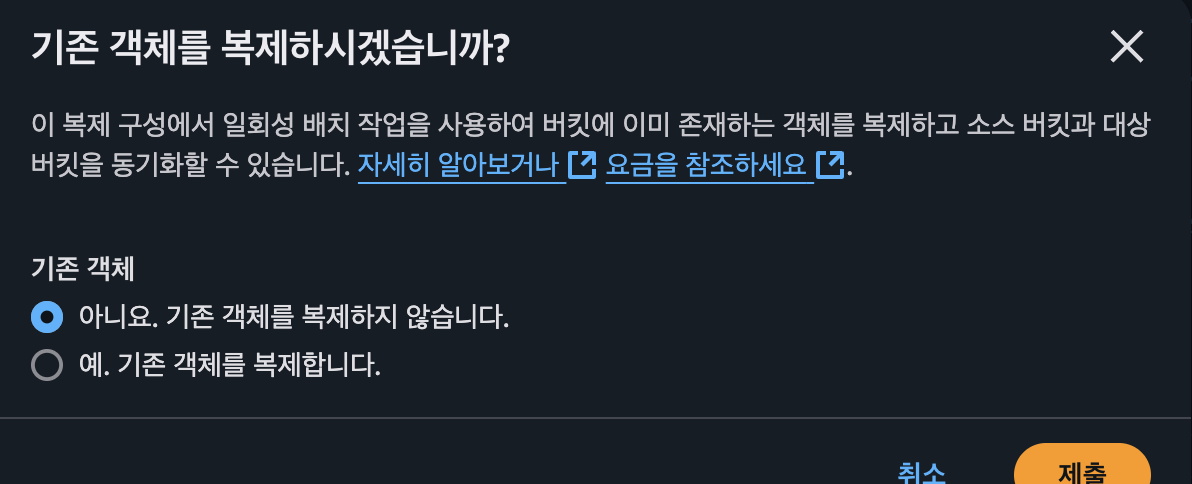
기존 객체를 복사하지 않도록 진행
- 구성 확인
Mistral-7B 데이터 확인 및 테스트 파일 생성 → S3 자동 Export 및 리전 간 복제
- cloud9 작업 디렉터리 이동
cd /home/ec2-user/environment/eks/FSxL
- 파드 확인
kubectl get pods
- 파드 접속
kubectl exec -it vllm-mistral-inf2-deployment-7d886c8cc8-4cdcg -- bash
- 영구 볼륨 클레임 마운트 확인
df -h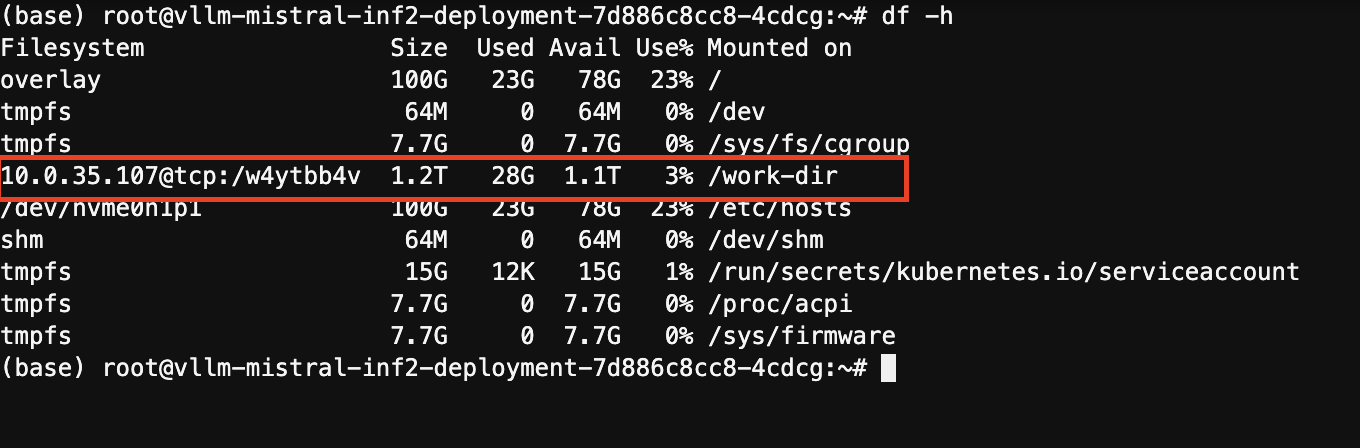
- 저장된 내용 검사 - Mistral-7B 모델이 저장되어 있음
cd /work-dir/
ls -ll
- 모델 데이터 구조 확인
cd Mistral-7B-Instruct-v0.2/
ls -ll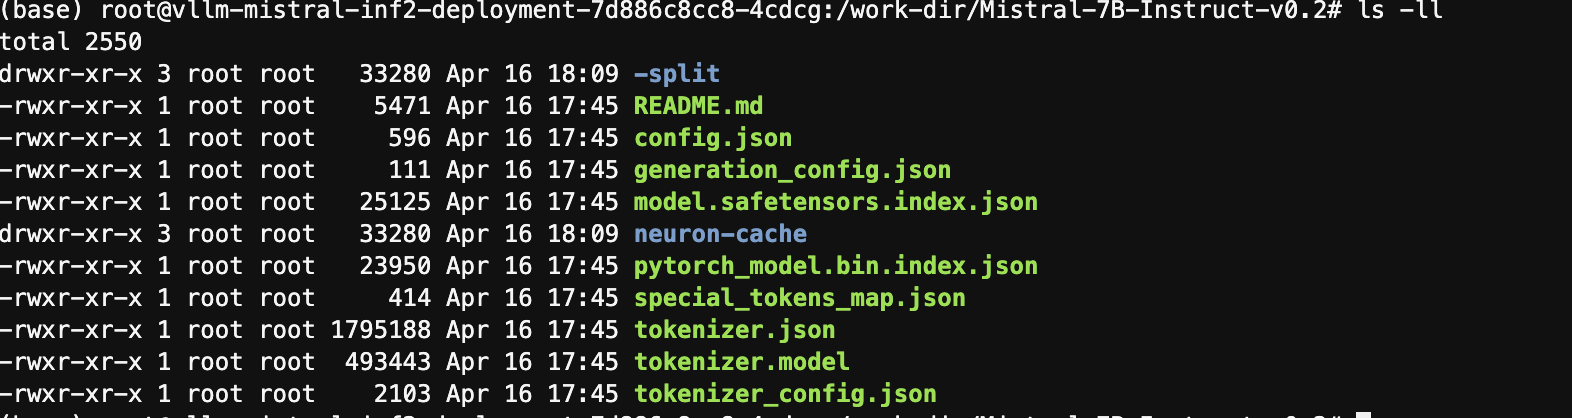
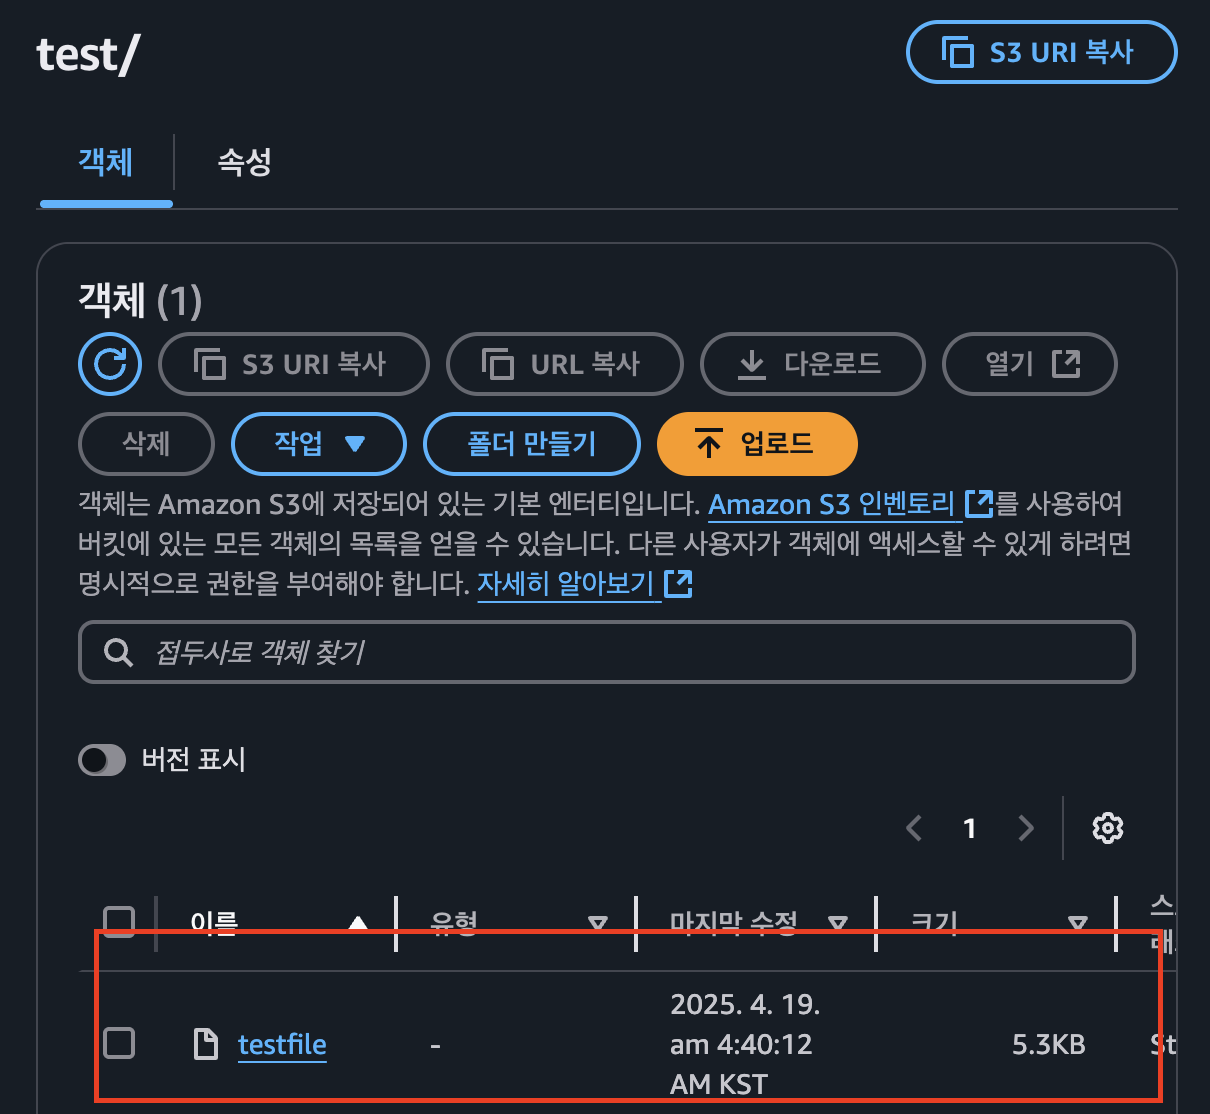
- 테스트 파일 생성
cd /work-dir
mkdir test
cd test
cp /work-dir/Mistral-7B-Instruct-v0.2/README.md /work-dir/test/testfile
ls -ll /work-dir/test
- 테스트 파일 생성 확인 - 다른 리전에서도 해당 파일 존재 확인
데이터 계층 테스트를 위한 자체 환경 생성
- 사용자 본인이 직접 테스트용 환경을 구축 하여 진행
동적 프로비저닝 테스트를 위한 새 PV 및 FSx Lustre 인스턴스 배포
- 환경변수 선언
VPC_ID=$(aws eks describe-cluster --name $CLUSTER_NAME --region $AWS_REGION --query "cluster.resourcesVpcConfig.vpcId" --output text)
SUBNET_ID=$(aws eks describe-cluster --name $CLUSTER_NAME --region $AWS_REGION --query "cluster.resourcesVpcConfig.subnetIds[0]" --output text)
SECURITY_GROUP_ID=$(aws ec2 describe-security-groups --filters Name=vpc-id,Values=${VPC_ID} Name=group-name,Values="FSxLSecurityGroup01"  --query "SecurityGroups[*].GroupId" --output text)
- 변수 확인
echo $SUBNET_ID
echo $SECURITY_GROUP_ID
- 작업 디렉터리 변경
cd /home/ec2-user/environment/eks/FSxL
- fsxL-storage-class.yaml 확인
kind: StorageClass
apiVersion: storage.k8s.io/v1
metadata:
    name: fsx-lustre-sc
provisioner: fsx.csi.aws.com
parameters:
  subnetId: SUBNET_ID
  securityGroupIds: SECURITY_GROUP_ID
  deploymentType: SCRATCH_2
  fileSystemTypeVersion: "2.15"
mountOptions:
  - flock
- SUBNET_ID,SECURITY_GROUP_ID 변경
sed -i'' -e "s/SUBNET_ID/$SUBNET_ID/g" fsxL-storage-class.yaml
sed -i'' -e "s/SECURITY_GROUP_ID/$SECURITY_GROUP_ID/g" fsxL-storage-class.yaml
- StorageClass 생성
kubectl apply -f fsxL-storage-class.yaml
- 생성 확인
kubectl get sc
- PVC 생성
kubectl apply -f fsxL-dynamic-claim.yaml
- PVC 확인
kubectl describe pvc/fsx-lustre-dynamic-claim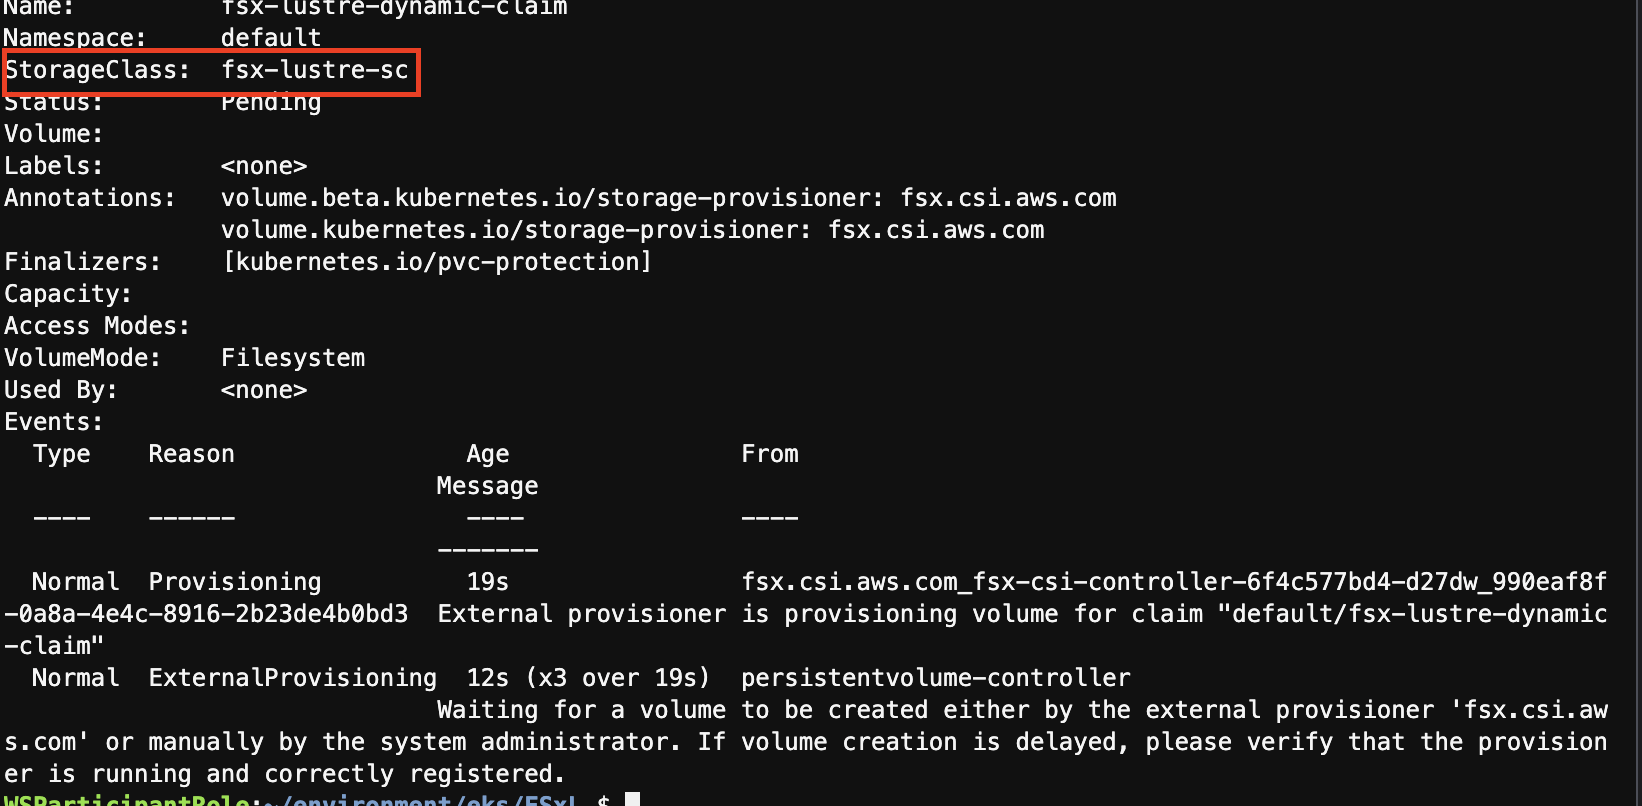
- PVC 바인딩 확인
kubectl get pvc
성능 테스트
- 작업 디렉터리 이동
cd /home/ec2-user/environment/eks/FSxL
- Lustre 인스턴스 FSx 가용성 영역 확안
aws ec2 describe-subnets --subnet-id $SUBNET_ID --region $AWS_REGION | jq .Subnets[0].AvailabilityZone
- 파드 배포 구성 편집
vi pod_performance.yaml
# 1번 : 맨 아래 두줄 주석 해제
# 2번 : topology.kubernetes.io/zone 변경
kind: Pod
apiVersion: v1
metadata:
  name: fsxl-performance
spec:
  containers:
    - name: fsxl-performance
      image: nginx
      ports:
        - containerPort: 80
          name: "http-server"
      volumeMounts:
        - name: persistent-storage
          mountPath: /data
  volumes:
  - name: persistent-storage
    persistentVolumeClaim:
      claimName: fsx-lustre-dynamic-claim
#  nodeSelector:
# topology.kubernetes.io/zone: us-east-2c- 파드 배포
kubectl apply -f pod_performance.yaml
- 파드 확인 → 배포 완료까지 약 2분 소요
kubectl get pods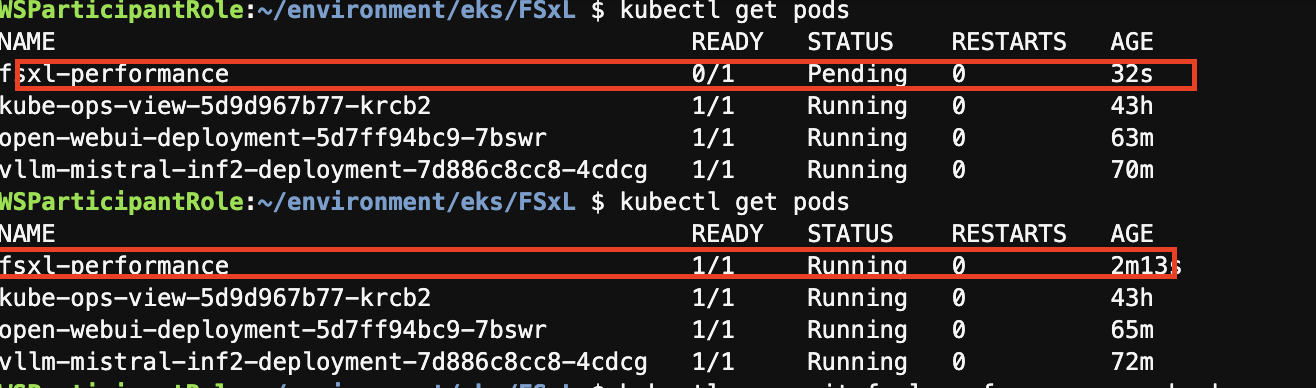
- 해당 컨테이너 접속
kubectl exec -it fsxl-performance -- bash
- FIO 및 IOping 설치
apt-get update
apt-get install fio ioping -y
- 지연시간 테스트 진행 - 평균 627.8 us 소요
ioping -c 20 .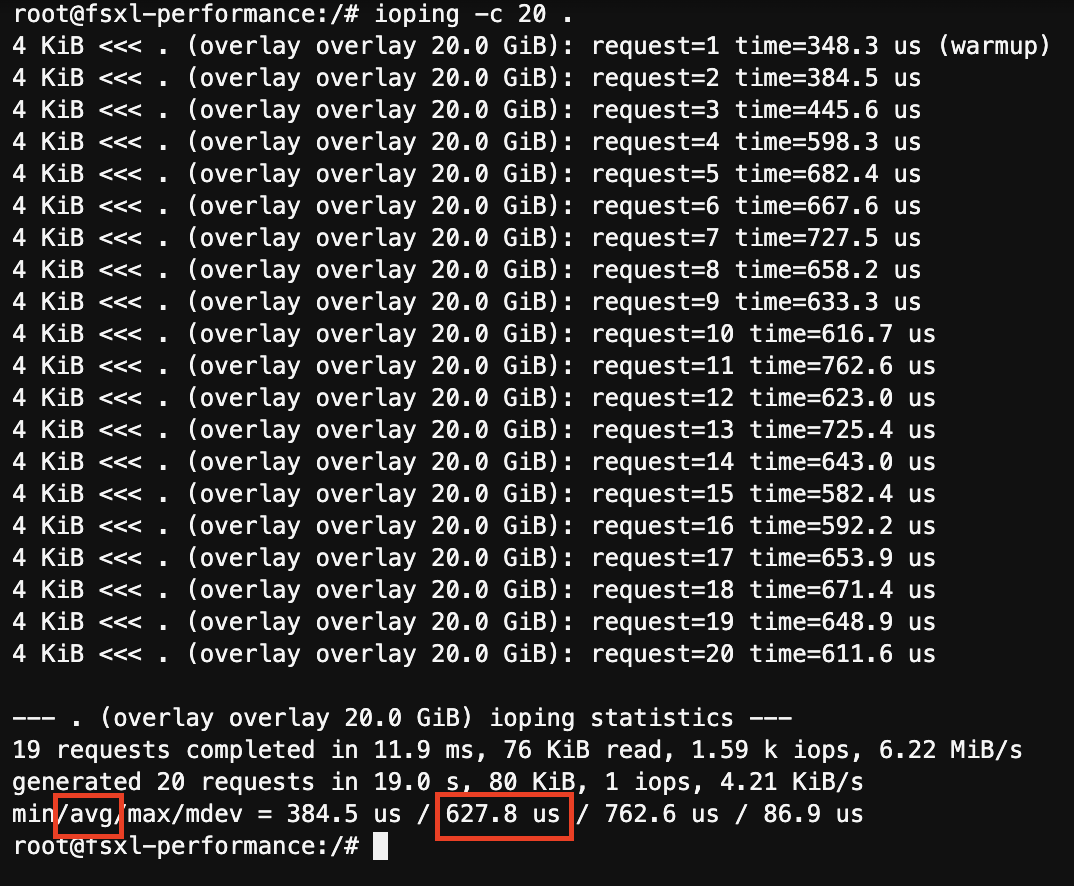
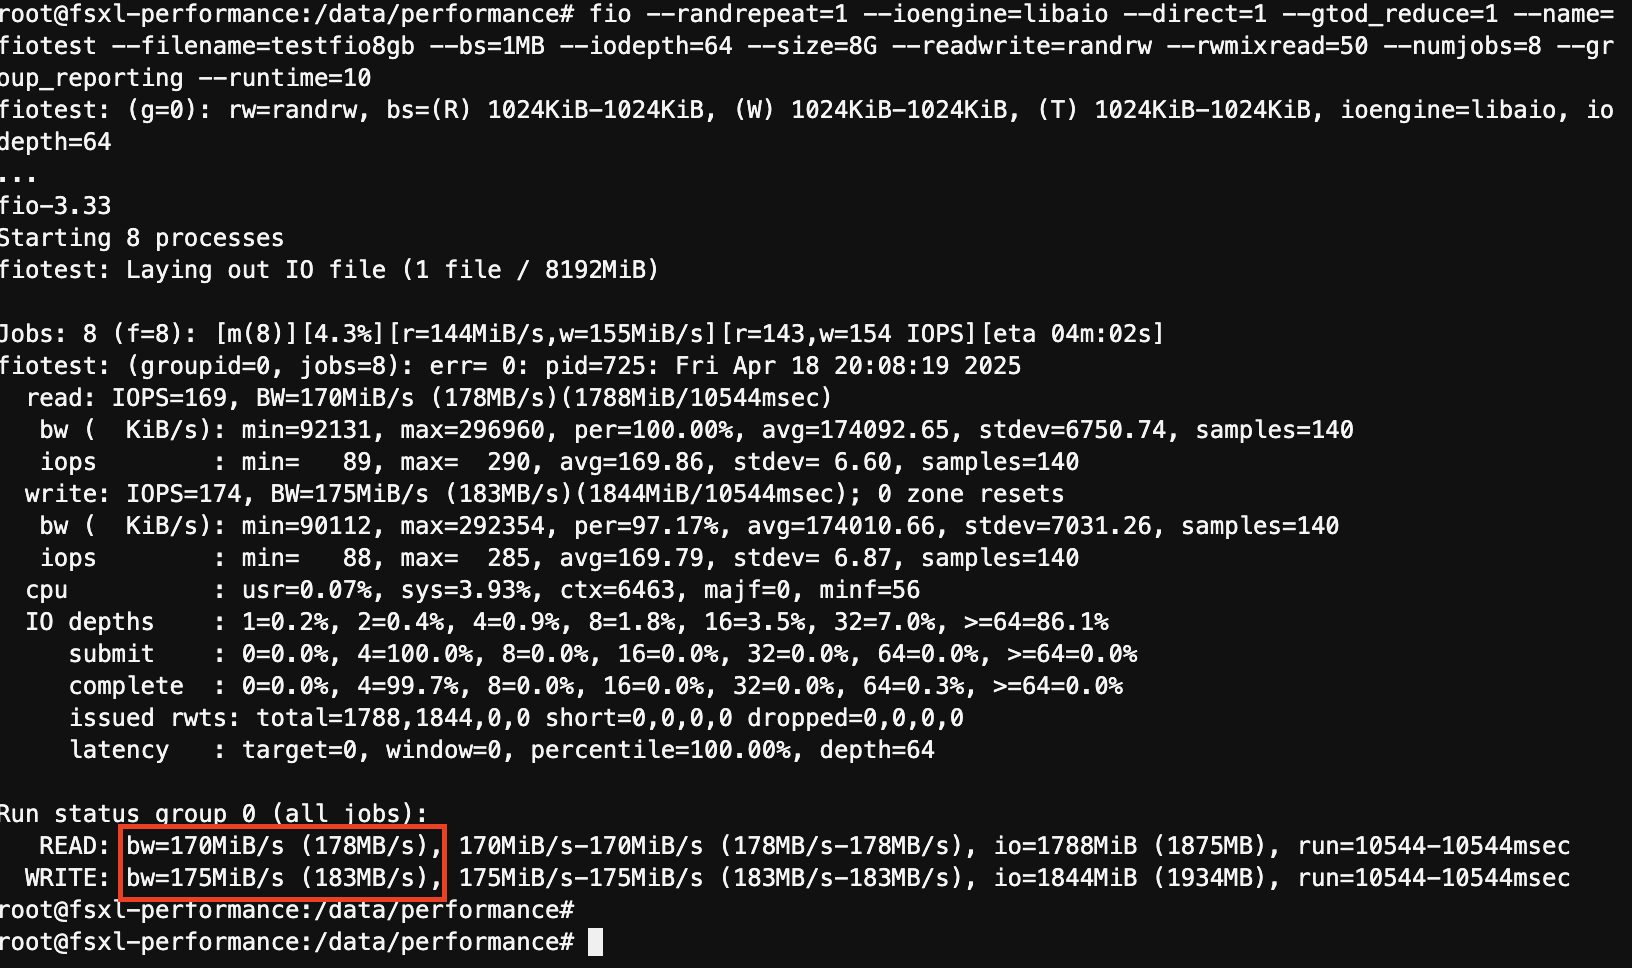
- 부하테스트 수행 후 처리량 값 기록
mkdir -p /data/performance
cd /data/performance
fio --randrepeat=1 --ioengine=libaio --direct=1 --gtod_reduce=1 --name=fiotest --filename=testfio8gb --bs=1MB --iodepth=64 --size=8G --readwrite=randrw --rwmixread=50 --numjobs=8 --group_reporting --runtime=10