실습환경 구성
사전 준비사항
주의사항
- 원활한 실습 진행을 위해서는 VPC quota를 늘려주시거나 혹은 2개 이상의 VPC를 생성할 수 있는 환경을 마련
- AWS CLI를 사용하는 IAM User 계정에
AdministratorAccess권한 부여가 필요하다 (실습 완료후에 해당 권한 삭제 진행)
k8s 애플리케이션 네트워킹 변화 과정
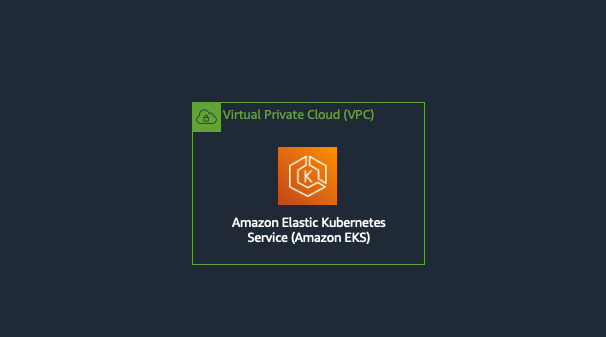
1. 첫 시작: 단일 클러스터 네이티브 네트워킹
출처 : AEWS 3기 스터디
- CoreDNS를 통해 클러스터 내부 서비스 간 DNS 해석
- Service 리소스 타입별(NodePort, ClusterIP, LoadBalancer) 서비스 구현
- Ingress 리소스로 L7 라우팅 및 SSL/TLS 종단점 제공
- 장점
- 설정이 단순하고, 기본 제공 리소스만으로 내부·외부 트래픽 모두 처리
- 마이크로서비스 초창기 구조에 적합
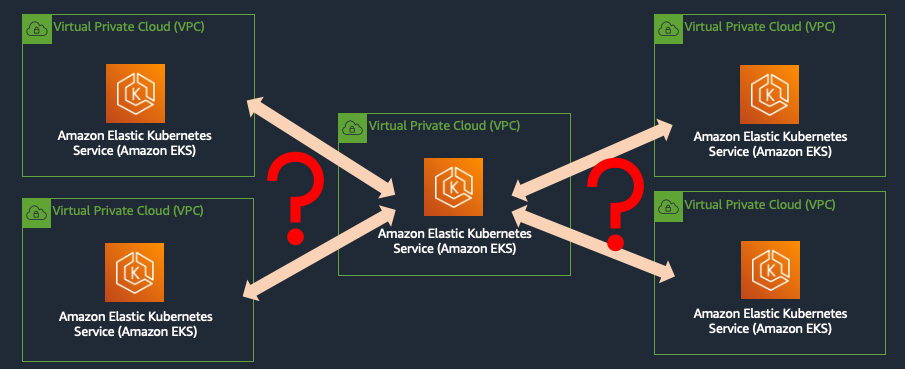
2. 워크로드의 진화: 멀티 클러스터·멀티 VPC 환경
2.1 서비스 디스커버리(Service Discovery)
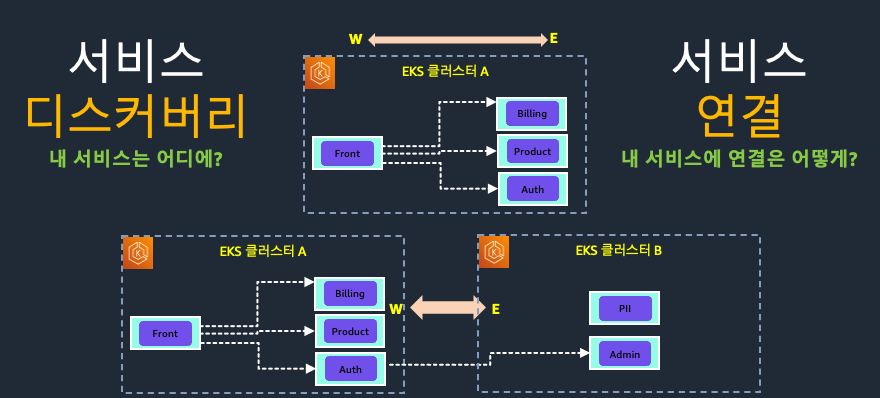
여러 클러스터로 분산된 마이크로서비스 간 통신을 위해선 먼저 어디에 어떤 서비스가 있는지 알아야 합니다.
-
클라이언트 사이드 패턴
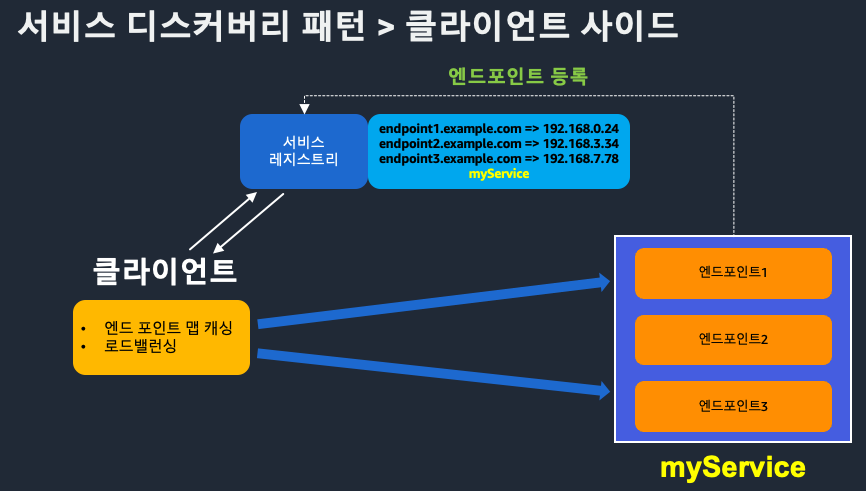
- 애플리케이션이 직접 서비스 레지스트리를 조회(e.g. Netflix Eureka, Spring Cloud)
- 장점: 단순 구현, 유연한 클라이언트 제어
- 단점: 클라이언트 로직 복잡도 증가
-
서버 사이드 패턴
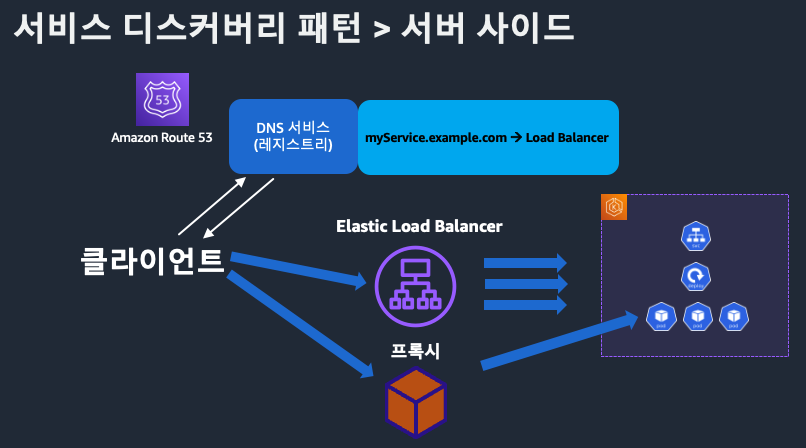
- 로드밸런서가 서비스 레지스트리를 조회하고 클라이언트 요청을 라우팅
- 장점: 클라이언트 단순화, 중앙집중식 제어
- 단점: 로드밸런서 장애 시 전체 영향
2.2 클라우드 벤더별 VPC 연결
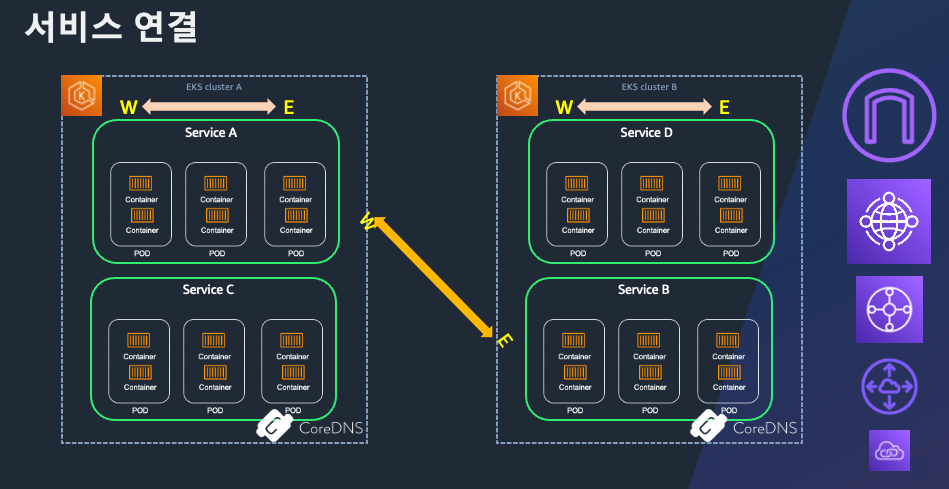
- VPC Peering, PrivateLink, Transit Gateway 등을 활용해 네트워크 레이어 연결
- 트래픽 경로와 ACL, 권한 관리 복잡도 증가
3. 복원력과 공통 기능을 위한 Service Mesh
- Istio, Linkerd, AWS AppMesh 등
- 사이드카 프록시 형태로 애플리케이션 컨테이너 옆에 배치
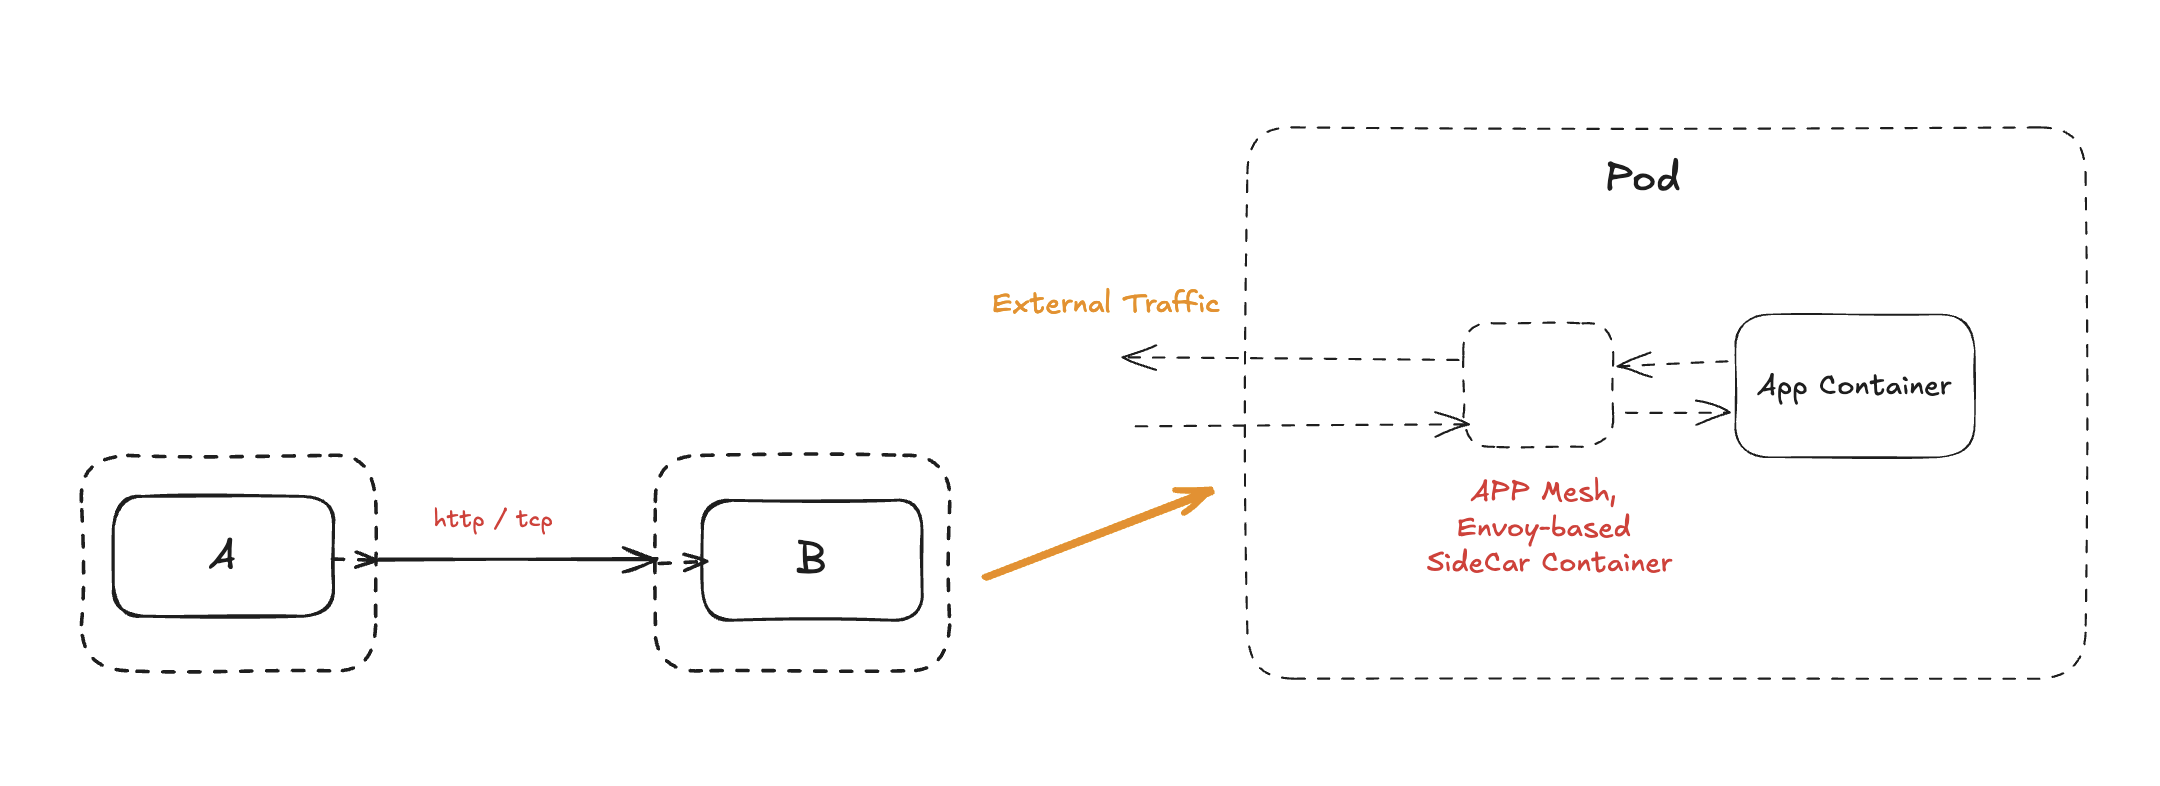
- 데이터 평면
- 트래픽 가로채기 → 암호화 터널 구성
- 서킷브레이커, 재시도, 타임아웃 로직 제공
- 제어 평면
- 서비스 레지스트리 관리, 설정 배포, 텔레메트리 수집
- 장점
- 세분화된 트래픽 제어 및 보안 정책
- 분산 추적, 메트릭, 로그 통합
4. 기존 방식의 한계
| 구분 | Ingress | Service Mesh |
|---|---|---|
| 지원 프로토콜 | 주로 HTTP/HTTPS (L7) | 주로 내부 동-서 트래픽 |
| 비표준 확장 | 벤더마다 어노테이션 필요 | 멀티 VPC·클러스터 환경에서 프록시 남발 |
| 외부 트래픽 처리 | 제한적 (gRPC, TCP, UDP 어려움) | 북-남(External→Internal) 기능 부족 |
| 운영 복잡도 | 단순하지만 기능 한계 | 사이드카 배포·관리 오버헤드 |
5. 새로운 요구사항과 향후 방향
- 책임 분리
- 인프라 팀·앱 개발자·DevOps 엔지니어 간 역할 명확화
- 일관된 리소스 관리
- 멀티 클러스터·서버리스·VM·컨테이너를 아우르는 중앙집중형 네트워크 레이어
- 이종 컴퓨팅 통합
- 서버리스, 엣지, VM을 포함한 하이브리드 환경 지원
- 차세대 네트워킹 솔루션
- Kubernetes Gateway API, Multi-Cluster Service Dispatch, eBPF 기반 CNI 등 표준화된 확장
- 네트워크 관찰성·보안·자동화 중심의 새로운 컴프넌트 부상
Gateway API의 등장
기존 Ingress와 Service Mesh의 한계(비표준 확장, 프로토콜 제약, 멀티 클러스터 복잡도 등)를 넘어서기 위해, SIG-NETWORK 커뮤니티에서는 Gateway API를 고안했습니다. Gateway API는 역할 기반의 명확한 책임 분리, L7/L4를 아우르는 범용적 프로토콜 지원, Kubernetes 네이티브 표준화, 그리고 멀티 클러스터·VPC 통합을 주요 목표로 설계되었습니다.
설계 목표
- 역할 기반(Role-Based)
- 인프라 관리자, 클러스터 운영자, 애플리케이션 개발자 각각에 맞는 API 레이어 제공
- 범용성(Universal)
- HTTP/HTTPS 뿐 아니라 gRPC, TCP, UDP 등 다양한 프로토콜 지원
- 확장 가능한 플러그인 방식으로 신규 프로토콜도 추가 가능
- 표준화(Standardized)
- Kubernetes Ingress처럼 포터블하고 벤더 독립적인 API 제공
- 확장성(Extensible)
- 멀티 클러스터 및 다수의 VPC 간 네트워크 정책과 라우팅 통일
주요 구성 요소
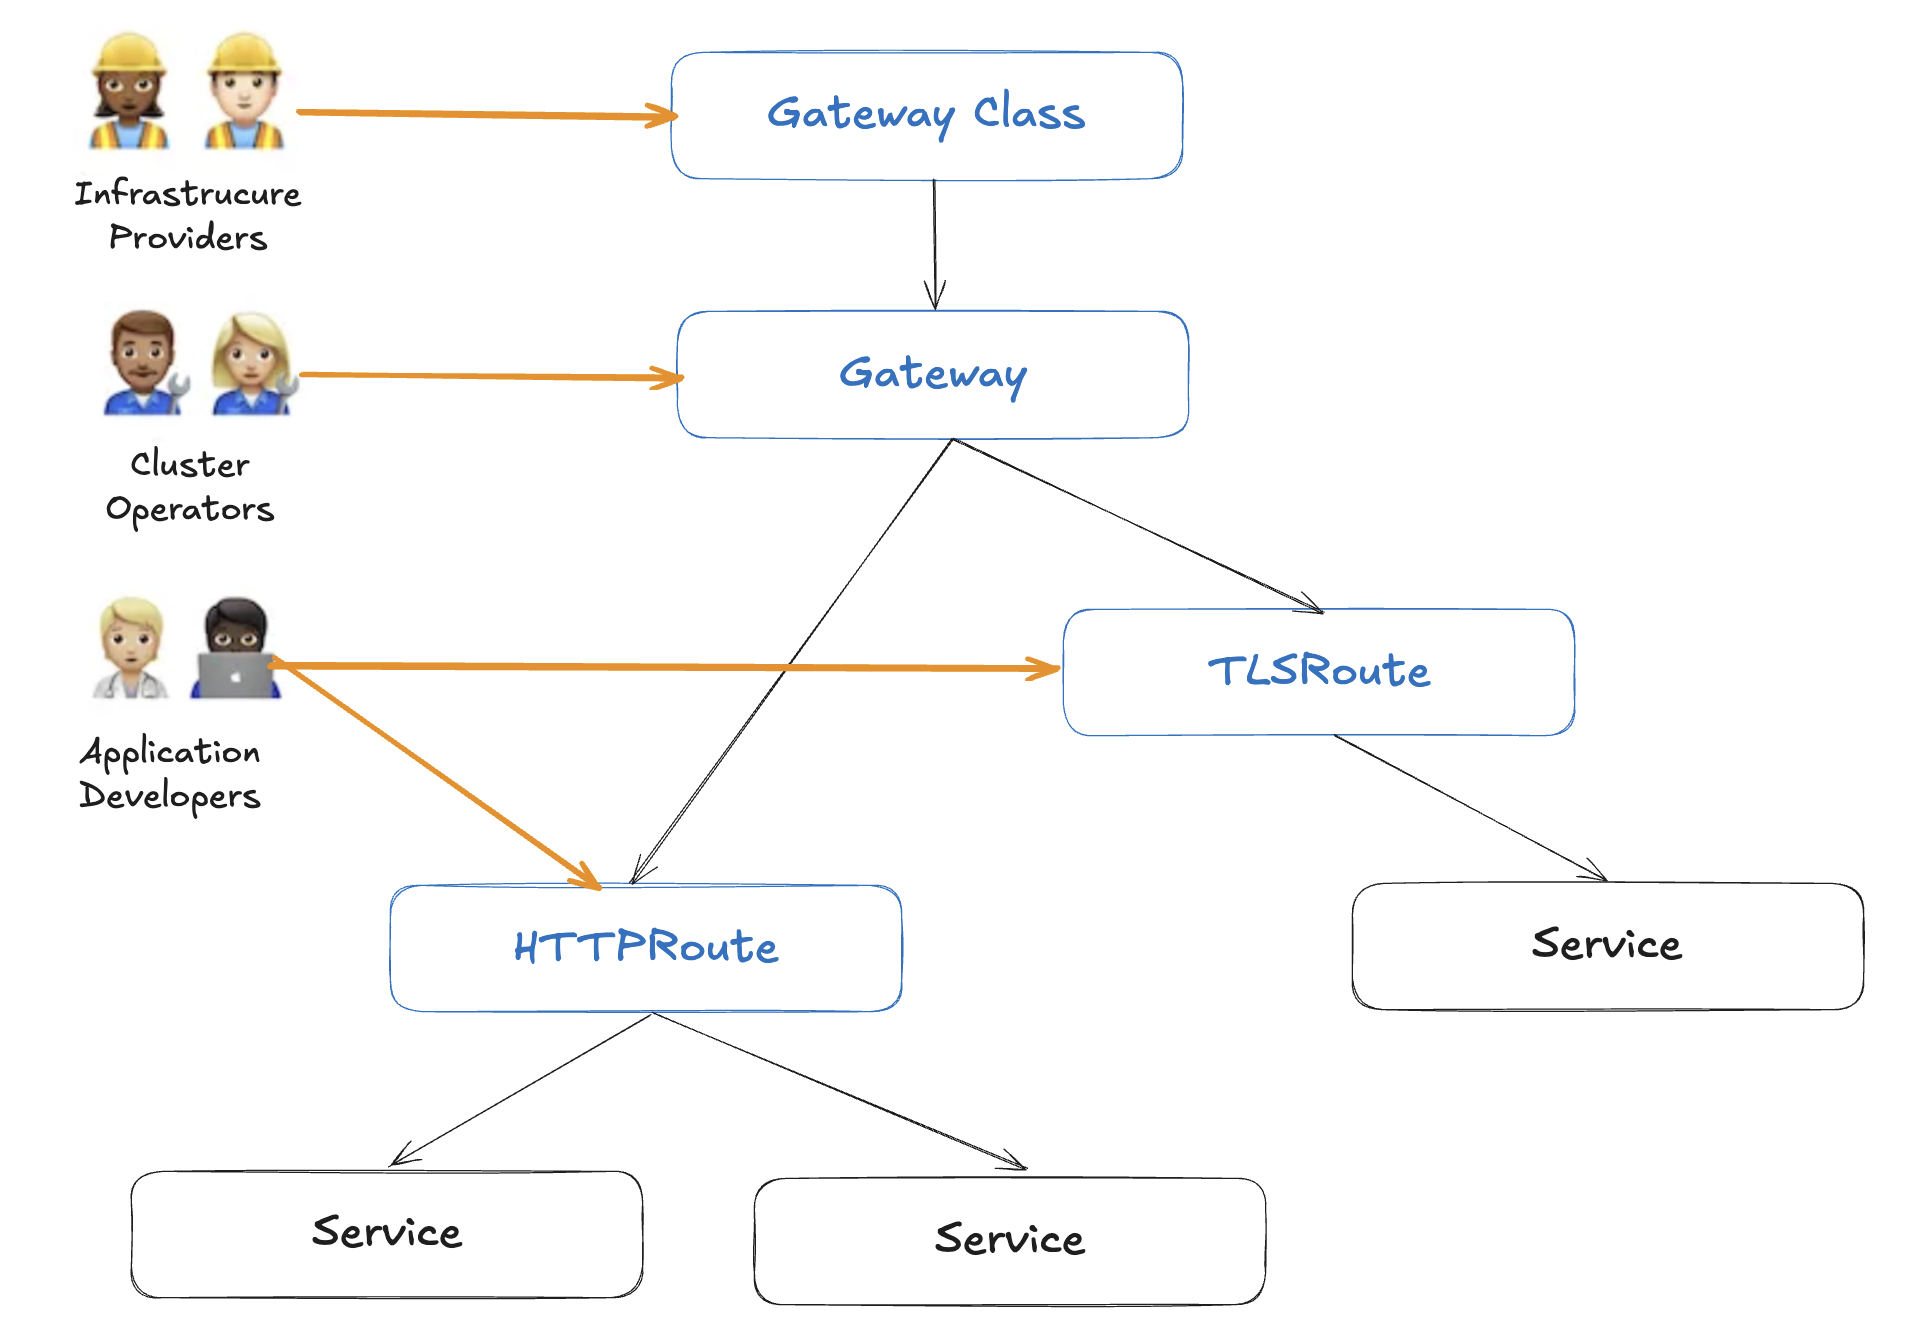
1. GatewayClass
- 역할: 공통 설정을 묶는 최상위 클래스
- 관리 주체: 인프라 관리자
- 주요 기능
- 컨트롤러 이름 지정 → 해당 컨트롤러가 구현할 Gateway 집합 정의
- 벤더별 확장 제공
2. Gateway
- 역할: 외부(또는 클러스터 간) 트래픽의 진입점
- 관리 주체: 클러스터 운영자
- 주요 기능
- 하나 이상의 Route 리소스와 연계
- 리스너(포트·프로토콜) 설정
- TLS 인증서, 정책 바인딩
3. Routes
- 역할: 구체적인 트래픽 매핑 규칙 정의
- 관리 주체: 애플리케이션 개발자
- 종류
- HTTPRoute: 경로·호스트 기반 라우팅
- TLSRoute: TLS 터미네이션 후 라우팅
- TCPRoute / UDPRoute: 비-HTTP 트래픽 라우팅
- GRPCRoute: gRPC 서비스 라우팅
- 주요 기능
- 대상 서비스(Service)와 트래픽 분배 비율 설정
- 인증·인가, 속도 제한, 헤더 조작 등 부가 정책 적용
AWS 통합: Amazon VPC Lattice
- VPC Lattice와 연계해 Gateway API를 서비스로 제공
- 멀티 VPC·계정 환경에서도 일관된 Gateway 관리 가능
- AWS 네트워크 리소스(PrivateLink, TGW 등) 설정을 추상화
Amazon VPC Lattice란?
출처 : AEWS 3기 스터디
현대적인 애플리케이션은 점점 더 마이크로서비스 아키텍처로 진화하고 있습니다. 다양한 컴퓨팅 환경과 VPC에 흩어진 서비스들을 어떻게 효율적으로 연결하고 보호할 수 있을까요?
이러한 고민을 해결하기 위해 AWS는 Amazon VPC Lattice 를 출시했습니다. 이 글에서는 VPC Lattice의 개념과 핵심 구성 요소들을 살펴봅니다.
VPC Lattice란?
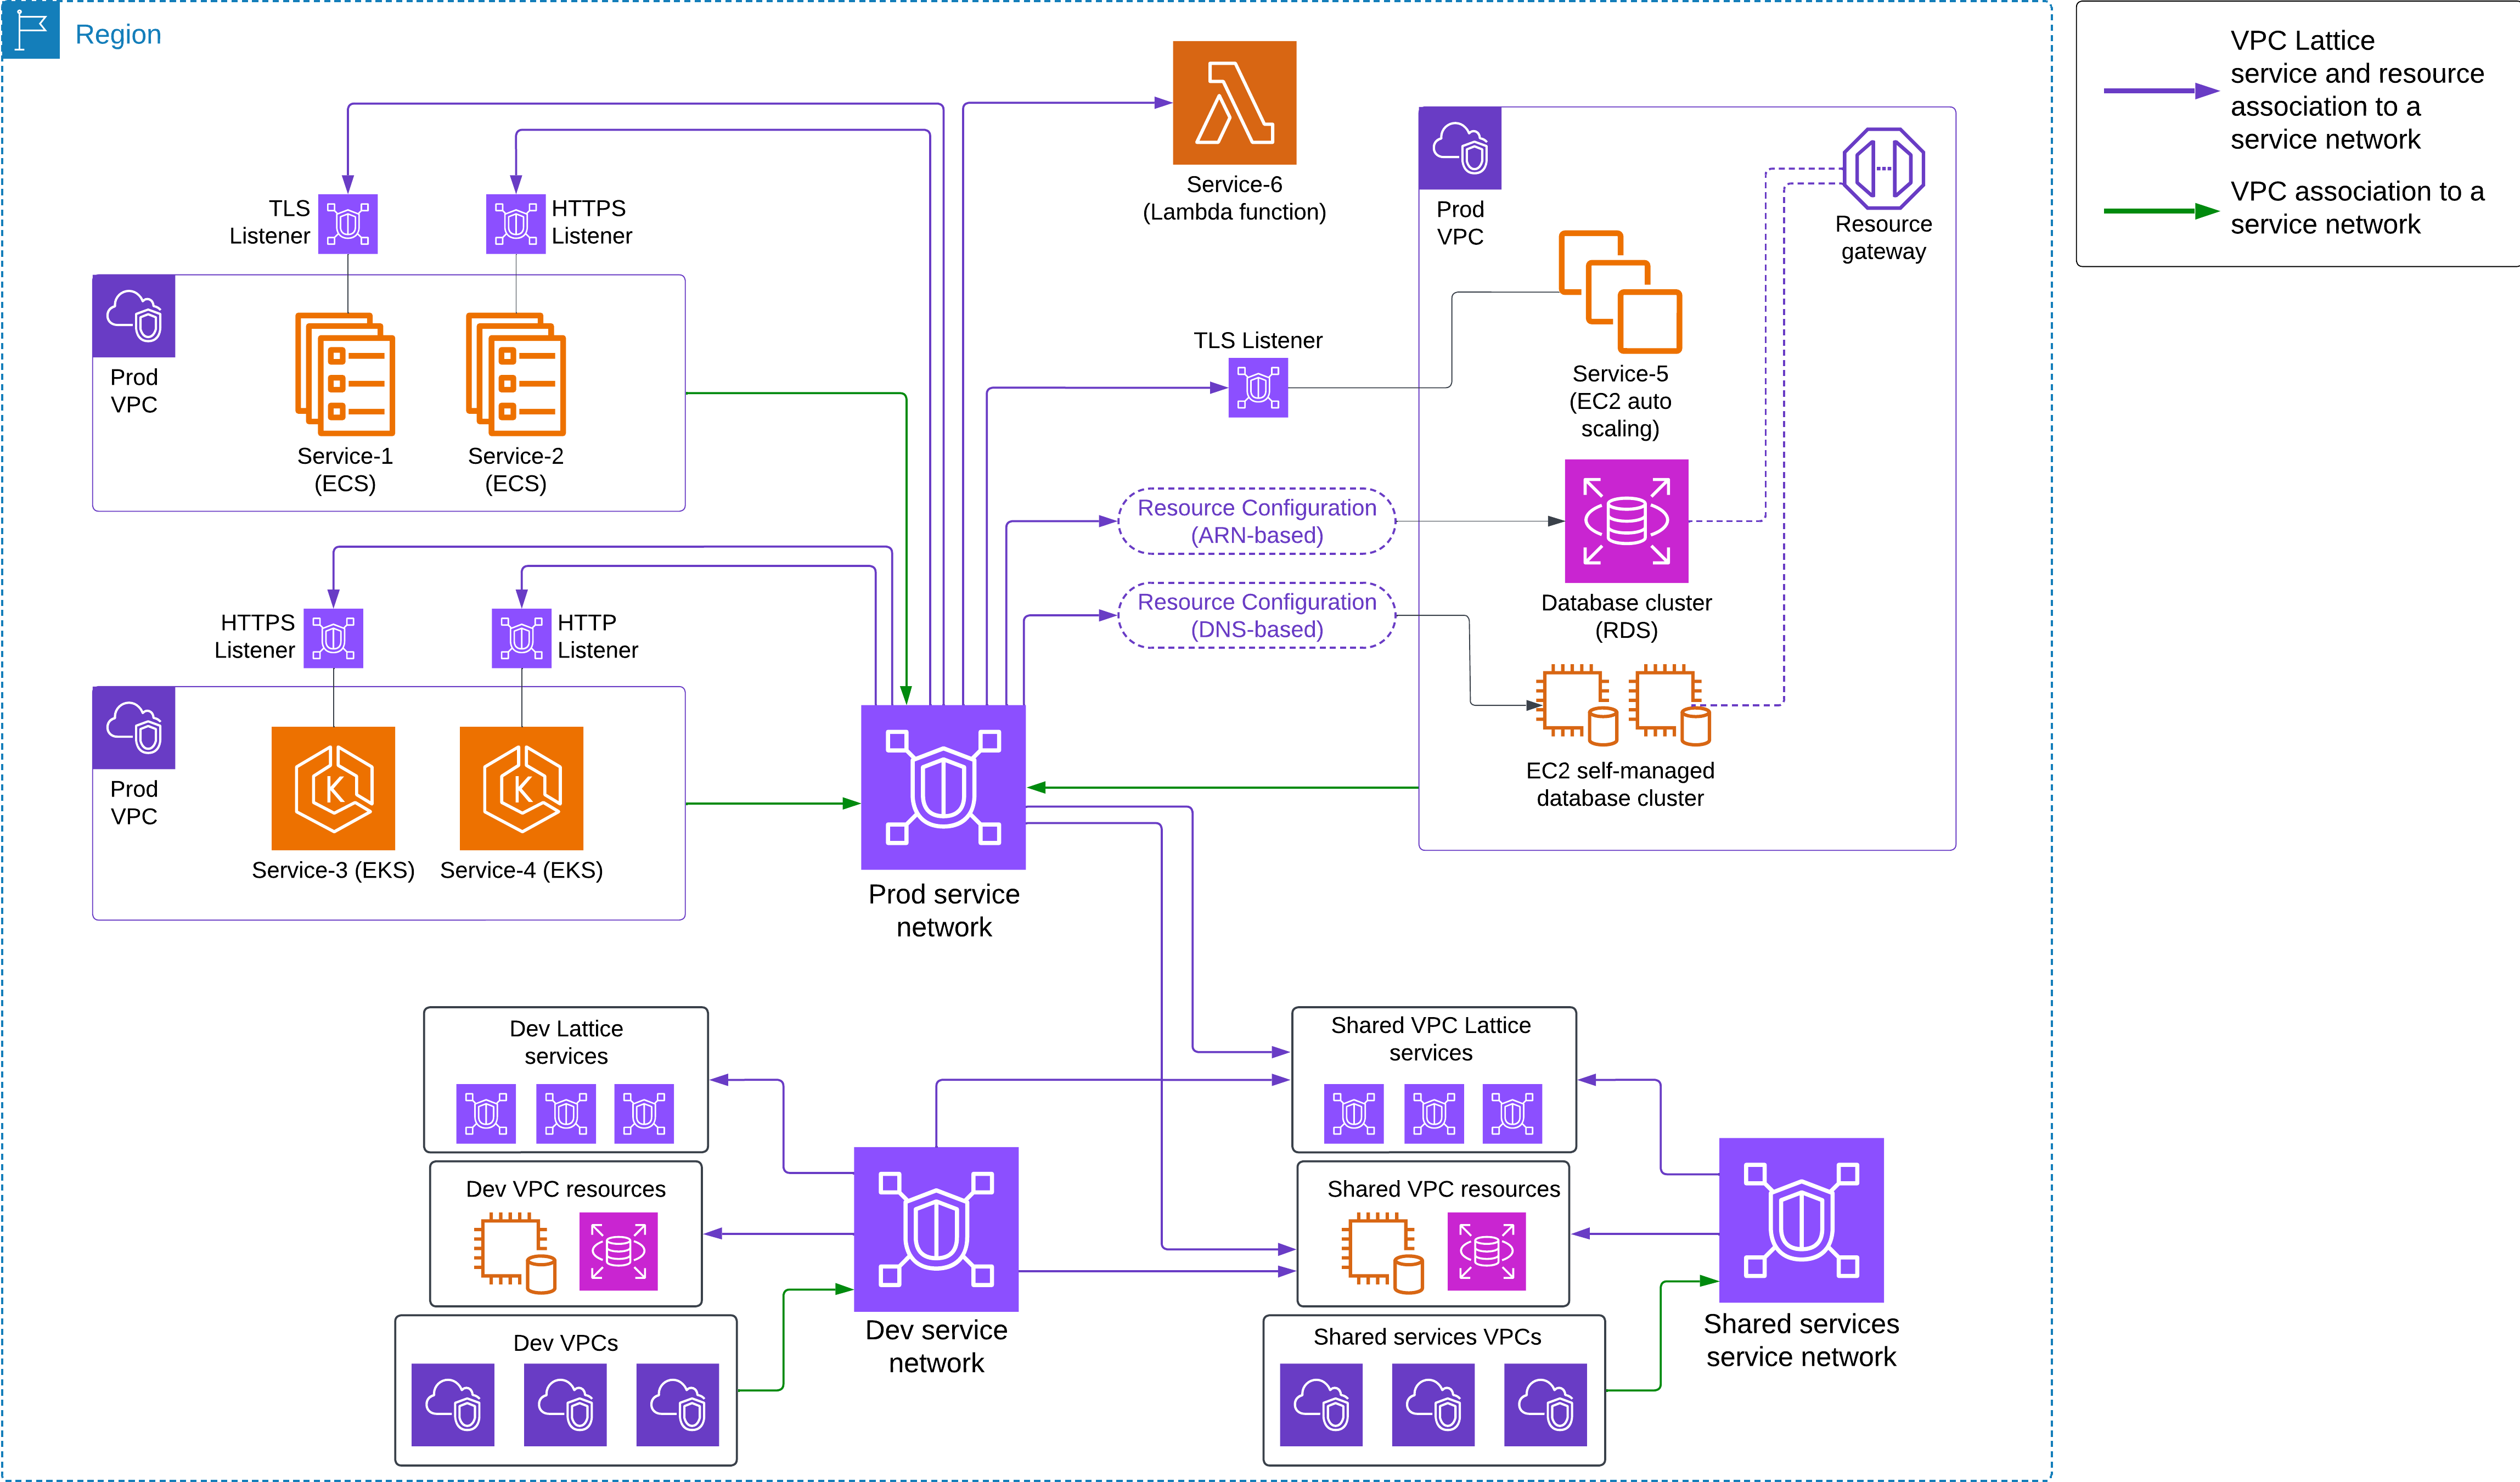
Amazon VPC Lattice는 EC2, EKS, Lambda 등 다양한 컴퓨팅 리소스 간에 통합된 애플리케이션 네트워킹 기능을 제공하는 완전관리형 서비스입니다. 단일 VPC는 물론, 여러 계정 및 리전 간의 서비스 연결, 보호, 모니터링을 단일 프레임워크로 통합할 수 있다는 것이 가장 큰 특징입니다.
- HTTP/HTTPS, gRPC 등 다양한 프로토콜 지원
- 보안 정책 및 모니터링을 일관된 방식으로 관리
- 중앙에서 서비스 검색 및 연결 지원
핵심 구성 요소 4가지
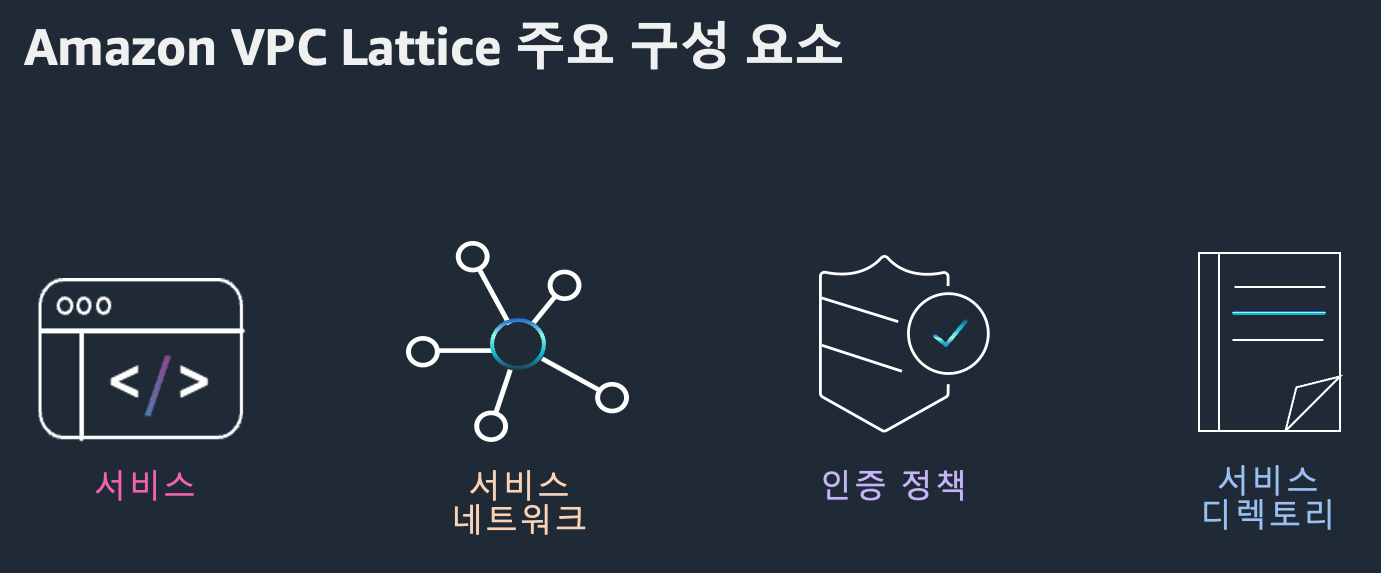
VPC Lattice는 네 가지 주요 컴포넌트로 구성되어 있습니다.
1. Service
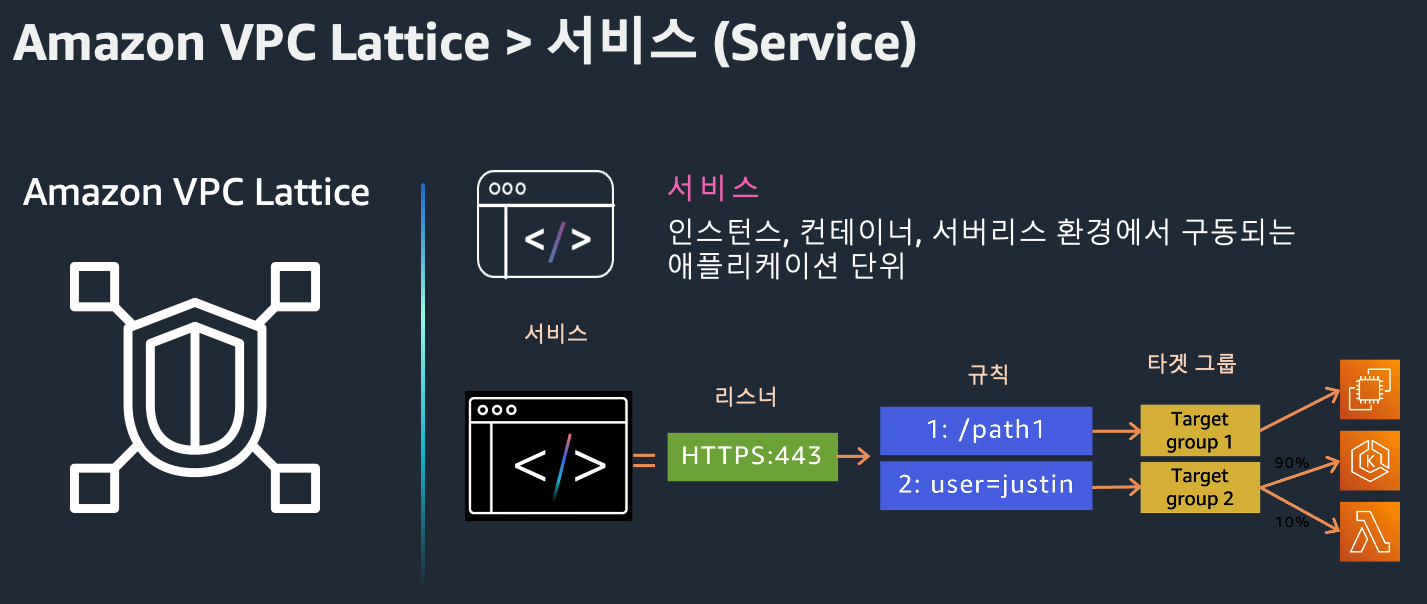
Service는 EC2, Lambda, EKS 등에서 동작하는 애플리케이션 단위입니다. 리스너를 통해 클라이언트 요청을 받고, 대상 그룹(Target Group)으로 라우팅합니다.
- 리스너(Listener): HTTP/1.1, HTTP/2, gRPC, HTTPS 지원
- 규칙(Rule): 경로, 헤더 등에 따라 요청 라우팅
- 대상 그룹(Target Group): EC2, IP, Lambda, K8s Pod 등
고유한 도메인을 가지며 상태 확인(Health check)을 통해 안정적인 트래픽 처리가 가능합니다.
2. Service Network
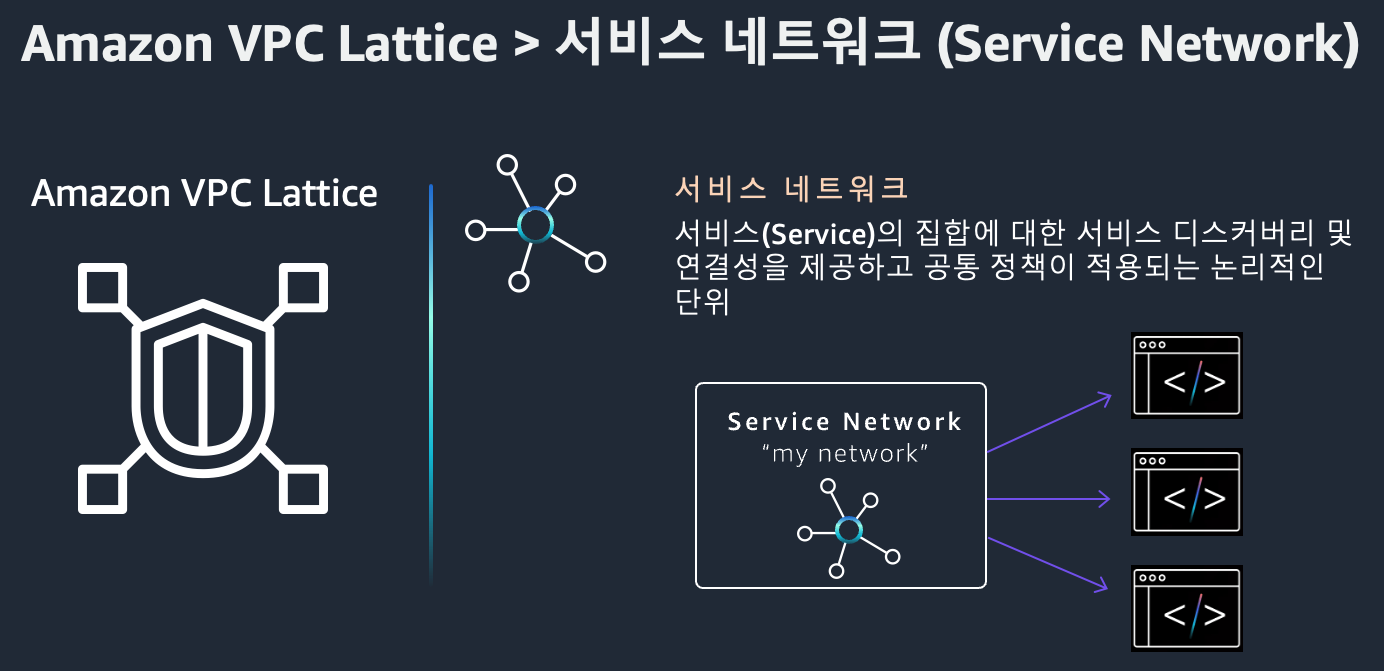
Service Network는 여러 서비스를 논리적으로 묶고, 해당 네트워크 안에서 트래픽 흐름을 제어할 수 있게 합니다. VPC 연결을 통해 접근 권한을 제어할 수 있습니다.
- 여러 VPC/서비스를 단일 네트워크로 통합
- 계정 및 리전 간 통신 지원
- 보안 및 모니터링 중앙 관리
3. Auth Policy
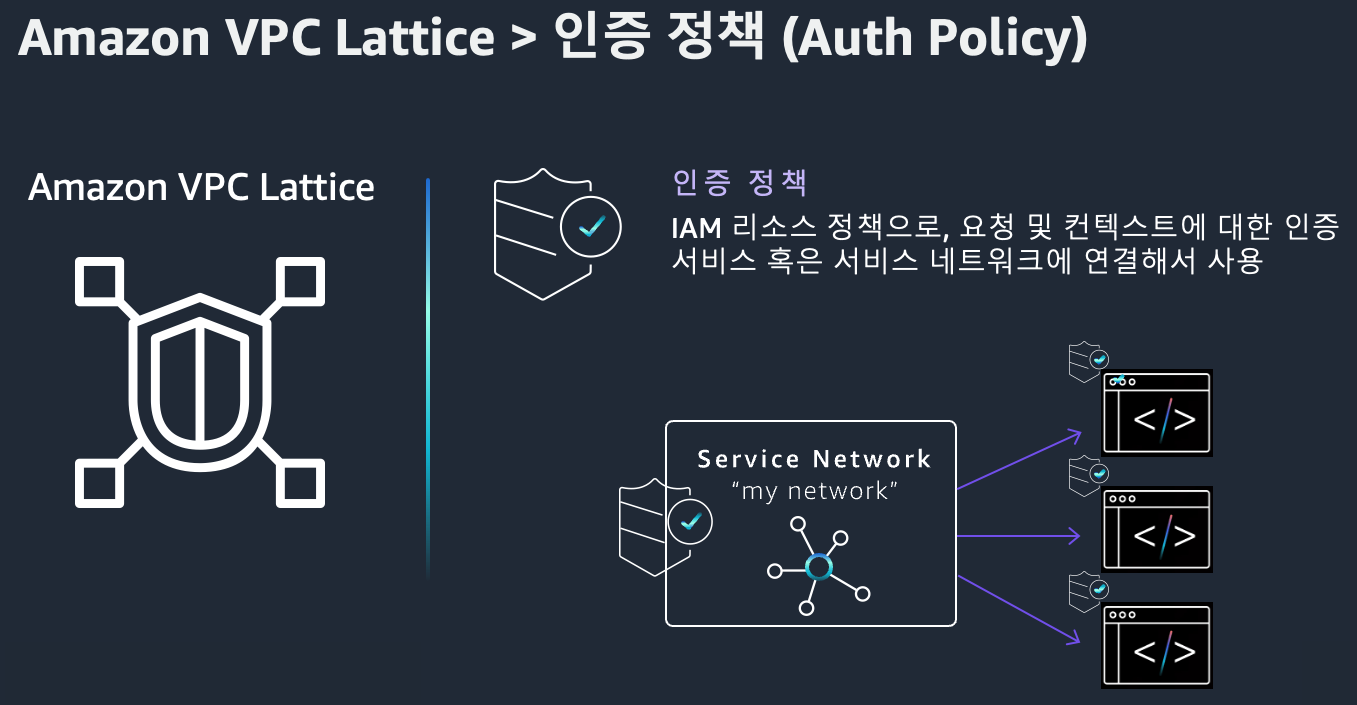
IAM 기반의 접근 제어 정책으로, 서비스에 접근 가능한 주체를 세부적으로 설정할 수 있습니다.
- 서비스 또는 서비스 네트워크 단위로 정책 적용
- HTTP 메서드, 경로, 헤더 조건 기반 제어 가능
- 조직 내 안전한 통신 보장
4. Service Directory
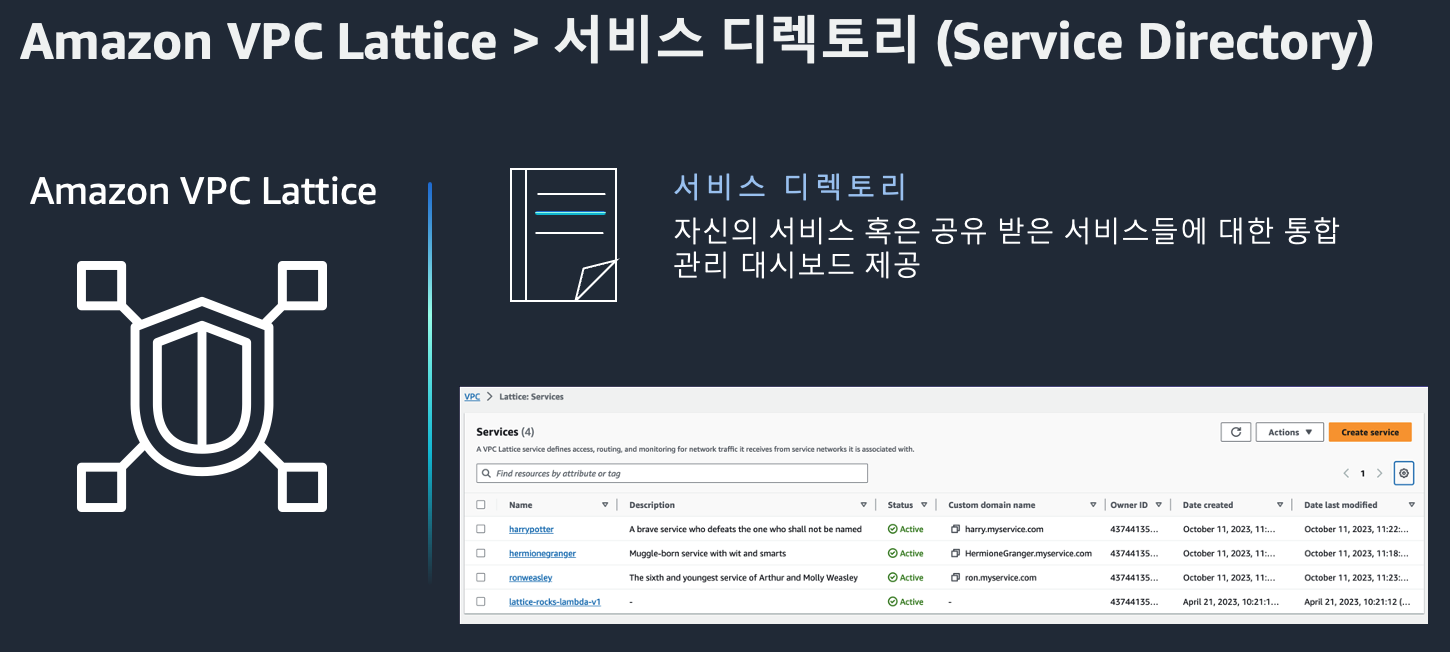
Service Directory는 조직 내 VPC Lattice 서비스를 한 눈에 확인하고 검색할 수 있는 카탈로그입니다.
- 모든 서비스 메타데이터 중앙 관리
- 서비스 설명 및 필터링 기능 제공
- 운영팀과 개발팀 간 협업 효율 향상
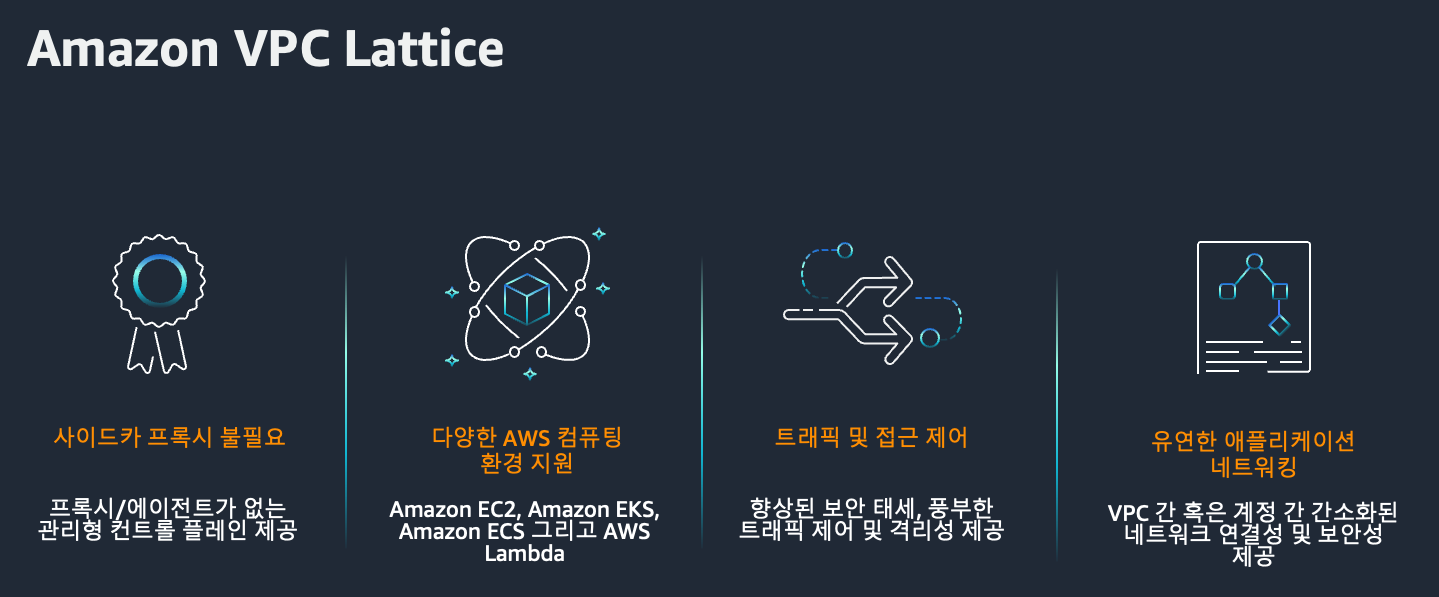
Amazon VPC Lattice의 장점
- 중앙 집중형 네트워킹 관리 여러 VPC, EC2 인스턴스, 컨테이너, Lambda 등으로 구성된 애플리케이션의 연결을 VPC Lattice를 통해 하나의 중앙 네트워크로 관리할 수 있습니다.
- 사이드카 프록시 불필요 Envoy 같은 사이드카를 배포할 필요 없이, 네트워크 레벨에서 애플리케이션 트래픽을 처리할 수 있습니다. → 운영 간소화 + 오버헤드 제거
- 복잡한 네트워크 구성 단순화 네트워크 라우팅, 보안 정책, 인증 등을 일관되게 관리할 수 있어, 마이크로서비스 환경에서 특히 유리합니다.
- IAM 및 SigV4 통합 보안 IAM 기반 인증/권한 부여와 SigV4 인증을 통해 세밀하고 안전한 트래픽 제어가 가능합니다.
- 로깅 및 트래픽 분석 통합 지원 CloudWatch, S3, Kinesis Firehose 등을 활용해 트래픽 로그 수집, 분석, 시각화까지 손쉽게 연동 가능합니다.
사용 사례 소개
사례 1: 단일 리전 내 애플리케이션 간 연결
사례 2: 온프레미스 → AWS 연결 (하이브리드 인프라)

사례 3: 리전 간 애플리케이션 연결
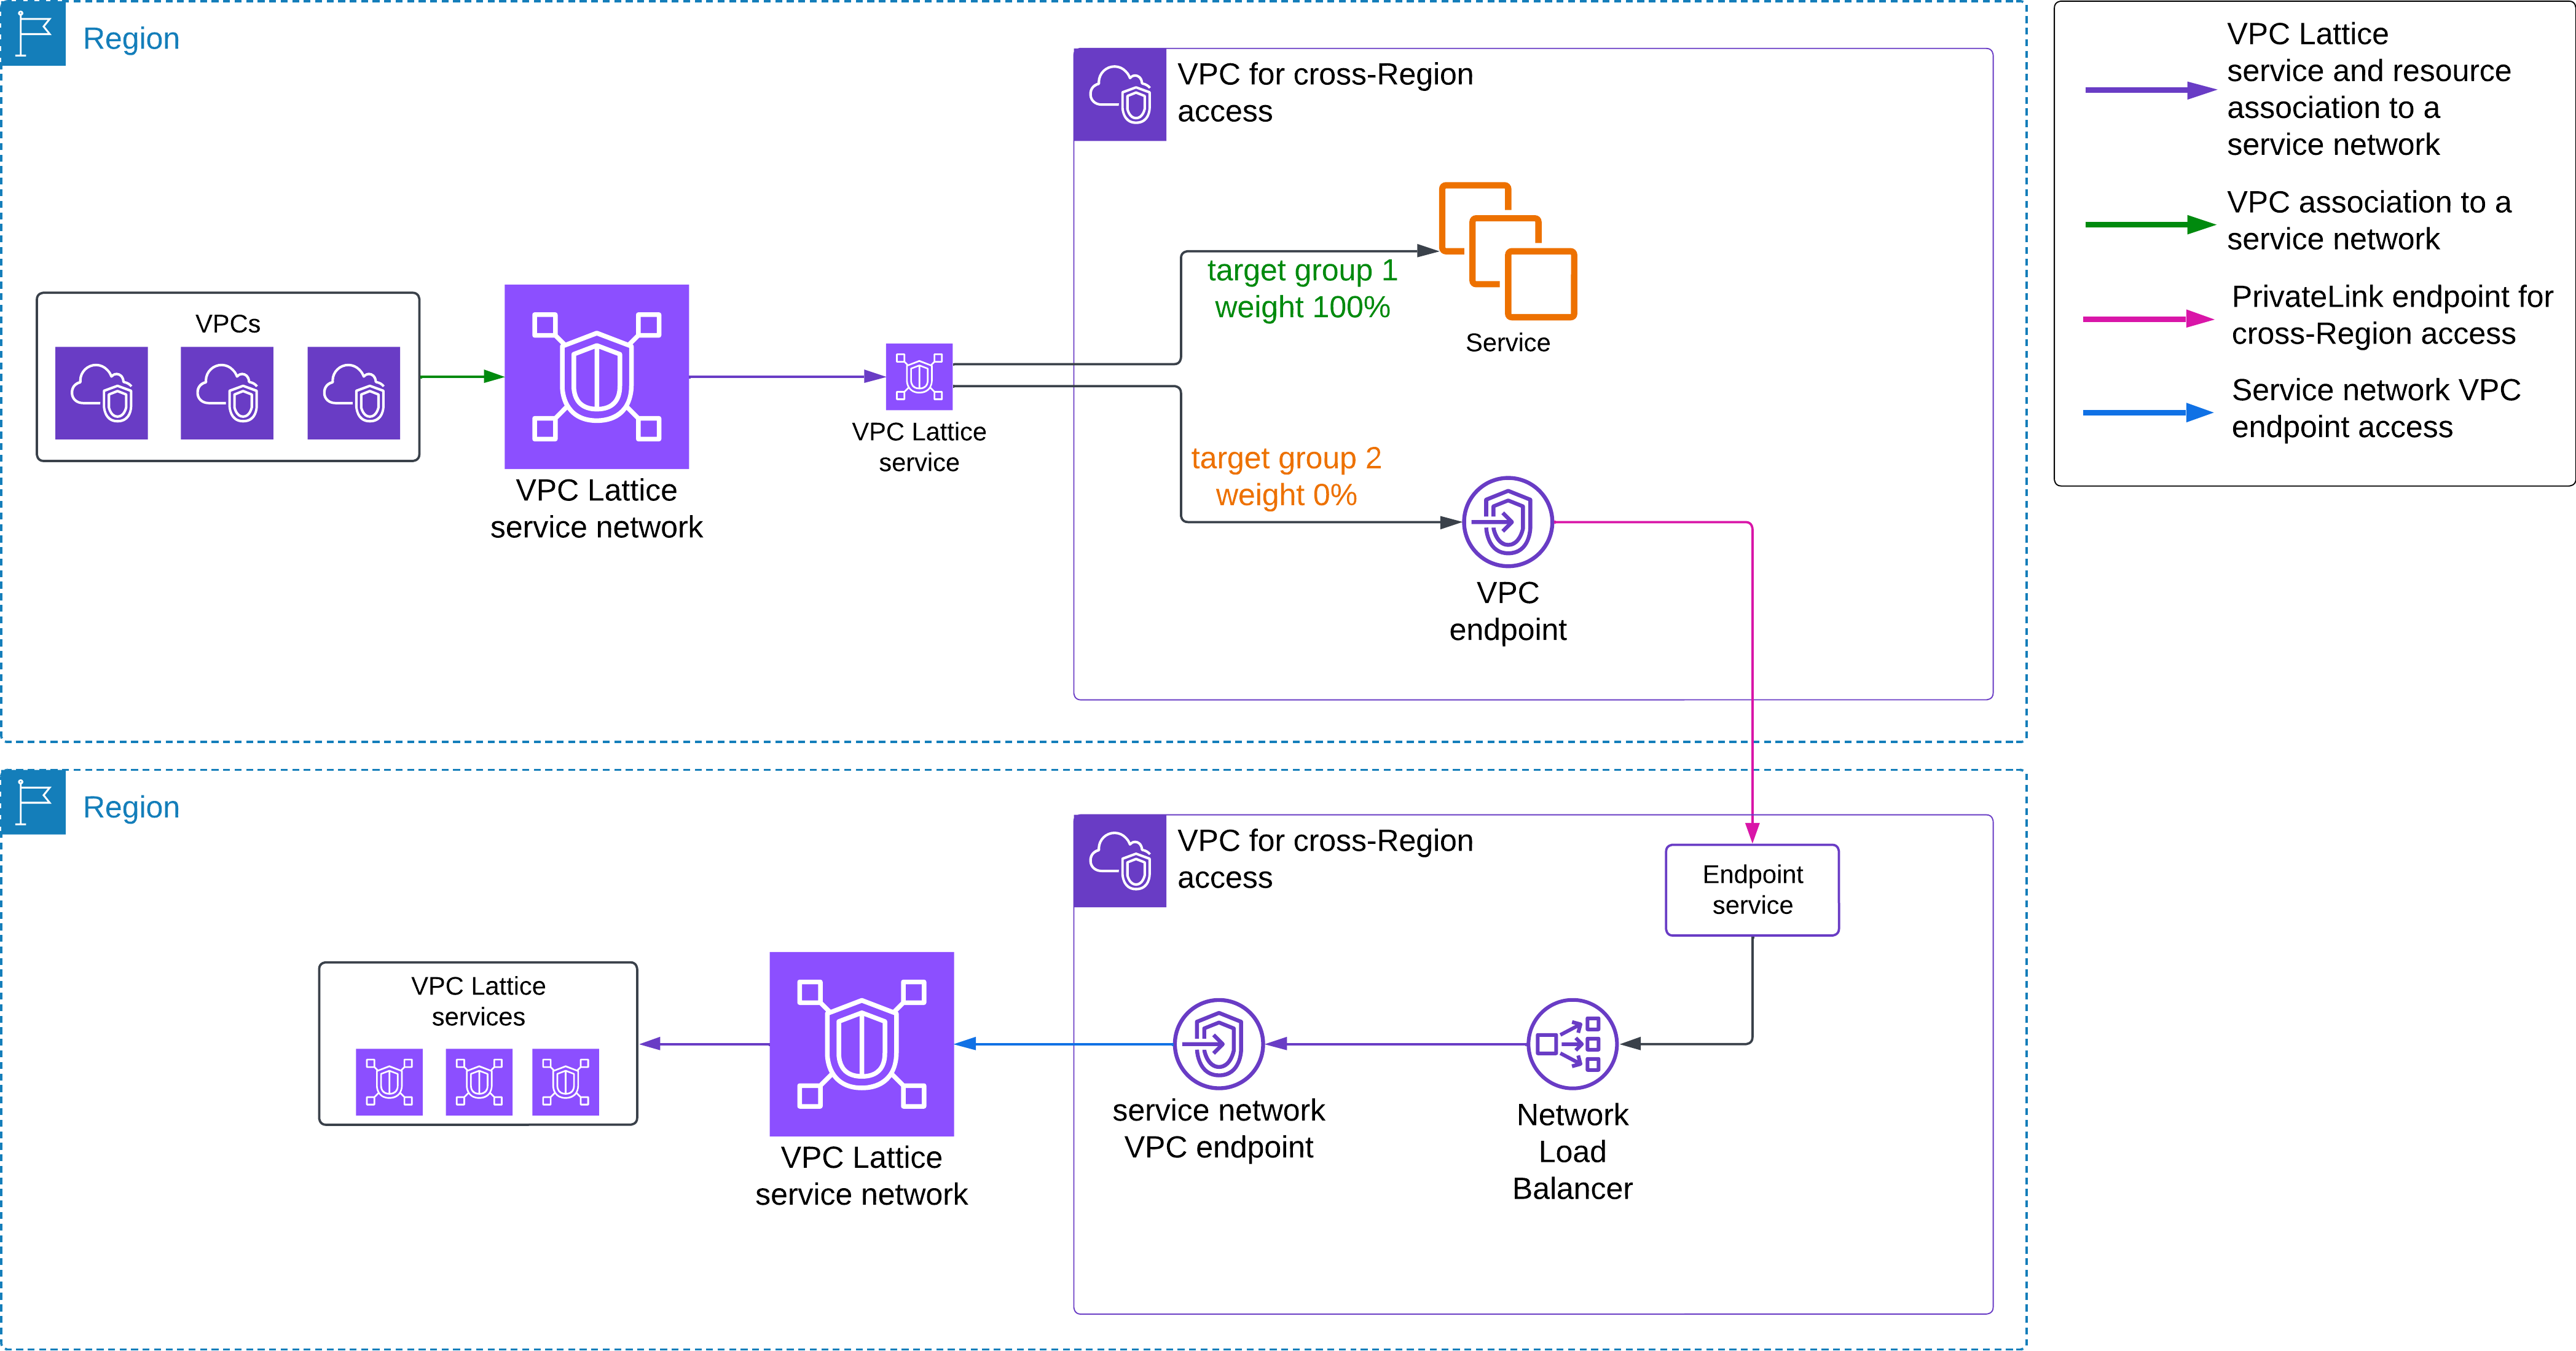
사례 4: 다중 계정 간 서비스 연결
AWS Gateway API Controller
AWS Gateway API Controller?
AWS Gateway API Controller는 Kubernetes의 Gateway API 리소스를 감시하여, 이를 기반으로 Amazon VPC Lattice 리소스를 자동으로 생성/연결하는 오픈소스 컨트롤러입니다.
즉, 사용자는 별도의 사이드카 프록시 없이도 쿠버네티스 네이티브 방식으로 VPC Lattice를 구성할 수 있게 됩니다.
Gateway API와 VPC Lattice 리소스 매핑
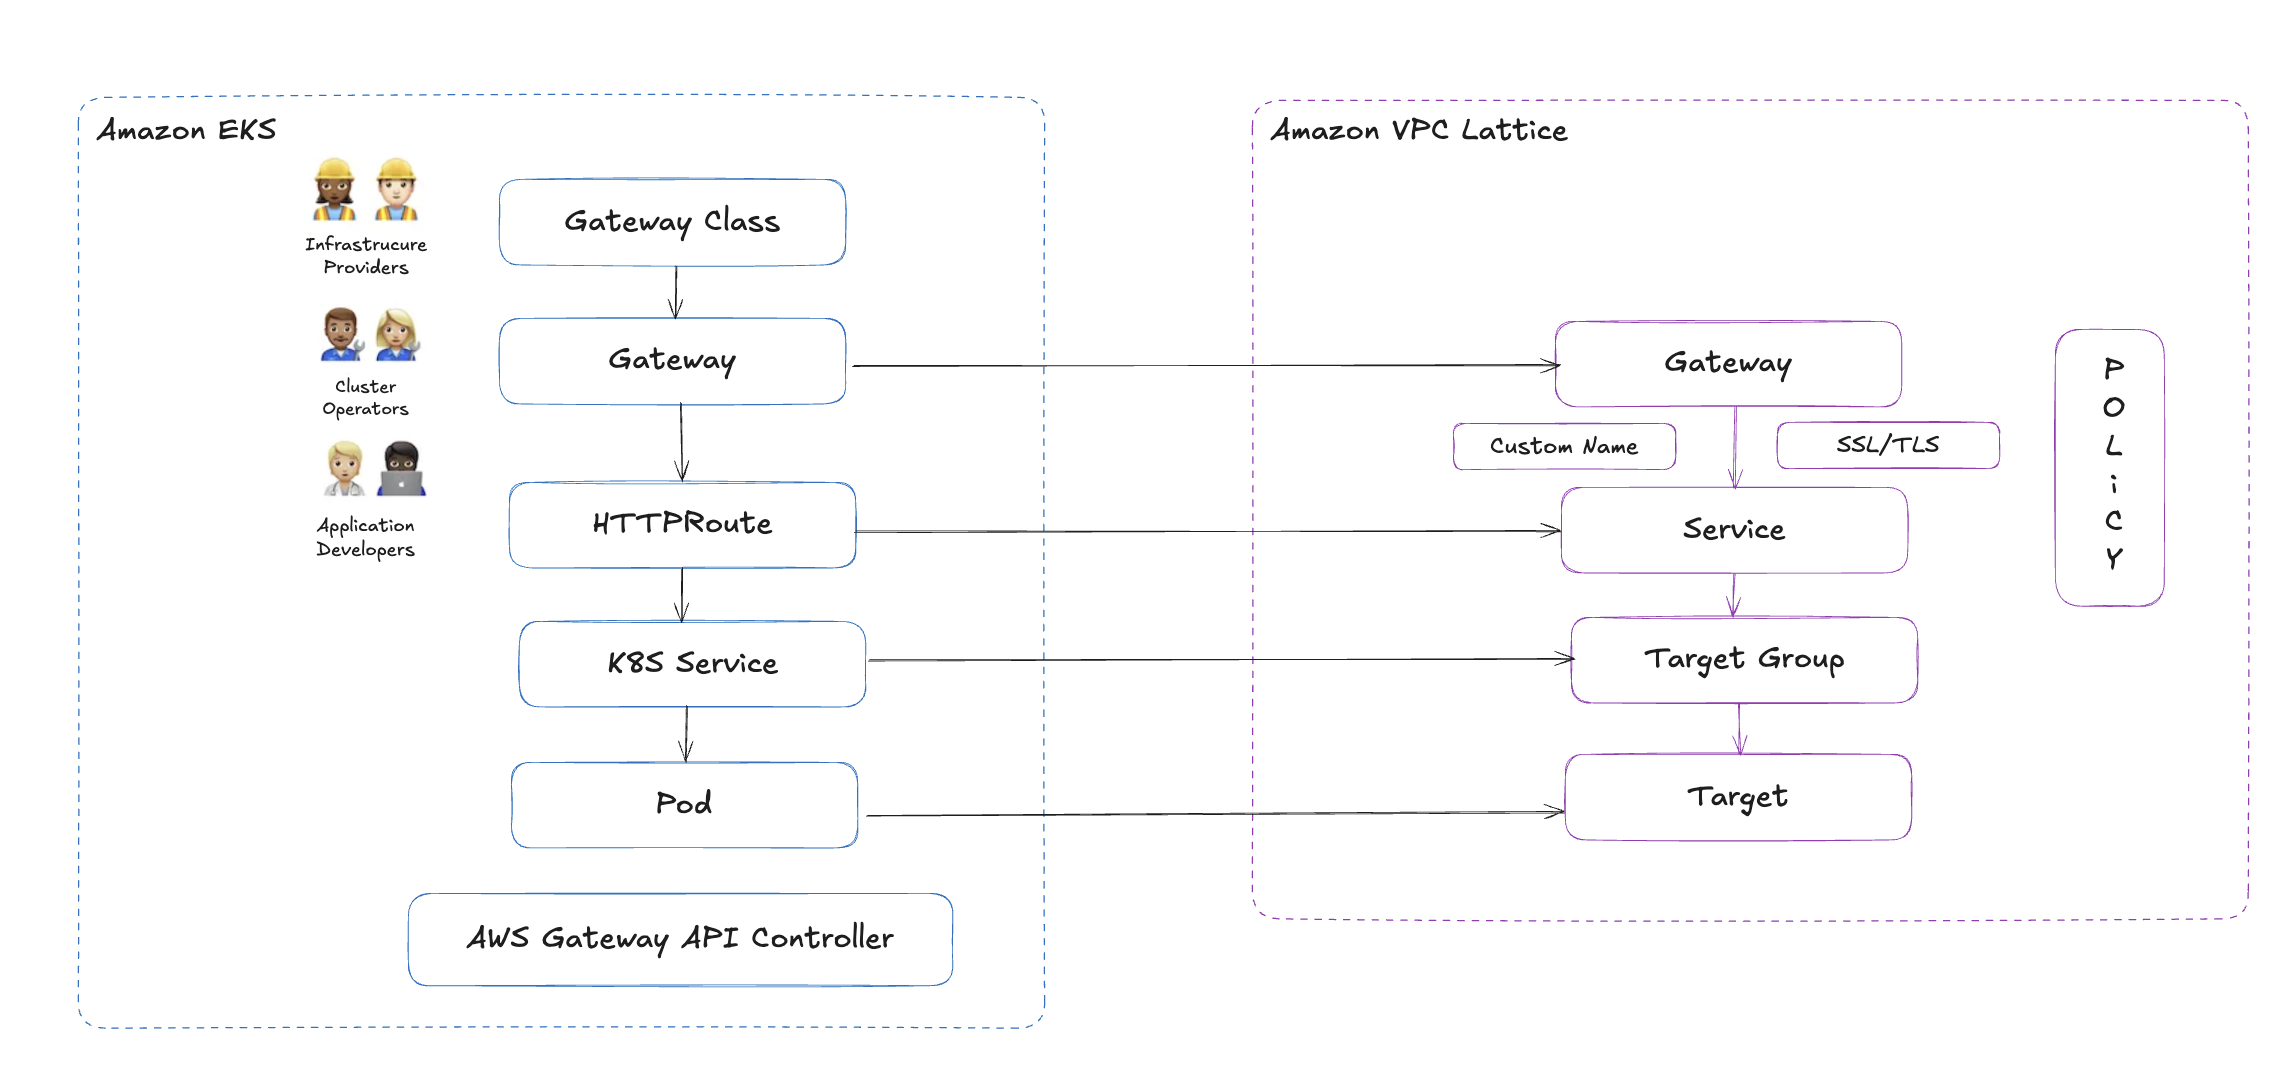
| Gateway API 리소스 | VPC Lattice 리소스 |
|---|---|
GatewayClass | VPC Lattice Controller 구성 방식 |
Gateway | VPC Lattice Service Network |
HTTPRoute / GRPCRoute | VPC Lattice Service 및 Route 규칙 |
BackendRef | Target Group (ECS, EKS, Lambda 등 대상 그룹 매핑) |
이러한 매핑을 통해, 클러스터 내 리소스를 선언적으로 정의하면 VPC Lattice 리소스가 자동으로 프로비저닝됩니다.
주요 기능
AWS Gateway API Controller는 다음과 같은 기능을 제공합니다:
- 멀티 VPC, 멀티 계정 간 서비스 연결 자동 처리
- 여러 쿠버네티스 클러스터 간 VPC Lattice 서비스 검색
- IAM 정책 기반의 보안 연결 구성 (Zero Trust Architecture 가능)
- 서비스 간 트래픽 관찰 및 추적 (CloudWatch 통합)
사용을 위한 요구사항
- Kubernetes 1.28 이상
- 기존 Ingress는 1.28부터 Frozen 상태입니다. 참고: K8s 공식 문서 – Ingress 상태 변화
- 앞으로는 Gateway API 기반 아키텍처가 표준으로 자리잡게 될 예정입니다.
- 기존 Ingress는 1.28부터 Frozen 상태입니다. 참고: K8s 공식 문서 – Ingress 상태 변화
- AWS Gateway API Controller 설치
kubectl또는Helm을 통해 설치 가능- 배포 가이드는 공식 문서에서 확인 가능
- Amazon VPC Lattice 활성화
- 서비스 네트워크, 서비스, 대상 그룹 등을 사용할 수 있는 권한과 환경 필요
실습 1 - Simple Client to Server communication
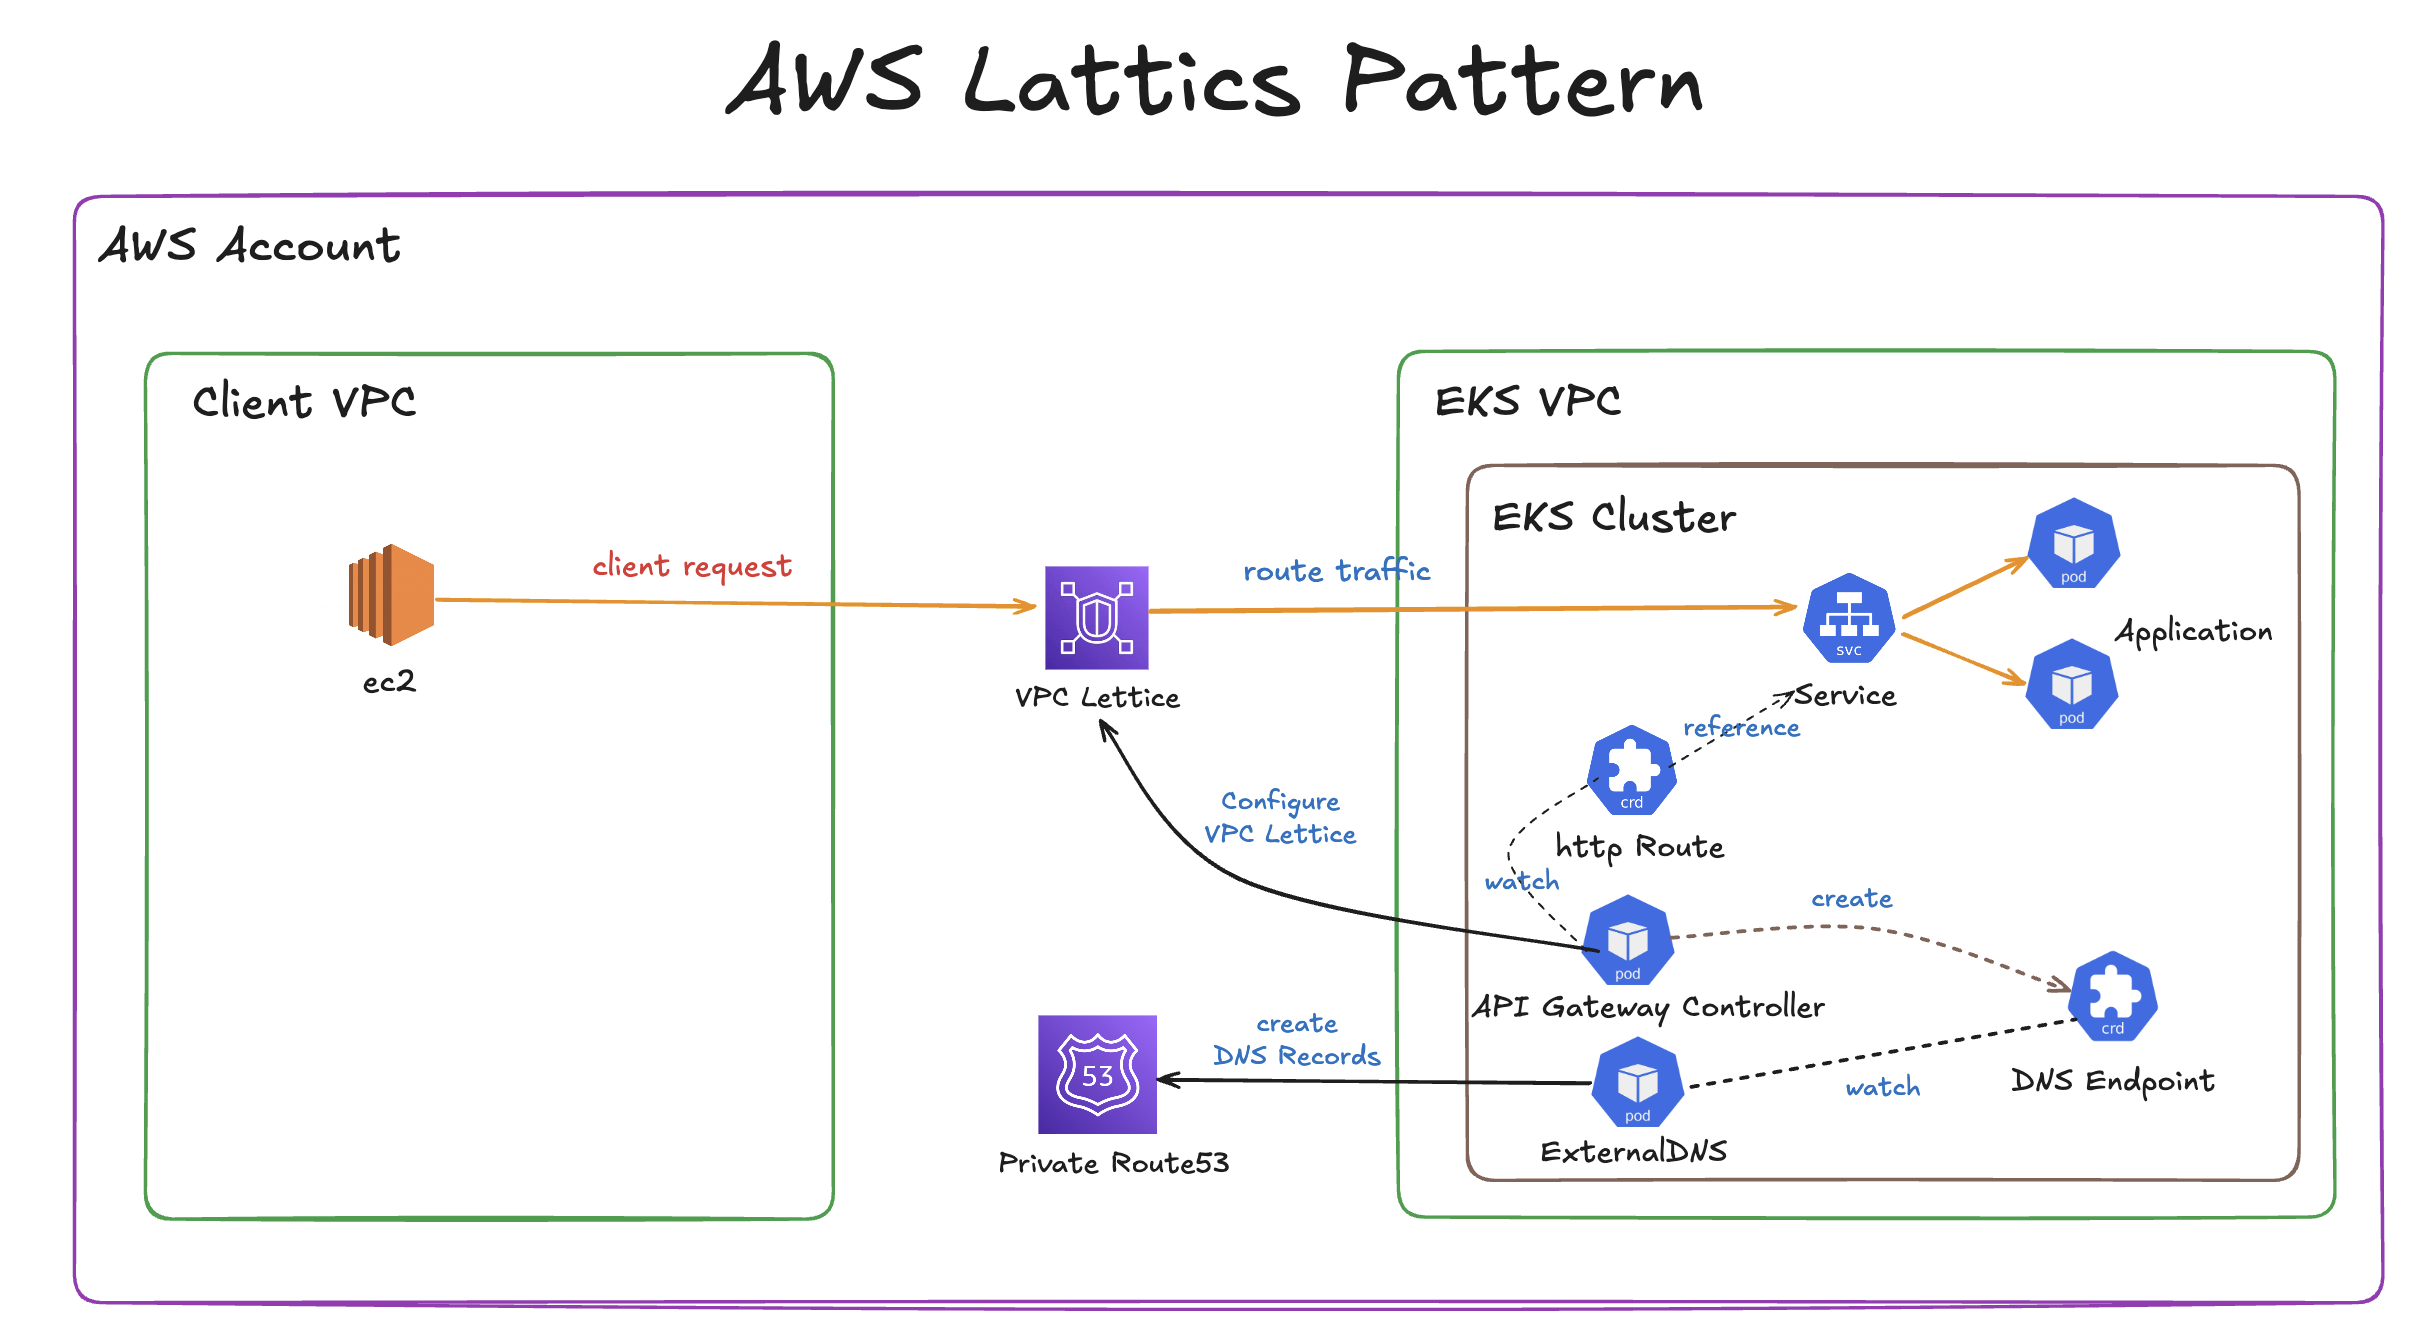
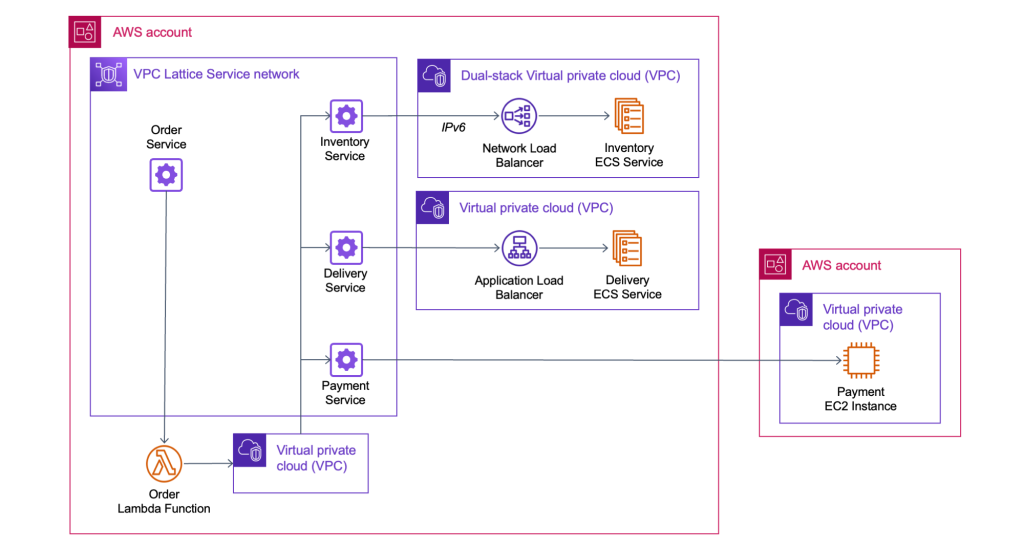
해당 실습에선 클라이언트 애플리케이션과 서버 애플리케이션을 서로 다른 VPC에 배포하고, 이들 간 통신을 Amazon VPC Lattice를 통해 연결하는 방법을 설명합니다. 특히 Terraform을 사용해 모든 리소스를 코드 기반으로 자동화하며, Route 53 + ExternalDNS를 활용해 사용자 지정 도메인까지 구성합니다.
Terraform 코드 준비 및 프로비저닝
- Git Repository Clone
git clone https://github.com/aws-ia/terraform-aws-eks-blueprints.git - 프로젝트 이동
cd terraform-aws-eks-blueprints/patterns/vpc-lattice/client-server-communication
- main.tf Region
ap-northeast-2으로 변경 (line 29)locals { name = basename(path.cwd) region = "ap-northeast-2" # 해당 정보 변경 cluster_vpc_cidr = "10.0.0.0/16" client_vpc_cidr = "10.1.0.0/16" azs = slice(data.aws_availability_zones.available.names, 0, 3) tags = { Blueprint = local.name GithubRepo = "github.com/aws-ia/terraform-aws-eks-blueprints" } }
- terraform init 실행
terraform init
- resource 배포
terraform apply -target="module.client_vpc" -auto-approve
terraform apply -target="module.cluster_vpc" -auto-approve
terraform apply -target=aws_route53_zone.primary -auto-approve

terraform apply -target="module.client_sg" -auto-approve
terraform apply -target="module.endpoint_sg" -auto-approve

terraform apply -target="module.client" -auto-approve
terraform apply -target="module.vpc_endpoints" -auto-approve

terraform apply -target="module.eks" -auto-approve
terraform apply -target="module.addons" -auto-approve

terraform apply -auto-approve
- kubeconfig 설정
aws eks update-kubeconfig --name client-server-communication --alias client-server-communication --region ap-northeast-2
- 파드 생성 확인
kubectl get pod -A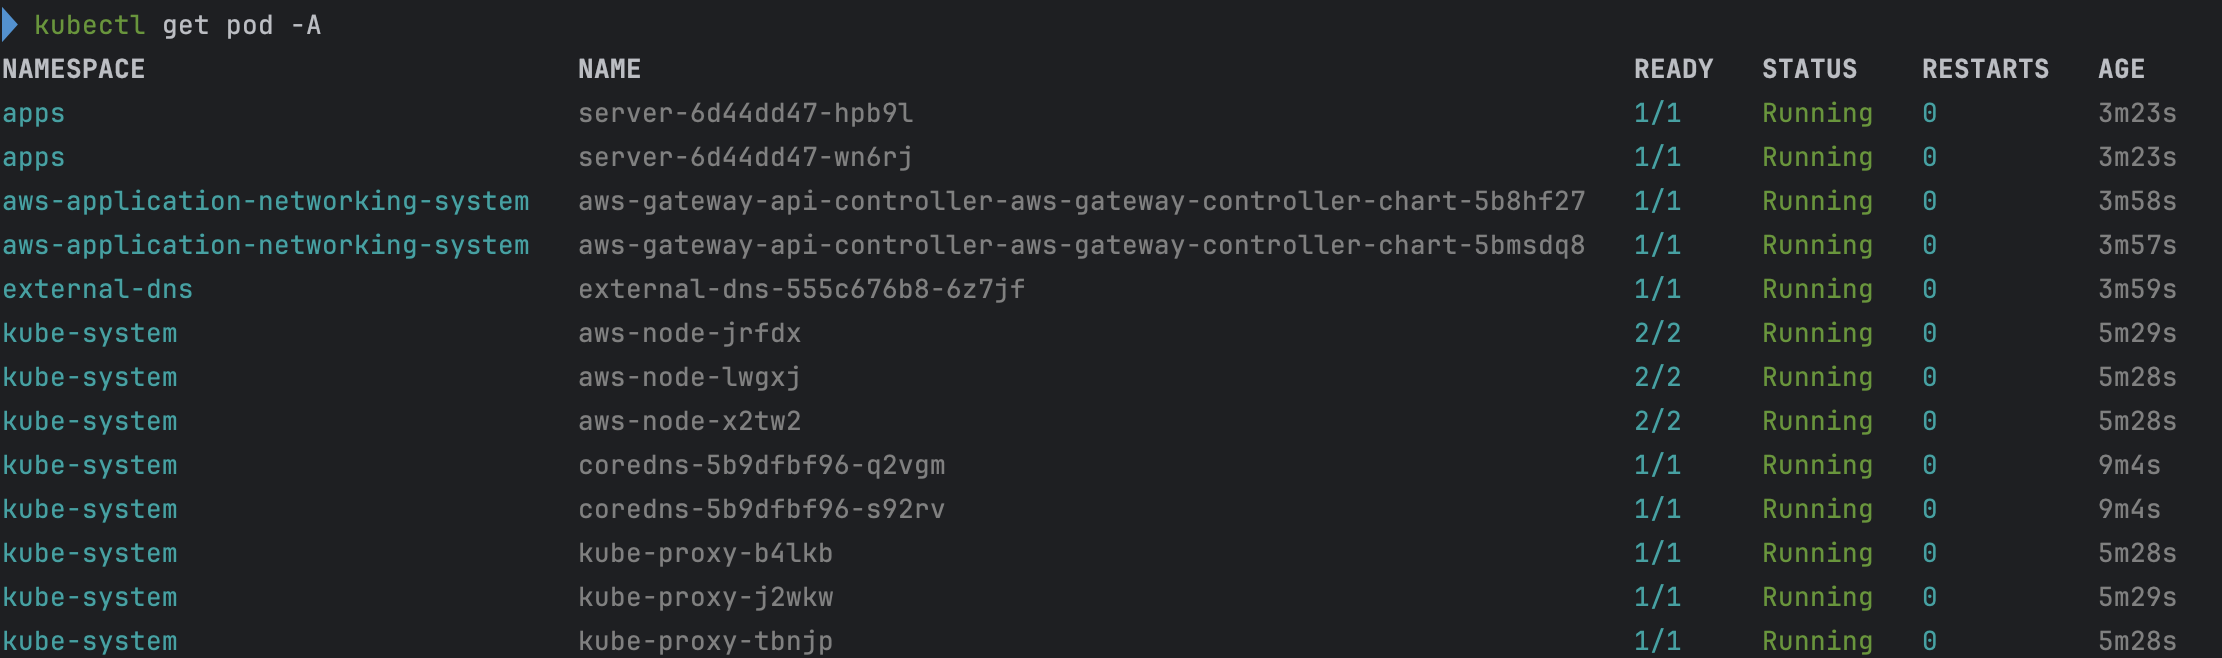
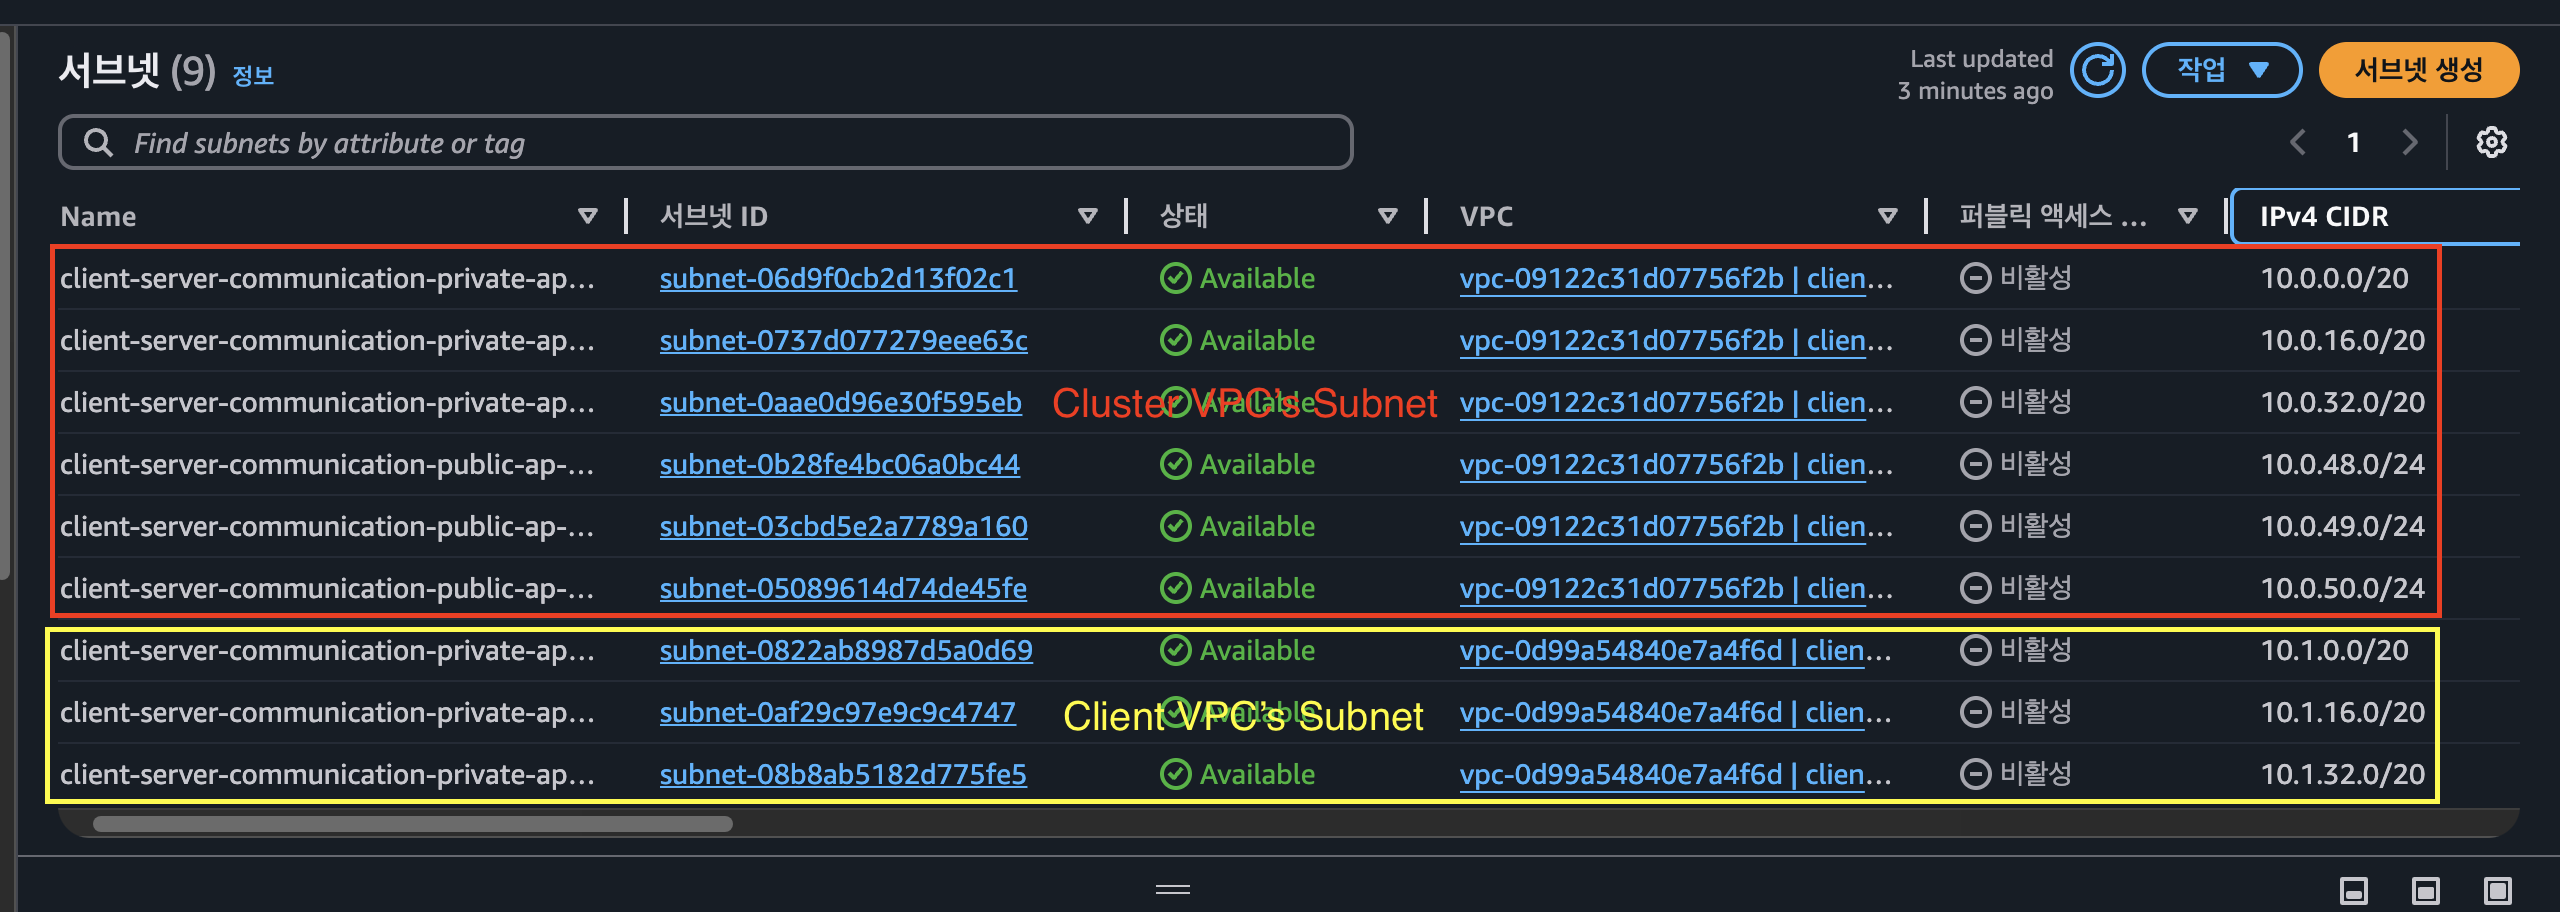
배포된 인프라 확인
VPC

Subnet
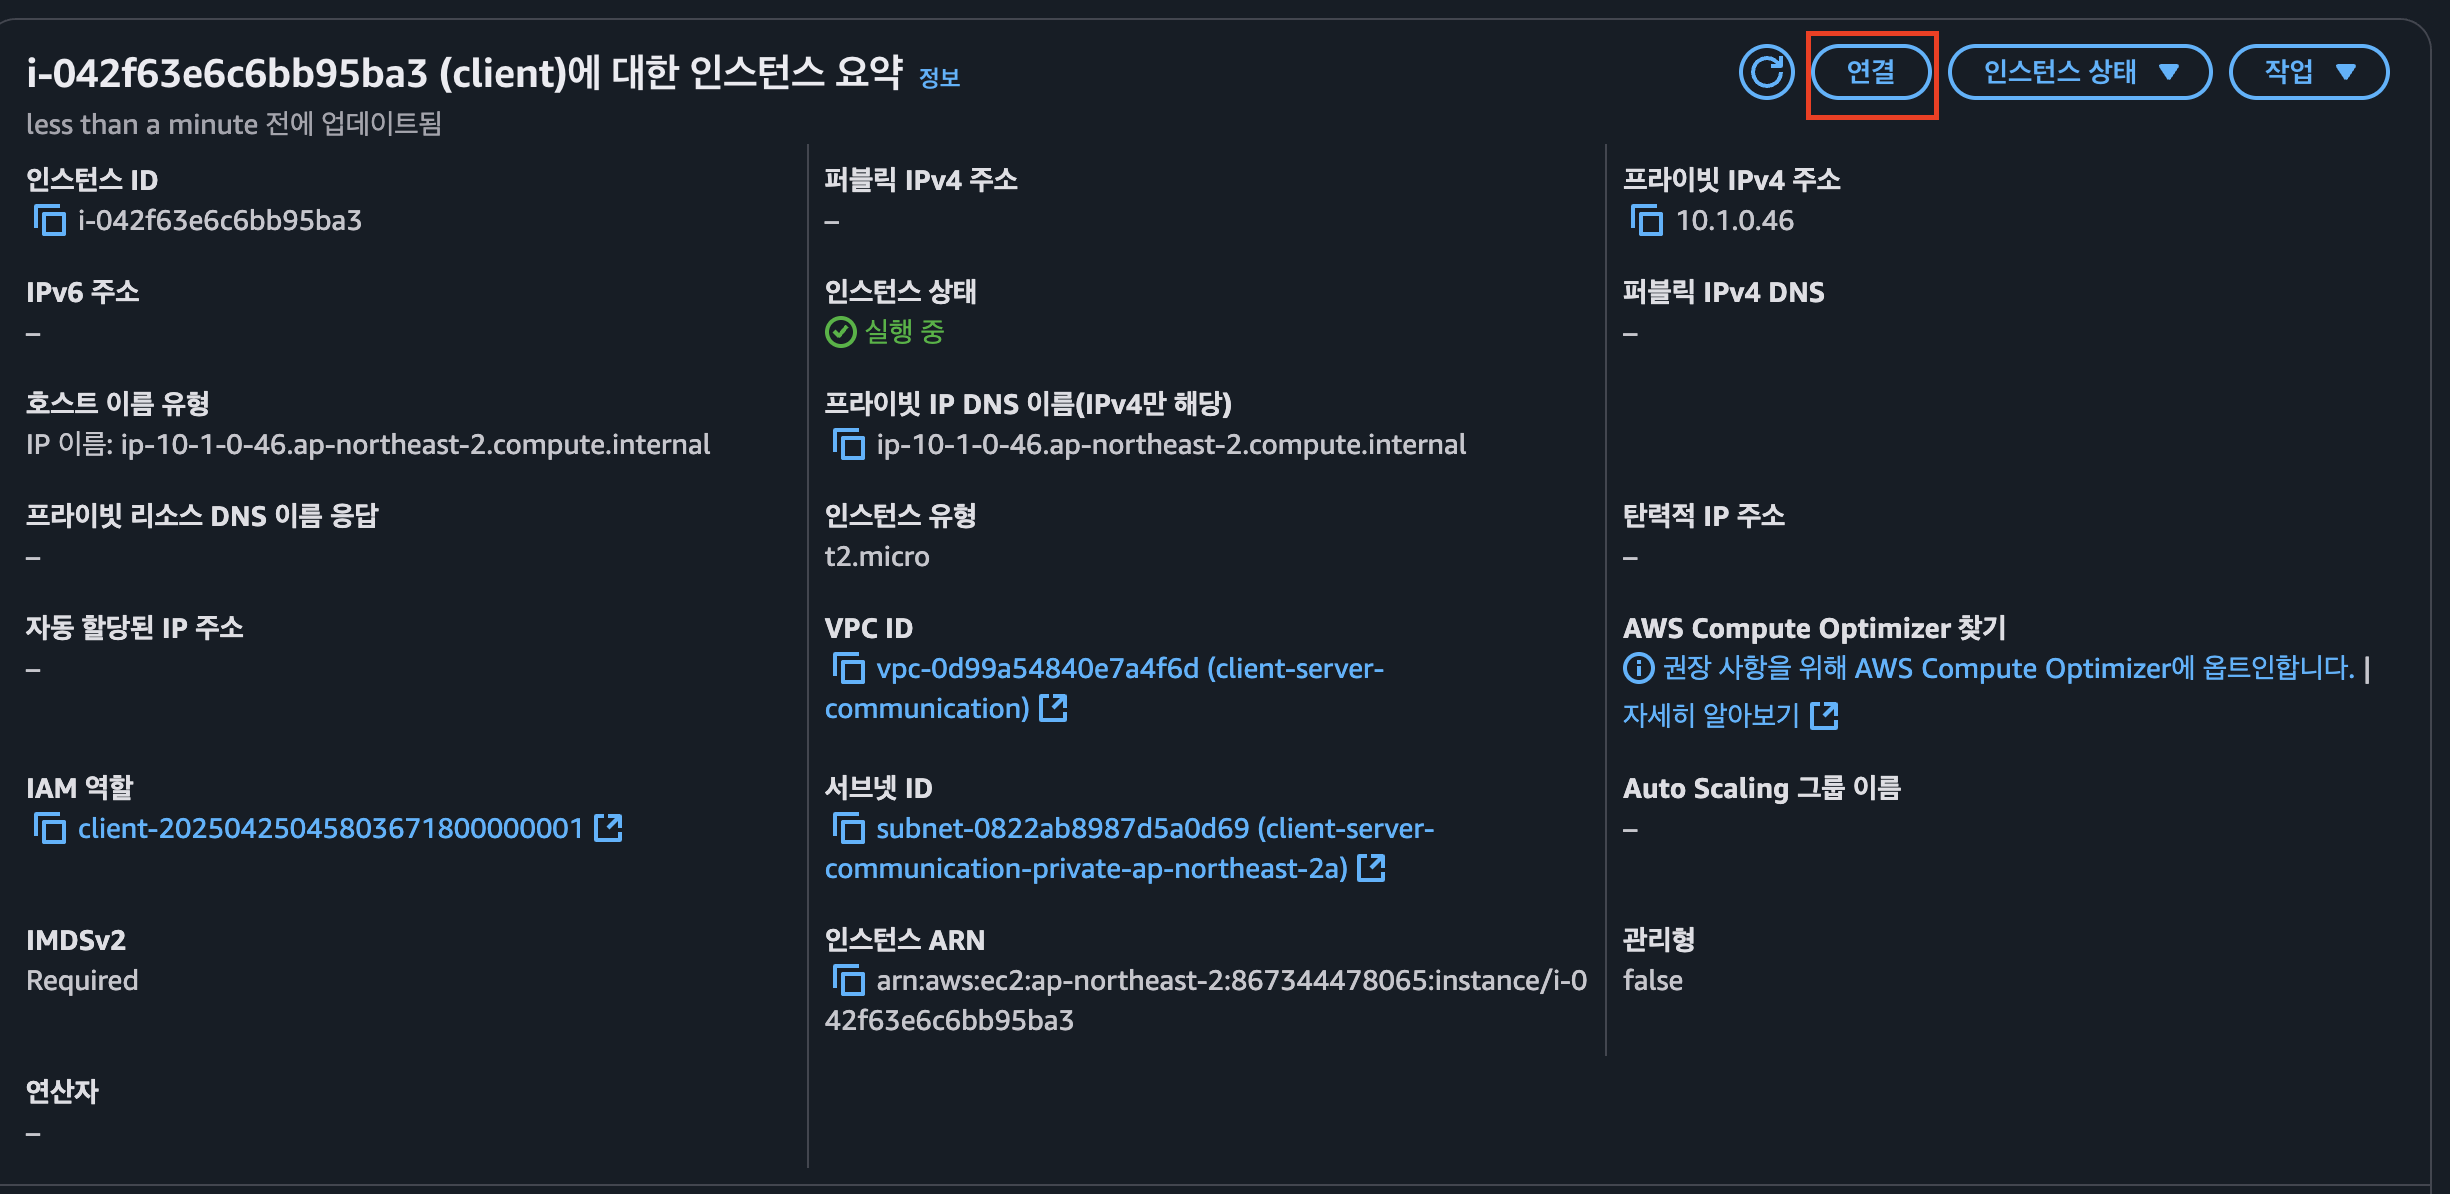
EC2 확인


VPC Lattice를 통한 Client to Server 통신 테스트
client Server에 ssh 접속
- 해당 client 접근 → 우측 상단에 연결 클릭
- Session Manager 탭 클릭 → 연결 클릭
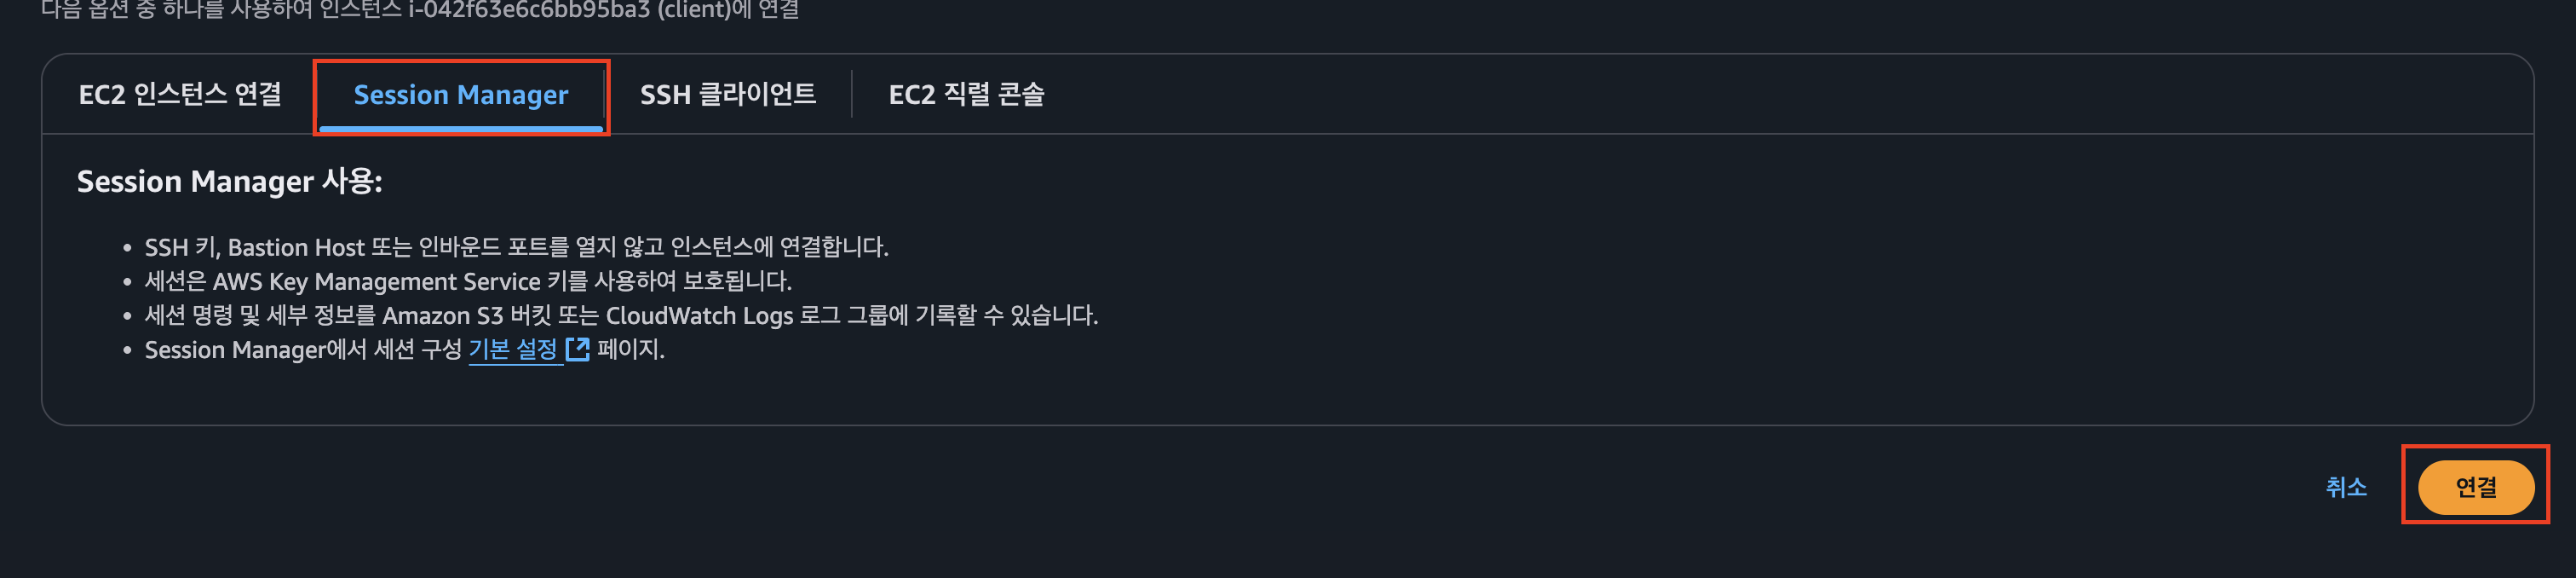
- client 서버에 연결

client 애플리케이션에서 cluster 애플리케이션으로 http 요청 전송
- 모니터링 목적 로그 확인
kubectl logs -f deployment/server -n apps --all-containers=true --since=1m
- curl 통신 테스트
curl -i http://server.example.com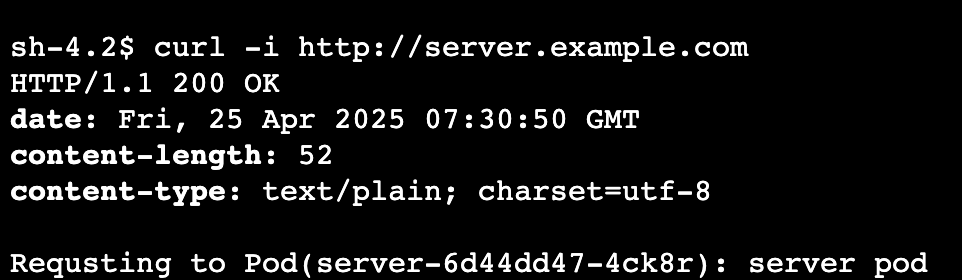

- nslookup으로 엔드포인트 조회
nslookup server.example.com
Amazon VPC Lattice 확인
- server-apps 확인

Amazon VPC Lattice Target Group 확인

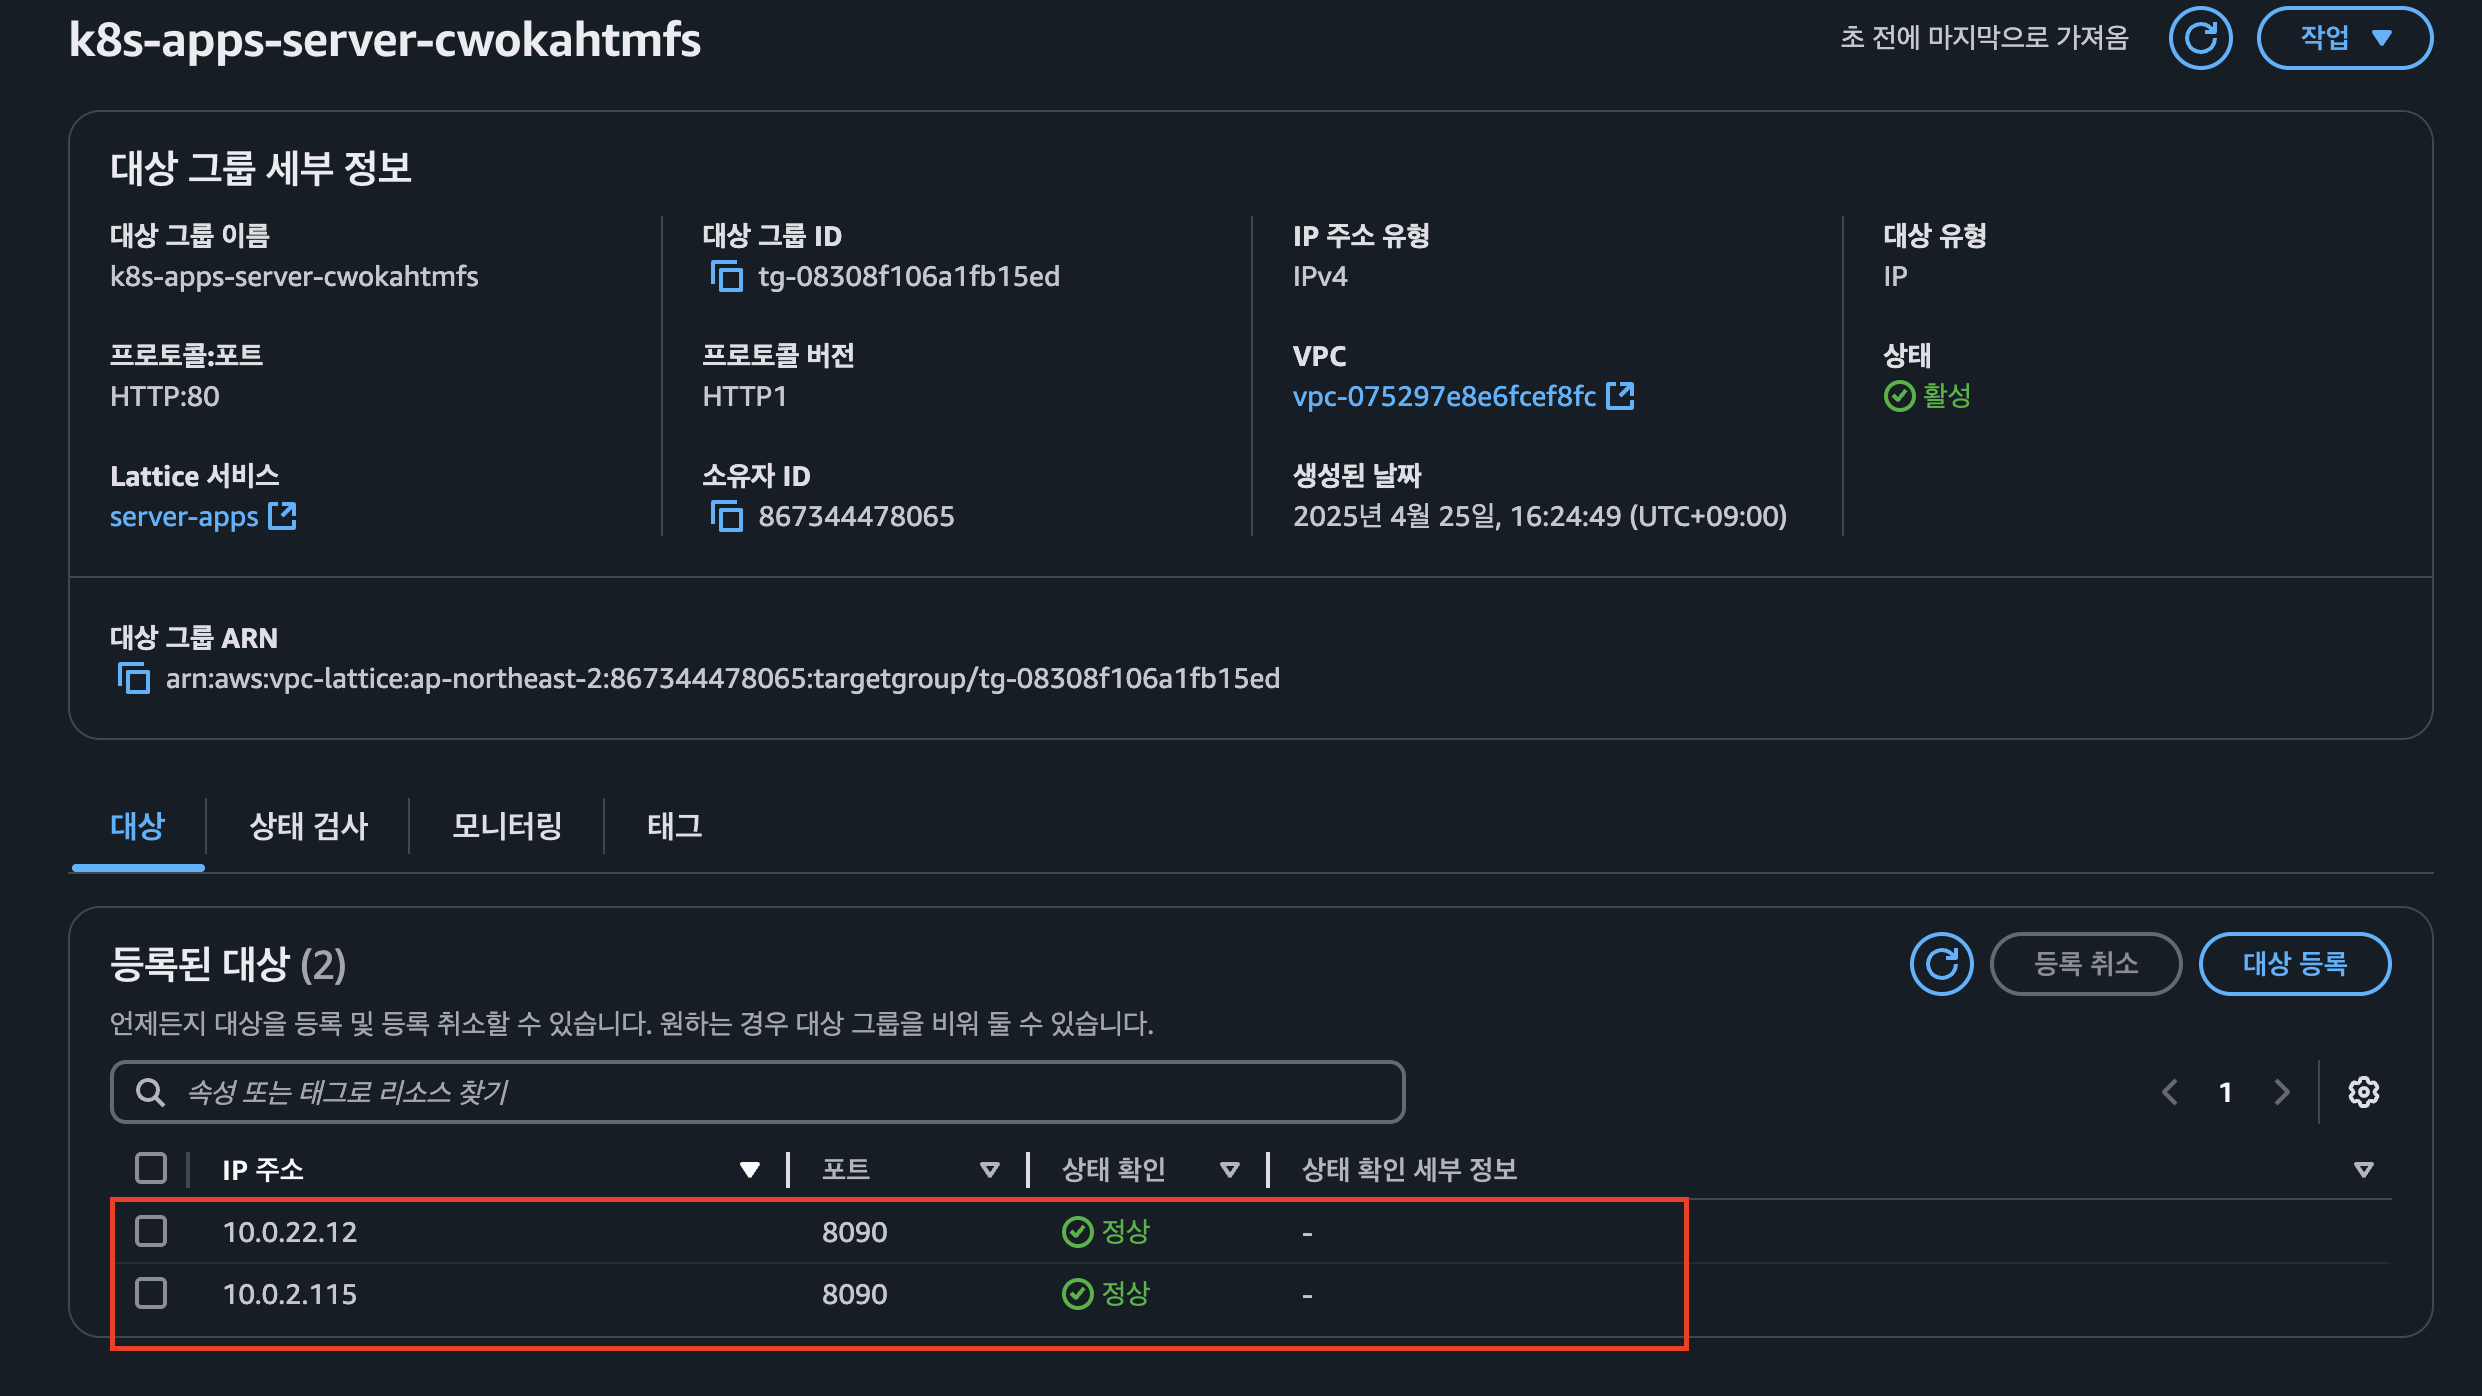
- pod 조회 하여 매칭 되는지 확인

AWS Gateway API Controller의 동작 체크
- AWS Gateway API Controller 로그 적제
kubectl logs deployment/aws-gateway-api-controller-aws-gateway-controller-chart -n aws-application-networking-system --all-containers=true > lattice.log
- 로그 분석
- EKS 클러스터 내에 GatewayClass, Gateway, Route에 대한 오브젝트가 추가 될 경우 Gateway API Controller에서 이를 감지하여 조정(reconcile) 진행
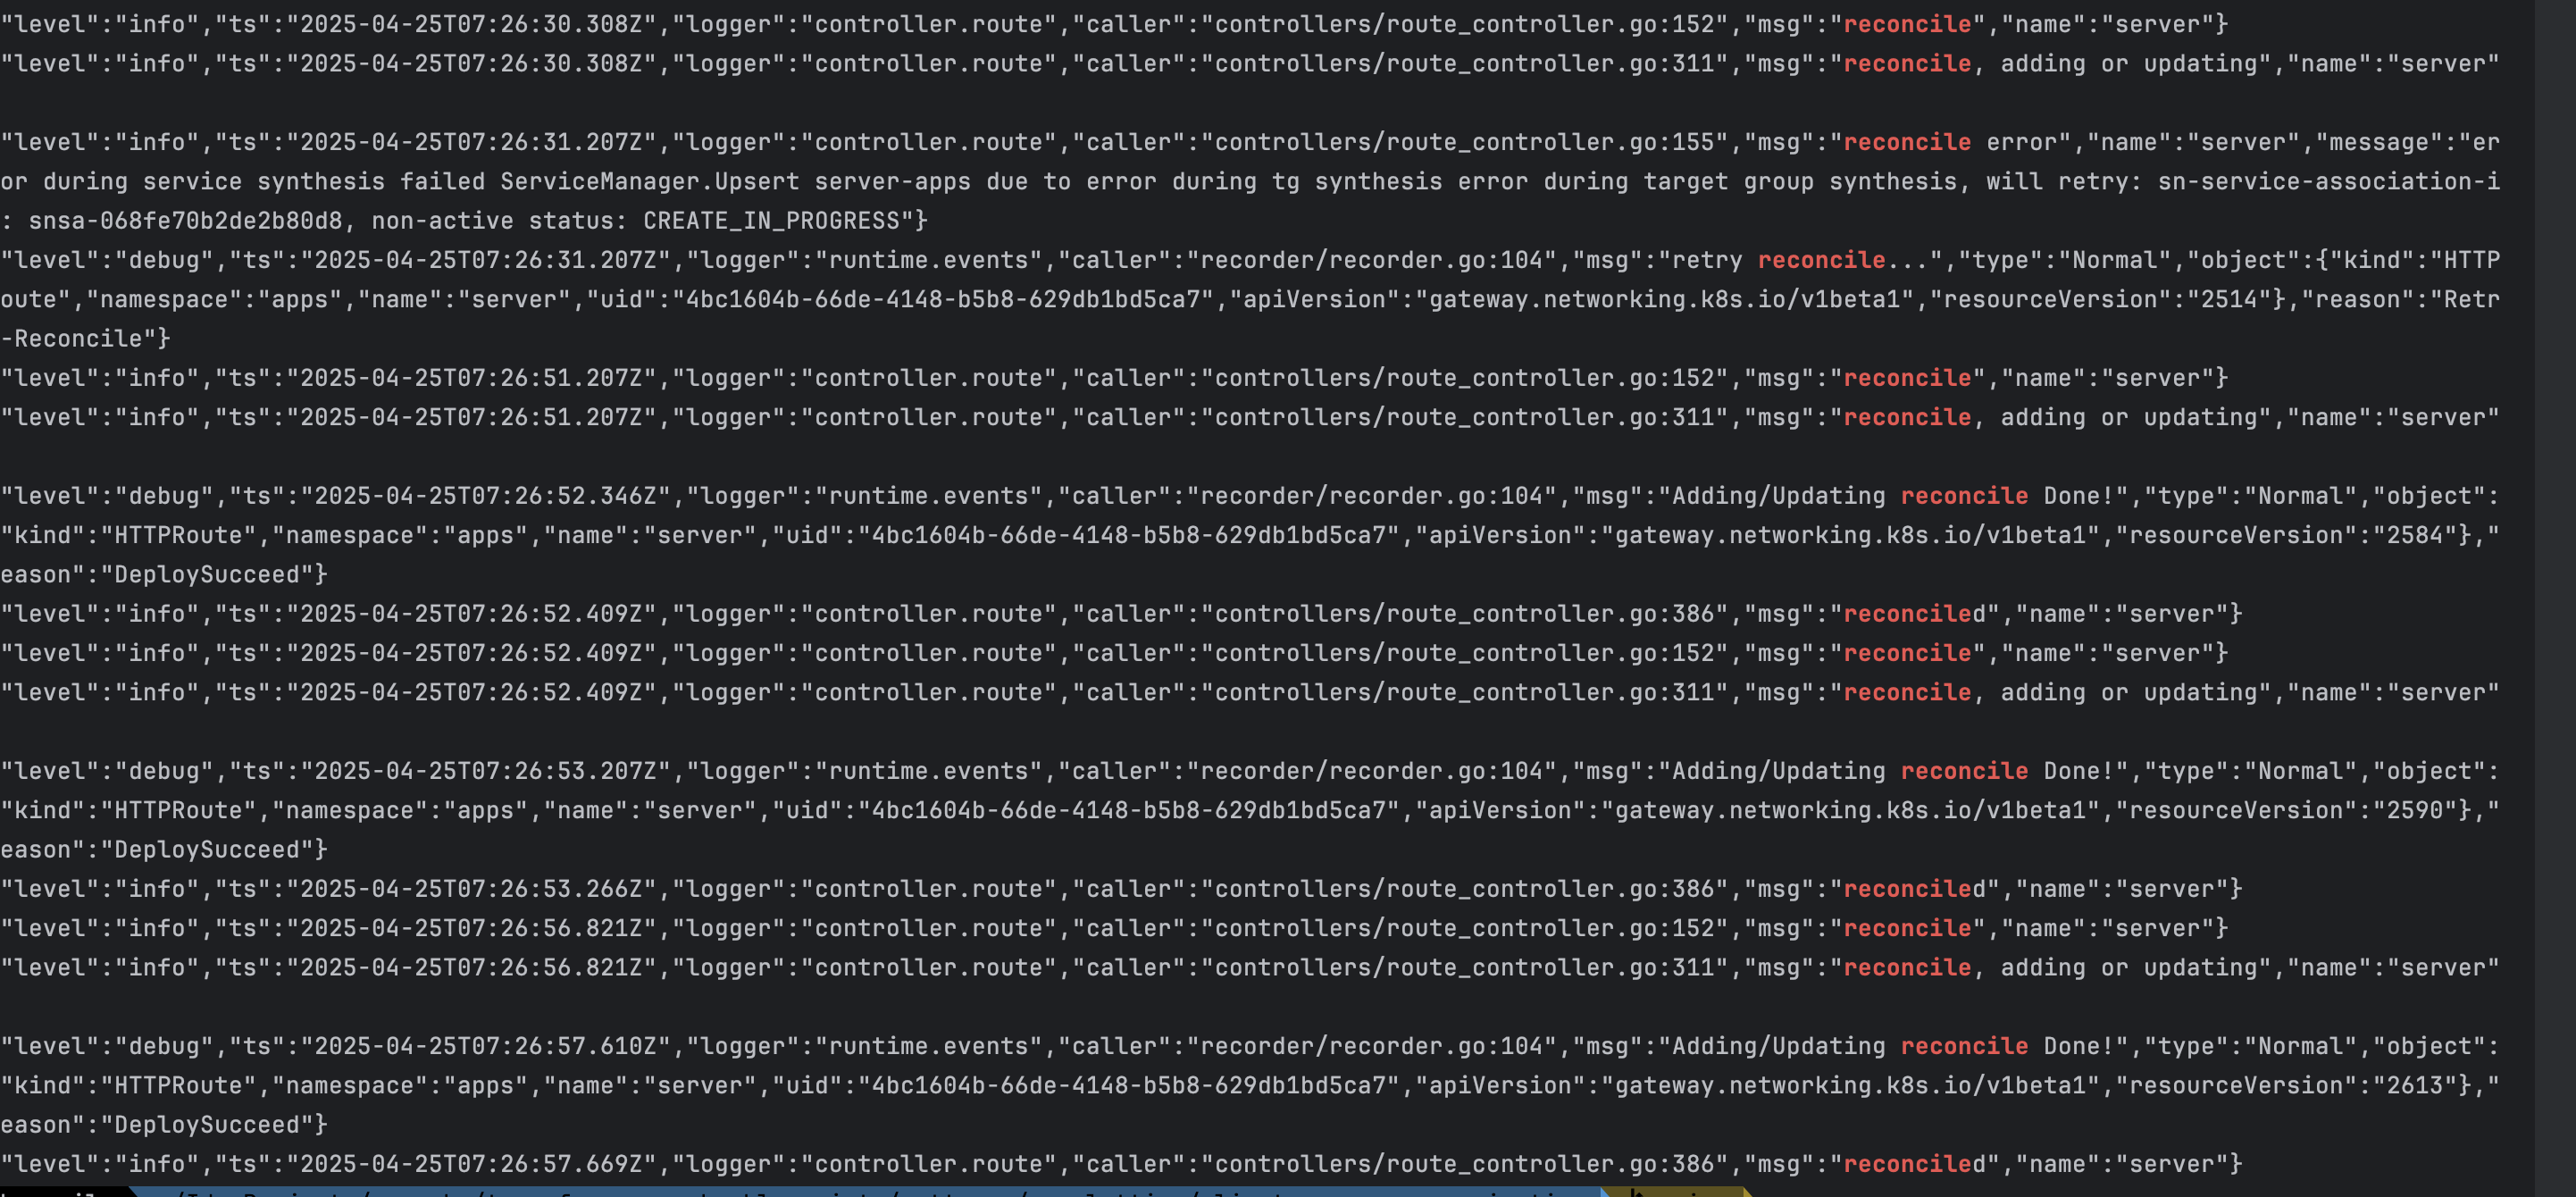
- EKS 클러스터 내에 GatewayClass, Gateway, Route에 대한 오브젝트가 추가 될 경우 Gateway API Controller에서 이를 감지하여 조정(reconcile) 진행
실습 리소스 정리
terraform destroy -target="module.client_vpc" -auto-approve
terraform destroy -target="module.cluster_vpc" -auto-approve
terraform destroy -target=aws_route53_zone.primary -auto-approve

terraform destroy -target="module.client_sg" -auto-approve
terraform destroy -target="module.endpoint_sg" -auto-approve

terraform destroy -target="module.client" -auto-approve
terraform destroy -target="module.vpc_endpoints" -auto-approve

terraform destroy -target="module.eks" -auto-approve
terraform destroy -target="module.addons" -auto-approve

terraform destroy -auto-approve
실습 2 -Multi Cluster secure communication
이번에는 멀티 클러스터 환경 간에서 Amazon VPC Lattice를 활용한 안전한 통신 방법에 대해 실습을 진행합니다.
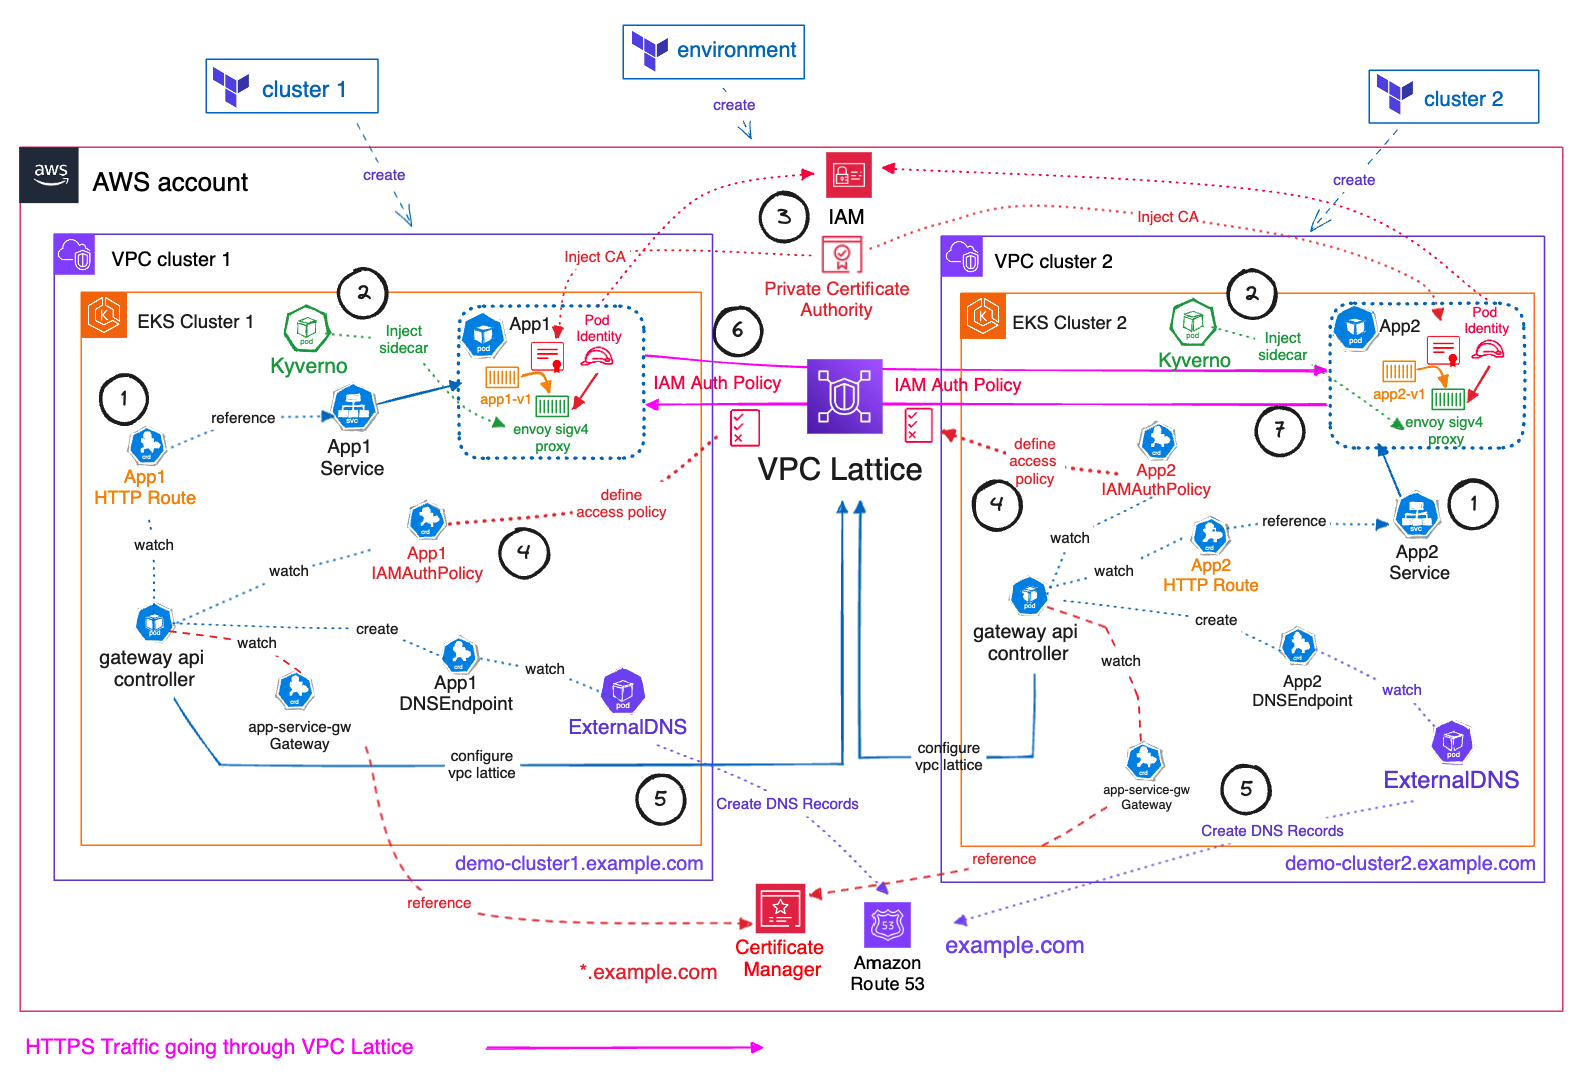
출처 : AWES Study 3기
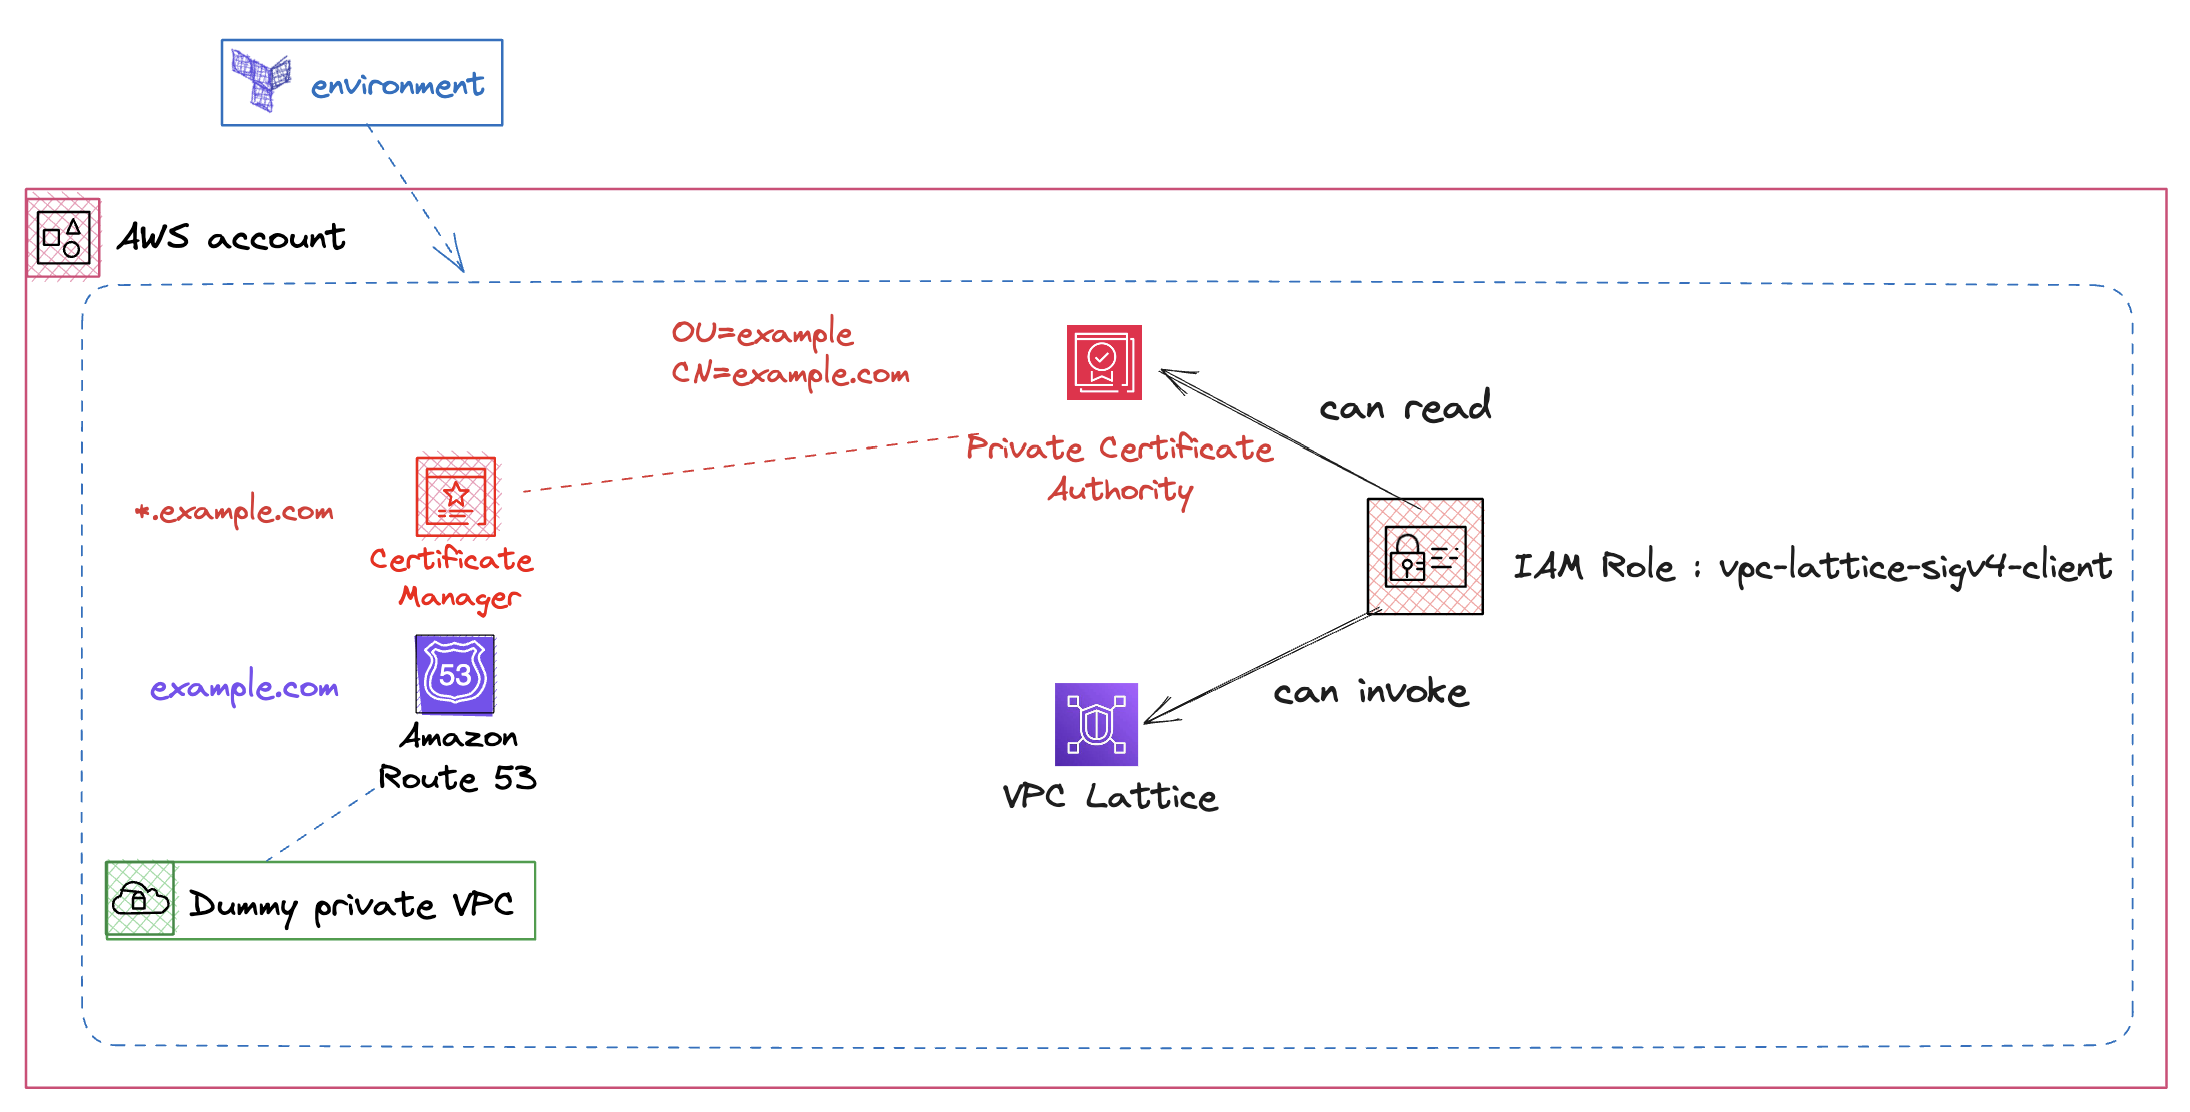
핵심 컴포넌트
| 범주 | 구성 요소 | 역할 |
|---|---|---|
| 인프라 | VPC Lattice | 중앙 집중형 서비스 라우터 |
| VPC-Cluster1, VPC-Cluster2 | 각각 겹치는 CIDR로 구성된 분리된 VPC | |
| 클러스터 | EKS Cluster1, EKS Cluster2 | 각 VPC에 배포된 쿠버네티스 클러스터 |
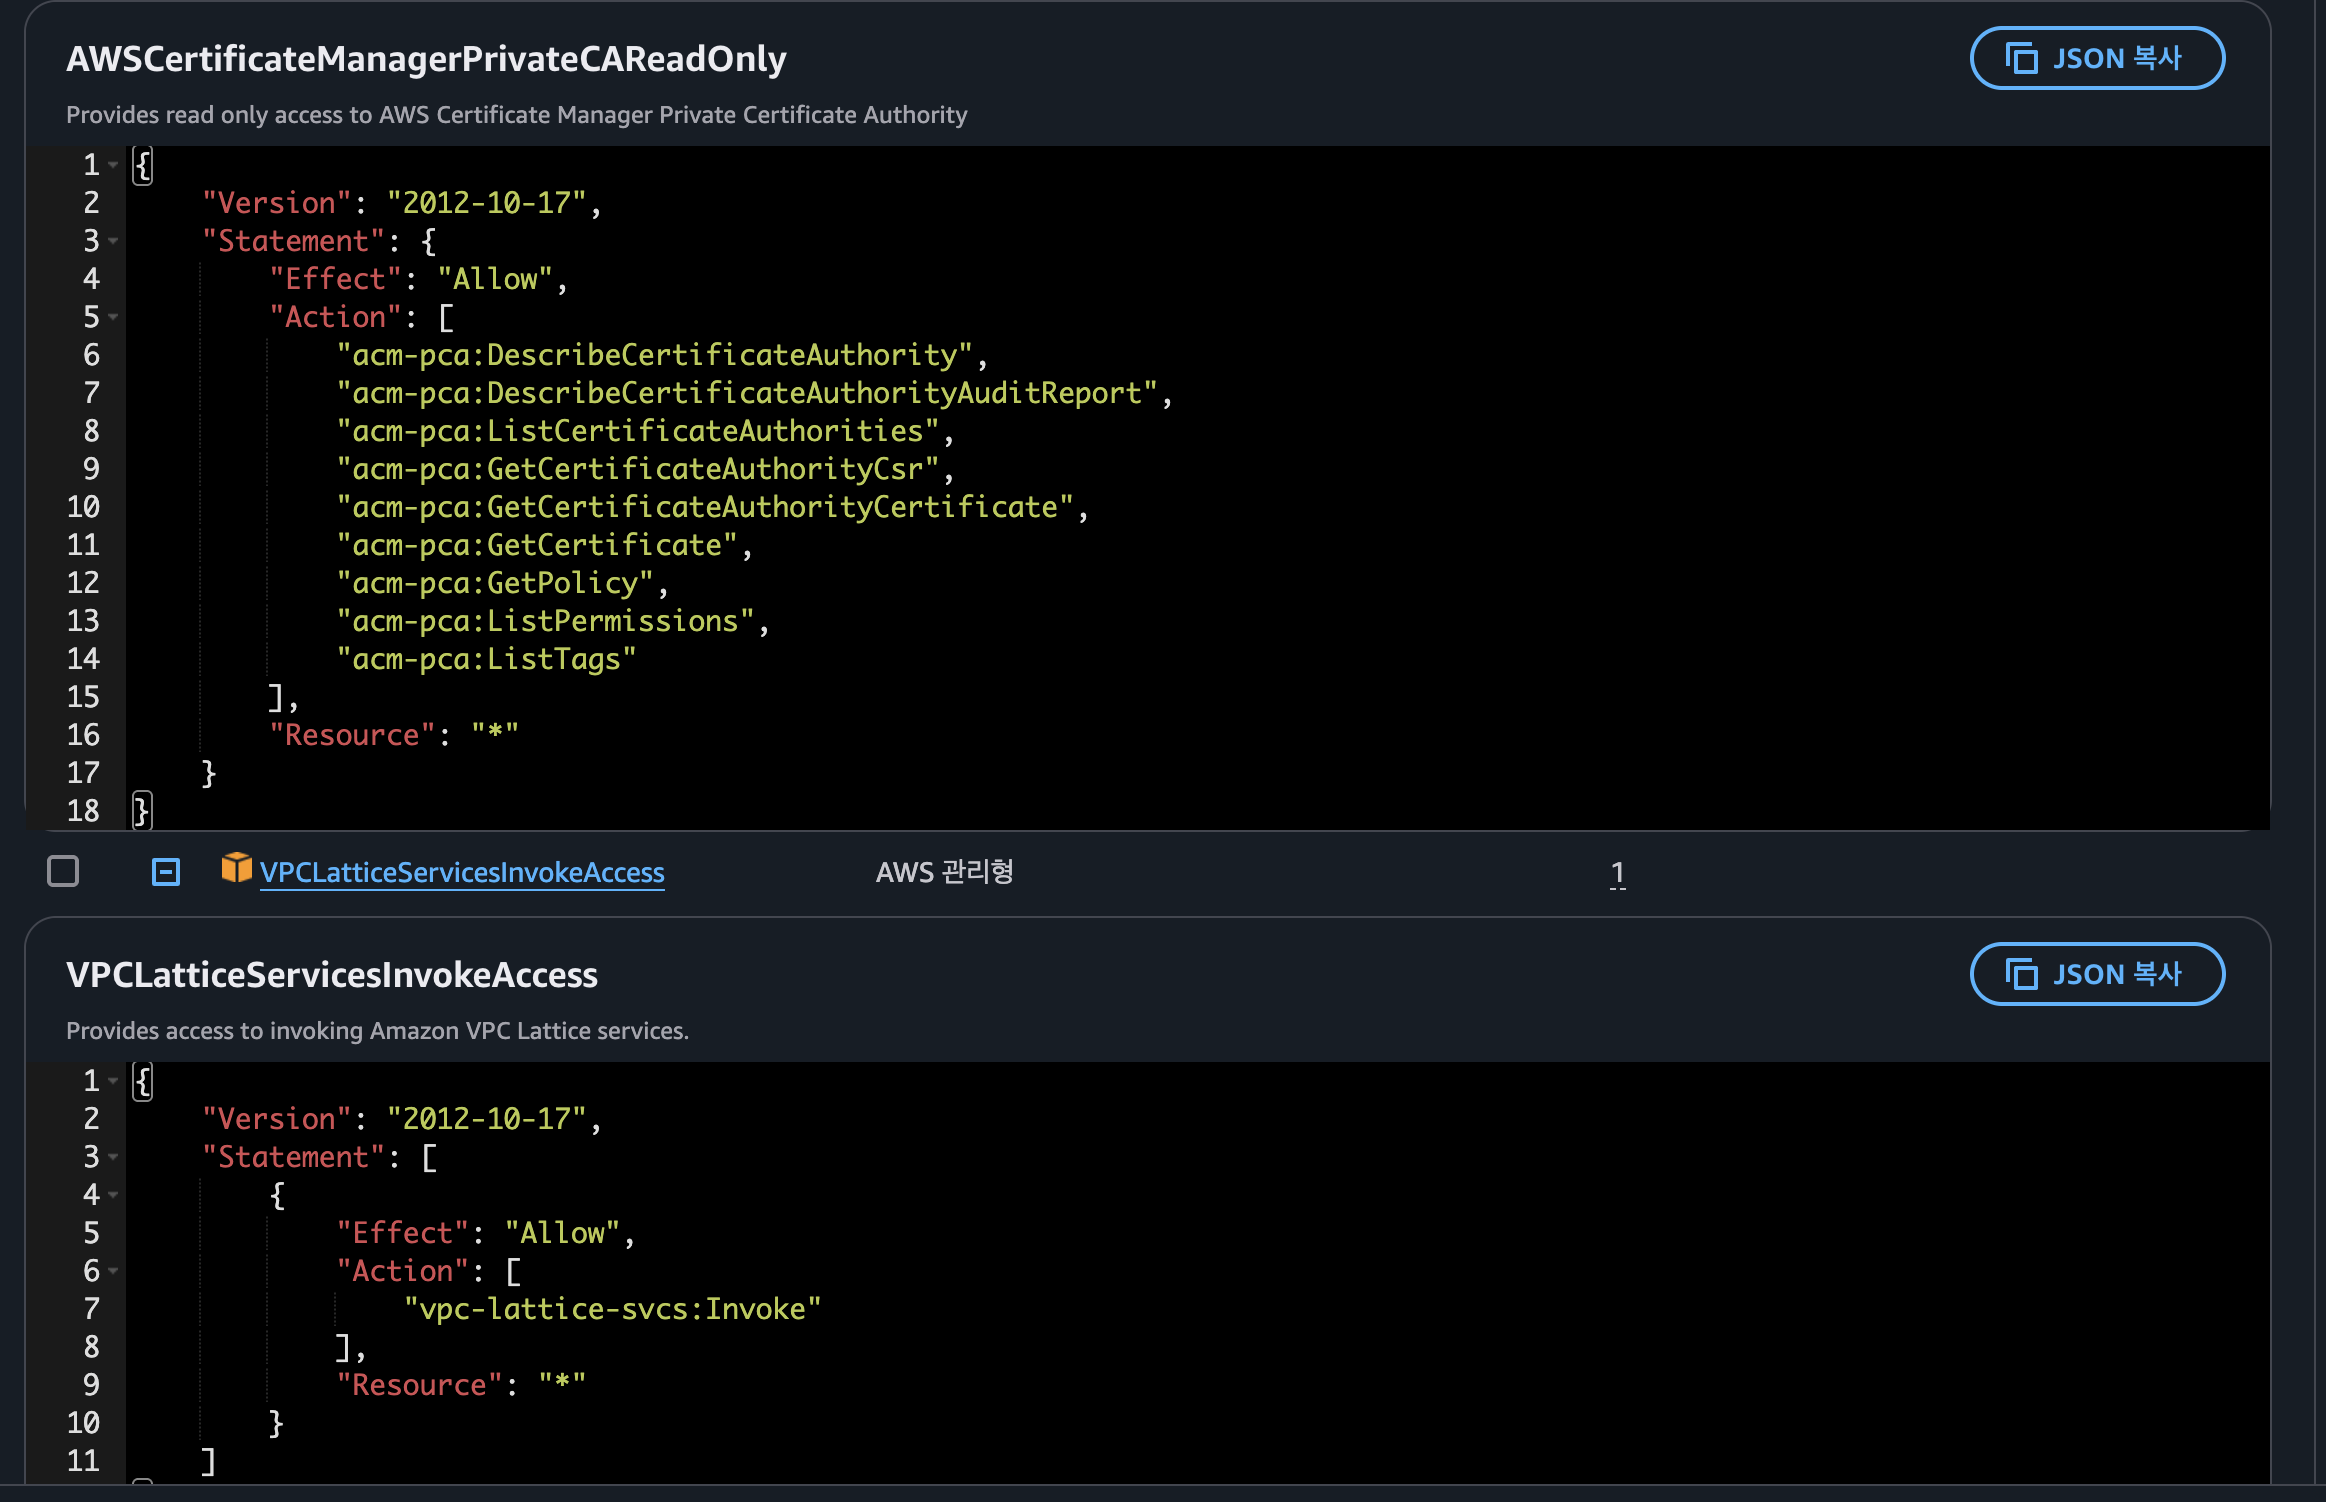
| 보안 & 인증 | ACM + AWS Private CA | *.example.com TLS 인증서 관리 및 발급 |
| IAM Auth Policy | 클러스터 간 호출 권한 제어 | |
| Envoy SigV4 Proxy (Kyverno 사이드카) | IAM 서명된 요청만 허용하는 사이드카 프록시 | |
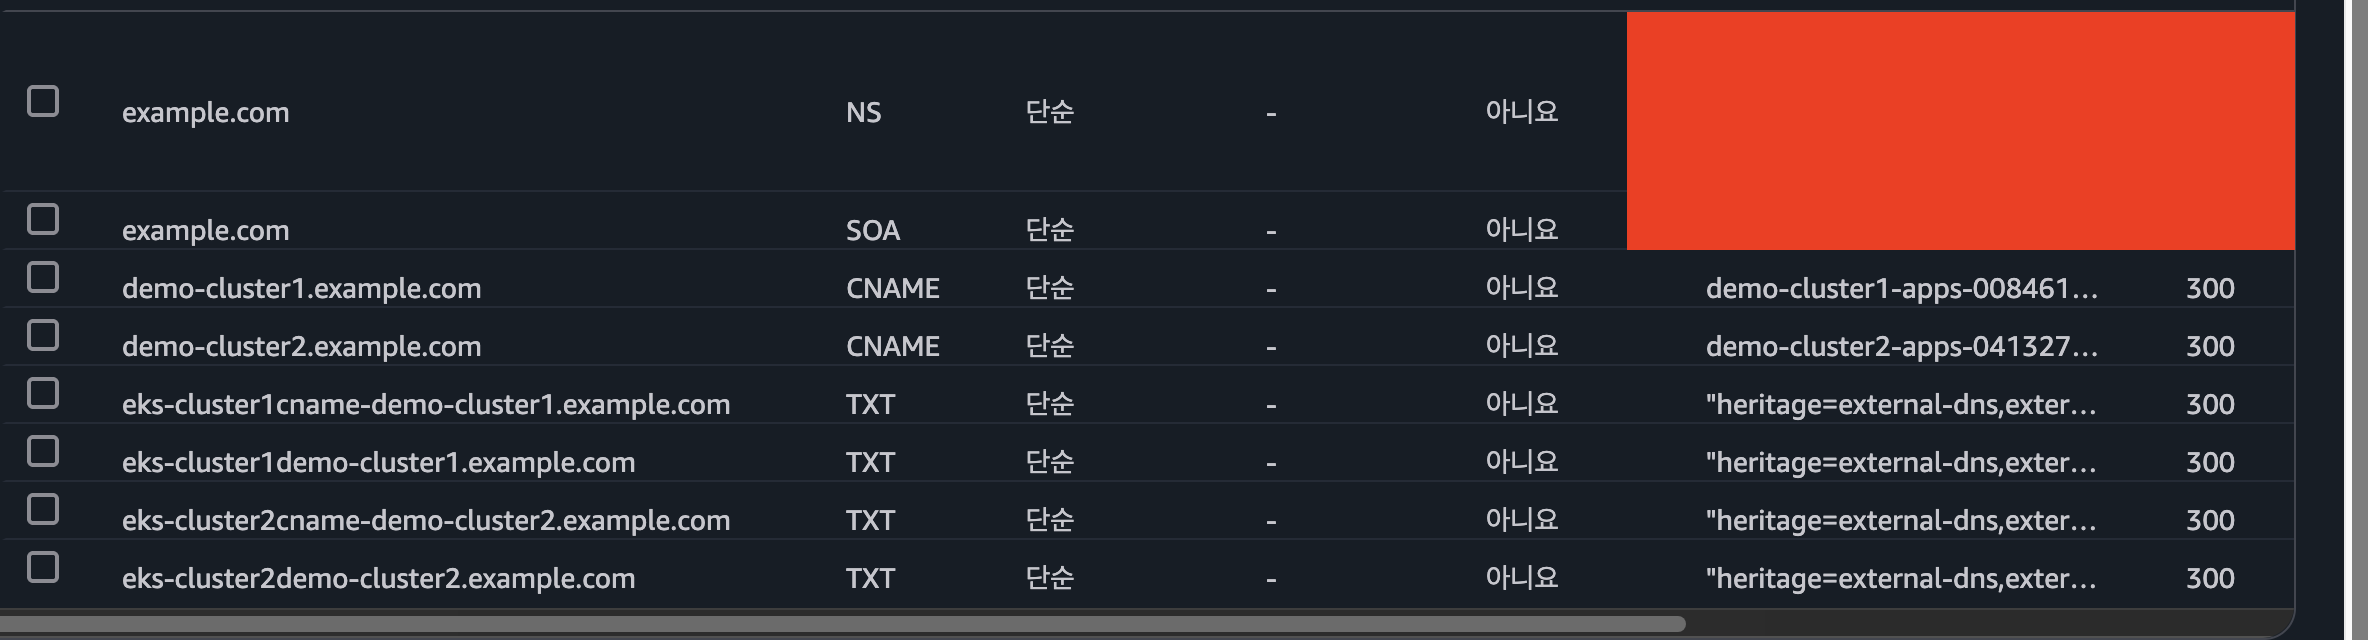
| DNS & SD | Amazon Route 53 Private Hosted Zone | 사설 DNS 존, Lattice 서비스와 결합 |
| ExternalDNS | Kubernetes Service → DNS 레코드 자동 생성 |
단계별 통신 흐름
-
클라이언트 요청
사용자는
https://demo-cluster1.example.com으로 요청을 전송합니다. -
VPC Lattice 접수
VPC Lattice가 요청을 받아 내부적으로 EKS Cluster1의 Envoy Proxy로 라우팅합니다.
-
Envoy SigV4 인증
Proxy 컨테이너는 IAM 자격 증명을 사용해 SigV4로 요청에 서명하고, TLS 터널을 설정합니다.
-
앱 처리
App1 Pod가 비즈니스 로직을 수행 후 응답을 반환합니다.
-
클러스터 간 호출
필요 시 Envoy를 통해 Cluster2의 서비스 (
demo-cluster2.example.com)로 동일한 방식으로 재연결 가능합니다. -
DNS 자동 관리
ExternalDNS가 Kubernetes Service 리소스를 감지해 Route 53에 레코드를 자동으로 등록·갱신합니다.
environment 프로비저닝
출처 : AEWS 스터디 3기
- 해당 폴더 접근
cd terraform-aws-eks-blueprints/patterns/vpc-lattice/cross-cluster-pod-communication/environment/
- main.tf 리전
ap-northeast-2으로 변경 (line 7)locals { name = "vpc-lattice" region = "ap-northeast-2" ## 해당 부분 변경 domain = var.custom_domain_name tags = { Blueprint = local.name GithubRepo = "github.com/aws-ia/terraform-aws-eks-blueprints" } }
- 인프라 프로비저닝 실행
terraform init
terraform apply --auto-approve
cluster 프로비저닝
- 해당 폴더 접근
cd ../cluster/
- main.tf 리전
ap-northeast-2으로 변경 (line 31)locals { name = "eks-${terraform.workspace}" region = "ap-northeast-2". # 해당 부분 변경 cluster_vpc_cidr = "10.0.0.0/16" azs = slice(data.aws_availability_zones.available.names, 0, 3) domain = data.terraform_remote_state.environment.outputs.custom_domain_name certificate_arn = data.terraform_remote_state.environment.outputs.aws_acm_cert_arn acmpca_arn = data.terraform_remote_state.environment.outputs.aws_acmpca_cert_authority_arn custom_domain = data.terraform_remote_state.environment.outputs.custom_domain_name app_namespace = "apps"
- cluster 1번 배포
./deploy.sh cluster1

# 배포 완료 후, 아래 명령으로 kubectl config 설정을 완료합니다.
≈
- cluster 2번 배포
./deploy.sh cluster2

# 배포 완료 후, 아래 명령으로 kubectl config 설정을 완료합니다.
eval `terraform output -raw configure_kubectl`
프로비저닝 된 인프라 및 애플리케이션 확인
Cluster 확인
- cluster 배포 확인

- Pod Identity associations 확인

- IAM Role 확인
VPC Lattice
- Lattice Gateway 확인
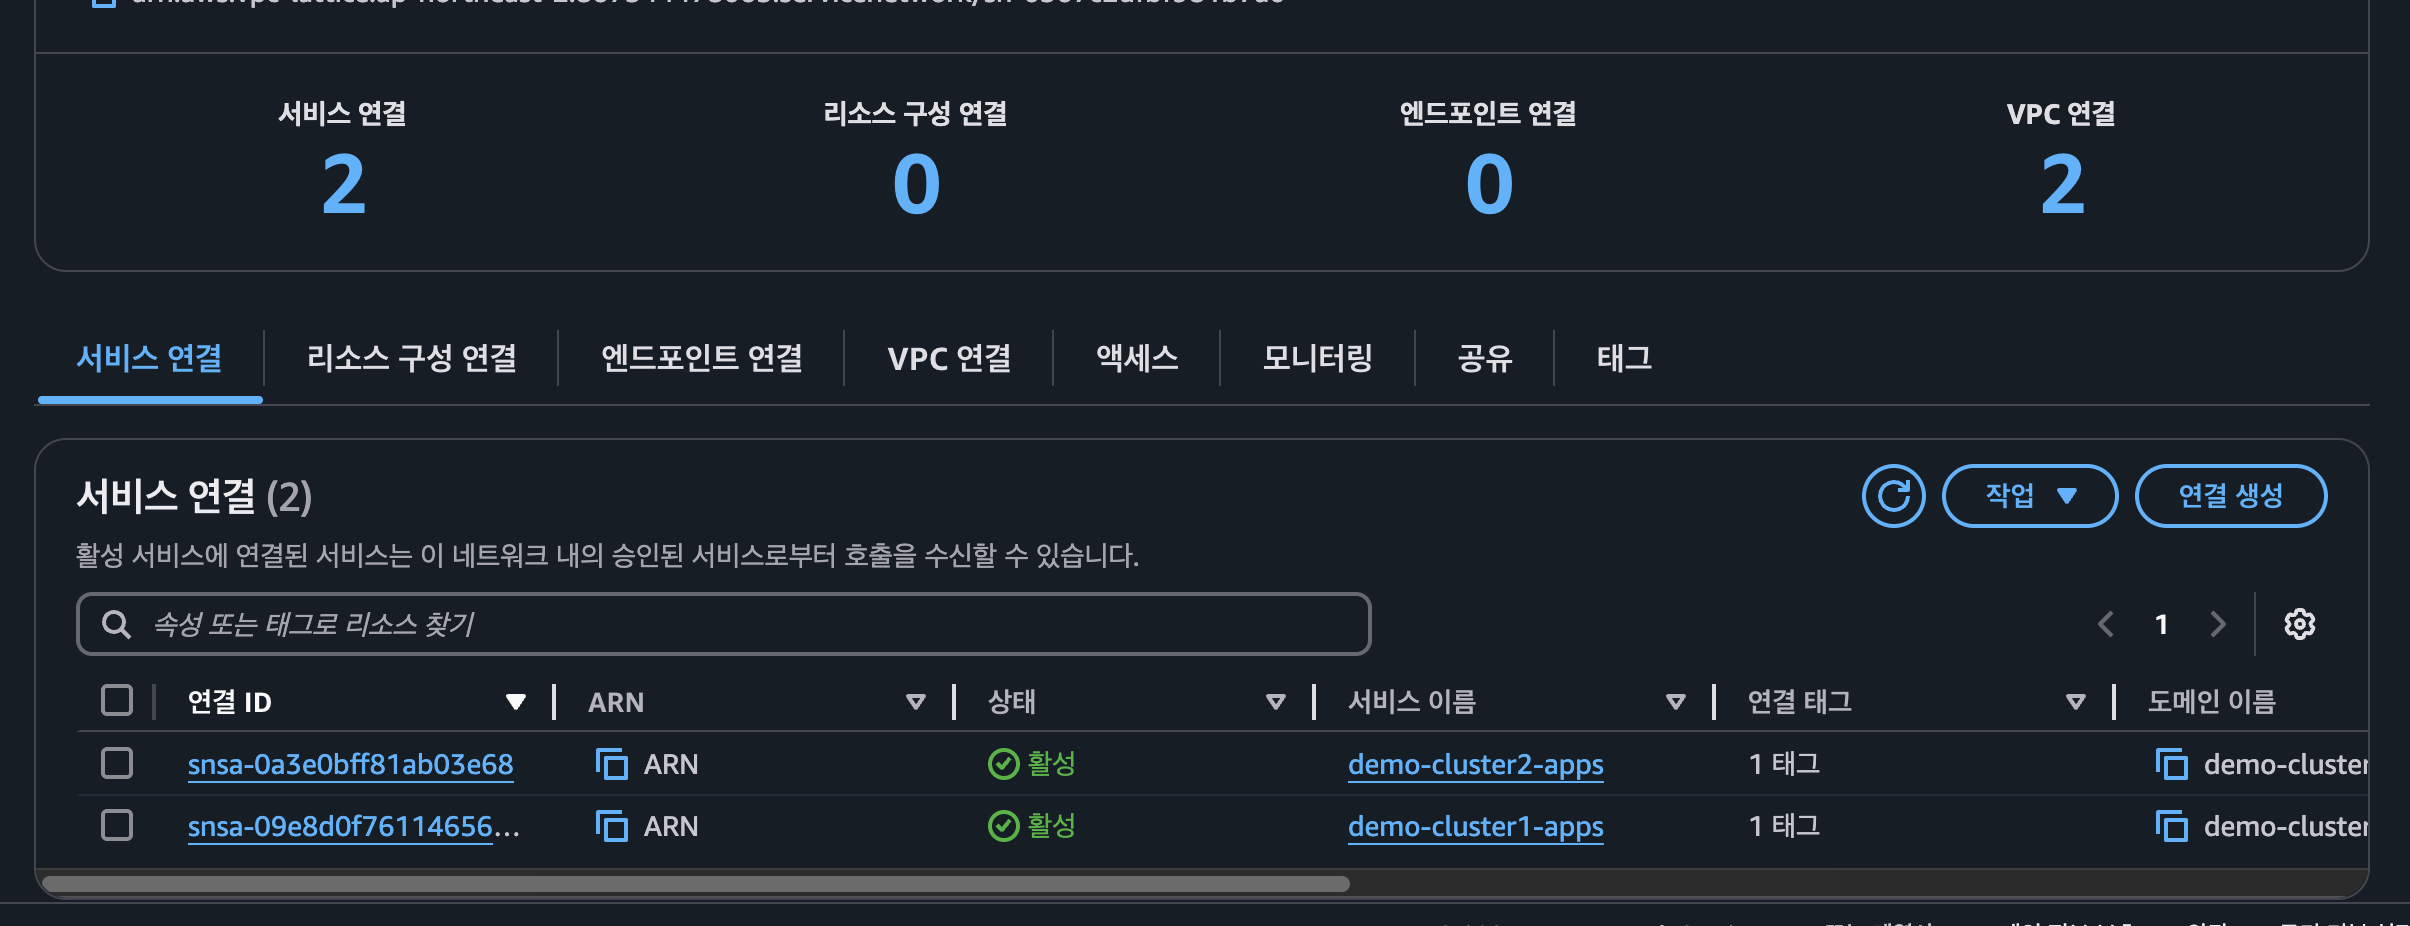
- Lattice Service 확인

- Route 53 확인
EKS 클러스터 별 애플리케이션
- cluster 1 확인
# cluster 1 전환
kubectl config use-context eks-cluster1

# pod 조회
kubectl get po -A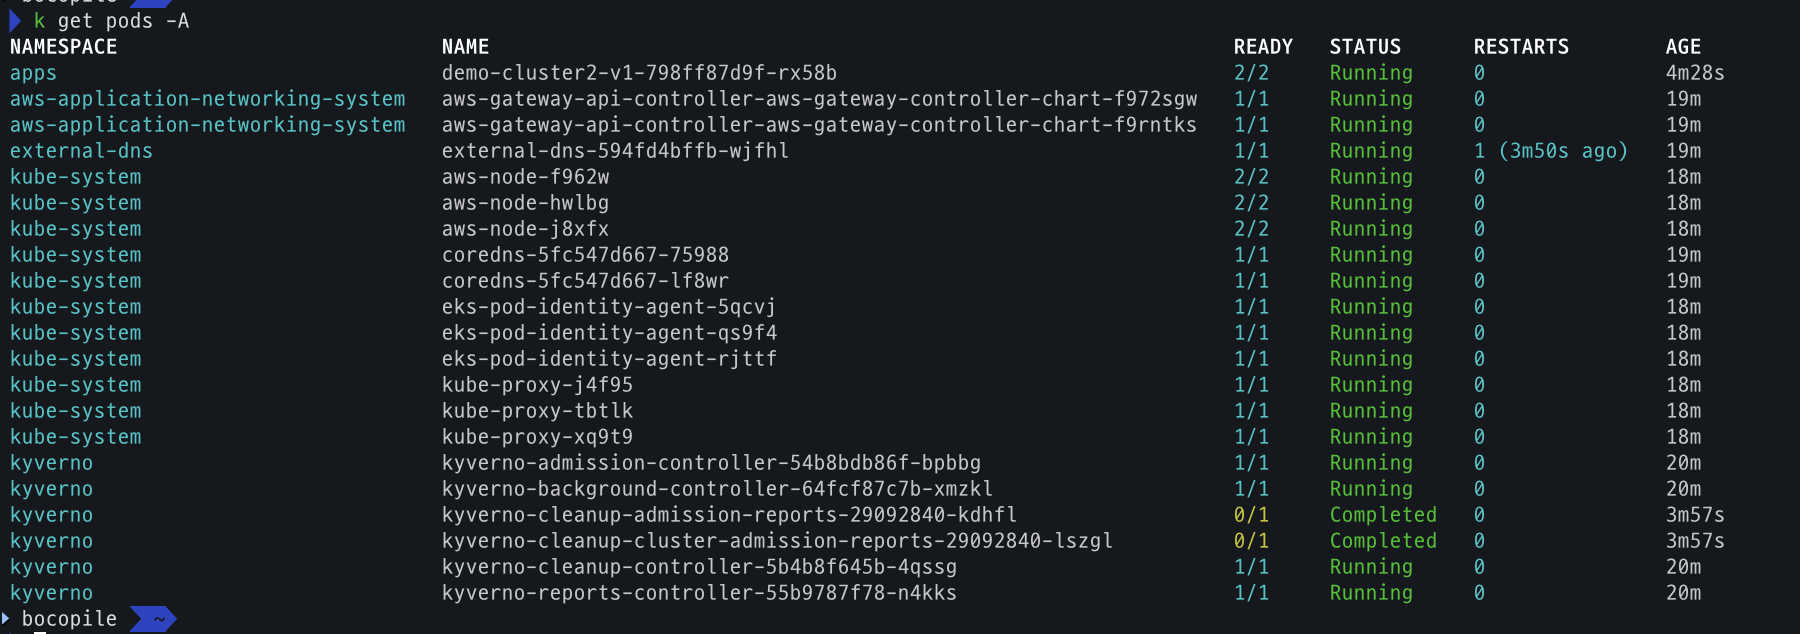
- cluster 2 확인
# cluster 2 전환
kubectl config use-context eks-cluster2

# pod 조회
kubectl get po -A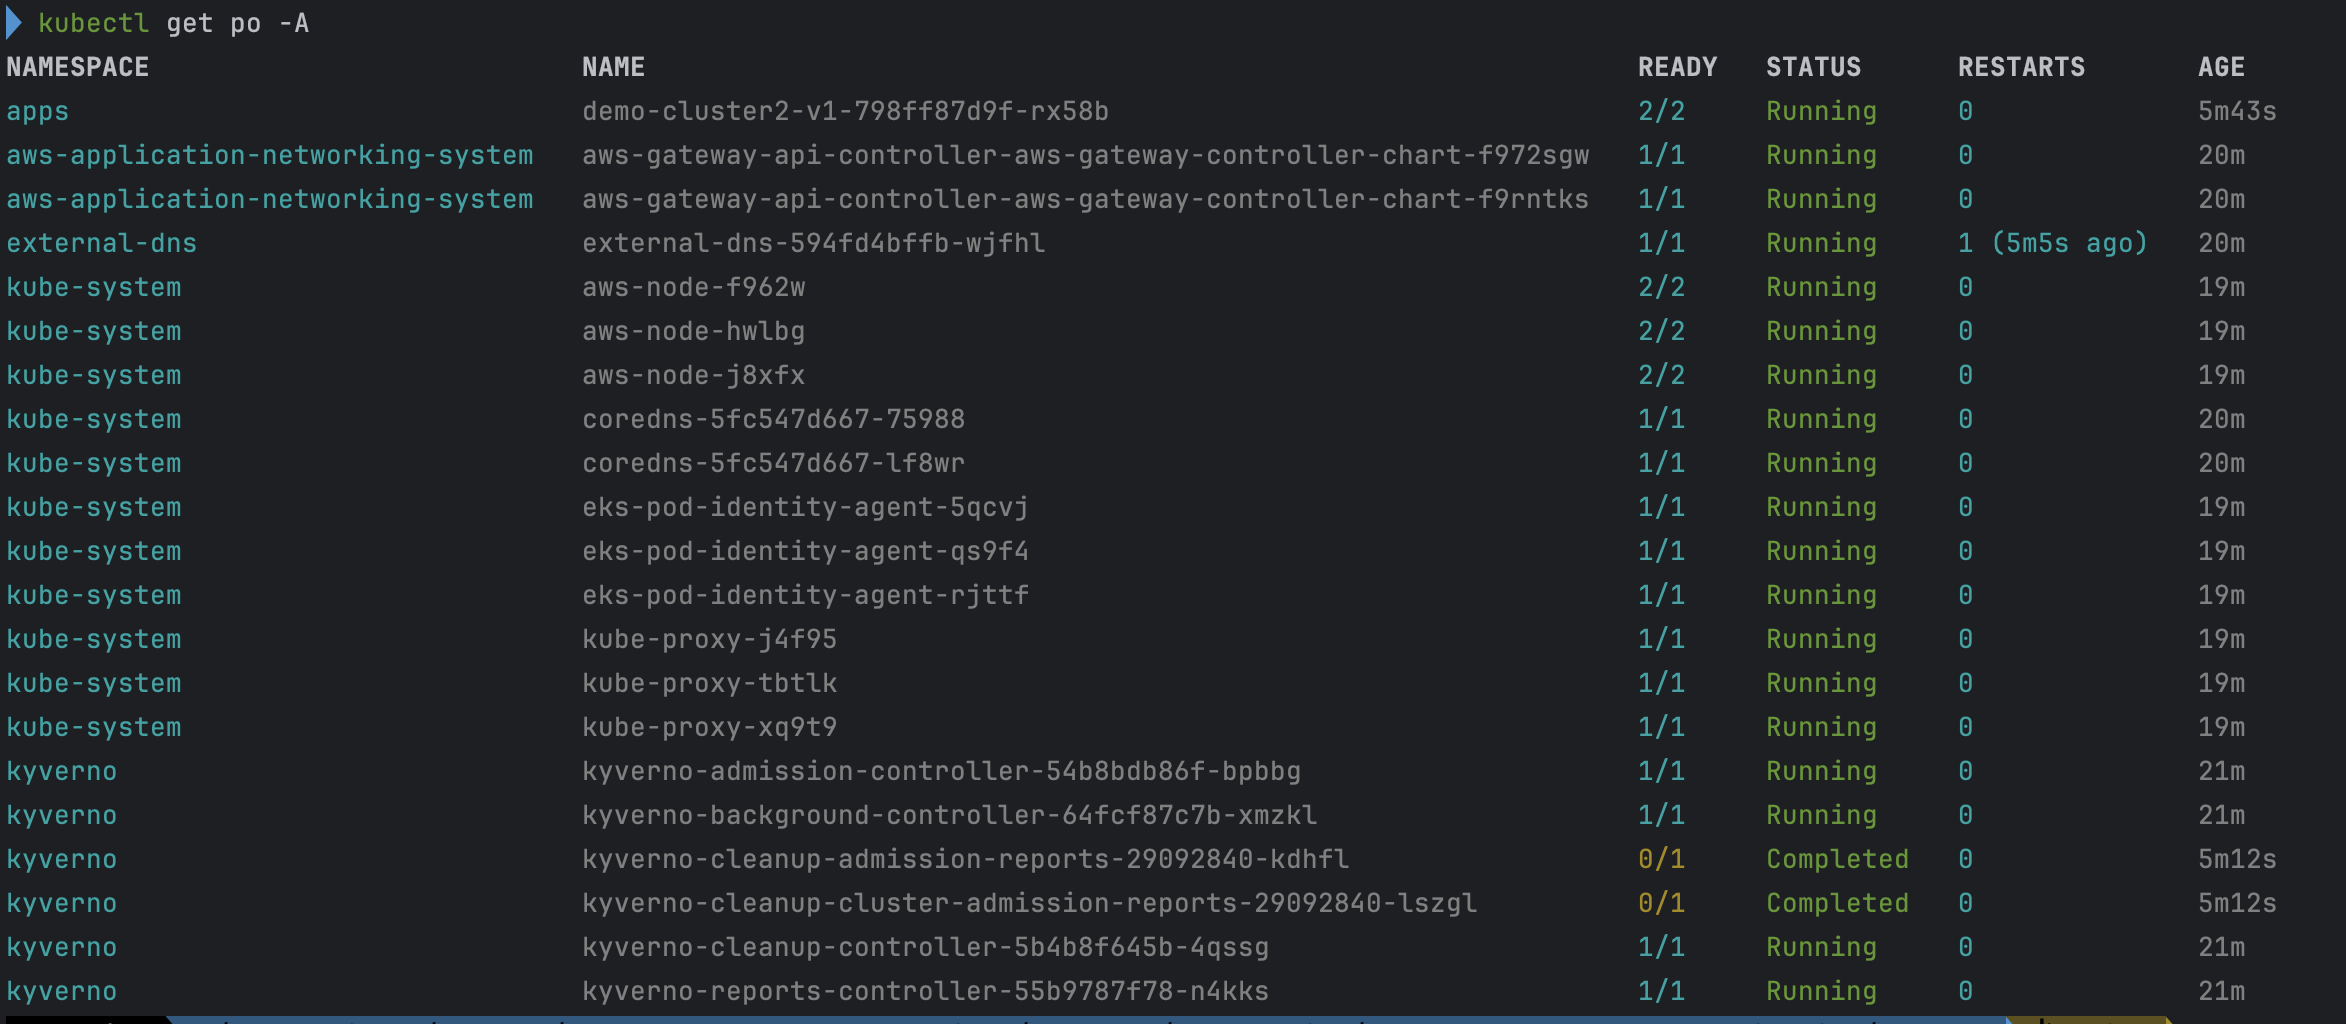
통신 테스트 및 동작방식 확인
- cluster 1번 데모 애플리케이션 → cluster 2번 데모 애플리케이션 호출
kubectl --context eks-cluster1 \ exec -ti -n apps deployments/demo-cluster1-v1 -c demo-cluster1-v1 \ -- curl demo-cluster2.example.com- 통신이 되는것을 확인

- 통신이 되는것을 확인
- cluster 1번 데모 애플리케이션 → cluster 1번 데모 애플리케이션 호출
kubectl --context eks-cluster1 \ exec -ti -n apps deployments/demo-cluster1-v1 -c demo-cluster1-v1 \ -- curl demo-cluster1.example.com- IAMAuthPolicy가 eks-cluster2 으로만 호출 가능하도록 설정하여서
AcceptDeniendException발생.
- IAMAuthPolicy가 eks-cluster2 으로만 호출 가능하도록 설정하여서
- IAMAuthPolicy 상세 확인
kubectl --context eks-cluster1 \
  get IAMAuthPolicy -n apps demo-cluster1-iam-auth-policy  \
  -o json | jq ".spec.policy | fromjson"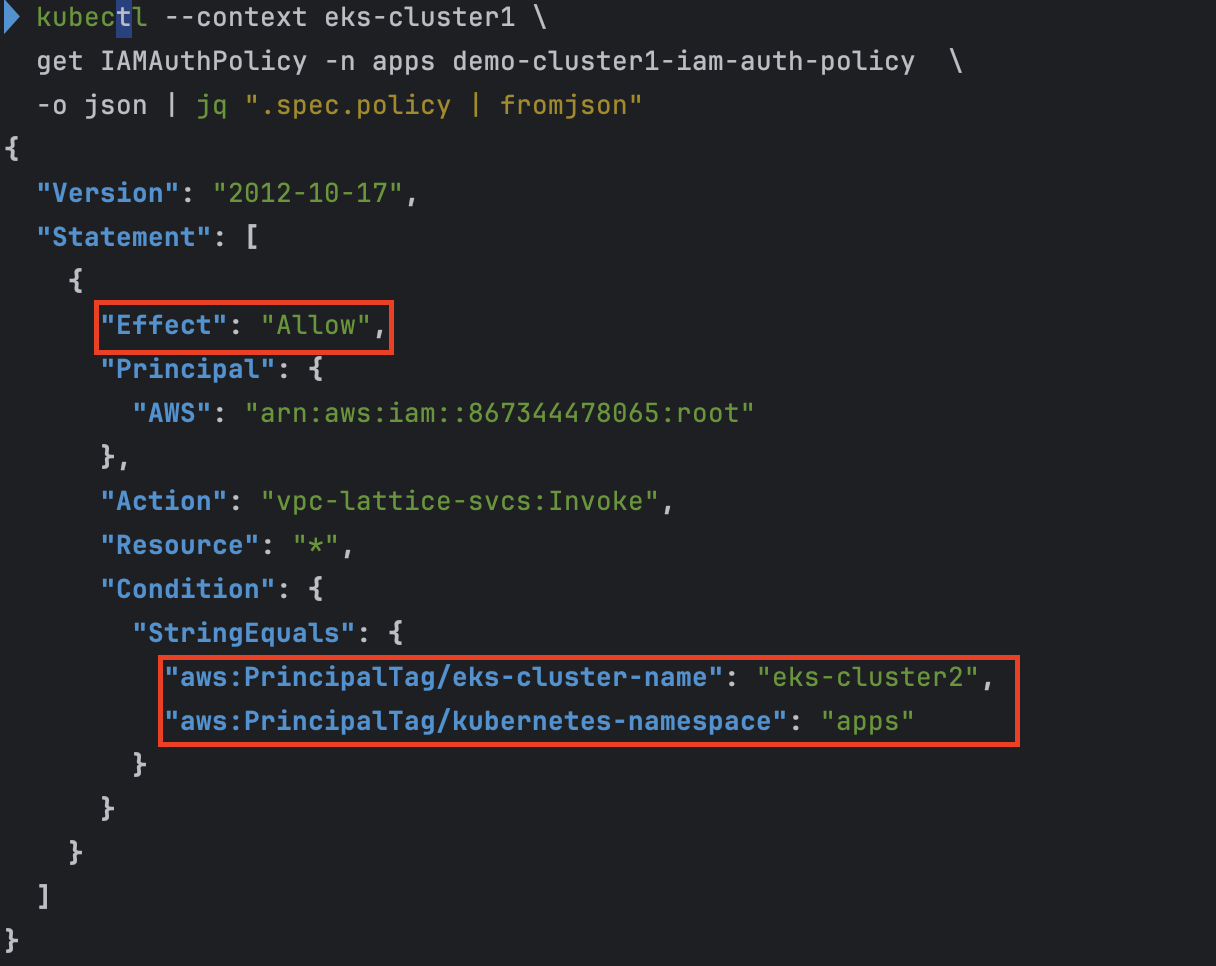
- IAMAuthPolicy 상세 확인
kubectl describe IAMAuthPolicy demo-cluster1-iam-auth-policy -n apps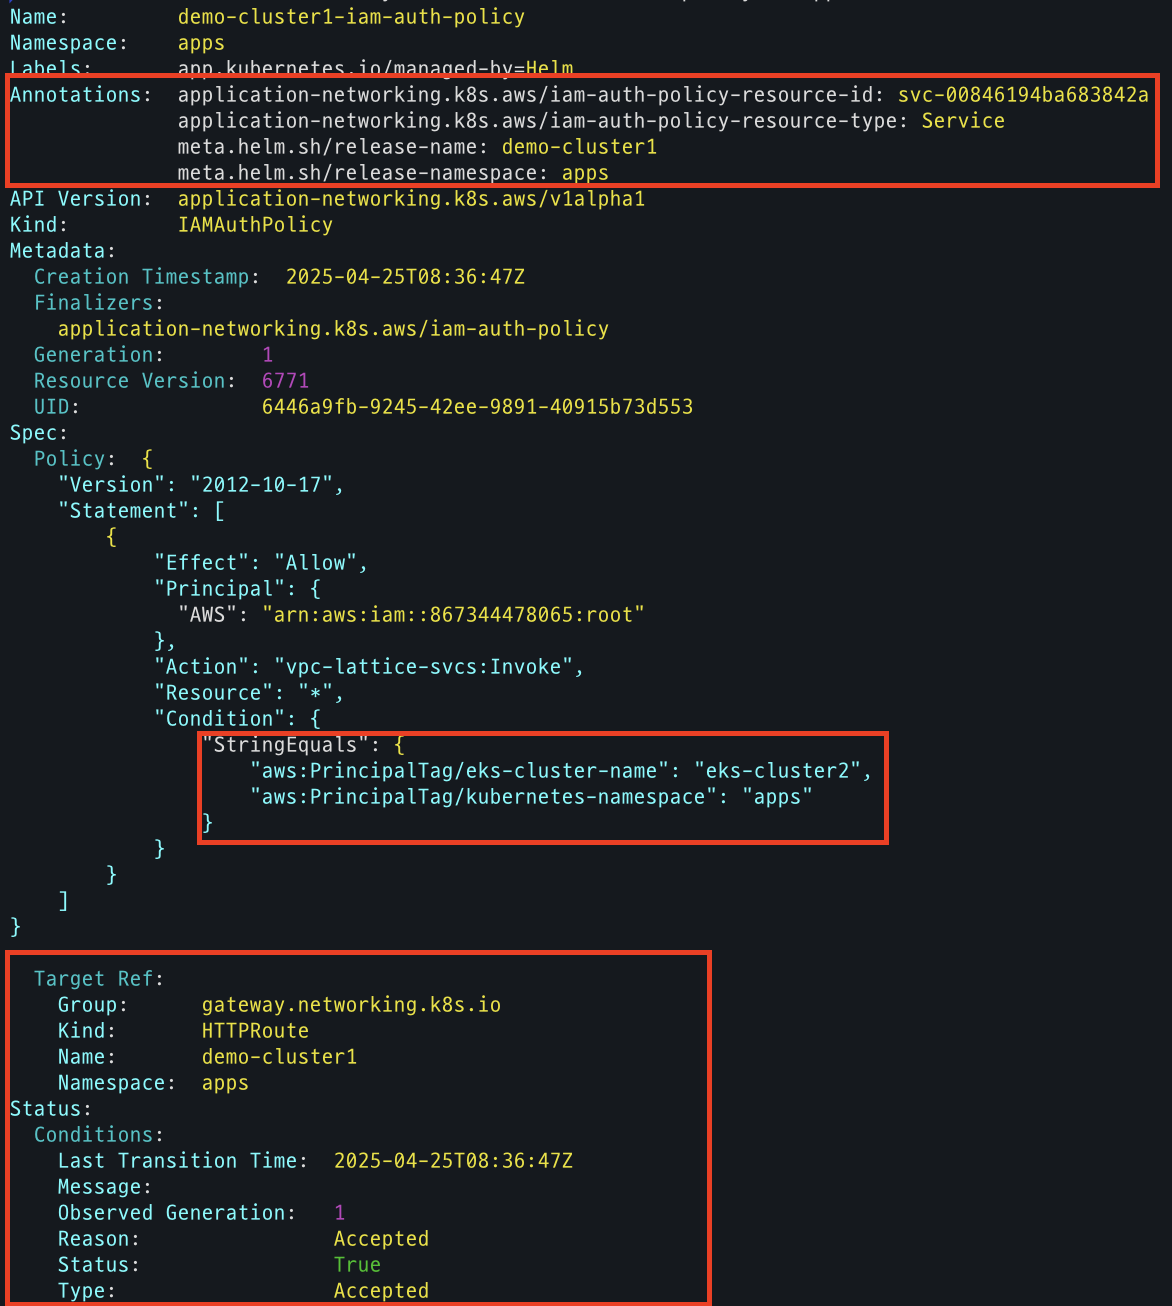
Kyverno의 역할
- Pod Mutating via Kyverno ClusterPolicy
- runAsGroup 설정: 컨테이너의 GID를
0이 아닌1000으로 지정해, 관리자 권한 프로세스(예: kube-proxy)에 적용되지 않도록 함 - iptables 룰 주입: 모든 애플리케이션 트래픽을 Envoy 사이드카로 리다이렉트하도록
REDIRECT규칙 삽입
- runAsGroup 설정: 컨테이너의 GID를
- Envoy 사이드카 프록시 주입
- Private CA 인증서 설치: init 스크립트 실행 시 AWS Private CA에서 발급된 인증서를 가져와 컨테이너의 신뢰 저장소에 추가
- VPC Lattice 신뢰 설정: 설치된 인증서를 기반으로 Envoy가 VPC Lattice 엔드포인트와 안전하게 통신하도록 구성
이 과정을 통해 데모 애플리케이션 Pod는 Kyverno로 자동조작(mutating)되어, 애플리케이션 → Envoy → VPC Lattice 경로를 투명하게 보호할 수 있게 됩니다.
실습 리소스 정리
cd ./patterns/vpc-lattice/cross-cluster-pod-communication/cluster/

./destroy.sh cluster2

./destroy.sh cluster1