5. EKS PV for Instance Stroe & Add Node Group
신규 노드 그룹 (ng2 생성)

-
c5d.large 의 EC2 인스턴스 스토어(임시 블록 스토리지) 설정 작업
- 기본 디스크 드라이브 오류, 인스턴스가 중지됨, 인스턴스가 최대 절전 모드로 전환됨, 인스턴스가 종료됨
- 인스턴스 스토어는 EC2 스토리지(EBS) 정보에 출력되지는 않는다
-
인스턴스 스토어 볼륨의 모든 타입의 스토리지 크기 조회
aws ec2 describe-instance-types \
 --filters "Name=instance-type,Values=c5*" "Name=instance-storage-supported,Values=true" \
 --query "InstanceTypes[].[InstanceType, InstanceStorageInfo.TotalSizeInGB]" \
 --output table
- 신규 노드 그룹 생성 전 정호 확인
eksctl create nodegroup -c $CLUSTER_NAME -r ap-northeast-2 --subnet-ids "$PubSubnet1","$PubSubnet2","$PubSubnet3" --ssh-access \
  -n ng2 -t c5d.large -N 1 -m 1 -M 1 --node-volume-size=30 --node-labels disk=instancestore --max-pods-per-node 100 --dry-run > myng2.yaml
- 변수 선언
#
export PubSubnet1=$(aws ec2 describe-subnets --filters Name=tag:Name,Values="$CLUSTER_NAME-Vpc1PublicSubnet1" --query "Subnets[0].[SubnetId]" --output text)
export PubSubnet2=$(aws ec2 describe-subnets --filters Name=tag:Name,Values="$CLUSTER_NAME-Vpc1PublicSubnet2" --query "Subnets[0].[SubnetId]" --output text)
export PubSubnet3=$(aws ec2 describe-subnets --filters Name=tag:Name,Values="$CLUSTER_NAME-Vpc1PublicSubnet3" --query "Subnets[0].[SubnetId]" --output text)
echo $PubSubnet1 $PubSubnet2 $PubSubnet3

#
SSHKEYNAME=<각자 자신의 SSH Keypair 이름>
SSHKEYNAME=bocopile-key
신규 노드 그룹 생성
- myng2.yaml 파일 작성
cat << EOF > myng2.yaml
apiVersion: eksctl.io/v1alpha5
kind: ClusterConfig
metadata:
  name: myeks
  region: ap-northeast-2
  version: "1.31"

managedNodeGroups:
- amiFamily: AmazonLinux2
  desiredCapacity: 1
  instanceType: c5d.large
  labels:
    alpha.eksctl.io/cluster-name: myeks
    alpha.eksctl.io/nodegroup-name: ng2
    disk: instancestore
  maxPodsPerNode: 110
  maxSize: 1
  minSize: 1
  name: ng2
  ssh:
    allow: true
    publicKeyName: $SSHKEYNAME
  subnets:
  - $PubSubnet1
  - $PubSubnet2
  - $PubSubnet3
  tags:
    alpha.eksctl.io/nodegroup-name: ng2
    alpha.eksctl.io/nodegroup-type: managed
  volumeIOPS: 3000
  volumeSize: 30
  volumeThroughput: 125
  volumeType: gp3
  preBootstrapCommands:
    - |
      # Install Tools
      yum install nvme-cli links tree jq tcpdump sysstat -y

      # Filesystem & Mount
      mkfs -t xfs /dev/nvme1n1
      mkdir /data
      mount /dev/nvme1n1 /data

      # Get disk UUID
      uuid=\$(blkid -o value -s UUID mount /dev/nvme1n1 /data)

      # Mount the disk during a reboot
      echo /dev/nvme1n1 /data xfs defaults,noatime 0 2 >> /etc/fstab
EOF
- 신규 노드 그룹 생성 , 확인
# 신규 노드 그룹 생성
eksctl create nodegroup -f myng2.yaml

# 확인
kubectl get node --label-columns=node.kubernetes.io/instance-type,eks.amazonaws.com/capacityType,topology.kubernetes.io/zone
kubectl get node -l disk=instancestore
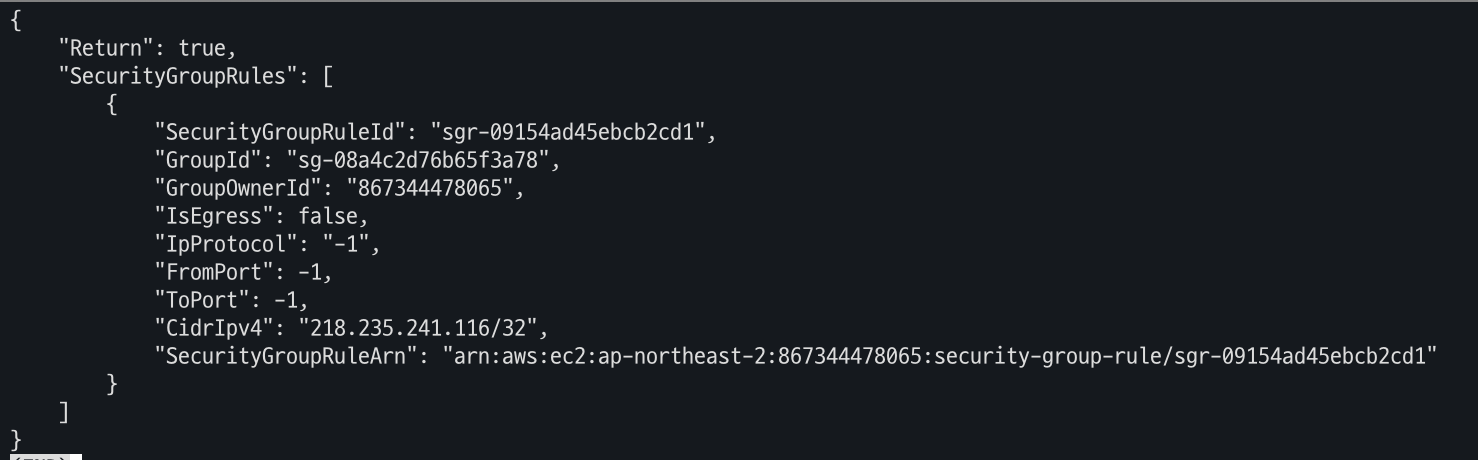
- ng2 노드 그룹 (ng2-remoteAccess 포함된 보안 그룹 ID) 확인
# ng2 노드 그룹 *ng2-remoteAccess* 포함된 보안그룹 ID
aws ec2 describe-security-groups --filters "Name=group-name,Values=*ng2-remoteAccess*" | jq
export NG2SGID=$(aws ec2 describe-security-groups --filters "Name=group-name,Values=*ng2-remoteAccess*" --query 'SecurityGroups[*].GroupId' --output text)
aws ec2 authorize-security-group-ingress --group-id $NG2SGID --protocol '-1' --cidr $(curl -s ipinfo.io/ip)/32
aws ec2 authorize-security-group-ingress --group-id $NG2SGID --protocol '-1' --cidr 172.20.1.100/32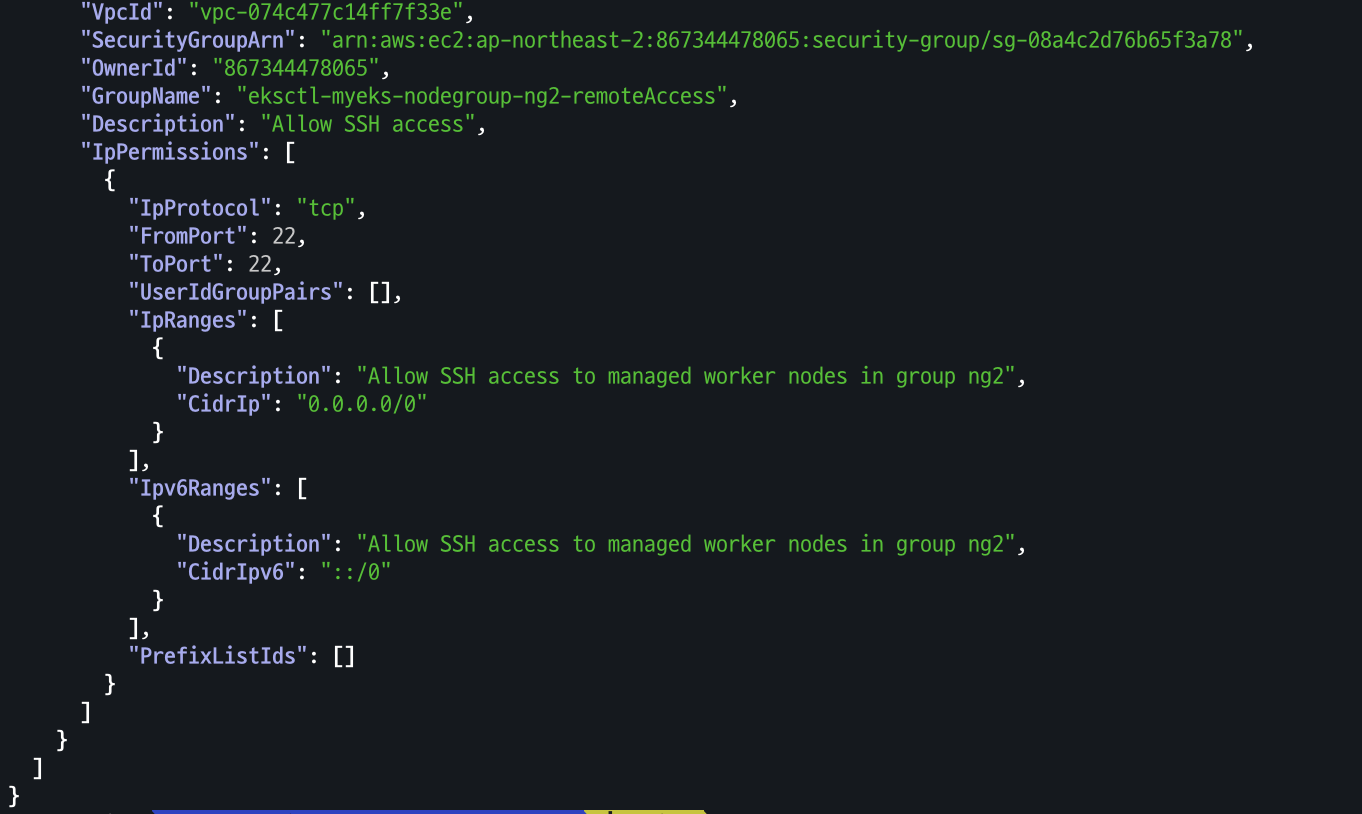

-
워커 노드 SSH 접근 테스트
# 워커 노드 SSH 접속
N4=<각자 자신의 워커 노드4번 공인 IP 지정>
N4=3.39.239.90
ssh ec2-user@$N4 hostname
# 확인
ssh ec2-user@$N4 sudo nvme list
ssh ec2-user@$N4 sudo lsblk -e 7 -d
ssh ec2-user@$N4 sudo df -hT -t xfs
ssh ec2-user@$N4 sudo tree /data
ssh ec2-user@$N4 sudo cat /etc/fstab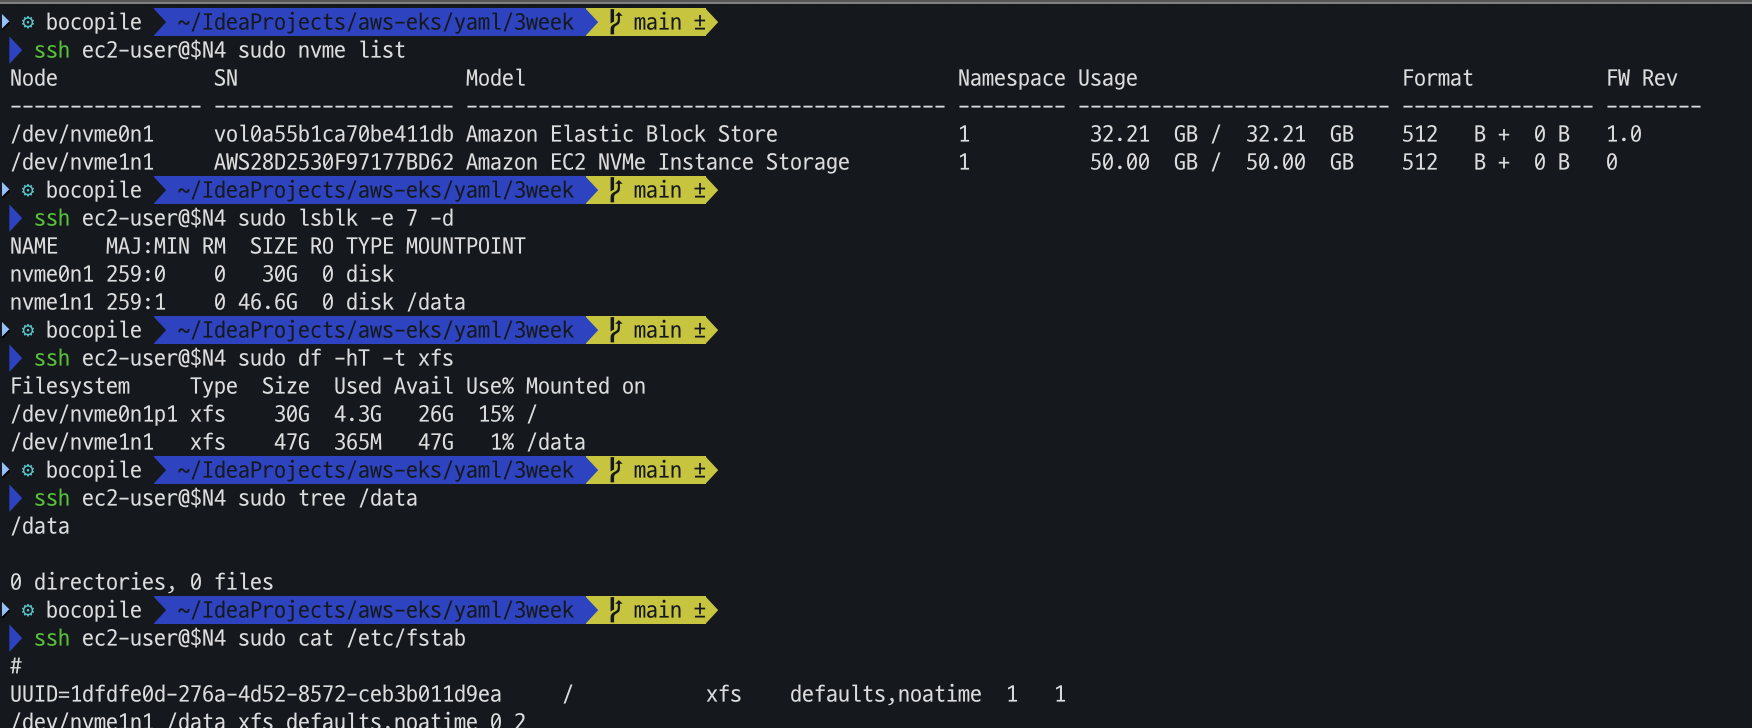
- 해당 디스크의 최대 파드 수 확인
# (옵션) max-pod 확인
kubectl describe node -l disk=instancestore | grep Allocatable: -A7
- local-path 스토리지 클래스 재생성 : 패스 변경
# 기존 local-path 스토리지 클래스 삭제
kubectl delete -f https://raw.githubusercontent.com/rancher/local-path-provisioner/v0.0.31/deploy/local-path-storage.yaml

# local-path-provisioner 설치
curl -sL https://raw.githubusercontent.com/rancher/local-path-provisioner/v0.0.31/deploy/local-path-storage.yaml | sed 's/opt/data/g' | kubectl apply -f -

# nodePathMap 확인
kubectl describe cm -n local-path-storage local-path-config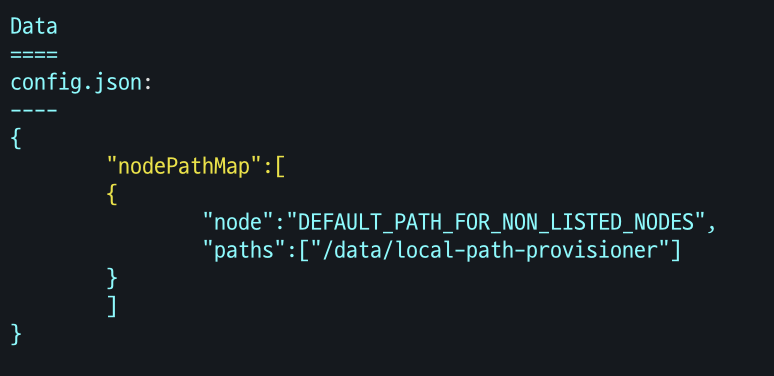
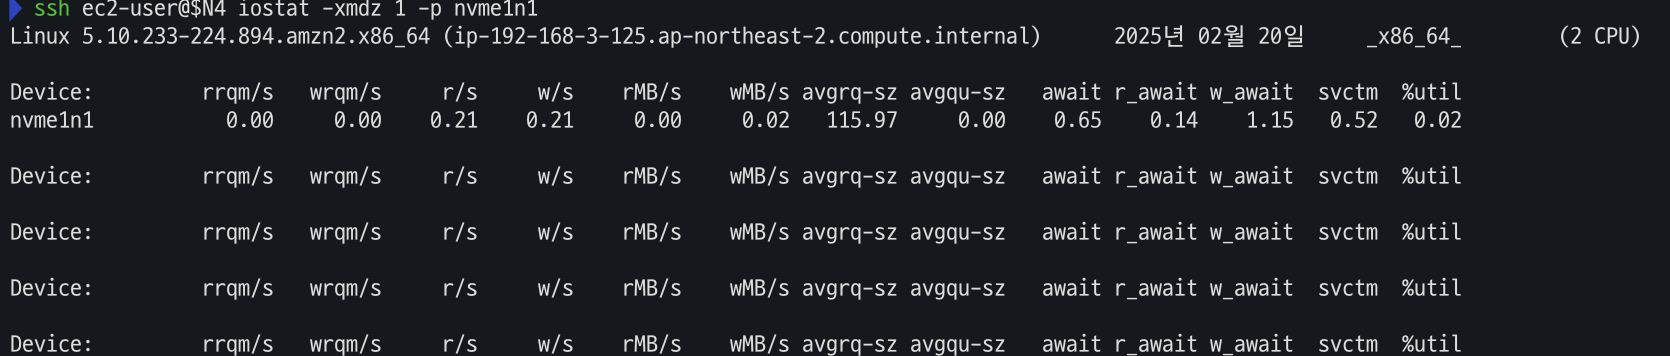
- 운영서버 Read 측정
# 모니터링
watch 'kubectl get pod -owide;echo;kubectl get pv,pvc'
ssh ec2-user@$N4 iostat -xmdz 1 -p nvme1n1
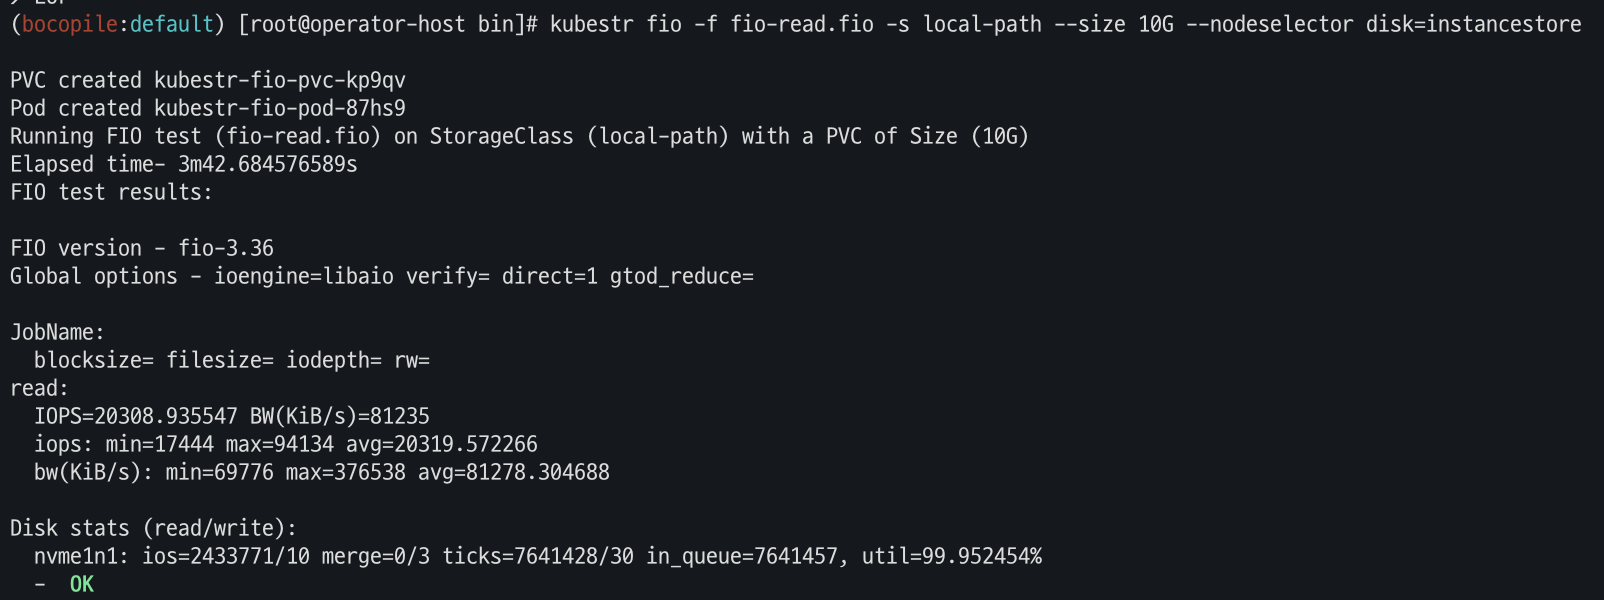
# [운영서버 EC2] Read 측정
kubestr fio -f fio-read.fio -s local-path --size 10G --nodeselector disk=instancestore
6. 노드 그룹
사전 지식
Docker Buildx란?
- Docker Buildx는 Docker의 빌드 기능을 확장한 빌드 도구로, 기존
docker build명령어보다 다중 아키텍처 이미지 빌드, 고급 캐싱, 빌드 성능 향상 등의 기능을 제공 - 주요 기능
- 멀티 아키텍처 빌드 지원
- 하나의
Dockerfile을 사용해 x86, ARM, RISC-V 등 여러 아키텍처에 대한 이미지를 동시에 빌드
- 하나의
- 병렬 빌드
- 여러 노드에서 동시에 빌드를 실행하여 성능 최적화
docker-container드라이버를 사용하면 원격 빌드 노드를 추가하여 빌드 클러스터를 만들 수 있음
- 캐싱 기능 향상
- 내장된 캐시 내보내기/가져오기 기능을 지원하여 빌드 속도를 최적화
-cache-from및-cache-to옵션을 사용하여 이전 빌드 캐시를 재사용 가능
- 멀티 아키텍처 빌드 지원
docker buildx 실행
- EC2 현재 아키텍처 조회
arch
- 서로 다른 아키텍처의 image를 실행
# CPU Arch arm64v8 , riscv64 실행 시도 docker run --rm -it riscv64/ubuntu bash docker run --rm -it arm64v8/ubuntu bash- 아키텍처가 맞지 않아 실행 실패가 된다.
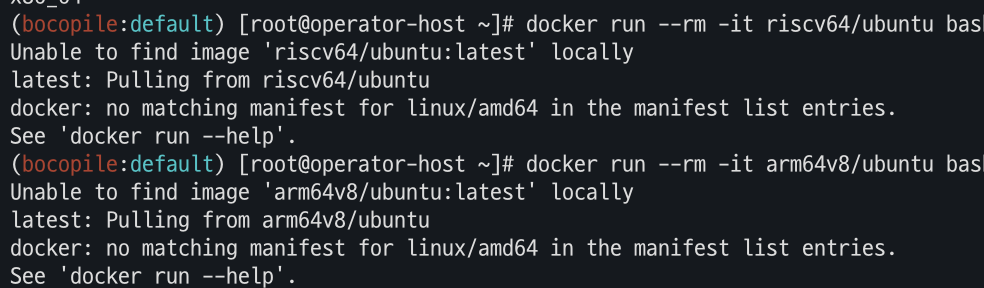
- 아키텍처가 맞지 않아 실행 실패가 된다.
- Docker buildx 활성화
# docker buildx 활성화 (멀티 아키텍처 빌드를 위해 필요)
docker run --rm --privileged multiarch/qemu-user-static --reset -p yes
docker images

docker buildx create --use --name mybuilder
docker buildx ls
- Buildx 정상 동작 확인
docker buildx inspect --bootstrap
docker ps

컨테이너 이미지 빌드 및 실행
- amd 64 / arm 64
#
mkdir myweb && cd myweb

# server.py 파일 작성
cat > server.py <<EOF
from http.server import ThreadingHTTPServer, BaseHTTPRequestHandler
from datetime import datetime
import socket

class RequestHandler(BaseHTTPRequestHandler):
    def do_GET(self):
        self.send_response(200)
        self.send_header('Content-type', 'text/plain')
        self.end_headers()

        now = datetime.now()
        hostname = socket.gethostname()
        response_string = now.strftime("The time is %-I:%M:%S %p, VERSION 0.0.1\n")
        response_string += f"Server hostname: {hostname}\n"
        self.wfile.write(bytes(response_string, "utf-8"))

def startServer():
    try:
        server = ThreadingHTTPServer(('', 80), RequestHandler)
        print("Listening on " + ":".join(map(str, server.server_address)))
        server.serve_forever()
    except KeyboardInterrupt:
        server.shutdown()

if __name__ == "__main__":
    startServer()
EOF

# Dockerfile 생성
cat > Dockerfile <<EOF
FROM python:3.12
ENV PYTHONUNBUFFERED 1
COPY . /app
WORKDIR /app
CMD python3 server.py
EOF

# 빌드, 실행
docker pull python:3.12
docker build -t myweb:1 -t myweb:latest .
docker images
docker run -d -p 8080:80 --name=timeserver myweb
curl http://localhost:8080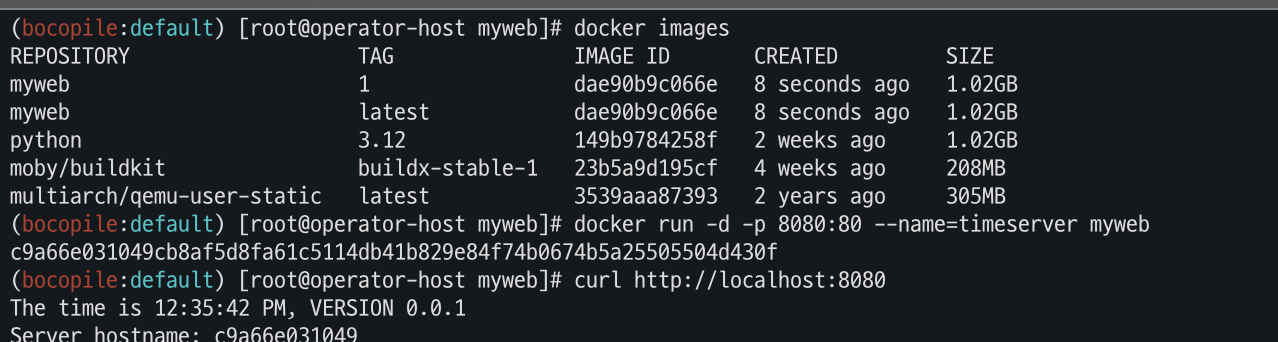
# 확인 후 Container 삭제 진행
docker rm -f timeserver
docker images- Docker hub 로그인
-
Docker Hub 계정이 없는 경우 https://hub.docker.com/ 여기에서 회원가입을 진행해야 한다.
docker login
-
-
멀티 플랫폼 빌드, 푸시
 # 멀티 플랫폼 빌드 후 푸시
 DOCKERNAME=<도커허브 계정명>
 DOCKERNAME=gjrjr4545

 docker buildx build --platform linux/amd64,linux/arm64 --push --tag $DOCKERNAME/myweb:multi .
 docker images
 docker manifest inspect $DOCKERNAME/myweb:multi | jq
 docker buildx imagetools inspect $DOCKERNAME/myweb:multi
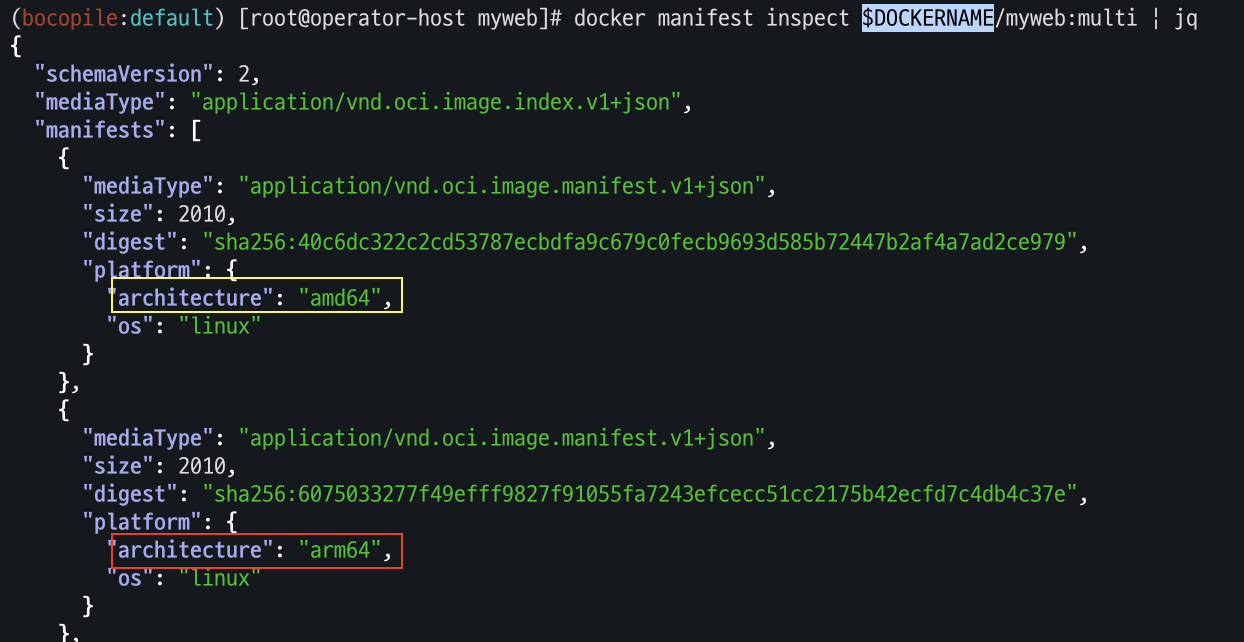
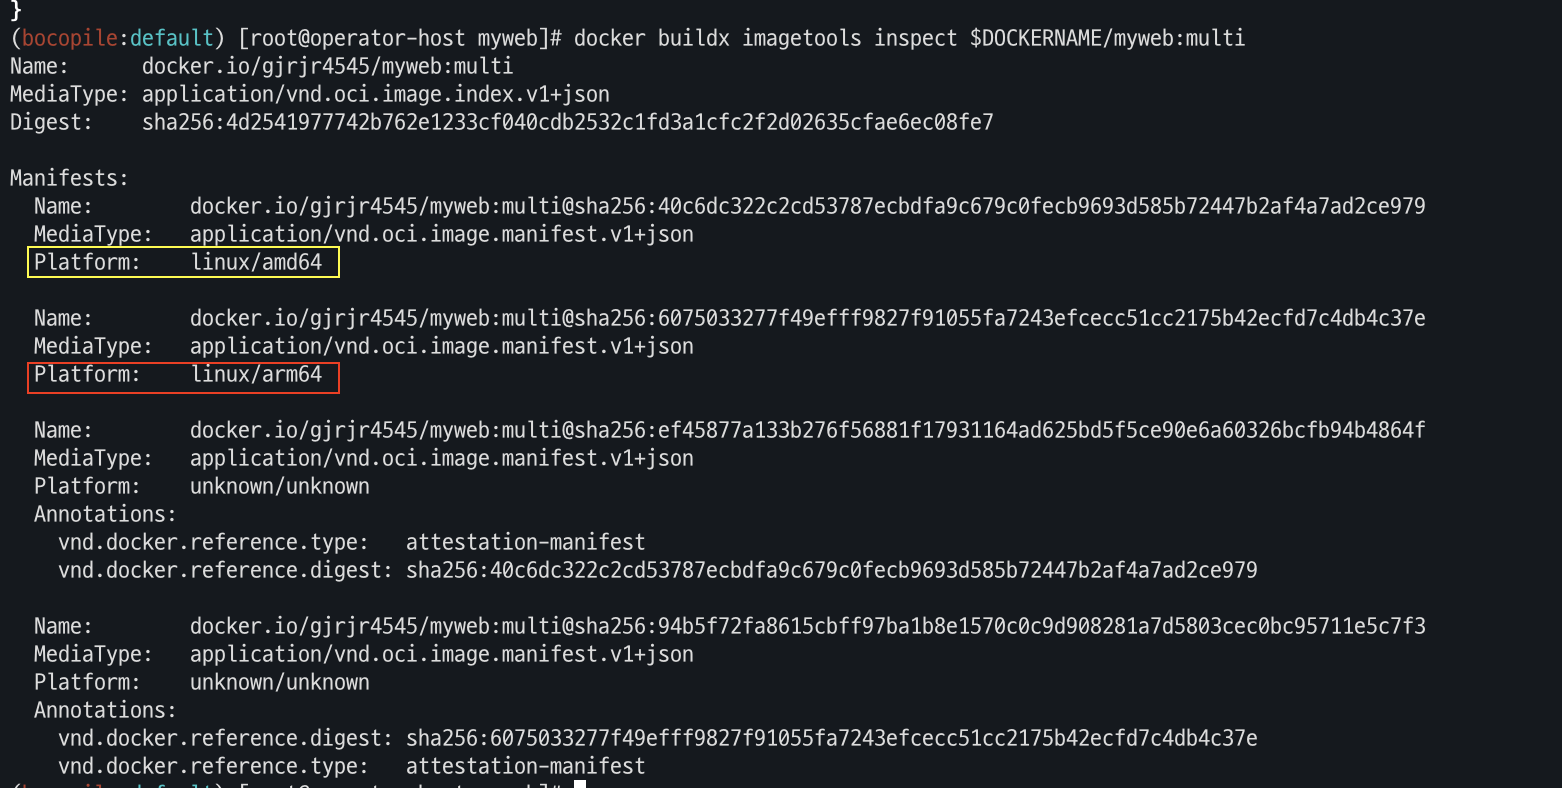
- Docker Hub에도 push가 되었는지 확인 합니다.

- Docker Hub에도 push가 되었는지 확인 합니다.
-
mac 테스트
- mac arch 확인
arch
- 컨테이너 실행
docker ps
docker run -d -p 8080:80 --name=timeserver $DOCKERNAME/myweb:multi
docker ps
- 컨테이너 접속 및 로그 확인
# 컨테이너 접속 및 로그 확인
curl http://localhost:8080
docker logs timeserver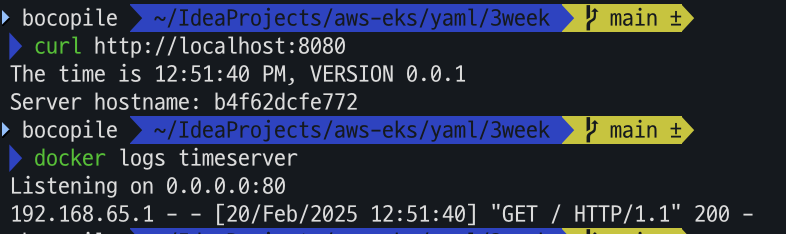
- mac arch 확인
-
컨테이너 이미지 내부에 server.py 파일 확인
# 컨테이너 이미지 내부에 server.py 파일 확인
docker exec -it timeserver cat server.py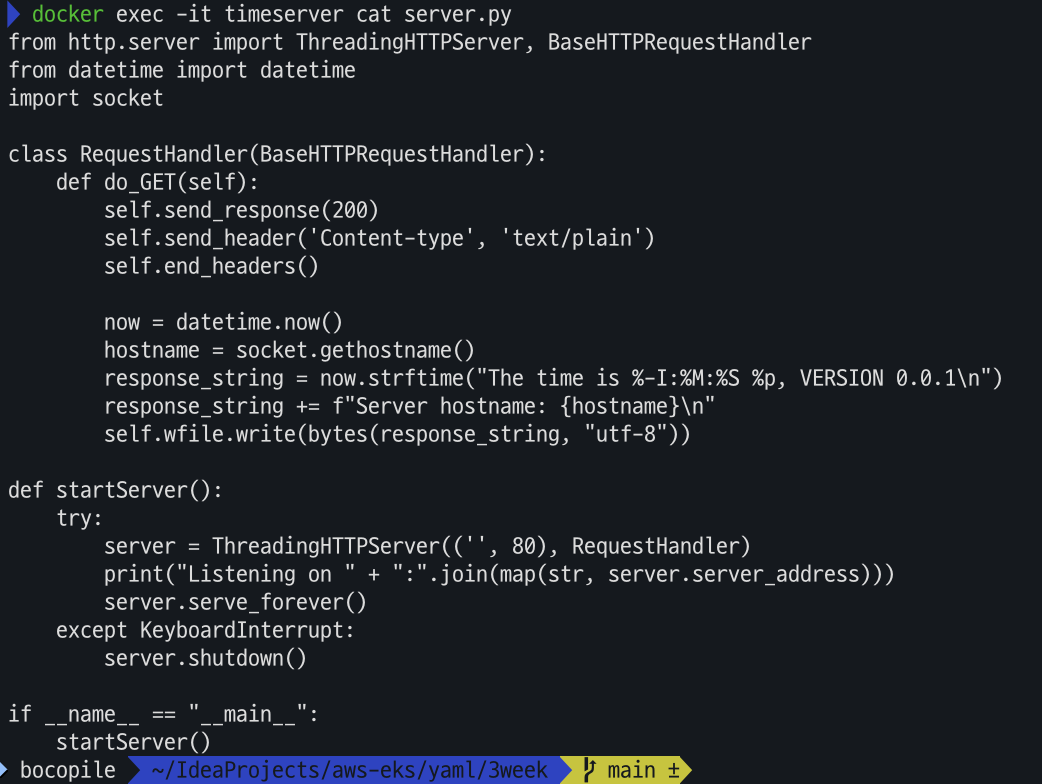
- 테스트 완료 후 컨테이너 삭제 진행
# 컨테이너 삭제
docker rm -f timeserver
AWS ECR 프라이빗 저장소 사용
- IAM 계정 변수 선언
# IAM 계정 변수 선언
export ACCOUNT_ID=$(aws sts get-caller-identity --query 'Account' --output text)
aws ecr get-login-password \
--region ap-northeast-2 | docker login \
--username AWS \
--password-stdin ${ACCOUNT_ID}.dkr.ecr.ap-northeast-2.amazonaws.com
cat /root/.docker/config.json | jq
- ECR 프라이빗 저장소 생성
aws ecr create-repository --repository-name myweb

- ECR 프라이빗 저장소에 푸시
docker buildx build --platform linux/amd64,linux/arm64 --push --tag ${ACCOUNT_ID}.dkr.ecr.ap-northeast-2.amazonaws.com/myweb:multi .
docker images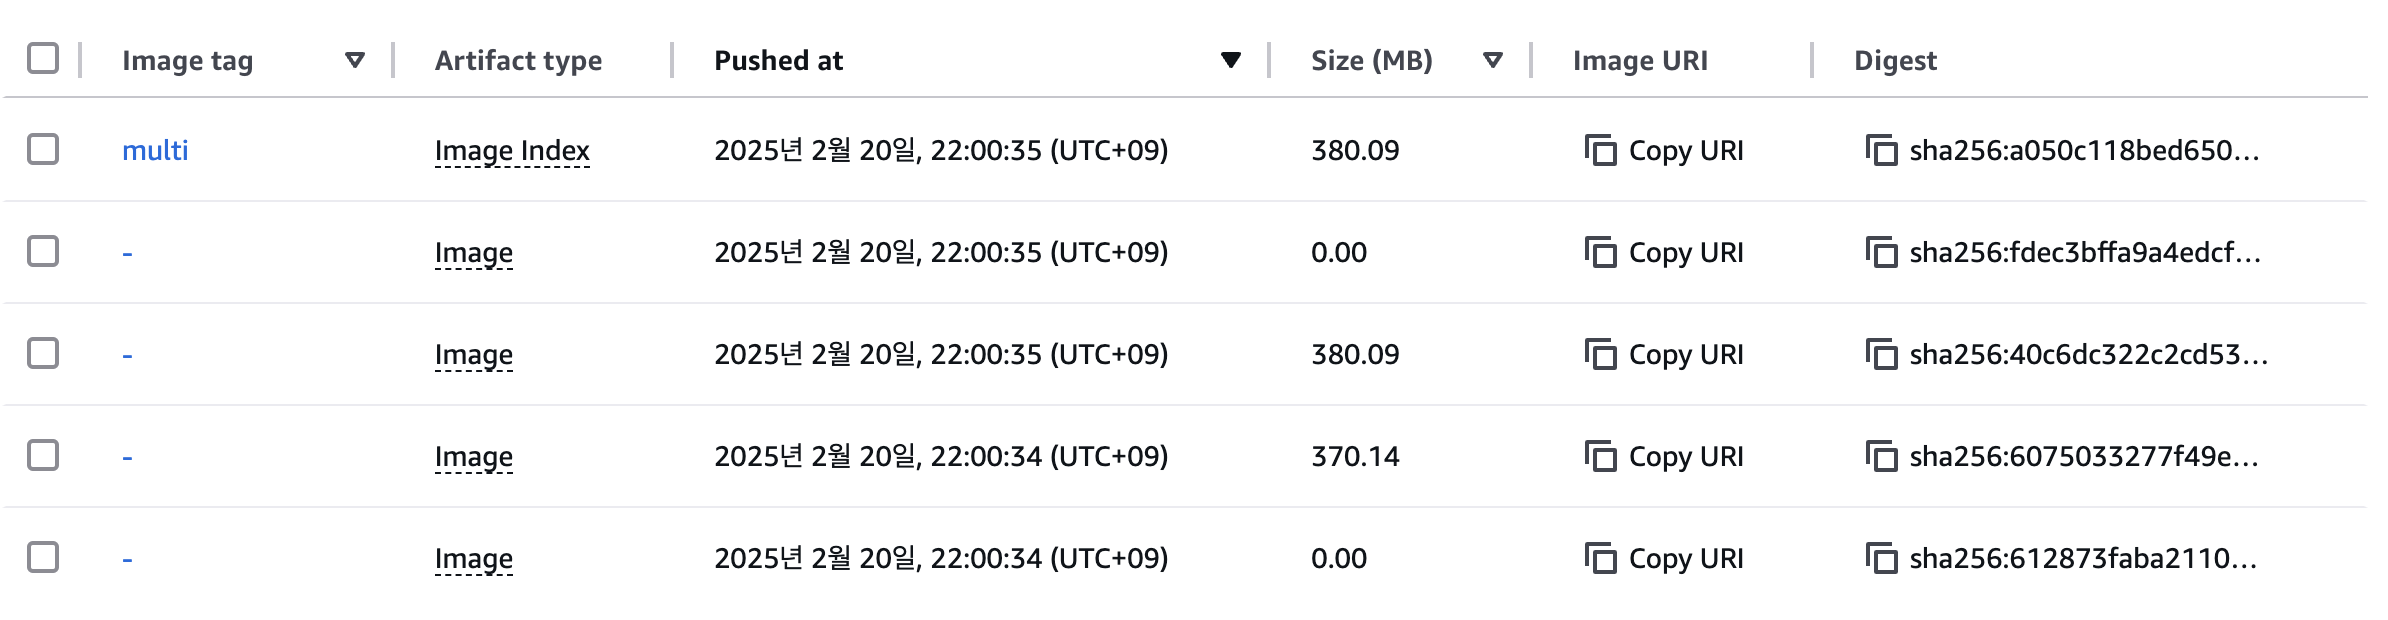
- 테스트
- 컨테이너 실행
# 컨테이너 실행 : 윈도우PC(amd64)와 macOS(arm64) 두 곳 모두 동일한 컨테이너 이미지 경로로 실행해보자!
docker run -d -p 8080:80 --name=timeserver ${ACCOUNT_ID}.dkr.ecr.ap-northeast-2.amazonaws.com/myweb:multi
docker ps
curl http://localhost:8080
- 컨테이너 실행
ARM 노드 그룹
정의
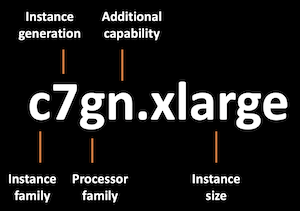
AWS Graviton (ARM) Instance 노드 그룹 (ng3)
- AWS Graviton 프로세서 : 64-bit Arm 프로세서 코어 기반의 AWS 커스텀 반도체 ⇒ 20~40% 향상된 가격대비 성능
배포
- 기존 노드 그룹 arch 확인
# 기존 노드 그룹 확인
kubectl get nodes -L kubernetes.io/arch
- 신규 노드 그룹 생성
# 신규 노드 그룹 생성
eksctl create nodegroup -c $CLUSTER_NAME -r ap-northeast-2 --subnet-ids "$PubSubnet1","$PubSubnet2","$PubSubnet3" \
  -n ng3 -t t4g.medium -N 1 -m 1 -M 1 --node-volume-size=30 --node-labels family=graviton --dry-run > myng3.yaml
cat myng3.yaml
eksctl create nodegroup -f myng3.yaml
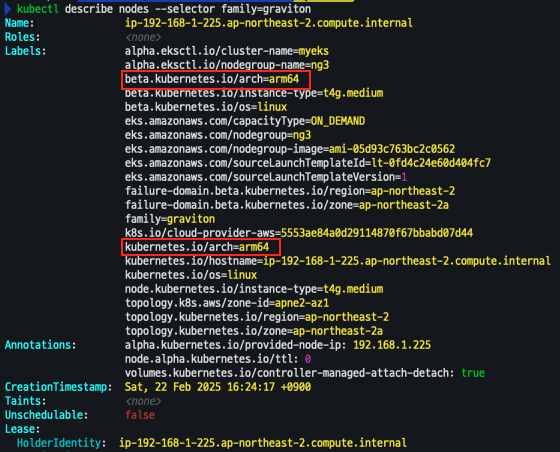
- 배포 확인
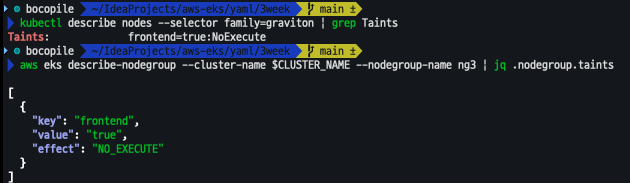
 # 확인
 kubectl get nodes --label-columns eks.amazonaws.com/nodegroup,kubernetes.io/arch,eks.amazonaws.com/capacityType
 kubectl describe nodes --selector family=graviton
 aws eks describe-nodegroup --cluster-name $CLUSTER_NAME --nodegroup-name ng3 | jq .nodegroup.taints

- taints 셋팅
# taints 셋팅 -> 적용에 2~3분 정도 시간 소요
aws eks update-nodegroup-config --cluster-name $CLUSTER_NAME --nodegroup-name ng3 --taints "addOrUpdateTaints=[{key=frontend, value=true, effect=NO_EXECUTE}]"
- taint 확인
 kubectl describe nodes --selector family=graviton | grep Taints
 aws eks describe-nodegroup --cluster-name $CLUSTER_NAME --nodegroup-name ng3 | jq .nodegroup.taints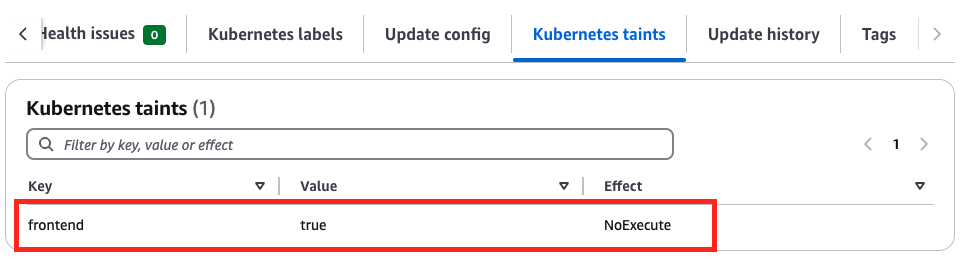
Run Pods on Graviton
- busybox
-
배포
# cat <<EOF | kubectl apply -f - apiVersion: v1 kind: Pod metadata: name: busybox spec: terminationGracePeriodSeconds: 3 containers: - name: busybox image: busybox command: - "/bin/sh" - "-c" - "while true; do date >> /home/pod-out.txt; cd /home; sync; sync; sleep 10; done" tolerations: - effect: NoExecute key: frontend operator: Exists nodeSelector: family: graviton EOF # 삭제 kubectl delete pod busybox -
파드 확인
# 파드가 배포된 노드 정보 확인
kubectl get pod -owide
kubectl describe pod busybox
kubectl exec -it busybox -- arch
kubectl exec -it busybox -- tail -f /home/pod-out.txt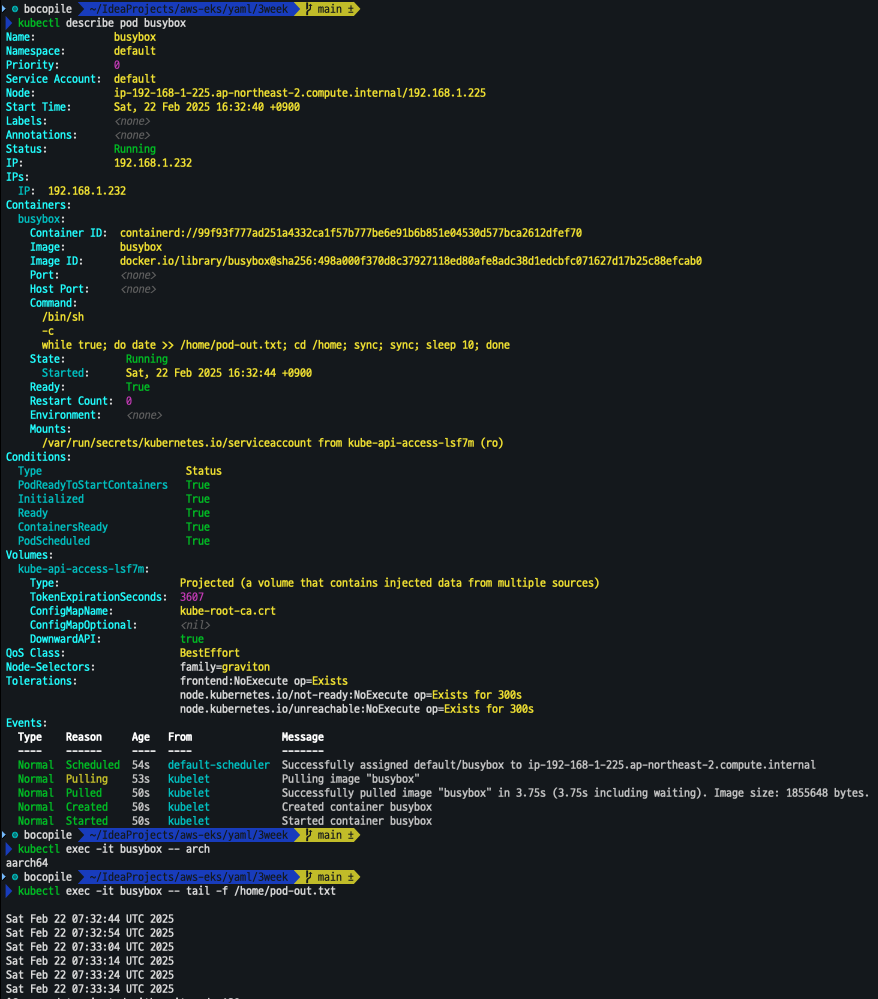
-
- 운영서버 EC2 에서 빌드한 myweb 컨테이너 이미지를 파드로 배포
- 파드 배포
cat <<EOF | kubectl apply -f - apiVersion: v1 kind: Pod metadata: name: myweb-arm spec: terminationGracePeriodSeconds: 3 containers: - name: myweb image: gjrjr4545/myweb:multi tolerations: - effect: NoExecute key: frontend operator: Exists nodeSelector: family: graviton --- apiVersion: v1 kind: Pod metadata: name: myweb-amd spec: terminationGracePeriodSeconds: 3 containers: - name: myweb image: gjrjr4545/myweb:multi EOF - 배포 확인
kubectl get pod -owide
kubectl exec -it myweb-arm -- arch
kubectl exec -it myweb-amd -- arch

kubectl exec -it myweb-arm -- curl localhost
kubectl exec -it myweb-amd -- curl localhost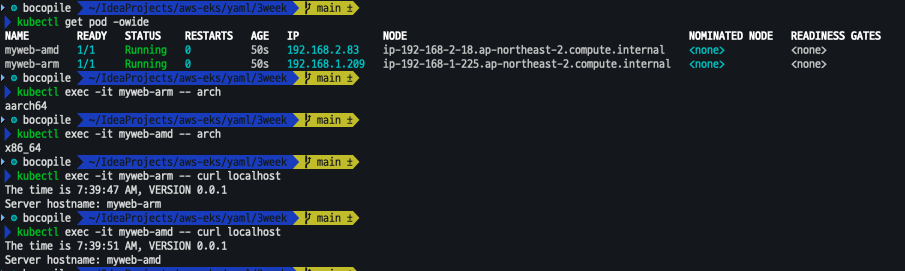
- 파드 배포
Spot 노드 그룹
Spot 노드 그룹 사용 이유
- AWS 고객이 EC2 여유 용량 풀을 활용하여 엄청난 할인으로 EC2 인스턴스를 실행
- EC2에 용량이 다시 필요할 때 2분 알림으로 Spot Instances를 중단 가능
- Kubernetes 워커 노드로 Spot Instances를 사용하는 것은 상태 비저장 API 엔드포인트, 일괄 처리, ML 학습 워크로드, Apache Spark를 사용한 빅데이터 ETL, 대기열 처리 애플리케이션, CI/CD 파이프라인과 같은 워크로드에 매우 인기 있는 사용 패턴
Instance type 다각화
- ec2-instance-selector 설치
curl -Lo ec2-instance-selector https://github.com/aws/amazon-ec2-instance-selector/releases/download/v2.4.1/ec2-instance-selector-`uname | tr '[:upper:]' '[:lower:]'`-amd64 && chmod +x ec2-instance-selector
mv ec2-instance-selector /usr/local/bin/
ec2-instance-selector --version
- 적절한 인스턴스 스팩 선택
ec2-instance-selector --vcpus 2 --memory 4 --gpus 0 --current-generation -a x86_64 --deny-list 't.*' --output table-wide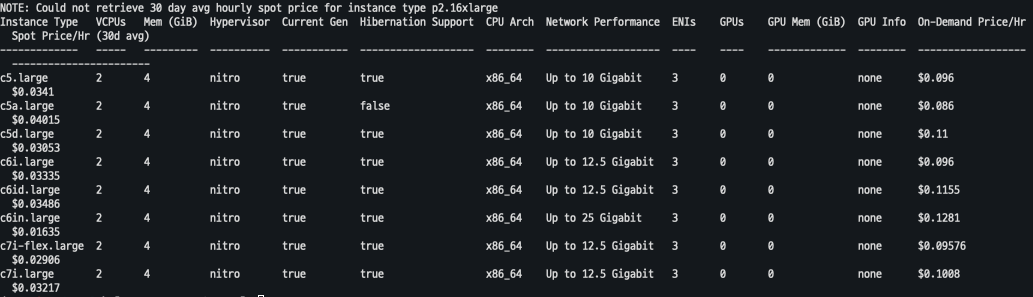
spot capacity 생성
- 기존 생성된 capacity 확인
kubectl get nodes -l eks.amazonaws.com/capacityType=ON_DEMAND
kubectl get nodes -L eks.amazonaws.com/capacityType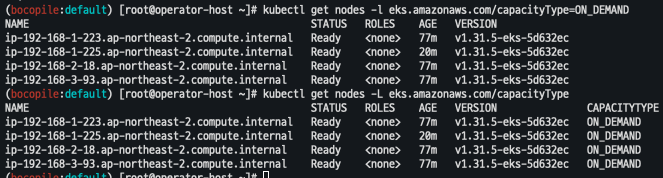
- 노드 그룹 생성
NODEROLEARN=$(aws iam list-roles --query "Roles[?contains(RoleName, 'nodegroup-ng1')].Arn" --output text)
echo $NODEROLEARN

aws eks create-nodegroup \
  --cluster-name $CLUSTER_NAME \
  --nodegroup-name managed-spot \
  --subnets $PubSubnet1 $PubSubnet2 $PubSubnet3 \
  --node-role $NODEROLEARN \
  --instance-types c5.large c5d.large c5a.large \
  --capacity-type SPOT \
  --scaling-config minSize=2,maxSize=3,desiredSize=2 \
  --disk-size 20

aws eks wait nodegroup-active --cluster-name $CLUSTER_NAME --nodegroup-name managed-spot
- 노드 그룹 확인
kubectl get nodes -L eks.amazonaws.com/capacityType,eks.amazonaws.com/nodegroup
Spot instances에 파드 생성
- 파드 생성
#
cat <<EOF | kubectl apply -f -
apiVersion: v1
kind: Pod
metadata:
  name: busybox
spec:
  terminationGracePeriodSeconds: 3
  containers:
  - name: busybox
    image: busybox
    command:
    - "/bin/sh"
    - "-c"
    - "while true; do date >> /home/pod-out.txt; cd /home; sync; sync; sleep 10; done"
  nodeSelector:
    eks.amazonaws.com/capacityType: SPOT
EOF
- 파드가 Spot Instances에 생성됬는지 확인
k get pods -o wide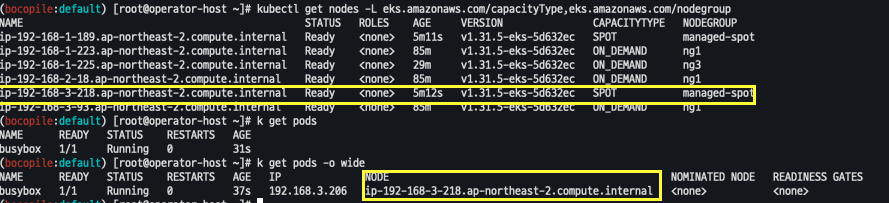
스팟 용량이 있는 EKS 관리형 노드 그룹의 중단 처리
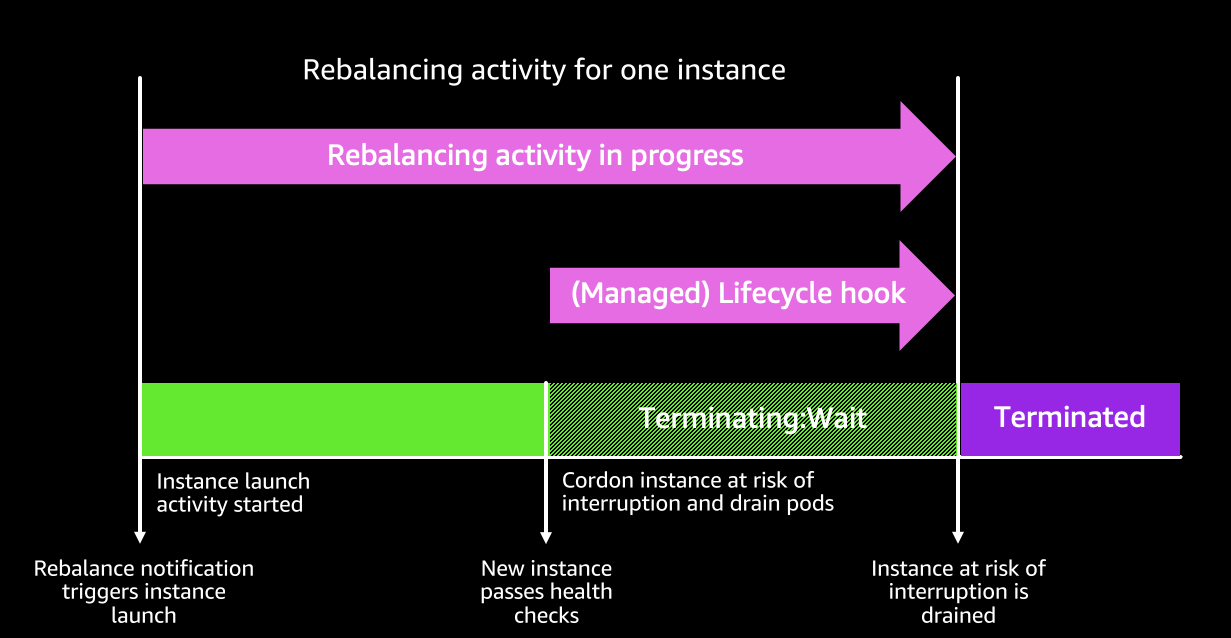
EKS 관리형 노드 그룹은 Spot 중단을 자동으로 처리하므로 AWS Node Termination Handler와 같은 추가 도구가 필요하지 않다.
- Spot 용량 재조정: Spot 중단 위험이 감지되면, Amazon EKS는 노드를 사전에 cordon & drain하여 애플리케이션 중단을 최소화한다.
- 교체 노드 프로비저닝: 새로운 Spot 노드가 Ready 상태가 되면 기존 노드를 cordon & drain하여 예약을 방지하고 실행 중인 Pod를 우아하게 제거한다.
- 즉시 드레이닝: 교체 노드가 준비되기 전 Spot 2분 중단 알림이 오면 즉시 드레이닝을 시작한다.
이 프로세스를 통해 Spot 중단 발생 시점까지 교체 노드를 기다리는 것이 아니라, 사전에 조치를 취해 Pod 스케줄링 지연을 최소화 한다
Bottlerocket AMI
배경
보안 중심 컨테이너 운영체제(OS)로, 컨테이너 실행에 필수적인 소프트웨어만 포함하여 공격 노출을 최소화한다.
- 불필요한 패키지 제거: 일반 OS 대비 보안 및 유지 관리 부담 감소
- 강화된 보안 기능:
- SELinux로 추가 격리 지원
- dm-verity로 루트킷 기반 공격 방지
- 안정적인 업데이트 관리: 원자적 업데이트 및 롤백 지원
이러한 특성을 통해 Bottlerocket은 안전하고 효율적인 컨테이너 운영 환경을 제공합니다.
장점
- 운영 비용 절감 & 가동 시간 증가: 경량 설계로 스토리지, 컴퓨팅, 네트워크 비용 절감 및 보안 위협 감소
- 자동 OS 업데이트 & 보안 강화: 원자적 업데이트 & 롤백 지원으로 업데이트 실패 위험 제거, 보안 패치 자동 적용
- AWS 프리미엄 지원: Amazon EC2, EKS, ECR 등과 동일한 AWS Support 플랜 적용
- 빠른 데이터 볼륨 연결: OS 바이너리 업데이트와 보안 패치 주기 분리, 사전 페치된 이미지 활용 가능
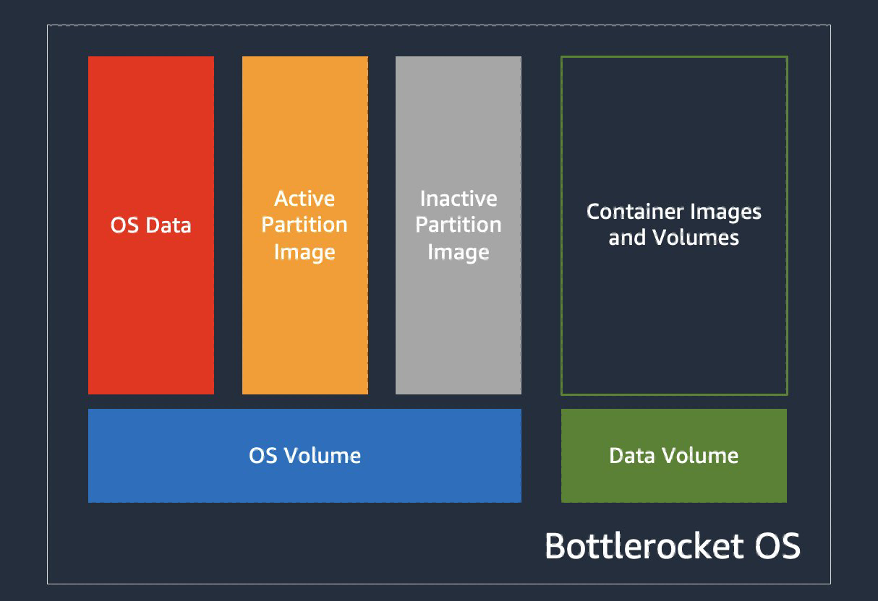 출처 : https://aws.amazon.com/ko/blogs/containers/reduce-container-startup-time-on-amazon-eks-with-bottlerocket-data-volume
고려 사항
- x86_64 및 arm64 프로세서를 지원하는 Amazon EC2 인스턴스에서 실행 가능
노드 그룹 생성 및 노드 접속
- Control / Admin Container 배치 참고
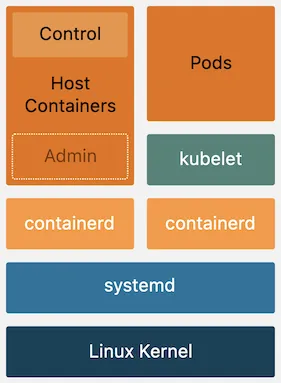 출처 : AEWS 3기 스터디
- yaml 파일 생성
cat << EOF > ng-br.yaml apiVersion: eksctl.io/v1alpha5 kind: ClusterConfig metadata: name: myeks region: ap-northeast-2 version: "1.31" managedNodeGroups: - name: ng-bottlerocket instanceType: m5.large amiFamily: Bottlerocket bottlerocket: enableAdminContainer: true settings: motd: "Hello, eksctl!" desiredCapacity: 1 maxSize: 1 minSize: 1 labels: alpha.eksctl.io/cluster-name: myeks alpha.eksctl.io/nodegroup-name: ng-bottlerocket ami: bottlerocket subnets: - $PubSubnet1 - $PubSubnet2 - $PubSubnet3 tags: alpha.eksctl.io/nodegroup-name: ng-bottlerocket alpha.eksctl.io/nodegroup-type: managed - name: ng-bottlerocket-ssh instanceType: m5.large amiFamily: Bottlerocket desiredCapacity: 1 maxSize: 1 minSize: 1 ssh: allow: true publicKeyName: $SSHKEYNAME labels: alpha.eksctl.io/cluster-name: myeks alpha.eksctl.io/nodegroup-name: ng-bottlerocket-ssh ami: bottlerocket subnets: - $PubSubnet1 - $PubSubnet2 - $PubSubnet3 tags: alpha.eksctl.io/nodegroup-name: ng-bottlerocket-ssh alpha.eksctl.io/nodegroup-type: managed EOF - 노드 그룹 배포
eksctl create nodegroup -f ng-br.yaml
- 정보 확인
# 노드의 OS 와 CRI 정보 등 확인
kubectl get node --label-columns=alpha.eksctl.io/nodegroup-name,ami,node.kubernetes.io/instance-type
kubectl get node -owide

# 인스턴스 IP 확인
aws ec2 describe-instances --query "Reservations[*].Instances[*].{InstanceID:InstanceId, PublicIPAdd:PublicIpAddress, PrivateIPAdd:PrivateIpAddress, InstanceName:Tags[?Key=='Name']|[0].Value, Status:State.Name}" --filters Name=instance-state-name,Values=running --output table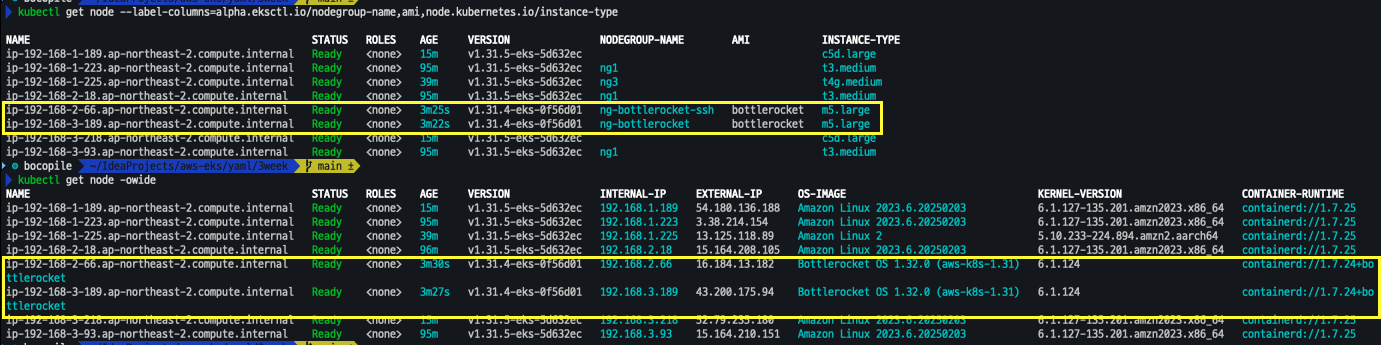
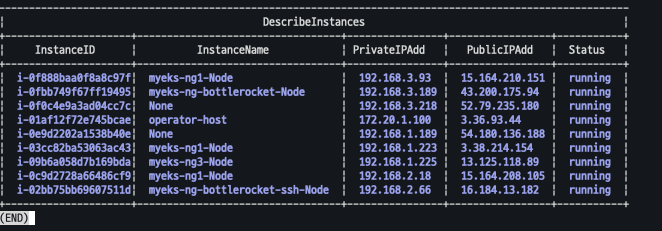
- 변수 선언
BRNode1=<ng-bottlerocket EC2 유동공인 IP>
BRNode2=<ng-bottlerocket-ssh EC2 유동공인 IP>
BRNode1=43.200.175.94
BRNode2=16.184.13.182
- SSH 로 노드 접속
- BRNode1 는 접근이 되지 않고 BRNode2만 접근이 되는 것을 확인할 수 있다.
- 해당 OS 정책상 ssh 서버로만 접근이 가능하다.
# SSH 접속 테스트
ssh $BRNode1
ssh $BRNode2
-
AWS SSM으로 노드 접속 / apiclient 사용
- AWS SSM : AWS SSM(Systems Manager)은 AWS에서 제공하는 관리형 서비스로, 클라우드 및 온프레미스 환경에서 인프라를 운영, 관리 및 자동화하는 데 사용
- SSM 접근
# ng-bottlerocket 인스턴스 ID 필터링 aws ec2 describe-instances --filters "Name=tag:eks:nodegroup-name,Values=ng-bottlerocket" | jq -r '.[][0]["Instances"][0]["InstanceId"]' # Run the below command to create an SSM session with bottlerocket node aws ssm start-session --target $(aws ec2 describe-instances --filters "Name=tag:eks:nodegroup-name,Values=ng-bottlerocket" | jq -r '.[][0]["Instances"][0]["InstanceId"]') ----------------- - apiclient 확인
# apiclient 사용
apiclient --help
apiclient -u /settings | jq
apiclient get | jq
apiclient get | grep motd
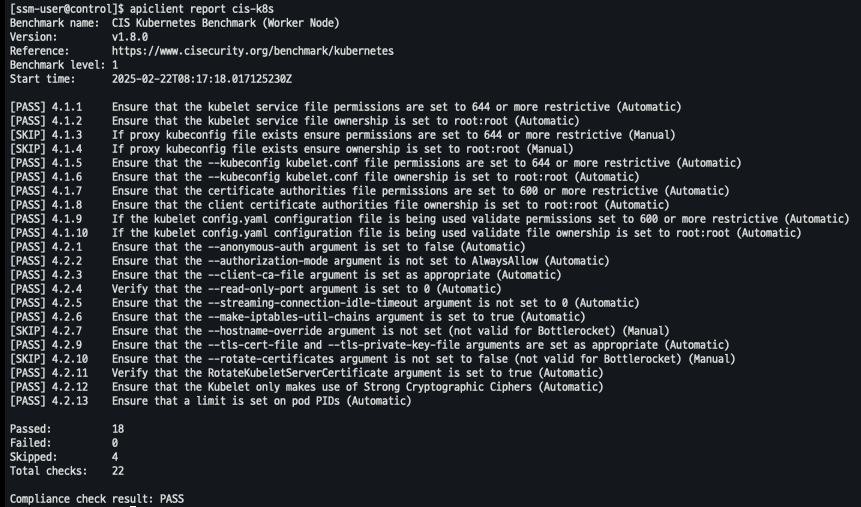
- CIS 기준 레포팅 생성 (Bottlerocket)
  # CIS benchmark for Bottlerocket
  apiclient report cis

  # Level 2 checks
  apiclient report cis -l 2

  # CIS Kubernetes benchmark : Level 1 of the CIS Benchmark.
  apiclient report cis-k8s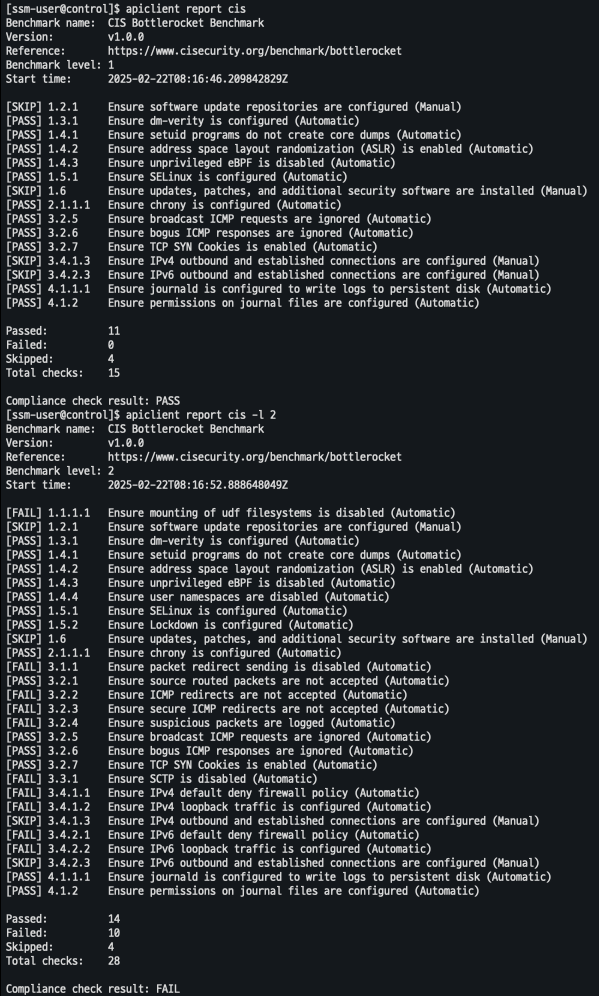
파드 배포
- 파드 배포
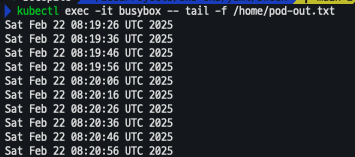
cat <<EOF | kubectl apply -f - apiVersion: v1 kind: Pod metadata: name: busybox spec: terminationGracePeriodSeconds: 3 containers: - name: busybox image: busybox command: - "/bin/sh" - "-c" - "while true; do date >> /home/pod-out.txt; cd /home; sync; sync; sleep 10; done" nodeSelector: ami: bottlerocket EOF - 파드 확인
# 파드가 배포된 노드 정보 확인
kubectl get pod -owide

#
kubectl exec -it busybox -- tail -f /home/pod-out.txt
호스트 네임스페이스로 탈옥하는 파드를 Bottlerocket AMI 노드에서 배포되게 실행
-
ng1 노드 그룹에 탈취용 파드 배포 : 파드 권한과 호스트 네임스페이스 공유로 호스트 탈취
- kube-system 네임 스페이스 파드 배포
cat <<EOF | kubectl apply -f - apiVersion: v1 kind: Pod metadata: name: root-shell namespace: kube-system spec: containers: - command:
- /bin/cat
image: alpine:3
name: root-shell
securityContext:
privileged: true
tty: true
stdin: true
volumeMounts: - mountPath: /host
name: hostroot
hostNetwork: true
hostPID: true
hostIPC: true
tolerations:
- /bin/cat
- effect: NoSchedule
operator: Exists - effect: NoExecute
operator: Exists
volumes: - hostPath:
path: /
name: hostroot
nodeSelector:
eks.amazonaws.com/nodegroup: ng1
EOF
- 파드 배포 확인
kubectl get pod -n kube-system root-shell
- 파드 권한과 호스트 네임스페이스 공유로 호스트 탈취 시도 => 탈취가 되는 것을 확인
     kubectl -n kube-system exec -it root-shell -- chroot /host /bin/bash
     [root@ip-192-168-3-93 /]# id
     root@ip-192-168-3-93 /]# ip -c a
     root@ip-192-168-3-93 /]# cat /etc/passwd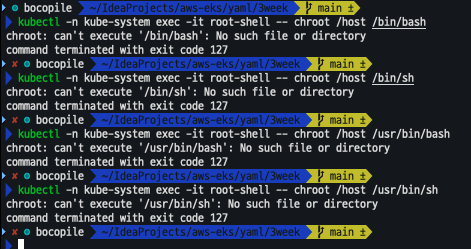
- kube-system 네임 스페이스 파드 배포
-
Bottlerocket AMI 노드에 탈취용 파드 배포 후 호스트 탈취 시도
- 파드 배포
cat <<EOF | kubectl apply -f - apiVersion: v1 kind: Pod metadata: name: root-shell namespace: kube-system spec: containers: - command: - /bin/cat image: alpine:3 name: root-shell securityContext: privileged: true tty: true stdin: true volumeMounts: - mountPath: /host name: hostroot hostNetwork: true hostPID: true hostIPC: true tolerations: - effect: NoSchedule operator: Exists - effect: NoExecute operator: Exists volumes: - hostPath: path: / name: hostroot nodeSelector: ami: bottlerocket EOF - 파드 확인
kubectl get pod -n kube-system root-shell - 파드 권한, 호스트 네임스페이스 공유로 호스트 탈취 시도 => 탈취 되지 않음
kubectl -n kube-system exec -it root-shell -- chroot /host /bin/bash
kubectl -n kube-system exec -it root-shell -- chroot /host /bin/sh
kubectl -n kube-system exec -it root-shell -- chroot /host /usr/bin/bash
kubectl -n kube-system exec -it root-shell -- chroot /host /usr/bin/sh
- 파드 배포
-
Bottlerocket AMI 노드에 apiclient 파드를 배포하여 enter-admin-container 진입
- 파드 배포
# kube-system 네임스페이스에 파드 배포 cat <<EOF | kubectl apply -f - apiVersion: v1 kind: Pod metadata: name: apiclient namespace: kube-system spec: containers: - command: - sleep - infinity image: fedora imagePullPolicy: Always name: regain-access securityContext: seLinuxOptions: level: s0 role: system_r type: control_t user: system_u volumeMounts: - mountPath: /usr/bin/apiclient name: apiclient readOnly: true - mountPath: /run/api.sock name: apiserver-socket restartPolicy: Always terminationGracePeriodSeconds: 0 volumes: - hostPath: path: /usr/bin/apiclient type: File name: apiclient - hostPath: path: /run/api.sock type: Socket name: apiserver-socket nodeSelector: ami: bottlerocket EOF - 파드 배포 확인
kubectl get pod -n kube-system apiclient
- 관리 컨테이너 활성화 및 진입
kubectl exec -i -t -n kube-system apiclient -- apiclient exec -t control enter-admin-container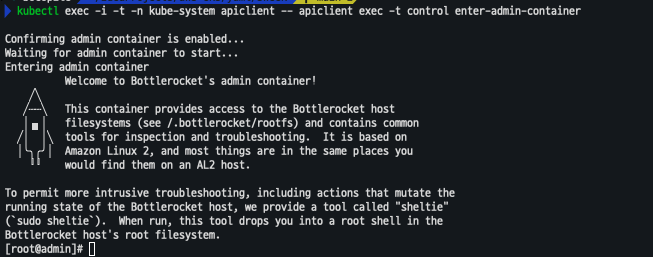
- 확인
[root@admin]# sudo sheltie
bash-5.1# whoami
- 파드 배포

DevOps Engineer