서론
이전 글에서 작성했다시피 근본적으로 잘못된 메세지는 재처리 과정이 불필요합니다. 하지만 DB Connection Pool에서 Connection을 얻지 못했다거나 DB가 다운되는 등 외부환경에 의해 영향을 받은 경우엔 재처리과정이 유의미합니다. 다시 시도했을 땐, 정상화가 되어있을 수 도 있기 때문입니다. 따라서 Exception에 따라 재처리할지 말지를 결정하는 로직을 구현해 봅시다.
Work Exchange, Work Queue, DLX, DLQ를 생성하는 작업은 이전 글에 기록해두었기때문에 생략하겠습니다.
기본 설정 파악하기
Custom을 진행하기 전, 기본적인 설정을 먼저 파악해봅시다.
ConditionalRejectingErrorHandler
기본적으로 RabbitMQ를 설정하게되면 SimpleRabbitListenerContainerFactorty를 사용하여 설정하게됩니다.
@Bean
public SimpleRabbitListenerContainerFactory rabbitListenerContainerFactory(
  ConnectionFactory connectionFactory,
  SimpleRabbitListenerContainerFactoryConfigurer configurer) {
      SimpleRabbitListenerContainerFactory factory =
        new SimpleRabbitListenerContainerFactory();
      configurer.configure(factory, connectionFactory);
      return factory;
}
그리고 해당 Factory는 AbstractRabbitListenerContainerFactory를 상속받고있으며
public class SimpleRabbitListenerContainerFactory extends AbstractRabbitListenerContainerFactory<SimpleMessageListenerContainer> {
...
AbstractRabbitListenerContainerFactory는 ErrorHandler의 구현체로 ConditionalRejectingErrorHandler클래스를 사용하고있습니다.
public abstract class AbstractMessageListenerContainer extends ... {
	...
	private ErrorHandler errorHandler;
    ...
    public AbstractMessageListenerContainer() {
		...
    	this.errorHandler = new ConditionalRejectingErrorHandler();
    	...
    }
}
ConditionalRejectingErrorHandler는 SpringAMQP프레임워크에서 제공하는 클래스이며, 메시지 핸들러에서 발생하는 예외를 다른 예외로 변환하는 역할을 합니다.
public class ConditionalRejectingErrorHandler implements ErrorHandler {
		...
        private boolean discardFatalsWithXDeath = true;
        ...
		public ConditionalRejectingErrorHandler() {
        	this.exceptionStrategy = new DefaultExceptionStrategy();
	    }

		public void handleError(Throwable t) {
			this.log(t);
			// 1. AmqpRejectAndDontRequeueException가 원인인지 파악한다.
			// 2. 원인이 아니라면 치명적인 Exception인지 확인한다.
			if (!this.causeChainContainsARADRE(t) && this.exceptionStrategy.isFatal(t)) {
				// 3. Listen 도중 일어난 Exception이 맞는지 확인한다.
				if (this.discardFatalsWithXDeath && t instanceof ListenerExecutionFailedException) {
					Message failed = ((ListenerExecutionFailedException)t).getFailedMessage();
					// 4. Fail 메세지가 있는지 확인한다.
					if (failed != null) {
						List<Map<String, ?>> xDeath = failed.getMessageProperties().getXDeathHeader();
						// 5. "x-death" 헤더에 값이 있는지 확인한다.
						if (xDeath != null && xDeath.size() > 0) {
							this.logger.error("x-death header detected on a message with a fatal exception; perhaps requeued from a DLQ? - discarding: " + failed);
							this.handleDiscarded(failed);
							throw new ImmediateAcknowledgeAmqpException("Fatal and x-death present");
						}
					}
				}

				throw new AmqpRejectAndDontRequeueException("Error Handler converted exception to fatal", this.rejectManual, t);
			}
		}

        ...
    	// AmqpRejectAndDontRequeueException가 원인인지 파악한다.
		protected boolean causeChainContainsARADRE(Throwable t) {
			for(Throwable cause = t.getCause(); cause != null; cause = cause.getCause()) {
				if (cause instanceof AmqpRejectAndDontRequeueException) {
					return true;
				}
			}
			return false;
		}
        ...
}
코드를 하나하나 살펴보면서 로직을 뜯어봅시다.
AmqpRejectAndDontRequeueException가 원인인지 파악한다.- 원인이 아니라면 치명적인 Exception인지 확인한다.
- 치명적인 Exception이라면 Listen 도중 일어난 Exception이 맞는지 확인한다.(
ListenerExecutionFailedException) - Fail 메세지가 있는지 확인한다.
- Fail 메세지가 있다면, "x-death" 헤더에 값이 있는지 확인한다.
- "x-death"헤더에 값이 있다면, 로그를 찍고
ImmediateAcknowledgeAmqpException을 던진다.
즉 정리하자면,
- 1~2번을 만족하지 못하면 예외를 그대로 던진다.
- 1~2번은 만족하나 3~6번을 만족하지 못하면
AmqpRejectAndDontRequeueException을 던진다. - 1~6번을 전부 만족한다면
ImmediateAcknowledgeAmqpException을 던진다.
여기서 치명적인 Exception이란?(ExceptionStrategy)
public static class DefaultExceptionStrategy implements FatalExceptionStrategy {
	...

    public boolean isFatal(Throwable t) {
		Throwable cause;
		for(cause = t.getCause(); (cause instanceof MessagingException || cause instanceof UndeclaredThrowableException) && !this.isCauseFatal(cause); cause = cause.getCause()) {
		}

		if (t instanceof ListenerExecutionFailedException && this.isCauseFatal(cause)) {
                this.logFatalException((ListenerExecutionFailedException)t, cause);
                return true;
		} else {
                return false;
		}
    }

	private boolean isCauseFatal(Throwable cause) {
            return cause instanceof MessageConversionException || cause instanceof org.springframework.messaging.converter.MessageConversionException || cause instanceof MethodArgumentResolutionException || cause instanceof NoSuchMethodException || cause instanceof ClassCastException || this.isUserCauseFatal(cause);
	}
}ConditionalRejectingErrorHandler는 내부클래스에 DefaultExceptionStrategy를 ExceptionStrategy 기본값으로 사용합니다.
public ConditionalRejectingErrorHandler() {
	this.exceptionStrategy = new DefaultExceptionStrategy();
}
그리고 해당 클래스는 아래 예외를 치명적인 Exception으로 간주하는 전략 클래스입니다.
- MessageConversionException
- MessageConversionException
- MethodArgumentResolutionException
- NoSuchMethodException
- ClassCastException
ImmediateAcknowledgeAmqpException는 뭐야?
AmqpRejectAndDontRequeueException는 메세지를 자동으로 거부시켜 큐에 다시들어가지 않고 DLX에 메세지를 전달시킵니다.
지난글에 조금더 자세히 설명하였습니다.
그렇다면 ImmediateAcknowledgeAmqpException는 무슨예외일까요?
ImmediateAcknowledgeAmqpException또한 Spring AMQP에서 제공하는 특수한 예외클래스입니다. 이는 AmqpRejectAndDontRequeueException와 반대로 메세지를 즉시 승인하여 RabbitMQ에 해당 메시지가 성공적으로 처리됐음을 알리고, 재시도 없이 큐에서 아예 제거하도록 요청합니다.
예를들어, 메시지 처리 중 예외 상황이 발생했지만 이 메시지를 더이상 처리하거나 재시도할 필요가 없는 경우 사용됩니다.
즉, ConditionalRejectingErrorHandler는 치명적인 예외 + 나머지 조건을 만족하면 예외가 발생하였어도 아예 재처리를 하지 않는것이죠.
Custom 시작
자 그럼 기본적인 설정을 알았으니 Custom을 해볼까요?
Custom ExceptionStrategy
저는 DefaultExceptionStrategy가 제공해주는 예외클래스와 함께 제가 만들어준 (애초에 메시지 자체가 잘못되어 발생하는 예외인)CustomException도 치명적인 Exception으로 간주하고자하였습니다.
따라서 아래와 같이 Custom한 ExceptionStrategy을 만들어주었습니다.
public class CustomFatalExceptionStrategy implements FatalExceptionStrategy {

    private final FatalExceptionStrategy fatalExceptionStrategy = new DefaultExceptionStrategy();

    /**
     * 치명적 에러로 간주하고 재처리하지 않는다.
     */
    @Override
    public boolean isFatal(Throwable t) {
        return fatalExceptionStrategy.isFatal(t)
                || t.getCause() instanceof NotFoundEntityException
                || t.getCause() instanceof MessageParsingError;
    }
}
데코레이터 패턴을 사용하여 DefaultExceptionStrategy의 isFatal 메서드를 수정하지않고 제가 원하는 Exception조건을 추가하였으며 해당 조건을 만족하게 되면 true를 반환합니다.
Custom ErrorHanlder
ConditionalRejectingErrorHandler대신 사용할 ErrorHandler또한 새로 정의해주었습니다.
ConditionalRejectingErrorHandler는 복잡한 if문 구조로 많은 조건을 체크하였는데 저는 이를 단순화하였습니다.
만약 메시징 도중 치명적인 Exception이 발생하면 ImmediateAcknowledgeAmqpException를 던지고 그 외엔 DLX로 보내주는 AmqpRejectAndDontRequeueException를 던지도록 하였습니다.
@RequiredArgsConstructor
public class CustomErrorHandler implements ErrorHandler {

    private final FatalExceptionStrategy exceptionStrategy;

    @Override
    public void handleError(Throwable t) {
        if (this.exceptionStrategy.isFatal(t) && t instanceof ListenerExecutionFailedException) {
            throw new ImmediateAcknowledgeAmqpException(
                    "Fatal exception encountered. Retry is futile: " + t.getMessage(), t);
        }

        throw new AmqpRejectAndDontRequeueException(
                "Retryable exception encountered. Moving to DLX for retries: " + t.getMessage(), t);
    }
}
Config 설정
@Configuration
public class RabbitMQConfig {

    @Bean
    public SimpleRabbitListenerContainerFactory rabbitListenerContainerFactory(
            ConnectionFactory connectionFactory,
            SimpleRabbitListenerContainerFactoryConfigurer configurer) {
        SimpleRabbitListenerContainerFactory factory = new SimpleRabbitListenerContainerFactory();
        configurer.configure(factory, connectionFactory);
        factory.setErrorHandler(errorHandler());
        return factory;
    }

    @Bean
    public ErrorHandler errorHandler() {
        return new CustomErrorHandler(fatalExceptionStrategy());
    }

    @Bean
    FatalExceptionStrategy fatalExceptionStrategy() {
        return new CustomFatalExceptionStrategy();
    }
}
위에서 만들어준 Custom ExceptionStrategy와 Custom ErrorHanlder를 설정해줍니다.
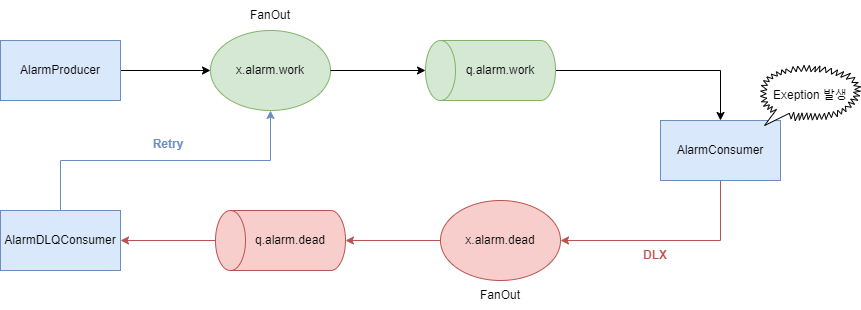
DLQ 재처리 로직 구현
위에서 재처리할 Exception들을 AmqpRejectAndDontRequeueException로 던졌으니, DLX로 전달된 메시지들을 retry해줄차례입니다.
물론 Spring에서 제공하는 기능이 있긴하지만 다른 메시지 처리 과정을 방해하는 단점을 가지고 있습니다.
지난글에 조금더 자세히 설명하였습니다.
따라서 DLX와 바인딩된 DLQ로 들어온 메시지를 재처리하는 로직을 아래와 같이 구현하였습니다.
@RequiredArgsConstructor
@Component
@Slf4j
public class AlarmDLQConsumer {

    private static final String RETRY_COUNT_HEADER = "x-retries_count";

    private final RabbitTemplate rabbitTemplate;

    @Value("${spring.rabbitmq.retry_count}")
    private int retryCount;

    @RabbitListener(queues = "q.alarm.dead")
    public void processFailedMessagesRequeue(Message failedMessage) {
        Integer retriesCnt = (Integer) failedMessage.getMessageProperties().getHeaders()
                .get(RETRY_COUNT_HEADER);
        if (retriesCnt == null) {
            retriesCnt = 0;
        }
        if (retriesCnt >= retryCount) {
            log.info("Discarding message");
            return;
        }
        log.info("Retrying message for the {} time", retriesCnt);
        failedMessage.getMessageProperties().getHeaders().put(RETRY_COUNT_HEADER, ++retriesCnt);
        rabbitTemplate.send("x.alarm.work",
                failedMessage.getMessageProperties().getReceivedRoutingKey(), failedMessage);
    }
}- 메시지 헤더에
RETRY_COUNT_HEADER값이 있는지 확인한다.
1-1. 값이 없다면 0으로 초기화 해준다. RETRY_COUNT_HEADER값이 config로 설정된retry_count이상인지 확인한다.
2-1. 이상이라면 재처리를 더이상 수행하지 않아야하기 때문에 메서드를 종료한다.- 미만이라면
retry_count값을 +1처리하고 다시 work queue로 메시지를 보낸다.
전체적인 프로세스를 다이어그램으로 그려보면 아래와 같습니다.

물론
ImmediateAcknowledgeAmqpException이 발생한 메시지는 DLX로 전달되지 않습니다.
마무리
지금까지 RabbitMQ가 무엇인지에 대해 알아보고 DLX부터 Error를 Handler하는 방법까지 알아보았습니다. 메시지가 무한으로 시도되는 이슈를 마주하고 여러 전략들에 대해 찾다보니 여기까지 작성하게 되었네요..
자세한 소스코드가 궁금하시다면 Github에 작성되어있으니 참고부탁드립니다.