서론
Spring을 사용해서 무엇을 만든다고 하면 대부분은 웹 어플리케이션을 제작한다.
이때, @Controller 어노테이션을 붙여 HTML 형식의 데이터를 제공하지 않고, 주로 @RestController 어노테이션을 붙여, JSON 형식의 데이터를 제공하는 API 서버를 만든다.
정말 간단한 CRUD 기능만 있는 웹 어플리케이션이라고 하여도, 서버가 제공하는 API의 개수가 많아지고 여러 가지 제약 조건 등이 추가되면 어떠한 URI에 HTTP 메서드를 사용해야 하는지, 어떠한 파라미터가 필요한지 알기가 어려워진다.
따라서 API를 문서화를 하는 작업이 필요하다.
API 문서는 직접 작성할 수도 있지만, 시간이 오래 걸리고 오타 또는 실수로 인해 누락되는 부분이 생길 수 있다.
또한 기존 API에 새로운 기능이 추가되거나 수정되었을 때, 해당 부분을 직접 찾아 반영해야 한다.
따라서 직접 API를 문서화하는 작업은 매우 비효율적이며, 정확하지 않을 수 있다.
그렇다면 이 문제를 어떻게 해결하고, API 문서를 자동으로 만들게 할 수는 없을까?
바로 본문으로 알아보자.
본문
직접 API 문서 작성
/products라는 URI가 있고, CREATE 요청과 상품의 정보를 전송하면 상품 생성, GET 요청을 전송하면 상품의 목록을 반환한다.
/products/:productId라는 URI에는 DELETE 요청을 전송하면 상품 삭제, PUT 요청과 상품의 정보를 전송하면 상품을 수정한다.
그렇다면 다음과 같이 API 문서화를 직접 작성할 수 있다.
- 상품 추가
  - /products
  - CREATE
  - 요청 형식
    {
      "productName": "상품1",
      "price": 10000,
      "quantity": 100
    }
  - 제약 조건
    productName: 3글자 이상
    price: 100원 이상, 1,000,000원 미만
    quantity: 1개 이상, 1000개 미만
  - 응답 형식
    {
      "message": "상품이 생성되었습니다. 상품 ID = 1"
    }

- 상품 조회
  - /products
  - GET
  - 요청 형식
    - 없음
  - 응답 형식
    [
      {
        "productId": 1,
        "productName": "상품1",
        "price": 10000,
        "quantity": 100
      },
      {
        "productId": 2,
        "productName": "상품2",
        "price": 10000,
        "quantity": 100
      }
    }

- 상품 수정
  - /products/:productId
  - PUT
  - 요청 형식
    {
      "productName": "상품1",
      "price": 10000,
      "quantity": 100
    }
  - 제약 조건
    productName: 3글자 이상
    price: 100원 이상, 1,000,000원 미만
    quantity: 1개 이상, 1000개 미만
  - 응답 형식
    {
      "message": "상품이 수정되었습니다."
    }

- 상품 삭제
  - /products/:productId
  - DELETE
  - 요청 형식
    - 없음
  - 응답 형식
    {
      "message": "상품이 삭제되었습니다."
    }
정말 간단한 CRUD 기능임에도 불구하고 작성해야 할 내용이 상당히 많다.
이때, 요구 사항이 변경되어 URI가 변경되거나, 제약 조건이 변경된다면 해당하는 부분을 직접 찾아 변경해야 한다.
이 작업이 누락되거나, 실수로 인해 오타가 발생할 경우 API 문서는 신뢰할 수 없게 된다.
만약, API 서버의 규모가 커지게 된다면 더 이상 수작업으로 API 문서화를 하는 것은 불가능할 것이다.
따라서 자동으로 API 문서화를 해 주는 작업이 필요하다.
Spring REST Docs
Spring은 여러 기능들을 모듈식으로 제공한다.
그중 API 문서화를 자동화할 수 있는 기능도 제공하는데, 바로 Spring REST Docs이다. (버전이 2.0.7과 3.0.0이 있는데, 3.0.0 버전은 Java 17, Spring 6가 필요하고, 2.0.7 버전은 Java 8, Spring 5가 필요하다.)
여기선 2.0.7 버전 기준으로 설명한다.
Spring REST Docs를 사용하면, AsciiDoc이라는 마크업 언어로 작성된 API 문서를 자동으로 생성해 준다.
Spring REST Docs를 사용하여 API 문서를 생성하려면 조건이 있다.
테스트 코드를 기반으로 작동하기에, 테스트 코드를 작성해야 한다.
이러한 조건 때문에 Spring REST Docs를 사용한 API 문서는 신뢰도가 높고, 결과적으로 프로그램의 완성도를 더욱 높여준다.
Spring REST Docs를 적용하는 법은 다음과 같다.
build.gradle 설정
build.gradle 파일에 다음과 같은 구문을 추가한다.
plugins {
    id "org.asciidoctor.jvm.convert" version "3.3.2" // asciidoctor 플러그인 추가
}

configurations {
   asciidoctorExt // asciidoctor를 확장하는 종속성에 대한 구성 선언
}

dependencies {
    // Spring REST Docs 의존성 추가
    testImplementation 'org.springframework.restdocs:spring-restdocs-mockmvc'
    //
    asciidoctorExt 'org.springframework.restdocs:spring-restdocs-asciidoctor'
}

asciidoctor {
   dependsOn test // asciidoctor를 수행하기전 test를 수행하도록 선언
   configurations 'asciidoctorExt'
}

tasks.register('copyApiDocument', Copy) { // 자동으로 생성된 문서를 옮겨주는 copyApiDocument task 선언
   dependsOn asciidoctor // copyApiDocument를 수행하기전 asciidoctor를 수행하도록 선언
   doFirst { // 작업이 실행되기전 수행하는 작업 선언
      delete file("src/main/resources/static/docs") // 기존 문서 삭제
   }
   // 생성된 문서를 static/docs로 이동
   from asciidoctor.outputDir
   into file("src/main/resources/static/docs")
}

build {
   dependsOn copyApiDocument // 프로젝트 빌드 전 copyApiDocument를 실행하도록 변경
}
공식 문서, 인터넷에 있는 다른 자료에선 다음과 같이 설정을 해준다.
ext {
    snippetsDir = file('build/generated-snippets') // 1
}

test {
   useJUnitPlatform()
   outputs.dir snippetsDir  // 2
}

asciidoctor {
   inputs.dir snippetsDir  // 3
   dependsOn test
}
하지만 기본적으로 snippetsDir의 경로가 build/generated-snippets로 설정이 되어있기 때문에 명시적으로 적어줄 필요가 없다.
마찬가지로 test와 asciidoctor의 task에 snippetsDir를 적어주지 않아도 잘 동작한다.
기본적인 설정을 해보고, 이슈가 생기면 수동으로 snippetsDir를 설정하면 될 것 같다.
테스트 코드 작성
build.gradle에서 Spring REST Docs 설정이 끝나면, 이제 테스트 코드를 작성하면 된다.
여기선 MockMvc 기반으로 설명한다. 참고로 REST Assured로도 가능하다.
테스트 코드는 다음과 같이 작성한다.
import static org.springframework.restdocs.mockmvc.MockMvcRestDocumentation.document;
import static org.springframework.restdocs.payload.PayloadDocumentation.fieldWithPath;
import static org.springframework.restdocs.payload.PayloadDocumentation.requestFields;
import static org.springframework.restdocs.payload.PayloadDocumentation.responseFields;

@WebMvcTest(ProductController.class)
@AutoConfigureRestDocs // REST Docs를 사용하려면 해당 에너테이션을 테스트 상단에 적는다.
class ProductControllerTest {

    @Test
    @DisplayName("/products로 POST 요청과 상품의 정보를 보내면 HTTP 201 코드와 함께 상품이 등록되어야 한다.")
    void createProduct_success() throws Exception {
        // given
        ProductCreateRequest request = new ProductCreateRequest("글렌피딕", 230_000, "https://image.com/image.png");

        given(productService.createProduct(anyString(), anyInt(), anyString()))
                .willReturn(new ProductDto(1L, "글렌피딕", 230_000, "https://image.com/image.png"));

        // expect
        mockMvc.perform(post("/products")
                        .contentType(MediaType.APPLICATION_JSON)
                        .content(objectMapper.writeValueAsString(request)))
                .andExpect(status().isCreated())
                .andExpect(header().string("location", "/products/1"))
                .andExpect(jsonPath("$.code").value("201"))
                .andExpect(jsonPath("$.message").value("상품이 생성되었습니다."))
                .andExpect(jsonPath("$.result.productId").value(1))
                .andExpect(jsonPath("$.result.name").value("글렌피딕"))
                .andExpect(jsonPath("$.result.price").value(230000))
                .andExpect(jsonPath("$.result.imageUrl").value("https://image.com/image.png"))
                .andDo(document("create-product",
                        requestFields(
                                fieldWithPath("name").description("상품의 이름"),
                                fieldWithPath("price").description("상품의 가격"),
                                fieldWithPath("imageUrl").description("상품의 이미지 URL")
                        ),
                        responseFields(
                                fieldWithPath("code").description("상태 코드"),
                                fieldWithPath("message").description("결과 메시지"),
                                fieldWithPath("result.productId").description("생성된 상품의 ID"),
                                fieldWithPath("result.name").description("생성된 상품의 이름"),
                                fieldWithPath("result.price").description("생성된 상품의 가격"),
                                fieldWithPath("result.imageUrl").description("생성된 상품의 이미지 URL")
                        )
                ));
    }
}
코드가 조금 많고, 지저분하지만 REST Docs의 가장 핵심적인 부분은 마지막 항목인 andDo() 메서드의 document() 메서드이다.
해당 메서드를 자세히 살펴보자.
.andDo(document("create-product",
        requestFields(
                fieldWithPath("name")
                        .description("상품의 이름"),
                fieldWithPath("price")
                        .description("상품의 가격"),
                fieldWithPath("imageUrl")
                        .description("상품의 이미지 URL")
        ),
        responseFields(
                fieldWithPath("code")
                        .description("상태 코드"),
                fieldWithPath("message")
                        .description("결과 메시지"),
                fieldWithPath("result.productId")
                        .description("생성된 상품의 ID"),
                fieldWithPath("result.name")
                        .description("생성된 상품의 이름"),
                fieldWithPath("result.price")
                        .description("생성된 상품의 가격"),
                fieldWithPath("result.imageUrl")
                        .description("생성된 상품의 이미지 URL")
        )
));
document() 메서드의 첫 번째 인자에는 문자열이 들어간다. 해당 문자열은 문서화 파일이 생성될 폴더를 적는다.
/로 구분하여 폴더로 나뉘게 할 수 있다.
ex) product/create
두 번째, 세 번째 인자엔 OperationRequestPreprocessor, OperationResponsePreprocessor 인터페이스가 들어가는데 해당 내용은 조금 뒤에 설명한다.
그리고 네 번째 인자부터는 Snippet이라는 인터페이스가 가변 인자로 들어간다.
Snippet을 조금 더 자세히 살펴보자.
Snippet
Snippet 인터페이스는 구현 메소드가 하나 밖에 없는 인터페이스이다.
public interface Snippet {
  void document(Operation operation) throws IOException;
}
Snippet 인터페이스를 구현한 클래스는 PayloadDocumentation, RequestDocumentation 클래스가 제공하는 정적 팩터리 메소드를 사용하면 된다.
PayloadDocumentation 클래스가 제공하고, 자주 사용하는 정적 팩터리 메소드는 다음과 같다.
- requestFields
- responseFields
requestFields
requestFields는 요청 본문의 필드를 문서화한다.
내부 인자로 FieldDescriptor 클래스를 넣는다.
FieldDescriptor 클래스는 마찬가지로 RequestDocumentation 클래스가 제공하는 정적 팩터리 메소드인 fieldWithPath() 메서드를 사용해서 생성한다.
fieldWithPath() 메서드도 똑같이 문자열이 들어가는데, 이는 JSON의 key 값을 넣는다.
상품 생성 시 요청의 JSON 형식
{
    "name": "상품 1",
    "price": 10000,
    "imageUrl": "https://image.com/image.png"
}requestFields(
fieldWithPath("name").description("상품의 이름"),
fieldWithPath("price").description("상품의 가격"),
fieldWithPath("imageUrl").description("상품의 이미지 URL")
)참고로, 모든 필드를 적어주어야 테스트가 성공한다.
만약 적지 않은 필드가 있다면 SnippetException이 발생하고 테스트가 실패한다.
이때, requestFields() 메소드를 사용하지 않고, relaxedRequestFields() 메서드를 사용하면 특정 필드를 제외할 수 있다.
relaxedRequestFields(
        // fieldWithPath("name").description("상품의 이름"),
        fieldWithPath("price").description("상품의 가격"),
        fieldWithPath("imageUrl").description("상품의 이미지 URL")
)
responseFields
responseFields는 응답 본문의 필드를 문서화한다.
내부 인자로 requestFields와 같이 FieldDescriptor 클래스를 넣는다.
FieldDescriptor는 위에서 설명했으니 생략한다.
마찬가지로, relaxedResponseFields() 메서드를 사용하여, 특정 필드를 제외할 수 있다.
참고로 JSON이 다음과 같은 구조로 되어 있을 때 다음과 같이 .으로 중첩된 객체를 찾을 수 있다.
{
    "code": "201",
    "message": "상품이 생성되었습니다. ID=1",
    "result": {
        "productId": 1,
        "name": "상품 1",
        "price": 10000,
        "imageUrl": "https://image.com/image.png"
    }
}responseFields(
fieldWithPath("code")
.description("상태 코드"),
fieldWithPath("message")
.description("결과 메시지"),
fieldWithPath("result.productId")
.description("생성된 상품의 ID"),
fieldWithPath("result.name")
.description("생성된 상품의 이름"),
fieldWithPath("result.price")
.description("생성된 상품의 가격"),
fieldWithPath("result.imageUrl")
.description("생성된 상품의 이미지 URL")
)PayloadDocumentation 클래스가 제공하고, 자주 사용하는 정적 팩터리 메소드는 다음과 같다.
- pathParameters
- requestParameters
pathParameters
@PathVariable에 들어가는 값을 문서화한다.
내부 인자로 ParameterDescriptor 클래스를 넣는다.
ParameterDescriptor 클래스는 RequestDocumentation 클래스가 제공하는 parameterWithName() 정적 팩터리 메소드를 사용해서 생성한다.
parameterWithName() 메소드의 인자는 문자열이 들어가는데, 해당 문자열은 컨트롤러에서 지정한 @PathVariable의 변수명을 넣는다.
pathParameters(
        parameterWithName("productId").description("상품 ID")
)
requestParameters
@RequestParam에 들어가는 값을 문서화한다.
즉, URI에 포함되는 쿼리 파라미터에 있는 값을 문서화한다.
pathParameters와 마찬가지로, 컨트롤러에서 지정한 @RequestParam의 변수명을 넣는다.
requestParameters(
        parameterWithName("name").description("상품의 이름"),
        parameterWithName("price").description("상품의 가격")
)
그 외, 여러가지 메소드 있으니 자세한 내용은 공식 문서를 참고하자.
테스트 실행
모든 구성을 끝내고, 테스트를 실행하면 build/generated-snippets 폴더에 다음과 같은 파일이 생성된다.
create-product 패키지는 document() 메서드에서 지정한 폴더이다.
해당 .adoc으로 끝나는 파일을 스니펫이라고 한다.
.
└── build
    └── create-product
        ├── curl-request.adoc
        ├── http-request.adoc
        ├── http-response.adoc
        ├── httpie-request.adoc
        ├── request-body.adoc
        ├── request-fields.adoc
        ├── response-body.adoc
        └── response-fields.adoc
주로 사용되는 스니펫은 다음과 같다.
http-request.adoc
[source,http,options="nowrap"]
----
POST /products HTTP/1.1
Content-Type: application/json;charset=UTF-8
Content-Length: 79
Host: localhost:8080

{"name":"글렌피딕","price":230000,"imageUrl":"https://image.com/image.png"}
----
HTTP 메서드와 URI, HTTP 프로토콜 등 요청에 필수적인 내용들이 담겨있다.
request-fields.adoc
|===
|Path|Type|Description

|`+name+`
|`+String+`
|상품의 이름

|`+price+`
|`+Number+`
|상품의 가격

|`+imageUrl+`
|`+String+`
|상품의 이미지 URL

|===
요청의 본문에 관한 내용들이 담겨있다.
http-response.adoc
[source,options="nowrap"]
----
{"code":"201","message":"상품이 생성되었습니다.","result":{"productId":1,"name":"글렌피딕","price":230000,"imageUrl":"https://image.com/image.png"}}
----
응답의 HTTP 프로토콜, 상태 코드 등 응답에 필수적인 내용들이 담겨있다.
response-fields.adoc
|===
|Path|Type|Description

|`+code+`
|`+String+`
|상태 코드

|`+message+`
|`+String+`
|결과 메시지

|`+result.productId+`
|`+Number+`
|생성된 상품의 ID

|`+result.name+`
|`+String+`
|생성된 상품의 이름

|`+result.price+`
|`+Number+`
|생성된 상품의 가격

|`+result.imageUrl+`
|`+String+`
|생성된 상품의 이미지 URL

|===
응답의 본문에 관한 내용들이 담겨있다.
index.adoc
생성된 스니펫을 html 파일로 만들려면 해당 경로에 index.adoc 파일를 생성한다.
src/docs/asciidoc/index.adoc
.
└── src
    └── docs
        └── asciidoc
            └── index.adoc
index.adoc 파일의 내용은 다음과 같이 작성한다.
include::{snippets}/create-product/http-request.adoc[]
include::{snippets}/create-product/request-fields.adoc[]
include::{snippets}/create-product/http-response.adoc[]
include::{snippets}/create-product/response-fields.adoc[]
include:: 를 사용하여 스니펫 파일을 불러올 수 있다.
그리고 터미널에서 다음 커맨드를 입력하면 index.adoc 파일이 HTML 형식으로 만들어진다.
./gradlew asciidoctor
.
└── build
    └── docs
        └── asciidoc
            └── index.html
IntelliJ 화면 우측
gradle탭의documententation항목에 있는asciidoctor를 실행해도 가능하다.
또한,build를 하면build.gradle에서 설정한copyApiDocumenttask가 실행되어resources/templates/docs폴더로 문서화 파일이 생성된다.
하지만 파일을 열어보면 예쁘게 문서화 파일이 생성되지는 않을 것이다.
JSON 예쁘게 만들기
우선 첫 번째 마음에 들지 않는 부분은 JSON이 한 줄로 출력이 된다.
기대하는 형식
{
    "name": "글렌피딕",
    "price": 230000,
    "imageUrl": "https://image.com/image.png"
}
처참한 결과
{"name":"글렌피딕","price":230000,"imageUrl":"https://image.com/image.png"}이를 해결하려면 document() 메서드의 두 번째, 세 번째 인자인 OperationRequestPreprocessor, OperationResponsePreprocessor 클래스를 추가해 줘야 한다.
import static org.springframework.restdocs.operation.preprocess.Preprocessors.preprocessRequest;
import static org.springframework.restdocs.operation.preprocess.Preprocessors.preprocessResponse;
import static org.springframework.restdocs.operation.preprocess.Preprocessors.prettyPrint;

...

.andDo(document("create-product",
        preprocessRequest(
                prettyPrint()),
        preprocessResponse(
                prettyPrint()),
        ...
));
그리고 다시 테스트를 돌려서 스니펫 파일을 확인해 보면 JSON에 포맷이 적용되어 예쁘게 적용된 것을 볼 수 있다.
[source,options="nowrap"]
----
{
  "name" : "글렌피딕",
  "price" : 230000,
  "imageUrl" : "https://image.com/image.png"
}
----
하지만, 매번 저렇게 preprocessRequest(), preprocessResponse() 메서드를 일일이 적용하기엔 귀찮기도 하고, 중복이 생긴다.
다음과 같이 MockMvc를 직접 생성하여 기본값을 설정해 줄 수 있다.
@WebMvcTest(ProductController.class)
@ExtendWith(RestDocumentationExtension.class)
class ProductControllerTest {
    MockMvc mockMvc;

    @BeforeEach
    void setUp(WebApplicationContext context, RestDocumentationContextProvider restDocumentation) {
        this.mockMvc = MockMvcBuilders.webAppContextSetup(context)
                .apply(documentationConfiguration(restDocumentation))
                .alwaysDo(document("{class-name}/{method-name}/",
                        preprocessRequest(prettyPrint()),
                        preprocessResponse(prettyPrint())))
                .build();
    }
}
alwaysDo() 메서드 안에 document() 메서드를 넣어주면 해당 값들이 기본값으로 사용된다.
그리고 첫 번째 인자의 문자열에 다음과 같은 문자열을 입력했다.
{class-name}/{method-name}
해당 문자열은 출력되는 폴더를 파라미터화 할 수 있다.
즉, 테스트 클래스와 메소드의 이름으로 생성되게 할 수 있다.
자세한 내용은 공식문서를 참고하자.
하지만 저렇게 일일이 mockMvc를 설정하는 것 자체가 중복이라 생각하기에 유틸리티 클래스를 만들어 해결하였다.
public class RestDocsHelper {
    public static RestDocumentationResultHandler customDocument(String identifier, Snippet... snippets) {
        return document("{class-name}/" + identifier,
                preprocessRequest(
                        prettyPrint()),
                preprocessResponse(
                        prettyPrint()),
                snippets
        );
    }
}
그리고 andDo(customDocument(...))로 사용하면 된다.
HTML 예쁘게 만들기
두 번째로 생성된 문서화 파일이 코드만 있어서 가독성이 낮다.
Spring REST Docs로 생성되는 문서화 파일은 AsciiDoc 이라는 마크업 언어로 생성된다.
따라서 AsciiDoc 문법을 사용하여 index.adoc 파일을 꾸며줘야 한다.
AsciiDoc의 문법을 다루기엔 내용이 너무 많으므로 간단하게 소개한다.
자세한 내용은 링크를 참조하자.
AsciiDoc 플러그인을 사용하면 미리보기로 볼 수 있다.
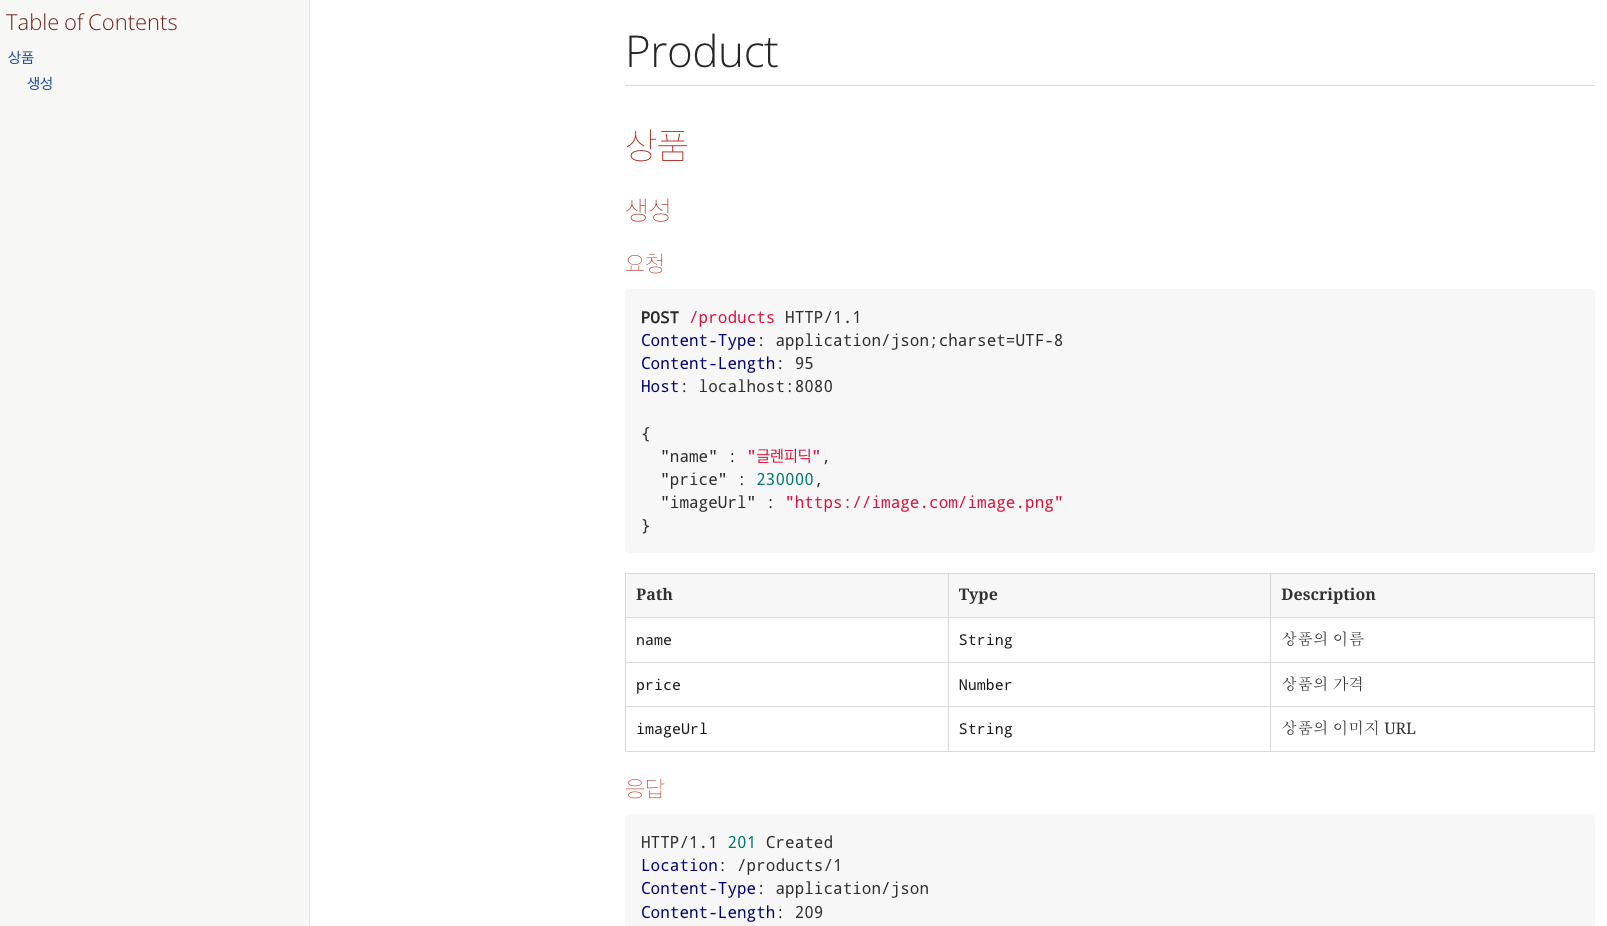
= Product
:toc: left
:source-highlighter: highlightjs
:sectlinks:

== 상품

=== 생성
==== 요청
include::{snippets}/product-controller-test/create/http-request.adoc[]
include::{snippets}/product-controller-test/create/request-fields.adoc[]

==== 응답
include::{snippets}/product-controller-test/create/http-response.adoc[]
include::{snippets}/product-controller-test/create/response-fields.adoc[]=는 Markdown에서 #과 같다.
그리고 주요하게 봐야 할 내용은 다음과 같다.
:toc:
:toc:는 Table of Contents의 약어로, 목차를 나타낸다.
left, right, preamble 등 여러 설정이 있다.
자세한 내용은 공식문서롤 참조하자.
:source-highlighter:
:source-highlighter:는 JSON 포맷의 색을 예쁘게 만들어준다.
highlightjs, rouge 등 여러 설정이 있다.
자세한 내용은 공식문서를 참조하자.
:sectlinks:
:sectlinks:는 섹션 제목을 링크로 바꿔준다.
큰 변경은 없지만, 색을 넣어주기 때문에 가독성이 올라간다.
API 문서 배포
이제 만든 API 문서를 배포해야 한다.
build.gradle에서 만든 copyApiDocument task를 실행하면 생성된 API 문서가 다음과 같은 경로로 이동된다.
.
└── src
    └── main
        └── resources
            └── static
                └── docs
                    └── index.html
이제 서버를 실행하고 다음과 같은 URI로 이동한다.
/docs/index.html
그러면 Spring REST Docs로 만든 API 문서를 확인할 수 있다.
결론
Spring을 사용하여 웹 어플리케이션을 개발하면 주로 API 서버를 만든다.
이때, 서버가 제공하는 API가 많아지면, 각 API가 어떤 URI에서 어떤 HTTP 메서드를 사용하며, 어떤 파라미터가 필요한지 파악하기 어려워진다.
이런 문제를 해결하기 위해 API 문서화가 필요하지만, 이 작업은 수동으로 하기에는 시간이 많이 들고, 오타나 실수로 인해 정보가 누락될 수 있다.
또한 API가 변경될 때마다 문서를 수동으로 업데이트하는 것은 비효율적이며, 실수로 인해 문서가 API와 일치하지 않게 될 가능성도 있다.
이때 스프링이 제공하는 REST Docs 모듈을 사용하여 해당 문제점을 개선할 수 있다.
Spring REST Docs을 사용하면 AsciiDoc라는 마크업 언어로 된 파일로 스니펫을 생성한다.
또한, 스니펫을 생성할 때 테스트 코드를 기반으로 실행되기 때문에 항상 정확한 API 문서를 얻을 수 있다.
하지만, 그만큼 문서를 작성할 때 드는 시간과 노력이 많고, 설정해야 할 작업들도 많다.
따라서 무조건 Spring REST Docs를 선택하는 것은 바람직하지 않을 수 있다.
Swagger 같은 문서화 도구를 참고하면, 더 쉽게 API 문서화를 자동화 할 수 있다.