서론
스프링 프레임워크의 핵심 기능은 IoC 컨테이너를 이용하여 객체에 대한 의존성 주입을 해주는 것이다.
스프링이 의존성을 해결한 객체는 Bean이라고 부르는데, Bean은 스프링 IoC 컨테이너에 의해 생성되고 관리된다.
빈은 Lifecycle(생명주기)을 가지는데, 이 생명주기에 대해 자세히 알아보자.
본문
스프링 컨테이너에 빈이 등록될 때 다음과 같은 과정을 거친다.
- Bean Definition 읽기: 스프링 설정 파일(XML, @Configuration), 어노테이션(@Component 등)을 사용하여 빈 설정 정보를 읽는다.
- Bean 객체 생성: Bean Definition에 정의된 정보를 바탕으로 빈을 생성한다.
- 의존성 주입: 생성된 빈에 필요한 의존성을 주입한다.
위의 3가지 과정을 통해 빈은 스프링 컨테이너에 의해 관리되고 사용된다.
또한 빈은 "기본적으로" 스프링 컨테이너가 종료될 때 같이 소멸된다.
즉, 빈은 스프링 컨테이너와 생명주기를 같이 가진다고 볼 수 있다.
빈은 스프링 컨테이너가 종료될 때 같이 소멸된다.
하지만 빈 스코프에 따라 생성되고 소멸되는 시점이 존재하는데, 이것은 밑에서 설명한다.
스프링 컨테이너는 빈을 관리하며 생명주기도 같이 관리한다.
그리고 스프링 컨테이너가 빈의 생명주기를 관리할 때 실행되는 것이 있다.
이것을 Lifecycle Callback(생명주기 콜백)이라고 한다.
생명주기 콜백은 빈이 생성과 소멸 될 때 실행된다.
빈의 생명주기 콜백은 다음과 같이 지정해 줄 수 있다.
InitializingBean,DisposableBean인터페이스 구현
@Component
public class A implements InitializingBean, DisposableBean {
    @Override
    public void afterPropertiesSet() throws Exception {
        System.out.println("Init");
    }

    @Override
    public void destroy() throws Exception {
        System.out.println("Destroyed");
    }
}@PostConstruct,@PreDestroy어노테이션 사용
@Component
public class A {
    @PostConstruct
    public void init() {
        System.out.println("Init");
    }

    @PreDestroy
    public void destroy() {
        System.out.println("Destroy");
    }
}
스프링 공식문서에서는 어노테이션을 사용하는 것을 권장한다.
그렇다면 스프링 컨테이너는 왜 빈의 생명주기를 관리하는 걸까?
우선 첫 번째로 초기화 및 종료 시점에 리소스를 관리할 수 있다.
데이터베이스 연결, 소켓 연결 등 네트워크를 사용하여 외부 리소스를 사용할 때 연결하고 해제하는 작업이 필요하다.
빈이 생성될 때 외부 리소스를 사용하게 된다면 외부 리소스의 연결 시점을 사용자가 직접 조작할 수 있다.
그리고 외부 리소스 사용이 끝나면 연결을 해제해야 다른 곳에서 외부 리소스를 사용할 수 있다.
따라서 빈의 초기화 시점과 소멸 시점에 해당 작업을 해주면 개발자의 입장에서 구현이 편해진다.
두 번째로 필요할 때 동적으로 객체를 생성하고 소멸시킬 수 있다.
따라서 메모리 사용을 더 효율적으로 할 수 있다.
위의 두 방법은 빈 스코프가 singleton일 땐 크게 체감이 되지 않는다.
왜냐하면 싱글턴 빈의 생명주기는 스프링 컨테이너의 시작과 종료까지 함께 하기 때문이다.
따라서 빈 스코프를 prototype, request,session 등을 사용해야 해당 이점을 크게 누릴 수 있다.
다음과 같이 예시 코드로 빈 스코프에 대한 생명주기를 확인해 보자.
Prototype Scope
@RestController
public class PrototypeController {
    private final PrototypeService prototypeService;

    public PrototypeController(PrototypeService prototypeService) {
        this.prototypeService = prototypeService;
    }

    @GetMapping("/prototype")
    public double prototypeBean() {
        return prototypeService.logic();
    }

    @PostConstruct
    public void init() {
        log.info("PrototypeController Init");
    }

    @PreDestroy
    public void destroy() {
        log.info("PrototypeController Destroy");
    }
}
@Component
@Scope(value = "prototype")
public class PrototypeService {
private static final Logger log = LoggerFactory.getLogger(PrototypeService.class);
private final double value = Math.random() * 100;
public double logic() {
log.info("Prototype value = {}", value);
return value;
}
@PostConstruct
public void init() {
log.info("Prototype Bean Init");
}
@PreDestroy
public void destroy() {
log.info("Prototype Bean Destroy");
}
}/prototype으로 GET 요청시 결과는 다음과 같다.
51.41651420290755
(새로고침)
51.41651420290755
(새로고침)
51.41651420290755
(새로고침)
51.41651420290755
prototype 빈 스코프는 스프링 컨테이너에서 빈을 가져올 때 새로운 인스턴스를 생성한다.
즉, prototype 빈이 생성되거나 주입될 때 생명 주기는 해당 주입된 대상을 따라간다.
따라서 새로운 인스턴스를 생성하지만, 생명 주기가 singleton인 컨트롤러에 주입됐기에 같은 결과가 나온다.
그리고 어플리케이션을 종료하면 다음과 같은 로그가 출력된다.
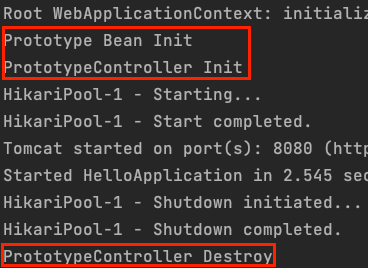
프로토타입 빈에 설정한 @PostConstruct 메서드는 실행됬지만 @PreDestroy 메서드는 실행되지 않았다.
왜냐하면 스프링 컨테이너는 prototype 빈에 대한 초기화 단계에만 관리하고, 그 이후엔 관리하지 않기 때문이다.
즉, 이후 생명주기 관리는 다음과 같이 프로토타입 빈을 사용하는 클라이언트가 관리해야 한다.
@PreDestroy
public void destroy() {
    log.info("PrototypeController Destroy");
    prototypeService.destroy(); // 직접 생명주기를 관리해야 한다.
}
Request Scope
request 스코프는 웹에서 Request, 즉 요청이 들어오면 생성된다.
그리고 요청이 끝나면 prototype 스코프와 다르게, 컨테이너에서 소멸된다.
request 스코프를 사용하는 코드는 다음과 같다.
@RestController
public class RequestController {
    private final RequestService requestService;

    public RequestController(RequestService requestService) {
        this.requestService = requestService;
    }

    @GetMapping("/request")
    public double requestBean() {
        return requestService.logic();
    }
}
@Component
@Scope("request")
public class RequestService {
private static final Logger log = LoggerFactory.getLogger(RequestService.class);
private final double value = Math.random() * 100;
public double logic() {
log.info("Request value = {}", value);
return value;
}
@PostConstruct
public void init() {
log.info("Request Bean Init");
}
@PreDestroy
public void destroy() {
log.info("Request Bean Destroy");
}
}이렇게 코드를 작성하고 어플리케이션을 실행시키면 다음과 같은 예외가 발생하며 어플리케이션이 종료된다.
Unsatisfied dependency expressed through constructor parameter 0; nested exception is org.springframework.beans.factory.support.ScopeNotActiveException: Error creating bean with name 'requestService': Scope 'request' is not active for the current thread; consider defining a scoped proxy for this bean if you intend to refer to it from a singleton; nested exception is java.lang.IllegalStateException: No thread-bound request found: Are you referring to request attributes outside of an actual web request, or processing a request outside of the originally receiving thread? If you are actually operating within a web request and still receive this message, your code is probably running outside of DispatcherServlet: In this case, use RequestContextListener or RequestContextFilter to expose the current request.왜냐하면 singleton의 생명주기와 request의 생명주기는 다르기 때문이다.
singleton 스코프로 설정된 빈의 생명주기는 스프링 컨테이너가 처음 등록되고 종료될 때까지 유지된다.
하지만 request 스코프로 설정된 빈의 생명주기는 웹 요청이 들어오고 나올 때만 유지된다.
따라서 스프링 컨테이너에서 singleton 빈을 생성하고 의존성을 주입할 때 request 빈은 생성할 수 없으므로, 다음과 같은 예외가 발생하는 것이다.
해결법은 @Scope 어노테이션에 다음과 같이 proxyMode를 설정한다.
@Component
@Scope(value = "request", proxyMode = ScopedProxyMode.TARGET_CLASS)
public class RequestService {
    ...
}proxyMode의 자세한 설명은 다음 공식문서롤 참고하자.
참고로 request, session 스코프의 경우 @RequestScope, @SessionScope를 사용할 수 있다.
@Target({ElementType.TYPE, ElementType.METHOD})
@Retention(RetentionPolicy.RUNTIME)
@Documented
@Scope(WebApplicationContext.SCOPE_REQUEST)
public @interface RequestScope {
    /**
    * Alias for {@link Scope#proxyMode}.
    * <p>Defaults to {@link ScopedProxyMode#TARGET_CLASS}.
    */   @AliasFor(annotation = Scope.class)
    ScopedProxyMode proxyMode() default ScopedProxyMode.TARGET_CLASS;
}
다음과 같이 @RequestScope에 proxyMode가 기본적으로 TARGET_CLASS인 것을 볼 수 있다.
그리고 request 스코프를 사용할 때 요청을 보내면 다음과 같은 결과가 나온다.
21.266915878548243
(새로고침)
52.9088047863665
(새로고침)
37.45101933380681
(새로고침)
콘솔에는 다음과 같이 출력된다.
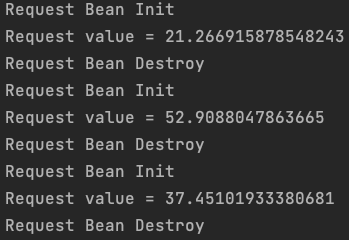
@PostConstruct, @PreDestroy가 호출되는 것을 볼 수 있다.
즉, 스프링 컨테이너에서 생명주기를 관리한다.
Session Scope
session 스코프는 세션이 생성되면 생성된다.
session 스코프를 사용하는 코드는 다음과 같다.
@RestController
public class SessionController {
    private final SessionService sessionService;

    public SessionController(SessionService sessionService) {
        this.sessionService = sessionService;
    }

    @GetMapping("/session")
    public double sessionBean() {
        return sessionService.logic();
    }

    @GetMapping("/session/invalidate")
    public String validateSession(HttpSession httpSession) {
        httpSession.invalidate();
        return "Session Invalidate";
    }
}
@Component
@SessionScope // Request 스코프와 같이 ProxyMode를 TargetClass로 설정해야 한다.
public class SessionService {
private static final Logger log = LoggerFactory.getLogger(SessionService.class);
private final double value = Math.random() * 100;
public double logic() {
log.info("Session value = {}", value);
return value;
}
@PostConstruct
public void init() {
log.info("Session Bean Init");
}
@PreDestroy
public void destroy() {
log.info("Session Bean Destroy");
}
}그리고 요청을 보내면 다음과 같은 결과가 나온다.
23.724403917508084
(새로고침)
23.724403917508084
(새로고침)
23.724403917508084
콘솔에는 다음과 같이 출력된다.
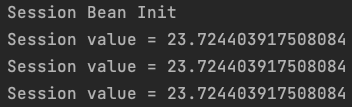
세션은 기본적으로 설정된 시간동안 유지되기 때문에 새롭게 요청을 보내도, 세션이 사라지고 다시 생성되기 전까지 같은 값을 출력한다.
하지만 session 스코프의 빈은 세션의 시간이 초과하여도 바로 소멸되지 않고, 시간이 초과한 후 다시 요청받을 때 소멸되고 생성된다.

또는 HttpSession 객체에 invalidate() 메서드를 호출하면 소멸된다.

결론
스프링은 컨테이너에 빈을 등록할 때 의존성을 주입할 뿐 아니라, 객체의 생명주기도 관리한다.
생명주기를 관리하면 객체의 초기화, 소멸 시점에 특정 메소드를 호출할 수 있어 코드의 유지보수성과 확장성이 향상된다.
이것을 생명주기 콜백이라고하며, 생명주기 콜백을 사용하면 외부 리소스를 사용할 때 연결과 해제 작업을 편하게 사용할 수 있다.
또한 필요시에 객체를 생성하고 소멸시킬 수 있으므로 어플리케이션의 성능도 향상시킬 수 있다.
한 가지 주의할 점은 생명주기의 범위가 다른 빈을 의존성으로 사용할 때 proxyMode를 따로 설정해 주어야 한다.