2023.11.03 TIL
Camera module 이용해보기
매우 오래걸리므로 미리 입력할것들
# sudo apt-get install libcblas-dev 했더니 밑에 얘로 하라고 뜸
sudo apt-get install libatlas-base-dev

sudo apt-get install libhdf5-dev
sudo apt-get install libhdf5-serial-dev
sudo apt-get install libatlas-base-dev
sudo apt-get install libjasper-dev
sudo apt-get install libqtgui4  # not available
sudo apt-get install libqt4-test  # Unable to locate

sudo pip3 install -U opencv-python  # 이게 매우매우매우 오래걸림
pip3 install -U numpy
Optional : sudo apt-get install byobu
htop result → 작업관리자 비슷하다
Camera module이란?
Good spec
Reasonable price
근데 32-bit Raspbian만 지원.
연결하기
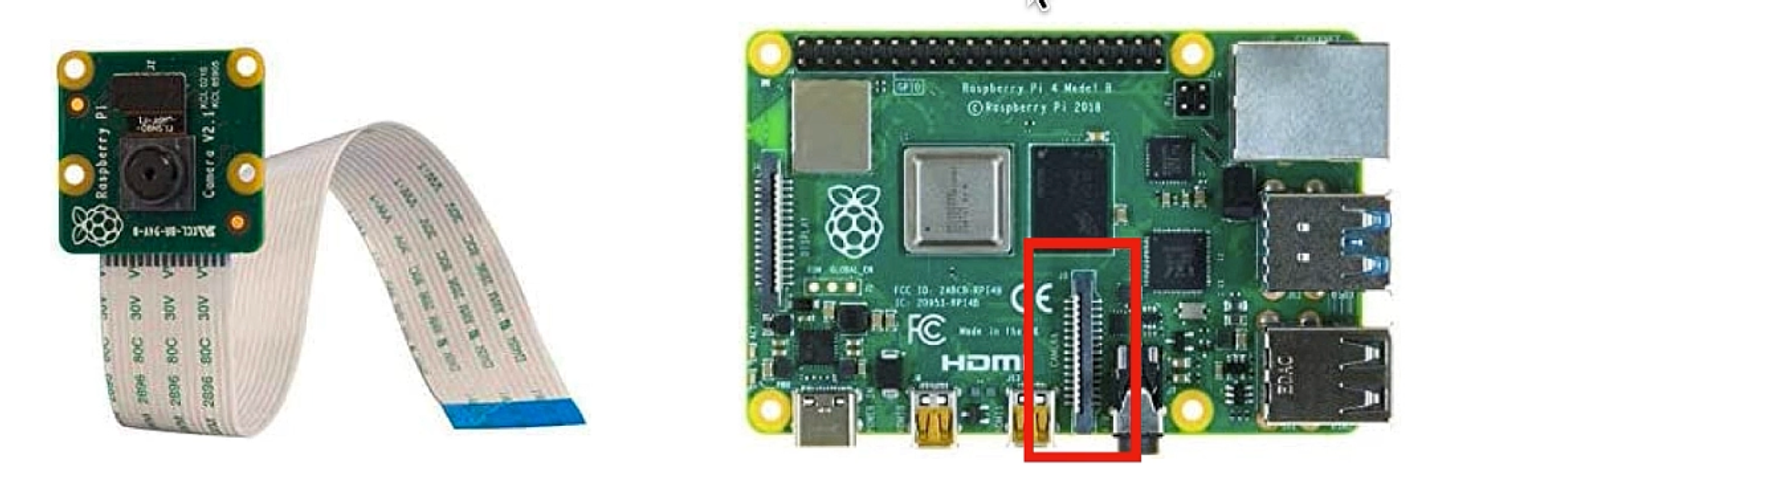
📏 항상 Hardware → Software 순서로 고민하자
저기에 꽂고 Raspberry Pi 한테 알려주자
sudo raspi-config
3번 → I1의 Legacy camera → enable
정상 작동하는지 확인해보기
- 사진
raspistill -o Desktop/image.jpg- 바탕화면에 camera module로 찍힌 image.jpg가 생기면 성공
- 비디오
raspivid -o Desktop/video.h264- 바탕화면에 camera module로 찍힌 video.h264가 생기면 성공
Monitor 연결 안되어있을때 image 보는법들
- Visual Studio Code ssh 연결 이용
- Scp 이용
scp -Pxxxx pi@xxx.xxx.xxx.xxx/home/pi/workspace/python/lecture3등등/image.jpg ~/Downlods/.
PiCamera package 활용해보기
설치
pip3 install picamera
import 해보기
from picamera import PiCamera
from time import sleep  # time 패키지에서 sleep만 import하겠다
Camera 코드로 init 해보기
from picamera import PiCamera
from time import sleep

camera = PiCamera()

camera.start_preview()  # 모니터에 카메라가 찍는 화면이 나옴
sleep(5)
camera.stop_preview()  # 5초후 화면 사라짐
PiCamera 패키지로 할수있는 것들
camera.resolution = (2592, 1944)  # 카메라 해상도 조절
camera.framerate = 15  # 초당 몇회를 input으로 쓸지 조절

camera.PiCamera()  # 이건 왜 또쓴거지

camera.annotate_text_size = 50  # text 자막 크기 조절

camera.annotate_text("Hello World!")  # 자막 달기

camera.capture('/home/pi/Desktop/image.jpg')  # 캠쳐

camera.start_recording('/home/pi/Desktop/image.jpg')  # 녹화
sleep(5)
camera.stop_recording() # 5초간 녹화camera.awb_mode = 'sunlight' # 햇살 필터 ~이것들 외에도 매우 많다. 아래 링크 참고
9. API - The PiCamera Class — Picamera 1.13 Documentation
Camera module을 이용한 프로그램
OpenCV를 이용한 circle detection 해보기
Open source Computer Vision 패키지를 쓰자
import 해보기, 확인해보기
import cv2

cap = cv2.VideoCapture(0)  # Camera init(0번 device 찰칵). 이걸로 확인해보는 이유: cv2는 알아서 camera 가져오지않아줌

ret, frame = cap.read()  # data 가져오기
if ret:  # frame 가져오기에 성공했다면
	cv2.imwrite('image.jpg', frame)  # 해당 frame 저장

cap.release()  # 카메라 놔주기
총 코드
import cv2

cap = cv2.VideoCapture(0)  # 이걸로 안되면 숫자 바꿔보기

while True:  # 루프를 돌며 circle 찾기가 끝나면 다음 image를 받아온다
	ret, frame = videoCapture.read()
	if not ret: break  # frame이 제대로 안들어온다면 프로그램 종료

	gray = cv.cvtColor(frame, cv.COLOR_BGR2GRAY)  # Convert Color: frame의 color를 BlueGreenRed에서 Gray로 바꾼다. (RGB랑 똑같음)
	blur = cv.GaussianBlur(gray, (15, 15), 0)  # gray라는 input을 (15, 15) filter size로 blur한다. 왜요? 노이즈 줄여주기 위해.

	circles = cv.HoughCircles(blur, cv.HOUGH_GRADIENT, 2, 100, param1=100, param2=100, minRadius=35, maxRadius=500)  # Hough Transform을 이용해 grayscale image에서 circle을 찾아줘요.

	if circles is not None:
		priint(circles)  # circle이 있다면 출력

videoCapture.realease()
→ 막 숫자들이 출력되면 성공
Embedded System
최적화란
특정한 목적을 가지고, 계획을 세우고 계획을 코드로 실현하는 일
최대 성능, 최소 리소스, 최대 효율
임베디드 시스템에서는...
- 우리가 사용가능한 리소스(하드웨어)는?
- 우리의 타겟 애플리케이션은?
- 최적화의 목표는?
- 성능을 최대로 써보기
- 최대한 아껴써보기(power)
CPU, DRAM
Raspberry Pi 4 Model B version
- Broadcom 2711, Quad core Cortex-A72 (ARM v8) 64-bit SoC @ 1.8GHz
- LPDDR4-3200 SDRAM
htop → 노랑(Buffered Cache), 초록(User Application), 빨강(OS Kernel)으로 사용량 막대기 그래프가 나온다
Linux가 hardware들을 관리하는법
Linux Source GitHub
각 subsystem을 각자 review, 하나의 새로운 버전에 merge
Subsystem마다 maintainer 존재
CPU
CPU마다 instruction의 대화방식이 다름…
보통 CPU 제조사에서 contribute
Linux의 idea → 둘로 나누자
- Worker (CPU)
- Work Order (Process)
- 근데 order가 여러개면 어쩌지
- Scheduler를 두자
직접 확인해보기
cat /proc/cpuinfo → 4개의 core 확인 가능
Process 만들어보기
// process.c
#include <stdio.h>
#include <time.h>

int main() {
	int i = 0;
	int ret = 0;

	for(i = 0; i < 1000000000; i+)
		ret += 1;

	return 0;
}
gcc -o process process.c
ls
Terminal 2개 준비
한쪽에는 htop
한쪽에는 ./process
Process가 어느정도 시간이 걸려서 종료되는지 확인해보기
time ./process
→ real : 우리가 느끼는 시간 (4.4~5)
→ user : CPU가 user level에서 execution을 위해 존재한 시간
→ sys : Scheduling, Kernel 편의사항 사용 등을 위해 system에서 머무는 시간들의 모임
1️⃣ OS Level 최적화 - 최소 resource(power)를 사용해서 해보기
sudo su
ls /sys/devices/system/cpu → 4개 CPU 리스트 출력
CPU governor : 각 device가 어떻게 전력소비를 할지 결정
powersave governor 설정 (cpu0~3 다)
echo powersave > /sys/devices/system/cpu/cpu0/cpufreq/scaling_governor
CPU frequency를 낮춤
time ./process → 거의 두배 느려진것을 확인할 수 있다
2️⃣ Application Level 최적화 - 성능을 최대로 써보기
Multi Threading
#include <stdio.h>
#include <pthread.h>

#define NUM_THREADS 2
#defing MAX_NUM 1000000000

void *summing(void *arg) {  // 각 thread에서 실행할 함수
	int start = 0;
	int end = start + MAX_NUM / NUM_THREADS;
	int sum = 0;

	for(int i = start; i < end; i++)
		sum += 1;

	printf("sum %d\n", sum);
	pthread_exit(NULL);
}

int main() {
	pthread_t threads[NUM_THREADS];  // thread의 구조체 (2개가 만들어진다)
	int thread_args[NUM_THREADS];  //
	int i;

	for(i = 0; i < NUM_THREADS; i++)
		pthread_create(&threads[i], NULL, summing, &thread_args[i]);  // 각 thread 구조체 pointer initialize. 이 thread는 summing이라는 일을 할것이다.

	for(i = 0; i < NUM_THREADS; i++)
		pthread_join(&threads[i], NULL);  // 각 thread를 실행, 끝날때까지 기다리게 된다.

	return 0;
}
gcc -o process_mthread process_thread.c -lpthread → 마지막 옵션 : pthread library를 사용하겠다
time ./process_mthread → 거의 두배 빨라진 것을 알수있다
→ 그런데! user는 두배다?! → 각 core는 6초씩만 일했지만 worker(thread)가 2개였으니까 12초이다.
→ 그리고 sys가 늘어났다?! → 각 thread에게 공평하게 나눠주기 위해 고민한 시간..
DRAM
Linux의 idea → Demand Paging
- Work Order (Process)
- 각 process들은 DRAM을 많이 가지고싶음 (ex: 배열 10000개)
- OS
- DRAM을 최대한 아껴쓰고싶음 → 필요하다고 할때만 나눠주고 싶지만 비효율적
- 해결책 → 각 process가 자신들이 메모리를 많이 가지고있다고 생각하게 한다
- 근데 Page Fault 발생?! → 연결해준다.
cat /sys/kernel/debug/fault_around_bytes 65536
직접 확인해보기
#include <stdio.h>
#include <stdlib.h>
#include <string.h>
#include <unistd.h>
#include <sys/mman.h>

#define PAGE_SIZE 4096
#define MEM_SIZE (1ul << 30)  // 이 Application이 OS한테 1GB 미리 요청해서 mapping 해놓음
#define STEP_SIZE (100ul << 20)

int main() {
	char *mem = mmap(NULL, MEM_SIZE, PROT_READ | PROT_WRITE, MAP_PRIVATE | MAP_ANONYMOUS, -1, 0);

	if (mem == MAP_FAILED) {
		perror("mmap failed");
		exit(EXIT_FAILURE);
	}
	size_t step_offset = 0;
	size_t touched_size = 0;

	while (touched_size < MEM_SIZE) {
		memset(mem + step_offset, 0, STEP_SIZE);  // 100MB 단위로 touching. 근데 Application은 실제로는 OS한테 1GB를 받은게 아님
		touched_size += STEP_SIZE;  // Application이 touching 하자마자 OS는 재빨리 Physical Memory 연결해줌

		printf("Touched %lu MB\n", touched_size >> 20);

		if (touched_size < MEM_SIZE) {  // Enter 칠때마다 100MB씩 touch. 10번 이루어질것.
			printf("Press enter to continue to next step...");
			getchar();
		}
		step_offset += STEP_SIZE;
	}

	if (munmap(mem, MEM_SIZE) == -1) {
		perror("munmap failed");
		exit(EXIT_FAILURE);
	}

	return 0;
}
Linux Tip - Byobu
터미널이 종료되어도 현재 작업상태를 남겨놓고 싶을때
sudo apt-get install byobu
Terminal(RaspberryPi) exit → 다시 접속 → $ byobu → 실행하던게 그대로 남아있다!
Python의 multi-threading
threading — Thread-based parallelism
Python의 multi-processing