프로젝트 경험이 있으신 분이라면, Firebase에 대해 한번쯤은 들어보셨을텐데요. Firebase를 사용하면 로그인, 채팅, 푸시 알림 등의 기능을 백엔드 개발자 없이 구현할 수 있습니다.
설령 백엔드 개발자가 따로 있다 하더라도 구현의 편의성을 높이기 위해, 자체 서버와 Firebase를 함께 사용하기도 합니다. 그만큼 프론트엔드에서 Firebase는 거의 필수적으로 다룰 수 있어야 하는 중요한 기술스택입니다.
그래서 이번 포스팅에서는 Firebase 사용을 연습해볼 겸, Firebase로 로그인을 구현하는 방법에 대해 알아보도록 하겠습니다.
1. 파이어베이스 프로젝트 생성하기
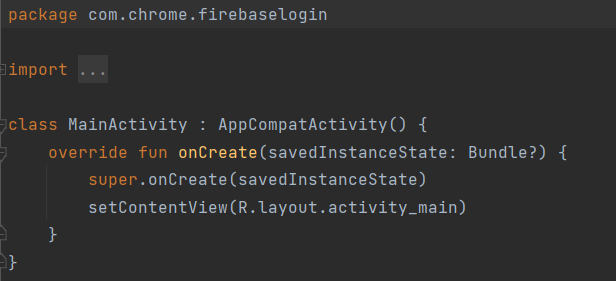
① Firebase Login이라는 이름으로 프로젝트를 생성한다.
- com.chrome.firebaselogin 부분을 복사해둔다.
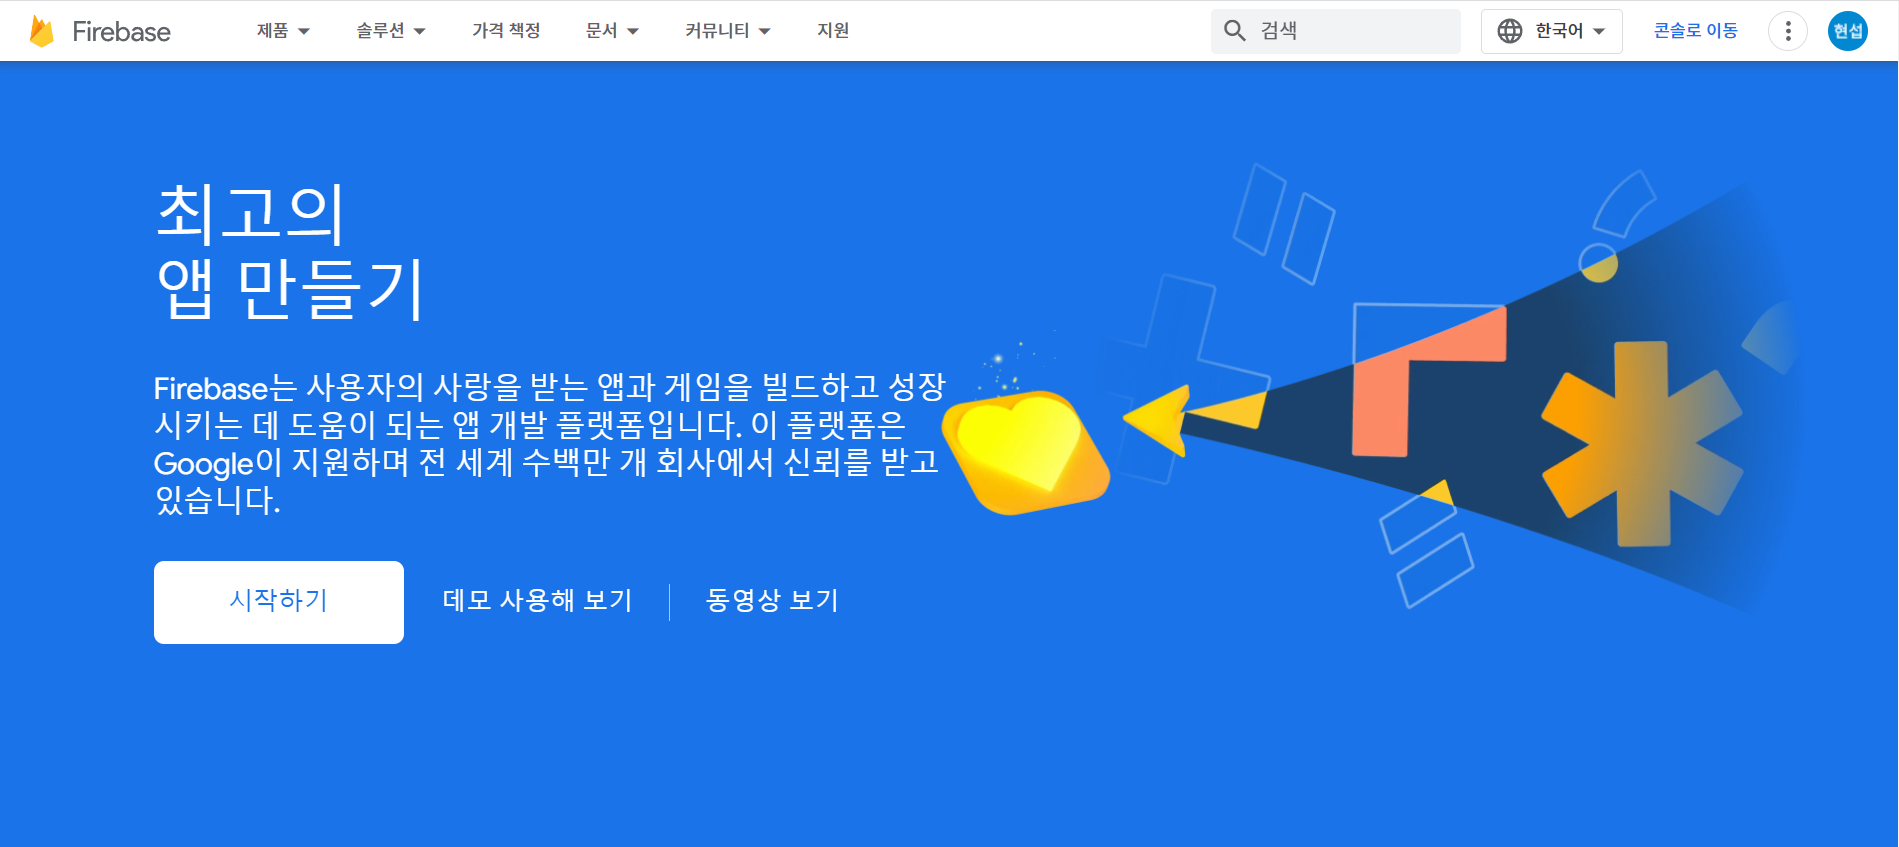
② 아래의 링크를 따라 파이어베이스에 접속한 후, 로그인을 진행한다. 콘솔로 이동 버튼을 클릭한다.
>> 파이어베이스 홈페이지
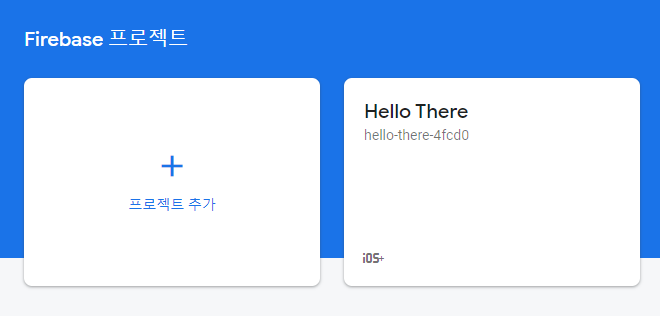
③ 프로젝트 추가 버튼을 클릭한다.
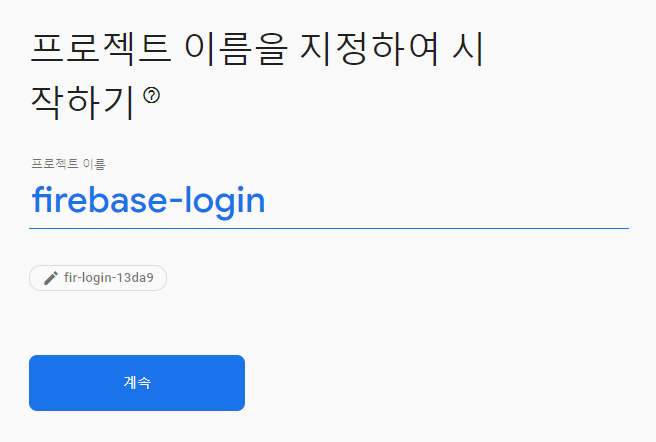
④ 프로젝트의 이름을 지정한다.
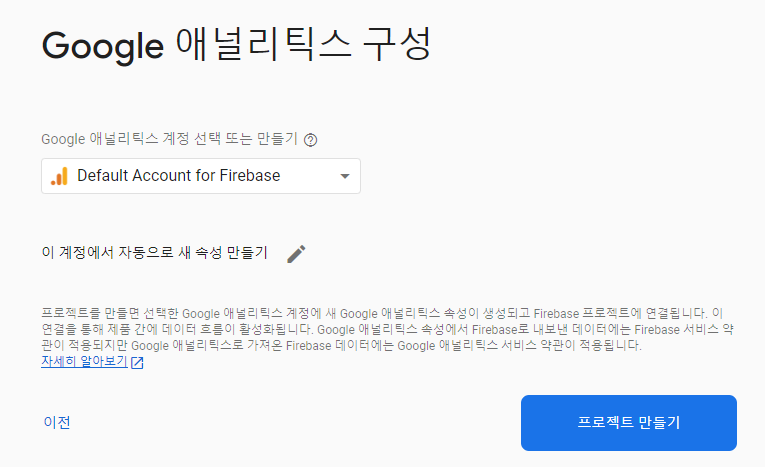
⑤ Default Account for Firebase를 선택 후 프로젝트를 생성한다.
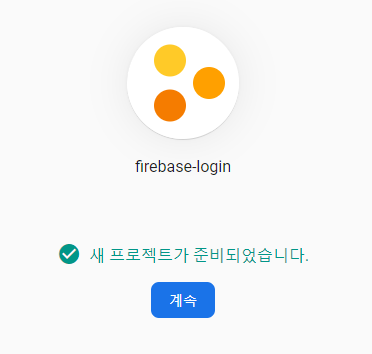
⑥ 생성이 완료되면 계속 버튼을 클릭한다.
2. 앱 등록하기
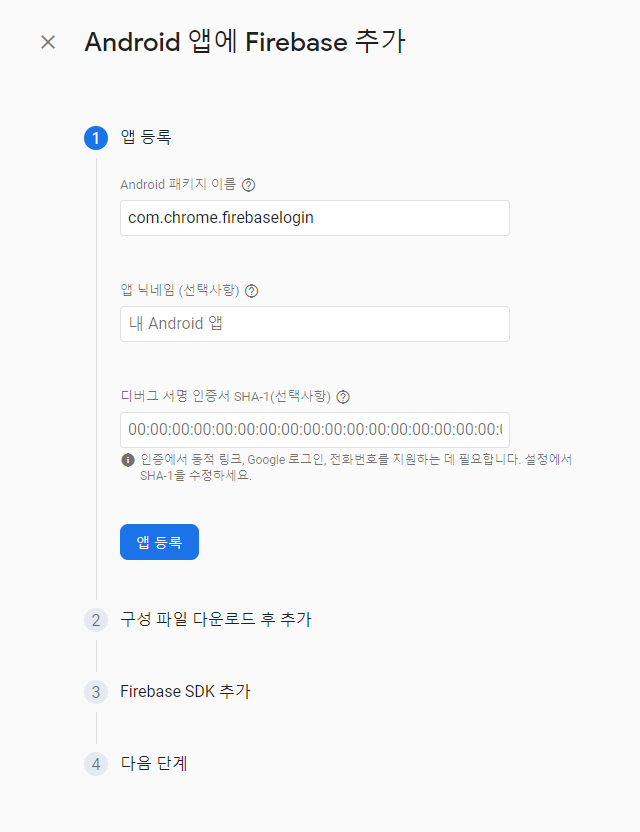
① 안드로이드 모양 버튼을 클릭한다.
② 방금 복사한 패키지 명을 붙여 넣고 앱 등록 버튼을 클릭한다.
③ google-service.json 다운로드 버튼을 클릭한다.
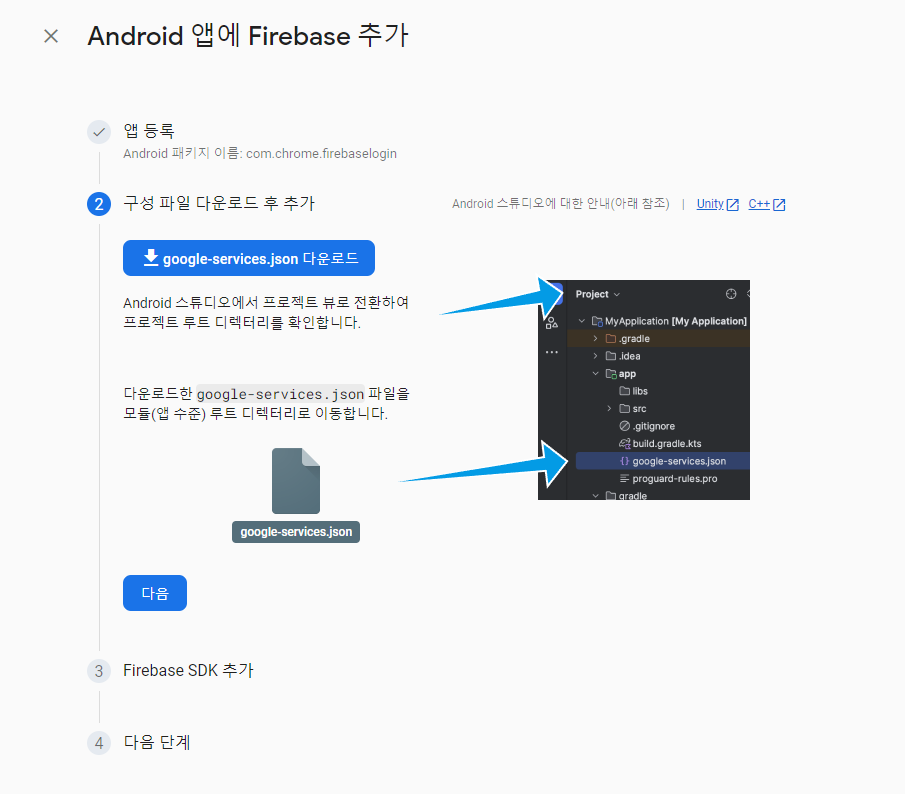
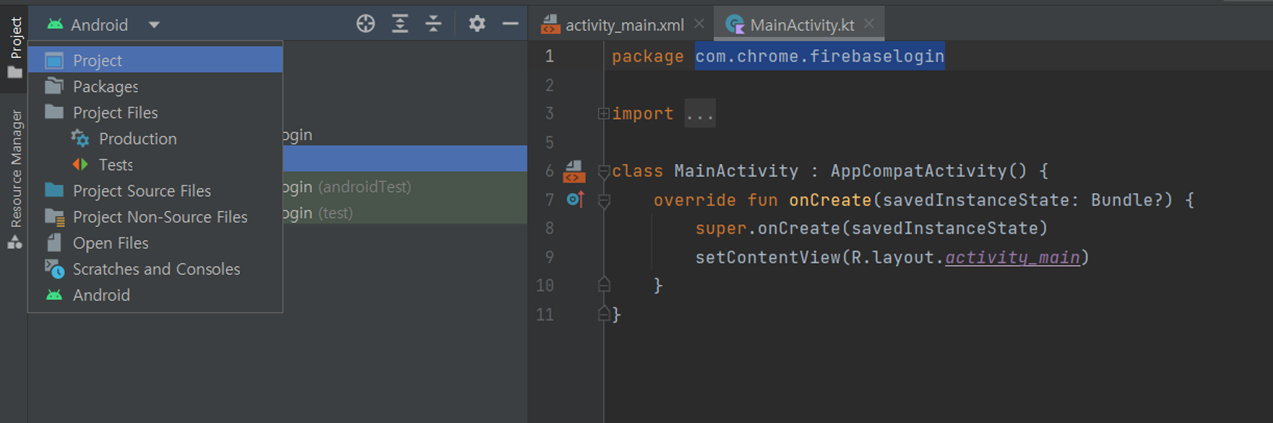
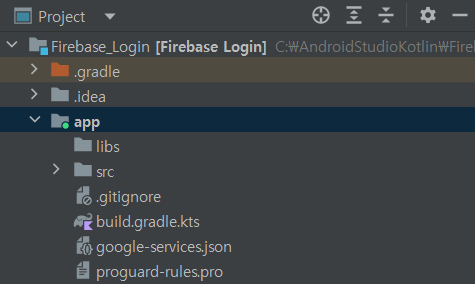
④ Android를 Project로 변경한 후 App 디렉토리에 방금 다운로드 받은 json 파일을 넣는다.
⑤ 다시 Project를 Android로 변경한 후 build.gradle.kts (Project) 파일에 아래의 내용을 추가한다. Sync Now도 반드시 눌러주어야 한다.
id("com.google.gms.google-services") version "4.3.15" apply false
⑥ 이번엔 build.gradle.kts (Module) 파일에 아래의 내용을 추가한다. 추가를 마치고 Sync Now를 눌러주자.
plugins {
  id("com.google.gms.google-services")
}
dependencies {
  implementation(platform("com.google.firebase:firebase-bom:32.2.2"))
  implementation("com.google.firebase:firebase-analytics-ktx")
}
이로써, 파이어베이스와 프로젝트의 연동이 완료된다.
3. 익명 로그인 구현하기
1) 파이어베이스 설정
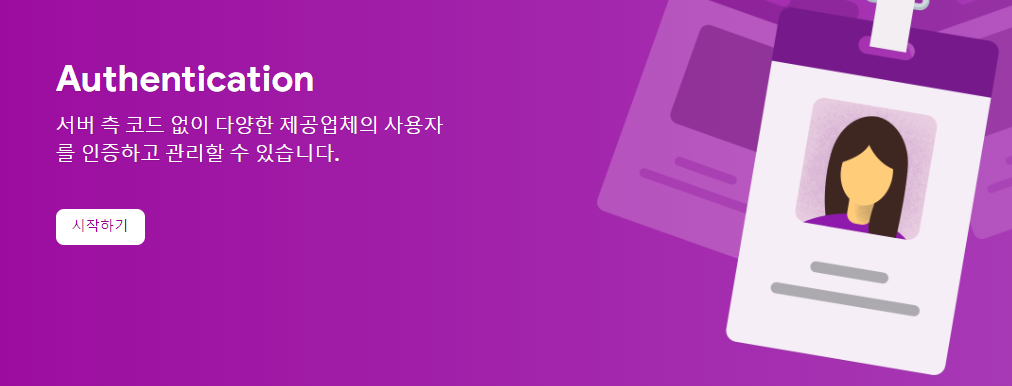
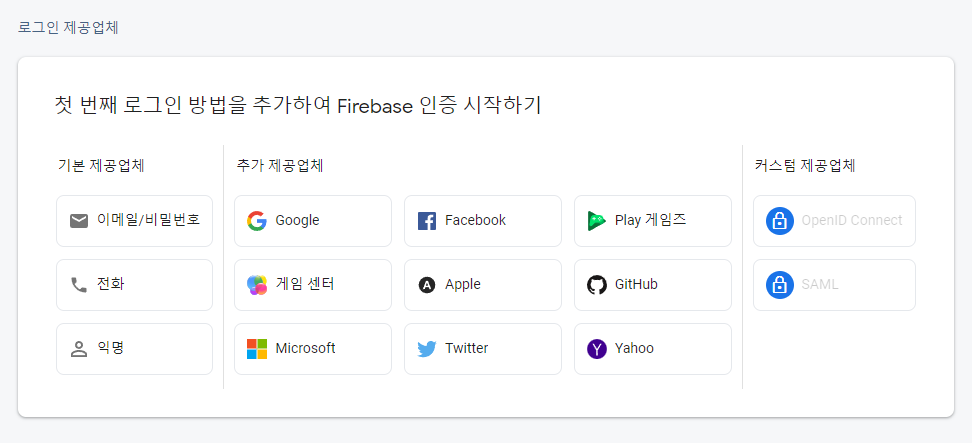
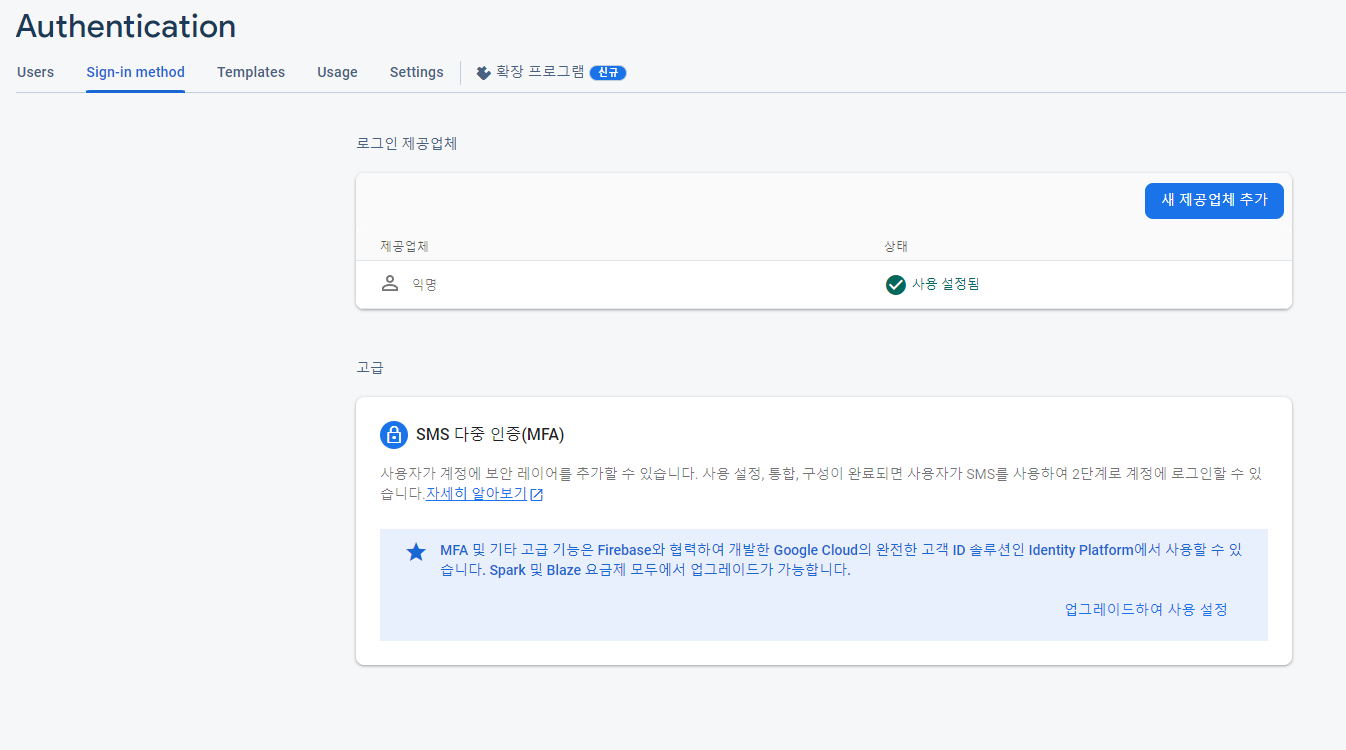
① 좌측 메뉴 > 빌드 > Authentication 버튼을 클릭한다.

② 시작하기 버튼을 클릭한다.
③ 익명 버튼을 클릭한다.
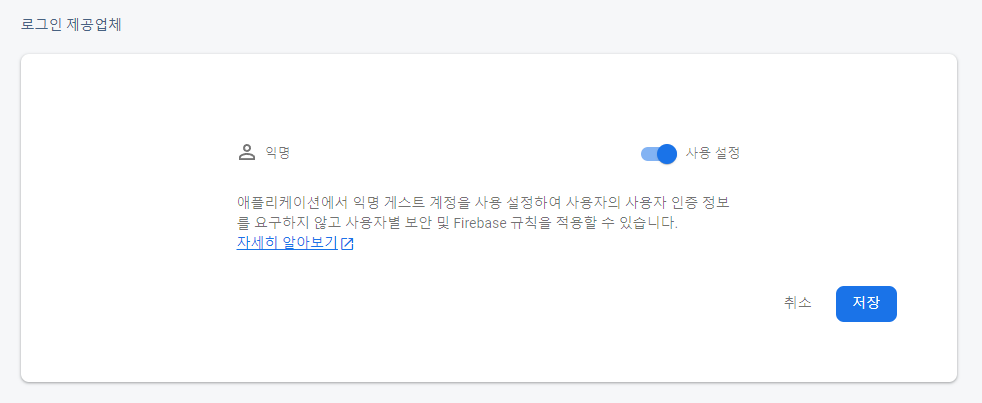
④ 사용 설정 토글을 ON으로 변경하고 저장한다.
2) 코드 작성
① activity_main.xml 파일에 기존 TextView 태그는 삭제하고 Button 태그를 추가한다.
<Button
	android:id="@+id/anonymous"
	android:layout_width="match_parent"
	android:layout_margin="50dp"
	android:layout_height="80dp"
	android:background="#87CEEB"
	android:text="Log in"
	android:textColor="#000000"
	android:textSize="30sp"
	app:layout_constraintBottom_toBottomOf="parent" />
② MainActivity 파일에 아래의 코드를 입력한다.
override fun onCreate(savedInstanceState: Bundle?) {
    super.onCreate(savedInstanceState)
    setContentView(R.layout.activity_main)
    val button = findViewById<Button>(R.id.anonymous)
    button.setOnClickListener {

    }
}
③ build.gradle.kts (Module) 파일에 익명로그인을 위한 의존성을 추가해주자. Sync Now도 클릭한다.
dependencies {
	implementation("com.google.firebase:firebase-auth-ktx")
}
④ 파이어베이스 인증 기능을 사용하기 위한 코드를 추가해주자. 아래의 공식문서를 참고하여 MainActivity에 코드를 작성한다.
>> 익명 로그인 관련 파이어베이스 공식 문서
private lateinit var auth: FirebaseAuth
override fun onCreate(savedInstanceState: Bundle?) {
super.onCreate(savedInstanceState)
setContentView(R.layout.activity_main)
auth = Firebase.auth
val button = findViewById<Button>(R.id.anonymous)
button.setOnClickListener {
auth.signInAnonymously()
.addOnCompleteListener(this) { task ->
if (task.isSuccessful) {
val user = auth.currentUser
Log.d("MainActivity", user!!.uid)
} else {
Toast.makeText(baseContext, "Authentication failed.", Toast.LENGTH_SHORT,).show()
}
}
}
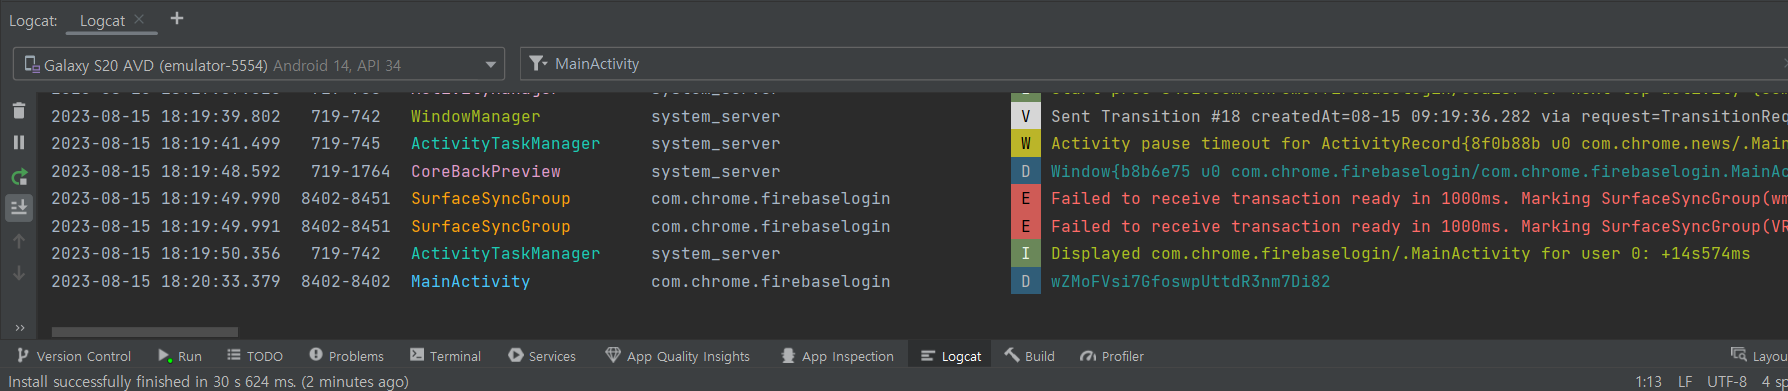
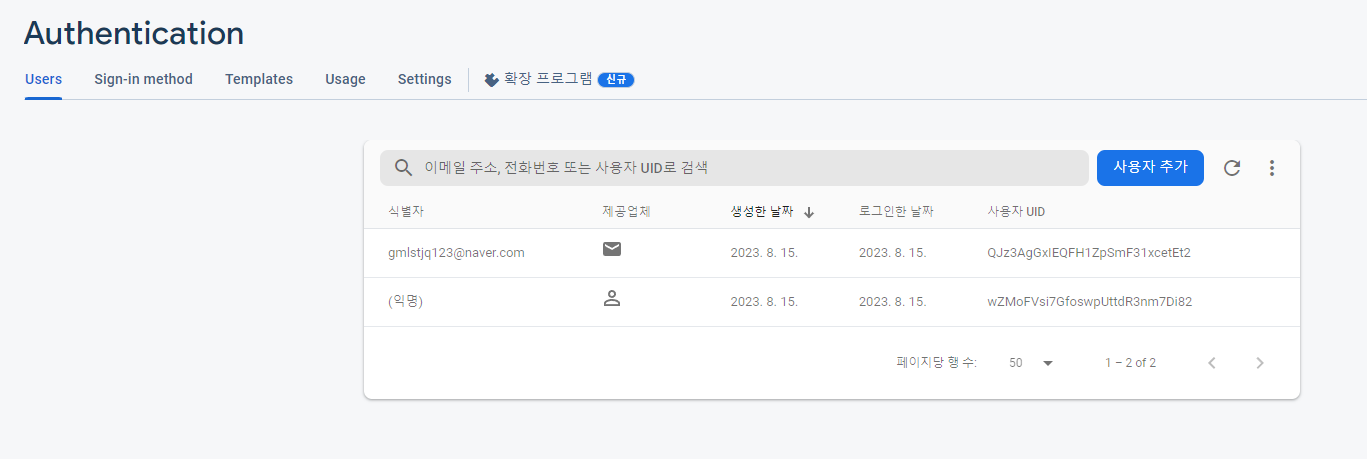
}⑤ 코드를 실행시킨 후, 로그인 버튼을 클릭하면 콘솔 Log에 UID 값이 출력되는 것을 확인할 수 있다.
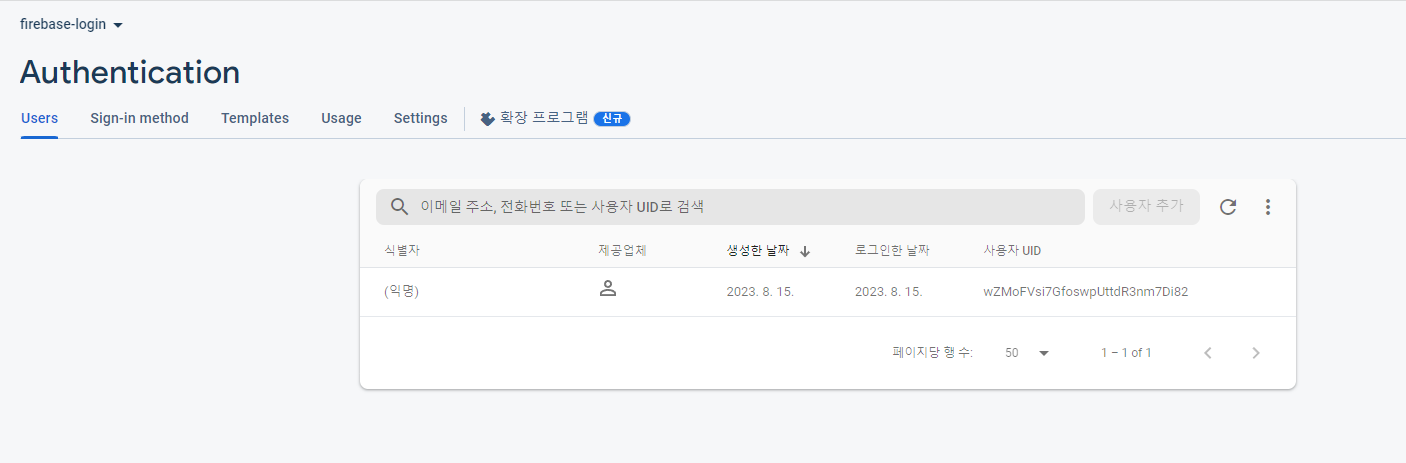
⑥ Firebase의 Authentication 메뉴의 User 탭에 가보면, 방금 확인한 UID와 동일한 UID로 유저가 생성된 것을 확인할 수 있다.
4. 이메일로 회원 가입하기
1) 파이어베이스 설정
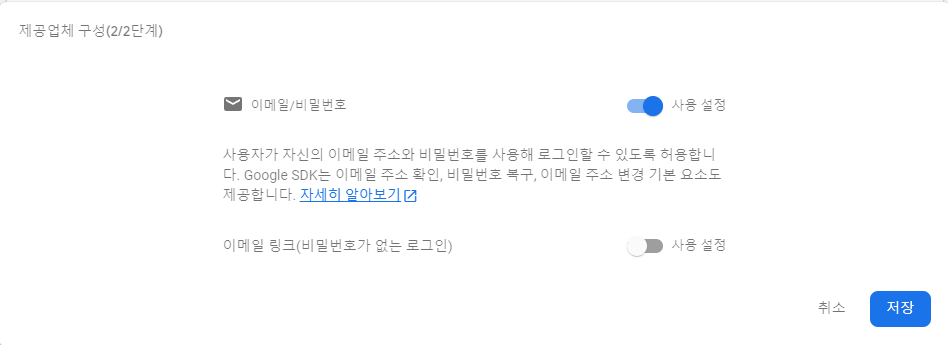
① 다시 파이어베이스의 Authentication으로 이동하여 Sign-in method 탭에 들어와서 새 제공업체 추가 버튼을 클릭한다.
② 이메일/비밀번호를 클릭한 후 이메일/비밀번호 토글을 ON으로 변경한다.
2) 코드 작성
① activity_main.xml 파일에 아래와 같이 입력한다.
<LinearLayout
    xmlns:android="http://schemas.android.com/apk/res/android"
    xmlns:app="http://schemas.android.com/apk/res-auto"
    xmlns:tools="http://schemas.android.com/tools"
    android:layout_width="match_parent"
    android:layout_height="match_parent"
    android:orientation="vertical"
    tools:context=".MainActivity">

    <EditText
        android:id="@+id/email"
        android:layout_marginTop="300dp"
        android:layout_marginHorizontal="20dp"
        android:layout_width="match_parent"
        android:layout_height="wrap_content"/>

    <EditText
        android:id="@+id/password"
        android:layout_margin="20dp"
        android:layout_width="match_parent"
        android:layout_height="wrap_content"/>

    <Button
        android:id="@+id/join"
        android:layout_width="match_parent"
        android:layout_height="50dp"
        android:layout_margin="50dp"
        android:background="#87CEEB"
        android:text="회원가입"
        android:textColor="#000000"
        android:textSize="30sp"
        app:layout_constraintBottom_toBottomOf="parent" />

    <Button
        android:id="@+id/login"
        android:layout_width="match_parent"
        android:layout_height="50dp"
        android:layout_margin="50dp"
        android:background="#87CEEB"
        android:text="로그인"
        android:textColor="#000000"
        android:textSize="30sp"
        app:layout_constraintBottom_toBottomOf="parent" />
</LinearLayout>
② 이제 MainActivity에 회원가입과 로그인 버튼에 대한 클릭 이벤트 리스너를 등록한다.
class MainActivity : AppCompatActivity() {
    private lateinit var auth: FirebaseAuth

    override fun onCreate(savedInstanceState: Bundle?) {
        super.onCreate(savedInstanceState)
        setContentView(R.layout.activity_main)

        auth = Firebase.auth
        val join = findViewById<Button>(R.id.join)
        val login = findViewById<Button>(R.id.login)

        join.setOnClickListener {
            val email = findViewById<EditText>(R.id.email)
            val password = findViewById<EditText>(R.id.password)
        }
        login.setOnClickListener {
            val email = findViewById<EditText>(R.id.email)
            val password = findViewById<EditText>(R.id.password)
        }
    }
}
③ 아래의 공식 문서를 참조하여 코드를 추가하자.
>> 이메일 로그인 관련 파이어베이스 공식 문서
join.setOnClickListener {
    val email = findViewById<EditText>(R.id.email)
    val password = findViewById<EditText>(R.id.password)
    auth.createUserWithEmailAndPassword(email.text.toString(), password.text.toString())
        .addOnCompleteListener(this) { task ->
            if (task.isSuccessful) {
                Toast.makeText(this, "회원가입 완료", Toast.LENGTH_LONG).show()
            } else {
                Toast.makeText(this, "회원가입 실패", Toast.LENGTH_LONG).show()
            }
        }
}

login.setOnClickListener {
    val email = findViewById<EditText>(R.id.email)
	val password = findViewById<EditText>(R.id.password)
}
④ 이제 코드를 실행한 후 회원가입 버튼을 누르면 "회원가입 성공"이라는 토스트 메시지가 출력되고, 유저가 파이어베이스에 등록될 것이다.
⑤ 아래와 같은 방법을 사용하면 placeholder로 사용자의 입력에 도움을 줄 수도 있다.
<EditText
    android:id="@+id/email"
    android:hint="email"
    android:layout_marginTop="300dp"
    android:layout_marginHorizontal="20dp"
    android:layout_width="match_parent"
    android:layout_height="wrap_content"/>

<EditText
    android:id="@+id/password"
    android:hint="password"
    android:layout_margin="20dp"
    android:layout_width="match_parent"
    android:layout_height="wrap_content"/>
5. 로그인 & 로그아웃 구현하기
① 이번에도 공식 문서를 참조하여 로그인을 구현해보자.
>> 이메일 로그인 관련 파이어베이스 공식 문서
login.setOnClickListener {
    val email = findViewById<EditText>(R.id.email)
    val password = findViewById<EditText>(R.id.password)
    auth.signInWithEmailAndPassword(email.text.toString(), password.text.toString())
        .addOnCompleteListener(this) { task ->
            if (task.isSuccessful) {
                Toast.makeText(this, "로그인 완료", Toast.LENGTH_LONG).show()
            } else {
                Toast.makeText(this, "로그인 실패", Toast.LENGTH_LONG).show()
            }
        }
}
② 이제 로그아웃을 구현하기 위해 activity_main.xml 파일에 로그아웃 버튼을 추가하자.
- 다른 버튼의 margin도 20dp로 줄여야 버튼이 화면 안에 위치할 수 있다.
<Button
        android:id="@+id/logout"
        android:layout_width="match_parent"
        android:layout_height="50dp"
        android:layout_margin="20dp"
        android:background="#87CEEB"
        android:text="로그아웃"
        android:textColor="#000000"
        android:textSize="30sp"
        app:layout_constraintBottom_toBottomOf="parent" />
③ MainActivity 파일에 아래의 내용을 추가한다.
- 로그인 버튼의 onClickListener 바로 아래에 추가하면 된다.
login.setOnClickListener {

}

val logout = findViewById<Button>(R.id.logout)
logout.setOnClickListener {
    Firebase.auth.signOut()
    Toast.makeText(this, "로그아웃 완료", Toast.LENGTH_LONG).show()
}
③ 이제 코드를 실행하여 회원가입 > 로그아웃 > 로그인을 눌러 정상적으로 동작하는지 확인하자.
④ 비밀번호를 직접적으로 노출하는 것보다는 *로 나오게 하는 것이 좋기 때문에 아래의 내용을 activity_main.xml 파일의 비밀번호 EditText 태그에 추가해주자.
<EditText
    android:id="@+id/password"
    android:inputType="textPassword"
    android:hint="password"
    android:layout_margin="20dp"
    android:layout_width="match_parent"
    android:layout_height="wrap_content"/>